As you've learned in this chapter, some tools are better at making certain types of selections than others. However, no matter which tool(s) you use, your selection will probably need some fine-tuning. Photoshop gives you lots of ways to modify, reshape, and even save your selections, all explained in the following pages. But before you do any of those things, you'll likely want to fine-tune your selection's edges. The difference between a pretty-good-around-the-edges selection and a perfect one is what separates Photoshop pros from mere dabblers. Read on to learn some simple edge-polishing techniques.
The best selection modifier in town is the Refine Edge dialog box (Figure 4-18), which got a complete overhaul in Photoshop CS5, making it easier than ever to select the tough stuff like hair and fur. It combines several edge-adjustment tools that used to be scattered around on different menus into one spot and includes an extremely useful preview option. Anytime you have a selection tool active and some marching ants on your screen, you'll see the Refine Edge button sitting pretty up in the Options bar; simply click it to open the dialog box. You can also open it by choosing Select→Refine Edge, pressing ⌘-Option-R (Ctrl+Alt+R on a PC), or clicking the Mask panel's Mask Edge button (see Figure 3-28 on Editing a Mask).

Figure 4-17. Top: It's worth taking a moment to try to see the shapes that make up the area you want to select. For example, you can select the circular top of this famous Texas building (shown in red) using the Elliptical Marquee, and then switch to the Rectangular Marquee set to "Add to selection" mode to select the area shown in green. Bottom: Another way to use the selection tools together is to draw a rectangular selection around the object you want to select, and then switch to the Magic Wand to subtract the areas you don't want. Hold down the Option key (Alt on a PC) so you're in "Subtract from selection" mode and then click the areas you don't want included in your selection, like this grayish background. With just a couple of clicks, you can select the prickly pear.
The Refine Edge dialog box now gives you seven different ways to preview your selection (compared to five in CS4). Because the preview appears in the main document window, you'll want to move the Refine Edge dialog box aside so it's not covering your image. Depending on the colors in your image, one of these backgrounds will let you see the selection better than the rest:
Tip
You can cycle through the preview modes by pressing the F key repeatedly when you have the Refine Edge dialog box open. To see your original image temporarily, press the X key.
Marching Ants. This option just shows the selection on the image itself. Keyboard shortcut: M.
Overlay. As the name indicates, this option displays your selection overlaid with the Quick Mask (see Using Quick Mask Mode). Unless you've changed its color, the overlay is light red; to change that color, see the box on Changing Quick Mask's Color. Keyboard shortcut: V.
Figure 4-18. The Refine Edge dialog box is much improved in Photoshop CS5. Not only does it let you see a live, continuously updated preview of what your selection will look like after fine-tuning, you also get seven different views to choose from, along with two new tools you can use to refine your selection before you click OK. If you forget what the dialog box's various settings do, never fear: Just hover above each setting and a tooltip appears explaining what each item does.
On Black. This option displays the selection on a black background, which is helpful if your image is light colored and doesn't have a lot of black in it. Keyboard shortcut: B.
On White. Choose this option if your image is mostly dark. The stark white background makes it easy to see your selection and the object you're selecting while you're fine-tuning it using the dialog box's tools. Keyboard shortcut: W.
Black & White. This option displays your selection as an alpha channel (pages The Channels Panel and You and Creating an Alpha Channel). Photoshop shows your selection in white and the mask in black; transitions between the two areas are subtle shades of gray. The gray areas let you see how detailed your mask has become, so you'll spend a fair amount of time in this mode. Keyboard shortcut: K.
On Layers. To see your selection atop the gray-and-white transparency checker-board, choose this mode. Keyboard shortcut: L.
Reveal Layer. This mode displays your image without a selection, as it appears in your document. Keyboard shortcut: R.

Once you've chosen a View Mode, you can tweak the following settings (and for best results, Adobe suggests you adjust them in this order):
Smart Radius. Turn this checkbox on to make Photoshop look closely at the edges of your selection to determine if they're hard (like the outline of your subject's body) or soft (like your subject's hair or fur). It's a good idea to turn it on each time you open this dialog box; if you turn on the Remember Settings option at the bottom of the dialog box, Smart Radius will stay on until you turn it off.
Radius. This setting controls the size of the area affected by the settings in this dialog box, or rather how far beyond the edge of your selection Photoshop analyzes. You might find it helpful to think of this setting as the selection's degree of difficulty. For example, if your selection is really complex, like the horse's mane in Figure 4-19, increase this setting to make Photoshop look beyond the selection boundary for the really wispy stuff (which also makes the program slightly soften the selection's edge). If your selection is fairly simple, lower this setting so Photoshop analyzes just the selection's boundary, which creates a harder edge. There's no magic numbers for this setting; it'll vary from image to image, so you'll need to experiment in order to get your selection just right.
Figure 4-19. Top: After creating a rough selection with the Quick Selection tool (left), you can use the Refine Edge dialog box's Refine Radius tool to brush across the areas you want to add to your selection (right). Bottom: Within minutes, you can settle this mare onto a new background, as shown here. What horse wouldn't be happier hanging out on a field of bluebonnets? To follow along, trot on over to this book's Missing CD page at www.missingmanuals.com/cds and download the files Horse.jpg and Field.jpg.
Refine Radius. Once you've adjusted the Radius setting, you can use this tool to paint over the edges of your selection to make Photoshop fine-tune them even more. This is where the Refine Edge dialog box really works its magic: As you drag with the brush, you can extend your selection beyond the boundaries Photoshop can see, creating a more precise selection of fine details. This tool is also intuitive: as you brush across the edges of your selection, it pays attention and tries to learn how you want it to behave. Wow, indeed!
Erase Refinements. If Photoshop gets a little overzealous and includes too much of the background in your selection, you can use this tool to let it know you don't want to include those areas.
Smooth. Increasing this setting makes Photoshop smooth the selection's edges so they're less jagged. But if you increase it too much, you risk losing details (especially on selections of hair and the like). To bring back some details without decreasing this setting, try increasing the Radius and Contrast settings.
Feather. This setting controls how much Photoshop blurs the edges of your selection, which is useful when you're combining images, as discussed in the box The Single Row and Column Marquee Tools.
Contrast. This setting sharpens your selection's edge, even if you softened it by increasing the Radius setting as mentioned above. A higher number creates a sharper edge and can actually reduce the noisy or grainy look that sometimes comes from a high Radius setting. (If you spend some quality time with Smart Radius and its refinement tools, you probably won't use this slider much, if at all.)
Shift Edge. You can tighten your selection (make it smaller) by dragging this slider to the left, which is a good idea if you're dealing with hair or fur. To expand it your selection and grab pixels you missed when you made your initial selection, drag this slider to the right.
Decontaminate Colors. This option helps reduce edge halos: leftover colored pixels around the edges of your selection that you see only after you put the object on a new background (as shown on Creating a Border Selection). Once you turn it on, Photoshop tries to replace the color of selected pixels with the color of pixels nearby (whether they're selected or not). Drag the Amount slider to the right to change the color of more edge pixels, or to the left for fewer. To see the color changes for yourself, choose Reveal Layer from the View Mode (or just press R).
Output To. This is Photoshop's way of asking what you'd like it to do with your new and improved selection. Here are your options:
Selection adjusts your original selection, leaving you with marching ants on your original layer just like you started with.
Layer Mask adds a layer mask to the current layer according to the selection you just made. You'll use this option most of the time.
New Layer deletes the background and creates a new layer containing only the selected item; no marching ants.
New Layer with Layer Mask adds a new layer complete with layer mask.
New Document deletes the background and sends only the selected item to a brand-new document.
New Document with Layer Mask sends the selected item to a new document complete with editable layer mask.

Whew! Those settings probably won't make a whole lot of sense until you start using 'em. To get you off and running, here's how to select a subject with wispy hair:
Open an image and select the item using the Quick Select tool.
Press W to grab the Quick Select tool and paint across the object you want to select (Figure 4-19, top left). Don't worry about the quality of the selection because you'll tweak it in a moment.
Open the Refine Edge dialog box.
Hop up to the Options bar and click the Refine Edge button.
Choose the On White View Mode.
To see the horse's mane a little better—in all its wispy goodness—press W to view it atop a white background.
Turn on the Smart Radius checkbox and drag the slider to the right.
How far should you drag the Radius slider, you ask? It depends on your image. Your goal is to drag the slider as far to the right as you can get away with, while still maintaining some hardness in your selection's edges. The amount varies with every single image because there's no magic Radius setting that'll work on every selection (a setting of 3.2 was used here).
Use the Refine Radius tool to brush across the soft edges of your selection (Figure 4-19, top right).
Press E to grab the Refine Radius tool, or click its icon near the top left of the Refine Edge dialog box (it looks like a tiny brush atop a curved, dotted line). Then mouse over to your image and brush across the soft areas you want to add to your selection, like the wispy bits of the horse's mane. Try to avoid any areas that are correctly selected (such as the horse's nose), as Photoshop tends to over-analyze them and exclude parts it shouldn't. If you end up adding too much to the selection, press Option (Alt) to switch to the Eraser Refinement tool and brush across the areas you don't want included in your selection.
Turn on the Decontaminate Colors checkbox and adjust its slider accordingly.
Once you turn this option on, drag the slider slightly to the right to shift the color of partially selected edge pixels so they more closely match pixels that are fully selected. Once again, this value varies from image to image (15% was used for this image).
From the Output To pop-up menu, choose Layer Mask.
Photoshop adds a layer mask to the active layer reflecting your selection, as shown in Figure 4-19 (bottom).
Exhausted yet? This kind of thing isn't easy, but once you master using Refine Edges, you'll be able to create precise selections of darn near anything!
Note
You can also use the new Refine Edge dialog box to add creative edges to photos. For example, grab the Rectangular Marquee tool and draw a box around your image about half an inch inside your document's edge. Then click the Options bar's Refine Edge button and, in the resulting dialog box, drag the Radius slider to about 40 pixels for a cool painterly effect. Be sure to choose Layer Mask from the Output To menu to keep from harming your original image.
When you're making selections, you may encounter edge halos (also called fringing or matting). An edge halo is a tiny portion of the background that stubbornly remains even after you try to delete it (or hide it with a layer mask, Layer Masks: Digital Masking Tape). They usually show up after you replace the old background with something new (see Figure 4-20).
Here are a few ways to fix edge halos:
Contract your selection. Use the Refine Edge dialog box (Creating Selections with Channels) or choose Select→Modify→Contract (though the latter method won't give you a preview) to contract your selection. Use this technique while you still have marching ants—before you delete the old background (or, better yet, hide the background with a layer mask [Layer Masks: Digital Masking Tape]).
Run the Minimum filter on a layer mask. Once you've hidden an image's background with a layer mask, you can run the Minimum filter on the mask to tighten it around the object. Video explains this super-useful trick.
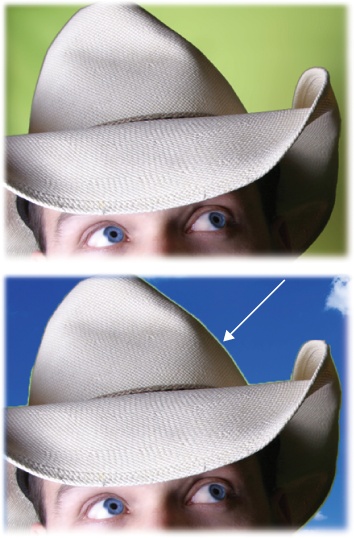
Figure 4-20. Here you can see the intrepid cowboy on his original green background (top) and on the new background (bottom). The green pixels stubbornly clinging to his hat are an edge halo. This aggravatingly tiny rim of color—a sure sign that an image has done time in Photoshop—can be your undoing when it comes to creating realistic images. Edge halos make a new sky look fake and don't help convince anyone that Elvis actually came to your cookout.
Use the Defringe command. Run this command after you delete the background (alas, it doesn't work on layer masks or while a selection is active). Choose Layer→Matting→Defringe and then enter a value in pixels. Photoshop analyzes the active layer and replaces the color of the pixels around the object's edge with the color of nearby pixels. For example, if you enter 2 px, it'll replace a 2-pixel rim of color all the way around the object.
Remove Black/White Matting. If Photoshop has blessed you with a halo that's either black or white, you can make the program try to remove it automatically. After you've deleted the background, select the offending layer and then choose Layer→Matting→Remove Black Matte or Remove White Matte. (Like Defringe, this command doesn't work on layer masks or while you have an active selection.)
If you peek at the Select→Modify menu, you'll find the same options as in the Refine Edge dialog box (but without a preview). There is, however, one addition: the Border option, which lets you turn a solid selection into a hollow one. Let's say you drew a circular selection with the Elliptical Marquee tool (The Rectangular and Elliptical Marquee Tools). You can turn that selection into a ring by choosing the Border option (which is handy if you want to make a neon sign or select the outer rim of an object). Just enter a pixel width, press OK, and poof! Your formerly solid selection is now as hollow as can be.
Have you ever tried to make a slanted rectangular selection like the one shown in Figure 4-21? If so, you may have found the experience a little frustrating. Sure, you can try using one of the Lasso tools, but it's quicker to transform—meaning reshape—a rectangular selection instead. (The Transformers in Chapter 6 has more on the Transform tools.)

Figure 4-21. Top: You can easily select the center part of this playing card with the Rectangular Marquee tool (page 139). Once you see marching ants, choose Select→Transform Selection and rotate the resulting bounding box to get the angle you need. Bottom Left: Next, Ctrl-click (right-click on a PC) inside the bounding box and choose Distort from the shortcut menu, as shown here. Then drag each corner handle so it meets up with a corner of the yellow box on the card. Bottom Right: When you're all finished, press Return (Enter on a PC) to accept the transformation.
Note
When you transform a selection (as opposed to part of your image), Photoshop won't mess with any of your image's pixels. Instead, the program simply changes the shape of the selection—in other words, the shape of the marching ants.
Once you've made a selection, choose Select→Transform Selection or Ctrl-click (right-click on a PC) inside the selection and, from the shortcut menu that appears, choose Transform Selection. Photoshop puts a rectangular box with little, square resizing handles on its four sides around your selection (it's called a bounding box). You can move the selection around by clicking inside the bounding box and dragging in any direction. (If you want to exit the bounding box without making any changes, press the Esc key.) The resizing handles let you:
Scale (resize). Drag any handle to change the size and shape of your selection. Drag inward to make it smaller and outward to make it bigger.
Rotate. If you position your cursor outside one of the bounding box's corners, your cursor turns into a curved, double-headed arrow. That's your cue that you can drag to rotate your selection (just drag up or down in the direction you want to rotate).
If you need to change the shape of your selection, just Ctrl-click (right-click on a PC) inside the bounding box and you'll get yet another shortcut menu with the following options (see Figure 4-21, bottom left):
Free Transform lets you apply any of the transformations listed below freely and in one action (instead of having to choose and apply them one at a time).
Scale and Rotate work as described in the previous list.
Skew lets you slant your selection by dragging one of the bounding box's side handles.
Perspective lets you drag any corner handle to give your selection a one-point perspective—that is, a vanishing point where it seems to disappear into the distance.
Warp makes Photoshop place a grid over your selection that lets you reshape it in any way you want. Drag any control point (the two evenly spaced points on all four sides of the selection) or line on the grid to twist your selection however you like, or choose a ready-made preset from the Options bar's Warp pop-up menu.
Tip
Using the Warp option is your ticket to a quick page-curl effect. Visit this book's Missing CD page at www.missingmanuals.com/cds to learn how.
Content-Aware Scale can intelligently resize the unimportant background areas of your image while the subject of your image remains unchanged. You can learn all about it on The Content-Aware Scale Tool.
Rotate 180°, Rotate 90° CW, and Rotate 90° CCW turn your selection 180 degrees, 90 degrees clockwise, or 90 degrees counterclockwise, respectively.
Flip Horizontal and Flip Vertical flip your selection either horizontally (like it's reflected in a mirror) or vertically (like it's reflected in a puddle).
When you're finished transforming your selection, press Return (Enter on a PC) to accept the changes.
If you'd rather fine-tune—or even create—selections by painting with a brush (see Chapter 12), no problem; in fact, you can create a selection from scratch using this method. Just enter Quick Mask mode and you'll find all of Photoshop's painting tools (even filters!) waiting to help you tweak your selection. Quick Mask mode gives you the freedom to work on selections with almost any tool you want.
You can enter Quick Mask mode by clicking the button at the bottom of the Tools panel that looks like a circle within a square or by pressing the Q key. When you do, Photoshop looks to see whether you have an active selection. If you do, it puts a red overlay over everything but the selection. (If you don't, you won't see any change but you can still use the directions in this section to create a selection.) This color-coding makes it easy to edit your selection visually by painting.
While you're in Quick Mask mode, you can use the Brush tool ((Re)Introducing the Brush Tool) to:
Deselect a portion of your selection—in other words, to add an area to the mask—by making black your foreground color chip (Foreground and background color chips) and then paint the area.
Extend the area covered by your selection by painting the area you want to add white (you may need to press X to flip-flop your color chips).
Create a soft-edged selection or semi-transparent area by painting with gray. For example, by painting with 50 percent gray—lower a black brush's opacity in the Options bar to 50 percent—you'll create a selection that's half see-through. You can create a similar effect by painting with a soft-edge brush.
All the usual tools and document tricks work while you're in Quick Mask mode: You can zoom in or out by pressing ⌘ and the + or – key (Ctrl and + or – on a PC), press and hold the space bar to move around within the document once you're zoomed in, and use any of the selection tools covered in this chapter. Even the Marquee and Lasso tools work in this mode. You can also fill the entire mask, or your selection, with black or white (see Filling a Selection with Color), which is helpful when you have a large area to paint or when you want to paint the entire selection by hand. You can run filters in this mode to create interesting edges (Brush Strokes) or use the Gradient tool, set to a black-to-white gradient, to create a fade (Fading Color to Black and White).
Once you finish fine-tuning your selection, press the Q key to exit Quick Mask mode and the marching ants come rushing back, as shown in Figure 4-22, so you can see your newly edited selection.

Figure 4-22. Top left: Start by selecting the white background with the Magic Wand tool (page 151). Top right: When you pop into Quick Mask mode, Photoshop leaves the area you've selected in full color (in this case, white) and puts a red overlay over everything else. Now you can quickly clean up problem areas—like the drop shadow peeking out from beneath the badge—because they're so easy to spot with the red overlay. Use the Brush tool set to paint with black or white, or the Polygonal Lasso tool (fill the selection area with black or white). Bottom: Once you're finished, exit Quick Mask mode by pressing Q, and you see the fine-tuned selection marked by marching ants.
If you create a selection that's not exactly in the right spot or you've got several objects of the same shape to alter, you may need to move the selection itself. Or maybe you need to move the pixels underneath the selection, or onto their own layer. In any of those cases, you've got plenty of options, including:
Moving the selection (the marching ants) within the same layer. Make sure you have a selection tool active (it doesn't matter which one), and then, click inside the selection and drag to move it to another part of the document. You can also nudge the selection into place with the arrow keys on your keyboard.
Moving the selected object (the actual pixels) within the same document. Press V to select the Move tool and then drag with your mouse to reposition the object. Be aware that a big, gaping hole will appear where the object used to be! (If you're on a Background layer, the hole will be filled with the color your foreground color chip is set to.)
Moving the selected object onto its own new layer within the same document. Press ⌘-J (Ctrl+J on a PC) to "jump" the selected pixels onto their very own layer, just above the current layer. That way, whatever you do to the selected area won't harm the original image. If you don't like your changes, you can throw the extra layer away. Or, if you create an effect that's a little too strong—maybe you overwhitened a set of teeth—you can reduce the layer's opacity (Tweaking a Layer's Opacity and Fill) to lessen the effect. (Flip back to Chapter 3 for more on using layers.)
Moving the selected object to another document. Press ⌘-C (Ctrl+C on a PC) to copy the pixels and then open the other document and press ⌘-V (Ctrl+V) to paste the pixels in. The object appears on its very own layer that you can reposition with the Move tool. This technique is essential for performing the classic head swap, shown in Figure 4-23. A less memory-intensive (RAM-intensive) method is to ⌘-drag (Ctrl-drag) the selection from your document window onto another open document's tab.
Moving the selected object to a new document. Copy it as described above and then choose File→New. Photoshop opens a new document, sized to match the object on your Clipboard, into which you can paste the object.
![Here's a fun little prank to pull on your family, friends, and exes. Open a photo of someone and select their head using any of the selection tools discussed in this chapter (the Quick Selection tool was used here). Be sure to feather the selection so it doesn't have a hard edge (page 145) and then copy it (press ⌘-C [Ctrl+C on a PC]). Open the document that contains the new body and paste your selection into that document (⌘-V [Ctrl+V]). You can use the Move tool to reposition it onto the new body and, if you need to, use the Clone Stamp tool (see page 311) to hide parts of the original head. Good times!](/api/v2/epubs/9781449381691/files/httpatomoreillycomsourceoreillyimages761230.png.jpg)
Figure 4-23. Here's a fun little prank to pull on your family, friends, and exes. Open a photo of someone and select their head using any of the selection tools discussed in this chapter (the Quick Selection tool was used here). Be sure to feather the selection so it doesn't have a hard edge (page 145) and then copy it (press ⌘-C [Ctrl+C on a PC]). Open the document that contains the new body and paste your selection into that document (⌘-V [Ctrl+V]). You can use the Move tool to reposition it onto the new body and, if you need to, use the Clone Stamp tool (see page 311) to hide parts of the original head. Good times!
If you'd like Photoshop to remember your selection so you can use it again later, it's happy to do so. After you create the selection, choose Select→Save Selection. In the resulting dialog box, give your selection a meaningful name (like handsome devil) and then press OK (see Figure 4-24). When you're finished working with that document, be sure to save it as a native Photoshop file (Opening an Existing Document).
When you're ready to use the selection again, pop open the document and choose Select→Load Selection. In the resulting dialog box, click the Channel pop-up menu and pick your selection from the list (if you've saved only one selection in this particular document, Photoshop chooses it automatically). Leave the Operation section of the dialog box set to New Selection to bring back the saved selection as a whole (instead of adding to or subtracting from another selection). Press OK and the marching ants reappear, just like you saved them.

Figure 4-24. If you think you'll ever want to use a selection again, go ahead and save it—just in case. It's a good idea to save detailed selections that took you a long time to create.
Although the radio buttons in the Operation section of the Load Selection dialog box let you add, subtract, or intersect with your saved selection, it's easier just to load the selection, close the dialog box, and edit it using the selection tools discussed in this chapter.
Filling selections with color is a great way to create shapes and add colorful photo borders to images. After you've created the selection of your dreams, you can fill it with color in a couple of ways. One option is to choose Edit→Fill and, from the Use pop-up menu, choose Color. Pick something nice from the resulting Color Picker and then press OK twice to dismiss the dialog boxes. Photoshop fills your selection with the color you picked. Your other option is explained in Figure 4-25.

Figure 4-25. A more flexible way to fill a selection with color is to create a Solid Color Fill Adjustment layer (it's vector in nature so it doesn't add fat to your file size). After you've made a selection using the Rectangular Marquee tool, click the "Create new fill or adjustment layer" icon at the bottom of the Layers panel (the half-black/half-white circle) and choose Solid Color. Then grab a color from the resulting Color Picker and press OK to make a colorful photo border. For a bit of extra pizzazz, you can add an inner shadow to the photo layer using layer styles (page 128).
In Photoshop CS5, you have another option for filling selections called Content-Aware Fill. It works with the Fill command and the Spot Healing brush (The Spot Healing Brush) by comparing your selection, or brushstroke, to nearby pixels. Photoshop then fills the area so it blends seamlessly with the background.
Which option should you use when, you ask? If you've got plenty of good pixels on either side of the pixels you want to delete, try the Spot Healing brush. If you want to be more precise with your pixel zapping—say, if the item you want to delete is super close to something you want to keep—create a selection first and then use Content-Aware Fill (if possible, it's best to include some of the background in your selection). For example, you can follow these steps to break up a perfectly good boy band, as shown in Figure 4-26.
![Once you've created a selection (left), you can use the new Content-Aware Fill option to fill the selected pixels with those nearby. As you can see here, it does an amazing job! With a few quick clicks of the Spot Healing Brush (set to Content-Aware [page 427]), this band member is history.The voodoo Photoshop uses to fill your selection is random and changes each time you use the command. In other words, if at first you don't succeed, try choosing Edit→Fill again—you'll likely get different results!](/api/v2/epubs/9781449381691/files/httpatomoreillycomsourceoreillyimages761236.png.jpg)
Figure 4-26. Once you've created a selection (left), you can use the new Content-Aware Fill option to fill the selected pixels with those nearby. As you can see here, it does an amazing job! With a few quick clicks of the Spot Healing Brush (set to Content-Aware [page 427]), this band member is history. The voodoo Photoshop uses to fill your selection is random and changes each time you use the command. In other words, if at first you don't succeed, try choosing Edit→Fill again—you'll likely get different results!
Note
Want to follow along? Visit this book's Missing CD page at www.missingmanuals.com/cds and download the image BoyBand.jpg.
Open your image and duplicate the Background layer by pressing ⌘-J (Ctrl+J).
Since there's no way to tell the Fill command to sample all layers (bummer!), it won't work on an empty layer.
Use the selection tool of your choice to select the band member on the left.
Because there's a decent amount of contrast between the boy and the grassy meadow, the Magnetic Lasso (Magnetic Lasso tool) does a great job. Grab it from the Tools panel by pressing Shift-L repeatedly until you see it appear. Mouse over to your image and click once to set a starting point, and then drag around the boy, clicking to add anchor points here and there. (For more on using the Lasso tools, flip back to Using the Lasso Tools.)
Choose Edit→Fill and, from the Use pop-up menu, choose Content Aware.
As soon as you press OK, Photoshop fills your selection with pixels from the surrounding area.
To fix the remaining outline of the missing bandmate, just switch back to the Spot Healing Brush by pressing K (in the Options bar, make sure Content Aware is turned on). With a quick brushstroke here and there, you can clean up the final image quite nicely and it won't take hours like it did in previous versions of the program. Until you can actually wish an object out of a photo, this new tool ought to suit you just fine.
Sometimes you'll want to give your selection a stroke (as in outline, not the medical condition). While you can stroke selections of any shape, this technique comes in really handy when you use it in conjunction with the marquee tools. For example, you can combine a stroke with the Rectangular Marquee tool to add a thin black outline to your photo or with the Elliptical Marquee to circle yourself in a group picture.
When it comes to adding a bit of class to a photo, few effects beat a thin black outline. Whether you're floating the image within text or posting it in your blog, adding an outline gives the edge a little definition, making the design look nicely finished. Here's how to add an outline around the edge of your image:
Open your image and select it.
If your image is the same size as the document, choose Select→Select All. If it's smaller than the document and lives on its own layer, ⌘-click (Ctrl-click on a PC) the layer's thumbnail in the Layers panel instead.
Choose Edit→Stroke and tell Photoshop how thick, which color, and where you want the stroke to be.
In the Stroke dialog box, enter a pixel dimension in the Width box and then click the little color swatch. Choose a color from the resulting Color Picker and then press OK. Back in the Stroke dialog box's Location section, choose Inside to make the outline appear just inside the image's border.
Click OK to see your new outline.
To circle someone in a photo, as shown in Figure 4-27, you follow basically the same steps:
Open a photo and select the Elliptical Marquee tool (The Rectangular and Elliptical Marquee Tools) from the Tools panel.
Drag to draw an oval around the person's head. Remember that you can press the Shift key while you drag to draw a perfect circle, or press the Option key (Alt on a PC) to draw the oval from the inside out. Move the selection if you need to by clicking inside it and dragging with your mouse.
Figure 4-27. Once you've created a selection, you can outline it by choosing Edit→Stroke. In the resulting dialog box (shown here), pick a width, color, and location for the outline and then press OK. If you want to play it safe, you can add the stroke on its own layer. Just add a new layer to your document (page 81) before choosing Stroke from the Edit menu and then make sure that layer is active. That way, when you add the stroke, it'll appear on the new layer instead of the original image.
Choose Edit→Stroke, enter the stroke width, and pick a color.
In the Stroke dialog box, tell Photoshop how thick you want the stroke to be. You want it to be at least 2 pixels wide so the circle is thick enough to see. Click the color swatch, choose a color from the resulting Color Picker, and then click OK. In the Location section, turn on the Center option so Photoshop will center the stroke over the marching ants. If you've entered a width of 2 pixels, for example, the program will put one pixel of the stroke on the outside of the selection and one on the inside (in other words, the stroke will straddle your selection).
Press OK to see your newly circled head.
At this point you can get rid of the marching ants by pressing ⌘-D (Ctrl+D on a PC) to deselect.

Get Photoshop CS5: The Missing Manual now with the O’Reilly learning platform.
O’Reilly members experience books, live events, courses curated by job role, and more from O’Reilly and nearly 200 top publishers.

