The far right side of the Application Frame is home to a slew of small windows called panels (years ago they were called palettes), which let you work with commonly used features like colors, adjustments, layers, and so on. Panels don't have to live alone; you can link them together in groups, which you can then move around. Feel free to organize the panels however you like and position them anywhere you want. Panels can be free floating or docked (attached) to the left, top, or right side of your screen.
Photoshop starts you off with three docked panel groups filled with the panels it thinks you'll most likely need first. The first group includes the Colors, Swatches, and Styles panels; the second group includes Adjustments and Masks; and the third includes Layers, Channels, and Paths (there's more on docked panels coming up shortly).
To work with a panel, select it by clicking its tab. Panels are like Silly Putty—they're incredibly flexible. You can collapse, expand, move, and resize them or swap 'em for other panels (the Windows menu lists all the panels in Photoshop). Here's how:
Collapse or expand panels. If the panels are encroaching on your editing space, you can shrink them both horizontally and vertically so they look and behave like buttons (see Figure 1-6). To collapse a panel horizontally into a button nestled against the side of another panel (or the edge of your screen), click the tiny double arrow in its top-right corner (click this same button again to expand the panel). To collapse a panel vertically against the bottom of the panel above it, double-click a blank spot in the dark gray area near the panel's tab to make it roll up like a window shade (double-click it again to roll it back down). To adjust a panel's width, hover your cursor over its left edge and, when your cursor turns into a double-headed arrow, drag left or right to make the panel bigger or smaller. Collapsing and expanding panel groups works exactly the same way.
Figure 1-6. Here you can see the difference between expanded (left) and collapsed (right) panels. Double-click the medium gray bar at the top of a panel to collapse it vertically (circled on the left), rolling it up like a window shade; double-click the bar again to expand it. You can also collapse a panel horizontally by clicking the double arrows at the top right of the panel (circled, right), at which point it turns into a small square button.
Note
In Photoshop CS4, you accomplished this panel collapsing and expanding business with a single-click; in CS5, it takes a double-click. Flip back to What's New in Photoshop CS5 to learn why.
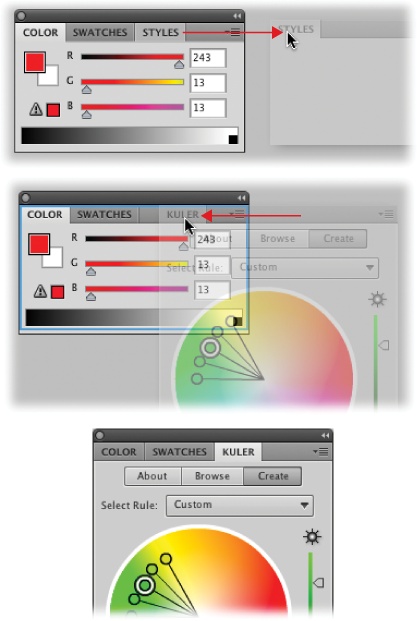
Modify panel groups. As mentioned earlier, Photoshop clumps frequently used panels into panel groups. If you don't use a certain panel in a group, you can replace it with one you do use. To remove a panel, click its tab and drag it out of the panel group to a different area of your screen (see Figure 1-7 top); then click the tiny circle in the panel's top-left corner to close it. (On a PC, click the X button in the panel's top-right corner instead.) Don't worry—the panel isn't gone forever; if you want to reopen it, simply choose it from the Windows menu.
To add a panel to a group, first make sure the panel is open (if not, select it from the Windows menu). Then grab the top of the panel near its tab and drag it into the group you want to add it to; when you see a blue outline appear around the panel group, release your mouse button (see Figure 1-7 middle).
Figure 1-7. Top: You can remove panels you don't use to free up space. For example, if you never use the Styles panel (and you probably won't use it much), drag it out of the panel group and close it. Middle: When you're dragging a panel into a panel group, wait until you see a blue line around the inside of the group before you release your mouse button. Here the Kuler panel is being added to a panel group. Bottom: When you release your mouse button, the new panel becomes part of the group. To rearrange panels within a group, drag their tabs left or right.
Dock and undock panels. The first time you open Photoshop, it docks three sets of panel groups to the right side of your screen (or Application Frame). But you're not stuck with your panels glued to this spot; you can set them free by turning them into floating panels. To liberate a panel, grab its tab, pull it out of the group it's in, and then move it anywhere you want. When you let go of your mouse button, the panel appears where you put it—all by itself.
To undock a whole panel group, click an empty spot in the group's tab area and drag it out of the dock (Figure 1-8 top). Once you release your mouse button, you can drag the panel group around by clicking the same empty spot in the tab area. Or, if the group is collapsed, click the tiny dotted lines at the top of the group, just below the dark gray bar (Figure 1-8 bottom). To dock the panel (or panel group) again, drag it back to the right side of your screen.
Figure 1-8. Top: To undock a panel or panel group, grab a free area to the right of the tabs at the top of the panel and drag it somewhere else on your screen. To dock it again, drag it to the right side of your screen—on top of the other panels. When you see a thin blue line appear where you want the panel or group to land, release your mouse button. Bottom: You can move vertically collapsed panels in the same way, but you grab them by the row of tiny dots that appears at the top (shown here).
Getting the hang of undocking, redocking, and arranging panels takes a little practice because it's tough to control where the little buggers land. When the panel you're dragging is about to join the dock area at the right side of your screen (or a different panel group), a thin blue line appears showing you where the panel or group will go. Unfortunately, the line can be tough to spot because it's so thin and light colored.


Tip
If the thin blue highlight lines are hard to see when you're trying to group or dock panels, try dragging the panels more slowly. When you drag the panel into a group or dockable area, the blue highlight hangs around longer and the panel itself becomes momentarily transparent.
One of the panels you'll frequent the most is named Tools (Figure 1-9 left); it serves as home base for all of Photoshop's editing tools. When you first launch the program, you'll see the Tools panel on the left side of your screen, but you can drag it anywhere you want by clicking the double row of dots near its top (Figure 1-9 right).

Figure 1-9. Unfortunately, there's not enough room in the Tools panel for each tool to have its own spot (or the panel would be a mile long), so related tools are grouped together into toolsets. The microscopic black triangle at the bottom right of each tool's button lets you know it represents more than one tool (the Move and Zoom tools are the only ones that live alone). To see the other tools, hold down the tool's button and Photoshop displays a list of the other tools it harbors in a fly-out menu, as shown here (left). Photoshop starts you off with a one-column Tools panel (left), but you can collapse it into two columns (right) by clicking the tiny triangles circled here (click it again to switch back to one column). If you want to undock the Tools panel, grab the dotted bar shown here and drag the panel wherever you want it.
Once you expand a toolset, you'll see the tool's keyboard shortcut listed to the right of its name. These shortcuts are great timesavers because they let you switch between tools without moving your hands off the keyboard. To access a tool that's hidden deep within a toolset, add the Shift key to the tool's shortcut and you'll cycle through all the tools in that toolset. For example, to select the Elliptical Marquee tool, press Shift-M repeatedly until that tool appears in the Tools panel.
Tip
If you need to switch tools temporarily—for a quick edit—you can use the spring-loaded tools feature. Just press and hold a tool's keyboard shortcut to switch to that tool and then perform your edit. As soon as you release the key, you'll jump back to the tool you were using before. For example, if you're painting with the Brush and suddenly make an error, press and hold E to switch to the Eraser and fix your mistake. Once you release the E key, you're back to using the Brush tool. Sweet!
For an overview of all the tools in this panel, check out Appendix D, online. For a quick reminder of what each tool does, hover your cursor over its icon for a couple of seconds and Photoshop displays a handy tooltip that includes the tool's name and keyboard shortcut (you have to keep your mouse perfectly still).
Photoshop can handle millions of colors, but its tools let you work with only two at a time: a foreground color and a background color. Each of these is visible as a square color chip near the bottom of the Tools panel (in Figure 1-9 they're black and white, respectively). Photoshop uses your foreground color when you paint or fill something with color. It uses your background color to do things like set the second color of a gradient (a smooth transition from one color to another, or to transparency) and erase parts of a locked Background layer (Restacking Layers); it's also helpful when you're running special effects like the Clouds filter (Render). In other words, the foreground color is where most of the action is. If you want to change either color, click its color chip once to make Photoshop open the Color Picker (Choosing Individual Colors), which lets you select another color for that particular color chip. To swap your foreground and background colors, click the double-headed arrow just above the two chips or press X. (Remember this shortcut; it's extremely handy when you work with layer masks, which are discussed in Chapter 3.)
In the upper-right part of your screen is the Color panel, which also displays your current foreground and background color chips. This panel lets you pick a new color for either chip without having to open the just-mentioned Color Picker (which means Photoshop won't pop open a big dialog box that hides part of your image). The Color panel is discussed in Chapter 12 on The Color Panel.
Tip
If you're using the Brush tool, you can summon Photoshop CS5's new onscreen Color Picker (Painting from Scratch). Instead of being inside a dialog box, it appears to sprout from within your image! To see it for yourself, press B to grab the Brush tool and then press and hold Ctrl-Option-⌘ (right-click+Alt+Ctrl on a PC).
The Swatches panel holds miniature samples of colors, giving you easy access to them for use in painting or colorizing your images. This panel also stores a variety of color libraries like the Pantone Matching System (special inks used in professional printing). You'll learn all about the Swatches panel in Chapter 12 on The Swatches Panel.
Styles are special effects created with a variety of layer styles (Layer Styles). For example, if you've created a glass-button look by using several layer styles, you can save the whole lot of 'em as a single style—which means you can apply it with a single click (instead of adding each layer style individually). You can also choose from tons of built-in styles; they're all discussed starting on Using the Styles Panel.
The Adjustments panel gives you one-stop access to all of Photoshop's Adjustment layers, as well as their various presets. Instead of making color and lighting changes to your original image, you can use Adjustment layers to make the change on a separate layer, giving you all kinds of editing flexibility and keeping your original image out of harm's way. They're explained in detail in Chapter 3 (The Layers Panel) though you'll see 'em used throughout this book.
This panel lets you create and fine-tune layer masks. You'll dive headfirst into masks in Chapter 3 (Layer Masks: Digital Masking Tape), but, for now, you can think of them as digital masking tape that lets you hide the contents of a layer, whether it's an adjustment of some sort (a color or lighting change) or parts of an image. This panel also gives you access to several ways to fine-tune a mask once you've created it.
The Layers panel is the single most important panel in Photoshop. Layers let you work with your images as if they were a stack of transparencies, so you can create one image from many. By using layers, you can resize, adjust the opacity, and add layer styles to each item independently. Understanding layers is the key to Photoshop success, and you'll learn all about them in Chapter 3.
Channels are where Photoshop stores the color information your images are made from, whether that's RGB (red, green, blue), CMYK (cyan, magenta, yellow, black), grayscale, and so on. Channels are extremely powerful, and you can use them to edit the individual colors in your image, which is helpful in sharpening images, creating selections (telling Photoshop which part of an image you want to work with), and so on. Chapter 5 has the scoop on channels.
Paths are the outlines you make with the Pen and Shape tools. But these aren't your average, run-of-the-mill lines—they're made up of points and paths instead of pixels, so they'll always print perfectly crisp. You can also make them bigger or smaller without losing any quality. You'll learn all about paths in Chapter 13.
Think of the Navigator panel as a map. It displays a mini version of your image with a frame around the area you're currently zoomed in on. You can use this panel to move around in your document and change your zoom level. The Navigator panel is especially useful when you're working with huge images and you're zoomed in to work on fine details. To see it in action, flip to Chapter 2, Zooming with the Navigator Panel.
A histogram is a mountainous-looking graph that represents the color and brightness info contained in your image. The left side of the graph shows how much of the image falls into the darkest range of colors (shadows), the far right shows the lightest range (highlights), and the area in the middle represents colors in between (midtones). Histograms are crucial when you're color-correcting images, and they're discussed at length in Chapter 9, beginning on Using Levels.
The Info panel is your command center for general info about the image you're working on. It shows you the color values of certain pixels, your cursor's location within the document, image size, and other useful bits of, well, image info. It changes on the fly to show info that relates to the currently selected tool and gives you a handy tip about using that tool (provided you have that option turned on). You can find out more on pages 401 and 404.
Get Photoshop CS5: The Missing Manual now with the O’Reilly learning platform.
O’Reilly members experience books, live events, courses curated by job role, and more from O’Reilly and nearly 200 top publishers.

