(Re)Introducing the Brush Tool
You've already used the Brush tool for all kinds of things in previous chapters: editing layer masks (Using Layer Masks), creating a selection (Using Quick Mask Mode), colorizing grayscale images (Colorizing Images), and so on. In this section you'll learn how to paint with it, and in CS5 it's a more realistic experience than ever before. But first you need to understand a bit more about how this tool works. Grab the Brush tool by pressing B or by clicking its icon in the Tools panel (see Figure 12-11).
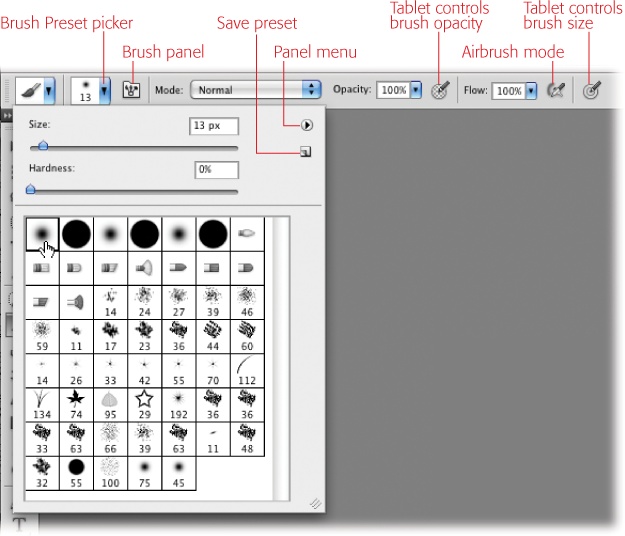
Figure 12-11. The Brush toolset also harbors the Pencil tool (see the caption of Figure 12-17 on page 508 for more about the Pencil tool) and the Color Replacement tool (page 454). Just press Shift-B repeatedly to cycle through the tools. Use the Options bar to set your brush size, choose the kind of tip you want, and adjust opacity, among other things.
Tip
In Photoshop CS5, you can control brush size and hardness with a keyboard shortcut: Ctrl-Option-drag (right-click+Alt-drag on a PC) horizontally left or right to change brush size, or vertically up or down to change brush hardness.
If you peek in the Options bar, you'll see a slew of settings:
Tool presets. Use this pop-up menu to access brush settings you've previously saved.
Brush Preset picker. Photoshop has a ton of built-in brushes, and you can use this pop-up menu to access and manage them (Loading ...
Get Photoshop CS5: The Missing Manual now with the O’Reilly learning platform.
O’Reilly members experience books, live events, courses curated by job role, and more from O’Reilly and nearly 200 top publishers.

