Chapter 1. Services
The basic computing unit in a Dapr-enabled application is a service. One of the goals of Dapr is to enable you to write these services in the way you like with the language of your choice. Dapr sits side by side with your services and brings in necessary capabilities such as state management, tracing, and secured communication when you need them. This chapter walks you through how various Dapr features came to be.
The World Before Cloud
Around the year 2000, I (Haishi) was working at a financial software company in San Francisco. On the second floor there was a server room, which required a special key card to access. The room was always freezing cold and noisy. It hosted everything the company needed to operate—domain controller, mail servers, file servers, source repositories, databases, test labs, and all the HR records. Other than the server racks, the room was filled with shelves of tapes stacked up to the ceiling. The company backed up the servers regularly, and all the backups were stored on these tapes. The room was also equipped with huge tanks of pure nitrogen gas, which would be released to save the room in case of fire.
The IT staff were very protective of the servers. And they were frequently annoyed by developers’ requests to deploy new service versions—after all, keeping the CEO’s mailbox working was a higher priority. Deploying a new version was a major operation: servers were backed up, databases were backed up, servers were patched, data migration scripts were executed, validation tests were executed. And if the tests failed, everything got rolled back, and the IT guys gave us the evil eye. Their pagers beeped, and they told us they could only do another deployment tomorrow.
At the time, the browser/server (B/S) architecture was on the rise and set to replace the established client/server (C/S) architecture. The main promise of the B/S architecture was to enable smooth client adoption by making the clients as thin as a web browser. As more and more companies tried to adopt a subscription-based business model instead of the traditional license-based business model, B/S architecture concentrated large amounts of compute resources back into centralized servers. These servers were critical to business. However, managing them became an increasingly hard problem. The companies had to go through extensive capability planning processes to ensure that they could purchase enough servers that would satisfy their requirements without blowing the budget. At the same time, because the services had to be kept available during updates and server failures, the companies needed the ability to quickly and consistently deploy and update their applications with minimal interruptions to running services.
Cloud Promises and Challenges
A few years later, the cloud rose to the challenge of running highly available hosted services. It promised availability and elasticity, offering consumption-based pricing and infinite capacity. However, these promises didn’t come for free. They imposed some new requirements on how applications were designed.
Availability
Cloud computing achieves high availability through redundancy. Cloud servers are not magical—they fail just like the servers in your own datacenters. But when a cloud server fails, the provider won’t have enough human resources to diagnose and fix the server problem on the fly. Instead, they’ll simply pull another server from their enormous server pool and migrate your application over, and it will continue as usual.
This means that at any time, your application might be stopped and restarted on a brand-new server instance. This raises some challenges in terms of how you design your services. For example, if you accumulate in-memory state, the state will be lost when the restart happens. If your service takes a long time to be initialized, service availability will be affected as well. Furthermore, if you save some state locally, such as by writing a file to a local drive, that state will be lost when the migration happens. Migrating state is always troublesome. Therefore, many cloud workload management systems require the applications to be stateless, which means these applications don’t save any local state to the hosting environment.
Moving application bits from one server to another takes time. If an application can be broken down into smaller pieces, moving and restoring those smaller pieces is much more efficient. Using these smaller services, sometimes referred to as microservices, is becoming the de facto way of composing applications. Microservices are usually loosely coupled, because they should remain functional as their peers are being moved and restarted.
If your service must be stateful, which means it must save some local state, the state needs to be replicated to ensure availability. In such cases, a single writer instead of multiple writers is often used to avoid data conflicts.
Elasticity
When the demands of a service exceed the capacity of the hosting server, there are two possible solutions: the service can be migrated to a more powerful server, or multiple copies of the service can be deployed to share the workload. The latter approach, which is called scaling out, is the preferred way to scale in the cloud. Because cloud providers have huge numbers of servers, a service in theory can be scaled out infinitely. On the flip side, when the workload diminishes, a service can be scaled in to release unused compute capacity. Because you pay for what you consume in the cloud, such elasticity can be a major cost saver if you have seasonal heavy loads (such as in retail businesses) or occasional spikes (such as in news businesses) in your workloads.
For simple web APIs, scaling out is relatively straightforward. This is because each web request is often self-contained, and data operations are naturally segmented by transaction scopes. For such APIs, scaling out can be as simple as adding more service instances behind a load balancer. However, not all applications are designed to be scaled out. Especially when a service assumes it has full control of the system state, multiple instances of the service may make conflicting decisions. Reconciling such conflicts is a hard problem, especially when prolonged network partitioning happens. The system is then said to have a “split brain,” which often leads to irreconcilable conflicts and data corruption.
Partitioning is an effective way to scale out a service. A large workload can often be split into multiple partitions along logical or physical boundaries, such as by customers (or tenants), business units, geographic locations, countries, or regions. Each of the partitions is a smaller system that can be scaled in or out as needed. Partitioning is especially useful when scaling a stateful service. As mentioned before, the state of a stateful service needs to be replicated to ensure availability. Partitioning controls the amount of data being replicated and allows parallel replication because all replication operations are scoped to partitions.
Partitions can be either static or dynamic. Static partitioning is easier in terms of routing, as routing rules can be predetermined. However, static partitioning may lead to unbalanced partitions, which in turn lead to problems such as overstressed hotspots and underutilized server capacity. Dynamic partitioning dynamically adjusts partitions using techniques such as consistent hashing. Dynamic partitioning usually can ensure evenly distributed workloads across partitions. However, some partition-aware routing logic is needed to route user traffic to the appropriate partitions. It’s also hard to ensure data separation, which is required by some compliance standards, on dynamic partitions. When you design your services, you need to decide on a partitioning strategy based on both your technical and nontechnical needs and stick to it, because changing partitioning strategies later is often difficult, especially when you have constant incoming data streams.
Cloud Native Applications
Cloud native applications are designed to be operated in a cloud environment. For an application to be considered “cloud native,” it should present the following characteristics:
- Automatically deployable
A cloud native application can be consistently redeployed when necessary. This feature is required when automatic failover is enabled to ensure high availability. Virtualization and containerization allow applications to be packaged as self-contained packages that can be deployed on different hosting nodes without possible conflicts in external dependencies. These packages must be deployable without human intervention because the failover mechanism may get triggered at any time due to different conditions such as machine failures and compute resource rebalancing.
As mentioned previously, moving a stateless service to a new machine is simpler than moving a stateful service, and being able to launch a new service instance quickly is key to improving availability. However, being stateless is not a mandatory requirement of a cloud native application. Techniques such as partitioning enable stateful service instances to be moved efficiently as well.
- Isolation among components
A component in a multicomponent cloud native application should continue to operate when other components fail. Although the component may be unable to deliver the required functionality, it should be able to restore to a fully functional state when all dependent services come back online. In other words, a failing component or a restarting component should not cause cascading errors in other components.
Such isolation is usually achieved by a combination of clearly defined APIs, client libraries with automatic retires, and loosely coupled design through messaging.
Isolation among components also means the components should be individually scalable. The consumption-based model requires cloud native application operators to fine-tune the resource consumptions of individual components to better meet the requirements with minimum resource consumption. This requires components to be adaptive to workload changes when related components are being scaled.
Cloud native applications are usually composed of microservices (in fact, the two terms are often thought of as synonymous). Despite the name, microservices don’t have to be small—the concept is all about operations. Microservices applications are isolated, consistently deployable, and easy to scale, making them ideally suited to a cloud environment.
Infrastructure Is Boring
For a cloud platform to fulfill the promise of availability and elasticity, workloads must be separated from the underlying infrastructure so that infrastructure can be mobilized as needed for common cloud operations such as failover and scaling. Infrastructural concerns should be the last thing on a developer’s mind. Projects such as Open Application Model (OAM, discussed later in this chapter) and Dapr aim at providing developers tools and abstractions so that they can design and develop applications that are agnostic to the underlying infrastructure, for both cloud and edge deployment.
Dapr and containers
Containerization provides a lightweight isolation mechanism for workloads, and Kubernetes offers powerful workload orchestration on clustered compute nodes. Dapr is designed to work natively with containers and Kubernetes. However, as you saw in the previous chapter, Dapr works in noncontainerized environments as well. The primary reason for this design is to support IoT scenarios and legacy scenarios in which containers are not used. For example, a legacy system running on a virtual machine or a physical server can use a Dapr process, which can be configured as a Windows service or a Linux daemon. You can run the Dapr runtime as an independent container as well, and because it’s lightweight it can easily be deployed to devices with lower capacities.
Regardless of how you deploy your Dapr sidecars, the sidecars provide local service endpoints that bring various capabilities to your application that you can leverage without needing to worry about any infrastructural details—this is the key value of Dapr. A cloud native application often uses various cloud-based services, such as storage services, secret stores, authentication servers, messaging backbones, and more. Dapr abstracts these services into simple interfaces so that your applications can be reconfigured to use different service implementations, including containerized services and hosted services, in different deployment environments.
IaaS, PaaS, SaaS, and serverless
Many cloud projects start with a debate over which tier of the cloud—IaaS, PaaS, or SaaS—should be the entry point. We’ll take SaaS (Software as a Service) out of the discussion for now, because from an application’s perspective, using SaaS means calling a hosted API. This doesn’t affect how the application itself is hosted.
IaaS (Infrastructure as a Service) gives you the most flexible control over the compute resources you provision in the cloud. Because you’re working at the infrastructural level, you can tailor your hosting environment in the exact way you want. You can choose the network topology, operating system, runtime, frameworks, and more. Then you deploy your application on the specified infrastructure and manage it just as you would in a local datacenter. Working at infrastructural level, however, makes it harder to take advantage of the cloud’s availability and elasticity features. For example, although your cloud provider can automatically restore a failed virtual machine and trigger a redeployment of your application, the time it takes to build up the environment could be lengthy, causing unexpected outages.
PaaS (Platform as a Service) is more opinionated. When you follow the programming models chosen by a PaaS platform, many infrastructural burdens are taken off your shoulders. Dapr is designed to work with different PaaS platforms. Architecturally, Dapr is just a set of service endpoints your application can use. In a way, it’s a “local SaaS” that your application can consume. It doesn’t mandate how your application is written, or which frameworks your application uses.
Because Dapr runs as a sidecar, it will work with any serverless platform that supports the concept of grouped containers. This includes different flavors of managed Kubernetes clusters as well as Azure Container Instances (ACI), which supports container groups. To run on a serverless platform that doesn’t support container groups, you can package the Dapr process as part of your application container.
With these discussions in mind, we’ll now introduce how Dapr provides service invocation abstractions among distributed components. The service invocation feature provides the fundamental supports that allow components in a microservices application to communicate with each other.
Service Invocation
Multiple services can communicate with each other through Dapr sidecars, as shown in Figure 1-1. When service a, represented by a Dapr sidecar named dapr-a, tries to call a method foo defined by service b, represented by a Dapr sidecar named dapr-b, the request goes through the following steps:
Service a sends a request to its own Dapr sidecar through localhost:3500 (assuming the sidecar listens to port 3500) with path /v1.0/invoke/<target Dapr ID>/method/<target method>. Note that a service always sends the invocation request to its own Dapr sidecar through localhost.
The dapr-a sidecar resolves the address of the dapr-b sidecar and forwards the request to dapr-b’s invocation endpoint.
The dapr-b sidecar invokes service b’s
/fooroute.
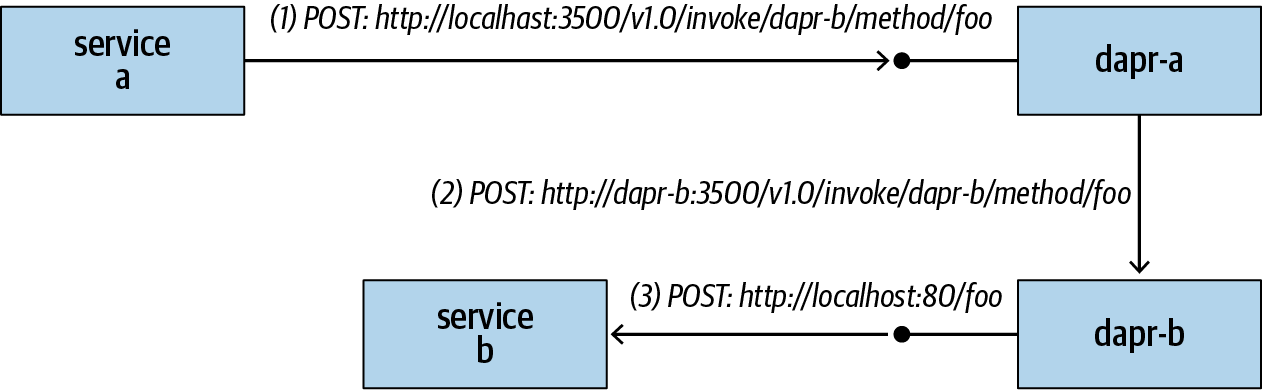
Figure 1-1. Service invocation through Dapr sidecars
Name Resolution
The first step required to invoke another service is to locate the service. Each Dapr sidecar is identified by a string ID. The task of name resolution is to map the Dapr ID to a routable address. By default, Dapr uses the Kubernetes name resolution mechanism when running on Kubernetes, and it uses multicast DNS (mDNS) while running in local mode. Dapr also allows other name resolvers to be plugged into the runtime as a component.
Kubernetes
When you deploy a pod with Dapr annotations, Dapr automatically injects a Dapr sidecar container into your pod. It also creates a ClusterIP service with a -dapr postfix. To verify this, use kubectl to deploy the following pod spec from Dapr’s sample repository:
apiVersion: apps/v1
kind: Deployment
metadata:
  name: pythonapp
  labels:
    app: python
spec:
  replicas: 1
  selector:
    matchLabels:
      app: python
  template:
    metadata:
      labels:
        app: python
      annotations:
        dapr.io/enabled: "true"
        dapr.io/id: "pythonapp"
    spec:
      containers:
      - name: python
        image: dapriosamples/hello-k8s-python
Then you can use kubectl to view the created service:
kubectl get svc pythonapp-dapr
NAME             TYPE        CLUSTER-IP    EXTERNAL-IP   PORT(S)            AGE
pythonapp-dapr   ClusterIP   10.0.79.144   <none>        80/TCP,50001/TCP   11m
By default, Kubernetes uses CoreDNS for name resolution. The following commands create a busybox pod in your cluster and examine the default name resolution configuration:
kubectl apply -f https://k8s.io/examples/admin/dns/busybox.yaml
kubectl exec busybox cat /etc/resolv.conf
In our environment, which is hosted on Azure Kubernetes Service (AKS), they produce the following output:
nameserver 10.0.0.10
search default.svc.cluster.local svc.cluster.local
  cluster.local vvdjj2huljtelaqnqfod0pbtwh.xx.internal.cloudapp.net
options ndots:5
You can manually look up the service address using the following command:
kubectl exec -ti busybox -- nslookup pythonapp-dapr
This command generates the following output in our environment. You should get similar results in yours, except for the resolved service IP. The output shows how Dapr can resolve the Dapr ID, pythonapp-dapr, to the corresponding service to be invoked:
Server:    10.0.0.10
Address 1: 10.0.0.10 kube-dns.kube-system.svc.cluster.local

Name:      pythonapp-dapr
Address 1: 10.0.79.144 pythonapp-dapr.default.svc.cluster.local
When the pod is scaled out, traffic to the service is evenly distributed among the instances—this is how a Dapr sidecar scales out.
mDNS
The multicast DNS protocol is used to resolve hostnames to IP addresses on a small network by broadcasting UDP packets. Essentially, each participant announces its own address and updates its DNS lookup cache based on what its peers announce. When running in local mode, Dapr uses mDNS for name resolution.
When multiple Dapr sidecars run on the same host, they need to listen to different HTTP/gRPC ports to avoid port conflicts. In such cases, mDNS resolves to the specific port the Dapr instance is listening to. For example, the Dapr ID dapr-a may get resolved to localhost:3500, and the Dapr ID dapr-d may get resolved to localhost:3600.
Note
At the time of writing, Dapr’s mDNS implementation is constrained to a single host. Chances are, by the time you’re reading this text, the implementation will have been extended to support multiple machines on the same local network. Until that happens, Dapr’s local mode supports only Dapr sidecars running on the same host, listening to different ports. After the extension, Dapr sidecars running on the same local network will be able to address each other through Dapr IDs.
Requests and Responses
Dapr forwards all request headers as well as query parameters for HTTP requests, and all metadata associated with gRPC requests. Although services can talk to Dapr through either HTTP or gRPC, Dapr sidecars always communicate with each other through gRPC. When converting an HTTP request to a gRPC request, all HTTP headers are encoded into the headers metadata element of the gRPC request. Dapr supports common HTTP verbs including GET, POST, DELETE, and PUT.
Dapr uses mutual TLS to secure communications among sidecars. Dapr sidecars authenticate with each other with sidecar-specific certificates that are rooted to a cluster-level CA (when running on Kubernetes), or a customer-supplied root certificate—see Chapter 4 for details. The communication between a service and its associated sidecar is often unprotected as the sidecar is assumed to be in the same security domain as the service, but you can configure end-to-end encryption between two services through Dapr.
Concurrency Control
The Dapr runtime supports a max-concurrency switch. When set to a positive value, this controls how many concurrent requests can be dispatched to a user service. Once the number of concurrent requests exceeds the given threshold, additional requests will be held in flight until additional processing capacity is freed up. This means a client request may time out due to a busy service.
Service Invocation Experiment
In this section, we’ll conduct a small service invocation experiment. We’ll use PHP here, but remember that you can pick any language you like; all you need to do is to write a simple web server without any Dapr-specific logic or libraries.
Creating the PHP service
The first step is to create a simple PHP web service. This service responds to any requested routes and returns the request method, request path, and request headers:
Create a new folder named php-app.
Under the php-app folder, create a new PHP script file named app.php with the following contents:
<?php

$method = $_SERVER[’REQUEST_METHOD’];
$uri = $_SERVER[’REQUEST_URI’];

$headers = array();
foreach ($_SERVER as $key => $value) {
    if (strpos($key, ’HTTP_’) == 0 && strlen($key) >5) {
        $header = str_replace(’ ’, ’-’, ucwords(str_replace(’_’, ’ ’,
          strtolower(substr($key, 5)))));
        $headers[$header] = $value;
    }
}

echo json_encode(array(’method’=>$method, ’uri’ => $uri,
  ’headers’ => $headers));

?>
Under the same folder, create a Dockerfile with these contents:
FROM php:7.4-cli
COPY . /usr/src/myapp
WORKDIR /usr/src/myapp
CMD ["php", "-S", "0.0.0.0:8000", "app.php"]
Build and push the Docker image:
docker build -t
<image tag>. docker push<image tag>
Deploying the service
The next step is to create a Kubernetes deployment spec to deploy the PHP service. You’ll also define a LoadBalancer service so that you can access the service through a public IP:
Create a new php-app.yaml file with the following contents:
kind: Service apiVersion: v1 metadata: name: phpapp labels: app: php spec: selector: app: php ports: - protocol: TCP port: 80 targetPort: 8000 type: LoadBalancer --- apiVersion: apps/v1 kind: Deployment metadata: name: phpapp labels: app: php spec: replicas: 1 selector: matchLabels: app: php template: metadata: labels: app: php annotations: dapr.io/enabled: "true" dapr.io/id: "phpapp" dapr.io/port: "8000" spec: containers: - name: php image:<image tag>ports: - containerPort: 8000 imagePullPolicy: AlwaysDeploy the file using
kubectl. Then get the public IP of thephpappservice:kubectl apply -f php-app.yaml kubectl get svc phpapp
Use a browser or Postman to send a request to http://<your service ip>/abc/def?param=123. You should get a JSON document that is similar to the following:
{
  "method":"GET",
  "uri":"\/abc\/def?param=123",
  "headers":{
        ...
  }
}
Exposing the -dapr service
As mentioned previously, when you deploy a pod with Dapr annotations Dapr creates a -dapr ClusterIP service. For this experiment, you’ll edit the service to change its type to LoadBalancer, which means it will be assigned a public IP through the load balancer:
kubectl edit svc phpapp-dapr
Replace ClusterIP in this file with LoadBalancer and then save the file. kubectl should report that the service has been edited:
service/phpapp-dapr edited
Wait for a public IP to be assigned to phpapp-dapr. Then you can invoke the PHP service through the exposed Dapr service:
http://<dapr service IP>/v1.0/invoke/phpapp/method/foo
You can experiment with combinations of different request paths, parameters, and request headers. You’ll be able to observe how Dapr forwards the metadata to the PHP service.
The Universal Namespace
At the time of writing, we are designing a new Dapr capability tentatively called the universal namespace. So far, Dapr name resolution and communication work only in a single cluster. However, we’d like to extend Dapr so that it supports name resolution and communication across multiple clusters.
The idea of the universal namespace is to allow users to postfix service names with cluster identifiers so that services on different clusters can address each other through names such as <service name>.<cluster identifier>. For example, to invoke a method foo on service-1 on cluster1, a client would simply send a POST request to a Dapr endpoint at http://localhost:3500/v1.0/invoke/service-1.cluster1/foo.
Because Dapr sidecars are often exposed as ClusterIP services, we plan to introduce a new Dapr gateway service that can be associated with a public IP. Name resolution through DNS will resolve to the gateway service address, and the gateway will forward the request to local services. Of course, if you choose to expose a Dapr service with a public IP, the DNS records on the other cluster can be updated to directly route the traffic to the target service without going through the gateway.
To secure communication across clusters, root certificates of the clusters (or a shared root certificate) are exchanged for mutual TLS authentication.
Note
We’ll talk more about this and other up-and-coming Dapr features in Chapter 7.
Pub/Sub
Microservices architectures advocate for loosely coupled services. When a service invokes another service through Dapr, it doesn’t need to resolve the physical service address itself. Instead, it can simply refer to another service through the corresponding Dapr ID. This design allows great flexibility in service placement. However, the calling service still needs to know the exact name of the target service.
Many modern applications comprise multiple services that are developed and operated by different teams. Especially in large enterprise environments, different services may have different life cycles, and a service may get replaced by a completely different service. Maintaining direct connections among these services can be difficult, if not impossible. We therefore need ways to keep services loosely coupled but efficiently integrated as a complete application.
To achieve better loose coupling, Dapr supports message-based integration patterns. Before we dive into how Dapr provides messaging support, let’s recap the benefits of this approach.
Benefits of Message-Based Integration
Message-based integration allows services to exchange messages through a messaging backbone, as shown in Figure 1-2. Instead of sending requests directly to one another, all services communicate with each other by exchanging messages through the messaging backbone. This additional level of indirection brings many desirable characteristics, as summarized in the following subsections.
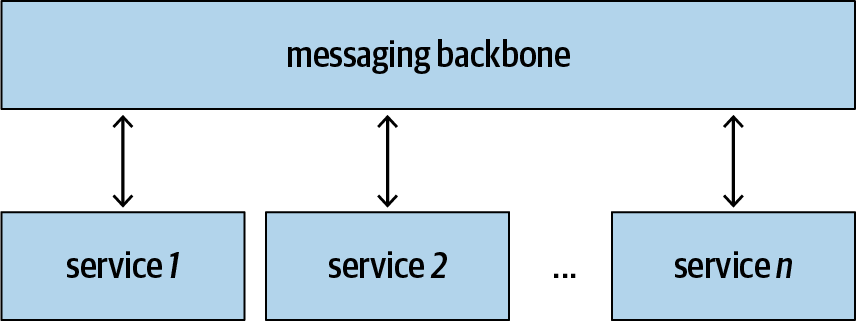
Figure 1-2. Message-based integration
Alleviating performance differences
Different services have different throughputs. If all services are chained together through direct invocations, the overall throughput of the system is determined by the slowest service in the chain. This is usually unacceptable. For example, a web service should remain responsive to take new orders as the backend service processes orders, which may take much longer.
In such cases, the frontend service can take a new order, put it to a processing queue, and get ready to take the next order. At the same time, the backend service can pick up and process orders at its own pace, without affecting the responsiveness of the frontend service. Furthermore, the backend service can be independently scaled out to drain the processing queue faster.
Advanced queuing features such as deduplication (removing duplicate requests), priority queuing (bumping higher-priority requests to the front of the queue), and batching (combining requests together into a single transaction) can help to further optimize the system.
Improving availability
Message-based integration can also help improve system availability in some cases. For instance, when the backend is brought down for maintenance or upgrade, the frontend can keep taking new requests and queue them.
With a globally redundant messaging backbone your system can even survive regional failures, because the queued requests remain available even when all your system components fail. They can be picked up when the system restarts.
Some queuing systems allow checking out a work item without removing it from the queue. Once the work item is checked out, the processor is given a time window to process it and then remove it from the queue. If the processor fails to do so in the allotted time, the work item will be made available for others to check out. This is an implementation of at-least-once message delivery and ensures a work item is processed at least once.
Flexible integration topology
You can implement various service topologies through message-based integration: pub/sub, bursting to cloud, content-based routing, scatter-gather, competing consumer, dead letter channel, message broker, and many more.
In the pub/sub pattern, publishers publish messages to a topic to which subscribers subscribe. Figure 1-3 illustrates some of the integration topologies you can achieve with pub/sub.
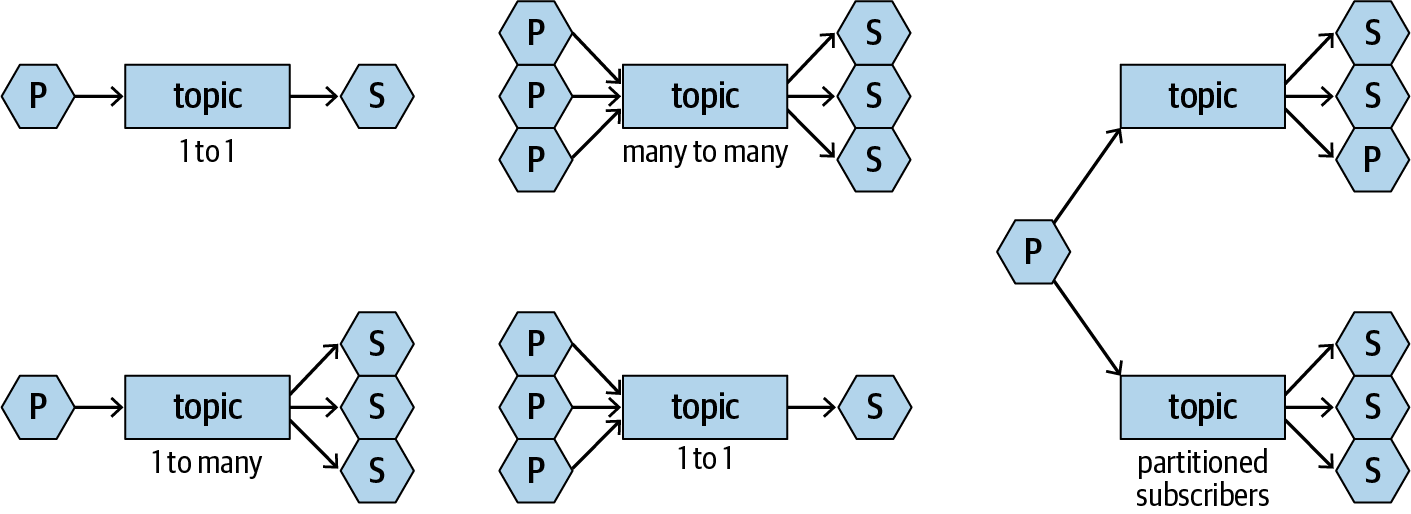
Figure 1-3. Integration patterns with pub/sub
One of the major benefits of pub/sub is that the publishers and subscribers are totally decoupled (well, to be exact, they are still coupled by message format, but we’re just talking about topology here). A publisher never cares how many subscribers subscribe to the topic it publishes to, or who the subscribers are. The same applies to the subscribers. This means publishers and subscribers can be evolved or replaced at any time without affecting each other. This is quite powerful, especially when multiple teams are trying to work together to deliver a complex application.
Pub/Sub with Dapr
To subscribe to topics, your application should send a GET request to the Dapr sidecar with a list of topics and corresponding routes as a JSON array, as shown in the following Node.js sample code:
app.get(’/dapr/subscribe’, (_req, res) => {
    res.json([
      {
        topic: "A",
        route: "A"
      },
      {
         topic: "B",
         route: "B"
      }
    ]);
});
Then the sidecar sends you events through POST requests when publishers publish content to the subscribed-to topics:
app.post(’/A’, (req, res) => {
    console.log("A: ", req.body);
    res.sendStatus(200);
});
To publish to a topic, your application should send a POST request to a /publish/<topic> endpoint on your Dapr sidecar with the message to be sent as the POST body, wrapped as a CloudEvent (more on this in the following section):
const publishUrl = `http://localhost:3500/v1.0/publish/<topic>`; request( { uri: publishUrl, method: ’POST’, json:<message>} );
Note
You can get the source code of a complete pub/sub sample from Dapr’s sample repository.
How Pub/Sub Works
Pub/sub needs a messaging backbone. However, as explained in the Introduction, one of Dapr’s design principles is to not reinvent the wheel. So instead of creating a new messaging backbone, Dapr is designed to be integrable with many popular messaging backbones, including Redis Streams, NATS, Azure Service Bus, RabbitMQ, Kafka, and more (for the complete list, see the Dapr repository).
Dapr uses Redis Streams as the default messaging backbone. The Stream is an append-only data structure introduced by Redis 5.0. You can use XADD to add data elements into a Stream, and you can use APIs like BLPOP to retrieve data. Each subscriber is assigned its own consumer group so that they can process their own copies of messages in parallel.
Dapr follows the CloudEvents v1.0 spec. CloudEvents is a Cloud Native Computing Foundation (CNCF) sandbox-level project at the time of writing; its goal is to create a consistent way to describe events that can be used across event producers and consumers. Dapr implements all the required attributes: id, source, specversion, and type. It also implements the optional datacontenttype and subject attributes. Table 1-1 shows how these attributes are populated.
| Attribute | Value |
|---|---|
data |
Message payload |
datacontenttype |
application/cloudevent+json, text/plain, application/json |
id |
UUID |
source |
Sender Dapr ID |
specversion |
1.0 |
subject |
Subscribed topic |
type |
com.dapr.event.sent |
Dapr Components
Dapr groups different functionalities, such as pub/sub, the state store, middleware, and secrets, as components (a.k.a. building blocks). It ships with default implementations, but you can plug in alternate implementations if you like.
A component is defined by a metadata file, which is in the Kubernetes CRD format. For example, the following file defines a Redis state store named, quite creatively, statestore:
apiVersion: dapr.io/v1alpha1
kind: Component
metadata:
  name: statestore
spec:
  type: state.redis
  metadata:
  - name: redisHost
    value: <YOUR_REDIS_HOST_HERE>:6379
  - name: redisPassword
    value: <YOUR_REDIS_KEY_HERE>
When running in local mode, Dapr looks for a ./components folder under your Dapr installation folder (which can be overridden by a --component-path) and loads all component files found under that folder. When running in Kubernetes mode, these files should be deployed to your Kubernetes cluster as CRDs. For example, to apply the preceding state store definition, you would use:
kubectl apply -f ./redis.yaml
The following is a definition of an OAuth 2.0 authorization middleware:
apiVersion: dapr.io/v1alpha1
kind: Component
metadata:
  name: oauth2
spec:
  type: middleware.http.oauth2
  metadata:
  - name: clientId
    value: "<your client ID>"
  - name: clientSecret
    value: "<your client secret>"
  - name: scopes
    value: "https://www.googleapis.com/auth/userinfo.email"
  - name: authURL
    value: "https://accounts.google.com/o/oauth2/v2/auth"
  - name: tokenURL
    value: "https://accounts.google.com/o/oauth2/token"
  - name: redirectURL
    value: "http://dummy.com"
  - name: authHeaderName
    value: "authorization"
This file defines a component of type middleware.http.oauth2 named oauth2. You can assemble multiple middleware components into a custom pipeline by defining a custom configuration, as described next.
Dapr Configurations
A Dapr sidecar can be launched with a custom configuration, which is a file in local mode or a configuration object in Kubernetes mode. A Dapr configuration again uses Kubernetes CRD semantics so that the same configuration can be used in both local mode and Kubernetes mode.
At the time of writing, you can use Dapr configurations to customize distributed tracing and create custom pipelines. The schema is likely to be extended in future versions; consult the online Dapr documentation for updated details. The following sample shows a configuration that enables distributed tracing and defines a custom pipeline with the OAuth middleware:
apiVersion: dapr.io/v1alpha1
kind: Configuration
metadata:
  name: pipeline
spec:
  tracing:
    samplingRate: "1"
  httpPipeline:
    handlers:
    - type: middleware.http.oauth2
      name: oauth2
To apply this configuration, use kubectl (assuming the filename is pipeline.yaml):
kubectl apply -f ./pipeline.yaml
Note
At the time of writing, you need to restart your pods to pick up new configuration changes.
To apply the custom configuration, you need to add a dapr.io/config annotation to your pod spec:
apiVersion: apps/v1
kind: Deployment
metadata:
  name: echoapp
  labels:
    app: echo
spec:
  replicas: 1
  selector:
    matchLabels:
      app: echo
  template:
    metadata:
      labels:
        app: echo
      annotations:
        dapr.io/enabled: "true"
        dapr.io/id: "echoapp"
        dapr.io/port: "3000"
        dapr.io/config: "pipeline"
    spec:
      containers:
      - name: echo
        image: <your Docker image tag>
        ports:
        - containerPort: 3000
        imagePullPolicy: Always
Custom Pipelines
Middleware defined in a custom pipeline are applied in the order in which they appear in the custom configuration file on the request side and in the reverse order on the response side. A middleware implementation can choose to participate in the ingress pipe, egress pipe, or both, as shown in Figure 1-4.
In addition to custom middleware, Dapr always loads two middleware at the top of the chain: the distributed tracing middleware and the CORS middleware. We’ll talk about distributed tracing in the next section. CORS is configured by a runtime switch, allowed-origins, that contains a list of comma-separated allowed request origins. This switch may get merged into the Dapr configuration in future versions.
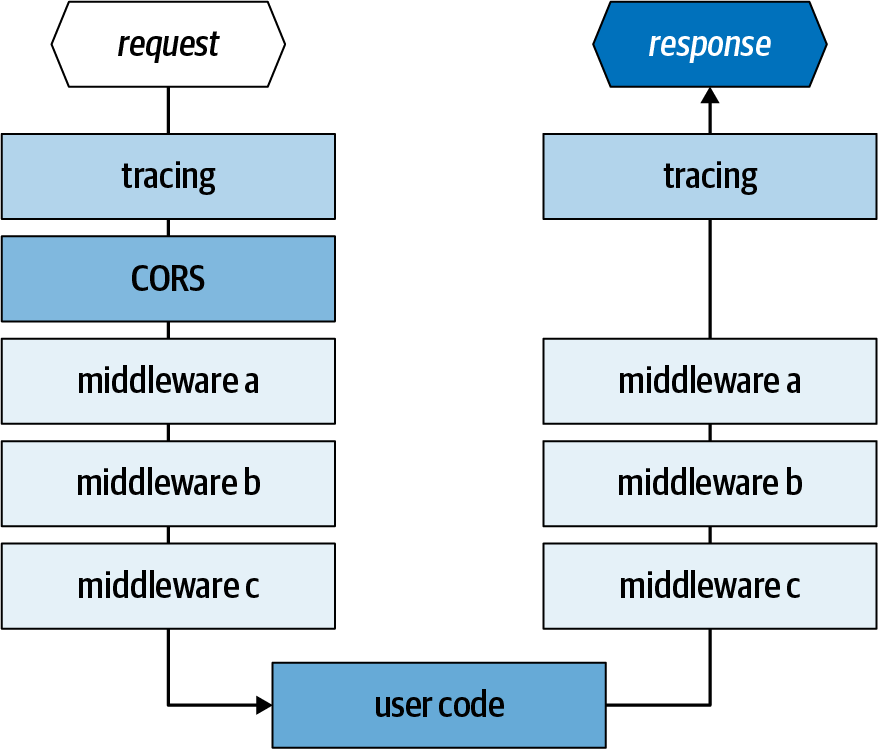
Figure 1-4. A custom pipeline
Custom Pipeline Experiment
In the following experiment, you’ll create a custom pipeline with a strange middleware that changes all request bodies to uppercase. We created the middleware for testing purposes; you can use it to verify whether your custom pipeline is in place.
Since we’ve been using a different programing language for each of the samples so far, we’ll switch to Rust for this exercise. You can certainly choose a different language and web framework to write the app, which simply echoes back what’s received. The following discussion assumes you have Rust installed and configured on your machine.
Creating the Rust app
Create a new Rust project using
cargo:cargo new rust-web cd rust-web
Modify your Cargo.toml file to include the necessary dependencies:
[dependencies]
actix-web = "2.0"
actix-rt = "1.0.0"
actix-service = "1.0.0"
serde = "1.0"
bytes = "0.5.2"
json = "*"
Modify the src/main.rs file to contain the following code:
use actix_web::{
    web, App, Error, HttpResponse, HttpServer,
};
use json::JsonValue;
use bytes::{Bytes};

async fn echo(body: Bytes) -> Result<HttpResponse, Error> {
    let result = json::parse(std::str::from_utf8(&body).unwrap());
    // return result
    let injson: JsonValue = match result {
        Ok(v) => v,
        Err(e) => json::object! {"err" => e.to_string() },
    };
    Ok(HttpResponse::Ok()
        .content_type("application/json")
        .body(injson.dump()))
}

#[actix_rt::main]
async fn main() -> std::io::Result<()> {
    HttpServer::new(|| {
        App::new()
            .data(web::JsonConfig::default().limit(4096))
            .service(web::resource("/echo").route(web::post().to(echo)))
    })
    .bind("127.0.0.1:8088")?
    .run()
    .await
}
Launch the application and make sure it works:
cargo run
Use a web testing tool such as Postman to send a POST request to the web server with a JSON payload. You should see the payload played back in the response.
Define the custom pipeline
In this part of the exercise you’ll create two manifest files, a Dapr configuration file and a middleware definition file:
Create a new components folder under your application folder.
Add a new uppercase.yaml file under this folder, with the following contents. The file defines a
middleware.http.uppercasemiddleware, which doesn’t have any metadata:apiVersion: dapr.io/v1alpha1 kind: Component metadata: name: uppercase spec: type: middleware.http.uppercase
Define a pipeline.yaml file under your application folder with the following contents. This configuration defines a custom pipeline with a single
middleware.http.uppercasemiddleware:apiVersion: dapr.io/v1alpha1 kind: Configuration metadata: name: pipeline spec: httpPipeline: handlers: - type: middleware.http.uppercase name: uppercase
Testing
To test the application locally, launch the Rust application with a Dapr sidecar from your application folder:
dapr run --app-id rust-web --app-port 8088 --port 8080 --config ./pipeline.yaml
cargo run
Then use Postman to send a POST request to the following address with a JSON payload:
http://localhost:8080/v1.0/invoke/rust-web/method/echo
You should see that the response JSON document contains only uppercase letters.
Note
Testing on Kubernetes is left as an exercise for interested readers.
OAuth 2.0 Authorization
OAuth 2.0 authorization middleware is one of the middleware components shipped with Dapr. It enables the OAuth 2.0 Authorization Code Grant Flow. Specifically, when a request is received by the Dapr sidecar with OAuth 2.0 middleware enabled, the following steps happen:
The Dapr sidecar checks whether an authorization token exists. If not, Dapr redirects the browser to the configured authorization server.
The user logs in and grants access to the application. The request is redirected back to the Dapr sidecar with an authorization code.
Dapr exchanges the authorization code for an access token.
The sidecar injects the token into a configured header and forwards the request to the user application.
Note
At the time of writing, the middleware doesn’t support refresh tokens.
Figure 1-5 illustrates how the OAuth middleware can be configured to provide OAuth authorization to an application.
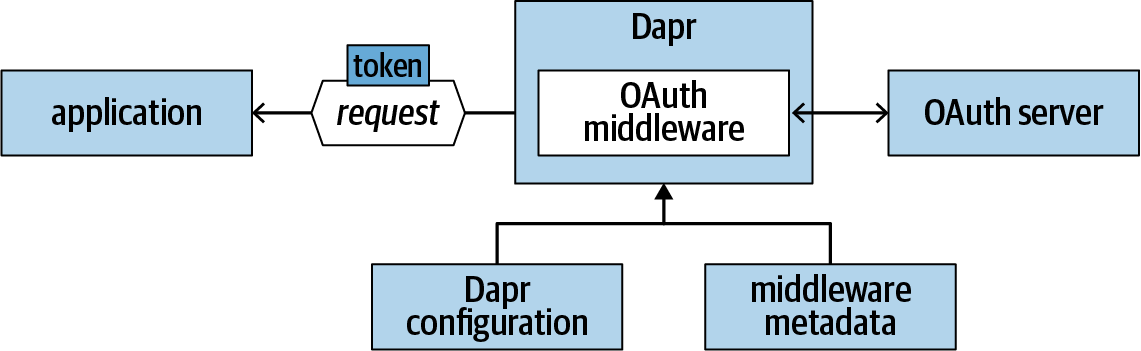
Figure 1-5. Custom pipeline with OAuth middleware
OAuth is a popular protocol that is supported by many authorization servers, including Azure AAD, Facebook, Fitbit, GitHub, Google APIs, Slack, Twitter, and more. To work with these authorization servers, you need to register your application with the servers you want to use. Different servers offer different registration experiences. At the end, you need to collect the following pieces of information:
Table 1-2 lists the authorization and token URLs of some of the popular authorization servers.
| Server | Authorization URL | Token URL |
|---|---|---|
| Azure AAD | https://oreil.ly/M_5KZ | https://oreil.ly/3p0-u |
| GitHub | https://oreil.ly/tbgaL | https://oreil.ly/N2a_1 |
| Google APIs | https://oreil.ly/H79ez | https://oreil.ly/zN1NP https://oreil.ly/SerId |
| https://oreil.ly/FJKKk | https://oreil.ly/WtvKZ |
Once you collect the required information, you can define the OAuth middleware and your custom pipeline. The middleware follows the OAuth flow and injects the access token into the configured authHeaderName header.
Authoring a Custom Middleware
Dapr’s HTTP server uses FastHTTP, so Dapr HTTP middleware are also written as FastHTTP handlers. Dapr defines a simple middleware interface that consists of one GetHandler method that returns a fasthttp.RequestHandler:
type Middleware interface {
  GetHandler(metadata Metadata) (func(h fasthttp.RequestHandler)
    fasthttp.RequestHandler, error)
}
Your implementation should return a function that takes in the downstream request handler and returns a new request handler. Then you can insert inbound or outbound logic around the downstream handler, as shown in the following code snippet:
func GetHandler(metadata Metadata) fasthttp.RequestHandler {
  return func(h fasthttp.RequestHandler) fasthttp.RequestHandler {
    return func(ctx *fasthttp.RequestCtx) {
      //inbound logic
      h(ctx)  //call the downstream handler
      //outbound logic
    }
  }
}
Your custom middleware, like other custom components, should be contributed to Dapr’s components-contrib repository, under the /middleware folder. Then you’ll need to submit another pull request against the main repository to register the new middleware type. You’ll also need to follow the registration process to register your middleware.
Note
The registration process described here is likely to be eliminated in future versions. At the time of writing only HTTP middleware is supported, but we plan to support gRPC middleware in future versions as well.
Distributed Tracing
Diagnosing problems in a distributed application is challenging. You need to collect traces from multiple services and establish correlations among the log entries to establish the complete call chain. It’s a daunting task, especially in a large-scale system with tens or even hundreds of services with millions of transactions every second.
Dapr makes your application topology more complex because it inserts sidecars around all participating services. On the other hand, because Dapr injects sidecars, it can provide help with diagnostics. Since all traffic flows through Dapr sidecars, Dapr can automatically establish correlations among requests and collect distributed traces into one consistent view. Dapr leverages OpenTelemetry to achieve this.
Another benefit of using Dapr distributed tracing is that your service code doesn’t need to be instrumented, or to include any tracing libraries. All method calls are automatically traced by Dapr. And because tracing configuration is completely separate, changing or reconfiguring the tracing system doesn’t affect your running applications. At the time of writing, Dapr doesn’t expose a tracing API to user services for additional tracing needs. However, exposing such an API in Dapr has been discussed.
Tracing Middleware
Dapr distributed tracing is a middleware that can be plugged into any Dapr sidecar. It works under both the HTTP and gRPC protocols. The middleware is built around two key concepts: the span and correlation ID.
Span
A span represents a single operation, such as an HTTP request or a gRPC call. A span may have a parent span and multiple child spans. A span without a parent is called a root span. A span is identified by a span ID. Dapr keeps track of two kinds of spans: server spans and client spans. When a service receives a request, Dapr creates a server span. When a service invokes another service, Dapr creates a client span. The span types help tracing systems to track different roles in a service invocation.
Dapr extracts the method name from the request path and uses it as the span name, and it uses the span status to record the call result. Dapr maps HTTP response codes to a few span statuses, as summarized in Table 1-3.
| HTTP response code | Span status |
|---|---|
| 200 | OK |
| 201 | OK |
| 400 | Invalid Argument |
| 403 | Permission Denied |
| 404 | Not Found |
| 500 | Internal |
| Other | Record as is |
Correlation ID
Dapr uses a correlation ID to track a call chain across multiple services. When a request comes in Dapr searches for an X-Correlation-ID header in the HTTP request headers or gRPC metadata. If the ID exists, Dapr chains new tracing spans to the existing correlation ID. If not, Dapr considers the request a new client-initiated request and starts a new call chain.
Exporters
At the time of writing, Dapr uses OpenCensus, which is getting merged into OpenTelemetry, for collecting distributed traces. OpenCensus supports the concept of exporters, which send traces and metrics to different tracing backends. Exporters are the extension points of OpenCensus, and they are what Dapr uses to connect to different backend systems such as Zipkin and Azure Monitor. At the time of writing, Dapr supports the OpenTelemetry native exporter, a Zipkin exporter, and a string exporter for testing purposes.
Tracing with Zipkin
Zipkin is a popular distributed tracing system. The following walkthrough shows you the steps for configuring Dapr distributed tracing with Zipkin.
Creating configuration files
You need to define two artifacts, a Zipkin exporter component and a Dapr configuration with tracing enabled:
Create a zipkin.yaml file. Each exporter component has an
enabledattribute that can be used to turn the exporter on or off. Other attributes are specific to the exporter. The Zipkin exporter requires a singleexporterAddressattribute, which points to the Zipkin API endpoint:apiVersion: dapr.io/v1alpha1 kind: Component metadata: name: zipkin spec: type: exporters.zipkin metadata: - name: enabled value: "true" - name: exporterAddress value: "http://zipkin.default.svc.cluster.local:9411/api/v2/spans"Create a Dapr configuration file named tracing.yaml. The configuration contains a
samplingRateswitch that controls how often the traces should be sampled (setting this to"0"disables tracing):apiVersion: dapr.io/v1alpha1 kind: Configuration metadata: name: tracing spec: tracing: samplingRate: "1"
Deploying a Zipkin instance
Use the following command to deploy a Zipkin instance locally using a Docker container:
docker run -d -p 9411:9411 openzipkin/zipkin
To deploy a Zipkin instance on your Kubernetes cluster, use these commands:
kubectl run zipkin --image openzipkin/zipkin --port 9411
kubectl expose deploy zipkin --type ClusterIP --port 9411
Enabling and viewing tracing on Kubernetes
Follow these steps to enable tracing on Kubernetes:
Apply the exporter component and the Dapr configuration:
kubectl apply -f tracing.yaml
kubectl apply -f zipkin.yaml
Modify your pod spec to include an annotation that uses a custom Dapr configuration:
annotations:
  dapr.io/config: "tracing"
Deploy or restart your pod, and operate your service as usual. Traces are automatically collected and sent to the Zipkin endpoint.
You can use the Zipkin UI to view tracing data. To access the UI, you can set up port forwarding through
kubectl, then use http://localhost:9411 to view the tracing data:kubectl port-forward svc/zipkin 9411:9411
Enabling and viewing tracing locally
To enable tracing locally, follow these steps:
Launch a local Zipkin instance as a Docker container:
docker run -d -p 9411:9411 openzipkin/zipkin
Modify the zipkin.yaml file to point to the local Zipkin endpoint:
apiVersion: dapr.io/v1alpha1
kind: Component
metadata:
  name: zipkin
spec:
  type: exporters.zipkin
  metadata:
  - name: enabled
    value: "true"
  - name: exporterAddress
    value: "http://localhost:9411/api/v2/spans"
Create a components folder under your application folder and move the zipkin.yaml file into that folder.
Launch your service with a Dapr sidecar using the following command:
dapr run --app-id mynode --app-port 3000 --config ./tracing.yaml
  <command to launch your service>
Use your service as usual. You can then view tracing data using the Zipkin UI at http://localhost:9411.
Tracing with Azure Monitor
At the time of writing, Dapr users a Local Forwarder that collects OpenCensus traces and telemetry data and forwards it to Application Insights. Dapr offers a prebuilt container, daprio/dapr-localforwarder, to facilitate the configuration process. Once you have the container running, you can follow steps similar to those used to configure Zipkin to configure the Local Forwarder as a ClusterIP service on your Kubernetes cluster. Once the Local Forwarder is configured, enter the Local Forwarder agent endpoint in your native exporter configuration file:
apiVersion: dapr.io/v1alpha1
kind: Component
metadata:
  name: native
spec:
  type: exporters.native
  metadata:
  - name: enabled
    value: "true"
  - name: agentEndpoint
    value: "<Local Forwarder address, for example: 50.140.60.170:6789>"
You can then use the rich Azure Monitor features to view and analyze your collected tracing data. Figure 1-6 shows an example of the Azure Monitor UI showing an application with multiple services calling each other.
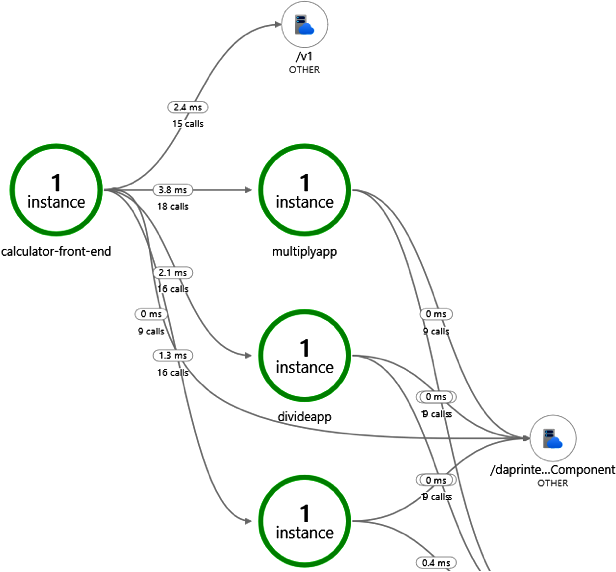
Figure 1-6. Viewing tracing data in Azure Monitor
You can deploy multiple exporters at the same time. Dapr forwards traces to all exporters.
Service Operation
As a distributed programming model and runtime, Dapr doesn’t concern itself with service operation. However, Dapr is designed to work with existing Kubernetes toolchains and new open source projects such as OAM for managing applications that are comprised of multiple services. This section is not meant to provide a comprehensive introduction, but to be an index of related resources.
Service Deployment and Upgrade
When running on Kubernetes, Dapr uses the sidecar injector that automatically injects Dapr sidecar containers into pods annotated with the dapr.io/enabled attribute. You then manage your pods as usual using common Kubernetes tools such as kubectl. For example, the following YAML file describes a deployment with a single container and a load-balanced service (this example is from the distributed calculator sample which you can find in Dapr’s sample repository):
kind: Service
apiVersion: v1
metadata:
  name: calculator-front-end
  labels:
    app: calculator-front-end
spec:
  selector:
    app: calculator-front-end
  ports:
  - protocol: TCP
    port: 80
    targetPort: 8080
  type: LoadBalancer

---
apiVersion: apps/v1
kind: Deployment
metadata:
  name: calculator-front-end
  labels:
    app: calculator-front-end
spec:
  replicas: 1
  selector:
    matchLabels:
      app: calculator-front-end
  template:
    metadata:
      labels:
        app: calculator-front-end
      annotations:
        dapr.io/enabled: "true"
        dapr.io/id: "calculator-front-end"
        dapr.io/port: "8080"
    spec:
      containers:
      - name: calculator-front-end
        image: dapriosamples/distributed-calculator-react-calculator
        ports:
        - containerPort: 8080
        imagePullPolicy: Always
You can use kubectl to deploy the deployment:
kubectl apply -f calculator-front-end.yaml
Once the deployment is created, you can use kubectl to scale it to multiple replicas:
kubectl scale deployment calculator-front-end --replicas=3
You can also use kubectl to update a deployment to a new image version—for example:
kubectl set image deployment.v1.apps/calculator-front-end calculator-front-end
  =dapriosamples/distributed-calculator-react-calculator:<version tag>
Note
For more information on managing Kubernetes deployments, consult the documentation.
OAM
Open Application Model is an open source project that aims to provide a platform-agnostic modeling language for cloud native applications. OAM describes the topology of an application that is comprised of multiple interconnected components. It is concerned with application topology, but not with how individual services are written. Dapr goes to a deeper level and provides a common programming model and the supporting runtime for cloud native applications. As you’ve seen earlier in this chapter, Dapr can handle service name resolution and invocation routing. At the same time, Dapr can be configured to be used with existing service mesh systems to provide fine-tuned traffic control among services. Figure 1-7 shows how OAM’s logical topology, Dapr routes, and service mesh policies overlay on top of each other.
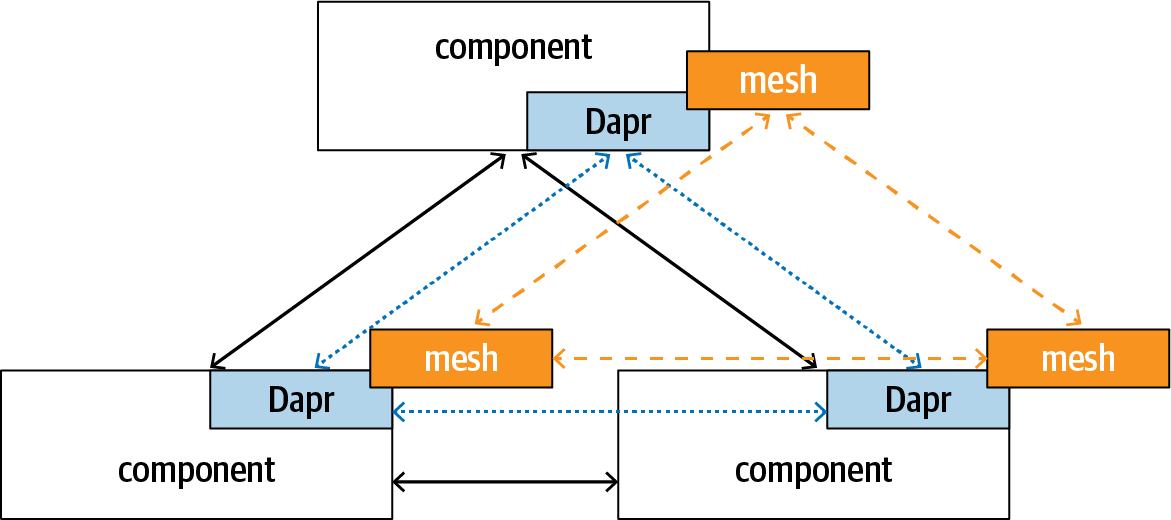
Figure 1-7. Relationship between OAM and Dapr
OAM allows you to attach traits to each component to control behavior such as scaling. For example, the following manual scaling trait scales a frontend component to five replicas:
apiVersion: core.oam.dev/v1alpha1
kind: ApplicationConfiguration
metadata:
  name: custom-single-app
  annotations:
    version: v1.0.0
    description: "Customized version of single-app"
spec:
  variables:
  components:
    - componentName: frontend
      instanceName: web-front-end
      parameterValues:
      traits:
        - name: ManualScaler
          properties:
            replicaCount: 5
You can group multiple components into a scope, and you can associate scopes, components, and traits through an application configuration. The core rationale behind this design is separation of concerns. The goal of OAM is to give developers a way to describe an application independently of any infrastructural concerns, to give the application operators a way to configure applications to satisfy business needs, and to give the infrastructural operators a way to describe how the desired topology and configuration are realized on a specific platform.
A common form of component is a container deployed as a Kubernetes pod. This means you can add Dapr annotations to your component and the Dapr sidecar injector can inject Dapr sidecars into your pods.
The combination of OAM and Dapr provides a complete solution for writing platform-agnostic applications—OAM provides the platform-agnostic modeling language, and Dapr provides abstract common APIs for state, service invocation, pub/sub, security, and bindings. At the time of writing, both OAM and Dapr are under active development. It’s expected that more integrations will be introduced in future versions.
Why do we believe writing platform-agnostic applications is important? Because we envision a future of ubiquitous computing, in which compute happens within the context of data. An application should be adaptive to where data is. This means applications need to work on different cloud platforms and on-premises systems, as well as in hybrid environments that span across cloud and edge.
Summary
This chapter provided a detailed introduction to how Dapr enables services to communicate with each other through direct invocations as well as messaging. You also saw how Dapr allows the construction of customized processing pipelines through middleware. You can chain multiple middleware together to form a custom pipeline that can intercept and transform either ingress traffic or egress traffic.
Dapr offers built-in support for distributed tracing over both the HTTP and gRPC protocols. Distributed tracing is a mandatory feature of a distributed framework to efficiently diagnose a distributed application. Dapr leverages OpenTelemetry to integrate with various tracing backends.
OAM and Dapr aim at providing a complete solution for writing platform-agnostic cloud native applications. OAM provides a platform-agnostic modeling language to describe application topology. Dapr provides HTTP/gRPC-based APIs that abstract common tasks such as service name resolution and invocation, pub/sub, state management, security management, and bindings to external services.
In the next chapter, we’ll introduce the Dapr state API.
Get Learning Dapr now with the O’Reilly learning platform.
O’Reilly members experience books, live events, courses curated by job role, and more from O’Reilly and nearly 200 top publishers.

