Introduction
Over the years, many distributed programming models and frameworks have been introduced, such as the Common Object Request Broker Architecture (CORBA), Microsoft Distributed Component Object Model (DCOM), COM+, Java Remote Method Invocation (RMI), Akka, Microsoft Service Fabric actors, and many others. This book introduces our contribution, the Distributed Application Runtime (Dapr), which has been well received by the community so far. Dapr is a new distributed runtime that is under active development. The best way to get up-to-date information is to visit Dapr’s official website. Instead of focusing on API details, this book aims to provide background information on how Dapr is designed and how we see it evolving in the future. We hope the book can help you understand the architecture and design philosophy of Dapr so that you can better apply Dapr in your own applications and make great contributions to the Dapr community.
What Is Dapr?
Dapr is a an event-driven, portable runtime for building microservices for the cloud and the edge. It uses a companion container or process to deliver the building blocks needed by distributed applications, including state management, service discovery, reliable messaging, observability, and more, which will be discussed in detail later. Dapr companion processes, or sidecars, expose a standard API surface through HTTP/gRPC protocols. This allows Dapr to support any programming language that supports HTTP or gRPC without requiring any SDKs for libraries to be included in application code. Dapr sidecars are interconnected to form an isolated, distributed runtime for a distributed application, as illustrated in Figure I-1.
When we presented the sidecar architecture to some prospective customers, the idea immediately clicked with several of them. Although our gut feeling told us we were on to something, we spent a fair amount of time discussing why Dapr was necessary, and how Dapr would change the cloud native programming model. The central question was this: Why do we need yet another programming model for distributed applications? Or in other words, what makes Dapr unique and useful? Let’s take a look at what it offers.
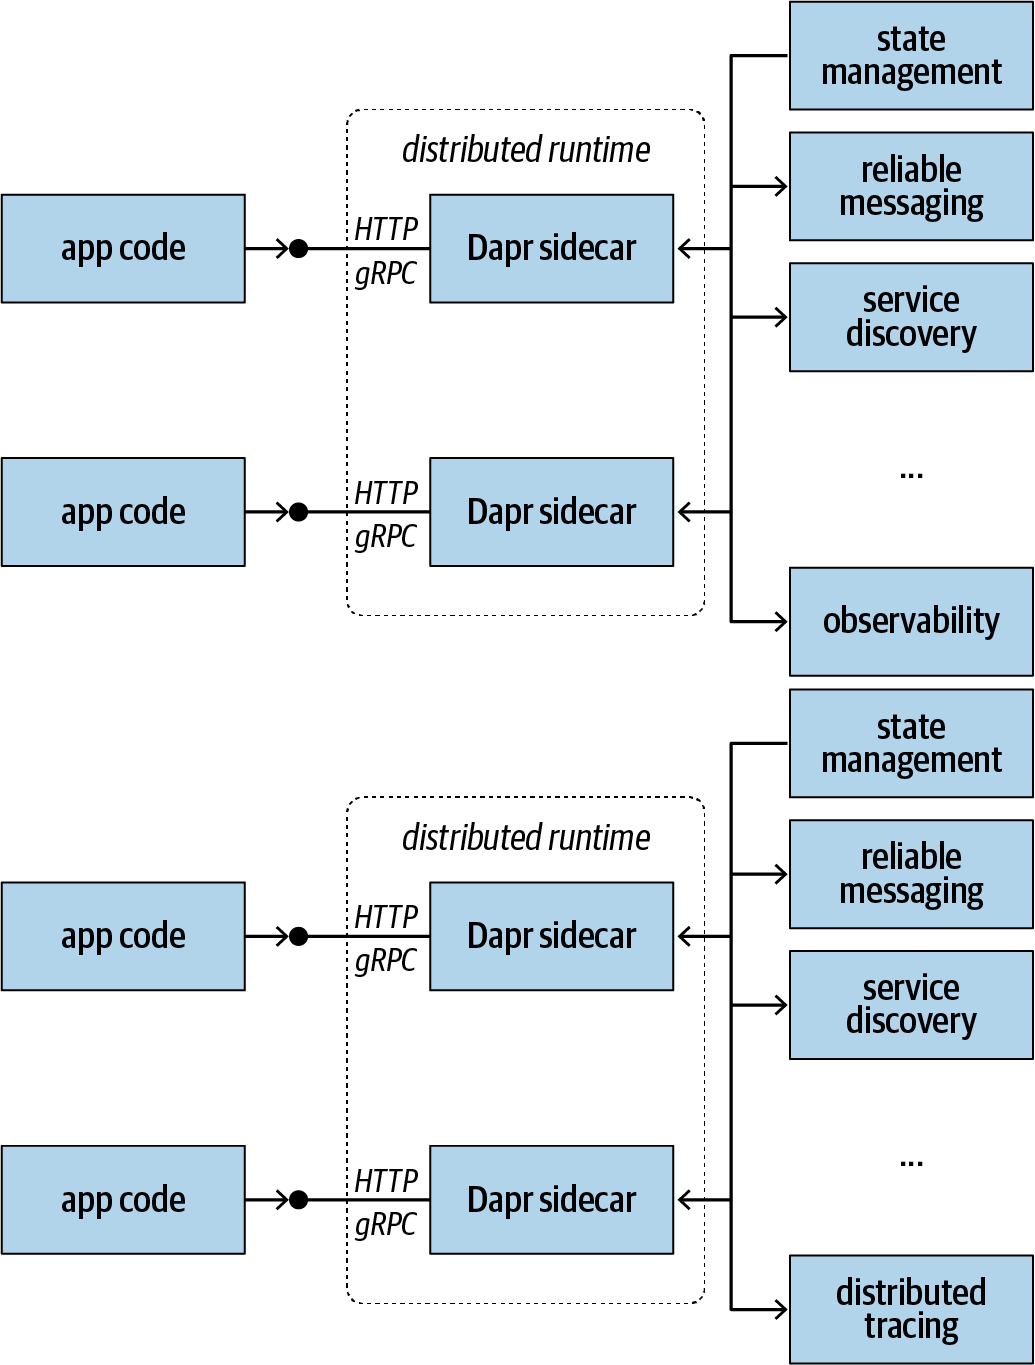
Figure I-1. Dapr sidecars work with application code by delivering distributed building blocks through standard HTTP/gRPC protocols
A Programming Model for a Heterogeneous Environment
A programming model is by definition a set of opinions describing how the designer of the model believes a certain type of programs should be written. The more opinionated a programming model is, the stronger guidance it provides to developers. However, it also imposes a stronger lock-in to a specific framework or implementation, which can be problematic. Modern microservice applications often comprise services written by different teams or external vendors, and there is unprecedented mobility in the modern computing workforce. Getting everyone to buy into a particular programming language or framework is often difficult.
We acknowledge that in the software world of today, we need to embrace variety and seek out ways for developers with different skillsets, working styles, and preferences to work together in harmony. We want developers to be able to express their business logic without fear of vendor lock-in. While seeking a solid common ground for all developer communities, we observed that a microservice, at a high level of abstraction, is a processing unit that exposes some access endpoints, which in turn often talk HTTP. Hence, HTTP seemed like a reasonable common denominator to choose among service developers. For example, to save state with Dapr, all the application code needs to do is send a POST request with a key/value collection as a JSON document to a state API provided by the Dapr sidecar. Sending a POST request to a REST API endpoint is such a common practice that we have never encountered any developer who finds it troublesome during our numerous interviews with developers at different skill levels.1
Standardizing on HTTP allows maximum interoperability across services written in different programming languages. Throughout this book, you’ll see how Dapr enables some unique interoperable scenarios, such as invoking an actor written in a different programming language than the caller.
More Helpful, Less Opinionated
Many existing distributed programming models try to constrain developers to very narrow paths to protect them from making common mistakes in distributed computing. But keeping developers ignorant of the ins and outs of distributed computing is a double-edged sword. On the one hand, it protects them from shooting themselves in the foot. On the other hand, it prevents them from dealing effectively with more complex scenarios. What we often see is that developers try to work around framework limitations, leading to strange and unnatural abuses and antipatterns. Some frameworks even try to create an error-free environment for developers, capturing errors and employing retry or recovery logic to keep the developers oblivious. This means the developers never learn about their mistakes; they keep making the same mistakes repeatedly with the underlying framework silently correcting them, which leads to unnecessary overhead and extra latency.
Dapr tries to be helpful but less opinionated. It delivers common capabilities to developers with default behaviors that are safe for even inexperienced developers to use. On the other hand, it doesn’t stop developers from growing their distributed programming skillsets and using advanced constructs as needed. For example, Dapr state management offers optimistic concurrency by default. This allows most transactions to complete without interfering with one another. When conflicts happen, Dapr doesn’t try to hide the errors from the developers; instead, developers are expected to handle such errors.2 Fortunately, handling responses from HTTP requests is also a fundamental skill for web service developers. In the case of a conflict, an explicit 409 Conflict code is returned. The developer can choose to simply forward the response back to client, which is a common practice in web applications (as we don’t usually want to do lengthy automatic retries on the server). Thus, exposing the error doesn’t necessarily increase the burden on the service developer. On the other hand, if the developer decides to do something with the error, they are welcome to do so. The result is a healthy relationship between the framework and the developer—the developer is left trouble-free most of the time, and they can choose how much they want to be involved in error handling.
Don’t Reinvent the Wheel!
Many frameworks try to provide “full-stack” solutions that address every aspect of distributed programming. Because they are fully packaged solutions, they rarely consider how to integrate with others—it’s either their way or the highway.
Dapr takes a different approach. Many of Dapr’s components are pluggable, including state stores and messaging. This design gives developers great flexibility in choosing what services to use with Dapr. Furthermore, because Dapr allows dynamic binding, developers or operators can choose to bind to different services that are most suitable for the current development context. For example, when an application is deployed on the edge in a disconnected model, it can be bound to a local Redis store running in a Docker container. When the same application is deployed in the cloud, its state store can be bound to a globally replicated data store such as Azure Cosmos DB.
Dapr applies the same principle for reliable messaging. Instead of trying to implement a brand-new messaging system, Dapr is designed to work with proven message buses. Dapr provides a common, HTTP-based facade in front of these message buses, and it pushes configuration management out of the way of developers. This design allows developers to implement reliable messaging with minimal effort, while giving the operations team great flexibility in terms of choosing, configuring, and operating messaging systems.
Dapr uses other open source systems as integral parts, and it works well with popular open source solutions. The Dapr runtime is built on top of proven web frameworks, namely Fast HTTP; Dapr injects itself as sidecar containers while running on Kubernetes; Dapr sidecars work well side by side with service mesh sidecars; Dapr uses OpenTelemetry as the default tracing solution; and the list goes on. Dapr is designed as a hub of building blocks. It was never meant to be a self-contained framework that ships everything from the ground up. This design allows Dapr to surface new capabilities to developers with great agility. It also allows the community to contribute new capabilities to the ecosystem to empower even more service developers.
This open design also makes the Dapr core runtime very lightweight. At the time of writing, it takes about 40 MB of disk space and uses about 4 MB of memory. It runs with 0.1 vCPU cores and adds submillisecond overhead to service invocations. The lightweight runtime reduces resource consumption and improves sidecar injection time. This makes Dapr suitable for dynamically scaled, high-density scenarios such as IoT and big data applications.
Unified Programming Model
There exist different programming models for different types of services: stateless services, stateful services, functions, actors, MapReduce jobs, and others. Dapr doesn’t impose hard separations among these service types. Instead, it views all services as processing units that take some inputs and generate some outputs.
Note
Dapr allows you to write all services in a consistent manner. You can reconfigure services to behave differently later.
Imagine writing a stateless web service, and then reconfiguring it to behave as a function with input/output bindings and hosting it on a serverless environment of your choice. Or, you can make it a stateful service by introducing a state store. And you can further make the service identity-aware, which allows it to act as an actor. Such flexibility has been unimaginable until Dapr.
Many enterprise applications comprise services with different types—say, a stateless web frontend, a stateful backend, and a bunch of workers that are modeled and activated as actors. Developers are often forced to learn all these programming models, or they are tempted to force all service types into the single programming model they are most comfortable with. Although we’ve seen some successful projects with “pure functions” or “pure actors,” most enterprise applications span multiple programming models, frameworks, and even hosting environments.
Dapr offers a unified programming model that delivers capabilities through a standardized HTTP/gRPC protocol. Developers no longer need to target a specific service type when they start to design their service. Instead, when they need certain capabilities, such as state management or bindings, they simply call the corresponding API on the application’s sidecar. Even different routes to the same service can assume different roles and present different characteristics. For example, a service can be activated as an instance of an actor, or it can be invoked as a stateful service that provides aggregations across all actor instances.
Another example of the usefulness of the unified programming model is to enable a web service to be triggered by events from popular cloud services through bindings. Figure I-2 demonstrates a photo handler from a web service that is triggered not only by browser clients but also by blob events from both Azure Storage and Amazon S3—without any code changes. The service developer never needs to learn specific service APIs to talk to these services—all the details are abstracted away by bindings.
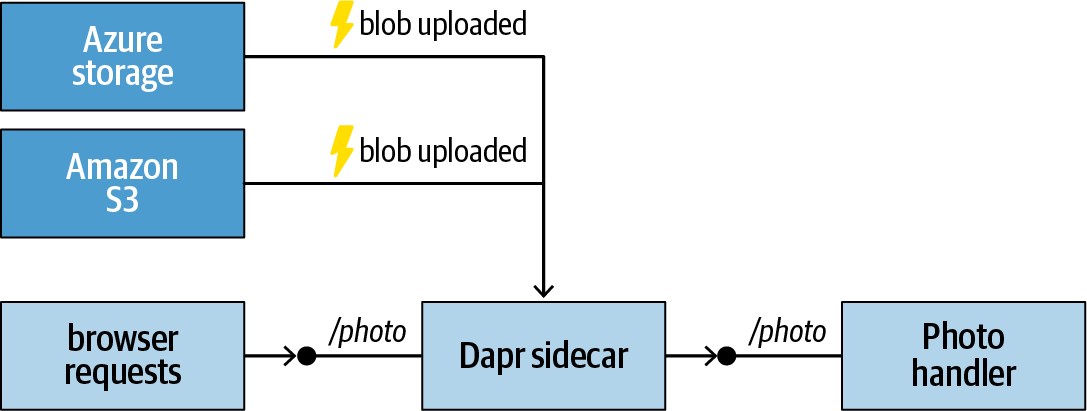
Figure I-2. Dapr bindings
In the remainder of this introduction, we’ll give you a brief tour of Dapr’s architecture and how it works. The core idea behind Dapr is indeed very simple, but we are pleased to see how a vibrant community is growing rapidly from that simple idea. We hope the idea resonates with you too.
Dapr Architecture
Dapr is made up of the Dapr CLI, a runtime, and a number of control plane services. It also ships with an extensible building block library containing common building blocks such as state stores, messaging backbones, bindings, and observability.3 We’ll cover all these parts in great detail throughout this book, so the following is just a quick introduction to some of them to give you a general idea:
- Dapr CLI
- The Dapr CLI is a cross-platform command-line tool that you can use to configure, manage, and monitor your Dapr instances. It also provides access to useful tools such as the Dapr dashboard.
- Dapr host
The Dapr host hosts an instance of the Dapr runtime. The most common form is a Docker container, which is injected into a pod to run side by side with user code on Kubernetes.4 Dapr can also run in standalone mode as a service process or a daemon.
The Dapr host implements communication protocols such as HTTP and gRPC.
- Dapr API
- The Dapr API defines the programmable interface to the Dapr runtime.5
- Dapr runtime
- The Dapr runtime implements the Dapr API. It’s the core of Dapr’s functionality.
- Dapr operator
- The Dapr operator is a Kubernetes-specific component that supports Dapr’s Kubernetes mode. It manages configurations and bindings, which are implemented as Kubernetes custom resources.
- Dapr sidecar injector
- This component handles Dapr sidecar container injection when Dapr runs in Kubernetes mode.
- Dapr placement service
- The placement service manages routes to Dapr instances or service partitions. It maintains a route table that directs requests to a specific actor ID or partition ID to the same Dapr runtime instance. See Chapter 5 for details on this service.
- Dapr Sentry
- Dapr Sentry is a built-in certificate authority (CA) for certificate issuing and management.
- Building block: State stores
- Dapr saves actor and stateful service state into configurable state stores. Redis is the default local state store, but others, including on-cluster stores, can be plugged into Dapr. There is also a growing list of supported state stores contributed by the community, including Azure Cosmos DB, Cassandra, etcd, Firestore, Memcached, MongoDB, ZooKeeper, and many more. See Chapter 2 for details on how to define and configure custom state stores.
- Building block: Pub/sub
- By default, Dapr offers at-least-once message delivery and configures Redis Streams as the messaging backbone for reliable messaging. See Chapter 3 for details on messaging and how you can customize messaging behaviors.
- Building block: Bindings
- Dapr uses bindings to connect application code to different input and output channels. It defines a very simple binding interface, and it invokes this interface in a single-threaded manner. This design makes writing a new binding a relatively easy task that can often be completed in just a few hours.
- Building block: Observability
- Dapr is integrated with OpenTelemetry, a set of open source libraries for collecting application metrics and distributed traces. See Chapter 1 for details on how to configure distributed tracing and how to collect application metrics.
You’re almost ready to get your hands on Dapr. The getting started samples in the following section use the raw HTTP/gRPC interfaces, but we do also offer a few language-specific experiences, as explained next.
Language Support
Dapr is language agnostic. It offers distributed application building blocks through HTTP or gRPC. However, we do acknowledge the desire many developers have to use language-specific, strongly typed software development kits (SDKs). Out of the box, Dapr ships a few SDKs with actor support in popular languages, including C#, Python, and Java. We expect the community to contribute more SDKs in additional programming languages in the future.
Tip
Even if you choose a language-specific actor framework based on Dapr, your actors will remain interoperable with actors implemented using other Dapr actor frameworks or the pure Dapr runtime.
The Dapr runtime implementation and bindings are developed using Go, the language of choice among the open source community. In theory, additional Dapr API implementations in other programming languages may appear too—we’ll leave that decision to the community.
Okay, enough theory already. Now let’s put Dapr into action!
Getting Started with Dapr
You have several different options for getting started with Dapr: standalone mode, Kubernetes mode, or one of the language-specific SDKs. The standalone mode is the easiest way to get started on a local machine. The Kubernetes mode is how Dapr will be used in a production environment. Finally, the SDKs get you up to speed quickly with Dapr (especially Dapr actors) in a familiar language. This section walks you through all three paths.
Hello, World! with Dapr Standalone Mode
Observing the prevailing tradition, we’ll start our journey with a Hello, World application that listens to a greeting event and responds with a “Hello, World!” message.
Getting Dapr on your machine
The Dapr CLI provides an init command that can bootstrap the Dapr runtime to your local machine or a Kubernetes cluster. To install Dapr in standalone mode, follow these steps:
Make sure Docker is running on the machine. The Dapr CLI uses Docker to run the Redis state store and Dapr placement service.
Download the release binary from GitHub:
Windows: dapr_windows_amd64.zip
Linux: dapr_liux_amd64.zip
macOS: dapr_darwin_amd64.zip
Linux ARM devices: dapr_linux_arm.zip
Extract the Dapr CLI binary to a folder of your choice.
Optionally, to make the CLI easily accessible, move the binary to the /user/local/bin folder on macOS and Linux, or add the folder from step 3 to your
PATHenvironment variable on Windows.Initialize Dapr by running:
dapr init
The init command launches two containers: a Redis container that is used for reliable messaging as well as the default state store, and a Dapr placement service container that manages placement of actors and partitioned services. If you get an error message saying “failed to launch the container,” you probably have an existing container that is holding the required ports (6379 for Redis, 50005 for the placement service on macOS/Linux, and 6050 for the placement service on Windows). In such cases, you need to shut down the containers that are holding those ports and try the init command again. If everything goes fine, you should see something like:
Making the jump to hyperspace...
Downloading binaries and setting up components...
Success! Dapr is up and running
Once you’ve initialized Dapr, you can check the current CLI version and Dapr runtime version by using:
dapr --version
At the time of writing, that command returns:
cli version: 0.1.0
runtime version: 0.1.0
Now we can get to our application!
Creating the Hello, World application
It’s time to create a Hello, World application. Because Dapr is language agnostic, we’ll write sample code in various programming languages throughout this book. You can find code samples in different languages in the Dapr sample repository.
For this example, we’ll use Go. Create a new main.go file with your favorite code editor (such as Visual Studio Code) with the following contents:
package main

import (
    "encoding/json"
    "fmt"
    "log"
    "net/http"
)

type incomingEvent struct {
    Data interface{} `json:"data"`
}

func main() {
    http.HandleFunc("/greeting",
          func(w http.ResponseWriter, r *http.Request) {
        var event incomingEvent
        decoder := json.NewDecoder(r.Body)
        decoder.Decode(&event)
        fmt.Println(event.Data)
        fmt.Fprintf(w, "Hello, World!")
    })
    log.Fatal(http.ListenAndServe(":8088", nil))
}
This code launches a web server at port 8088, and when it gets a request to the /greeting route, it prints out the request body (which it assumes contains a data field) and returns the string “Hello, World!”
Launching your application through a Dapr sidecar process
In a command line or terminal window, launch a new Dapr runtime instance as the sidecar process to your application. Note that the dapr run command allows you to postfix the command line to launch your application—in this case, go run main.go:
dapr run --app-id hello-dapr --app-port 8088 --port 8089 go run main.go
That command should generate output like the following:
Starting Dapr with id hello-dapr. HTTP Port: 8089. gRPC Port: 52016
== DAPR == time="2019-11-11T21:22:15-08:00" level=info msg="starting Dapr Runtime
-- version 0.1.0 -- commit 4358565-dirty"
== DAPR == time="2019-11-11T21:22:15-08:00" level=info msg=
  "log level set to: info"
== DAPR == time="2019-11-11T21:22:15-08:00" level=info msg="standalone mode
configured"
== DAPR == time="2019-11-11T21:22:15-08:00" level=info msg="dapr id: hello-dapr"
== DAPR == time="2019-11-11T21:22:15-08:00" level=info msg="loaded component
messagebus (pubsub.redis)"
== DAPR == time="2019-11-11T21:22:15-08:00" level=info msg=
  "loaded component statestore (state.redis)"
== DAPR == time="2019-11-11T21:22:15-08:00" level=info msg="application protocol:
http. waiting on port 8088"
You’re up and running! Both Dapr and your app logs will appear here
...
The output shows that the Dapr runtime is launched in standalone mode, it’s connected to an application at port 8088, it’s using Redis as the state store and messaging backbone, and it’s listening for both HTTP traffic (at the specified port, 8089) and gRPC requests (at a random port, 52016). Dapr displays its runtime logs and your application logs in the same terminal window. This allows you to easily trace interactions between the Dapr sidecar and your application.
Before we continue, let’s take a look at the command-line switches we used in the preceding command:
app-id- Each Dapr sidecar process is identified by a string ID. Dapr runtime instances use these IDs to address each other.
app-port- The application port.
port- The HTTP port the Dapr sidecar process listens to.
Table I-1 summarizes the dapr run command-line switches available at the time of writing. More detailed information on each of these is provided in Chapter 1, and you can always use the command dapr run --help to get the latest information on the supported switches.
| Switch | Usage | Default |
|---|---|---|
app-id |
The Dapr sidecar ID | N/A |
app-port |
The application port | N/A |
config |
The Dapr configuration file | N/A |
enable-profiling |
Enables pprof profiling via HTTP endpoint | false |
grpc-port |
The Dapr gRPC port | -1 (random) |
log-level |
Sets the level of log verbosity: debug, info, warning, error, fatal, or panic |
info |
max-concurrency |
Controls the number of allowed concurrent calls | -1 (unlimited) |
port |
The Dapr HTTP port | -1 (random) |
profile-port |
The port for the profile server to listen on | -1 (random) |
protocol |
Tells Dapr to use HTTP or gRPC to communicate with the app | http |
Putting Dapr into action
It’s time to have some fun with Dapr! The Dapr sidecar provides a /<version>/invoke/<action-id>/method/<methodname> route that clients can use to directly invoke a method on your application. For example, a request to the /v1.0/invoke/hello-dapr/method/greeting route will be passed to the /greeting handler you have in your Go application.
To test this, launch a browser and navigate to this address:
http://localhost:8089/v1.0/invoke/hello-dapr/method/greeting
You should get back a “Hello, World!” message. Congratulations, you just invoked a web method on your application through Dapr!
Well, maybe that’s not very exciting by itself. Later in this book, you’ll see how the Dapr sidecar can bring you features like distributed tracing and HTTPS termination without you writing any additional code.
Next, let’s make the application stateful. As mentioned earlier, transitioning from stateless to stateful is not always easy with other frameworks, but with Dapr the process is quite natural.
Note
Dapr supports these verbs through direct invocation: GET, POST, DELETE, and PUT.
Adding state
State management is one of the capabilities Dapr sidecars bring to your application. We’ll discuss this topic in more detail in Chapter 2, but for now let’s go through a quick sample to show you how to turn our Hello, World application into a stateful application. We’ll save a simple keyed value into a state store as the application state.
Define the Redis state store
First we need to tell the Dapr sidecar that a state store is available. In standalone mode, you achieve this by adding a state store description file to a components folder under the folder where your application is running.
When you run the dapr init command, the Dapr CLI automatically creates the components folder with a default Redis state store configuration and a Redis messaging backbone configuration. For example, the following is the default redis.yaml configuration file the Dapr CLI generates:
apiVersion: dapr.io/v1alpha1
kind: Component
metadata:
  name: statestore
spec:
  type: state.redis
  metadata:
  - name: redisHost
    value: localhost:6379
  - name: redisPassword
    value: ""
We’ll go over the file schema in Chapter 2. For now, note that the file defines the Redis host address as localhost:6379 without a password. You should update this file to match your Redis settings if you are using a different Redis server.
Update the application to handle state
Your application can request state from the Dapr sidecar through the /<version>/state/ route, and it can save state by posting a state object to the sidecar’s store name<key>/<version>/state/store name route. When you post state, Dapr allows you to post multiple key/value pairs as a JSON array:
[
    {
        "key": "key-1",
        "value": "some simple value"
    },
    {
        "key": "key-2",
        "value" : {
            "field-a" : "value-a",
            "field-b" : "value-b"
        }
    }
]
When you request state back, such as the "key-1" value in this example, you get the value by itself, encoded as a JSON object. In this case, you’d get back some simple value.
Update your application code as shown here:
1     package main
2
3     import (
4         "bytes"
5         "encoding/json"
6         "fmt"
7         "io/ioutil"
8         "log"
9         "net/http"
10       "strconv"
11   )
12
13   type stateData struct {
14       Key   string `json:"key"`
15       Value int    `json:"value"`
16   }
17
18   func main() {
19       http.HandleFunc("/greeting",
20           func(w http.ResponseWriter, r *http.Request) {
21           resp,:= http.Get("http://localhost:8089/v1.0/state/statestore/
               mystate")
22           defer resp.Body.Close()
23           body,:= ioutil.ReadAll(resp.Body)
24           strVal := string(body)
25           count := 0
26           if strVal != "" {
27               count, _ = strconv.Atoi(strVal)
28               count++
29           }
30
31           stateObj:=[]stateData{stateData{Key: "mystate", Value: count}}
32           stateData, _ := json.Marshal(stateObj)
33           resp, = http.Post("http://localhost:8089/v1.0/state/statestore",
34               "application/json", bytes.NewBuffer(stateData))
35           if count == 1 {
36               fmt.Fprintf(w, "I’ve greeted you " +
37                 strconv.Itoa(count)+" time.")
38           } else {
39               fmt.Fprintf(w, "I’ve greeted you " +
40                 strconv.Itoa(count)+" times.")
41           }
42       })
43       log.Fatal(http.ListenAndServe(":8088", nil))
44   }
Now whenever the /greeting handler is called, it requests the state value with a mystate key by sending a GET request to http://localhost:8089/v1.0/state/statestore/mystate (where 8089 is the port on which the Dapr sidecar is listening). Then it increments the value and posts it to http://localhost:8089/v1.0/state/statestore> to be preserved. Next, let’s test our application.
Testing the application
To test the application, you need to launch it with the Dapr sidecar:
dapr run --app-id hello-dapr --app-port 8088 --port 8089 go run main.go
Once the Dapr sidecar is launched, you should see a few new lines in the terminal window indicating the state store has been found and initialized:
== DAPR == time="2019-11-11T22:01:03-08:00" level=info msg="dapr id: hello-dapr"
== DAPR == time="2019-11-11T22:01:03-08:00" level=info msg="loaded component
statestore (state.redis)"
== DAPR == time="2019-11-11T22:01:03-08:00" level=info msg="loaded component
messagebus (pubsub.redis)"
== DAPR == time="2019-11-11T22:01:03-08:00" level=info msg="application protocol:
http. waiting on port 8088"
You’re up and running! Both Dapr and your app logs will appear here.

== DAPR == time="2019-11-11T22:01:15-08:00" level=info msg=
  "application discovered on port 8088"
== DAPR == 2019/11/11 22:01:15 redis: connecting to localhost:6379
== DAPR == 2019/11/11 22:01:15 redis: connected to localhost:6379
  (localAddr: [::1]:55231, remAddr: [::1]:6379)
Launch a browser and navigate to http://localhost:8089/v1.0/invoke/hello-dapr/method/greeting. As you refresh the page, you should see the greeting count increase.
Now, press Ctrl-C in the terminal to stop both the Dapr sidecar and your application. This simulates a complete crash of the app (as well as the Dapr sidecar). Then launch your app with the Dapr sidecar again, and you’ll discover that the application state was preserved. The reason for this should be apparent: the Dapr sidecar saves the state to the external Redis store.
If you want to check the state saved in Redis, you can use Docker’s exec command to connect to the Redis server and query the keys (you can get the Redis container’s name by using docker ps):
docker exec -it <name of your Redis container> redis-cli
Figure I-3 shows that on my machine, I have a hello-dapr-mystate hash key with a data field with the value 6 and a version field with the value 7 (we’ll explain how versioning works in Chapter 2).
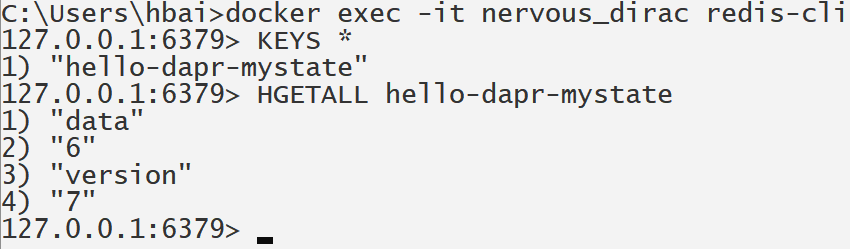
Figure I-3. Querying Redis records
Now that you have your application running on a local machine, let’s see how to get the same application to run on a Kubernetes cluster.
Hello, World! with Dapr Kubernetes Mode
To demonstrate using Dapr on Kubernetes, we’ll create a pair of services: a Python service that periodically sends out messages, and a Node.js service that listens to the messages.
To get stared, you’ll need a Kubernetes cluster with role-based access control (RBAC) enabled. You’ll also need kubectl configured against your cluster.
Note
This book assumes you are familiar with Kubernetes, so we’ll skip any Kubernetes introductions here.
Installing Dapr
If you’ve got the Dapr CLI installed, you can use the following command to bootstrap Dapr onto the Kubernetes cluster against which your kubectl is currently configured:
dapr init --kubernetes
Or you can deploy Dapr by using Helm:
helm repo add dapr https://daprio.azurecr.io/helm/v1/repo
helm repo update
helm install dapr/dapr --name dapr --namespace dapr-system
To quickly verify whether Dapr has been configured, use the following command to list the pods in your Kubernetes cluster (you’ll need to add the -n dapr-system switch to the following command if you used Helm, as the Helm chart deploys Dapr pods under the dapr-system namespace):
kubectl get pods
You should see four Dapr-related pods—dapr-operator, dapr-placement, dapr-sentry, and dapr-sidecar-injector—as shown in the following sample output:
NAME                                    READY   STATUS    RESTARTS   AGE
dapr-operator-76888fdcb9-x9ljc           1/1    Running   0          10s
dapr-placement-666b996945-dh55v          1/1    Running   0          9s
dapr-sentry-68997bc894-c49ww             1/1    Running   0          10s
dapr-sidecar-injector-744d97578f-dkcbq   1/1    Running   0          9s
With Dapr properly initialized on Kubernetes, we can now move on to implementing our message receiver and message sender, starting with the receiver.
Coding the message receiver
We’ll write the receiver using Node.js. Instead of initializing the project using npm, we’ll create all the application files from scratch. The application is a simple one—it listens to a /greeting route and prints out whatever it gets. To get started, follow these steps:
Create a new folder named node_receiver.
Create a new app.js file inside the new folder. As mentioned, the application is simple—it listens to POST requests to a
/greetingroute and prints out the request body. As you can see, there’s nothing related to Dapr in the following code. This is a simple Node.js server that has absolutely no knowledge of Dapr:const express = require(’express’); const bodyParser = require(’body-parser’); const app = express(); const port = 8088; app.use(bodyParser.json()); app.post(’/greeting’, (req, res) => { console.log(req.body); res.status(200).send(); }); app.listen(port, ()=> console.log(`Receiver is running on port ${port}`));Create a new project.json file under the same folder, as follows:
{
  "name": "node_receiver",
  "version": "1.0.0",
  "description": "",
  "main": "app.js",
  "author": "",
  "license": "ISC",
  "dependencies": {
    "body-parser": "^1.18.3",
    "express": "^4.16.4"
  }
}
Before we go further, let’s make sure the Node.js app works by itself:
Go to the node_receiver folder.
Install the required dependencies:
npm install
Launch the application:
node app.js
Use a tool like Postman to send a POST request to http://localhost:8088/greeting with the following JSON payload:
{
  "msg": "Hello, World!"
}
You should see the message logged on the application’s console.
Now it’s time to package up the application as a Docker container so that we can deploy it to Kubernetes:
Create a Dockerfile under the node_receiver folder:
FROM node:8-alpine
WORKDIR /usr/src/app
COPY . .
RUN npm install
EXPOSE 8088
CMD [ "node", "app.js" ]
Build the Docker image using
docker build(replace<username>with your Docker Hub account name):docker build -t
<username>/node_receiver .Do a trial run by launching the container and then sending a POST request to it:
docker run --rm -p 8088:8088
<username>/node_receiverOnce you’re done with the test, press Ctrl-C to stop and remove the container.
Push the image to Docker Hub (assuming you’ve logged in to Docker Hub using your Docker Hub account):
docker push
<username>/node_receiver
Now the receiver is ready. Next, we’ll move on to the sender.
Coding the message sender
We’ll write the sender using Python. It will send a message every five seconds:
Create a new folder named python_sender.
Create a new app.py file under the new folder, with the following contents:
import time
import requests
import os

n = 0
while True:
    n = (n + 1) % 1000000
    message = {"msg" :"Hello, World! " + str(n)}
    try:
        resp = requests.post("""http://localhost:3500/v1.0/invoke/
            nodereceiver/method/greeting""", json=message)
    except Exception as e:
        print(e)
    time.sleep(5)
Create a Dockerfile under the same folder, with these contents:
FROM python:3.7.1-alpine3.8
COPY . /app
WORKDIR /app
RUN pip install requests
ENTRYPOINT ["python"]
CMD ["app.py"]
Build and push the Docker container:
docker build -t
<username>/python_sender . docker push<username>/python_sender
This concludes the coding part. Next, we’ll create Kubernetes artifacts to deploy both the sender and the receiver.
Creating the Kubernetes artifact
Finally, we are ready to create Kubernetes deployment specifications that deploy both the sender and the receiver container. To do this, follow these steps:
Create a new app.yaml file with the following contents (be sure to replace
<username>with your Docker Hub account name). Note that to enable the Dapr sidecar, you annotate your container deployment withdapr.io/enabledanddapr.io/id. If you expect to receive incoming calls, you also need to add adapr.io/portannotation. The Dapr sidecar injector reacts to these annotations and injects Dapr sidecar containers into your application pods:apiVersion: apps/v1 kind: Deployment metadata: name: nodereceiver labels: app: node spec: replicas: 1 selector: matchLabels: app: node template: metadata: labels: app: node annotations: dapr.io/enabled: "true" dapr.io/id: "nodereceiver" dapr.io/port: "8088" spec: containers: - name: node image:<username>/node_receiver ports: - containerPort: 8088 imagePullPolicy: Always --- apiVersion: apps/v1 kind: Deployment metadata: name: pythonsender labels: app: python spec: replicas: 1 selector: matchLabels: app: python template: metadata: labels: app: python annotations: dapr.io/enabled: "true" dapr.io/id: "pythonsender" spec: containers: - name: pythonsender image:<username>/python_sender imagePullPolicy: AlwaysDeploy the file using
kubectl:kubectl apply -f ./app.yaml
Once the file is deployed, use
kubectlto query deployed pods. You should see anodereceiverpod and apythonsenderpod, as shown in the following sample output. As you can see, each pod contains two containers—one application container and one automatically injected Dapr sidecar container:$ kubectl get pods NAME READY STATUS RESTARTS AGE ... nodereceiver-7668f7899f-tvgk9 2/2 Running 0 8m pythonsender-5c7c54c446-nkvws 2/2 Running 0 8m
To see if the sender and the receiver are communicating with each other, use the following command (replace
<postfix>with the actual pod ID postfix in your environment):kubectl logs nodereceiver-
<postfix>nodeThis command generates output like the following:
Receiver is running on port 8088
{ msg: ’Hello, World! 2’ }
{ msg: ’Hello, World! 3’ }
{ msg: ’Hello, World! 4’ }
{ msg: ’Hello, World! 5’ }
{ msg: ’Hello, World! 6’ }
Now you know how to use Dapr sidecars through the HTTP protocol. In the next section, you’ll learn how to use the gRPC protocol instead. If you are not interested in using gRPC, you can skip the next section.
Using gRPC
gRPC is an open source remote procedure call (RPC) system developed by Google. It uses Protocol Buffers (Protobuf), an efficient data serialization mechanism also developed by Google, as both the interface description language (IDL) and the data serialization method. As in other RPC systems, a gRPC client communicates with a gRPC server through a gRPC stub, which can be autogenerated using gRPC tools.
Note
A detailed introduction to gRPC is outside the scope of the book. See https://grpc.io for more details.
gRPC uses HTTP/2 as the communication protocol. This version has several performance advantages over HTTP/1.1, including features such as proactive data push to avoid multiple requests for resources on a page, multiplexing multiple requests over a single TCP connection, HTTP header data compression, and request pipelines.
Since its introduction, gRPC has gained great popularity in the web services and microservices communities. Dapr is no exception: it uses gRPC for communications among Dapr sidecars and provides native gRPC support for communication with both clients and application code.
It’s time for some exercises. In the following walkthrough, you’ll use Dapr’s gRPC client to invoke a method on a server.
Invoking an Application from a gRPC Client
In this section, we’ll create a gRPC client that invokes the /greeting method in our Hello, World service. We’ll use the fourth programming language you’ll see in this introduction, C#.
Note
Dapr is language-neutral, and to prove the point we’d like to cover as many programming languages as possible in this book. Fortunately, modern programming languages are quite readable in general.
Prerequisites
To complete the following exercise, you’ll need:
.NET Core SDK 2.2 or above
Visual Studio 2013 or newer, or Visual Studio Code (we’ve tested the following steps with Visual Studio 2017 and Visual Studio 2019)
A Git client
Clone the Dapr repository
Since we want to autogenerate a gRPC client, we need to access Dapr’s Protobuf definition file (usually with the extension .proto). You can get the file by cloning the dapr/dapr GitHub repository:
git clone https://github.com/dapr/dapr.git
Note
As the Dapr repo is Go-based, following Go convention you should clone the repository to your local $GOPATH/src/github.com/dapr/dapr folder.
Create the client application
We’ll create a simple C# console application as the gRPC client using Visual Studio:
Create a new .NET Core console app named grpc-client.
Add a few NuGet packages to your project—you’ll need these tools to autogenerate the gRPC client:
Grpc.ToolsGrpc.ProtobufGrpc
Add a new folder named protos to the project.
Right-click on the protos folder and select Add®Existing Items. Pick the $GOPATH/src/github.com/dapr/dapr/pkg/proto/dapr/dapr.proto file (you can choose to add a link to the file instead of copying the file locally).
Right-click on the newly added file and select the Properties menu option. In the Properties window, change the Build Action to “Protobuf compiler” and gRPC Stub Classes to “Client only,” as shown in Figure I-4.
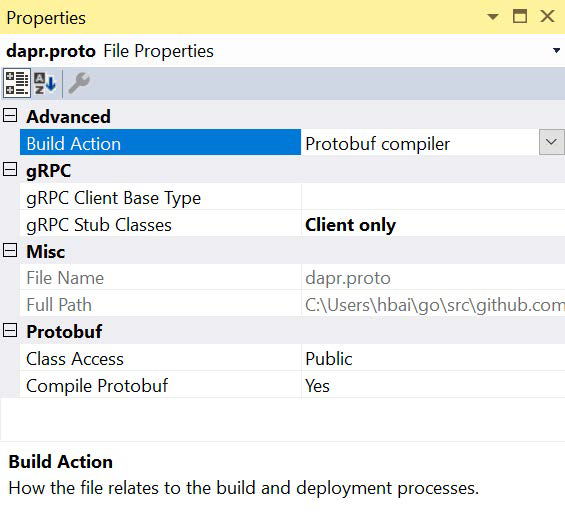
Figure I-4. dapr.proto properties
Replace all the code in the Program.cs file with the following code:
using Google.Protobuf.WellKnownTypes;
using Grpc.Core;
using System;

namespace grpc_client
{
    class Program
    {
        static void Main(string[] args)
        {
            Channel channel = new Channel("localhost:3500",
                  ChannelCredentials.Insecure);
            var client = new
                  Dapr.Client.Grpc.Dapr.DaprClient(channel);
            Value val = new Value();
            val.StringValue = "Hi, Dapr.";
            Metadata metadata = new Metadata();
            var result = client.InvokeService(new
                  Dapr.Client.Grpc.InvokeServiceEnvelope
            {
                 Method = "greeting",
                 Id = "hello-dapr",
                 Data = Any.Pack(val)
            }, metadata);
            Console.WriteLine(result.Data.Value.ToStringUtf8());
        }
    }
}
This code uses gRPC to send the string “Hi, Dapr.” to a greeting method through a Dapr sidecar at localhost:3500 with ID hello-dapr.
Test the client
For this test, we’ll reuse the Go Hello, World application we created earlier:
Launch the Go application with a Dapr sidecar. Note that you need to use the
grpc-portswitch to specify a gRPC port in this case:dapr run --app-id hello-dapr --app-port 8087 --port 8089 --grpc-port 3500 go run main.go
In Visual Studio, press Ctrl-F5 to launch the client. The program should stop after printing the “Hello, World!” string.
The Go application currently expects a JSON object with a
datafield. However, the client sends just a simple string. If you’d like the Go application to be able to display the payload correctly, you can update the/greetinghandler to directly print the body instead of trying to decode it:txt, _ := ioutil.ReadAll(r.Body) fmt.Println(string(txt))
This concludes the client-side work. We’ll move on to the server side next.
Writing a gRPC Server
Now we’ll rewrite the Hello, World service to expose a gRPC endpoint instead of an HTTP endpoint. And to keep to the trend of using a different programming language in every example, we’ll use Java this time.
Prerequisites
To complete the following exercise, you’ll need:
The Java Development Kit (JDK)
A Git client
Create the server application
The following walk-through uses the Maven command-line tool (mvn). There are plug-ins for IDEs such as Eclipse and IntelliJ, but we feel using the command-line tool offers the most clarity on exactly what’s happening. Here are the steps to create the server application:
Use
mvnto create a new project namedgrpc-server. Note that the command specifies the group ID asio.dapr, which matches with the Protobuf description file in the Dapr repository—if you want to use a different group ID, you’ll need to update your Protobuf description in step 4 to match the parameter value:mvn archetype:generate -DgroupId=io.dapr -DartifactId=grpc-server -DarchetypeArtifactId=maven-archetype-quickstart -DinteractiveMode=false
Switch to the grpc-server folder:
cd grpc-server
Make a new src/main/proto folder (for Linux/macOS you need to add the
-pswitch):mkdir src/main/proto
Copy $GOPATH/src/github.com/dapr/dapr/pkg/proto/dapr/dapr.proto into this folder. We’ll reuse this file in this walk-through because it contains the app service definition we need. You can start with your own Protobuf definition files if you prefer, but you’ll need to make sure your service definition is compatible with the app service definition in the dapr.proto file.
Update the pom.xml file to include the necessary dependencies:
<dependencies>
  ...
  <dependency>
    <groupId>io.grpc</groupId>
    <artifactId>grpc-netty</artifactId>
    <version>1.14.0</version>
  </dependency>
  <dependency>
    <groupId>io.grpc</groupId>
    <artifactId>grpc-protobuf</artifactId>
    <version>1.14.0</version>
  </dependency>
  <dependency>
    <groupId>io.grpc</groupId>
    <artifactId>grpc-stub</artifactId>
    <version>1.14.0</version>
  </dependency>
</dependencies>
Add the build script to the pom.xml file:
<build>
  <extensions>
    <extension>
      <groupId>kr.motd.maven</groupId>
      <artifactId>os-maven-plugin</artifactId>
      <version>1.5.0.Final</version>
    </extension>
  </extensions>
  <plugins>
    <plugin>
      <groupId>org.xolstice.maven.plugins</groupId>
      <artifactId>protobuf-maven-plugin</artifactId>
      <version>0.5.1</version>
      <configuration>
        <protocArtifact>
        com.google.protobuf:protoc:3.5.1-1:exe:${os.detected.classifier}
        </protocArtifact>
        <pluginId>grpc-java</pluginId>
        <pluginArtifact>
        io.grpc:protoc-gen-grpc-java:1.14.0:exe:${os.detected.classifier}
        </pluginArtifact>
      </configuration>
      <executions>
        <execution>
          <goals>
            <goal>compile</goal>
            <goal>compile-custom</goal>
          </goals>
        </execution>
      </executions>
    </plugin>
  </plugins>
</build>
Run the Maven build command (
mvn). This will generate the source files you need under the target\generated-sources\protobuf\grpc-java\io\dapr folder:mvn -DskipTests package
Add a new src/main/java/io/dapr/AppServiceImpl.java file with the following code. This is a typical gRPC server implementation that implements one of the methods defined by the app service (
invokeService, which is called when Dapr dispatches a direct invocation request to the app):package io.dapr; import com.google.protobuf.Any; import com.google.protobuf.StringValue; import io.dapr.DaprGrpc.DaprImplBase; import io.dapr.DaprProtos.*; public class AppServiceImpl extends DaprImplBase { @Override public void invokeService(InvokeServiceEnvelope request, io.grpc.stub.StreamObserver<InvokeServiceResponseEnvelope> responseObserver) { System.out.println(request); Any response = Any.pack(StringValue.newBuilder() .setValue("Hello, World!").build()); InvokeServiceResponseEnvelope envelope = InvokeServiceResponseEnvelope.newBuilder() .setData(response).build(); responseObserver.onNext(envelope); responseObserver.onCompleted(); } }Modify src/main/java/io/dapr/App.java:
package io.dapr;

import io.grpc.*;

public class App {
  public static void main( String[] args ) throws Exception {
    Server server = ServerBuilder.forPort(8090)
        .addService(new AppServiceImpl())
        .build();

    server.start();
    System.out.println("Server started.");
    server.awaitTermination();
  }
}
Run the Maven build command again to make sure everything compiles:
mvn -DskipTests package
Test the gRPC server
The gRPC server is now ready for a test run. In this walk-through, we’ll reuse the C# gRPC client we created earlier in this introduction:
Build and launch the gRPC server using Maven:
mvn -DskipTests package exec:java -Dexec.mainClass=io.dapr.App
Launch a Dapr sidecar. Note that the (application) protocol is set to
grpcin this case, and that a dummyecho acommand is used because we are attaching to an existing process:dapr --app-id hello-dapr --app-port 8090 --protocol grpc --grpc-port 3500 echo a
Run the C# gRPC client from Visual Studio. You should see the request logged by the gRPC server, and the “Hello, World!” message returned to the client.
Before we conclude this introduction, let’s briefly examine another Dapr feature—bindings, which are key to enabling the writing of platform-agnostic code.
Bindings
Bindings let you tie your applications to various event sources or destinations. This allows you to write platform-agnostic code that can be dynamically adapted for different environments and contexts. For example, you can use an input binding to bind to an Azure Blob storage container and have the binding triggered whenever a new blob is dropped into the container, or you can use an output binding to invoke an AWS Lambda expression when your service state exceeds a certain threshold. We’ll cover bindings in more detail in Chapter 3, but for now, let’s do a couple of quick experiments to see how binding works.
Binding in Standalone Mode
One of the key benefits of binding is separation of concerns. When you use bindings, you design your application to receive events from a named event source. However, you don’t provide any details about the event source. Then you (or someone who operates your application) can later choose to rebind your application to a completely different event source without affecting your code. As a matter of fact, you can even rebind your applications while they are running.
Dapr ships with a few prebuilt bindings. In standalone mode, each binding is described by a metadata file inside the components folder. In the following walkthrough, we’ll first act as a developer and write a simple HTML page with JavaScript that sends events to a destination named target. Then we’ll act as an application operator and configure the target to be an Azure Event Hub.
Developer: Write a simple HTML page
In this part, we’ll write an HTML page with a button. When the button is clicked, the app sends a message to a binding named target by making a POST request to the Dapr sidecar with the message addressed to target:
Create a new folder named html-app.
Create an index.html file under that folder, with the following contents. The code creates a button that, when clicked, sends a POST request to the Dapr sidecar at http://localhost:3500/v1.0/bindings/target using jQuery:
<!DOCTYPE html>
<html>
    <head>
        <script src="jquery.min.js"></script>
    </head>
    <body>
        <button onclick="postMessage()">Click me!</button>
    </body>
    <script>
        function postMessage() {
            $.ajax(
                {
                    type: "POST",
                    url: "http://localhost:3500/v1.0/bindings/target",
                    contentType:"application/json",
                    data: JSON.stringify({"data": "Hello, World!"})
                });
        }
    </script>
</html>
Such a POST is possible because the Dapr sidecar allows cross-region requests by default. You can change the behavior by changing the value of the allowed-origins switch (see Table I-1).
Operator: Define an Azure Event Hub binding
Now we’ll put on the operator’s hat and define what exactly target is. In this walkthrough, we’ll define target as an Azure Event Hub.
Note
We assume you are familiar with Azure in general, including how to use Azure Portal and especially Azure Cloud Shell.
Follow these steps to define the Azure Event Hub binding:
Log in to Azure Cloud Shell.
Create a new Azure Event Hub namespace:
az eventhubs namespace create --name
<namespace name>--resource-group<resource group name>-l<region, such as westus>Create a new Azure Event Hub event hub:
az eventhubs eventhub create --name
<event hub name>--resource-group<resource group name>--namespace-name<namespace name>Retrieve the Event Hub connection string. What you will need in step 6 is the
primaryConnectionStringfield in the output:az eventhubs namespace authorization-rule keys list --resource-group
<resource group name>--namespace-name<namespace name>--name RootManageSharedAccessKeyCreate a new components folder.
Add a new eventhub.yaml file under the folder. You’ll need to replace
<your connection string>with the connection string from step 4. Note that you need to append;<event hub name>to the end of the connection string to specify the exact event hub name:apiVersion: dapr.io/v1alpha1 kind: Component metadata: name: target spec: type: bindings.azure.eventhubs metadata: - name: connectionString value:<your connection string>
Sending events through Dapr
Now we are ready to send an event to target through Dapr. As you can see, the HTML code is oblivious to Azure Event Hub. It simply publishes an event to the Dapr sidecar, which resolves what target means and forwards the event to the designated target. To send the event:
Launch the HTML page in a browser.
Launch the Dapr sidecar:
dapr run --port 3500 echo a
Click the Click Me button on the HTML page.
Okay, nothing much happens. However, if you log in to your Azure Portal and observe incoming messages on your event hub, you’ll see messages being sent through Dapr, as shown in Figure I-5.
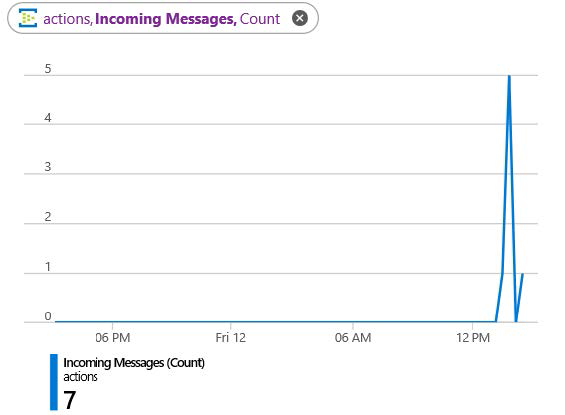
Figure I-5. Event Hub metrics in Azure Portal
Just like any other Dapr feature, bindings work well under Kubernetes. We’ll take a quick look at that next.
Binding in Kubernetes Mode
In case you haven’t noticed, the eventhub.yaml file is a Kubernetes custom resource definition (CRD) file. You can deploy this file directly to a Kubernetes cluster, and Dapr sidecars can pick it up and use it as a binding.
To deploy eventhub.yaml to a Kubernetes cluster, use the following command:
kubectl apply -f ./eventhub.yaml
The Dapr operator service on Kubernetes monitors binding CRDs for changes and notifies all Dapr sidecars in the cluster when a change is detected. This means you can dynamically update your binding definitions to rebind your applications to different sources while the applications are running.6 This is quite powerful in many scenarios. For example, when you have an edge application that bursts into the cloud, it can be dynamically bound to either edge-based services or cloud-based services to adapt to environment changes.
Summary
This introduction has provided a brief overview of Dapr, a language-neutral programming model that uses a sidecar to deliver microservices building blocks—including bindings, state management, reliable messaging, and actor capabilities—to application code without requiring the application code to include any Dapr-specific libraries or SDKs.
A key goal of Dapr is to abstract infrastructural details away from developers. Through Dapr building blocks, application code is completely isolated from the underlying infrastructure, allowing the application to be configured and reconfigured on different platforms at operation time without needing to change the application code. This is a powerful feature that enables scenarios such as edge and multicloud applications.
We hope you find Dapr interesting. Throughout the rest of the book, we’ll expand on all the Dapr components and cover various application scenarios with Dapr. We’ll also introduce how to extend Dapr in various ways. We hope you join the community to help make Dapr a simple, efficient, and powerful distributed programming model for everyone!
1 We introduced gRPC support later. The Dapr API is defined independent from delivery protocols. At the time of writing, we are also considering other wired protocols such as the Data Distribution Service (DDS), especially for IoT scenarios.
2 Dapr does provide configurable automatic retries to handle transient errors. However, it doesn’t stop an error bubbling up to app code when the retry policy expires.
3 Dapr is under active development, and the list of components is likely to grow. For example, at the time of writing, we are considering making execution policies and custom middleware pluggable components as well. For an up-to-date component list, please consult Dapr’s online documentation.
4 In this book, we assume you are familiar with general Kubernetes terms and concepts. For a detailed introduction to Kubernetes pods, please see the Kubernetes documentation.
5 Dapr’s API surface is growing over time as well.
6 At the time of this writing, the Dapr team is still deciding on the exact behavior of picking up new CRD changes—whether this needs a container restart. Please see the online documentation for latest updates.
Get Learning Dapr now with the O’Reilly learning platform.
O’Reilly members experience books, live events, courses curated by job role, and more from O’Reilly and nearly 200 top publishers.

