Chapter 4. Admin Basics and First-Time Provisioning
In Chapter 3, we considered 12 Data Cloud key value activities that contribute to data and AI democratization for the entire organization. We also learned how completing the foundational steps and building constituent components are critical to success and that change management is a necessary ingredient for a successful transition. Importantly, we realized the value of Data Cloud goes beyond traditional marketing use cases.
In addition, prior chapters informed us of how the pricing model for the Data Cloud platform changed to consumption based. We also discovered the importance of planning for an upcoming Data Cloud implementation as we evaluated options to deploy a Data Cloud platform within an existing core platform org or use a separate Data Cloud home org. We also reviewed topologies between Data Cloud and Salesforce CRM, Commerce Cloud, Marketing Cloud, and Marketing Cloud Personalization.
Planning for, architecting, and designing the roadmap for a Salesforce Data Cloud implementation are necessary activities for a successful implementation. Often, a Salesforce partner is enlisted to assist, especially for first-time Data Cloud implementations. Once the Data Cloud roadmap has been developed and validated, implementation can begin.
This chapter focuses on the first step of implementation: getting set up on the Salesforce Data Cloud platform. We’ll first learn about the different Data Cloud user personas because we’ll eventually need to configure user accounts for each of these different user types. Understanding the responsibilities of each of the personas will help us when we are ready to grant access to the platform.
Next, we’ll start our Data Cloud implementation by configuring the Admin user and provisioning the platform. We’ll also explore how to create profiles and configure additional Salesforce Data Cloud users. Importantly, we’ll learn about connecting our Data Cloud platform to relevant Salesforce Clouds, and we’ll follow the steps to establish the connection to our Salesforce core platform. We’ll gain an understanding of the important administrator responsibilities of managing Data Cloud feature access, and we’ll learn how to create custom permission sets and leverage sharing rules in our new Salesforce Data Cloud platform.
Getting Started
This section contains the required prework and some important things you should know before you get started in this chapter.
Prework
These requirements must be completed before you can get hands-on with Data Cloud:
- Set up your Salesforce core platform instance. As part of the setup, you’ll need a user account created for you with a Salesforce license and an Administrator profile associated with that user account. If you’re working with a Salesforce-provided developer org created for Data Cloud training purposes, this will already be done. Otherwise, if you’re working in a production environment, you’ll need to have an administrator create the user account for you.
- Your organization must have obtained the necessary SKUs for access to the Salesforce Data Cloud platform. As a reminder, there is one Data Cloud SKU, and there are several options for add-ons such as for Marketing Cloud licenses, Loyalty Management Cloud licenses, and Tableau licenses.
- If your Salesforce org does not have the Data Cloud Admin permission set, you’ll need to first add Data Cloud to your Salesforce account by clicking Setup → Your Account → Browse & Buy. Scroll through until you find the product labeled Data Cloud Provisioning. Add it to your cart and then check out. If you are not able to successfully provision your Data Cloud org, you’ll need to email myaccount@Salesforce.com to express your interest in Data Cloud. Make sure you include your org ID in the communication.
What You Should Know
This chapter will explore some of the permission sets associated with Salesforce Data Cloud, and instructions for the examples will be detailed enough that you can complete the process; however, you’d benefit greatly from having at least a basic understanding of how object access works in the Salesforce core platform. Salesforce Data Cloud platform access works similarly in many respects, so it is recommended that you complete some learning modules on Salesforce Trailhead to fill any gaps in your knowledge of org-wide defaults (OWDs) and object-level access, profiles, and permission sets.
Data Cloud User Administration Is Managed in the Core Platform
User administration for Salesforce Data Cloud is managed within the Salesforce core platform. Thus, it is important that you have administrator privileges in the core platform so you can set up and/or perform certain administrative duties for Salesforce Data Cloud.
As you’ll learn later in the chapter, sharing rules for Salesforce Data Cloud operate differently from the sharing rules within the Salesforce core platform. Therefore, it’s not an absolute necessity that you have an understanding of how sharing rules work on the core platform. Having a thorough understanding of Salesforce object access through the use of profiles and permission sets is, however, strongly recommended for working as an administrator in Salesforce Data Cloud. It is also helpful if you have experience setting up new Salesforce users.
Data Cloud User Personas
Whether a user is performing hands-on work within Salesforce Data Cloud or just viewing Data Cloud data in the Salesforce platform, they’ll need an appropriate permission set associated with their Salesforce user account. Depending on their responsibilities, they’ll be assigned one or more permission sets.
The standard Data Cloud permission sets are persona based. A persona represents a group of users clustered on shared behavior and goals. Personas are similar to categories of people. Within Salesforce, personas are based on the general tasks users perform in their roles, rather than just focusing only on what they do in the Salesforce platform. The reason personas are created this way is because the Salesforce platform is highly flexible and customizable to support people at different organizations who may carry out the same task using different Salesforce features or products, or perhaps even other systems.
The two main user personas for all Data Cloud instances are Data Cloud Admin and Data Cloud User. Every Data Cloud org comes with standard permission sets to support these two main user personas. It’s also possible to create custom permission sets. That’s an advanced topic we’ll discuss later in the chapter.
Salesforce Data Cloud Integration User
The Salesforce Data Cloud Integration User will be used automatically by the system once you establish that connection to Salesforce core later in the chapter. The Integration User is not a license that can be assigned to a person user who logs in to Data Cloud.
Many, but not all, Data Cloud orgs will have segmentation and activation add-on licenses. For those orgs, there will exist four additional permission sets to support the additional personas. Those four personas are Marketing Admin, Marketing Manager, Marketing Specialist, and Marketing Data Aware Specialist.
So, in total, there are six standard Data Cloud permission sets when segmentation and activation licenses have been purchased (Figure 4-1). Custom permission sets can also be created, and once you set up the connector to your Salesforce core instance, the Salesforce Data Cloud Integration User will be used automatically.
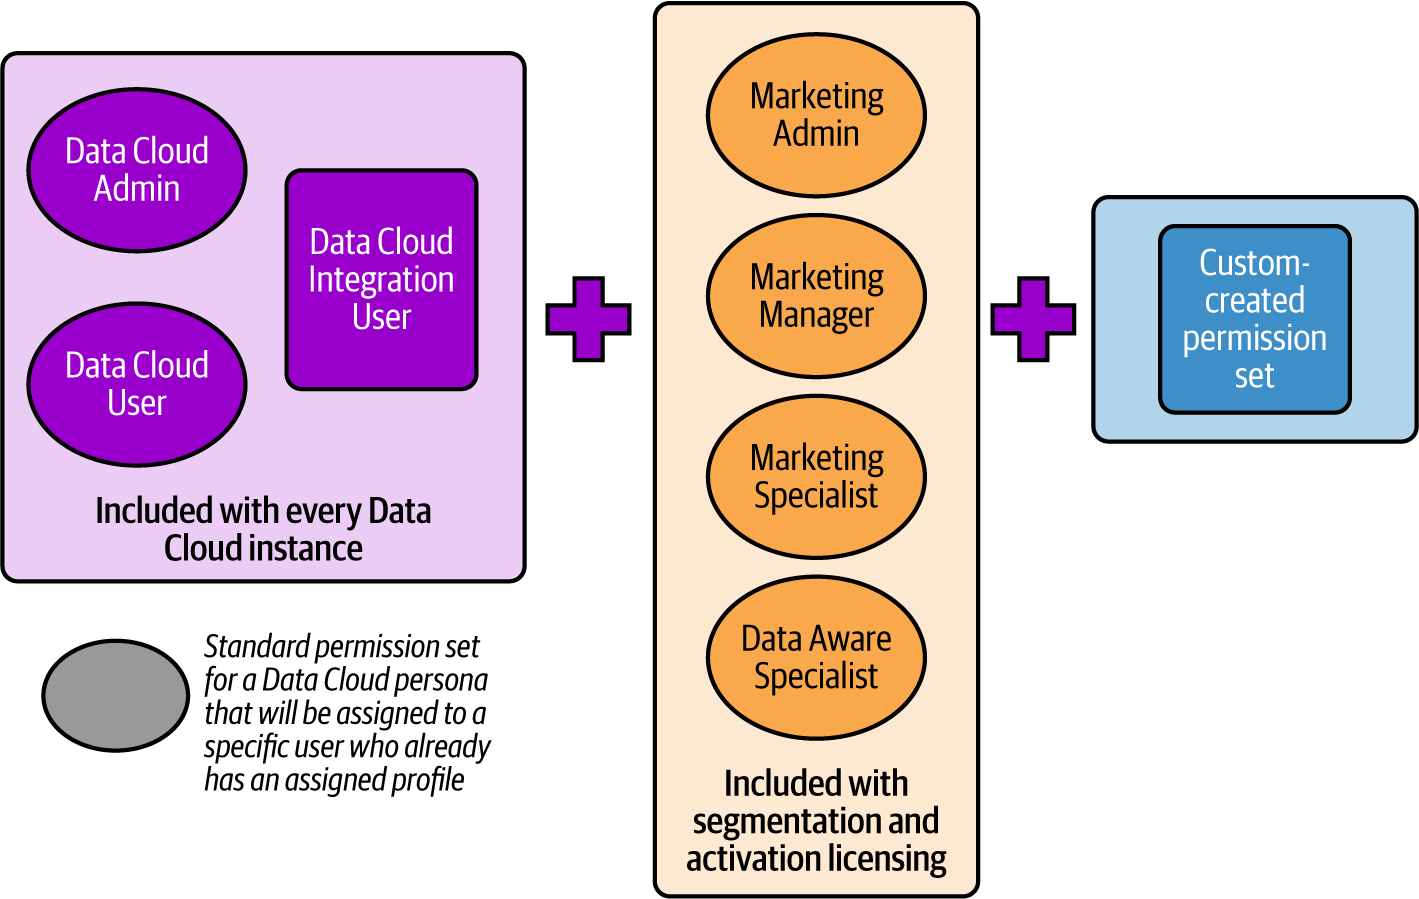
Figure 4-1. Persona-based permission sets included with Data Cloud
Let’s take a look at the responsibilities of each of the six different standard Data Cloud personas.
Data Cloud Admin and Data Cloud User
Data Cloud Admins can access all functionality within Data Cloud and are responsible for executing the day-to-day configuration, support, maintenance, and improvement of the Salesforce Data Cloud system. As such, they are also responsible for the first-time setup of the Data Cloud application. In addition, the Data Cloud Admin is responsible for user provisioning and assigning permission sets beyond the initial setup.
Tasks associated with the first-time Data Cloud platform setup and access management are specific to the administrator persona, so the upcoming chapter sections will be most relevant for the administrator persona.
Assign Admin Privileges to a Small Number of Users
Noticee that the Salesforce Data Cloud Admin is given extensive permissions. The Read, Create, Edit, Delete, View All, and Modify All object permissions are granted to almost all of the Salesforce Data Cloud objects. It’s therefore recommended that you assign this permission set only to a few users. Data Cloud Admin access given to a user can be revoked at any time, but if you remove the Data Cloud Admin privilege from any user, they will no longer be able to access Data Cloud unless you assign them another Data Cloud permission set.
You can view the complete object settings for this permission set by accessing Permission Sets from the Setup option of the gear icon and clicking on the Data Cloud Admin permission set. Be sure to click on Object Settings within the Apps section.
The Data Cloud User permission set can be assigned to any user who doesn’t fit within one of the other Data Cloud personas. The User permission set gives users the ability to Read, Create, Edit, Delete, View All, and Modify All for the data lake source key qualifiers object. For all other objects, the ability to Read and View is granted.
Data Cloud Marketing Admins
Data Cloud Marketing Admins have the same privileges and permissions as Data Cloud Admins. These admins are granted full access to all navigation components in Data Cloud, which means they can manage day-to-day configuration needs like support, maintenance, and enhancements tasks. The Marketing Admin permission set is one of four standard permission sets that come with the Data Cloud for Marketing license.
Data Cloud Marketing Managers
Data Cloud Marketing Managers are responsible for the overall segmentation strategy and identifying target campaigns. This permission set grants full access to segments, activations, and activation targets. However, no access is granted to Data Explorer and Profile Explorer. View-only access is available for all other navigation components.
Data Cloud Marketing Specialists
Data Cloud Marketing Specialists are responsible for creating, managing, and publishing segments of the messaging campaigns identified by the Marketing Manager. This permission set grants full access to segments, but no access is allowed to Data Explorer and Profile Explorer. View-only access is available for all other navigation components.
Data Cloud Marketing Data Aware Specialists
The Data Cloud Marketing Data Aware Specialist persona is specific to Salesforce Data Cloud. Data Aware Specialists are responsible for creating and managing data streams, mapping data, and building the CIs that can be used in segmentation within Data Cloud for Marketing. The Data Aware Specialist manages the logical, marketer-friendly data model defined by the Marketing Manager and Marketing Specialist.
The Data Aware Specialist also works with other team members; for example, the Data Aware Specialist works with the website developer when there is a requirement for activities like setting up the Salesforce Interactions SDK in Data Cloud.
To summarize, there are two permission sets that always exist: Data Cloud Admin and Data Cloud User. There are four more permission sets that exist when you have the Data Cloud for Marketing license (Table 4-1). All of these are standard permission sets that come ready to go OOTB. You just need to assign them to users.
| Permission Set | Description | License |
|---|---|---|
| Data Cloud Admin | Allows access to all Data Cloud features and administration | Data Cloud |
| Data Cloud User | Allows access to view Data Cloud features | Data Cloud |
| Data Cloud Marketing Admin | Allows access to all Data Cloud features and administration | Data Cloud for Marketing |
| Data Cloud Marketing Manager | Allows access to Data Cloud, management of the overall segmentation process, and creation of reports and dashboards | Data Cloud for Marketing |
| Data Cloud Marketing Data Aware Specialist | Allows access to Data Cloud, creation and management of data sources, registration of activation channels, and creation of reports and dashboards | Data Cloud for Marketing |
| Data Cloud Marketing Specialist | Allows access to Data Cloud and creation, management, and publishing of segments | Data Cloud for Marketing |
You can view the complete object settings for each of the permission sets by accessing Permission Sets from the Setup option of the gear icon and clicking on the specific permission set you want to view. Be sure to click on Object Settings within the Apps section.
Data Cloud for Marketing is an add-on license for the Data Cloud platform that gives users the ability to create segments and send them to activation targets. The Ad Audiences portion of the Data Cloud for Marketing license is what gives users the ability to activate segments to advertising platforms like Google Ads and Meta Ads.
As we later explore the Data Cloud menu options, you’ll learn what is possible within the Data Cloud platform and start to see how the standard persona-based permission sets allow you to accomplish specific tasks within the platform. Then, we’ll discuss in more detail permission sets and sharing rules. We’ll also discuss options for creating new custom permission sets when the standard persona-based permission sets don’t meet your organization’s needs.
First-Time Data Cloud Platform Setup
Before introducing the Data Cloud platform capabilities and menu options, let’s go through what’s needed to set up the platform for the first time so that you can access those menu options. Only a user with Salesforce Administrator privileges can perform the first-time Data Cloud platform setup. As a Salesforce Administrator, you’ll be able to set yourself up as a Data Cloud Admin. Afterward, you’ll be able to add other users to Data Cloud and then connect the platform to Salesforce Marketing Cloud and Salesforce CRM. As discussed in Chapter 2, you’ll likely be working with a subset of people for user testing activities before allowing everyone access to Data Cloud.
A basic first-time Data Cloud platform setup involves configuring users and connecting Data Cloud to other Salesforce Clouds by following these steps:
- Configure the Data Cloud Admin user.
- Provision the Data Cloud org.
- Create profiles for new Salesforce users (optional).
- Add new Salesforce users (optional).
- Assign permission sets to all users needing Data Cloud access.
- Connect Data Cloud to other Salesforce Clouds like Salesforce CRM and Marketing Cloud.
Note that you’ll only need to create new Salesforce user accounts for anyone who does not already have access to Salesforce CRM core. You may also want to delay assigning permission sets to end users until the Data Cloud instance is built out and ready for testing or ready to go live.
Configuring the Admin User
A new Data Cloud platform can be provisioned for either an existing or a new Salesforce org. In either case, a new or existing Salesforce Administrator internal to your organization will need to assign themselves the Data Cloud Administrator permission set as a first step in setting up the platform. If you are the Salesforce Administrator designated to also be the Data Cloud Admin, you can assign yourself the Data Cloud Admin permission set by following these steps:
- Click on the gear icon at the top right of the screen and then click on Setup. Search for Users in the Quick Find window.
- Select your username from the list.
-
Click the Edit Assignments button under the Permission Set Assignments section on the user page (Figure 4-2).

Figure 4-2. Edit assignments to add a new permission set to a Salesforce user account
-
Select the Data Cloud Admin permission set, then click the Add arrow icon. You should now see the Data Cloud Admin permission set in the Enabled Permission Sets box (Figure 4-3).
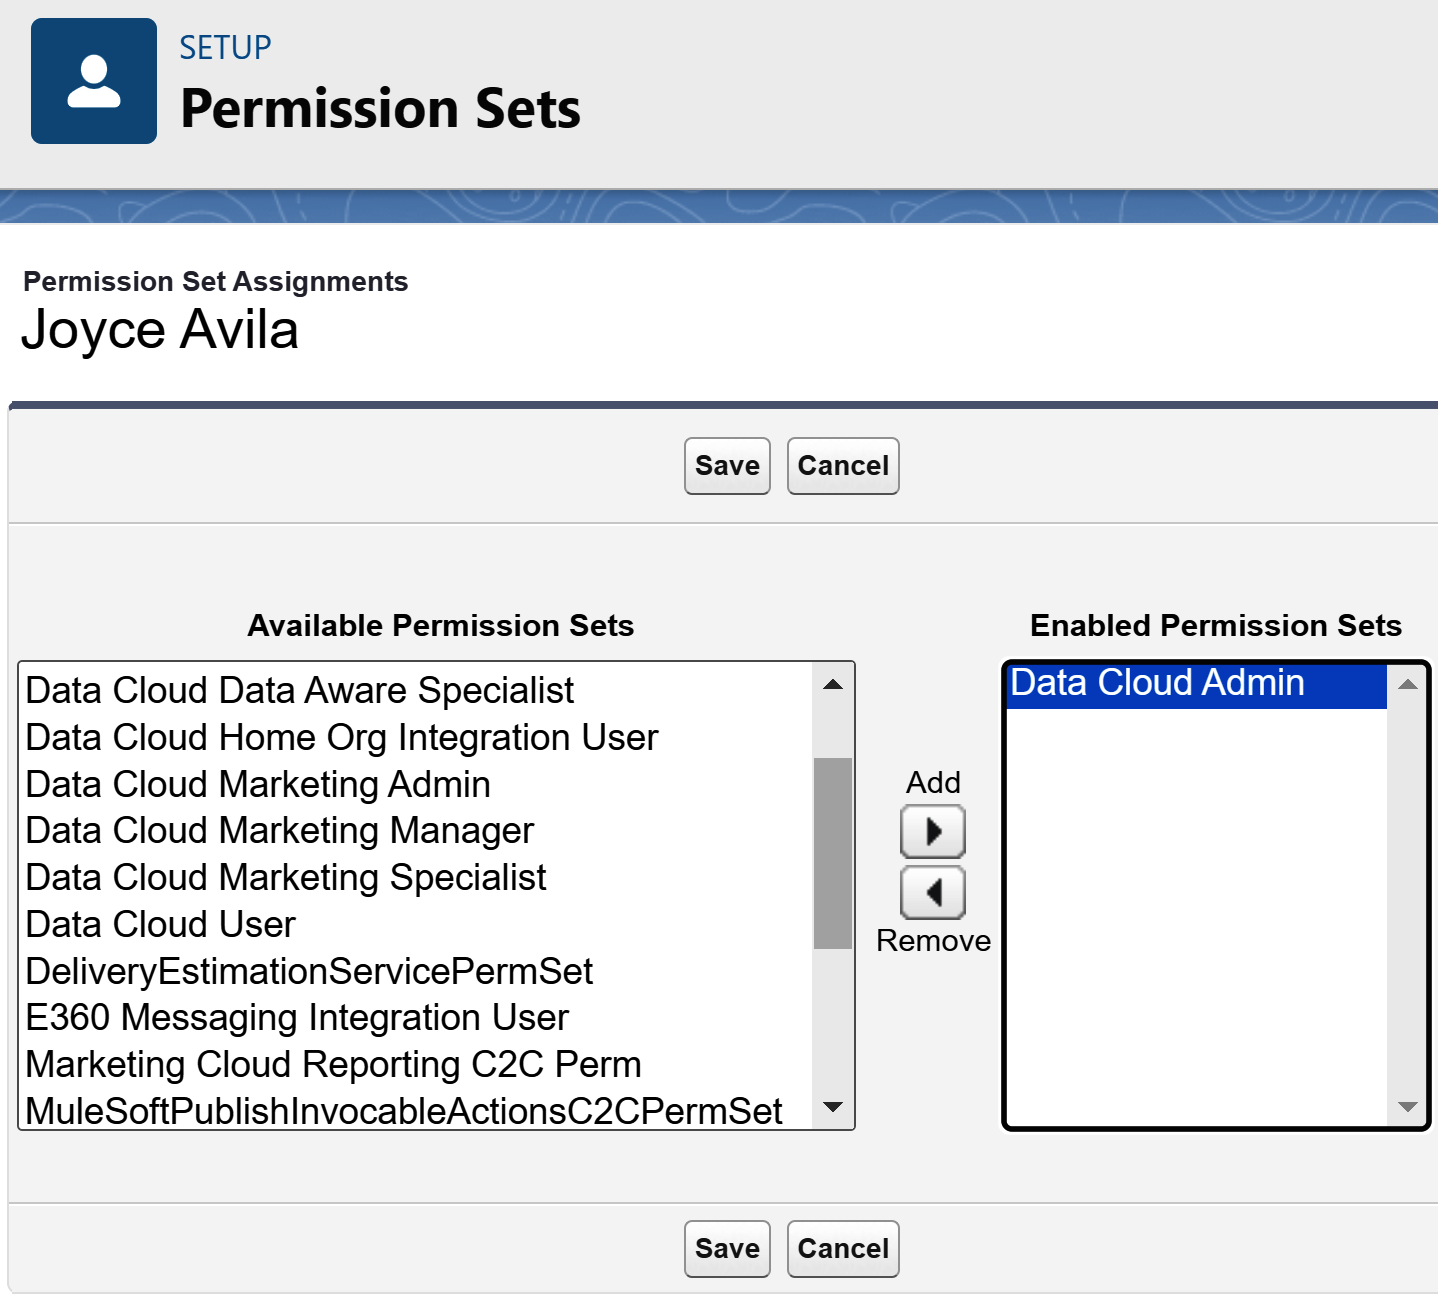
Figure 4-3. Assigning a new permission set for the Data Cloud Admin
- Be sure to click the Save button.
Data Cloud Setup Success
You’ll know that you’ve been successful in assigning yourself the Data Cloud Admin permission set if you click on the gear icon in the top right corner of the screen and one of your available options is Data Cloud Setup (Figure 4-4). You may need to refresh your screen if you don’t see the Data Cloud Setup option.
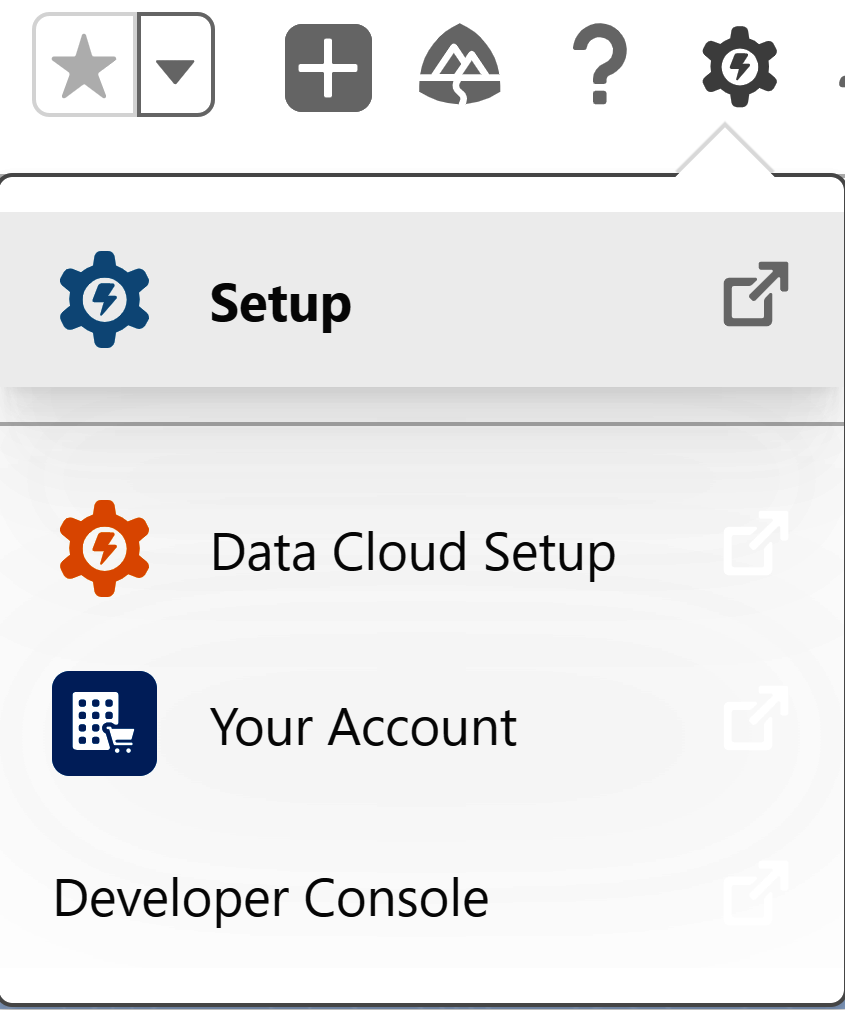
Figure 4-4. Data Cloud Setup accessed from the gear icon
Contact Your Salesforce Account Executive If Needed
Situations may arise throughout the setup process where you’ll need help from your Salesforce.com account executive or the Salesforce.com support team. For example, if you are setting up a new Salesforce org at the same time as your Data Cloud platform and you don’t receive your email with a log-link, or if you need your Data Cloud platform moved to a different Salesforce org, you’ll need to reach out directly to Salesforce.com for assistance.
Provisioning the Data Cloud Platform
The configuration setup of the Data Cloud platform will need to be done by a Data Cloud Administrator.
If you’ve successfully assigned yourself the Data Cloud Platform Admin permission set as described in “Configuring the Admin User”, you’re now ready to provision the new Data Cloud platform.
- Click on the gear icon at the top right of the screen and select Data Cloud Setup. A welcome screen will appear.
- Click the Get Started button on the bottom right of the screen (Figure 4-5). If you don’t see the button, try refreshing the page or logging out and back in again.
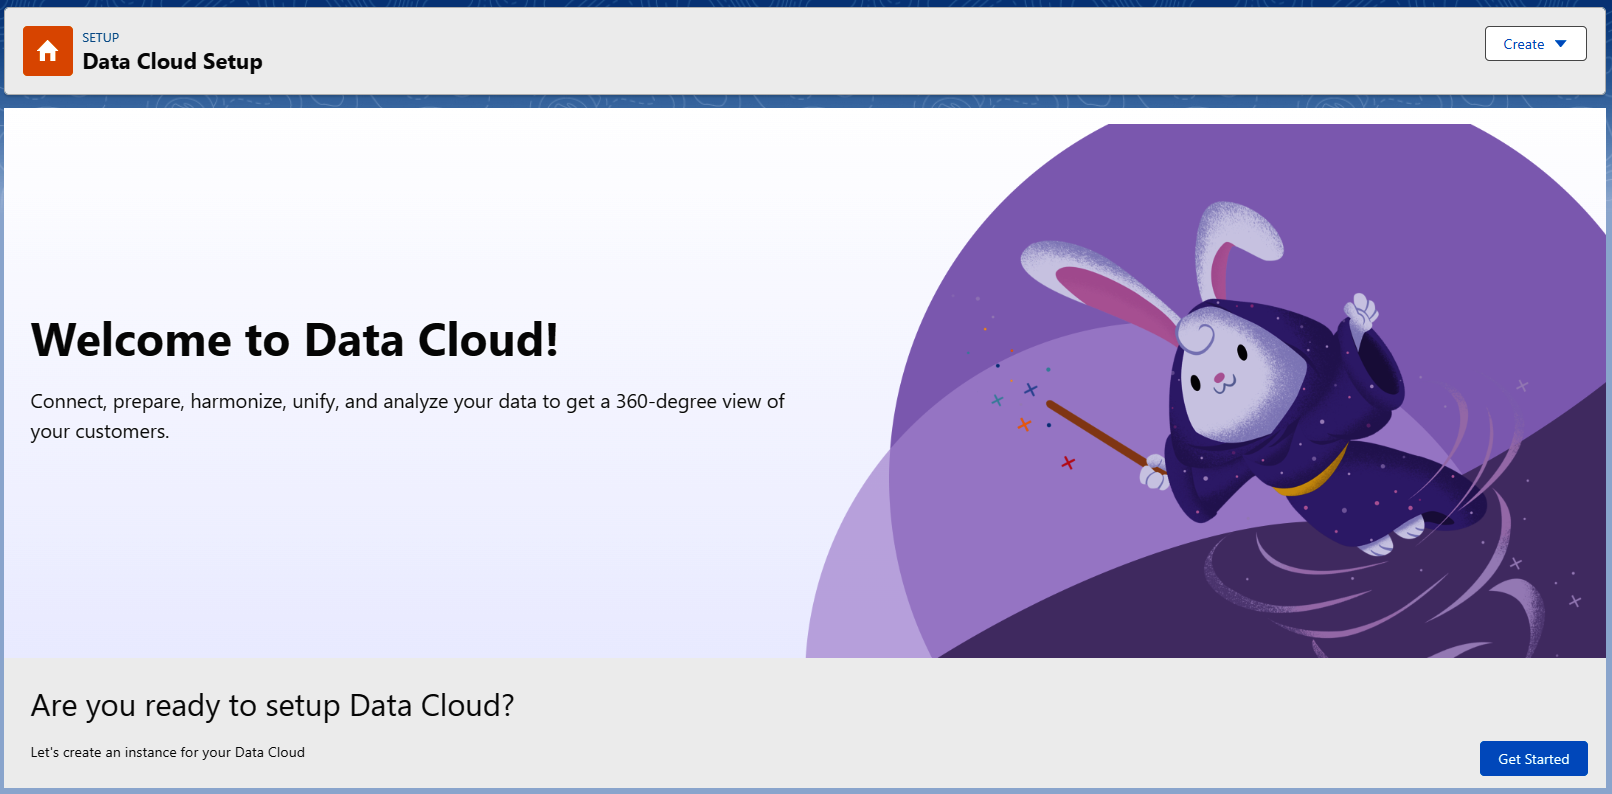
Figure 4-5. Welcome screen for Data Cloud initial setup
Success!
Once you’ve clicked the Get Started button, it may take a few minutes for the provisioning to complete. You’ll know that the Data Cloud platform was successfully set up when the message provides you with the location of your Data Cloud instance and your tenant-specific endpoint (Figure 4-6). The location of your Data Cloud instance informs you where your Data Cloud tenant is located, and you can use this information to connect trust site and maintenance notifications with your instance. The instance details will also be important to know if you implement the BYOL capabilities later. The endpoint is your unique, system-generated subdomain assigned to your tenant.
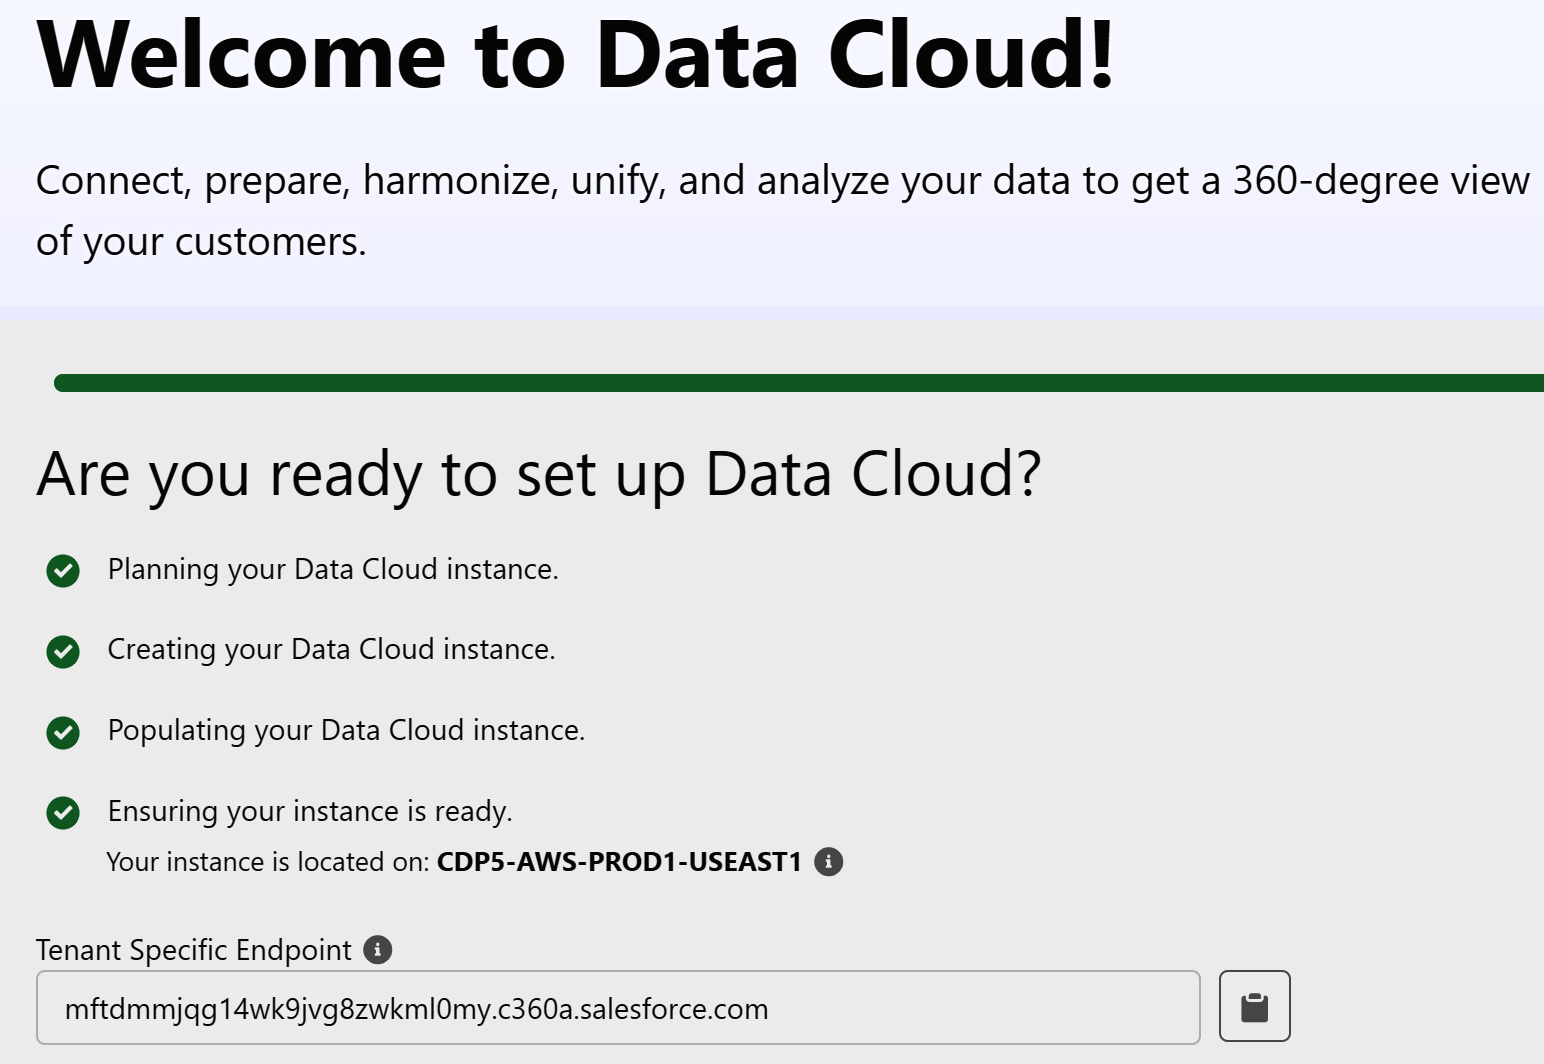
Figure 4-6. Completed Data Cloud setup screen
At this point in the process, you’re the only Data Cloud user able to access the platform. If you want others to access your Data Cloud instance, you’ll need to assign standard permission sets to existing Salesforce users. In addition, you’ll likely need to create some profiles and configure additional users next. We’ll discover how to create new profiles in the next session, but first, let’s install the standard starter data bundles we plan to use.
Navigate to Data Cloud Setup → Salesforce CRM, where you can confirm that your Salesforce CRM connection was established and has an active status. You can rename the connection, if desired, by clicking on the pencil icon. You’ll need to install each of the starter data bundles by clicking on the arrow to the right of each bundle and clicking the Install button. When prompted, choose the Install for Admin Only option and then click the Install button. Repeat the process for each data bundle you want to install.
Creating Profiles and Configuring Additional Users
As we learned previously, there are standard permission sets that come with each Salesforce Data Cloud account. These permission sets are meant for each of the Data Cloud personas described earlier in the chapter. We’ll want to assign permission sets to users, but before we do, we need to think about adding new users who don’t already access the Salesforce platform but who will need access to only Data Cloud. In these cases, we should consider creating new profiles for users who will only need access to the Salesforce Data Cloud instance.
As the Salesforce CRM Administrator, you’ll have been assigned the Admin profile. If you followed the instructions in the prior section, you added the Data Cloud platform Admin permission set to your user account. This allows you to now perform the admin duties within the Salesforce Data Cloud org.
As part of your admin duties, it’s very likely that you’ll need to add more Data Cloud users so that the platform functionality can be built out and used by others. Any new Data Cloud user, if already a Salesforce CRM user, will need to be assigned a default or custom permission set to access and use the Data Cloud platform.
If a new Data Cloud user does not already have an existing Salesforce CRM account, then you’ll need to configure a new Salesforce user account for them. If that is the case, you’ll need to assign them a profile as you are creating their new user account.
Let’s explore how to create new Data Cloud platform user profiles that you can assign to new Salesforce Data Cloud users.
Cloning Data Cloud profiles
As the Data Cloud Admin, you’ll want to create new profiles for each of the other four personas because these profiles must be created before you attempt to create new user accounts. You can follow these steps to create a custom profile by cloning an existing profile:
- Click on the gear icon on the top right of the screen and then select Setup. Type
profilesin the Quick Find box. -
Click on Profiles to see a list of all existing user profiles (Figure 4-7).
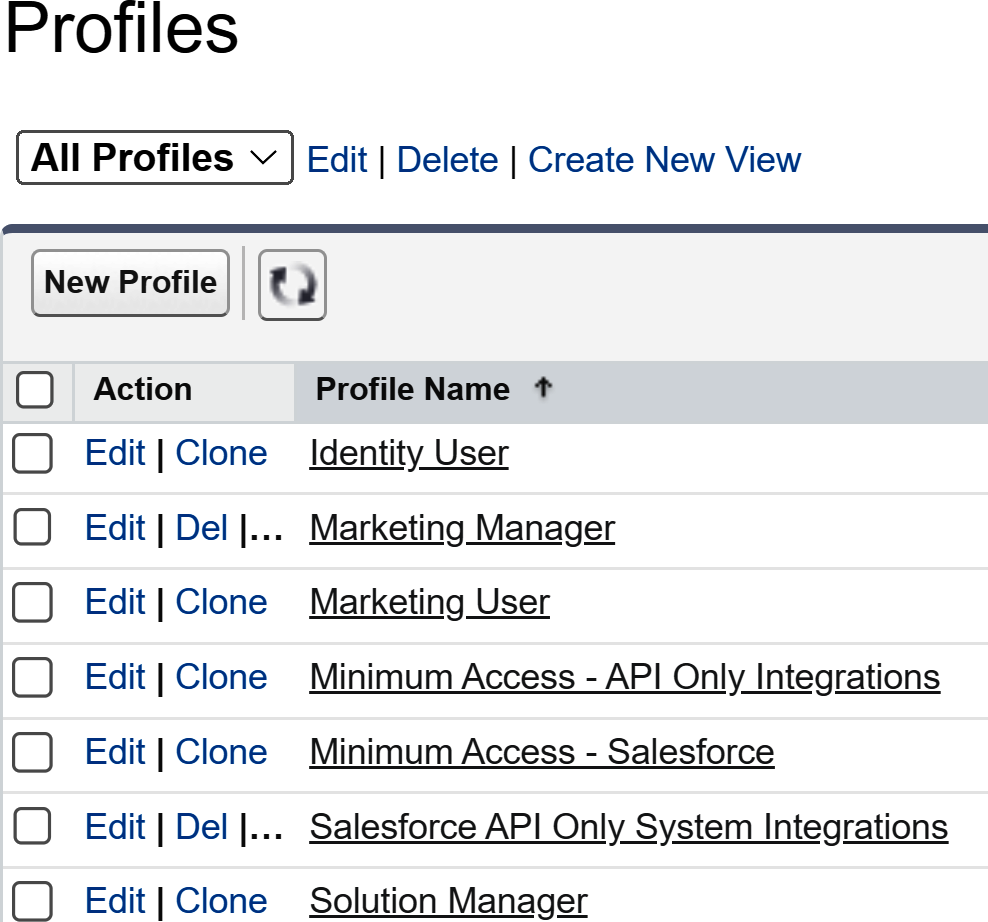
Figure 4-7. Existing Salesforce profiles in the Salesforce core platform
-
Locate the Identity User profile and click on it. Next, click Clone (Figure 4-8).

Figure 4-8. Identity User profile to be cloned
-
Enter the name of the custom profile you want to create in the Profile Name field. For our example, let’s create the Marketing Manager profile (Figure 4-9). Be sure to click the Save button when you’re done.
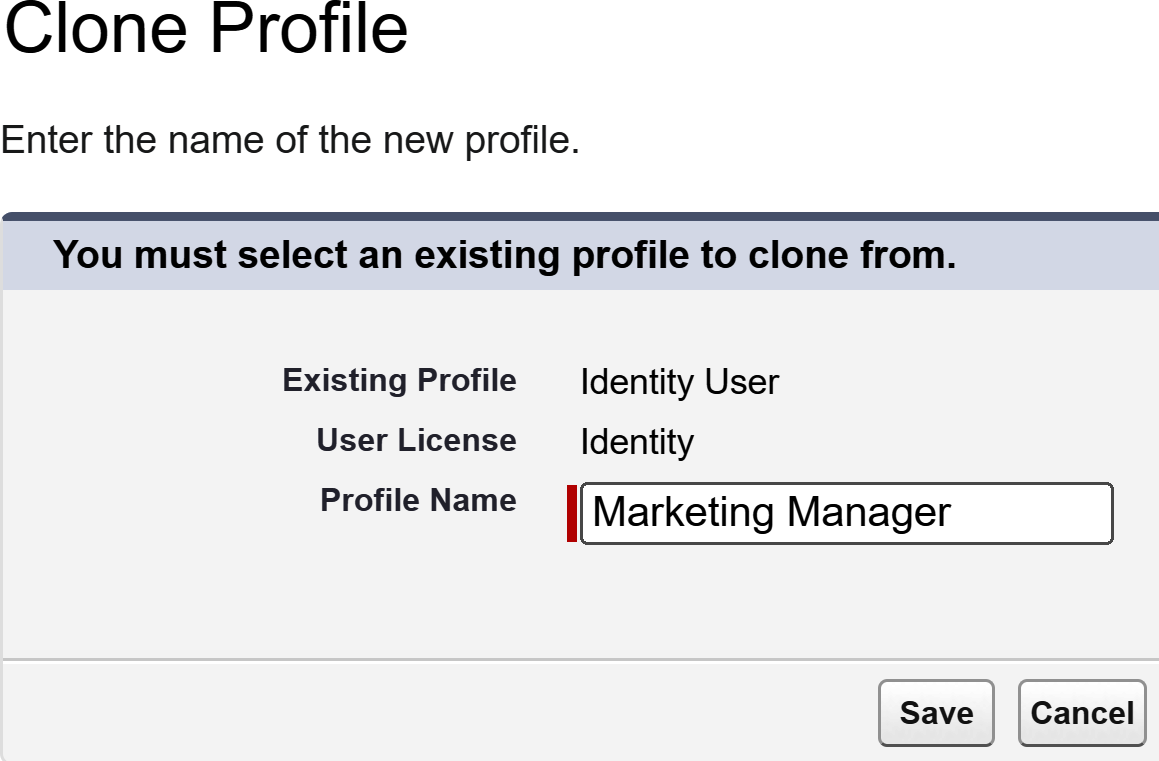
Figure 4-9. Cloning an identity user profile to create a new Marketing Manager profile
- Repeat the previous steps to create new profiles for any groups of users who need to access Data Cloud but do not already have Salesforce access.
Easy Ways to Limit the Number of New Custom Profiles Created
Every Salesforce user must be assigned a profile, and it’s best to use standard profiles when possible and limit the number of new custom profiles created. An alternative to creating more profiles is to consider use permission sets instead. For example, you may not need four different profiles for your marketing team. Depending on your company’s requirements, you could create one Marketing User profile, assign that one Marketing User profile to all users, and then assign one of the four standard permission sets to the user.
Creating new Data Cloud users
You can create new user accounts after you create the profiles needed for your new users. This can be done as part of the first-time setup now, or you can complete these steps anytime in the future. Follow these steps:
- Click on the gear icon at the top right of the screen and select the Setup option. In the Quick Find box, type
users. Click on Users and select the New User button. - Fill in the required information for your user, such as name, alias, email, and username.
Alert for First-Time User Creation
If this is your first time setting up new Salesforce users or it has been a while since you’ve set up new users, there are a few important things you don’t want to overlook. Be sure to review the Salesforce documentation for setting up new users and complete a Trailhead module, if needed. Also, check your company’s policies and procedures for creating new Salesforce users. Some organizations have a standard way in which they want to set up an alias or username for new Salesforce users, so ask in advance and be sure you’re following those internal naming convention policies.
Make updates to the locale settings and approver settings. Additionally, you’ll want to select the following:
- Role: None Specified (the default)
- User License: Identity
- Profile: Select one of the persona-based profiles you previously created
Click the Save button.
Email Notification
When you save a new Salesforce user account, the person receives an email notification with login instructions. However, if you are creating user accounts in advance of training for your users, then you may not want them to receive login instructions just yet. In that case, uncheck the box to send users an email notification. You can always generate that email at a later date, when you’re ready for your users to log in to the Data Cloud platform.
Assign permission sets just as you did before by clicking the Edit Assignments button under the Permission Set Assignments section. Select the desired permission set(s), click the Add button, and then click the Save button (Figure 4-10).
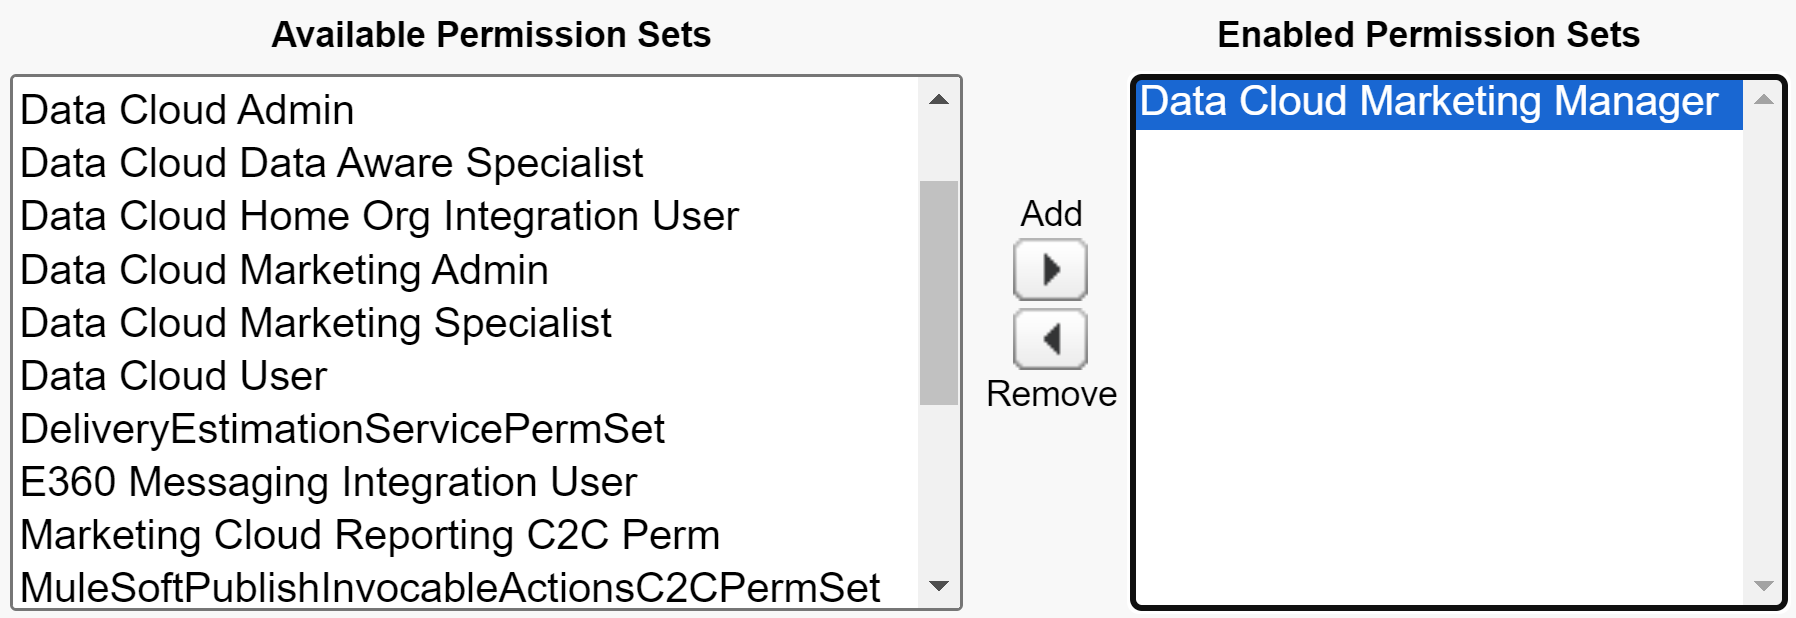
Figure 4-10. Assigning the Data Cloud Marketing Manager permission set
You can also create other Data Cloud administrators to help you with connecting to relevant Salesforce Clouds, as described in the next section.
Use Custom Permission Sets Sparingly
Data Cloud standard permission sets are automatically updated with each release as new features become available. Therefore, using a custom permission set could result in users not having access to new features or functionality in the future unless you manually adjust the custom permission set.
Connecting to Relevant Salesforce Clouds
Chapter 2 discussed the topology of the various Salesforce Clouds that can be connected to the CDP. Now, we’ll take an in-depth look how to use Data Cloud connectors to enable the connections between Data Cloud and the various Salesforce Clouds to which a connection can be made. Our discussion will include information about refresh schedules for these Salesforce Cloud connectors. Salesforce is continually improving refresh times, so you should review the Salesforce documentation for the data stream schedule for the most up-to-date information.
Currently, there are six native Salesforce Cloud connectors: CRM, Marketing Cloud, B2C Commerce, Marketing Cloud Account Engagement (formerly Pardot), Marketing Cloud Personalization (formerly Interaction Studio), and Omnichannel Inventory. The Salesforce CRM Connector is needed to access the data within your Salesforce core platform. It’s also the connector you’d use for ingesting Loyalty Management Cloud data using starter data bundles.
Salesforce customer relationship management connections
You’ll want to connect your Salesforce CRM orgs so that you can ingest data from those orgs. If you have any problems connecting any of your Salesforce CRM orgs to your Data Cloud platform, make sure you have the proper access to the Salesforce org(s) to which you’re trying to connect. Also, ensure that your CRM orgs have met the necessary criteria and that you’ve not exceeded the number of allowable CRM org connections.
Salesforce CRM Connection Limitations
There are some limitations on Salesforce CRM connections. You’ll need to use the Salesforce Lighting Experience, rather than the Salesforce Classic console, to enable Data Cloud. A Salesforce org must also have API access if it is to be connected. Some Salesforce editions, such as the Professional Edition, do not come with API access, but that access can be purchased as an add-on. In addition, you can connect no more than five CRM orgs to the Data Cloud platform. The five CRM orgs limit includes both the Salesforce CRM to which you have your Data Cloud provisioned and any external Salesforce orgs. Neither the Salesforce Marketing Cloud connection nor the Salesforce Commerce Cloud connection counts toward the limit.
The Salesforce CRM Connector enables access to one of three types of orgs: home orgs, external orgs, and sandbox orgs. A home org is the production org where the Data Cloud platform is installed, and it may include Salesforce CRM data such as Sales, Service, Commerce, Loyalty, and CRM custom objects. External orgs are Salesforce CRM production orgs external to the org where the Data Cloud platform is installed. A sandbox org is a copy of your organization, completely isolated from your Salesforce production environment, that you can use for a variety of purposes, such as testing and training.
It’s possible for a Salesforce Data Cloud org to connect to a Salesforce external production org where another Data Cloud org is installed. A Salesforce Data Cloud platform can also connect to any Salesforce CRM sandbox org, whether associated with the home org or an external org.
Domain Recommendations
If you have My Domain activated on your external Salesforce org and Data Cloud, it is recommended that you select “Don’t redirect” from the domain settings. Additionally, you’ll want to ensure that “Allow access” is granted for the Salesforce IP range for all external Salesforce orgs you want to connect to the Data Cloud platform. If you need more information about Salesforce IP addresses and domains to allow, you can check the Salesforce Help developer documentation.
During Data Cloud setup, your Data Cloud instance was automatically connected to the existing Salesforce org. If you need to connect to a different Salesforce org, you can follow these steps:
- Click on the gear icon at the top right of the screen and select Setup. In the Quick Find box, type
configuration. -
Click on Salesforce CRM and then the New button if you need to create additional connections. You’ll then be able to connect to another Salesforce production org or a sandbox org (Figure 4-11).
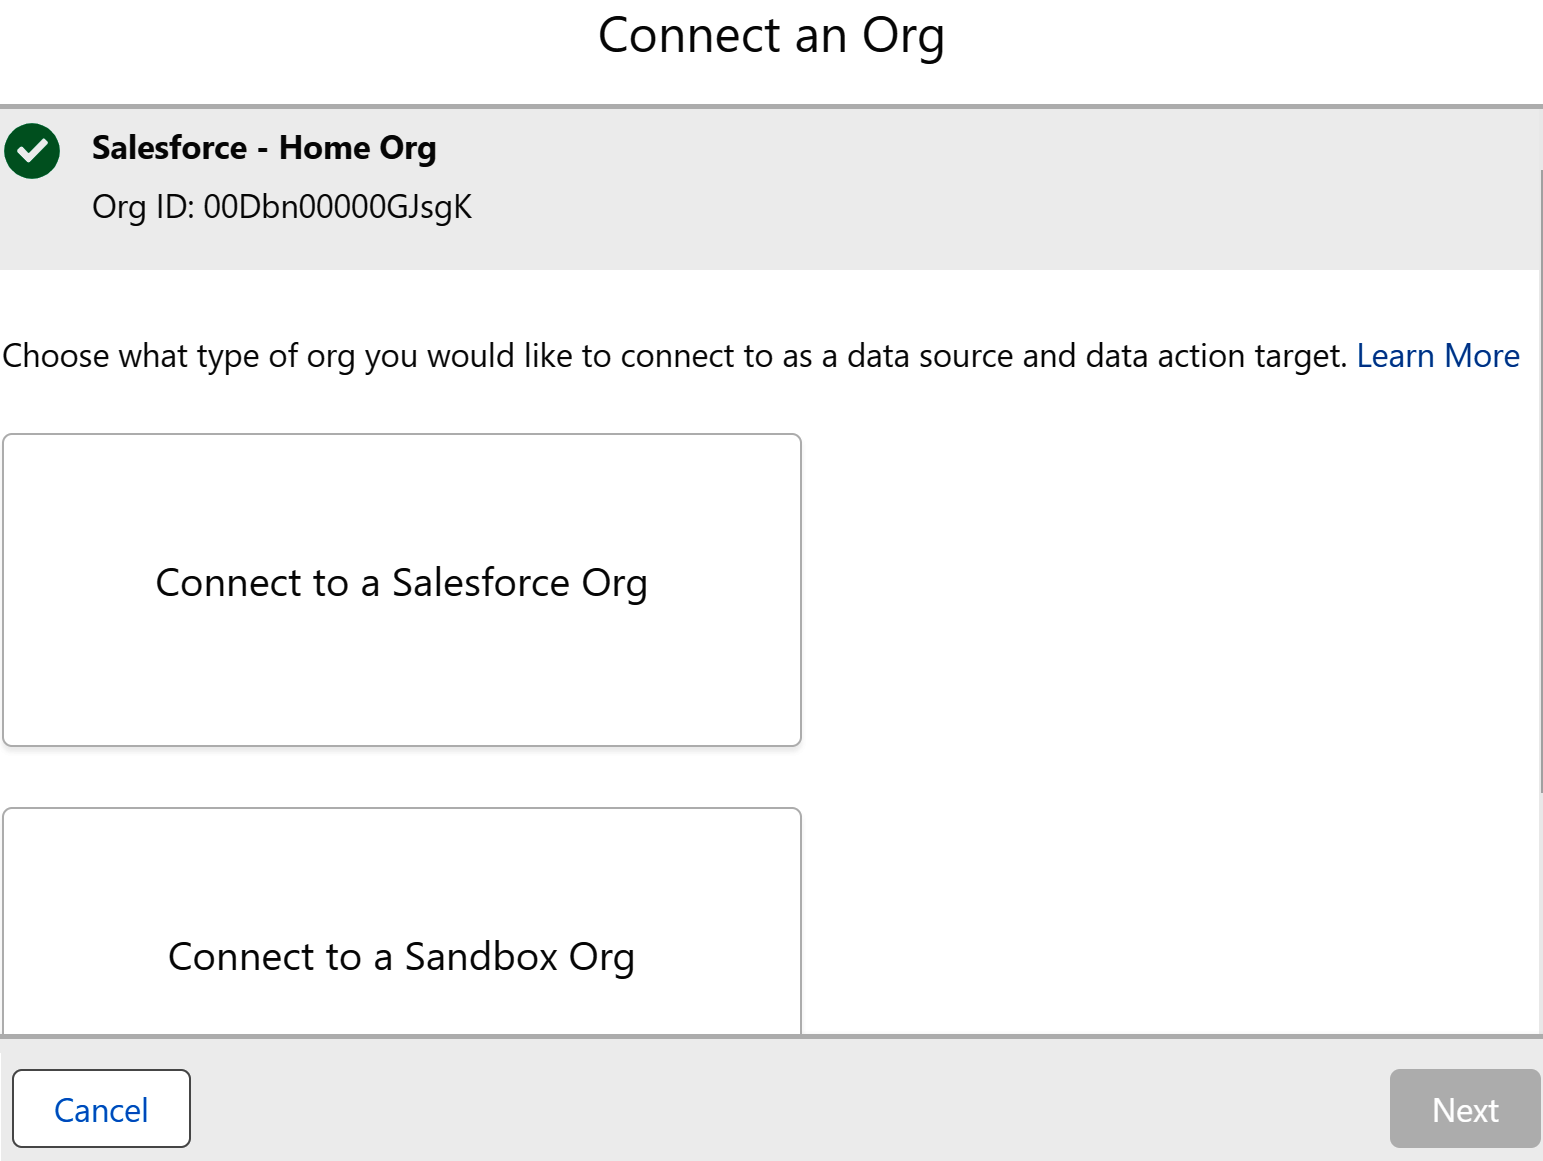
Figure 4-11. Connecting a new Salesforce CRM org to Data Cloud
- Complete the connection by entering your user credentials to establish the connection with the Data Cloud platform.
At this time, the CRM Connector supports Insert, Upsert, and Delete statements. Also, the sync scheduling options available are every 10 minutes (for Upserts) or biweekly (for a full refresh). However, the updates are ingested into Data Cloud during the next scheduled full refresh whenever you update a formula field created in the Data Cloud data stream using the Salesforce CRM Connector.
Make Sure to Plan for Unlimited Ingestion Lookback for CRM Connector
When creating Salesforce CRM data streams, the lookback is unlimited and this setting cannot be modified. All historical data for the selected objects and fields will be ingested. Thus, you’ll want to make sure you estimate in advance the data volume for ingestion of historical data as well as for ongoing data updates and additions. It’s possible to reduce processing of the ingested data by adjusting your lookback period in segmentation or queries. Alternatively, if you need precise control over what data gets ingested by Data Cloud and when, it’s possible to create a Salesforce Flow in the source system to “push” data to Data Cloud via Apex.
Once you’ve established your Salesforce CRM org connection to your Data Cloud platform, you can install some standard starter data bundles. Chapter 6 walks you through the steps that explain how to utilize data bundles for your Salesforce CRM orgs.
Marketing Cloud connection
Connecting your Data Cloud platform to Salesforce Marketing Cloud requires that you have admin access to Marketing Cloud. Data Cloud supports only Marketing Cloud Enterprise 2.0 account connections. Another requirement is that your Marketing Cloud account should default to the Enterprise ID (EID), the topmost parent business unit, so that each of the child business units to be used in activation can be accessed. It’s also important to note that you’re limited to connecting only one Salesforce Marketing Cloud to your Salesforce Data Cloud.
The Marketing Cloud Connector can help enrich customer profile data in many ways. Here are some examples of use cases achievable with the Marketing Cloud Connector:
- Ingesting email open and click data that can be used to identify top engagers for segmentation
- Ingesting Einstein scores that can be used for AI-based segmentation
- Surfacing Salesforce Marketing Insights data to CRM objects
Ingestion Lookback Limited to 90 Days for Marketing Cloud Connector
When creating Marketing Cloud data streams, only 90 days worth of data is ingested into Salesforce Data Cloud.
When you’re ready to connect your Salesforce Marketing Cloud account to the Data Cloud platform, you can follow the same steps you used before to set up the Salesforce CRM Connector. This time, you’ll just select Marketing Cloud under the Configuration option, instead of Salesforce CRM. You’ll then be prompted to enter your credentials (Figure 4-12).
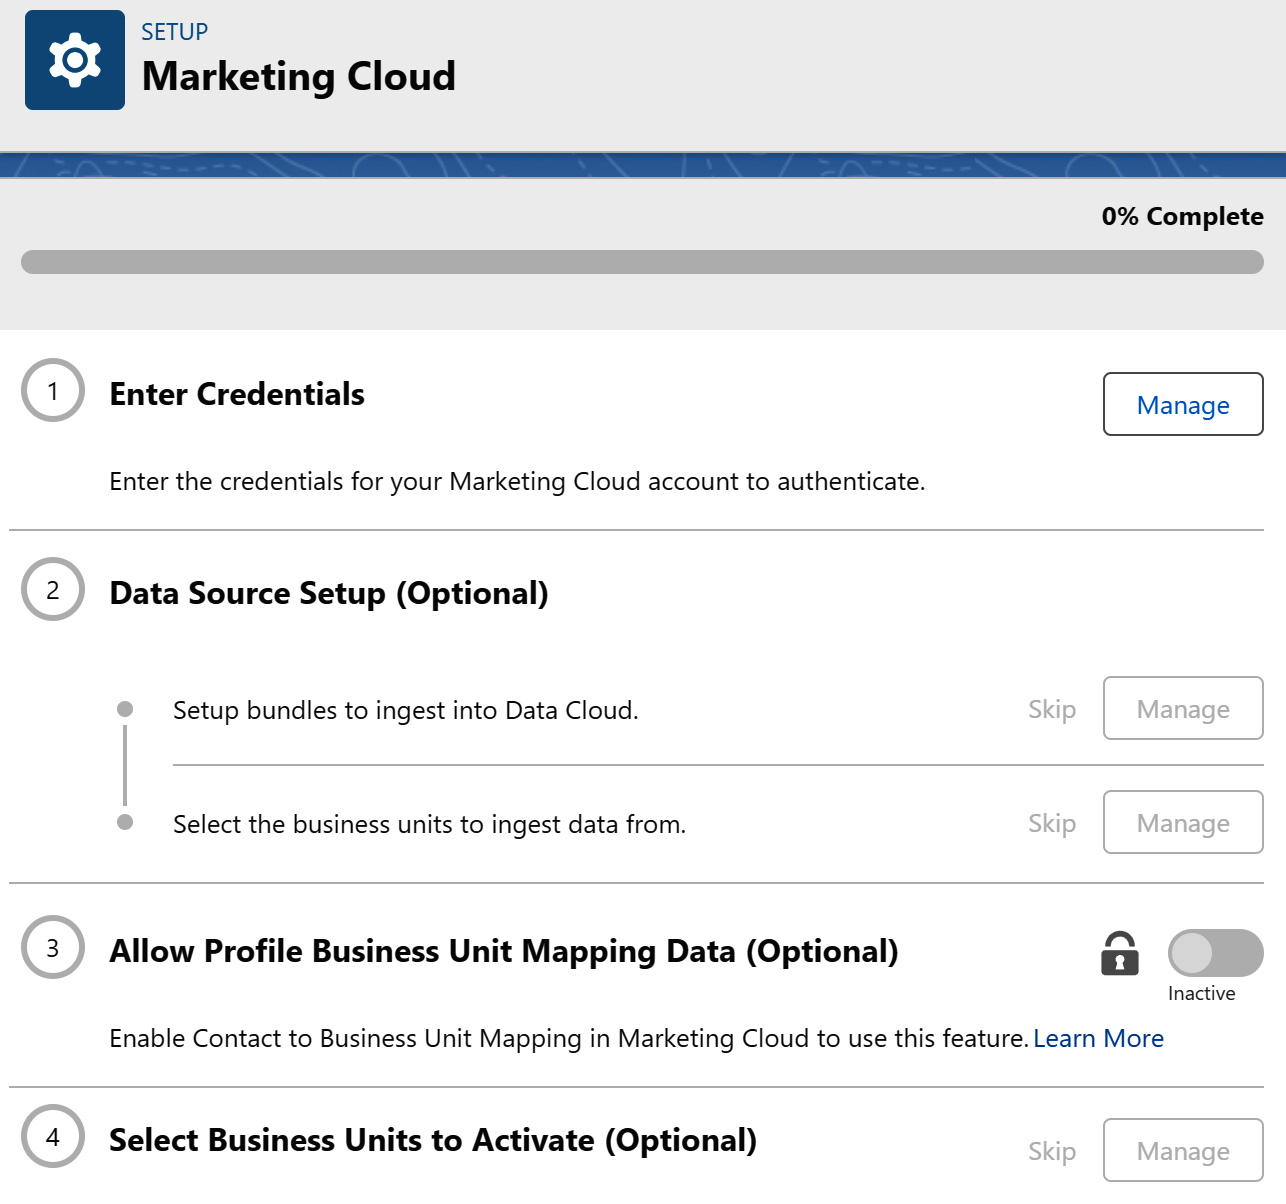
Figure 4-12. Connecting Salesforce Marketing Cloud to Data Cloud
It’s best practice to use a dedicated Marketing Cloud API user account for integration with Data Cloud to prevent disruptions resulting from expired passwords. A Marketing Cloud API user’s password doesn’t expire.
At this time, the Marketing Cloud Connector has a latency of hourly to 24 hours, and the data can be refreshed with an Upsert or a full refresh.
When setting up ingestion, it’s possible to use data bundles for Marketing Cloud, including the Email Studio, MobileConnect, MobilePush, and WhatsApp bundles. When it’s time for mapping in Chapter 9, there will be certain required mappings for the Affiliation DMO that will need to be completed for Marketing Cloud ingested data.
Salesforce B2C Commerce Cloud connection
You’ll need access to the B2C Commerce Business Manager in order to create the B2C Commerce Cloud connection to Data Cloud. Additionally, there is a requirement that Commerce Cloud Einstein must be activated before the B2C Commerce Cloud Connector can access the customer profile and transaction data from the B2C Commerce Cloud.
Importantly, Data Cloud can connect only to a B2C Commerce Cloud production instance. No B2C Commerce sandboxes can be connected to your Data Cloud platform.
Case Insensitivity
Within Salesforce Commerce Cloud, it’s possible to create different custom attributes with the same name but different case sensitivities. Salesforce Data Cloud converts all field labels to lowercase, so to avoid any data conflicts, you may need to first modify the field names in your B2C Commerce platform.
You can follow the same steps as before, but this time, select the B2C Commerce configuration. You’ll then be prompted to sync with your Commerce Cloud instance by providing the B2C Commerce Business Manager URL (Figure 4-13).
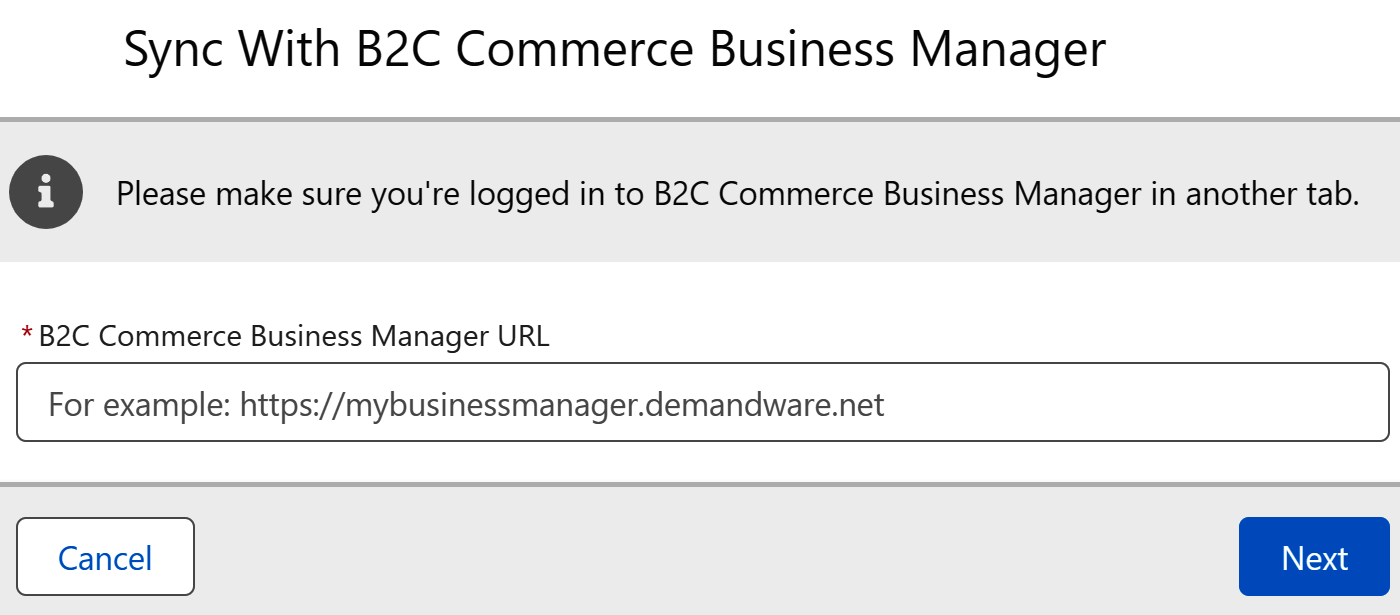
Figure 4-13. Connecting the Salesforce B2C Commerce Cloud to Data Cloud
Using the B2C Commerce Cloud Connectors allows you to ingest Commerce Cloud order data and related customer and catalog data. Sales order and sales order customer data have an hourly latency; all others have a daily latency. Sales order data can be refreshed with an Upsert; all others require a full refresh.
The B2C Commerce Order Bundle deploys mapping to Contact Point‒type DMOs that are used in identity resolution. When it’s time to perform data mapping, you’ll need to ensure that these specific DMO fields are mapped to the individual DMO fields (Table 4-2).
| DSO entity | DSO field | DMO entity | CustomerId |
|---|---|---|---|
| Sales order customer | customerId | Individual | CustomerId |
| Sales order customer | customerListId | Individual | CustomerListId |
| Sales order customer | customerNo | Individual | CustomerNo |
| Sales order customer | usId | Individual | UsId |
The ingestion lookback period for the B2C Commerce Connector is 30 days, as of the date the connection is established. Going forward, the B2C Commerce Connector will continue to ingest all the data.
Data Residency Requirements
The General Data Protection Regulation (GDPR) has strict residency requirements for the personal data storage of European Union (EU) citizens. The GDPR disallows the transfer and storage of this data outside of the EU, but there are exceptions when countries can receive and store data if the European Commission has determined that such countries have adequate data and privacy protections. The other exception occurs when a person gives consent for their data to be transferred outside of the European Union.
There are no technical restrictions preventing the connection of any B2C Commerce production org to a Salesforce Data Cloud platform, regardless of hosting location. Thus, your organization will need to ensure compliance with all residency requirements, including GDPR restrictions, before connecting your B2C Commerce org to Data Cloud. Salesforce can assist with providing technical information about the platform that will inform data residency decisions, but it is the data owner’s responsibility to ensure data residency requirements are met.
Marketing Cloud Account Engagement connection
Marketing Cloud Account Engagement (previously referred to as Pardot) is Salesforce’s business-to-business (B2B) marketing automation tool. The Marketing Cloud Account Engagement Connector provides Salesforce Data Cloud information about email activity. Email engagement data from the Email Activity object can be ingested using the Marketing Cloud Account Engagement bundle for Email Activity.
When establishing the Marketing Cloud Account Engagement Connector to Data Cloud, you’ll add the Account Engagement business units you want to connect. One caveat is that you can only connect Account Engagement business units that are associated with your Data Cloud Salesforce org.
Marketing Cloud Personalization connection
The Marketing Cloud Personalization (previously referred to as Interaction Studio) connector provides Salesforce Data Cloud with access to the profile-related and behavioral data from the Marketing Cloud Personalization platform. You’ll need to have the Admin permission in Marketing Cloud Personalization in order to create the connection to the Data Cloud platform. Additionally, Data Cloud Gear must be enabled, and all user attributes should be defined in the Marketing Cloud Personalization dataset.
Using the Marketing Cloud Personalization Connector allows you to ingest both anonymous and known data. This is really powerful because your Data Cloud stores anonymous, or unknown, data until it can be matched with known data. Refer to Chapter 1 for a more detailed discussion of known and unknown data.
Ingestion Lookback Not Available for Marketing Cloud Personalization Connector
When creating Marketing Cloud Personalization data streams, no historical data is ingested in Salesforce Data Cloud.
The latency for the Marketing Cloud Personalization connection is 15 minutes for Profile data and 2 minutes for Events/Engagement data.
Omnichannel Inventory connection
Salesforce Omnichannel Inventory provides near real-time inventory availability across all fulfillment channels, at the location level. The Omnichannel Inventory Connector creates new data streams for the following:
- Location group product exclusion change
- Location product inventory change
- Location group product inventory change
Do Not Remove Omnichannel Inventory Data Streams
Removing the data streams automatically created by the Omnichannel Inventory Connector will break the Omnichannel Inventory connection to Data Cloud.
Access to this Omnichannel Inventory Connector within Data Cloud is only available if your company has purchased Omnichannel Inventory licenses. The same is true for all other Salesforce Cloud connectors, which are only accessible in your Data Cloud org when they’re needed to connect to Salesforce CRM or Salesforce industry clouds.
Beyond the Basics: Managing Feature Access
Earlier in the chapter, you created new profiles for use with the other four default permission sets that come with segmentation and activation. The users given those profiles and permission sets will have the View All/Modify All privileges for the objects to which they have been granted access. However, there may be other users who need access to the Data Cloud platform who should not have those privileges. In those cases, you can manage Data Cloud feature access by creating custom permission sets and leveraging sharing rules.
Creating Data Cloud Custom Permission Sets
Sometimes, you may find yourself needing to give certain accesses to a person who doesn’t align with any of the default Data Cloud persona-based permission sets. The six default Salesforce Data Cloud permission sets are not editable, so if you want to make changes by increasing or decreasing what can be done with a specific permission set, you’ll need to create a new custom permission set. The easiest way to create a new permission set is to start by cloning an existing permission set.
Best Practice for Managing Data Cloud Feature Access
It’s possible for an administrator to create a new profile to assign an individual who doesn’t align with any of the default Data Cloud persona-based permission sets. However, creating a new profile is rarely the best approach for assigning access to the Data Cloud platform. Instead, use custom permission sets with an existing profile.
Let’s take a look at the recommended steps to create a new Data Cloud custom permission set:
- Click on the gear icon at the top right of the screen and select Setup. In the Quick Find box, type
usersand thenpermission sets. - Select the permission set you want to clone.
Selection of the Default Permission Set
If this is the first custom permission set you are creating, it is recommended that you select whichever default permission set is most like the custom permission set you want to create. That way, you’ll have to make the fewest changes.
-
Click the Clone button, give the new custom permission set a relevant name, and click the Save button (Figure 4-14).
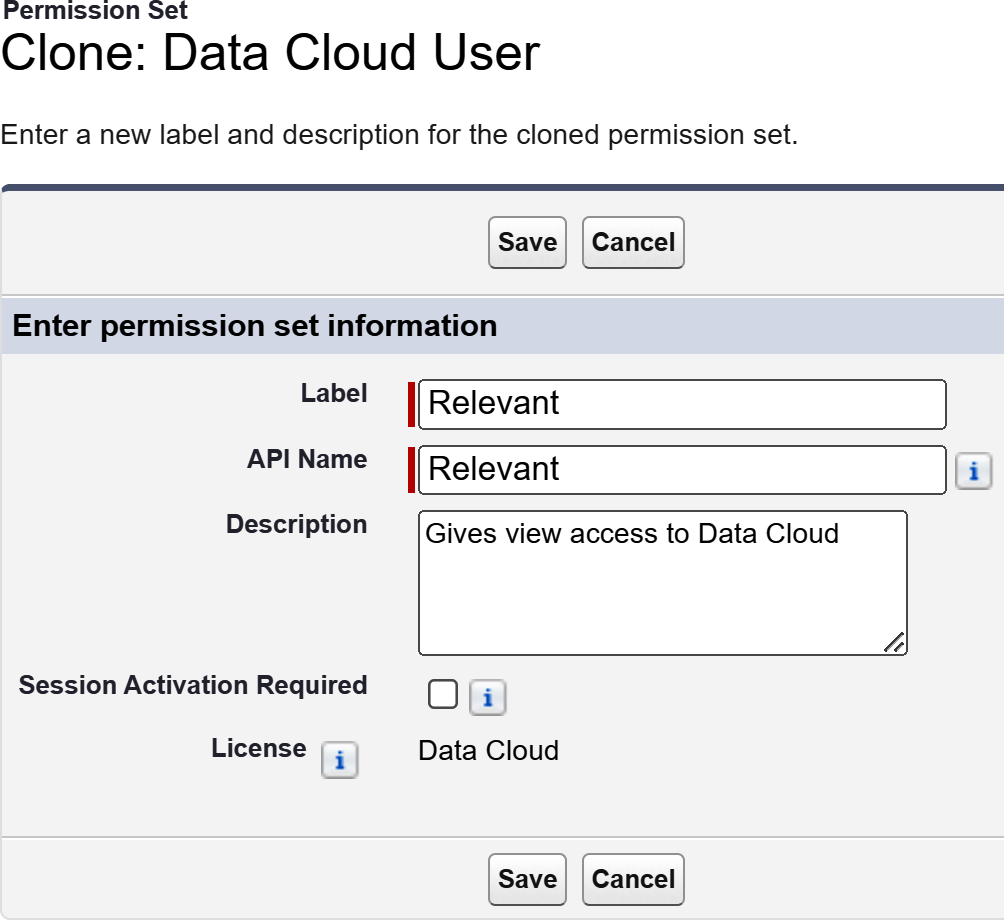
Figure 4-14. Creating a new permission set by cloning an existing permission set
-
Click on the link for the new permission set you just created. Click on the Object Settings link, scroll through the object settings for each object, and review the associated object permissions (Figure 4-15). Click on the name of any object for which you want to change the object settings.
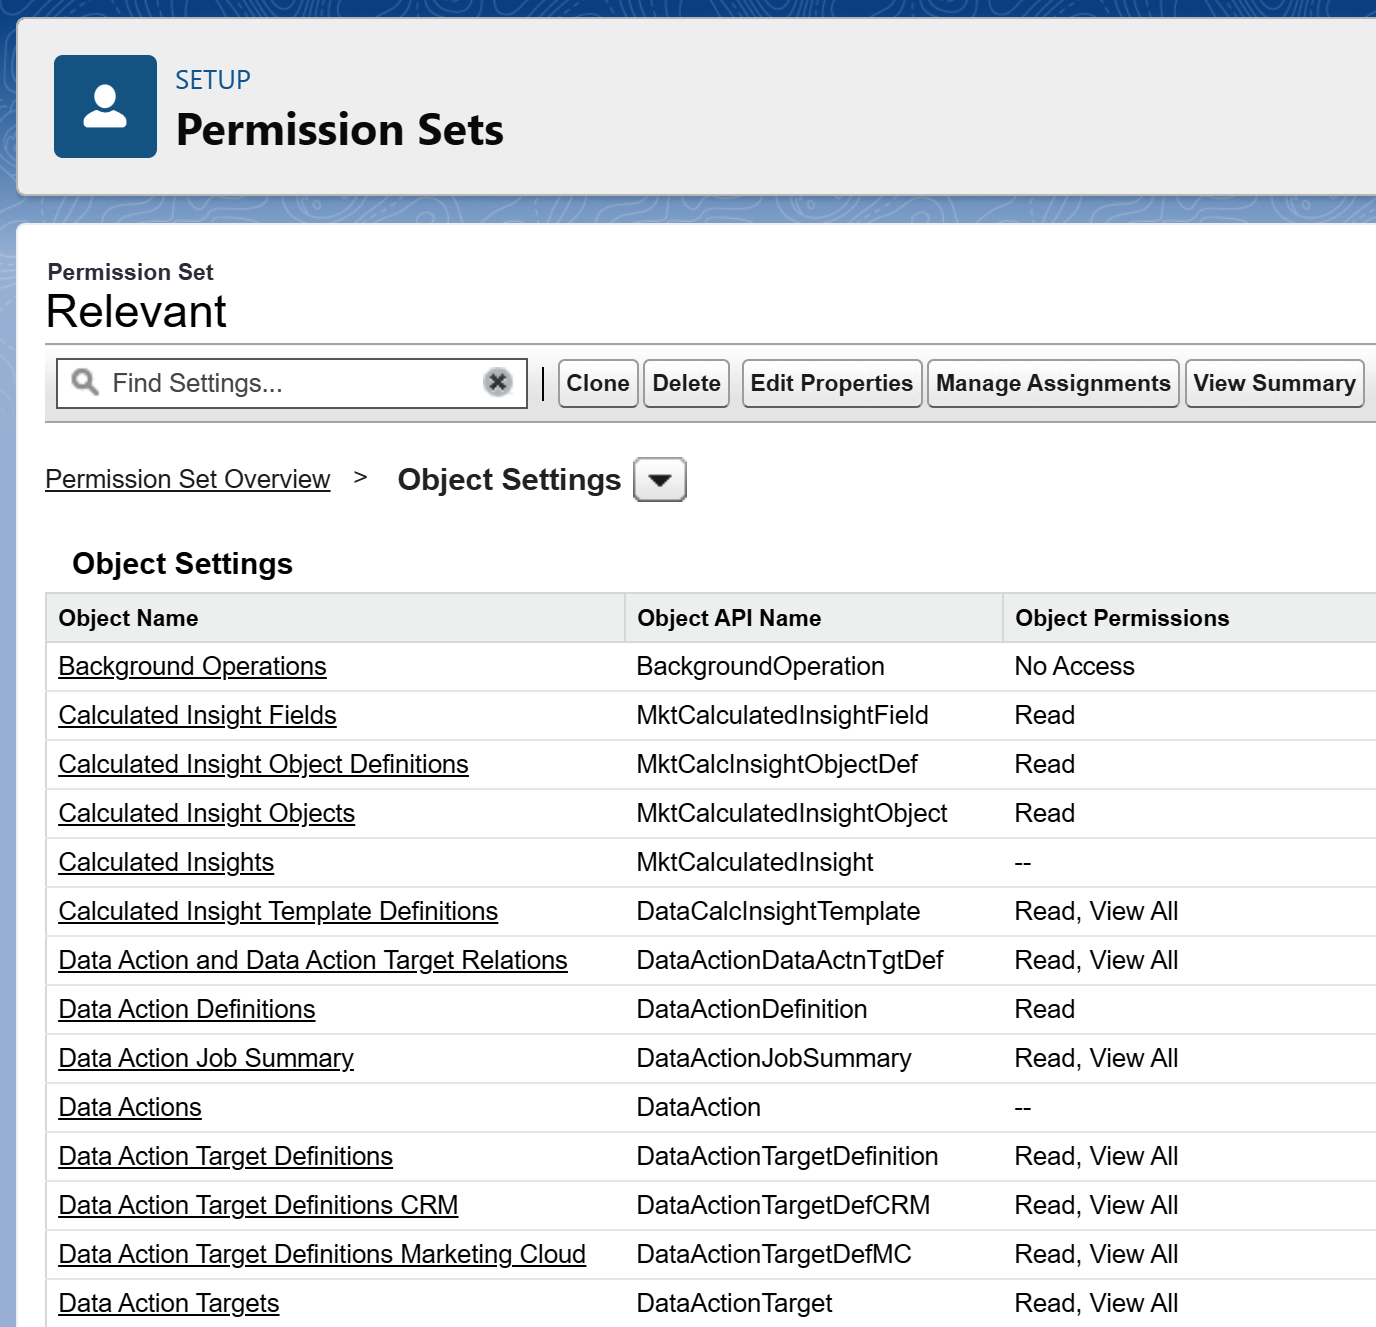
Figure 4-15. Object settings permissions to be edited
Check or uncheck the box beside the specific permission name you want to change on the permission set (Figure 4-16). When the box is checked, the permission is enabled for the particular object.
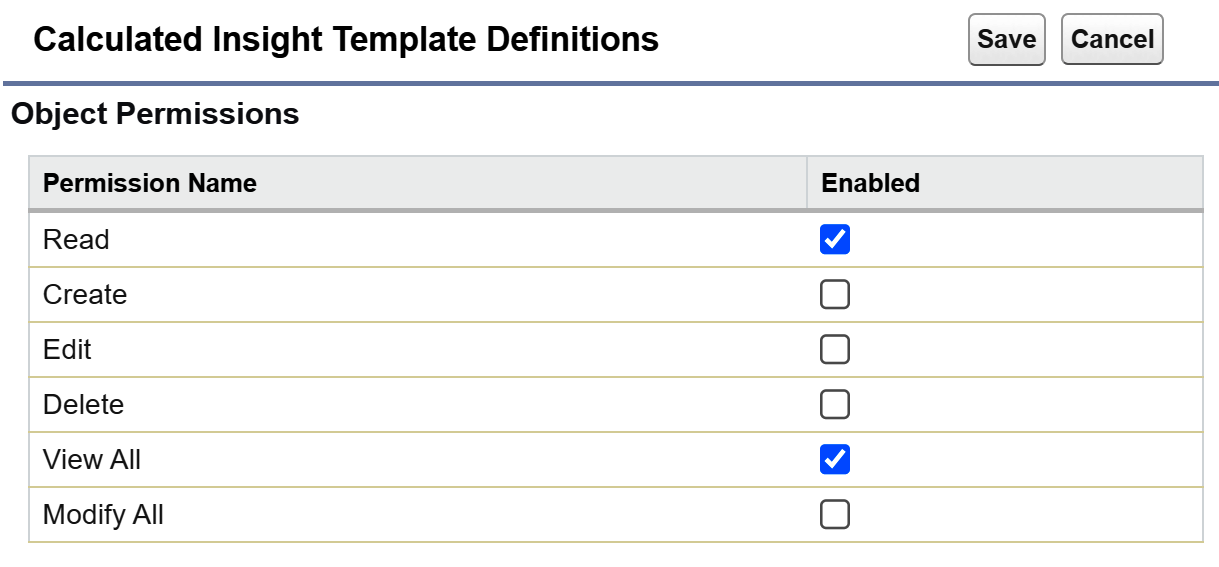
Figure 4-16. Object permissions to be enabled or disabled
View All and Modify All Special Considerations
For objects such as Segments and Activation Targets, you’ll likely want to deselect the View All and Modify All object permissions for your customer permission sets (Figure 4-16), especially if you intend to take advantage of sharing rules. It is important to note that removing the View All and Modify All permissions from a permission set assigned to a user does not take away that permission from the user if the user has been assigned a profile where View All and Modified All privileges are granted.
- Click the Save button when you’ve made all the changes to the permission set that you need.
- Assign the new custom permission set to a user. The steps to accomplish this are described in “Configuring the Admin User”.
Leveraging Data Cloud Sharing Rules
As we’ve seen thus far, permission sets give users the ability to access features and undertake certain activities within the Data Cloud platform. Permission sets, profiles, and sharing rules work much the same in Salesforce Data Cloud as they do in the Salesforce core platform. Within Salesforce, the OWD settings determine the overall most restrictive access, and permission sets are not the only way to open up access beyond the OWD settings. Based on defined criteria, sharing rules can also allow particular users greater access to records than is otherwise granted through OWDs.
Sharing Is No Longer Supported on Data Space–Aware Feature Objects
As of May 2024, data security within Data Cloud spaces was aligned with CRM access control, enforcing security for data spaces across all access methods. The upgrade included changes that integrated data space access control into permission sets. As a result, admins can now directly associate multiple data spaces with a permission set.
There are many reasons you might consider using sharing rules for your Data Cloud org. For example, you may want to restrict marketers from being able to see segments created by others outside of their team or regional area. In that case, you’d restrict visibility into segments by removing the View All/Modify All privileges in profiles and permission sets. After that, you’d open up the segments in each region to all those on the same team or in the same region by using sharing rules.
Another use case for sharing rules often occurs when one organization has multiple brands that should be marketed to distinct audiences. Managing activation targets through sharing rules can reduce the risk of activating to a brand audience in error.
Data Cloud Sharing Rules Do Not Apply to the Data
Unlike the sharing rules in the Salesforce core platform, Data Cloud sharing rules do not apply to actual data in the Salesforce data lake. Data Cloud sharing rules apply to Data Cloud objects, rather than data, and can only be based on the membership of a group or role.
Before setting up sharing rules, you’ll need to have first created in the org any groups and roles that you’ll be needing. Also, make sure that you’ve created all the profiles and permission sets that you need to enable sharing. Most likely, your profiles and permission sets will have the View All/Modify All privileges removed for all objects for which you want to create sharing rules. When you’ve prepared your groups, roles, profiles, and permission sets, you’re ready to update your sharing settings with the following steps:
- Click on the gear icon at the top right of the screen and select Setup. In the Quick Find box, type
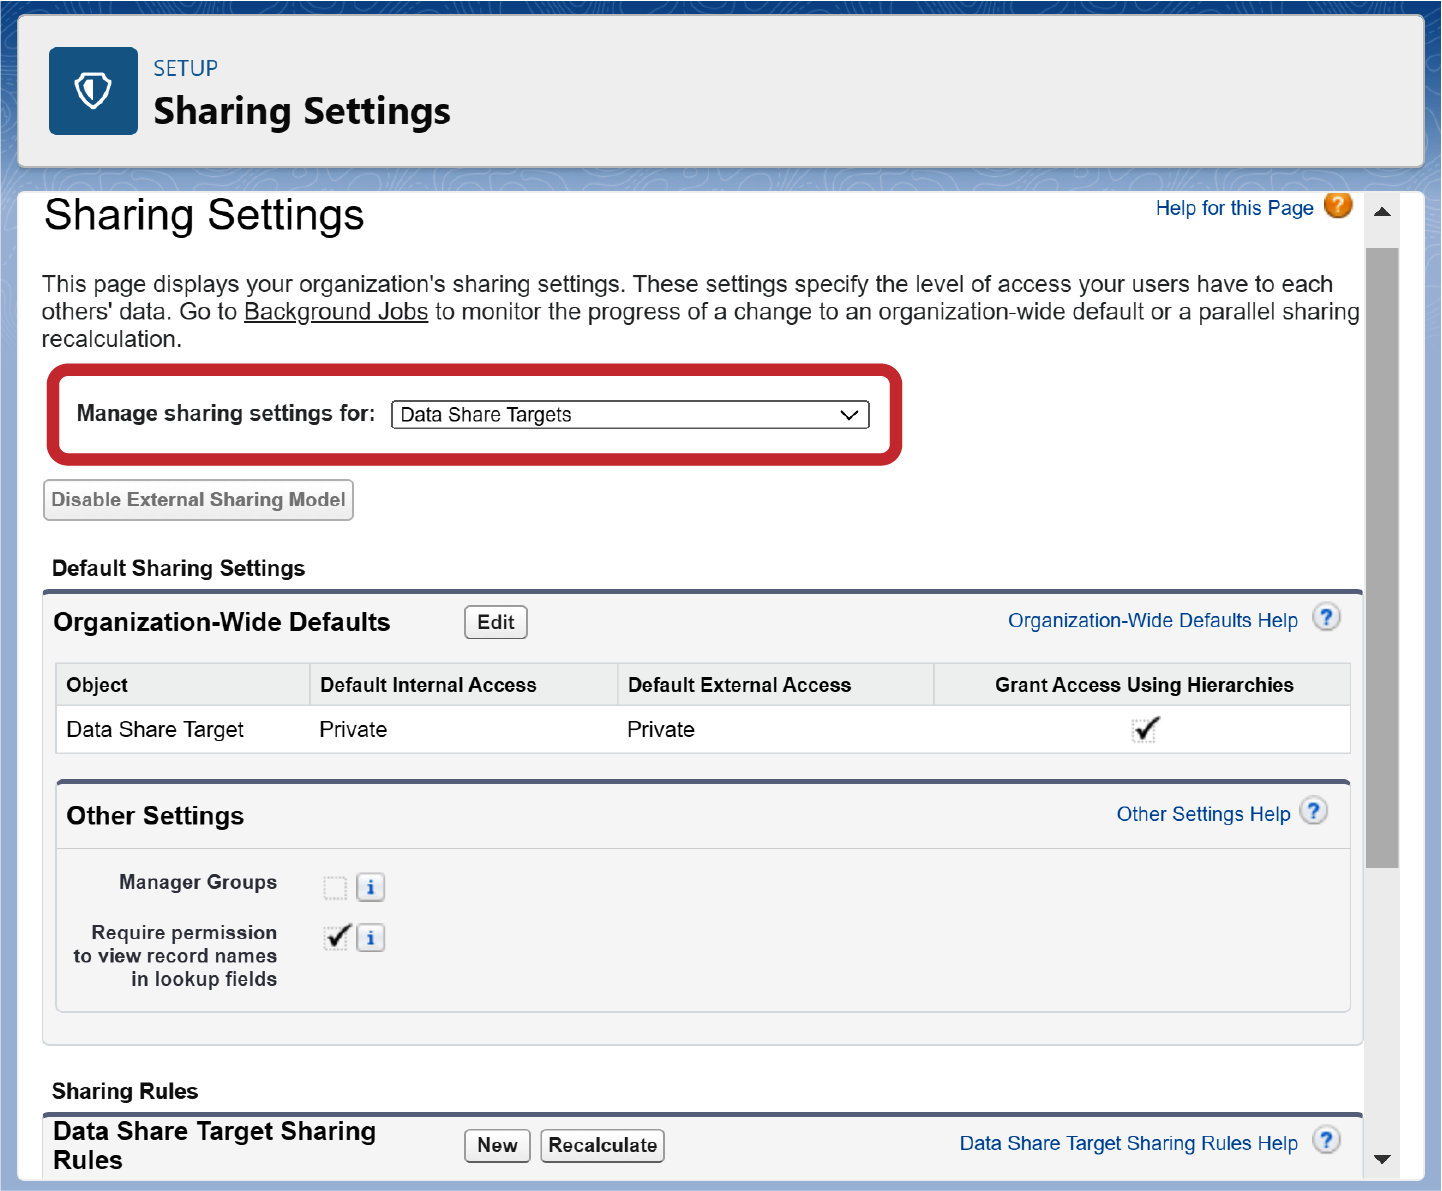
sharing settings. Search for the object for which you want to manage the sharing settings using the drop-down menu beside the “Manage sharing settings for:” option. In our example, we’ll select the Data Share Target object (Figure 4-17).
- Under the Sharing Rules section, click the New button.
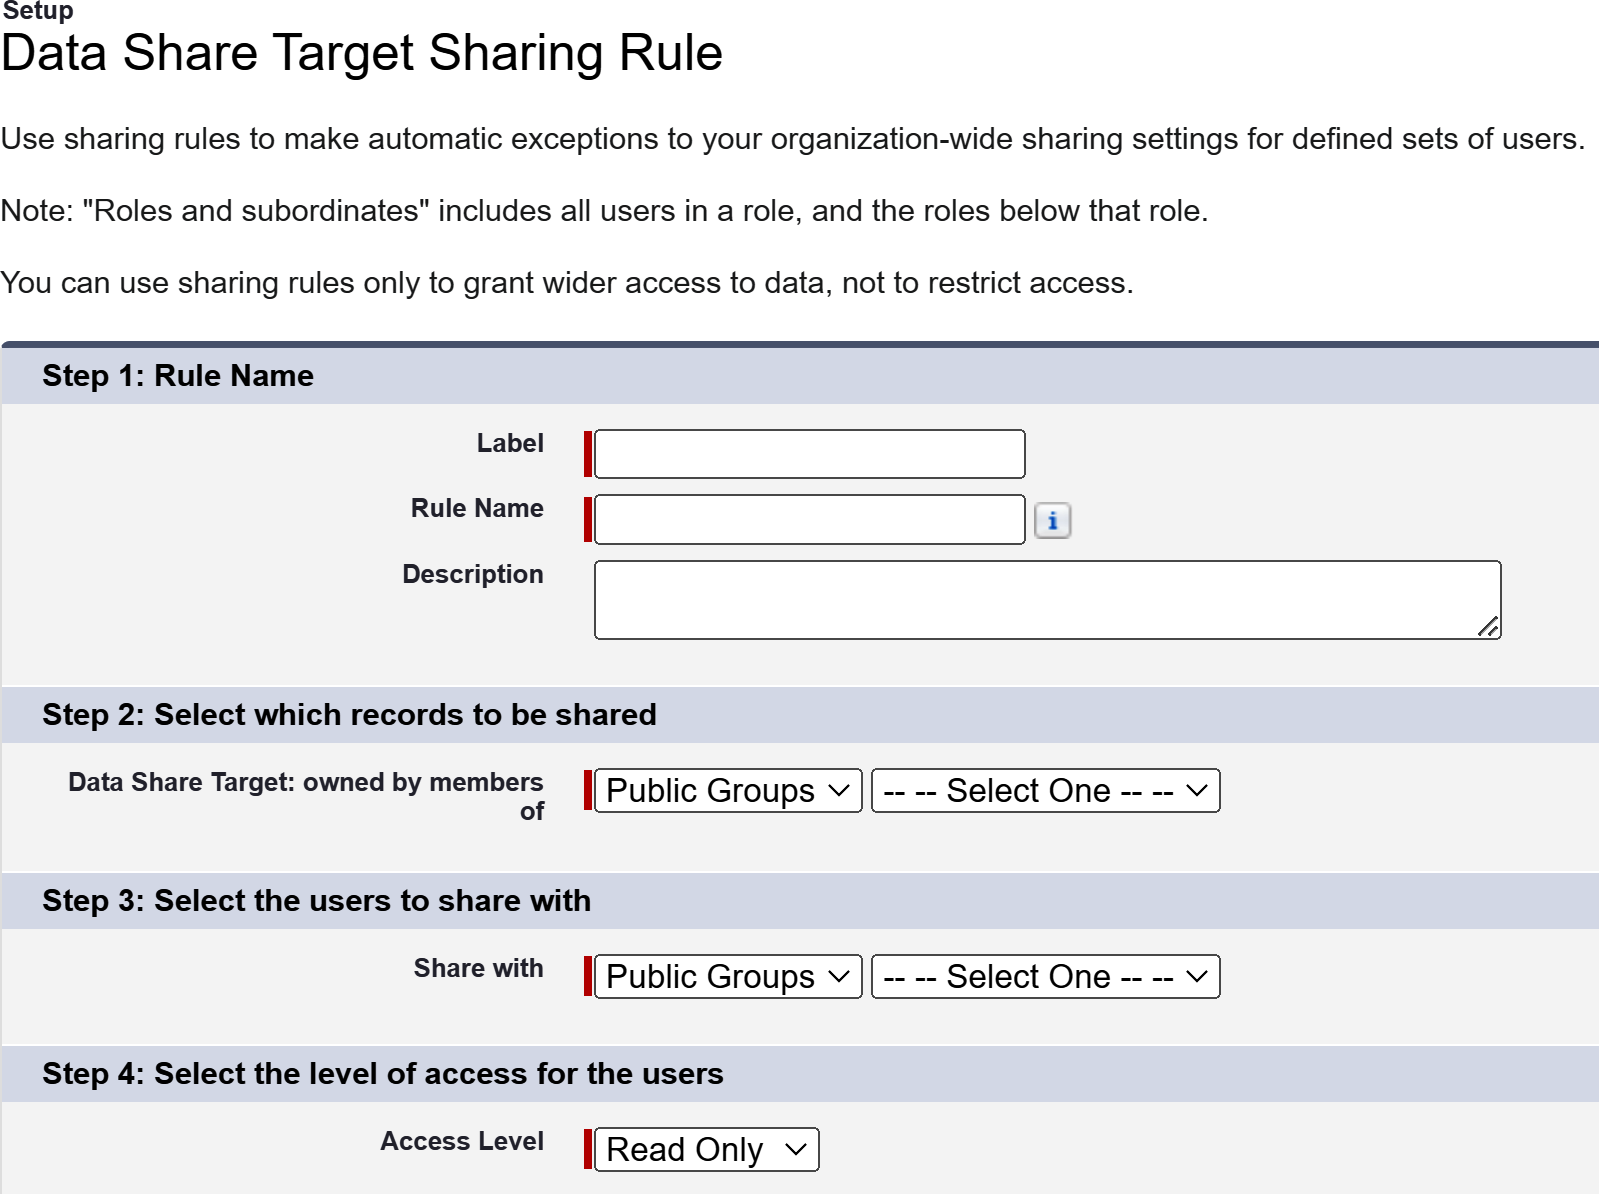
Define the rule name, select the records to be shared and with whom to share them, and identify the access level (Figure 4-18).
- Click the Save button.
- Repeat these steps to create any new sharing rules for other Data Cloud objects.
Objects Available for Data Cloud Sharing Rules
Data Cloud sharing rules are supported by the Activation Audience, Activation Targets, Calculated Insights, Data Stream, and Segment configuration objects.
Now that you’ve taken care of the platform first-time setup, you and the other Data Cloud users will be able to access the Data Cloud application within Salesforce. The next chapter will focus on briefly exploring each of the menu options within Salesforce Data Cloud.
Summary
In this chapter, we explored Salesforce Data Cloud from the perspective of an Admin persona. As such, we performed the first-time platform setup and learned how to manage Data Cloud feature access. In summary, there are five basic Data Cloud initial configuration steps:
- 1. Configure the admin user
Assign a Data Cloud Admin or Data Cloud Marketing Admin permission system to the Salesforce System Admin who will be completing the initial configuration steps.
- 2. Provision the Data Cloud platform
Navigate to the Setup gear icon and then click on Data Cloud Setup to get started.
- 3. Add new users to the Salesforce platform (optional)
-
If new users need to be added to the Salesforce platform, consider creating new profiles and custom permission sets to assign users who’ll be working only in Data Cloud.
- 4. Assign permission sets
Assign one of the standard permission sets to Salesforce users.
- 5. Set up sharing rules (optional)
-
After setting up the necessary groups and roles, set up sharing rules.
- 6. Connect to relevant Salesforce Clouds
Establish connections to the relevant Salesforce Clouds where OOTB connectors exist. Currently, those OOTB cloud connectors include CRM, Marketing Cloud, B2C Commerce, Marketing Cloud Account Engagement, and Marketing Cloud Personalization.
Now that you’ve provisioned the Data Cloud platform, you’re ready to take a look inside and see what’s available. In the next chapter, we’ll review each of the Data Cloud menu options as we navigate the platform.
Get Hands-On Salesforce Data Cloud now with the O’Reilly learning platform.
O’Reilly members experience books, live events, courses curated by job role, and more from O’Reilly and nearly 200 top publishers.
