Chapter 1. Introduction to Git
Simply put, Git is a content tracker. Given that notion, Git shares common principles of most version control systems. However, the distinct feature that makes Git unique among the variety of tools available today is that it is a distributed version control system. This distinction means Git is fast and scalable, has a rich collection of command sets that provide access to both high-level and low-level operations, and is optimized for local operations.
In this chapter you will learn the fundamental principles of Git, its characteristics, and basic git commands, and youâll receive some quick guidance on creating and adding changes to a repository.
We highly recommend that you take time to grasp the important concepts explained here. These topics are the building blocks of Git and will help you understand the intermediate and advanced techniques for managing a Git repository as part of your daily work. These foundational concepts will also help you ramp up your learning when we break down the inner workings of Git in chapters grouped in Part II, âFundamentals of Gitâ, Part III, âIntermediate Skillsâ, and Part IV, âAdvanced Skillsâ.
Git Components
Before we dive into the world of git commands, letâs take a step back and visualize an overview of the components that make up the Git ecosystem. Figure 1-1 shows how the components work together.
Git GUI tools act as a frontend for the Git command line, and some tools have extensions that integrate with popular Git hosting platforms. The Git client tools mostly work on the local copy of your repository.
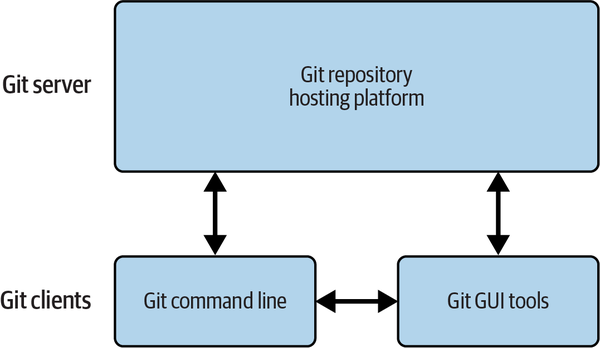
Figure 1-1. Overview of Git components
When you are working with Git, a typical setup includes a Git server and Git clients. You can possibly forgo a server, but that would add complexity to how you maintain and manage repositories when sharing revision changes in a collaborative setup and would make consistency more difficult (we will revisit this in Chapter 11). The Git server and clients work as follows:
- Git server
-
A Git server enables you to collaborate more easily because it ensures the availability of a central and reliable source of truth for the repositories you will be working on. A Git server is also where your remote Git repositories are stored; as common practice goes, the repository has the most up-to-date and stable source of your projects. You have the option to install and configure your own Git server, or you can forgo the overhead and opt to host your Git repositories on reliable third-party hosting sites such as GitHub, GitLab, and Bitbucket.
- Git clients
-
Git clients interact with your local repositories, and you are able to interact with Git clients via the Git command line or the Git GUI tools. When you install and configure a Git client, you will be able to access the remote repositories, work on a local copy of the repository, and push changes back to the Git server. If you are new to Git, we recommend starting out using the Git command line; familiarize yourself with the common subset of
gitcommands required for your day-to-day operations and then progress to a Git GUI tool of your choice.
The reason for this approach is that to some extent, Git GUI tools tend to provide terminologies that represent a desired outcome that may not be part of Gitâs standard commands. An example would be a tool with an option called sync, which masks the underlying chaining of two or more git commands to achieve a desired outcome. If for some reason you were to enter the sync subcommand on the command line, you might get this confusing output:
$ git sync

git: 'sync' is not a git command. See 'git --help'.

The most similar command is
       svn
Note
git sync is not a valid git subcommand. To ensure that your local working copy of the repository is in sync with changes from the remote Git repository, you will need to run a combination of these commands: git fetch, git merge, git pull, or git push.
There are a plethora of tools available at your disposal. Some Git GUI tools are fancy and extensible via a plug-in model that provides you the option to connect and leverage features made available on popular third-party Git hosting sites. As convenient as it may be to learn Git via a GUI tool, we will be focusing on the Git command-line tool for examples and code discussions, since this builds a good foundational knowledge that will lead to Git dexterity.
Git Characteristics
Now that we have given an overview of the Git components, letâs learn about the characteristics of Git. Understanding these distinct traits of Git enables you to effortlessly switch from a centralized version control mindset to a distributed version control mentality. We like to refer to this as âThinking in Gitâ:
- Git stores revision changes as snapshots
-
The very first concept to unlearn is the way Git stores multiple revisions of a file that you are working on. Unlike other version control systems, Git does not track revision changes as a series of modifications, commonly known as deltas; instead, it takes a snapshot of changes made to the state of your repository at a specific point in time. In Git terminology this is known as a commit. Think of this as capturing a moment in time, as through a photograph.
- Git is enhanced for local development
-
In Git, you work on a copy of the repository on your local development machine. This is known as a local repository, or a clone of the remote repository on a Git server. Your local repository will have the resources and the snapshots of the revision changes made on those resources all in one location. Git terms these collections of linked snapshots repository commit history, or repo history for short. This allows you to work in a disconnected environment since Git does not need a constant connection to the Git server to version-control your changes. As a natural consequence, you are able to work on large, complex projects across distributed teams without compromising efficiency and performance for version control operations.
- Git is definitive
-
Definitive means the
gitcommands are explicit. Git waits for you to provide instructions on what to do and when to do it. For example, Git does not automatically sync changes from your local repository to the remote repository, nor does it automatically save a snapshot of a revision to your local repo history. Every action requires your explicit command or instruction to tell Git what is required, including adding new commits, fixing existing commits, pushing changes from your local repository to the remote repository, and even retrieving new changes from the remote repository. In short, you need to be intentional with your actions. This also includes letting Git know which files you intend to track, since Git does not automatically add new files to be version-controlled. - Git is designed to bolster nonlinear development
-
Git allows you to ideate and experiment with various implementations of features for viable solutions to your project by enabling you to diverge and work in parallel along the main, stable codebase of your project. This methodology, called branching, is a very common practice and ensures the integrity of the main development line, preventiing any accidental changes that may break it.
In Git, the concept of branching is considered lightweight and inexpensive because a branch in Git is just a pointer to the latest commit in a series of linked commits. For every branch you create, Git keeps track of the series of commits for that branch. You can switch between branches locally. Git then restores the state of the project to the most recent moment when the snapshot of the specified branch was created. When you decide to merge the changes from any branch into the main development line, Git is able to combine those series of commits by applying techniques that we will discuss in Chapter 6.
Tip
Since Git offers many novelties, keep in mind that the concepts and practices of other version control systems may work differently or may not be applicable at all in Git.
The Git Command Line
Gitâs command-line interface is simple to use. It is designed to put full control of your repository into your hands. As such, there are many ways to do the same thing. By focusing on which commands are important for your day-to-day work, we can simplify and learn them in more depth.
As a starting point, just type git version or git --version to determine whether your machine has already been preloaded with Git. You should see output similar to the following:
$ git --version
git version 2.37.0
If you do not have Git installed on your machine, please refer to Appendix B to learn how you can install Git according to your operating system platform before continuing with the next section.
Upon installation, type git without any arguments. Git will then list its options and the most common subcommands:
   $ git

   usage: git [-v | --version] [-h | --help] [-C <path>] [-c <name>=<value>]
              [--exec-path[=<path>]] [--html-path] [--man-path] [--info-path]
              [-p | --paginate | -P | --no-pager] [--no-replace-objects] [--bare]
              [--git-dir=<path>] [--work-tree=<path>] [--namespace=<name>]
              [--super-prefix=<path>] [--config-env=<name>=<envvar>]
              <command> [<args>]

   These are common Git commands used in various situations:

   start a working area (see also: git help tutorial)
      clone     Clone a repository into a new directory
      init      Create an empty Git repository or reinitialize an existing one

   work on the current change (see also: git help everyday)
      add       Add file contents to the index
      mv        Move or rename a file, a directory, or a symlink
      restore   Restore working tree files
      rm        Remove files from the working tree and from the index

   examine the history and state (see also: git help revisions)
      bisect    Use binary search to find the commit that introduced a bug
      diff      Show changes between commits, commit and working tree, etc
      grep      Print lines matching a pattern
      log       Show commit logs
      show      Show various types of objects
      status    Show the working tree status

   grow, mark and tweak your common history
      branch    List, create, or delete branches
      commit    Record changes to the repository
      merge     Join two or more development histories together
      rebase    Reapply commits on top of another base tip
      reset     Reset current HEAD to the specified state
      switch    Switch branches
      tag       Create, list, delete or verify a tag object signed with GPG

   collaborate (see also: git help workflows)
      fetch     Download objects and refs from another repository
      pull      Fetch from and integrate with another repository or a local branch
      push      Update remote refs along with associated objects

   'git help -a' and 'git help -g' list available subcommands and some((("git help command")))
   concept guides. See 'git help <command>' or 'git help <concept>'
   to read about a specific subcommand or concept.
   See 'git help git' for an overview of the system.
Tip
For a complete list of git subcommands, type git help --all.
As you can see from the usage hint, a small handful of options apply to git. Most options, shown as [ARGS] in the hint, apply to specific subcommands.
For example, the option --version affects the git command and produces a version number:
   $ git --version
   git version 2.37.0
In contrast, --amend is an example of an option specific to the git subcommand commit:
$ git commit --amend
Some invocations require both forms of options (here, the extra spaces in the command line merely serve to visually separate the subcommand from the base command and are not required):
$ git --git-dir=project.git repack -d
For convenience, documentation for each git subcommand is available using git help subcommand, git --help subcommand, git subcommand --help, or man git-subcommand.
Note
The complete Git documentation is online.
Historically, Git was provided as a suite of many simple, distinct, standalone commands developed according to the Unix philosophy: build small, interoperable tools. Each command sported a hyphenated name, such as git-commit and git-log.
However, modern Git installations no longer support the hyphenated command forms and instead use a single git executable with a subcommand.
The git commands understand both âshortâ and âlongâ options. For example, the git commit command treats the following examples equivalently:
   $ git commit -m "Fix a typo."
   $ git commit --message="Fix a typo."
The short form, -m, uses one hyphen, whereas the long form, --message, uses two. (This is consistent with the GNU long options extension.) Some options exist in only one form.
Tip
You can create a commit summary and detailed message for the summary by using the -m option multiple times:
$ git commit -m "Summary" -m "Detail of Summary"
Finally, you can separate options from a list of arguments via the bare double dash convention. For instance, use the double dash to contrast the control portion of the command line from a list of operands, such as filenames:
$ git diff -w main origin -- tools/Makefile
You may need to use the double dash to separate and explicitly identify filenames so that they are not mistaken for another part of the command. For example, if you happened to have both a file and a tag named main.c, then you will need to be intentional with your operations:
   # Checkout the tag named "main.c"
   $ git checkout main.c

   # Checkout the file named "main.c"
   $ git checkout -- main.c
Quick Introduction to Using Git
To see Git in action, you can create a new repository, add some content, and track a few revisions. You can create a repository in two ways: either create a repository from scratch and populate it with some content, or work with an existing repository by cloning it from a remote Git server.
Preparing to Work with Git
Whether you are creating a new repository or working with an existing repository, there are basic prerequisite configurations that you need to complete after installing Git on your local development machine. This is akin to setting up the correct date, time zone, and language on a new camera before taking your first snapshot.
At a bare minimum, Git requires your name and email address before you make your first commit in your repository. The identity you supply then shows as the commit author, baked in with other snapshot metadata. You can save your identity in a configuration file using the git config command:
   $ git config user.name "Jon Loeliger"
   $ git config user.email "jdl@example.com"
If you decide not to include your identity in a configuration file, you will have to specify your identity for every git commit subcommand by appending the argument --author at the end of the command:
$ git commit -m "log message" --author="Jon Loeliger <jdl@example.com>"
Keep in mind that this is the hard way, and it can quickly become tedious.
You can also specify your identity by supplying your name and email address to the GIT_AUTHOR_NAME and GIT_AUTHOR_EMAIL environment variables, respectively. If set, these variables will override all configuration settings. However, for specifications set on the command line, Git will override the values supplied in the configuration file and environment variable.
Working with a Local Repository
Now that you have configured your identity, you are ready to start working with a repository. Start by creating a new empty repository on your local development machine. We will start simple and work our way toward techniques for working with a shared repository on a Git server.
Creating an initial repository
We will model a typical situation by creating a repository for your personal website. Letâs assume youâre starting from scratch and you are going to add content for your project in the local directory ~/my_website, which you place in a Git repository.
Type in the following commands to create the directory, and place some basic content in a file called index.html:
   $ mkdir ~/my_website
   $ cd ~/my_website
   $ echo 'My awesome website!' > index.html
To convert ~/my_website into a Git repository, run git init. Here we provide the option -b followed by a default branch named main:
   $ git init -b main

   Initialized empty Git repository in ../my_website/.git/
If you prefer to initialize an empty Git repository first and then add files to it, you can do so by running the following commands:
   $ git init -b main ~/my_website

   Initialized empty Git repository in ../my_website/.git/

   $ cd ~/my_website
   $ echo 'My awesome website!' > index.html
Tip
You can initialize a completely empty directory or an existing directory full of files. In either case, the process of converting the directory into a Git repository is the same.
The git init command creates a hidden directory called .git at the root level of your project. All revision information along with supporting metadata and Git extensions are stored in this top-level, hidden .git folder.
Git considers ~/my_website to be the working directory. This directory contains the current version of files for your website. When you make changes to existing files or add new files to your project, Git records those changes in the hidden .git folder.
For the purpose of learning, we will reference two virtual directories that we call Local History and Index to illustrate the concept of initializing a new Git repository. We will discuss the Local History and Index in Chapters 4 and 5, respectively.
Figure 1-2 depicts what we have just explained:
. âââ my_website âââ .git/ â âââ Hidden git objects âââ index.html
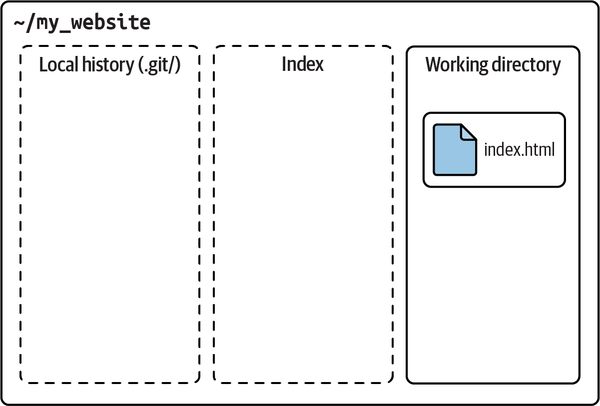
Figure 1-2. Initial repository
The dotted lines surrounding the Local History and Index represent the hidden directories within the .git folder.
Adding a file to your repository
Up to this point, you have only created a new Git repository. In other words, this Git repository is empty. Although the file index.html exists in the directory ~/my_website, to Git, this is the working directory, a representation of a scratch pad or directory where you frequently alter your files.
When you have finalized changes to the files and want to deposit those changes into the Git repository, you need to explicitly do so by using the git add file
command:
$ git add index.html
Warning
Although you can let Git add all the files in the directory and all subdirectories using the git add . command, this stages everything, and we advise you to be intentional with what you are planning to stage, mainly to prevent sensitive information or unwanted files from being included when commits are made. To avoid including such information, you can use the .gitignore file, which is covered in Chapter 5.
The argument ., the single period or dot in Unix parlance, is shorthand for the current directory.
With the git add command, Git understands that you intend to include the final iteration of the modification on index.html as a revision in the repository. However, so far Git has merely staged the file, an interim step before taking a snapshot via a commit.
Git separates the add and commit steps to avoid volatility while providing flexibility and granularity in how you record changes. Imagine how disruptive, confusing, and time-consuming it would be to update the repository each time you add, remove, or change a file. Instead, multiple provisional and related steps, such as an add, can be batched, thereby keeping the repository in a stable, consistent state. This method also allows us to craft a narrative of why we are changing the code. In Chapter 4 we will dive deeper into this concept.
We recommend that you strive to group logical change batches before making a commit. This is called an atomic commit and will help you in situations where youâll need to do some advanced Git operations in later chapters.
Running the git status command reveals this in-between state of index.html:
   $ git status

   On branch main

   No commits yet

   Changes to be committed:
     (use "git rm --cached <file>..." to unstage)
	    new file:   index.html
The command reports that the new file index.html will be added to the repository during the next commit.
After staging the file, the next logical step is to commit the file to the repository. Once you commit the file, it becomes part of the repository commit history; for brevity, we will refer to this as the repo history. Every time you make a commit, Git records several other pieces of metadata along with it, most notably the commit log message and the author of the change.
A fully qualified git commit command should supply a terse and meaningful log message using active language to denote the change that is being introduced by the commit. This is very helpful when you need to traverse the repo history to track down a specific change or quickly identify changes of a commit without having to dig deeper into the change details. We dive in deeper on this topic in Chapters 4 and 8.
Letâs commit the staged index.html file for your website:
   $ git commit -m "Initial contents of my_website"

   [main (root-commit) c149e12] initial contents of my_website
    1 file changed, 1 insertion(+)
    create mode 100644 index.html
Note
The details of the author who is making the commit are retrieved from the Git configuration we set up earlier.
In the code example, we supplied the -m argument to be able to provide the log message directly on the command line. If you prefer to provide a detailed log message via an interactive editor session, you can do so as well. You will need to configure Git to launch your favorite editor during a git commit (leave out the -m argument); if it isnât set already, you can set the $GIT_EDITOR environment variable as follows:
   # In bash or zsh
   $ export GIT_EDITOR=vim

   # In tcsh
   $ setenv GIT_EDITOR emacs
Note
Git will honor the default text editor configured in the shell environment variables VISUAL and EDITOR. If neither is configured, it falls back to using the vi editor.
After you commit the index.html file into the repository, run git status to get an update on the current state of your repository. In our example, running git status should indicate that there are no outstanding changes to be committed:
   $ git status

   On branch main
   nothing to commit, working tree clean
Git also tells you that your working directory is clean, which means the working directory has no new or modified files that differ from what is in the repository.
Figure 1-3 will help you visualize all the steps you just learned.
The difference between git add and git commit is much like you organizing a group of schoolchildren in a preferred order to get the perfect classroom photograph: git add does the organizing, whereas git commit takes the snapshot.
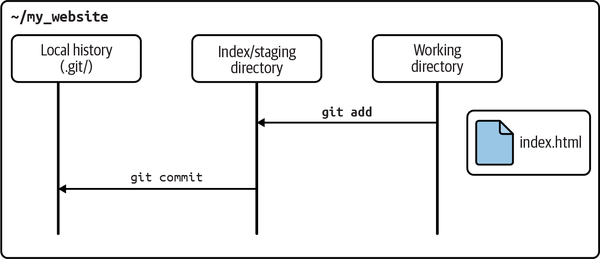
Figure 1-3. Staging and adding a file to a repository
Making another commit
Next, letâs make a few modifications to index.html and create a repo history within the repository.
Convert index.html into a proper HTML file, and commit the alteration to it:
   $ cd ~/my_website

   # edit the index.html file.

   $ cat index.html
   <html>
   <body>
   My website is awesome!
   </body>
   </html>

   $ git commit index.html -m 'Convert to HTML'
   [main 521edbe] Convert to HTML
    1 file changed, 5 insertions(+), 1 deletion(-)
If you are already familiar with Git, you may be wondering why we skipped the git add index.html step before we committed the file. It is because the content to be committed may be specified in more than one way in Git.
Type git commit --help to learn more about these options:
   $ git commit --help

   NAME
       git-commit - Record changes to the repository

   SYNOPSIS
       git commit [-a | --interactive | --patch] [-s] [-v] [-u<mode>] [--amend]
                  [--dry-run] [(-c | -C | --squash) <commit> | --fixup [(amend|reword):]<commit>)]
                  [-F <file> | -m <msg>] [--reset-author] [--allow-empty]
                  [--allow-empty-message] [--no-verify] [-e] [--author=<author>]
                  [--date=<date>] [--cleanup=<mode>] [--[no-]status]
                  [-i | -o] [--pathspec-from-file=<file> [--pathspec-file-nul]]
                  [(--trailer <token>[(=|:)<value>])...] [-S[<keyid>]]
                  [--] [<pathspec>...]

   ...
Tip
Detailed explanations of the various commit methods are also explained in the git commit --help manual pages.
In our example, we decided to commit the index.html file with an additional argument, the -m switch, which supplied a message explaining the changes in the commit: 'Convert to HTML'. Figure 1-4 explains the method we just discussed.
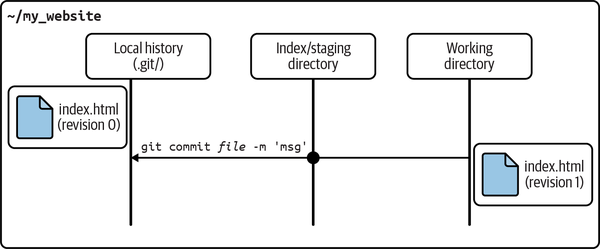
Figure 1-4. Staging and adding changes to a tracked file in a repository
Note that our usage of git commit index.html -m 'Convert to HTML' does not skip the staging of the file; Git handles it automatically as part of the commit action.
Viewing your commits
Now that you have more commits in the repo history, you can inspect them in a variety of ways. Some git commands show the sequence of individual commits, others show the summary of an individual commit, and still others show the full details of any commit you specify in the repository.
The git log command yields a sequential history of the individual commits within the repository:
   $ git log

   commit 521edbe1dd2ec9c6f959c504d12615a751b5218f (HEAD -> main)
   Author: Jon Loeliger <jdl@example.com>
   Date:   Mon Jul 4 12:01:54 2022 +0200

        Convert to HTML

   commit c149e12e89a9c035b9240e057b592ebfc9c88ea4
   Author: Jon Loeliger <jdl@example.com>
   Date:   Mon Jul 4 11:58:36 2022 +0200

        Initial contents of my_website
In the preceding output, the git log command prints out detailed log information for every commit in the repository. At this point you have only two commits in your repo history, which makes it easier to read the output. For repositories with many commit histories, this standard view may not help you traverse a long list of detailed commit information with ease; in such situations you can provide the --oneline switch to list a summarized commit ID number along with the commit message:
   $ git log --oneline

   521edbe (HEAD -> main) Convert to HTML
   c149e12 Initial contents of my_website
The commit log entries are listed, in order, from most recent to oldest1 (the original file); each entry shows the commit authorâs name and email address, the date of the commit, the log message for the change, and the internal identification number of the commit. The commit ID number is explained in âContent-Addressable Databaseâ. We will discuss commits in more detail in Chapter 4.
If you want to see more detail about a particular commit, use the git show command with a commit ID number:
   $ git show c149e12e89a9c035b9240e057b592ebfc9c88ea4

   commit c149e12e89a9c035b9240e057b592ebfc9c88ea4
   Author: Jon Loeliger <jdl@example.com>
   Date:   Mon Jul 4 11:58:36 2022 +0200

   Initial contents of my_website

   diff --git a/index.html b/index.html
   new file mode 100644
   index 0000000..6331c71
   --- /dev/null
   +++ b/index.html
   @@ -0,0 +1 @@
   +My awesome website!
Tip
If you run git show without an explicit commit number, it simply shows the details of the HEAD commit, in our case, the most recent one.
The git log command shows the commit logs for how changes for each commit are included in the repo history. If you want to see concise, one-line summaries for the current development branch without supplying additional filter options to the git log --oneline command, an alternative approach is to use the git show-branch command:
   $ git show-branch --more=10

   [main] Convert to HTML
   [main^] Initial contents of my_website
The phrase --more=10 reveals up to an additional 10 versions, but only two exist so far and so both are shown. (The default in this case would list only the most recent commit.) The name main is the default branch name.
We will discuss branches and revisit the git show-branch command in more detail in Chapter 3.
Viewing commit differences
With the repo history in place from the addition of commits, you can now see the differences between the two revisions of index.html. You will need to recall the commit ID numbers and run the git diff command:
   $ git diff c149e12e89a9c035b9240e057b592ebfc9c88ea4 \
               521edbe1dd2ec9c6f959c504d12615a751b5218f

   diff --git a/index.html b/index.html
   index 6331c71..8cfcb90 100644
   --- a/index.html
   +++ b/index.html
   @@ -1 +1,5 @@
   -My awesome website!
   +<html>
   +<body>
    My website is awesome!
   +</body>
   +</html>
The output resembles what the git diff command produces. As per convention, the first revision commit, 9da581d910c9c4ac93557ca4859e767f5caf5169, is the earlier of the content for index.html, and the second revision commit, ec232cddfb94e0dfd5b5855af8ded7f5eb5c90d6, is the latest content of index.html. Thus, a plus sign (+) precedes each line of new content after the minus sign (â), which indicates removed content.
Note
Do not be intimidated by the long hex numbers. Git provides many shorter, easier ways to run similar commands so that you can avoid large, complicated commit IDs. Usually the first seven characters of the hex numbers, as shown in the git log --oneline example earlier, are sufficient. We elaborate on this in âContent-Addressable Databaseâ.
Removing and renaming files in your repository
Now that you have learned how to add files to a Git repository, letâs look at how to remove a file from one. Removing a file from a Git repository is analogous to adding a file but uses the git rm command. Suppose you have the file adverts.html in your website content and plan to remove it. You can do so as follows:
   $ cd ~/my_website
   $ ls
   index.html  adverts.html

   $ git rm adverts.html
   rm  'adverts.html'

   $ git commit -m "Remove adverts html"
   [main 97ff70a] Remove adverts html
    1 file changed, 0 insertions(+), 0 deletions(-)
    delete mode 100644 adverts.html
Similar to an addition, a deletion also requires two steps: express your intent to remove the file using git rm, which also stages the file you intend to remove. Realize the change in the repository with a git commit.
Note
Just as with git add, with git rm we are not directly deleting the file; instead, we are changing what is tracked: the deletion or addition of a file.
You can rename a file indirectly by using a combination of the git rm and git add commands, or you can rename the file more quickly and directly with the command git mv. Hereâs an example of the former:
   $ mv foo.html bar.html
   $ git rm foo.html
   rm 'foo.html'

   $ git add bar.html
In this sequence, you must execute mv foo.html bar.html at the onset to prevent git rm from permanently deleting the foo.html file from the filesystem.
Hereâs the same operation performed with git mv:
$ git mv foo.html bar.html
In either case, the staged changes must subsequently be committed:
   $ git commit -m "Moved foo to bar"
   [main d1e37c8] Moved foo to bar
    1 file changed, 0 insertions(+), 0 deletions(-)
    rename foo.html => bar.html (100%)
Git handles file move operations differently than most similar systems, employing a mechanism based on the similarity of the content between two file versions. The specifics are described in Chapter 5.
Working with a Shared Repository
By now you have initialized a new repository and have been making changes to it. All the changes are only available to your local development machine. This is a good example of how you can manage a project that is only available to you. But how can you work collaboratively on a repository that is hosted on a Git server? Letâs discuss how you can achieve this.
Making a local copy of the repository
You can create a complete copy, or a clone, of a repository using the git clone command. This is how you collaborate with other people, making changes on the same files and keeping in sync with changes from other versions of the same repository.
For the purposes of this tutorial, letâs start simple by creating a copy of your existing repository; then we can contrast the same example as if it were on a remote Git server:
   $ cd ~
   $ git clone my_website new_website
Although these two Git repositories now contain exactly the same objects, files, and directories, there are some subtle differences. You may want to explore those differences with commands such as the following:
   $ ls -lsa my_website new_website
   ...
   $ diff -r my_website new_website
   ...
On a local filesystem like this, using git clone to make a copy of a repository is quite similar to using cp -a or rsync. In contrast, if you were to clone the same repository from a Git server, the syntax would be as follows:
   $ cd ~

   $ git clone https://git-hosted-server.com/some-dir/my_website.git new_website
   Cloning into 'new_website'...
   remote: Enumerating objects: 2, done.
   remote: Counting objects: 100% (2/2), done.
   remote: Compressing objects: 100% (103/103), done.
   remote: Total 125 (delta 45), reused 65 (delta 18), pack-reused 0
   Receiving objects: 100% (125/125), 1.67 MiB | 4.03 MiB/s, done.
   Resolving deltas: 100% (45/45), done.
Once you clone a repository, you can modify the cloned version, make new commits, inspect its logs and history, and so on. It is a complete repository with a full history. Remember that the changes you make to the cloned repository will not be automatically pushed to the original copy on the repository.
Figure 1-5 depicts this concept.

Figure 1-5. Cloning a shared repository
Try not to be distracted by some of the terms you see in the output. Git supports a richer set of repository sources, including network names, for naming the repository to be cloned. We will explain these forms and usage in Chapter 11.
Configuration Files
Git configuration files are all simple text files in the style of .ini files. The configuration files are used to store preferences and settings used by multiple git commands. Some of the settings represent personal preferences (e.g., should a color.pager be used?), others are important for a repository to function correctly (e.g., core repositoryformatversion), and still others tweak git command behavior a bit (e.g., gc.auto). Like other tools, Git supports a hierarchy of configuration files.
Hierarchy of configuration files
Figure 1-6 represents the Git configuration files hierarchy in decreasing precedence:
- .git/config
-
Repository-specific configuration settings manipulated with the
--fileoption or by default. You can also write to this file with the--localoption. These settings have the highest precedence. - ~/.gitconfig
-
User-specific configuration settings manipulated with the
--globaloption. - /etc/gitconfig
-
System-wide configuration settings manipulated with the
--systemoption if you have proper Unix file write permissions on the gitconfig file. These settings have the lowest precedence. Depending on your installation, the system settings file might be somewhere else (perhaps in /usr/local/etc gitconfig) or may be absent entirely.
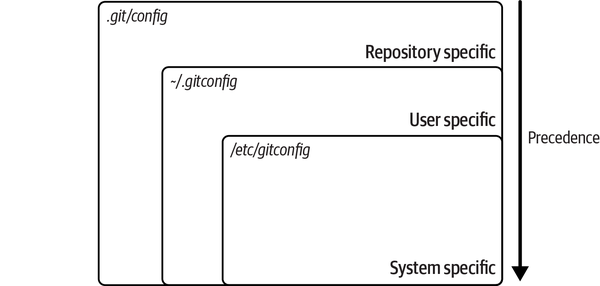
Figure 1-6. Git configuration files hierarchy
For example, to store an author name and email address that will be used on all the commits you make for all of your repositories, configure values for user name and user.email in your $HOME/.gitconfig file using git config --global:
   $ git config --global user.name "Jon Loeliger"
   $ git config --global user.email "jdl@example.com"
If you need to set a repository-specific name and email address that would override a --global setting, simply omit the --global flag or use the --local flag to be explicit:
   $ git config user.name "Jon Loeliger"
   $ git config user.email "jdl@special-project.example.org"
You can use git config -l (or the long form --list) to list the settings of all the variables collectively found in the complete set of configuration files:
   # Make a brand-new, empty repository
   $ mkdir /tmp/new
   $ cd /tmp/new
   $ git init

   # Set some config values
   $ git config --global user.name "Jon Loeliger"
   $ git config --global user.email "jdl@example.com"
   $ git config user.email "jdl@special-project.example.org"

   $ git config -l
   user.name=Jon Loeliger
   user.email=jdl@example.com
   core.repositoryformatversion=0
   core.filemode=true
   core.bare=false
   core.logallrefupdates=true
   user.email=jdl@special-project.example.org
Tip
When specifying the command git config -l, adding the options --show-scope and --show-origin will help to print the various sources for the configurations! Try this out with git config -l --show-scope --show-origin in your terminal.
Because the configuration files are simple text files, you can view their contents with cat and edit them with your favorite text editor too:
   # Look at just the repository-specific settings

   $ cat .git/config
   [core]
       repositoryformatversion = 0
       filemode = true
       bare = false
       logallrefupdates = true
ignorecase = true
	precomposeunicode = true

   [user]
       email = jdl@special-project.example.org
Note
The content of the configuration text file may be presented with some slight differences according to your operating system type. Many of these differences allow for different filesystem characteristics.
If you need to remove a setting from the configuration files, use the --unset option together with the correct configuration files flag:
$ git config --unset --global user.email
Git provides you with many configuration options and environment variables that frequently exist for the same purpose. For example, you can set a value for the editor to be used when composing a commit log message. Based on the configuration, invocation follows these steps:
-
GIT_EDITORenvironment variable -
core.editorconfiguration option -
VISUALenvironment variable -
EDITORenvironment variable -
The
vicommand
There are more than a few hundred configuration parameters. We will not bore you with them but will point out important ones as we go along. A more extensive (yet still incomplete) list can be found on the git config manual page.
Tip
A complete list of all git commands is online.
Configuring an alias
Git aliases allow you to substitute common but complex git commands that you type frequently with simple and easy-to-remember aliases. This also saves you the hassle of remembering or typing out those long commands, and it saves you from the frustration of running into typos:
   $ git config --global alias.show-graph \
           'log --graph --abbrev-commit --pretty=oneline'
In this example, we created the show-graph alias and made it available for use in any repository we create. When we use the command git show-graph, it will give us the same output we got when we typed that long git log command with all those options.
Summary
You will surely have a lot of unanswered questions about how Git works, even after everything youâve learned so far. For instance, how does Git store each version of a file? What really makes up a commit? Where did those funny commit numbers come from? Why the name âmainâ? And is a âbranchâ what I think it is? These are good questions. What we covered gives you a glimpse of the operations you will commonly use in your projects. The answer to your questions will be explained in detail in Part II.
The next chapter defines some terminology, introduces some Git concepts, and establishes a foundation for the lessons found in the rest of the book.
1 Strictly speaking, they are not in chronological order but rather are a topological sort of the commits.
Get Version Control with Git, 3rd Edition now with the O’Reilly learning platform.
O’Reilly members experience books, live events, courses curated by job role, and more from O’Reilly and nearly 200 top publishers.

