Chapter 1. The ABCs of C
C is a powerful language. It is procedural (meaning you do a lot of your coding work with procedures) and compiled (meaning the code you write must be translated for use by a computer using a compiler). You can write your procedures anywhere you can edit a text file, and you can compile those procedures to run on anything from supercomputers to the tiniest of embedded controllers. Itâs a fantastic, mature languageâIâm glad youâre here learning about it!
C has been around for quite some time: it was developed in the early 1970s by Dennis Ritchie at Bell Labs. You might have heard of him as one of the authors of the canonical C programming book, The C Programming Language with Brian Kernighan (Pearson). (If you see or hear or read about the phrase âK&Râ in the programming world, thatâs a reference to the book.) As a general purpose, procedural language built with an eye toward keeping programmers connected to the hardware their programs would run on, C caught on with both academic and industrial institutions outside Bell Labs to run a growing array of computers and remains a viable systems programming language.
Like all languages, C is not static. And with nearly 50 years under its belt, C has undergone many changes and spawned a great number of other languages. You can see its influence in the syntax of languages as disparate as Java and Perl. Indeed, some of Câs elements are so universal that you see it show up in pseudocode examples meant to represent âanyâ language.
As C grew in popularity, it became necessary to organize and standardize its syntax and features. The first part of this book will focus on Standard C as defined by the International Organization for Standardization (ISO) and the code we write will be portable to any C compiler on any platform. The latter part of this book will focus on using C with specific hardware such as the Arduino microcontroller.
Strengths and Weaknesses
When you think about solving actual problems with a computer these days, using a high-level language is a must. C provides a great balance between code you can think about and code that performs well when compiled for actual hardware. C has straightforward code structures and a wealth of useful operators. (These are the features that have spread into so many subsequent languages and makes it such a good option for lean code on microcontrollers.) C also gives you room to break problems up into smaller subproblems. You can reason about the code (and its inevitable bugs) as a humanâquite a handy thing.
C does have its downsides, though. C does not have some of the fancier features available today in other languages such as Javaâs automatic memory garbage collection. Many modern languages hide most of those details from the programmer at the expense of a little performance. C requires you to be more deliberate in how you allocate and manage resources like memory. Sometimes that requirement can feel tedious.
C also lets you write some pretty impressive bugs. It has no type safety or really any safety checks at all. Again, as a programmer, this hands-off approach means you can write clever, efficient code that really hums on the hardware. It also means that if you get something wrong, itâs up to you to find and fix the problem. (Tools like linters and debuggers help; weâll definitely be looking at those along the way.)
Getting Started
So how do we get started? As with any compiled language, weâll first need a file containing some valid C instructions. Weâll then need a compiler that can translate those instructions. With the right contents in the file and a compiler for your own computerâs hardware, you can have a C program running in just a few minutes.
If you have spent any time learning any computer language at all, youâre likely familiar with the idea of a âHello, Worldâ program. Itâs an admirably simple idea: create a tiny program that proves several things in one go. It proves you can write valid code in the language. It proves your compiler or interpreter works. It also proves you can produce visible output, which comes in very handy for humans, as it turns out. Letâs get started!
Tools Required
Folks use computers today for a vast array of tasks. Entertainment such as games and streaming video takes up as many (if not more) CPU cycles as business productivity work or even application development. And because computers are used as much for consuming as they are for producing, very few systems come with the tools required to do stuff like application development. Happily, those tools are freely available, but you do have to go get them yourself and then set them up to work on your system.
As Iâve noted before, this book focuses on writing clean, efficient C code. I take care in our examples to avoid overly clever patterns. I also work hard to ensure the examples do not rely on a particular compiler or a particular development platform. To that end, Iâll be working with the minimum setup required for any software development: a good editor and a good compiler.1
If youâre comfortable hunting down software online and want to dive right in, weâll be installing Visual Studio Code (often just âVS Codeâ) from Microsoft as our editor and the GNU developer tools from the GNU Foundation to handle compiling. More links and details follow, but feel free to jump to âCreating a C âHello, Worldââ after installing these tools on your own or if you already have an editor and a compiler youâre comfortable using.
Windows
Microsoft Windows owns the lionâs share of the desktop market. If you only write programs for one system, Windows gets you the most bang for your buck. But that means that youâll find a lot more competition in the software that helps you write those programs. There are more commerical developer applications for Windows than any other platform. Fortunately, many of those applications have a free or âcommunityâ version that will suffice for our purposes. (When we get to the Arduino focus in the second part of this book, weâll be looking at some Arduino-specific tools that include compilers.)
You canât talk about Windows and software development without mentioning the Visual Studio IDE (Integrated Development Environment) from Microsoft. If you want to build applications for Windows itself, itâs hard to beat Visual Studio. They even offer a community edition for students and individual developers. While I wonât be discussing either edition for the examples in this book, Visual Studio is a great IDE for Windows users and will easily handle our code. (I will, however, be using a close cousin called Visual Studio Code as our editor on all three of the major platforms.)
Note
Another popular commerical IDE is CLion from Jetbrains. CLion is also cross-platform so you can easily move between different operating systems and still feel productive. If you have experience with any of the other quality applications from Jetbrains, CLion can be a familiar way to get started writing and debugging C code.
There are myriad other text editors, each with some pros and cons. You can even use tools like the built-in Notepad application, although programming-specific editors will have some handy features that can make reading and debugging your code easier.
GNU tools on Windows
On Windows, installing the GCC tool from GNU can be a bit tedious. Thereâs no quick, friendly installer.2 You can find a variety of binary packages that provide most of what we need, but you still have to take care to download the GNU compiler subpackages and then configure your Windows environment.
We will install the Cygwin environment to get our Windows version of GCC. Cygwin is a much larger collection of tools and utilities that provides Windows users with a nice Unix shell environment. But âniceâ is pretty subjective, and if you donât know Unix or its derivatives such as Linux or modern macOS, you probably wonât use much else of the collection.
Grab the Cygwin setup executable. Once itâs done downloading, go ahead and launch it. You may need to âallow this app from an unknown publisher to make changes to your device.â You can try the âInstall from Internetâ option, but if you have any trouble, go back and use the âDownload Without Installingâ option. Youâll still want to follow the package selection step, but after the download completes, you can run this installer program a second time and choose the âInstall from Local Directoryâ option and use the folder where you downloaded all of the packages.
Go ahead and accept the defaults for any questions the installer asks. When you get to the mirror selection page, use one physically close to you if you can identify a university or business you know. Otherwise, any mirror should doâbut itâs OK to come back and pick a different one if you have any troubles with the download.
On the âSelect Packageâ screen, you do need to make an extra selection as gcc is not included by default. Switch the View dropdown to âFullâ and then enter âgccâ as a search term. You want the âgcc-coreâ package as highlighted in Figure 1-1. Any of the versions available are sufficient for our needs. At the time of this writing, we selected the most recent gcc-core version, which was 10.2.0-1.
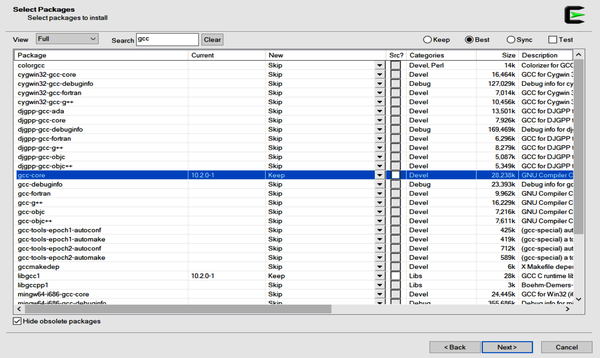
Figure 1-1. Selecting the Cygwin GCC package
Confirm your selections on the Review page and start the download! It may take a little time to download and install everything, but you should eventually hit the Finish screen. You can add the desktop icon if you want to play around with a Unix-like command prompt, but it is not required for the work weâll be doing. What is required, though, is an extra step to add the Cygwin tools to Microsoftâs command prompt.
You may wish to search online for a guided tour of creating and editing Windows environment variables, but here are the basics. (If youâve done this type of thing before, feel free to skip to the Cygwin folder selection and just put that in your path.)
From the Start menu, search for âenvâ and you should quickly see an option to edit the system environment variables at the top, as shown in Figure 1-2.
The System Properties dialog should open, and you want to click the âEnvironment Variablesâ¦â button near the bottom right corner, as shown in Figure 1-3.

Figure 1-2. Finding the environment variable editor in Windows
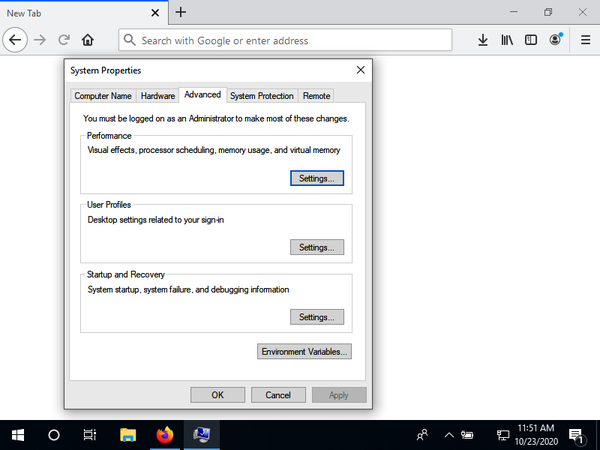
Figure 1-3. The System Properties dialog in Windows
You can set just your path or set it system wide. Highlight the PATH entry you want to update and then click Edit. Next, click the New button on the âEdit environment variablesâ dialog and then click the Browse button to navigate to the Cygwin bin folder, as shown in Figure 1-4. (If you recall the root folder you chose for the Cygwin installer to put everything in, you can also just type that in, of course.)
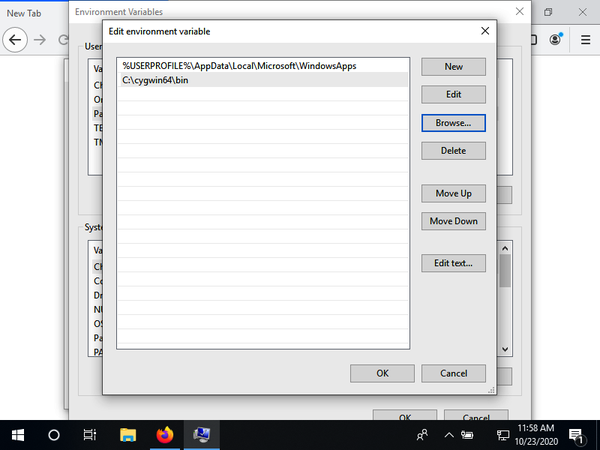
Figure 1-4. Adding the Cygwin bin folder to the Path environment variable
Select the OK button to close each of the dialogs and you should be set!
For the editor, you can find VS Code at the Visual Studio site. Depending on your system, you will most likely want either the 64-bit or 32-bit user installer version.3
Use the Extensions view shown in Figure 1-5 to grab the C/C++ extension. You can search for the simple letter âc,â but you might also see the extension right away on the âPopularâ list. Go ahead and click the small green Install button for the extension.
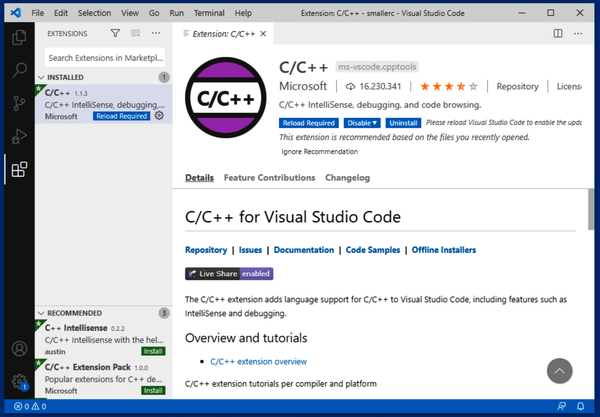
Figure 1-5. The C extension in VS Code
Letâs test the GCC tool from those Cygwin utilities.
(You may need to restart Visual Studio Code for it to recognize your Cygwin tools.) From the View menu, select the Terminal option. The Terminal tab should open at the bottom. You may need to hit the Enter key to get a prompt. Run gcc --version at the prompt. Hopefully, youâll see output similar to that in Figure 1-6.
You should see the version number matching the package you selected as you were installing Cygwin. If you do, hooray! Jump down to âCreating a C âHello, Worldââ and get started with your first C program. If you donât see any output or get a ânot recognizedâ error, review the steps to set up Windows environment variables. And as always, searching online for particular errors you see can help you solve most installation and setup issues.

Figure 1-6. Testing GCC in the Terminal tab
macOS
If you live mostly with graphical applications and tools, you might not be aware of the Unix underpinnings of macOS. While you can mostly remain blissfully ignorant of those underpinnings, it is useful to know a bit about navigating the world from a command prompt. Weâll be using the Terminal app to download and install GCC, but as with Windows, it is worth noting that Appleâs official developer tool, Xcode, can be used to write and compile C code. Fortunately we donât need all of Xcode to get going with C, so weâll stick to the minimum.
The Terminal app is in the Application â Utilities folder. Go ahead and start it. You should see something like Figure 1-7.
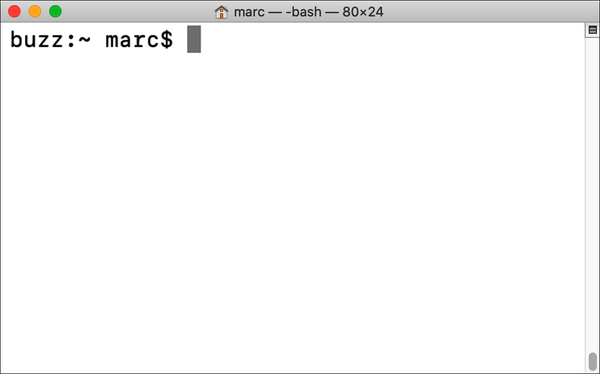
Figure 1-7. A basic macOS Terminal window
If you already have the main Apple programming application, Xcode, you can
quickly check to see if GCC is also available. Try running gcc -v:
$ gcc -v
Configured with: --prefix=/Library/Developer/CommandLineTools/usr --with...
Apple clang version 11.0.3 (clang-1103.0.32.62)
Target: x86_64-apple-darwin19.6.0
Thread model: posix
InstalledDir: /Library/Developer/CommandLineTools/usr/bin
The exact versions arenât that important; we just want to make sure GCC is in
fact available. If not, youâll need to install the xcode-select command-line tool, which will bring GCC along for the ride. Type in xcode-select --install and follow the prompts. A dialog will ask if you want to install the command-line tools; say yes and youâre on your way.
After the installation completes, go ahead and run that gcc -v command to make sure you have the compiler. If you donât get a good response, you may need to visit Appleâs Developer Support site and search on âcommand-line tools.â
Installing VS Code on macOS is much simpler. Visit the same VS Code downloads page at the Visual Studio site. Select the macOS download. You should receive a ZIP file in your standard download folder. Double-click that file to unzip it, and then drag the resulting Visual Studio Code.app file to your Applications folder. If you are prompted for your password to move the app to Applications, go ahead and provide it now.
Once relocated, go ahead and open VS Code. We want to add the C/C++ extension and then check that we can access GCC from the Terminal tab.
Pull up the Extensions panel in VS Code by clicking the âboxesâ icon shown in Figure 1-8. You can search for the simple letter âCâ and likely find the correct extension at the top of the results.
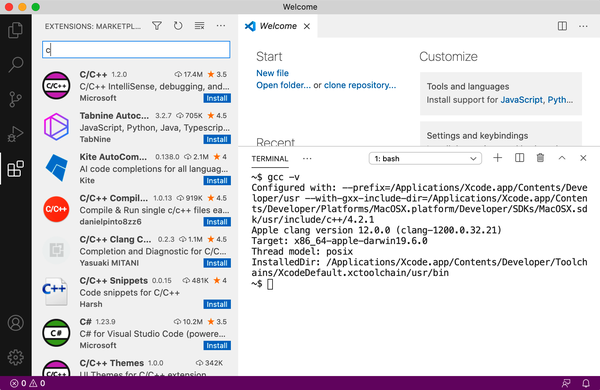
Figure 1-8. VS Code extensions
To try out the Terminal tab, open it from the View â Terminal menu item. You should see a new section at the bottom of your editor space. Go ahead and try running our GCC check command (gcc -v) in that new area. You should see results similar to Figure 1-9.
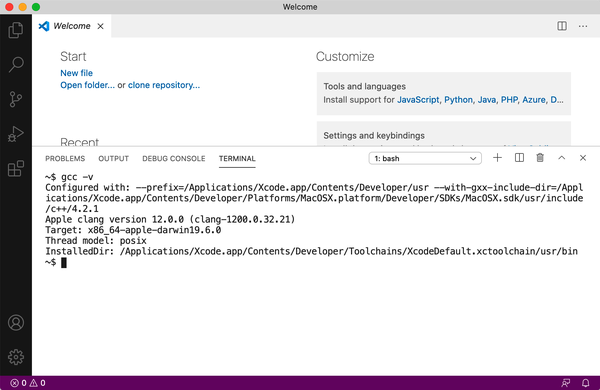
Figure 1-9. Trying GCC in VS Code on macOS
Again, if you donât get the expected results from running the gcc command, check Appleâs developer site. You can also find several video tutorials online that may help you with your particular setup.
Linux
Many Linux systems are geared toward folks who tinker. You might already have GCC available. You can check quickly by starting the Terminal app and running the same check used on other operating systems. If gcc -v returns an answerâother than âCommand not found,â of courseâthen you are good to go and can download VS Code. If you need to install GCC, you can use the package manager on your platform. You might have a nifty graphical application for such things; look for âdeveloper toolsâ or âsoftware developmentâ and then read the description to see if GCC or GNU utilities are included.
For Debian/Ubuntu systems, you can grab the build-essential metapackage that will include
GCC along with lots of other useful (or required) libraries and tools:
$ sudo apt install build-essential
For Redhat/Fedora/CentOS systems, the Dandified Yum (dnf) tool can be used. We only need GCC for our work in this book:
$ su -
# dnf install gcc
Although if youâre curious about software development in general, you might want to grab the âDevelopment Toolsâ group package, which includes GCC along with lots of other nifty things:
$ su -
# dnf groupinstall "Development Tools"
Manjaro is another popular Linux distribution based on Arch Linux. You can use the
pacman tool here:
$ su -
# pacman -S gcc
If you have some other flavor of Linux that doesnât use apt, dnf, or pacman, you can
easily search for âinstall gcc my-linuxâ or use the search option with your systemâs
package manager to look for âgccâ or âgnu.â
As a Linux user, you may already have some experience with text editors for writing shell scripts or other languages. If youâre already comfortable with your editor and the terminal, you can skip forward. But if you are new to coding or donât have a favorite editor, go ahead and install VS Code. Visit the same VS Code downloads page at the Visual Studio site as mentioned for the other operating systems. Get the appropriate bundle for your system. (If your flavor of Linux doesnât use .deb or .rpm files, you can get the .tar.gz version.)
Double-click the downloaded file and you should be prompted to go through a standard installation. You may be asked for an administrative password if you are installing VS Code for all users. Different distributions will put VS Code in different spots, and different desktops have different app launchers. You can also launch VS Code from the command line using the code command.
As with the other operating systems, we want to add the C/C++ extension and then check that we can access GCC from the Terminal tab.
Pull up the Extensions panel in VS Code by clicking the âboxesâ icon shown in Figure 1-10. You can search for the simple letter âCâ and likely find the correct extension at the top of the results.
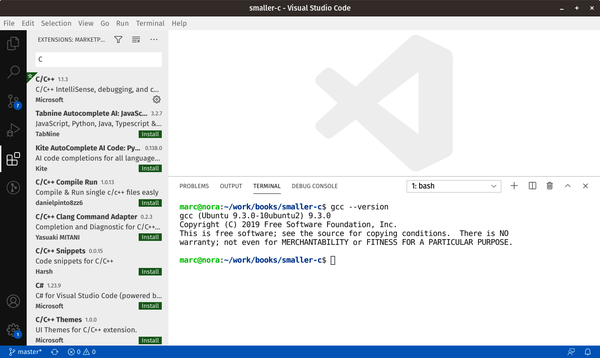
Figure 1-10. VS Code extensions on Linux
To try out the Terminal tab, open it from the View â Terminal menu item. You should see a new section at the bottom of your editor space. Go ahead and try running our GCC check command (gcc -v) in that new area. You should see (verbose and slightly messy) results similar to Figure 1-11.
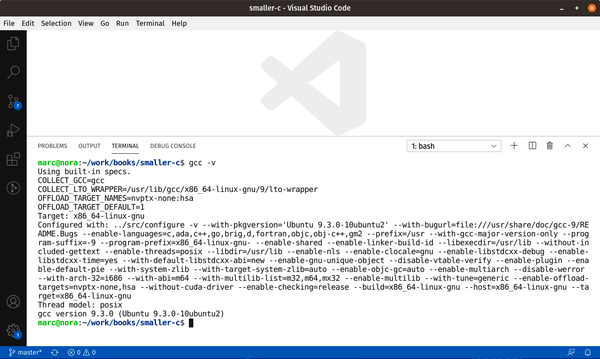
Figure 1-11. Trying GCC in VS Code on Linux
Hooray, hooray. Hopefully, you have a simple C development environment up and running. Letâs go write some code!
Creating a C âHello, Worldâ
With your editor and compiler in place, we can try out the acclaimed first program many developers write in any new language: the âHello, Worldâ program. It is meant to show you can write valid code in the new language and that you can output information.
C, as a language, can be terse. Weâll be getting into all the nitty-gritty of semicolons, curly braces, backslashes, and other strange symbols in this first program, but for now, copy this small bit of code verbatim. You can create a new file in VS Code using a right-click in the Explorer on the left, or using the File â New File menu item, or by pressing Ctrl+N.
#include <stdio.h>intmain(){printf("Hello, world\n");}
Go ahead and save the file and name it hello.c. Weâll also go ahead and open the Terminal in VS Code (View â Terminal menu item or Ctrl+`). You should see something similar to Figure 1-12.
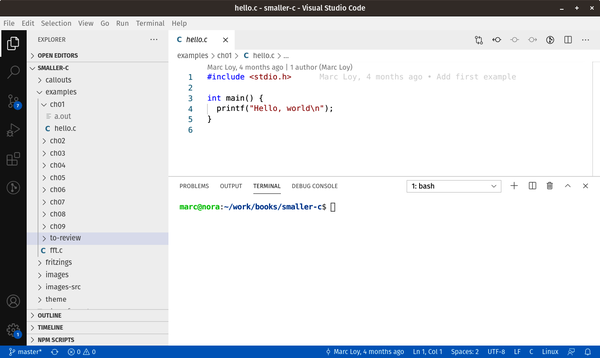
Figure 1-12. âHello, Worldâ and our Terminal tab
If you know other languages already then you can probably guess whatâs happening. Either way, letâs take a quick moment to review each line. But donât worry if some of these explanations feel opaque. Learning to program requires a lot of practice and a lot of patience. Later chapters will help you reinforce both skills.
#include <stdio.h>This line loads the header file for the âstandard input/outputâ library. Libraries (roughly speaking) are external pieces of code that can be attached to your own code when you run gcc. Header files are succinct descriptions of these external entities. Itâs a very common line for a very popular part of a very common library. Among other things, this header includes the definition of the printf() function we use to get our actual output. Almost every C program you write will use it.
This line is always at the top of the file, although as weâll see in Chapter 6 you will often use several libraries, each with their own header file #include line.
intmain(){
Complex programs can have dozens (even hundreds or thousands) of separate C files. Separating big problems into tinier parts is a fundamental part of being a good programmer. These smaller âbitesâ are easier to debug and maintain. They also tend to help you find moments of repeated tasks where you can reuse code you have already written. But whether
you have a big, complex program, or a tiny, simple one, you need some place to start. This line is that starting place. The main() function is always required, though it occasionally looks a little different. Weâll tackle types like the int you see at the beginning of the line in Chapter 2 and look more closely at functions in Chapter 5. But pay attention to that { at the end of the line. That character opens a block of
code.
printf("Hello, world\n");
This statement is the heart of our program. Less romantically speaking, it represents the body of our main() function block. Blocks contain one or more lines of code bounded (in C) by curly braces, and we often refer to the content of any block as its body. This particular body does one thing: it uses the printf() function (again, defined in stdio.h) to produce a friendly, global greeting. Weâll be going through printf() and things like the "Hello, world\n" snippet in much more detail in âprintf() and scanf()â.
I also want to quickly highlight the semicolon at the end of the line. That bit of punctuation tells the C compiler when you have finished a statement. That marker doesnât mean much here with only one statement in our block, but it will help down the road when we have more statements and statements that are messy enough to span several lines.
And last but certainly not least, here is the âclosingâ curly brace to match up with the âopeningâ curly brace two lines up:
}
Every block will have these open/close braces. One of the most common mistakes in programming is having one too many open or close braces. Happily, most modern editors have fancy syntax highlighting that can help you match up any pair of braces (and thus identify any braces that donât have a partner as well).
Compiling Your Code
Now we finally get to put all that software installation headache to use! In the Terminal tab, run the following command:
gcc hello.c
If all goes well, you wonât see any output, just a new command prompt. If something did go wrong, youâll get an error message (or many messages) that hopefully point you to what needs fixing. Weâll see debugging tricks as we encounter more examples, but for now, look back at your code and the example above to see if you can spot any differences.
Tip
If you are still having trouble with this first file, donât give up! Check out Appendix A on downloading the sample code for this book from GitHub. You can compile and run the code as is, or use our examples as a starting point for your own tweaks and modifications.
Running Your Code
After successfully compiling our first C program, how do we test it? If you list the files in your directory, youâll notice a new file named a.out on Linux and macOS systems, and a.exe on Windows systems. To run it, just type its name. On many Linux and macOS systems, your executable path may not include your working directory. In that case, use the local path prefix â./â. (The period means the current directory; the slash is just the standard path separator character.) Figure 1-13 shows the output.
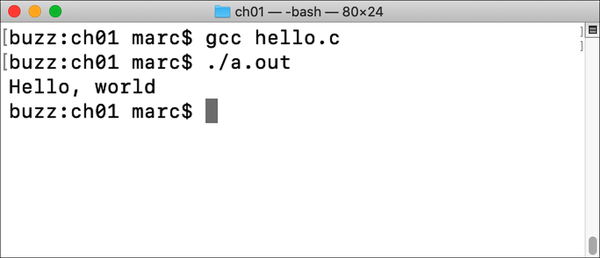
Figure 1-13. Saying hello on macOS and Linux
Figure 1-14 shows the output on Windows.
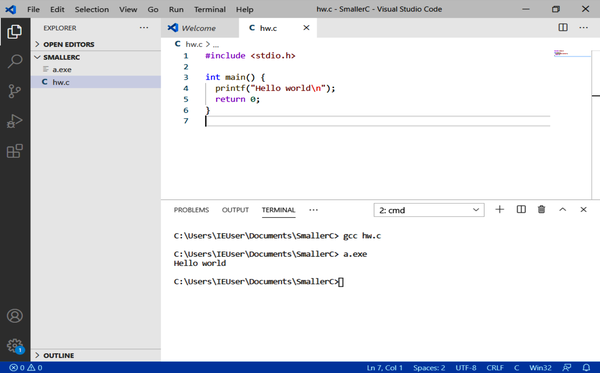
Figure 1-14. Saying hello on Windows
Note
On Windows, the .exe suffix marks a file as executable. However, you do not
need to include the suffix when you run the program. You can just type a.
Depending on the command prompt application used (cmd or PowerShell, for example),
you may also need to use the local directory prefix similar to macOS or Linux
(.\).
As a name, though, âaâ is pretty boring and definitely doesnât tell us what the
program does. You can use the -o (output) option to the gcc command to specify a
better name for your program if you like.
On Linux and macOS:
$ gcc hello.c -o hello
On Windows:
C:\> gcc hello.c -o hello.exe
Try that command and then look at the files in your folder. You should have a newly minted hello (or hello.exe) file that you can run. Much nicer.
Next Steps
Whewâ¦thatâs a lot of effort to get your computer to say hi! If it helps, it took humanity eons to get the first computer to do what you just did. :) But now that we have a working development environment, the next chapters will explore the details of the C language and show you how to write, debug, and maintain much more interesting programs. And with our microcontrollers, the popular term for smaller computers typically used for dedicated tasks like reporting the current temperature or counting the number of boxes waiting on a conveyor belt, weâll turn those interesting programs into interesting, physical creations!
1 Well, âanyâ is awfully expansive; if your language is an interpreted language, then of course you would need a good interpreter rather than a good compiler!
2 J. M. Eubank, however, has done the legwork on a single-file installer that you might want to check out if the general steps for a more complete setup look overwhelming: tdm-gcc.
3 If youâre unsure whether you have a 64-bit or 32-bit version of Windows, check out the Microsoft FAQ.
Get Smaller C now with the O’Reilly learning platform.
O’Reilly members experience books, live events, courses curated by job role, and more from O’Reilly and nearly 200 top publishers.

