Chapter 4. Working with Triggers and Actions
In Chapter 3, you learned how to create new flows four different ways. Because you first need to understand how to create a flow before diving into the details, I didn’t spend a lot of time explaining how the triggers and actions were being used or discussing how to fill them in. In this chapter, I will focus on helping you understand how to work with triggers and actions to create flows. I’ll explain how to find a trigger or action that will do what you want and how to use dynamic content to configure them at runtime. You’ll also learn how to use functions to transform the dynamic content into the specific values that you need and how to reference the dynamic content directly using JavaScript Object Notation (JSON). Finally, I’ll review how to modify the settings of some of the triggers and actions to change the way they operate in specific circumstances. By the end of this chapter, you’ll be able to create flows that you can begin to use to automate business processes in your organization.
Triggers, Actions, and Connectors
Triggers and actions are the primary building blocks in Power Automate. Each trigger or action represents an API that can be used to interact with a specific data source. Triggers and actions are both defined and contained in connectors.
Finding the Right Connector
At the time of writing, there are more than 645 connectors, with more being added every quarter. Many of the connectors are created by Microsoft. Others are created by third-party software vendors. For example, Oracle has created a connector that can be used to access an Oracle database. Some connectors are also created by independent developers and then verified by Microsoft. If you can’t find a connector for the data source you want to use, you can create your own custom connector.
Note
Creating custom connectors is an advanced topic and beyond the scope of this book. You can read more about custom connectors for Power Automate in the documentation.
With hundreds of connectors to choose from, one of the problems you will face is finding the connector that you want to use so you can access its triggers and actions. To make this easier, Power Automate provides a categorized search dialog that you can use to find a specific connector. Once you find a connector you are interested in, you can drill down to the documentation to get specific details about what that connector contains.
Exercise 4-1. Exploring connectors
In this example, we will browse through the list of available connectors to find the Dataverse database connector and look at the documentation provided.
-
Log in to https://make.powerautomate.com and select the Connectors tab in the navigation bar on the left. This will bring up a list of all the connectors available for Power Automate. You can use the drop-down on the right to limit the list to only include standard or premium connectors. Figure 4-1 shows the connector list filtered to show only standard connectors.

Figure 4-1. Filtering the connector list
-
Change the drop-down back to All Connectors and type “Dataverse” in the Search connector text box at the top of the page. You should now see two Dataverse connectors, one current and one legacy. Hovering your mouse over a connector will display a tooltip that shows the full name of the connector. As shown in Figure 4-2, both connectors display a green PREMIUM label that identifies that these are premium connectors that require additional licensing, as discussed in Chapter 2.
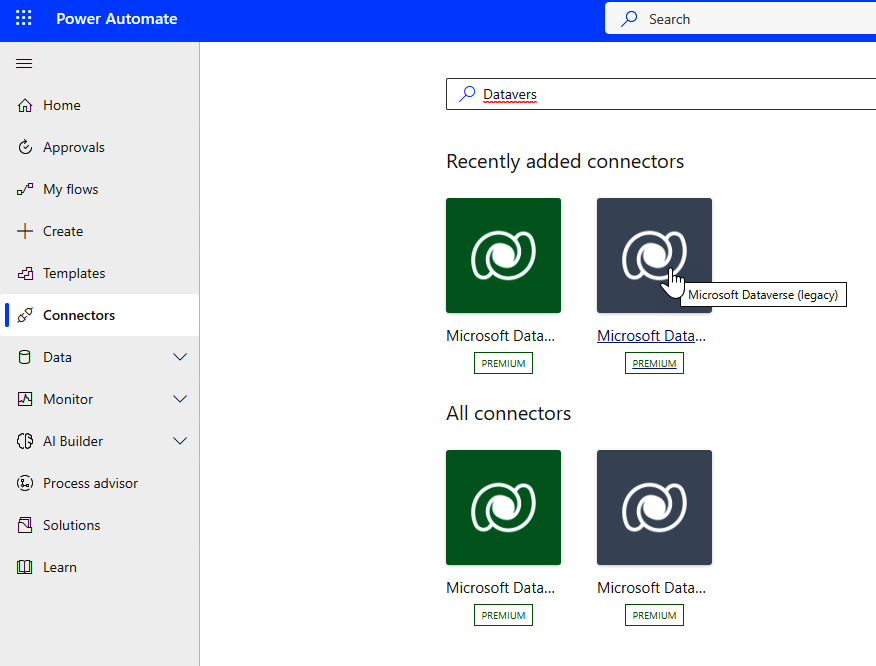
Figure 4-2. Searching for a connector
-
Select the green Microsoft Dataverse connector. This will bring up a page of information about the current Microsoft Dataverse connector, as shown in Figure 4-3. The page contains the following:
-
A brief description of the connector
-
A link to additional documentation
-
A list of the triggers contained in the connector
-
A list of templates used by the connector
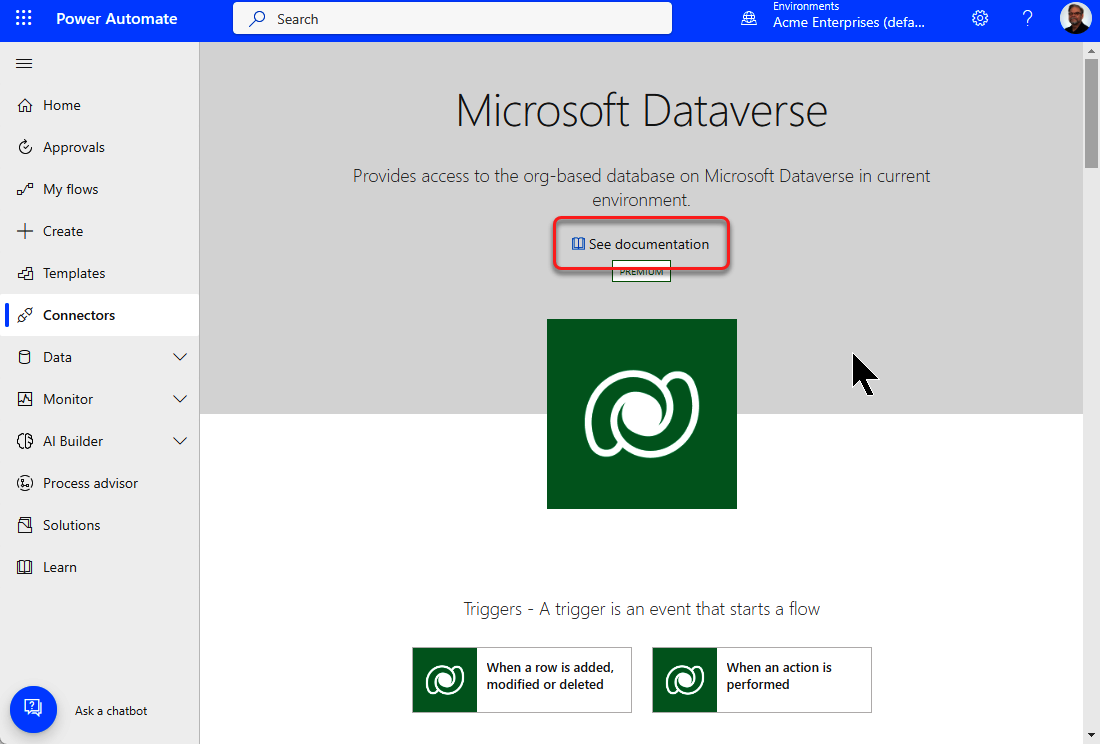
Figure 4-3. Dataverse description page
-
-
Select the “See documentation” link. This will take you to the connector documentation in Microsoft’s connector reference list, as shown in Figure 4-4. The documentation will provide detailed information about the connector, including a list of all the triggers and actions contained in the connector.
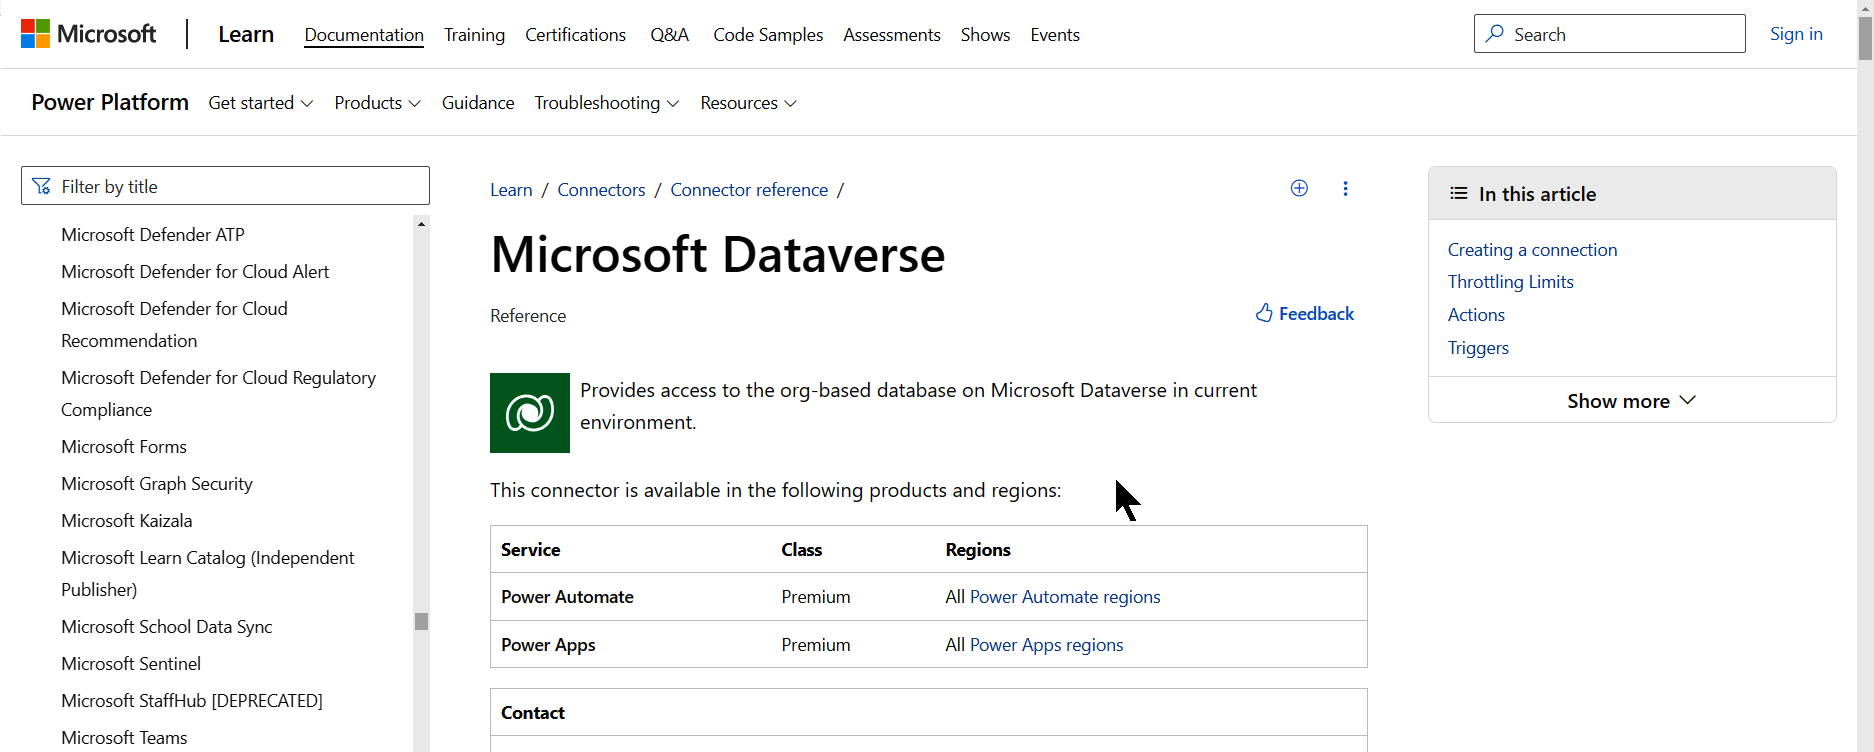
Figure 4-4. Dataverse documentation page
-
Click on the Actions link in the upper-right corner of the page. This will take you to a list of the Actions contained in the Dataverse connector, as shown in Figure 4-5. This list describes each action available in the Dataverse connector.
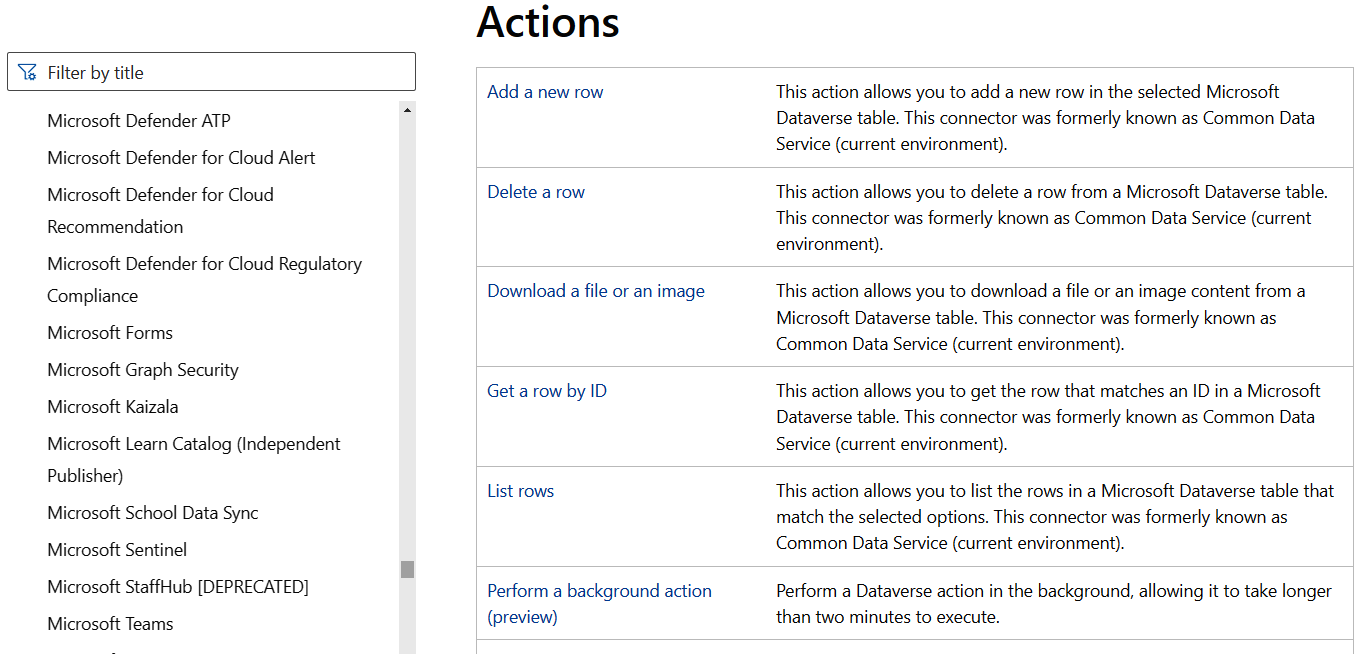
Figure 4-5. Dataverse actions list
-
Select the “List rows” action from the list. This will display information about that specific action, including a list of input parameters and values returned by the action (see Figure 4-6). The data type of the parameter and whether it’s required or not is critical when trying to fill out the fields in a trigger or action.
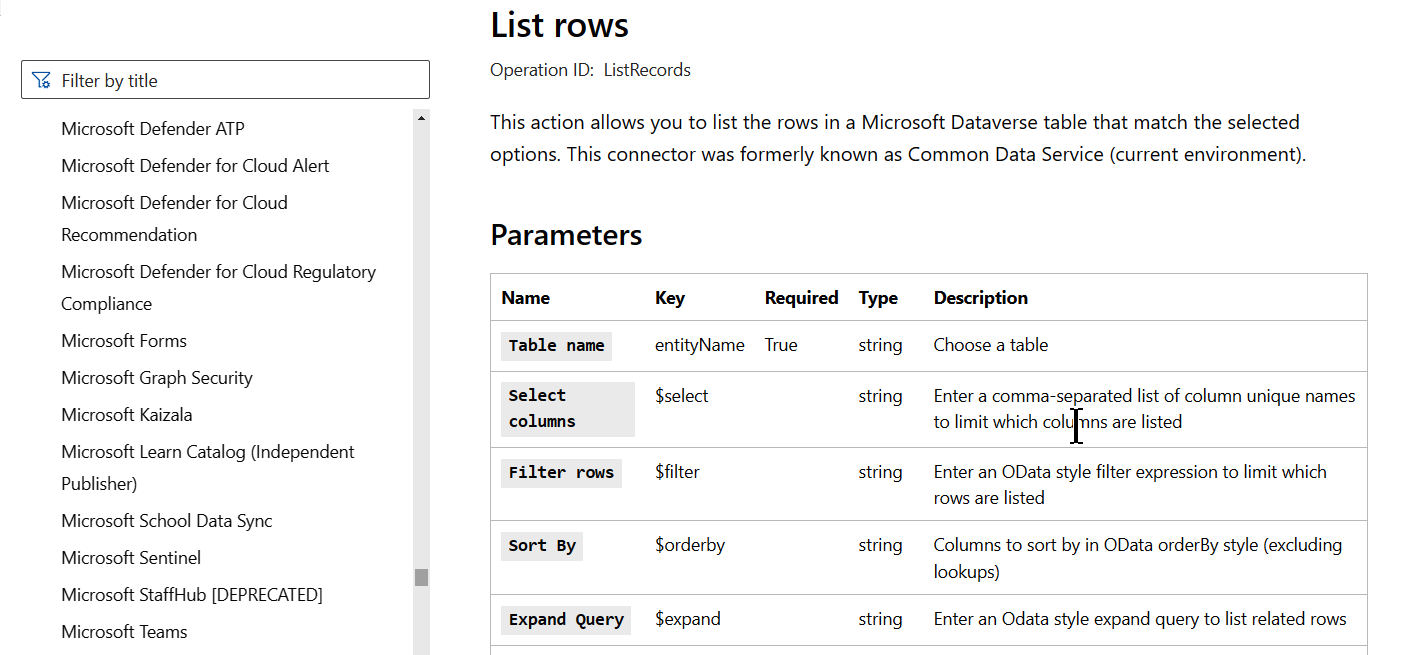
Figure 4-6. “List rows” action documentation
-
Spend some time looking at other connectors and their documentation. Then, I’ll show you how to use them in a specific flow.
Choosing a Trigger
Triggers represent the events that you will use to start your flow. They also provide the first set of data that your flow can use to complete your business process. Triggers can be automated, manual (instant), or scheduled (recurrence). The trigger you choose to start your flow will have a number of effects on your flow:
-
It will determine what user security context the flow runs under.
-
It will provide input parameters for your flow.
-
It will determine when your flow will run.
In almost every case, a flow will have only one trigger and it’s the first item in the flow. The designer will let you add more than one trigger, but this will normally prevent your flow from running. Because triggers determine the security context for the flow and provide input parameters, having two different triggers in the same flow will cause a problem. For example, an automated trigger, like when an item is created, will run using your security account and have information about the item that was created. But a manual trigger will run in the context of the person who starts it and will only contain parameters that they provide. Recurrence triggers provide yet a third case because they run in your security context but provide little in the way of input parameters. Choosing the right trigger is always an important design decision.
This doesn’t mean that the first trigger you choose locks you in. You can select a trigger when you create a flow or add it in the designer later. You can also change a trigger after you’ve started designing a flow by deleting the existing trigger and adding a new one.
Warning
Deleting a trigger and replacing it will remove any references to dynamic content provided by the old trigger. As a result, removing and replacing a trigger can be a labor-intensive operation after a flow has been developed.
Let’s try a simple scenario for the next few examples: You receive an email once a month from your accountant with an Excel spreadsheet containing an itemized list of your business expenses for the last month. You would like to save that spreadsheet with a descriptive filename to a folder in your OneDrive for Business site.
Exercise 4-2. Choosing a Trigger
-
Log in to https://make.powerautomate.com, and select the “My flows” tab in the navigation bar on the left. Select “Automated cloud flow” from the drop-down.
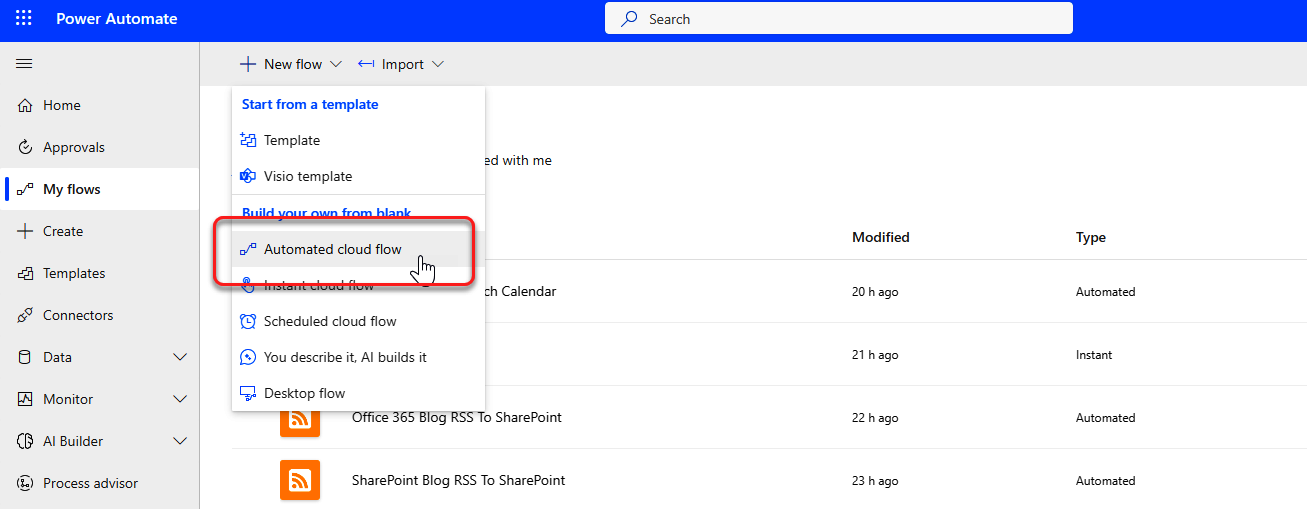
Figure 4-7. Creating an automated flow
-
In the “Build an automated cloud flow” dialog box, type “Upload Monthly Expense report” as your flow name and search for Outlook in the search box. Select “When a new email arrives (V3)” from the Office 365 Outlook connector (see Figure 4-7). Click Create to create your flow using that name and trigger. Clicking Skip will let you name your flow and pick a trigger in the designer.
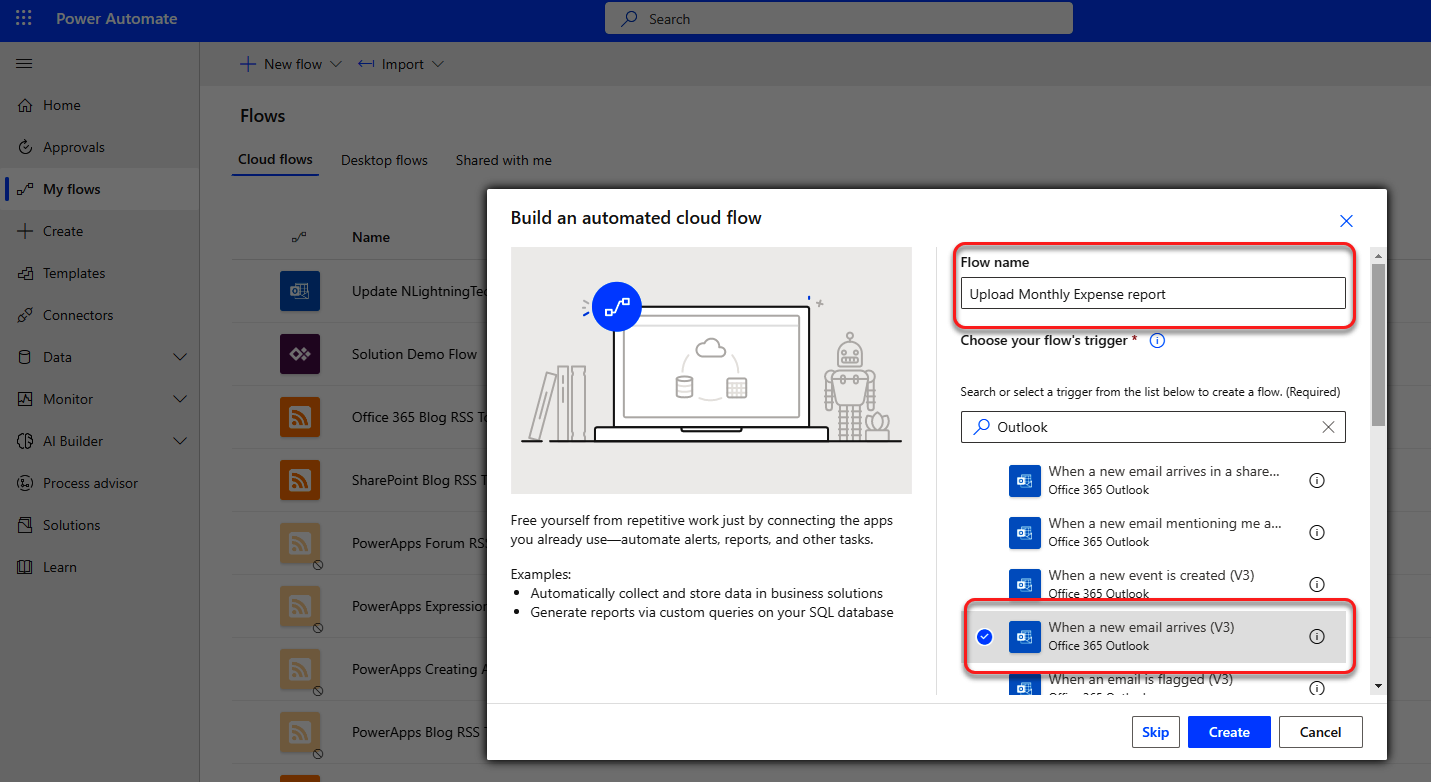
Figure 4-8. Naming flow and choosing trigger
The trigger you chose is preconfigured to watch all the incoming email in your Office 365 email inbox. Since you only get one spreadsheet a month, you will be wasting a lot of flow runs looking for the expense spreadsheet. So, you’ll want to find a way to limit how often the flow will run. One way to do that is by adding filters to the trigger that will keep it from starting too often.
-
Select “Show advanced options” to display fields that you can use for filtering. To test your results, you’ll use your own email address in place of the accountant’s email in this example. Type your Office 365 email address in the From field. Select it from the people picker dialog that displays below the field (see Figure 4-9). Change the Only with Attachments drop-down at the bottom to Yes. Now the trigger will only fire if the email is from you and contains an attachment.
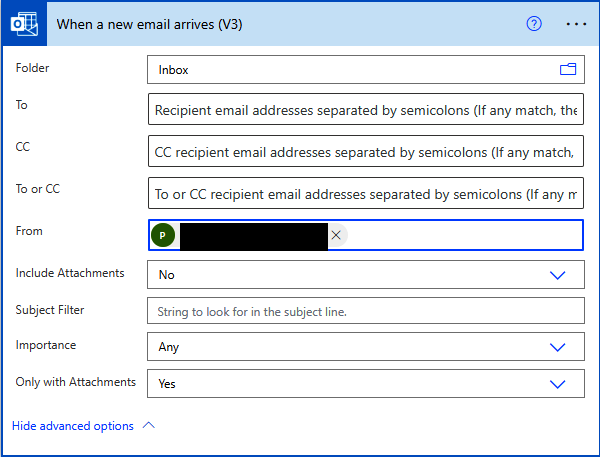
Figure 4-9. Setting trigger filters
But what if you get multiple emails each month from your accountant and all have files attached? You would still end up with more flow runs than you want. There is an alternate trigger that will only start when you flag an email in your mailbox. Using that trigger, you can choose which emails to run the flow on. To change the trigger, do the following:
-
Open the ellipsis (…) menu in the upper-right corner of the trigger and Select Delete. Click OK in the dialog to confirm the deletion (see Figure 4-10).
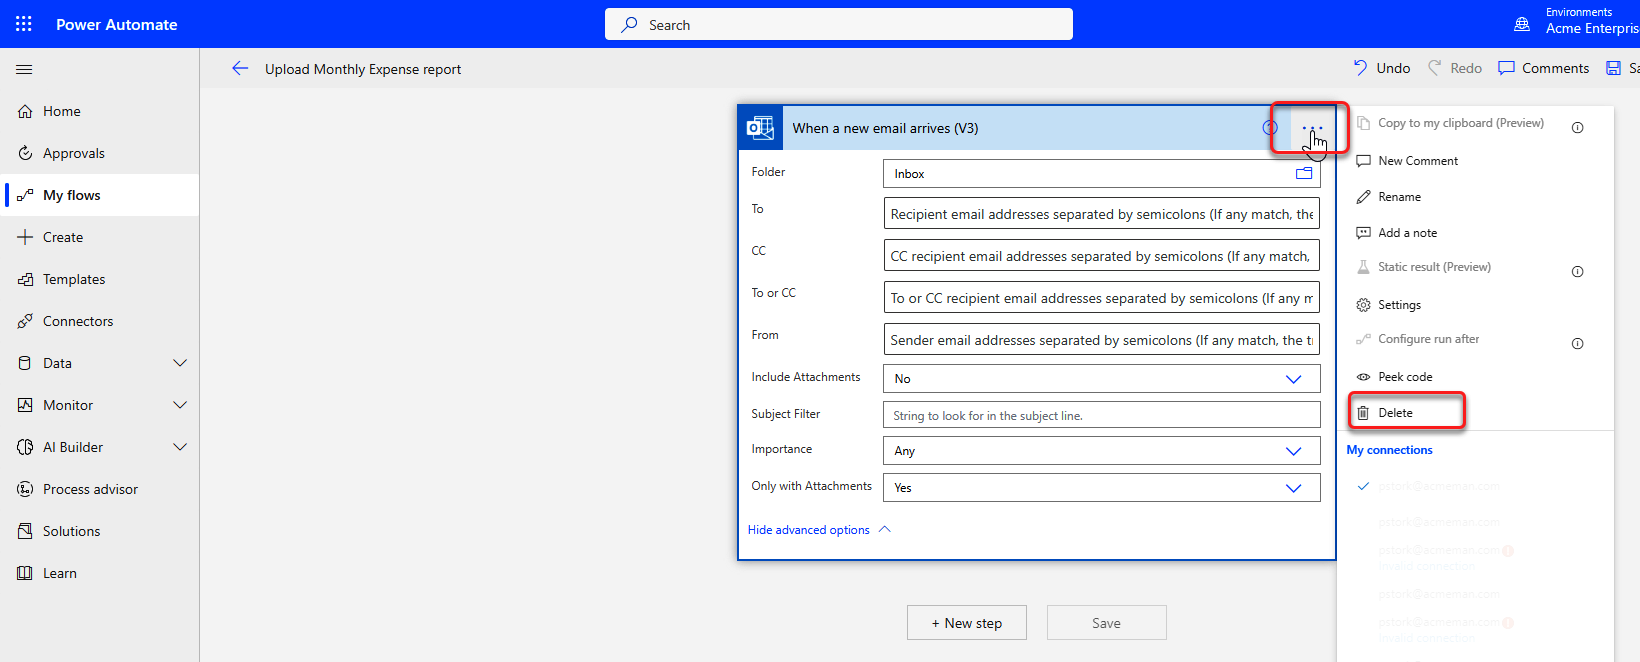
Figure 4-10. Deleting existing trigger
-
Type “Outlook” in the Search connectors and triggers search box. Select “When an email is flagged (V4) (preview)” trigger from the list (see Figure 4-11).
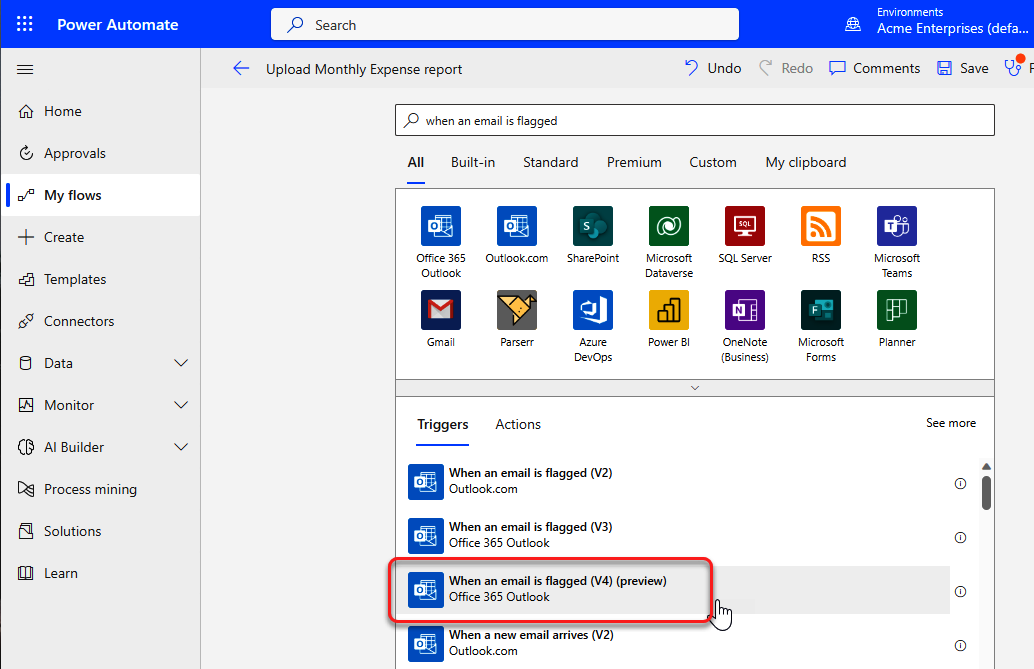
Figure 4-11. Adding an “When an email is flagged” trigger
-
Set the From and Only with Attachments fields in Advanced options the same way you did in step 3. Now the flow will only trigger when you flag an email in your mailbox that arrived from your accountant and that contains an attachment (see Figure 4-12).
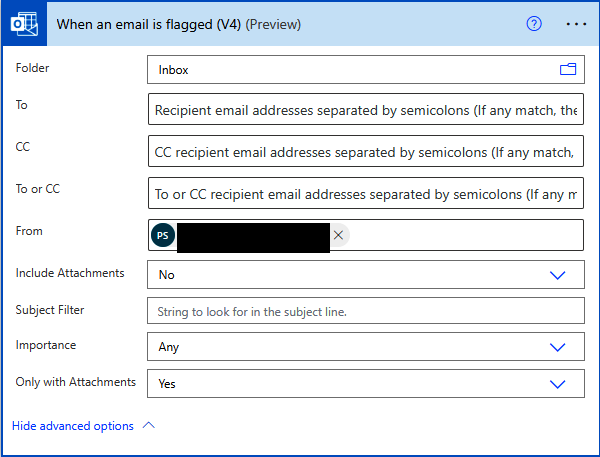
Figure 4-12. Completed trigger
You won’t be able to save the flow yet because it only contains a trigger. For a flow to accomplish anything, it must have a trigger and at least one action. We’ll look at adding actions next.
Adding Actions
Actions are the building blocks that you use to enhance and manipulate information in your flow to accomplish your business purpose. They implement the logic of your business process. Adding actions uses the same dialog that we used to add a new trigger to the designer after we deleted the previous trigger. In this next example, we’ll add actions to complete the flow for our scenario.
Exercise 4-3. Adding additional actions
-
Click “+ New step” just below the trigger that we added in the previous example. This will open the “Choose an operation” dialog (see Figure 4-13).
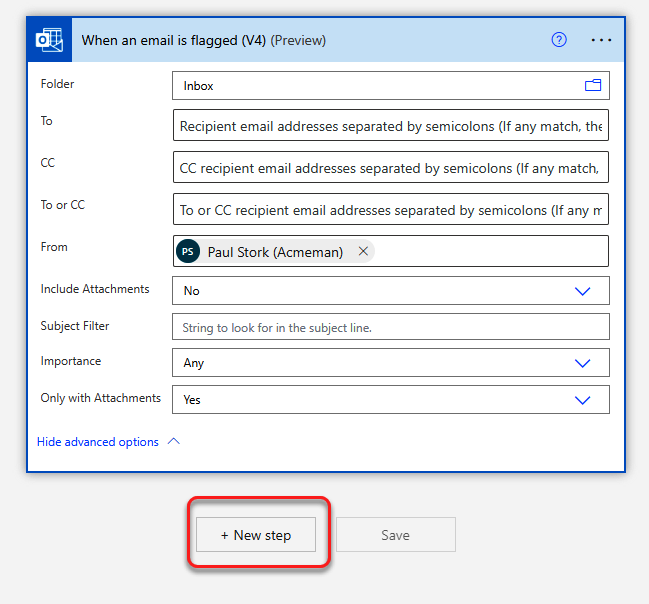
Figure 4-13. Adding an action step
-
Type “get attachment” in the search box, and select the “Get Attachment (V2)” action from the Office 365 Outlook connector (see Figure 4-14).
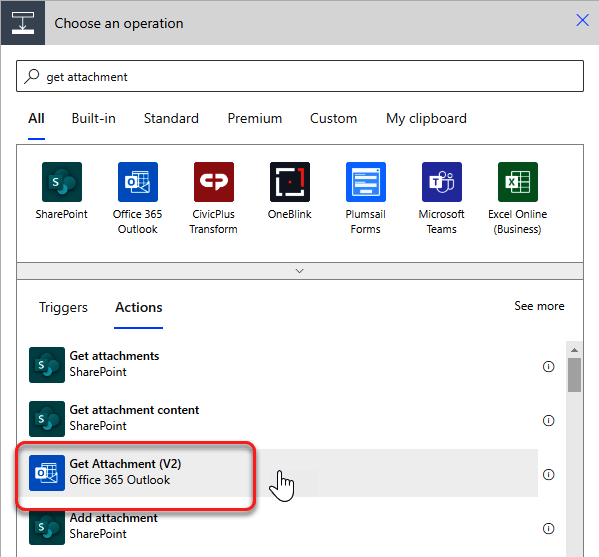
Figure 4-14. Adding “Get Attachment” step
-
Click “+ New step” just below the Get Attachment action that you just added. Type “create file” in the Search box, and select the “Create file” action from the OneDrive for Business connector. Your flow should now look like Figure 4-15.
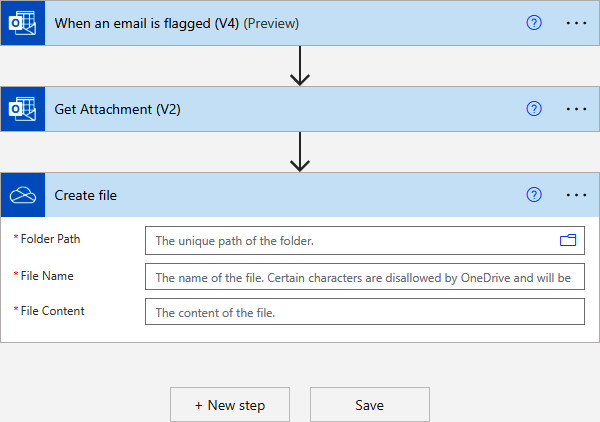
Figure 4-15. Adding “Create file” step
Your basic flow is now complete, but you still can’t save it because the details of the actions have not been filled in. The actions need information to accomplish their tasks, so you need to provide the details just like you did for the trigger fields earlier in this chapter. Triggers are usually configured using static values because they are the first thing in the flow. But later actions can be filled in using static values, variables, or content derived from the trigger or previous actions in the flow. When we use anything other than static values, we are using what Power Automate calls dynamic content.
Adding Dynamic Content
Dynamic content can hold several distinct types of data, such as the following:
-
An individual value with a specific data type
-
An object that has properties containing either simple or complex values
-
An array of values, objects, or other arrays
No matter what it holds, dynamic content represents the input and output values from the trigger or other previous steps. As a flow progresses, the amount of dynamic content grows. That means that you can use output from previous actions to configure additional actions. For example, you might retrieve information about a person’s manager using the “Get manager” action in the Office 365 Users connector. Once you have the manager, you can send an email to them using the email address that was retrieved as a property of the manager object value.
Selecting Dynamic Content to Add
To configure a trigger or action with dynamic content, just place your cursor in the field where you want to use the dynamic content. That will automatically open the “Add dynamic content” dialog. The dialog, as shown in Figure 4-16, has two tabs: Dynamic content and Expression. We’ll examine the Expression tab in the next section.
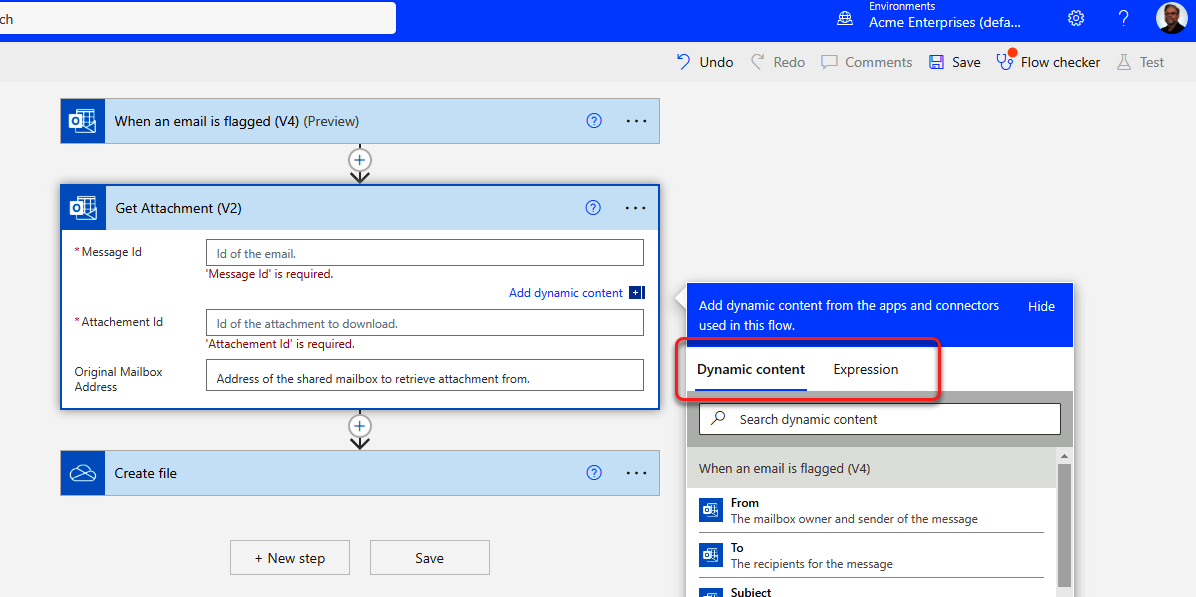
Figure 4-16. Dynamic content dialog
On some computers, the dynamic content dialog box won’t be displayed when you want to fill in a field in an action. This is caused by the screen resolution and available whitespace next to the actions in the designer. If enough whitespace does not exist, the dynamic content will be shown in an abbreviated list below the field, as shown in Figure 4-17. If the content you want is not displayed in the short list, you can click the “See more” link. Changing the size of the window or resolution of the monitor to increase the whitespace available will return the normal dynamic content dialog.
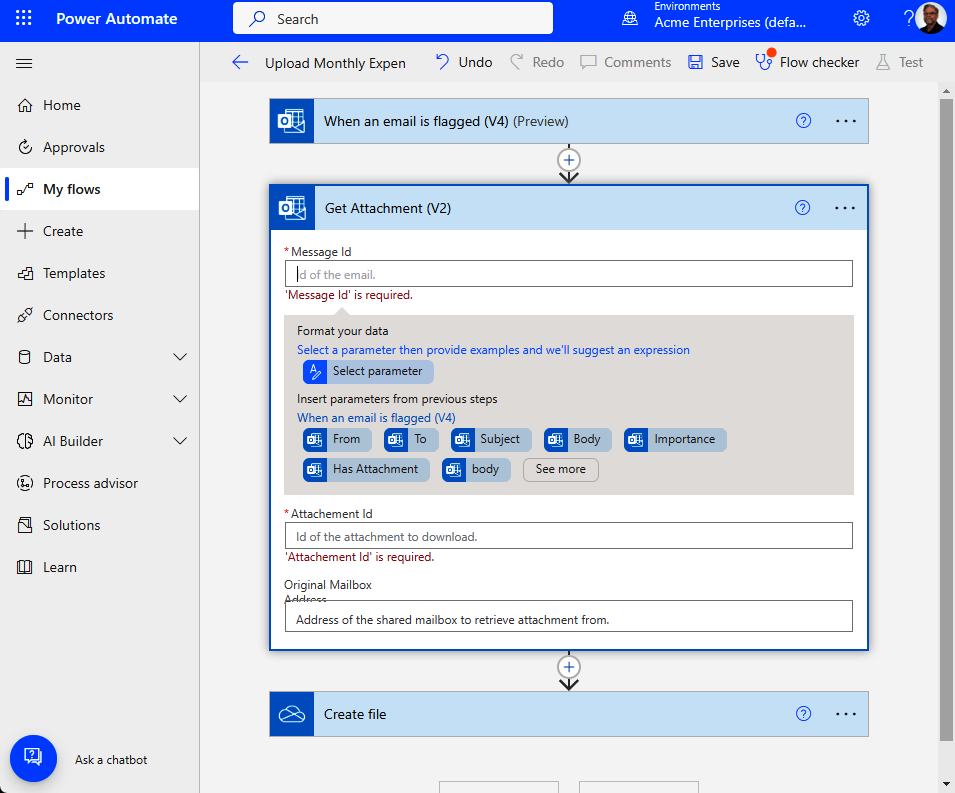
Figure 4-17. No dynamic content dialog
The Dynamic content tab shows a list of the dynamic content grouped by the trigger or action that it came from.
Exercise 4-4. Configuring actions with dynamic content
In this example, we’ll complete the flow we started earlier by adding dynamic content entries to the fields in the actions.
-
Click on the “Get Attachment (V2)” action to expand it and view the fields. Select the Message Id field to enter the Message Id of the email to get the attachment from. This will open the Add dynamic content dialog. Type “id” in the Search dynamic content box. This will filter the list of dynamic content available to make it easier to find the Message Id value. Click on Message Id under the “When an email is flagged (V4)” grouping (see Figure 4-18). This will insert the Message Id of the email flagged in the trigger.
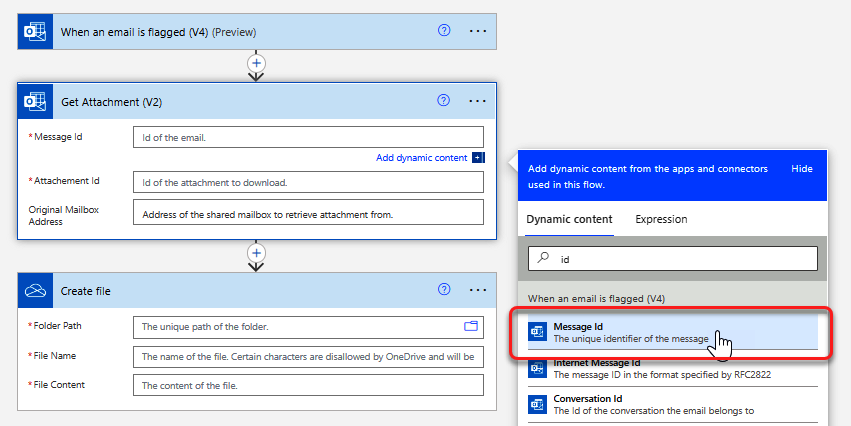
Figure 4-18. Inserting Message Id dynamic content
Note
Fields with a red asterisk (*) in front of their names are required fields. Dynamic or static values must be supplied for those entries. Fields without the asterisk are optional and can be left blank in most circumstances.
-
Select the Attachment Id field in the “Get Attachment (V2)” action. Filter the dynamic content on Id again and select Attachments > Attachment Id to insert it. An “Apply to Each” loop will be added around the “Get Attachment (V2)” action since there may be more than one attachment that needs to be processed (see Figure 4-19).

Figure 4-19. Adding Attachment Id
Note
When you access a value that is contained in an array, Power Automate will automatically enclose the action where you used the dynamic content in an “Apply to Each” loop. The loop will reference the array, and the dynamic content will reference the value inside the array.
-
Select the “Create file” action and drag it inside the “Apply to each” loop to make sure that we create one file for each attachment (see Figure 4-20). Select the “Create file” action to expand it.
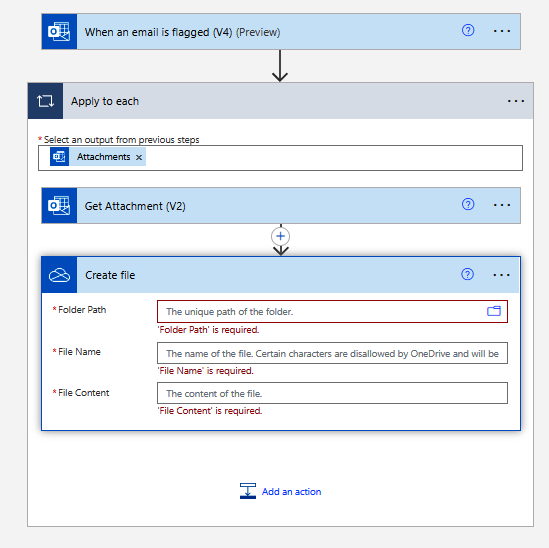
Figure 4-20. Dragging “Create file” inside loop
-
Click on the folder icon inside the Folder Path field. Use the navigation arrows in the dialog to drill down to the folder where you want to store the file (see Figure 4-21).
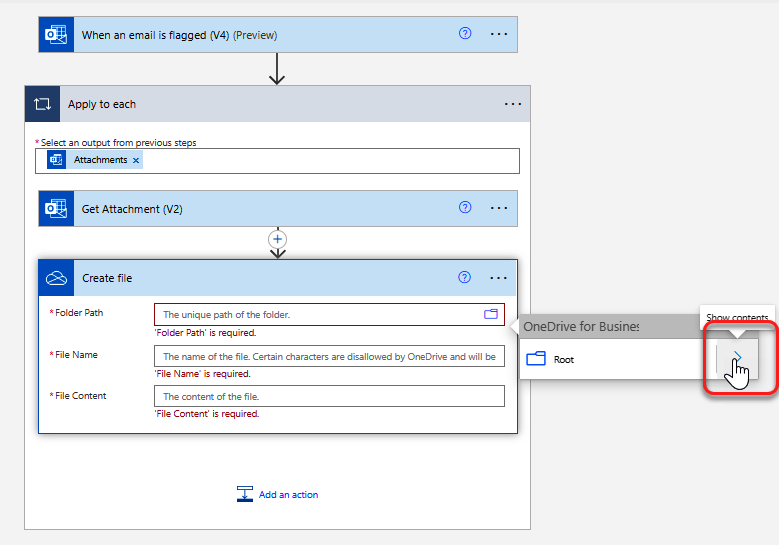
Figure 4-21. Selecting a folder
-
Select the “File Name” field in the “Create file” action. Filter the dynamic content on Name, and select Name under the “Get Attachment (v2)” action group to insert it. Select the “File Content” field and insert the Content Bytes under the “Get Attachment (v2)” action group (see Figure 4-22).
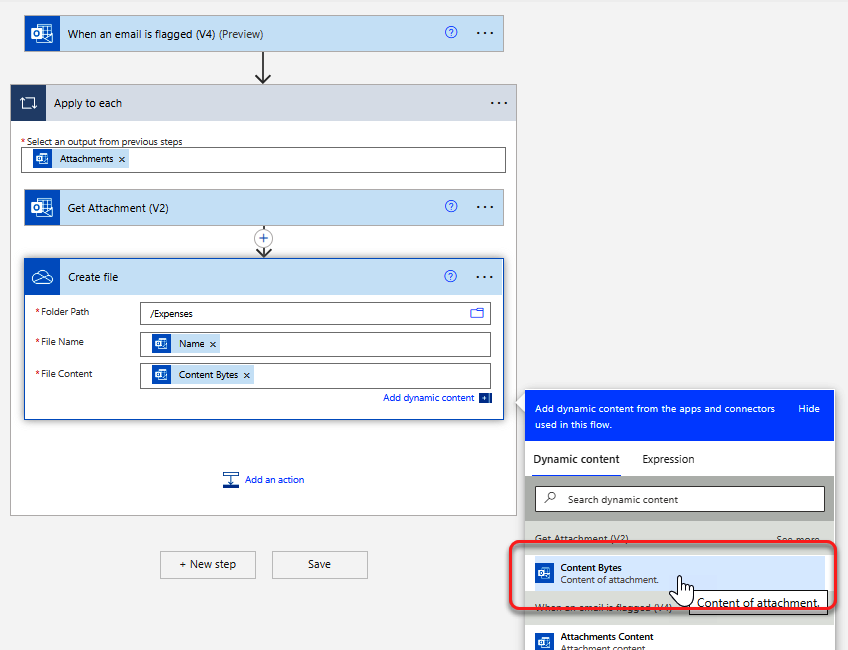
Figure 4-22. Selecting File Name and File Content
Warning
Inserting dynamic content from the wrong action can lead to unexpected results. For example, in the previous step, if you had picked Attachment Content from the trigger, you would end up with an empty file because the loop is based on a different array, so the Attachment Content is null at that point in the flow.
Now that you’ve filled in all the required fields in the trigger and actions, you can save and test your flow.
-
To save the flow to the cloud, select the Save link in the upper-right corner of the designer (see Figure 4-23).
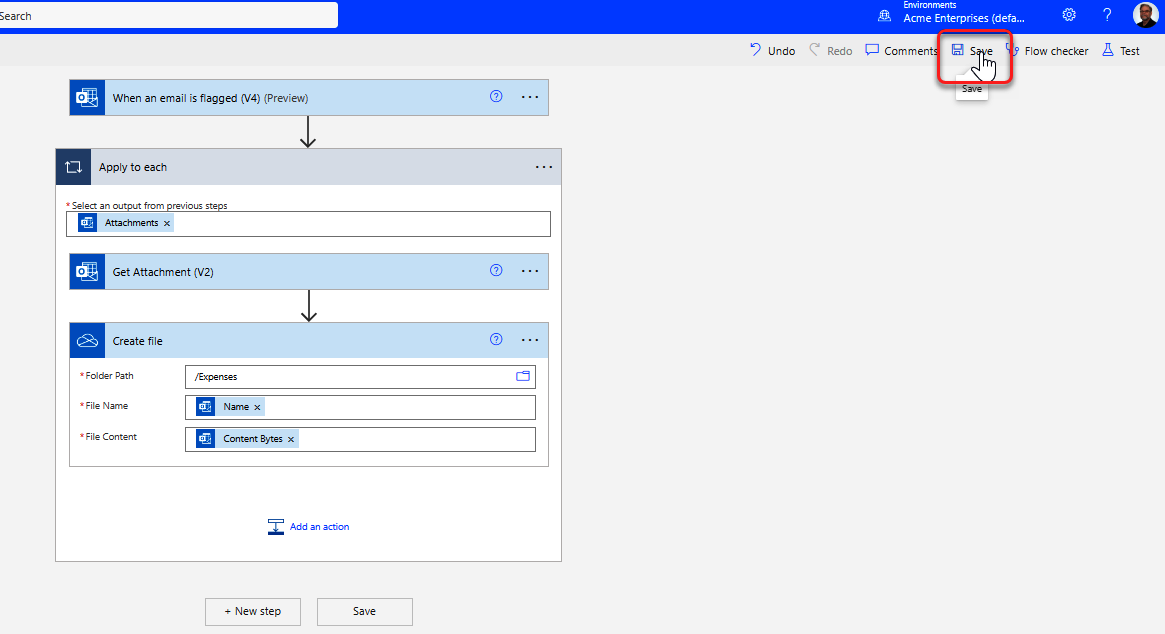
Figure 4-23. Saving your flow
-
To test whether your flow runs successfully or not, select the Test link in the upper-right corner of the designer. Select the Manually radio button that appears. Click the Test button. This will put your flow in Test mode (see Figure 4-24).
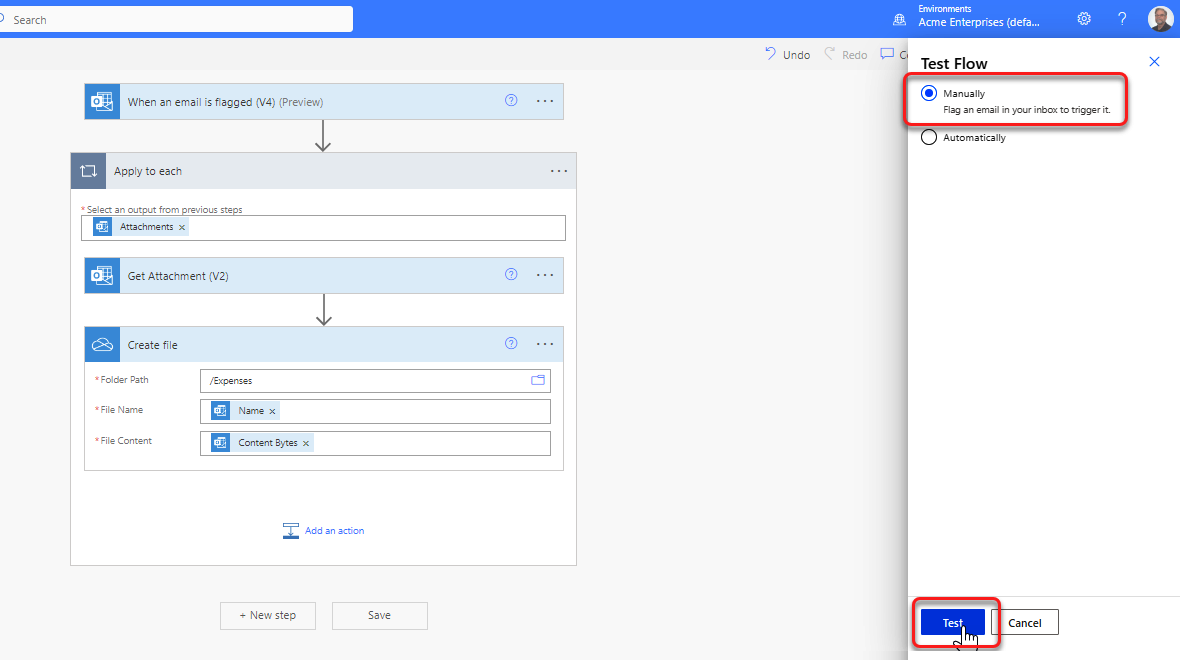
Figure 4-24. Testing a flow
-
Send an email to yourself that contains an attachment. After the email arrives, flag it to start the flow. After the flow runs, you will see whether it was successful or not. Each action will show a green circle with a checkmark if the flow succeeded. You can also check the folder in OneDrive for Business to see if the file(s) were saved successfully (see Figure 4-25).
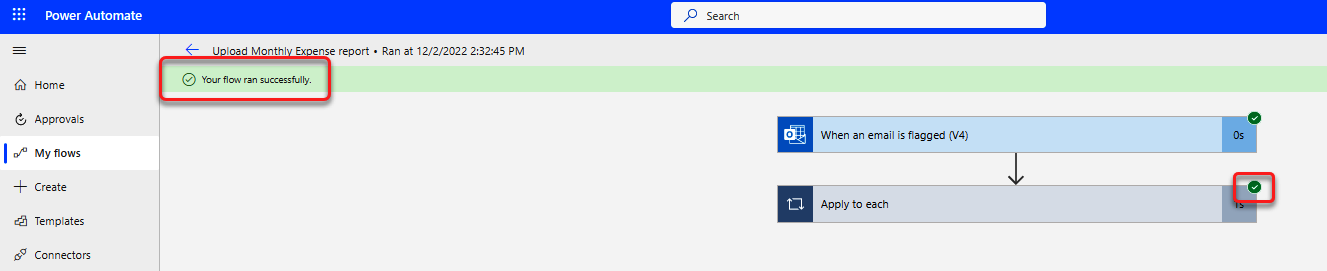
Figure 4-25. Checking a flow run
Where Is My Dynamic Content?
Since dynamic content is produced by almost every action in a flow, the list can get quite long. In the previous example, we used the Search box to filter the list so that we could find the content we wanted to add. If you can find the entry you want, adding dynamic content to a field in an action is a straightforward process. But there are some circumstances where it becomes much more difficult because the dynamic content you want doesn’t show up in the dialog. There are a few reasons why the dynamic content might not show in the dialog when you try to add it.
First, the dynamic content may not be available at this point in the flow. Dynamic content is generated by outputs of actions and the trigger. If a certain action hasn’t run yet in a flow, then it makes sense that the dynamic content for that action can’t be added until after the action runs. Dynamic content may also be in a different scope than the current action. For example, you can’t add dynamic content from inside a loop to an action outside the loop. Each iteration of the loop will have a specific value that is only in scope while you are inside the loop.
But the most troublesome reason why dynamic content doesn’t show in the dialog is because of aggressive filtering by the dynamic content dialog. The content may not be the right data type for the field you are populating. For example, let’s say you are in a field designed for a date, and the value you want to add is a string. You’ll see another example of this filtering when we start working with functions in the next section.
If you don’t see some dynamic content in the dialog, that doesn’t necessarily mean it’s not available. One way to fix this problem is to add the dynamic content you want to a Compose and then use the output of the Compose in the action where it’s not showing. I’ll show you some other ways to access the dynamic content you need without using a Compose—by using functions and JSON notation. Let’s look first at JSON notation and then see how we can use that in functions to manipulate the dynamic content in our flow.
Using JSON
JavaScript Object Notation (JSON) is a language-independent data interchange format. Like Extensible Markup Language (XML), it provides a way to transport data between applications formatted as a string. Power Automate can work with both XML and JSON, but JSON is the format used internally to pass inputs and outputs from one action to another. When you look at the run history of a flow to troubleshoot it, you will see that many of the flow actions have inputs and outputs that contain JSON. You can also use JSON to access dynamic content that doesn’t appear due to over-filtering in the dynamic content dialog. Understanding JSON is a critical skill to write and troubleshoot flows.
Understanding JSON Syntax
JSON syntax uses special characters to encapsulate specific types of data. Arrays are surrounded by square brackets, objects are marked with curly braces, and properties within objects are displayed as key-value pairs. Individual arrays, objects, and properties are separated by commas. Together these elements create a data hierarchy that can be understood by almost any modern application. Figure 4-26 displays a simple JSON array of people. Each person has a name, an age, and a birthdate.
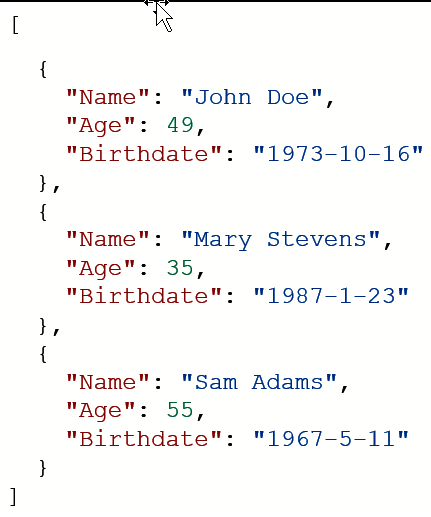
Figure 4-26. Sample JSON array
Flows reference data items in JSON using a particular syntax. If the array in Figure 4-26 was passed in as the output of a particular trigger, then you could reference Mary Stevens’s age as the following:
outputs('People_Array')[1]?['Age']
Each part of this line specifies something in the array:
-
outputs(‘People_Array’)references the JSON output of a Compose action called “People Array.” -
[1]references the second item in the array. Arrays use a zero-based index in JSON. -
?[‘Age’]references the Age property of the object. The?specifies that the property may be null, which means it may be missing from the values.
Using this kind of syntax means that you can reference almost any value used by the flow directly. But getting the reference right can be challenging for an inexperienced developer. There are a few various places that you can look in a flow to find the JSON reference you want.
Looking Up JSON Syntax
The first place you can look to find the syntax used in JSON is to hover your mouse over any entry in a field. When you do, a tooltip will be displayed that shows what the JSON syntax is for that value. Figure 4-27 shows the JSON reference for a ResponseId field that is output by a “When a new response is submitted” trigger in the Microsoft forms connector.
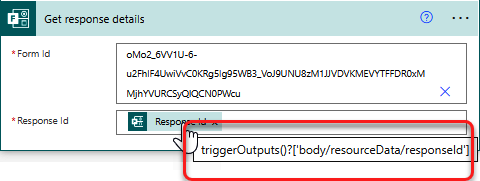
Figure 4-27. JSON syntax tooltip
The one problem with using the tooltip approach is that you can’t copy the value. If you want to use that value in another field, you’ll need to type it in yourself. But there is another way that you can access the JSON syntax of a field to copy and paste it somewhere later in your flow. If you select the ellipsis menu on an action, you will see an entry called Peek code. Not all actions have a Peek code option, but those that do will show you a read-only JSON representation of the entire action. You can highlight JSON input values in this view to copy and paste them elsewhere in your flow. Figure 4-28 shows the Peek code view for the action shown in Figure 4-27. You can see the highlighted response_id parameter. You can use Ctrl + C to copy that syntax for use elsewhere.
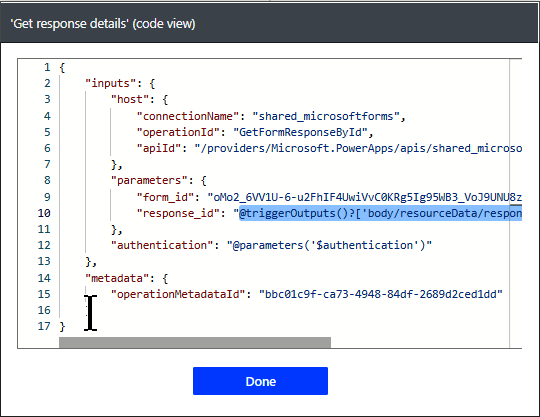
Figure 4-28. Peek code view
Tip
When using the Peek code view, make sure you remove the @ sign from the front of the JSON you copy. JSON values referenced inside a flow start with an @ sign, but it should not be included when you reference them in the designer.
Parsing JSON
JSON stores values, arrays, and objects in string format. But just having the string doesn’t always mean that you can reference the values inside using JSON. For example, if the JSON values are returned by something like a Representational State Transfer (REST) call to a web service, then the flow will only see them as a string value, not as JSON. To access the values stored in the JSON string, we need to parse the string to apply a schema. To do this, we use an action in Power Automate called Parse JSON.
Exercise 4-5. Using the Parse JSON action
In this example, we’ll create a flow to parse and use one of the sample values from the array in Figure 4-26.
-
Log in to https://make.powerautomate.com, and create a new instant cloud flow that uses the “Manually trigger a flow” trigger (see Figure 4-29). Name the flow “Parse JSON sample.”
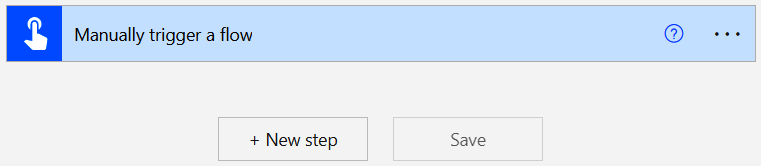
Figure 4-29. Creating Parse JSON sample flow
-
Click “+ New step” to add an “Initialize variable” action. Name the variable
varJSON, and select String from the drop-down as the variable type. Type the JSON string from Figure 4-26 into the Value field of the “Initialize variable” action (see Figure 4-30).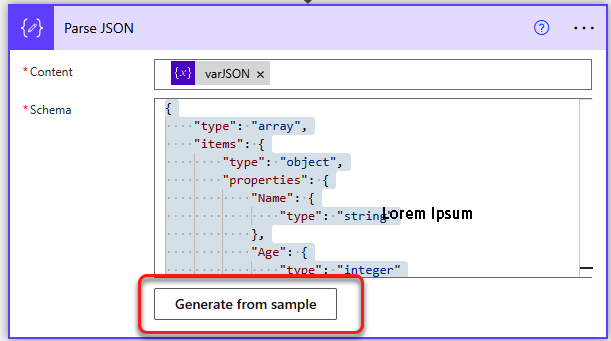
Figure 4-30. Initializing a string variable
-
Click “+ New step” to add a Compose action. Click inside the Inputs field to display the Dynamic content dialog. Select the Expression tab and type
variables('varJSON')[1]?['Age']into the function (fx) text box (see Figure 4-31). Click OK to insert the value.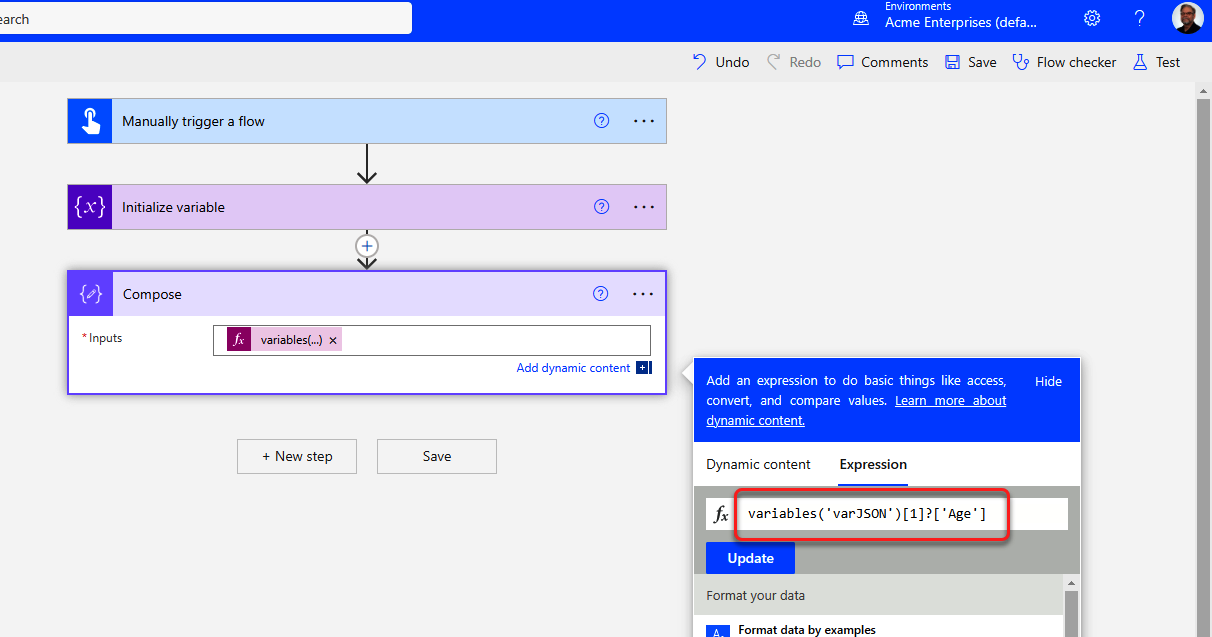
Figure 4-31. Viewing JSON property in Compose
-
Save and test your flow. The flow will fail because the variable is viewed as a string rather than JSON at this point (see Figure 4-32). We need to parse the string as JSON before we can access the fields inside.
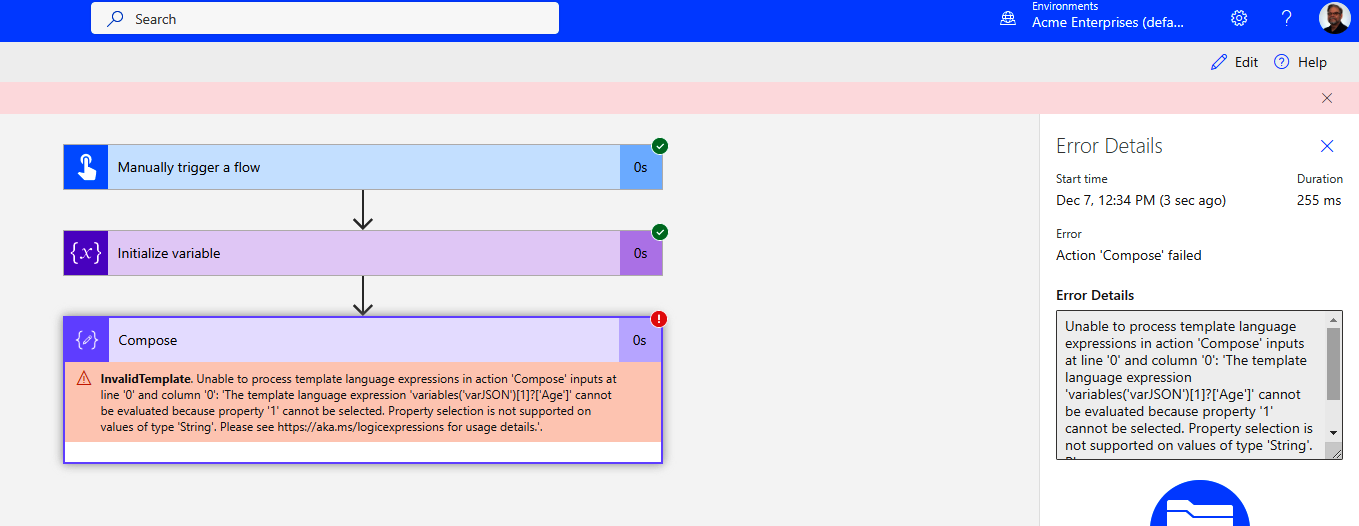
Figure 4-32. Flow test fails
-
Use the ellipsis menu to delete the Compose action. Click “+ New step” to add a Parse JSON action. Click your mouse inside the Content field to display the Dynamic content dialog. Select
varJSONunder the Variables section to add it to the Content field. Copy the JSON in the Value field of the “Initialize variable” action using Ctrl + A to highlight it and Ctrl + C to copy it. Click the “Generate from sample” button in the Parse JSON action and paste the JSON into the dialog (see Figure 4-33). Click the Done button to close the dialog.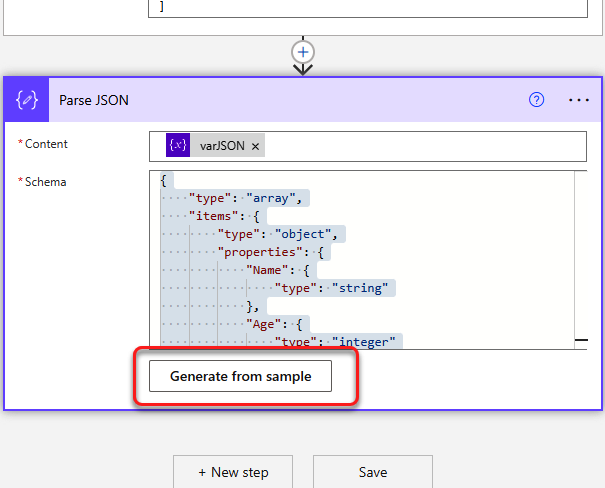
Figure 4-33. Filling in Parse JSON action
-
Click “+ New step” to add a Compose action. Click inside the Inputs field to display the Dynamic content dialog. Select the Expression tab and type
body('Parse_JSON')[1]?['Age']into the fx text box (see Figure 4-34). Click OK to insert the value.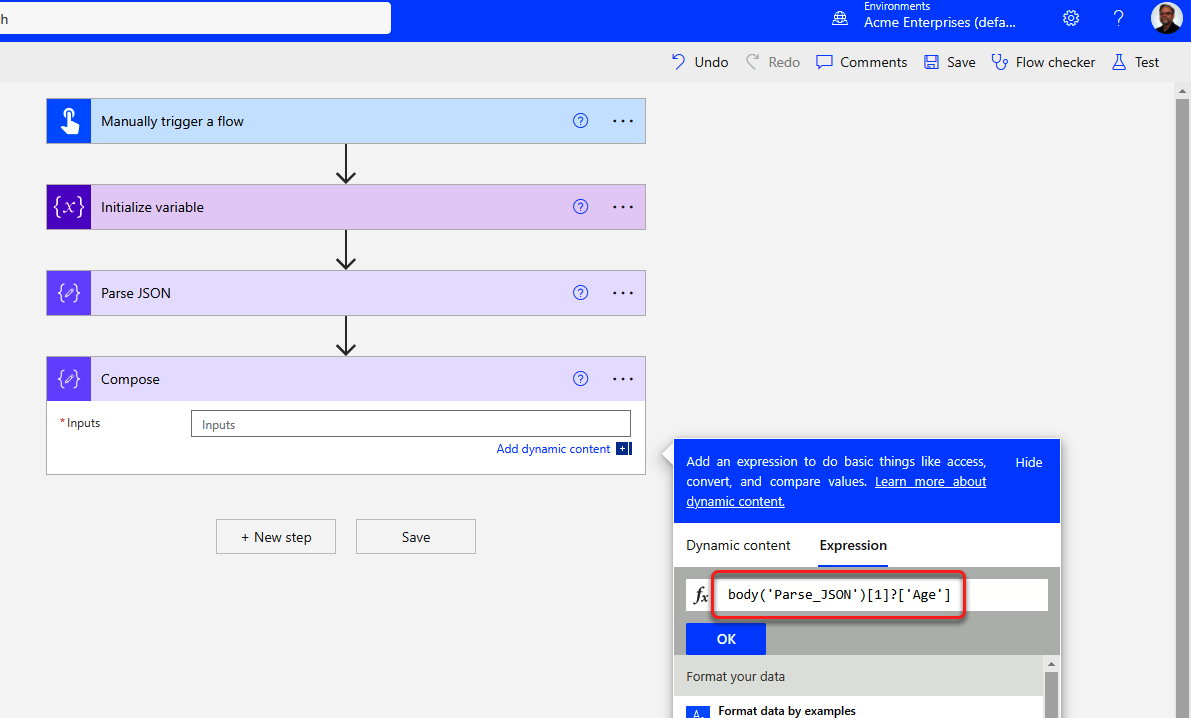
Figure 4-34. Inserting JSON expression
-
Save and test your flow. You should have no errors and see the value 35 in the outputs of the Compose (see Figure 4-35).
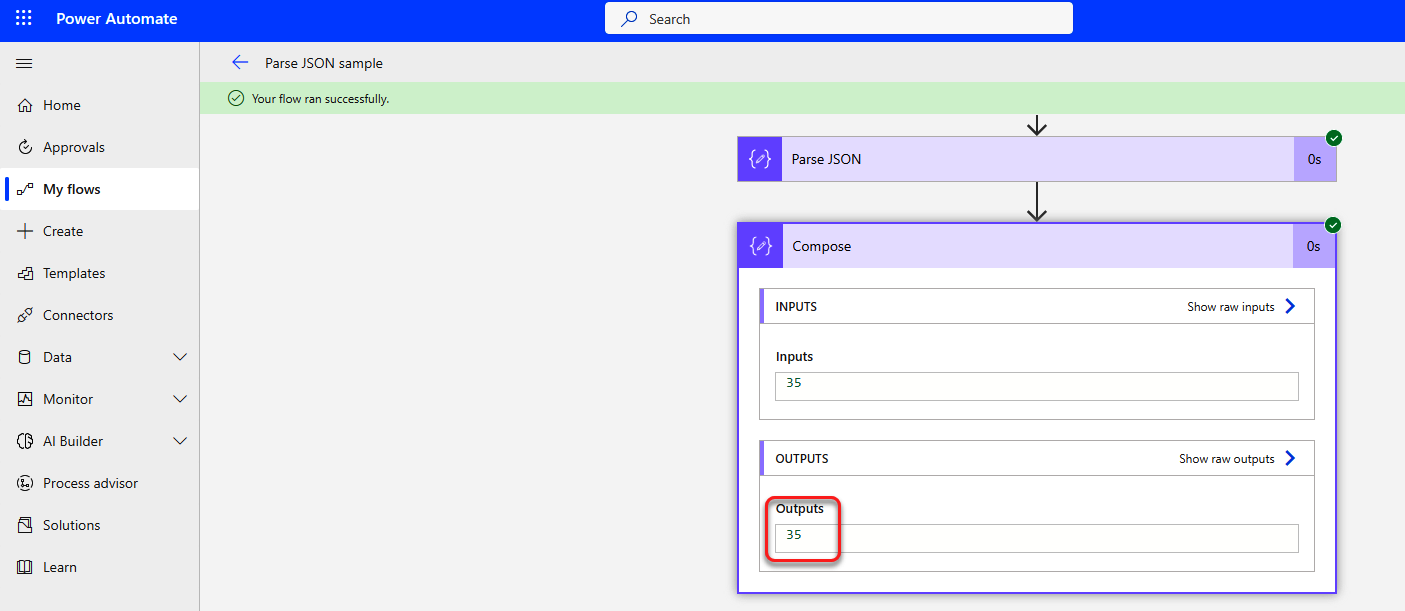
Figure 4-35. Parsing JSON test output
Now that you know how Power Automate passes information from one action to the next and you can access it directly using JSON, it’s time to look at how you can use functions to manipulate that content.
Working with Expressions
Getting started when you are building a flow in Power Automate is easy. Just select a trigger and add actions. Then configure the actions with dynamic content produced by the trigger or previous actions. But what if the dynamic content isn’t exactly what you need? For example, the trigger returns a date and time when the record was last modified, but you need to know whether that date and time is more than 60 days ago. So, you need to calculate today’s date minus 60 days. Power Automate has a full set of functions that you can use to complete complex calculations and operations to transform dynamic content into the data you need.
In Power Automate, these functions are called expressions. Power Automate uses the same functions that are available in Azure Logic Apps. You can find a list of available functions in the documentation. This website provides an excellent source of information about each function’s parameters and outputs. Individual links to documentation for each function can be found organized by category or as an alphabetical list of all the functions. This makes it easy to browse the lists to find details about any specific function.
These functions can be used inside a Power Automate action field to do things like convert a date to Universal Time Code, calculate mathematical formulas, combine strings to create a specific result, and much more. For example, since the equals operator in a Condition action is case sensitive, you might want to convert the dynamic content on both sides to lowercase to get a case-insensitive match. You can do that using the function toLower(<<dynamic content>>) as shown in Figure 4-36.
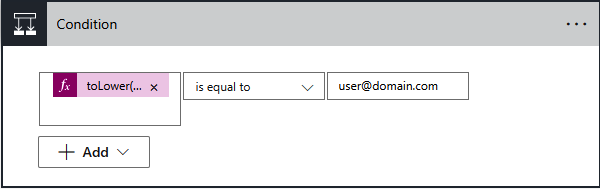
Figure 4-36. Using toLower() in a Condition
Many of these inline functions are also available as Power Automate actions. For example, convertTimeZone() will provide the same output as the Convert Time Zone action in the built-in Date Time connector. Using an inline function in place of an action can decrease the number of steps required in your flow. However, nesting multiple functions together can make your flow more difficult to troubleshoot by increasing the complexity of the fields in an action. I recommend that beginners start out using more actions and then replace them with inline functions as they become more proficient.
Understanding Function Syntax
Figure 4-37 shows the documentation for the toLower() function shown earlier. From the documentation, we can see that toLower() requires a single parameter of type string and returns that string in all lowercase letters. The documentation also provides an overall description of what the function does, as well as an example.
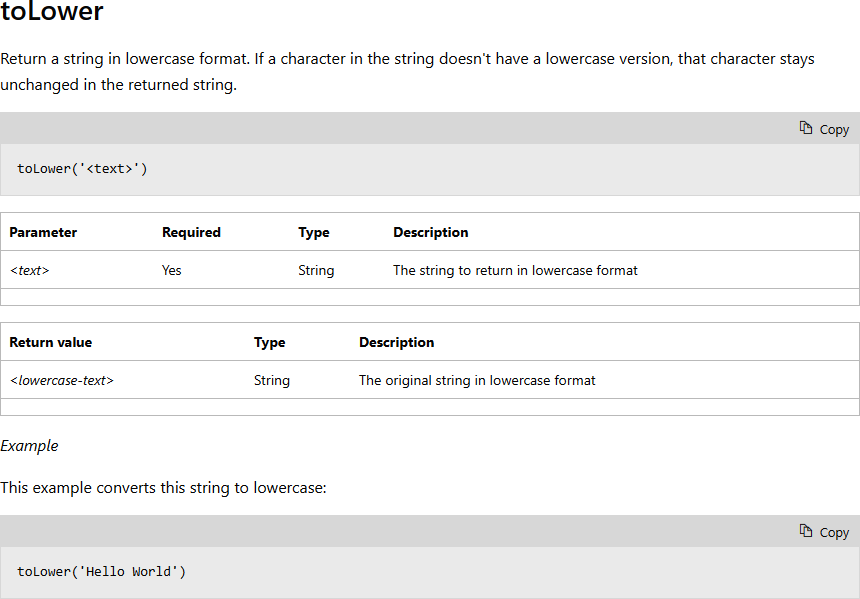
Figure 4-37. toLower() function documentation
Adding Dynamic Content to an Expression
Functions should be added to fields in Power Automate actions using the Expressions tab in the Dynamic content dialog. But typing an expression alone directly into the field won’t work. The function will be considered a text entry, and the expression won’t be evaluated. IntelliSense is a tool that can assist you when entering expressions through the Expressions tab. When you begin typing an expression in the Expressions tab, a list of potential expressions will be shown. You can complete your entry by choosing from the list, as shown in Figure 4-38.
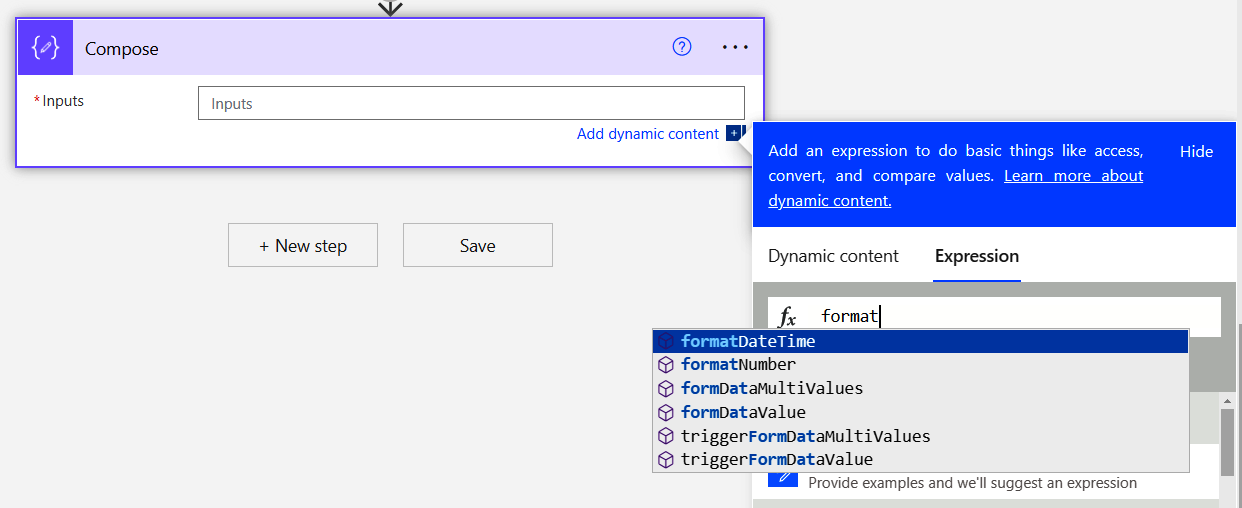
Figure 4-38. Expressions list
After entering the name of an expression, IntelliSense will also display a pop-up with an explanation of the function’s syntax, as shown in Figure 4-39.
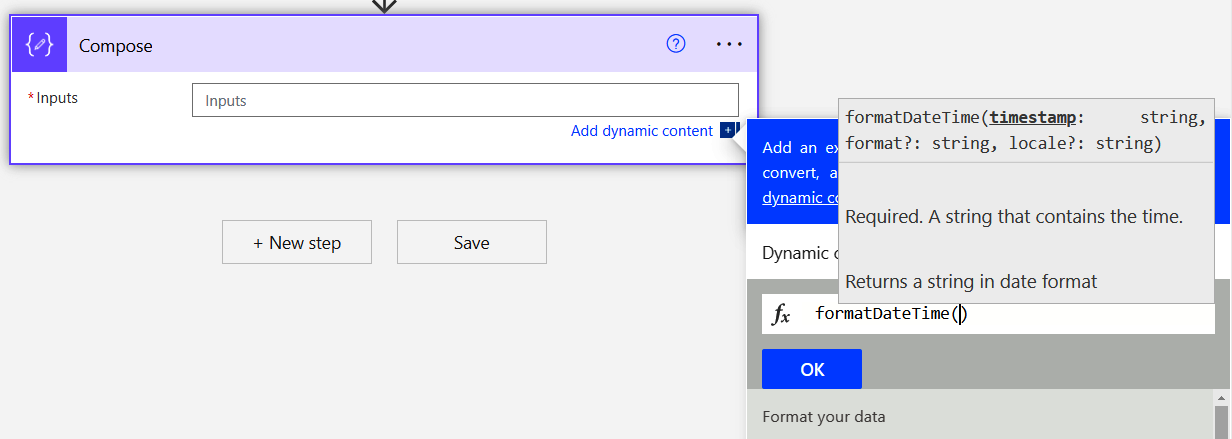
Figure 4-39. Function syntax in Expressions tab
Expression parameters can be entered either as static entries or JSON references to other dynamic content. String parameters are entered surrounded by single quotes. Trying to use double quotes when entering parameters is a common error when getting started with Power Automate flows. This will result in an error when you try to save the function, notifying you that the expression is invalid.
Dynamic content can be entered as a parameter by switching to the Dynamic content tab in the dialog and picking the value you want to add. However, because of aggressive filtering, the dynamic content you want won’t be displayed in the list when you want to use it in an expression. If you know the JSON syntax for the value, you can enter it directly in the Expression tab. You did this in Example 3-2 in the previous chapter, to access the ID of the first record in a filtered array of records. Entering JSON directly won’t change the data type requirements for the parameters, but it will help you overcome the aggressive filtering done by the Dynamic content tab.
Exercise 4-6. Using the Dynamic content Expression tab
In this example, we will send an email when a new row is added to the Dataverse Contacts table. We’ll need to use a few different functions to retrieve and format the information for the email.
-
Log in to https://make.powerautomate.com, and create a new automated cloud flow that uses the “When a row is added, modified, or deleted” trigger from the Dataverse connector (see Figure 4-40). Name the flow “Writing Expressions.”
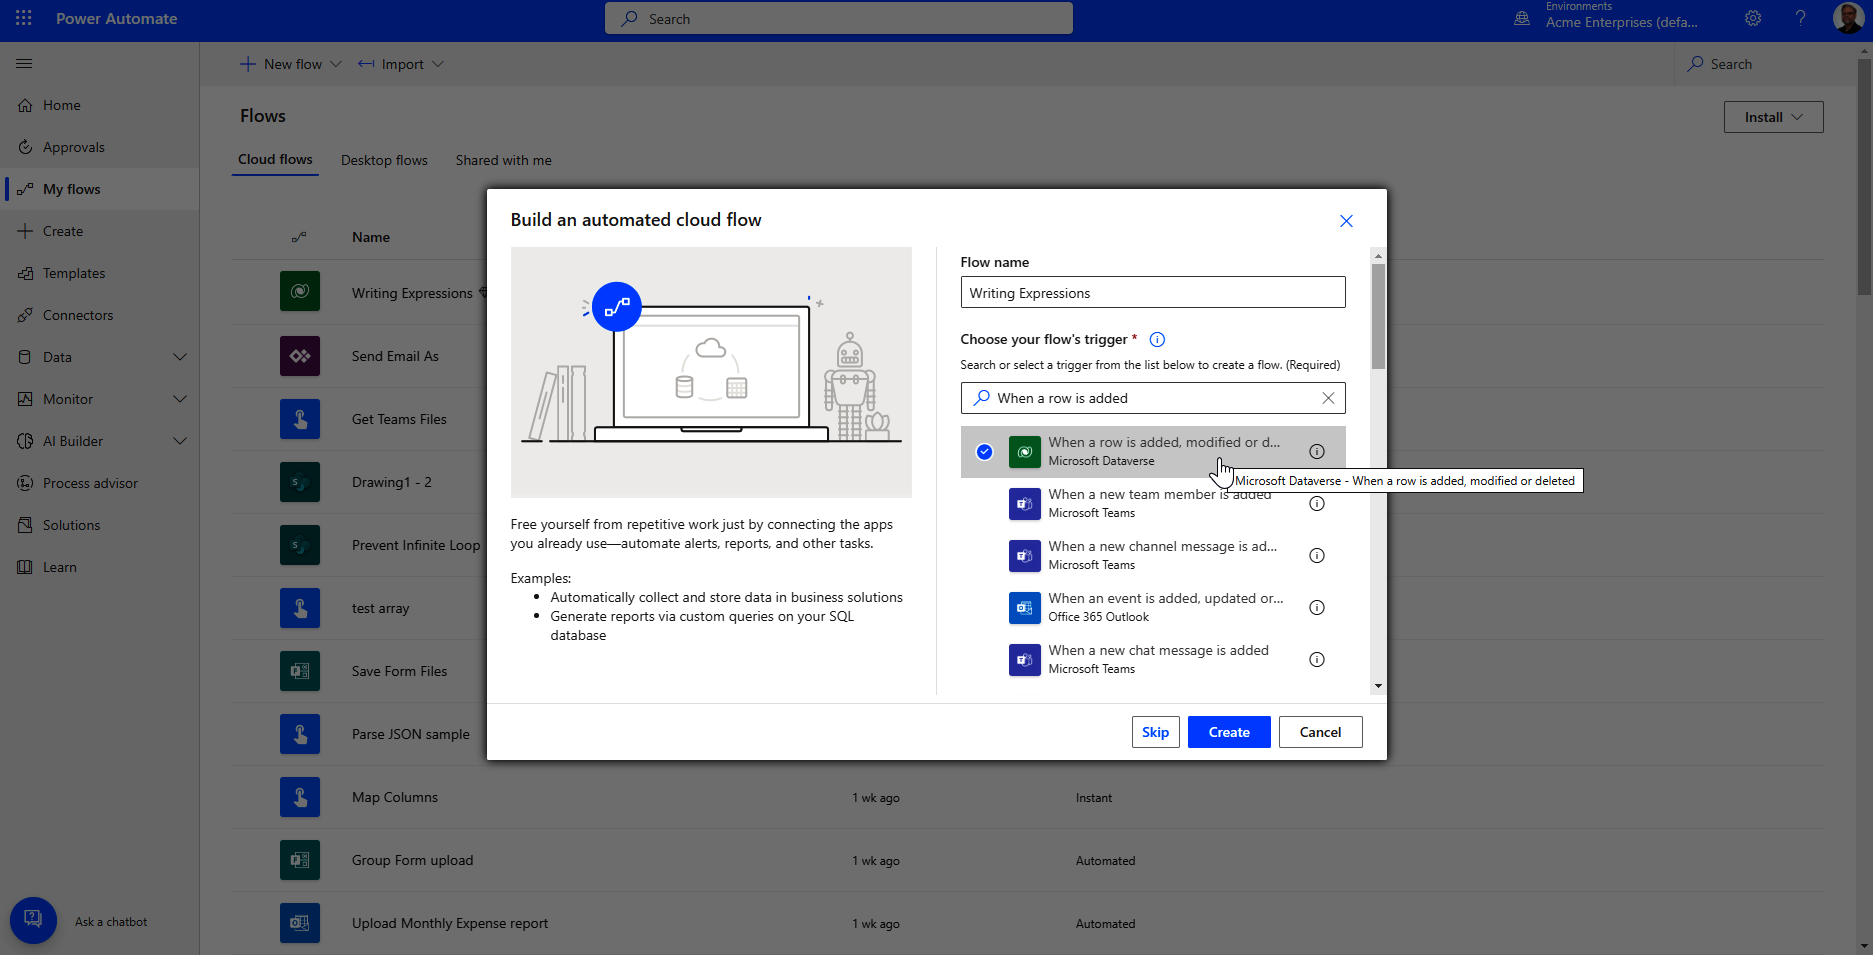
Figure 4-40. Creating Writing Expressions flow
-
Select the Change type to be Added so the flow only triggers when new rows are added. Select the Contacts table from the Table name drop-down, and select Organization to be the Scope, so any record added to the Contacts table will trigger the flow (see Figure 4-41).
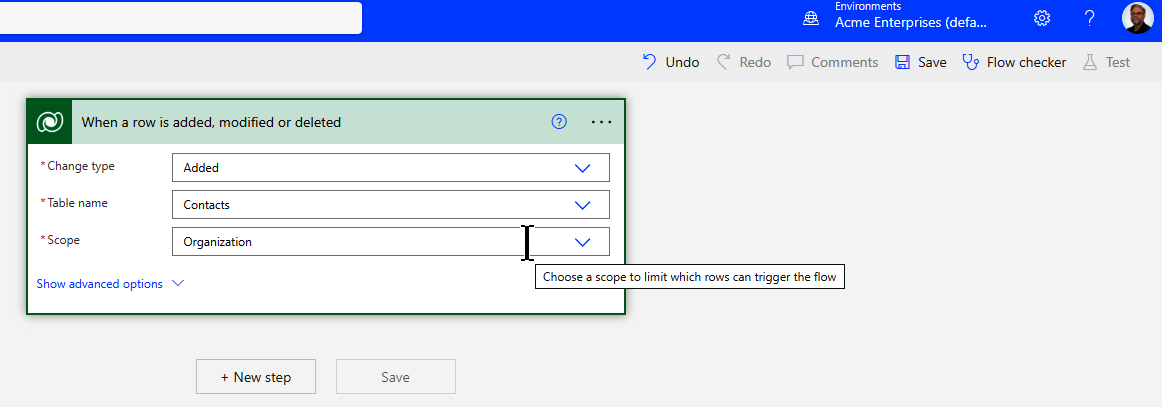
Figure 4-41. Configuring “Row Added” trigger
We want to include the name of the Company that the new contact is associated with and the time when the row was added. Dataverse returns a globally unique identifier (GUID) for the Company, so we’ll need to look up the Company in the Accounts table. Since company is optional, we’ll need to use a
Coalesce()expression to check if the GUID is null before doing the lookup. -
Click “+ New step” to add a “List rows” action from the Dataverse connector. Select the Accounts table in the Table name field. Click on the “Show advanced options” link to expand the advanced options. Type “accountid eq” in the “Filter rows” field. Select the Expression tab of the Dynamic content dialog. Type
coalesce(in the fx text box. Place your cursor inside the parentheses and switch to the “Dynamic content” tab. Select the Company Name Value dynamic content. Add the following after the dynamic content you just added:,guid().This will supply a random GUID if the Company Name field is null. The text box should now contain this :coalesce(triggerOutputs()?['body/_parentcustomerid_value'],guid())
Click Update to insert the expression into the “Filter rows” field (see Figure 4-42).

Figure 4-42.
Coalesce()expression -
Click “+ New step” to add a “Send an email (v2)” action. Type your email address in the To field. Type “A new Contact was added” in the Subject field. Type “A new Contact was added at” followed by a space in the Body field. The Dynamic content dialog will be displayed. Select the Expression tab in the dialog (see Figure 4-43).
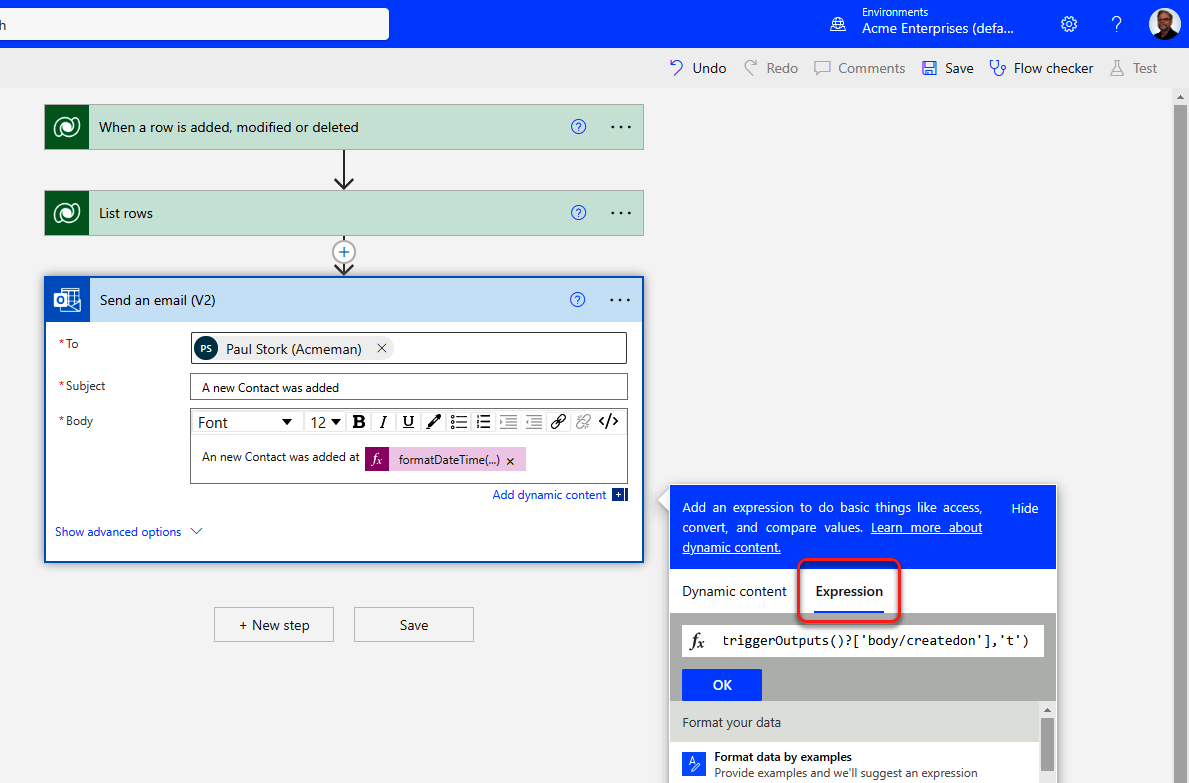
Figure 4-43. The Expression tab
-
Begin typing “format” in the fx text box. Select the
formatDateTimefunction from the list and add parentheses after it if necessary (see Figure 4-44).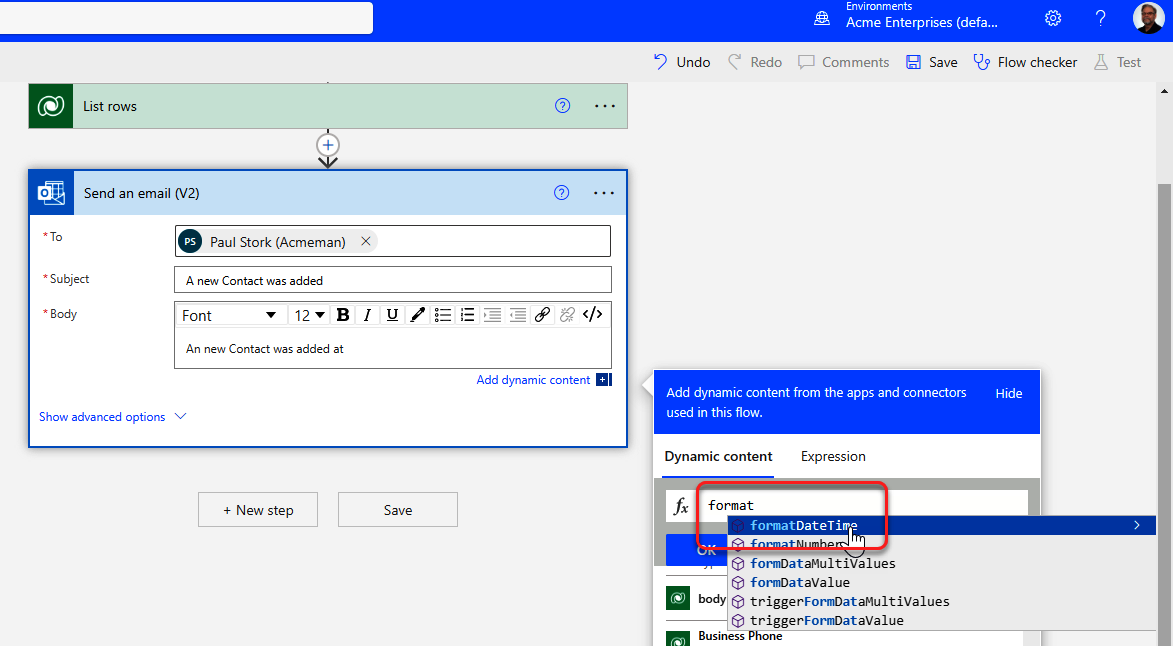
Figure 4-44. Selecting an expression
-
Place your cursor inside the parentheses and switch back to the Dynamic content tab. Select Description from the dynamic content in the trigger group. In the resulting expression, change
body/descriptiontobody/createdon. Add a comma and't'just before the closing parentheses. The text box should now contain this:formatDateTime(triggerOutputs()?['body/createdon'],'t')
Click OK to insert the expression into the email body (see Figure 4-45).
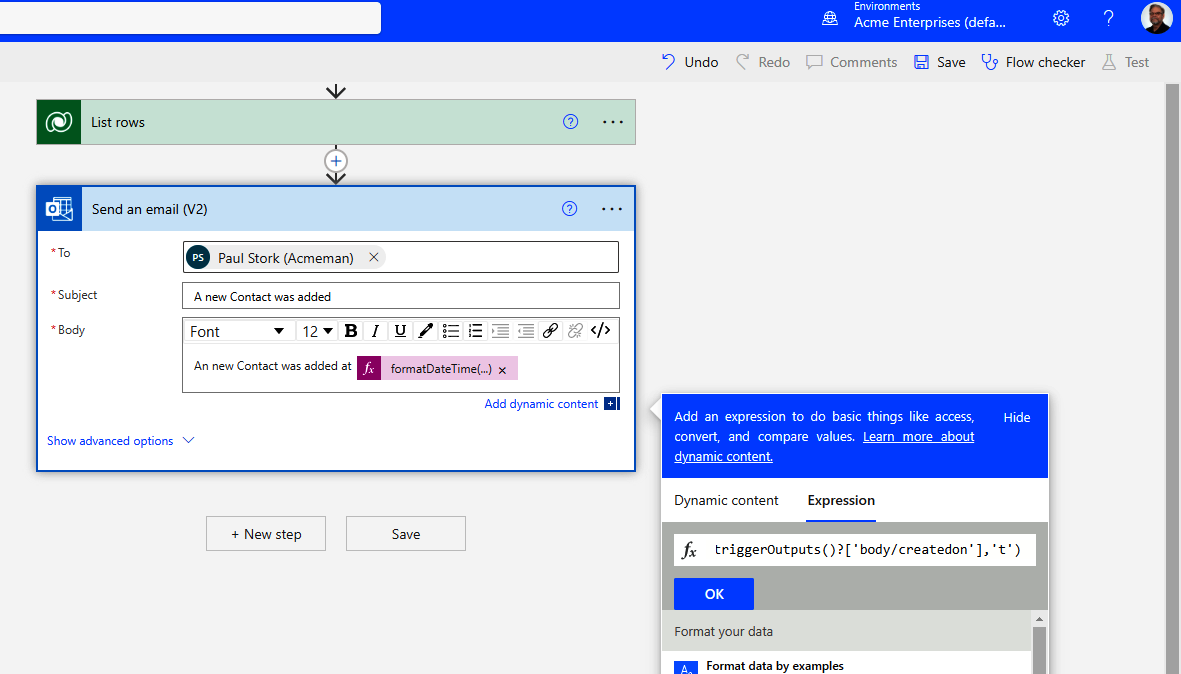
Figure 4-45. Formatting the
CreatedontimeNote
Createdoncannot be selected directly as dynamic content when using a function because the Dynamic content dialog aggressively filters the available values and thinks that it’s the wrong data type for the function. However, by using JSON notation, we can access the value directly. -
Type
forafter theFormatDateTime()function in the Body of the email. Typefirst()into the fx text box in the Expressions tab. Select the “Dynamic content” tab and insert the value Dynamic content from the List rows section. This will get the first row of the output from the “List rows” action we added previously. What we really want is the Name field from that first row. But that isn’t available. Move to the end of thefirst()function and type?['Name']after the close of the function. The text box should now contain the folloing:first(outputs('List_rows')?['body/value'])?['Name']Click Update to insert the expression into the email body (see Figure 4-46).

Figure 4-46. Using
first()to get Company Name -
Click Test in the upper-right corner and select the Manually radio button. Click the Test button at the bottom of the panel. Select Tables from the Data drop-down on the left side of the screen. Open the Account table and select Edit from the Edit drop-down menu. Select “+ New row” to add a new row to the table. Type “Acme Manufacturing” as the Account Name (see Figure 4-47). Click the Back link on the menu.
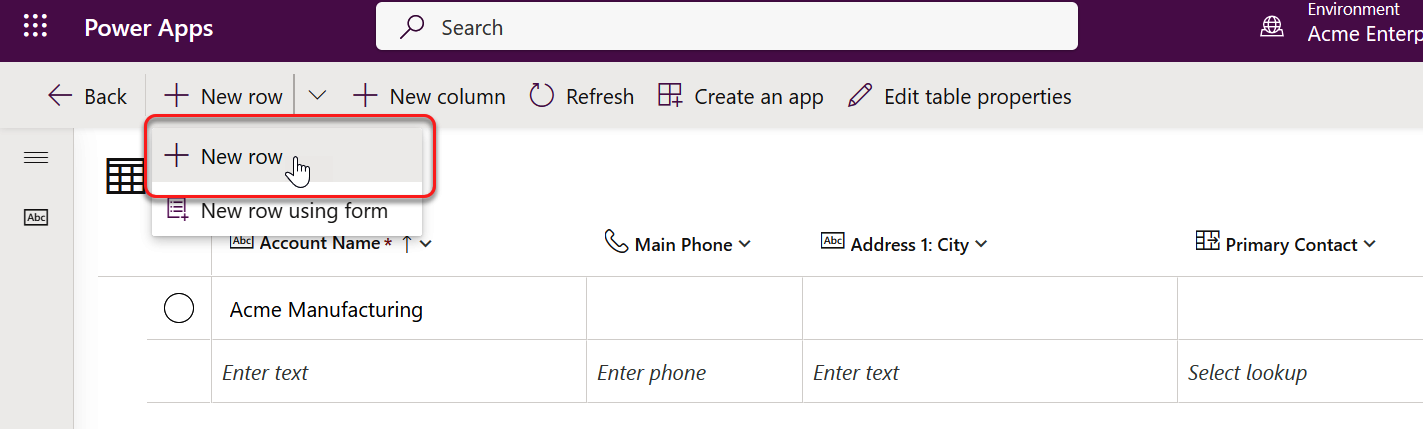
Figure 4-47. Adding a Company in Dataverse
-
Select Tables from the Data drop-down on the left side of the screen. Open the Contact table and select Edit from the Edit drop-down menu. Click “+New row” from the “+New row” drop-down to add a new Contact to the table (see Figure 4-48). Type the following values into the form:
-
First Name: John
-
Last Name: Doe
-
Account Name: Acme Manufacturing
Click Save & Close. Click Done.
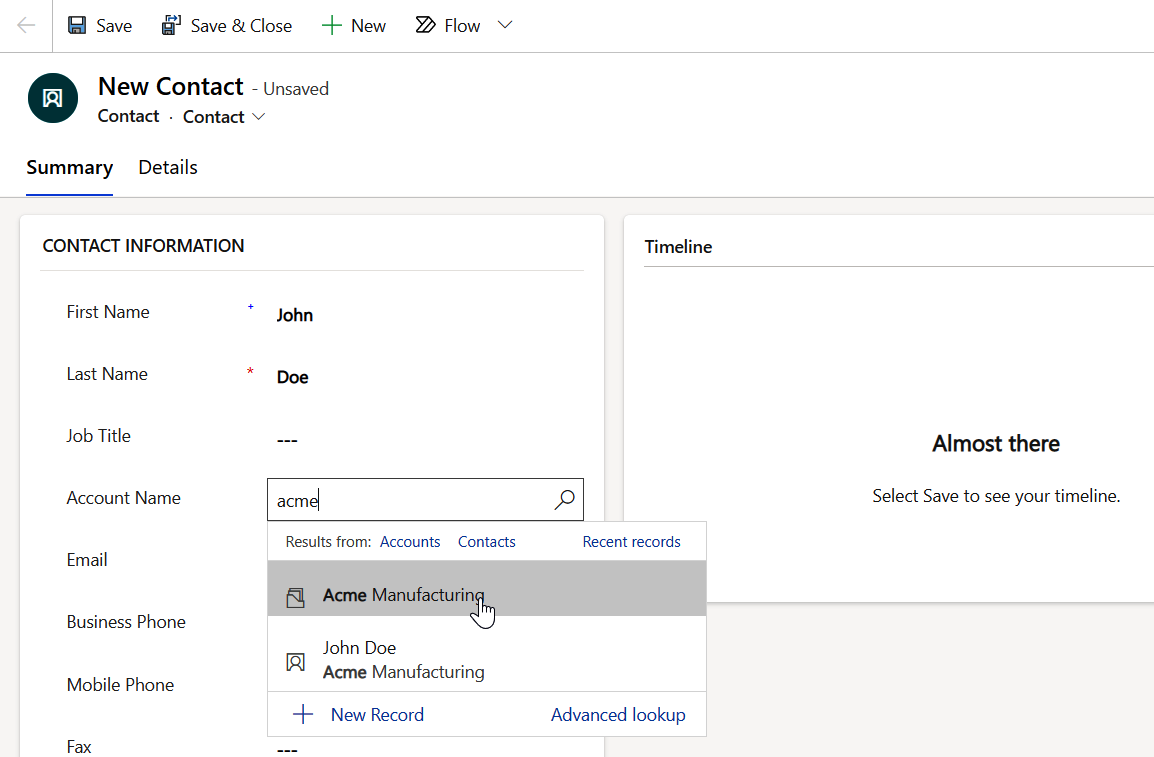
Figure 4-48. Adding a New Contact
-
-
Adding a New Contact record should trigger the flow within a few minutes. Return to Power Automate and review the flow for errors (see Figure 4-49).
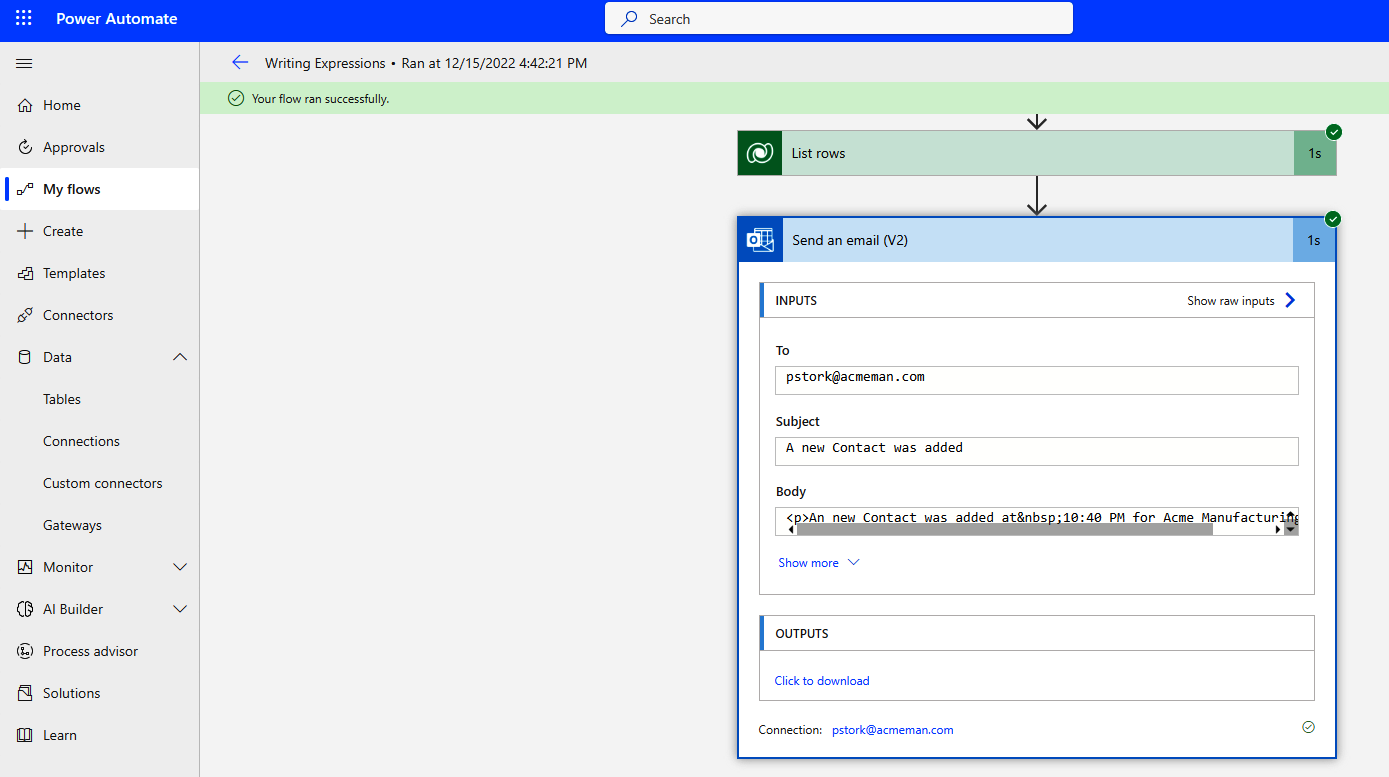
Figure 4-49. Reviewing flow history
Format Data by Examples
One of the most common uses for expressions in Power Automate is to apply a custom format to dynamic content. For example, you may want to take a date-time value that is written in ISO 8601 format and add it to an email in a format that is more familiar to your user. Power Automate makes this easy by supplying a “Format data by examples” entry in the Expressions tab. When you select that entry, a wizard will walk you through the process, asking for several things. First, it will ask you to pick the dynamic content field you want to format. Next, it will ask for one or more sample values and the output you would like for each. Once you have supplied those, it will provide you with a suggested expression to achieve that result. You can then test the expression and insert it into the field in the designer. You will be warned that you can’t get back to the “Format data by examples” wizard once you’ve inserted the value.
“Format data by examples” will only work on a single value at a time. You can’t use it to format arrays or multiple selections. But it does provide an easy way to obtain a specific output without needing to be completely familiar with all the functions available.
Exercise 4-7. Formatting a date
In this example, you’ll modify the email sent by the flow you created in Exercise 4-6 to include the date and time that the row was created. You’ll format the date and time the way you would like to see it presented.
-
Log in to https://make.powerautomate.com, and click on the flow titled “Writing Expressions” in your My flows list. Click on the Edit link at the top of the flow detail pane (see Figure 4-50).
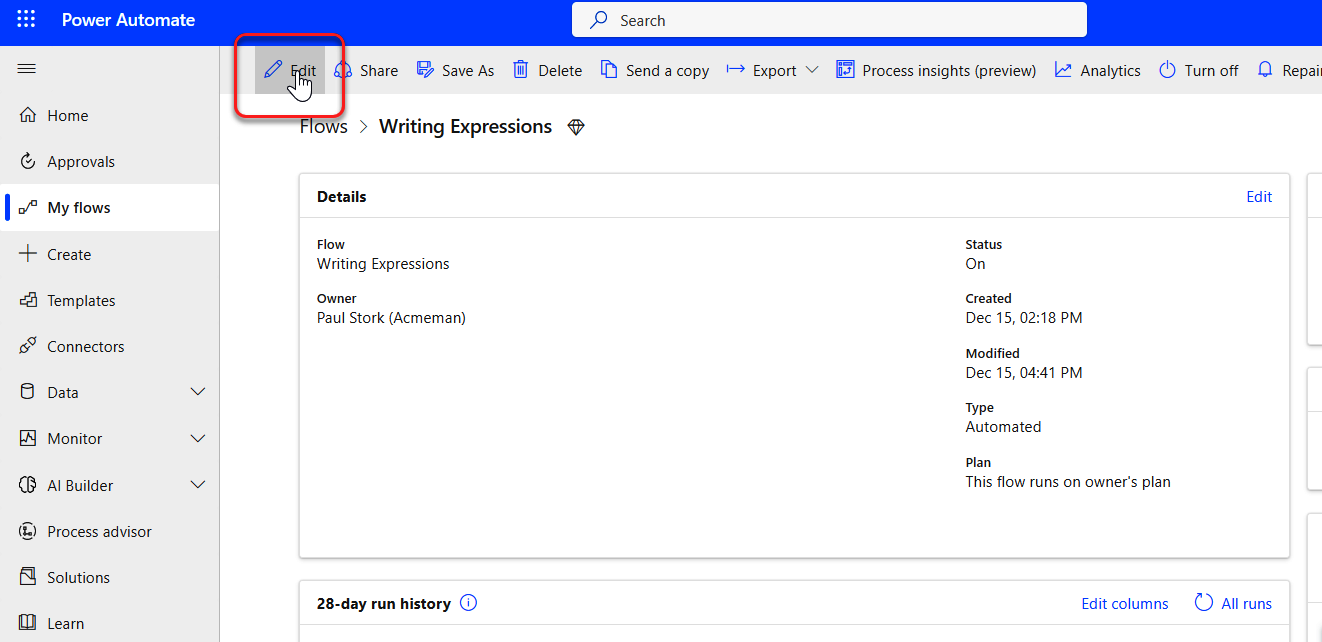
Figure 4-50. Editting existing flow
-
Expand the “Send an email (V2)” action and delete the
formatDateTimeexpression by clicking on the “x” (see Figure 4-51).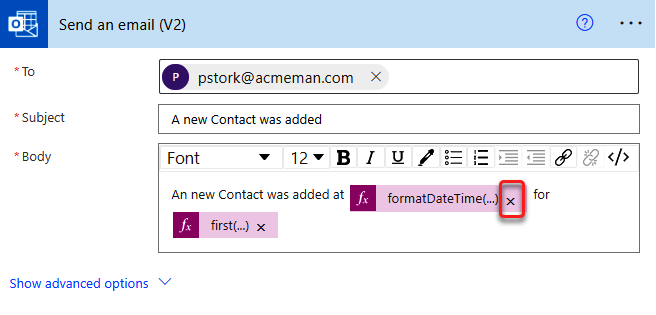
Figure 4-51. Removing existing
FormatDateTimeexpression -
With the input cursor where the
formatDateTimeexpression used to be, click on the Expression tab and select “Format data by examples” from the list of expressions (see Figure 4-52).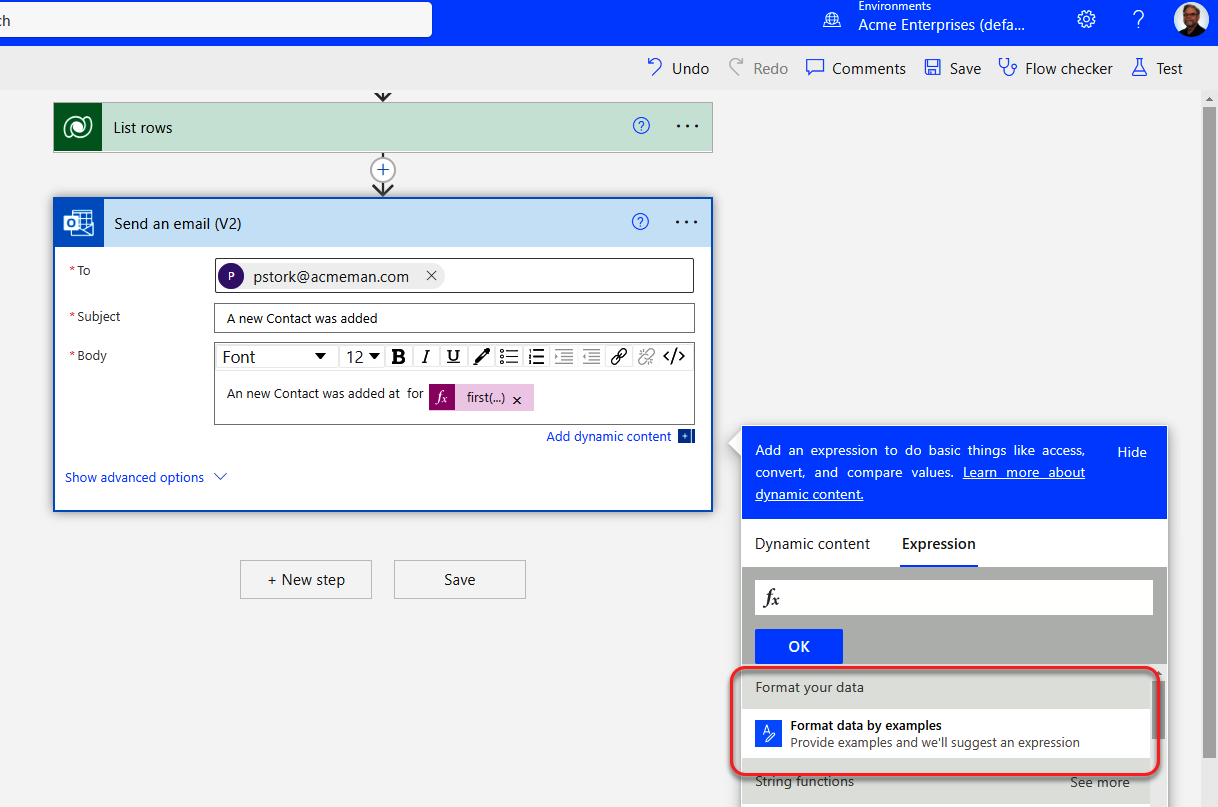
Figure 4-52. Starting “Format data by examples” wizard
-
Type “Created” into the Search box, and select Created On from the “When a row is added, modified or deleted” trigger (see Figure 4-53).
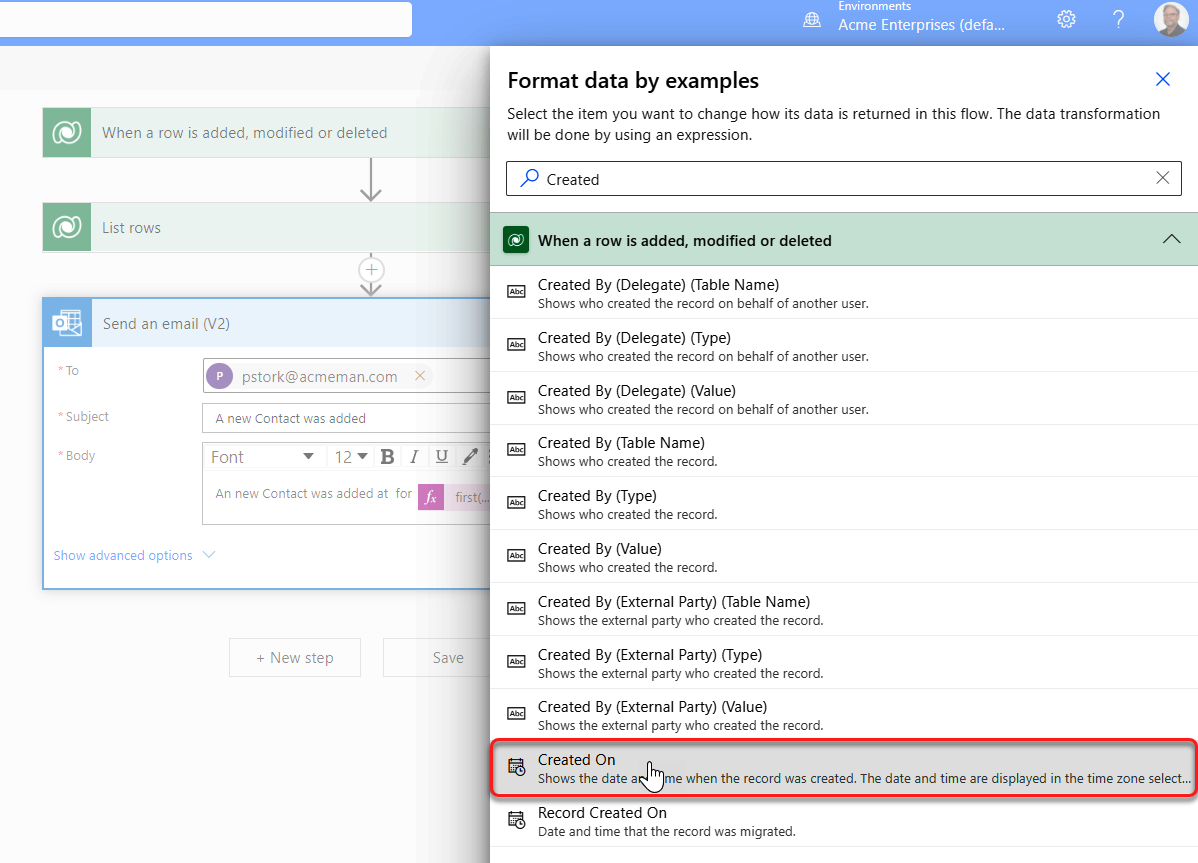
Figure 4-53. Selecting dynamic content
-
Type a typical ISO 8601–formatted date-time value like “2022-12-28T10:00:00.000Z,” into the Example value field. Type the date-time format you would like to see in the Desired output field (see Figure 4-54). Click “Get expression.”
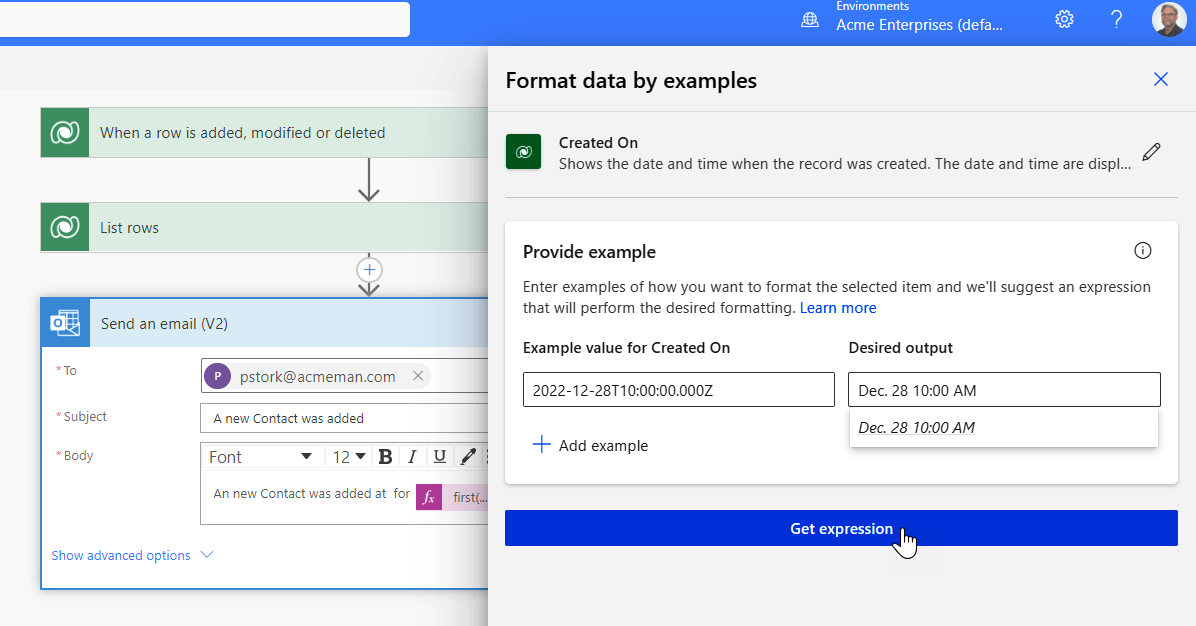
Figure 4-54. Getting expression
-
Click Apply to insert the expression generated by the wizard into the email. A warning will appear stating that you will not be able to go back to the wizard after inserting the expression. This means any edits to the expression will need to be made manually. Click “Got it” to close the dialog (see Figure 4-55).
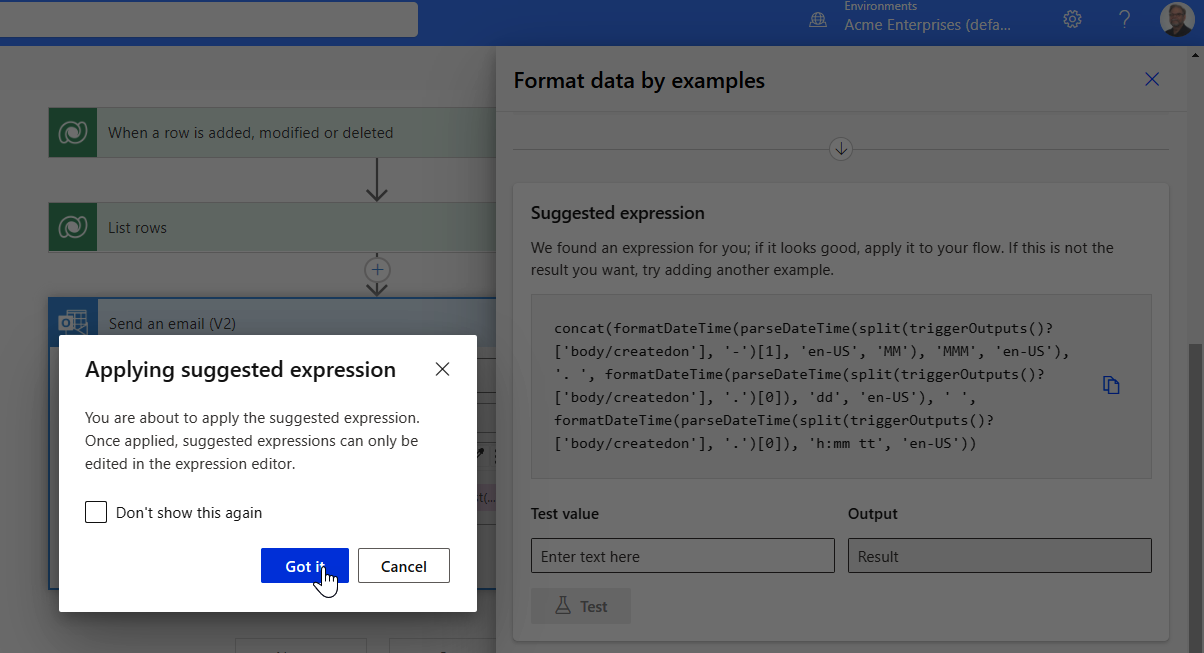
Figure 4-55. Inserting expression
-
Save and test the modified flow by adding a New Contact record. This should trigger the flow within a few minutes. Return to Power Automate and review the flow for errors (see Figure 4-56).

Figure 4-56. Reviewing flow history
If you know what you want your data value to look like but aren’t sure how to build a function to format the content, try using “Format data by examples.” It should at least give you some ideas on how to do it even if your first attempt isn’t perfect.
Using the Action Ellipsis (…) Menu
When building flows, you will usually configure your actions by using dynamic content and functions. But there are times when just manipulating the values supplied to fields in an action is not enough. In those cases, you will use the ellipsis (…) menu of the action or trigger to do additional configuration. Figure 4-57 shows a typical ellipsis menu.
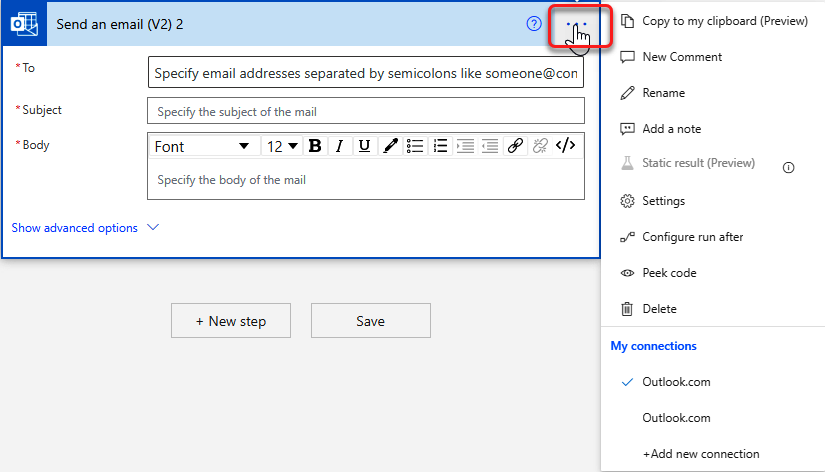
Figure 4-57. Ellipsis (…) menu for an action
The options available depend on the action or trigger itself. However, there are several entries that are common to most actions and triggers. Following are the common entries found on most ellipsis menus:
-
Copy to my clipboard
-
New Comment
-
Rename
-
Add a note
-
Static result (Preview)
-
Settings
-
Run after
-
Peek code
-
Delete
-
My connections
I’ll go over each of these menu entries at some point in the book. Some of them, like “Static result (Preview)” and “Run after” will be covered in Chapter 7 when I cover troubleshooting. I’ll also dedicate a section to the Settings menu entry later in this chapter since it contains a variety of additional choices. You have already been introduced to some options, like Peek code and Delete, earlier in the book. You saw how to use Peek code to look up and copy the JSON syntax for a value, and you’ve used Delete in a couple examples. Let’s review the rest of the entries now.
Copying Actions
The Copy entry on the ellipsis (…) menu can be used to copy a formatted action to your computer’s clipboard. Then, when you add an action you can use the My clipboard tab, as shown in Figure 4-58, to paste a copy of the action into the designer. The My clipboard tab will show all the actions you’ve copied since you logged in to the designer.
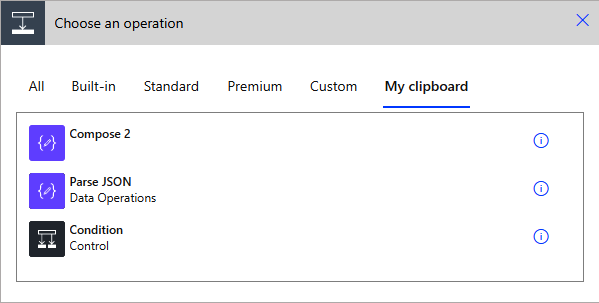
Figure 4-58. Pasting actions from My clipboard
Note
Copying triggers isn’t currently supported, so the Copy entry is grayed out on the Trigger menu.
You can even copy actions between two different flows by copying the actions you want, closing that flow, and opening the other one in the same Power Automate tab. You must use the same tab because the clipboard is specified in your current web session. If you open a different browser and log in again, you’ll get a different clipboard. When I showed you how to use Peek code earlier in this chapter, you saw that the action and its configuration is stored in JSON code. What you are copying when you use the “Copy to my clipboard” entry is that JSON configuration. Pasting that JSON in as a new action creates a copy of the action in a new location. Because it is using JSON references, the copy/paste may not work correctly if some of the references are not in scope when pasting the action in a new location. For example, if you copy an action inside an “Apply to each” loop and then try to paste it outside the loop, it won’t have access to values generated inside the loop. The paste will work, but an error will occur when you try to save the flow.
Renaming Actions and Triggers
Actions must have unique names within the flow and are limited to no more than 80 characters in length. When you add additional actions in a flow, a number is automatically added to the default name. For example, the second Compose you add to a flow will be named “Compose 2,” and the third would be “Compose 3.” This will satisfy the requirement that all action names must be unique. But it will make the logic of your flow hard to follow.
Using the Rename entry on the ellipsis menu, you can supply your own specific name to the action. If you only have one “List rows” action in a flow, it’s probably clear what it does. But if you have multiple Initialize Variable or Compose actions, it may be harder to remember what each of them is used for. Providing a meaningful name for each action can be time-consuming, but it should be done for actions that occur more than once in a flow.
Tip
Renaming an action after you have used dynamic content produced by that action in other actions may break those dynamic content JSON references. So, it’s a good idea to rename actions as you add them to the designer.
Renaming actions to give them more meaning will help you keep track of what your flow is doing. But adding marginal comments and notes to document your flow is also important. There are two entries on the ellipsis menu that can be used for this kind of documentation.
Adding Comments
The Comments link is best used when collaborating with other users to develop a flow. Using Comments, you can add marginal comments to the right side of the flow designer for a specific action. You can even @mention another user in the context of a comment. Doing that will add their name to the comment and send the comment to them by email. Users can also reply to a comment to create a comment thread. Each action in a flow can have multiple comment threads. The number of comment threads in an action or trigger are displayed in an indicator within the action card.
The Comments panel can be toggled open or closed using the Comments link at the top of the designer screen. Figure 4-59 shows a typical comment thread in a flow. Comment threads can be deleted or simply marked as resolved and left in the finished flow.
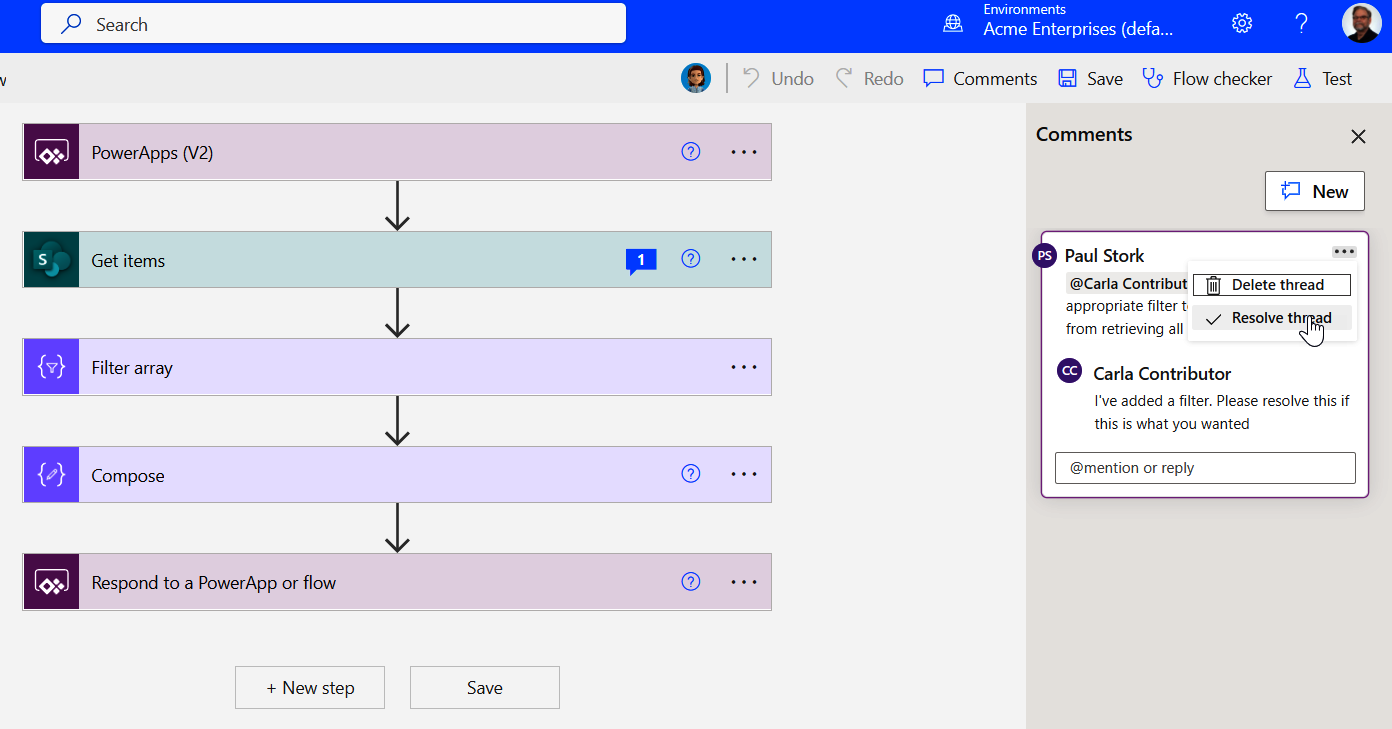
Figure 4-59. Comment thread in a flow
Adding Notes
Notes can also be added inline to each action and trigger in a flow. As shown in Figure 4-60, notes appear below the action header and above any fields that need to be filled in. One common use of the note field is to store the JSON source for functions used in the action so that they are easily visible without hovering over them to get a tooltip or loading them into the Expressions tab.
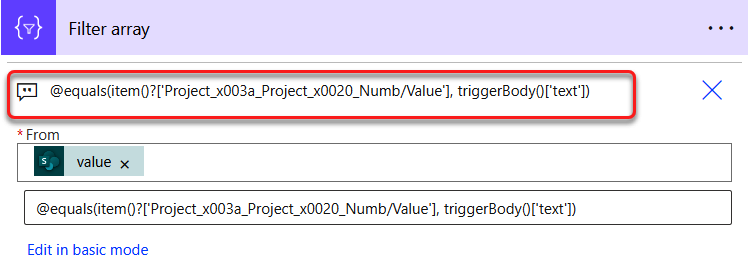
Figure 4-60. Note in an action
Adding a New Connection
Connections are created automatically when you add an action to a flow. But there are times when you want to create a new connection or switch which connection an action is using. The ellipsis menu will display a list of existing connections that you can use with a specific action, and there is an “+Add new connection” link that can be used to create new connections. If your flow is stored in a solution, then you will also see connection references listed.
Changing Action Settings
Each of the ellipsis menu settings I’ve discussed so far focuses on one thing. But there is also a Settings menu entry that provides access to a variety of settings. These settings can vary from action to action, but in this section I’ll cover the common settings available on most actions. Figure 4-61 shows a typical Settings panel for an action.
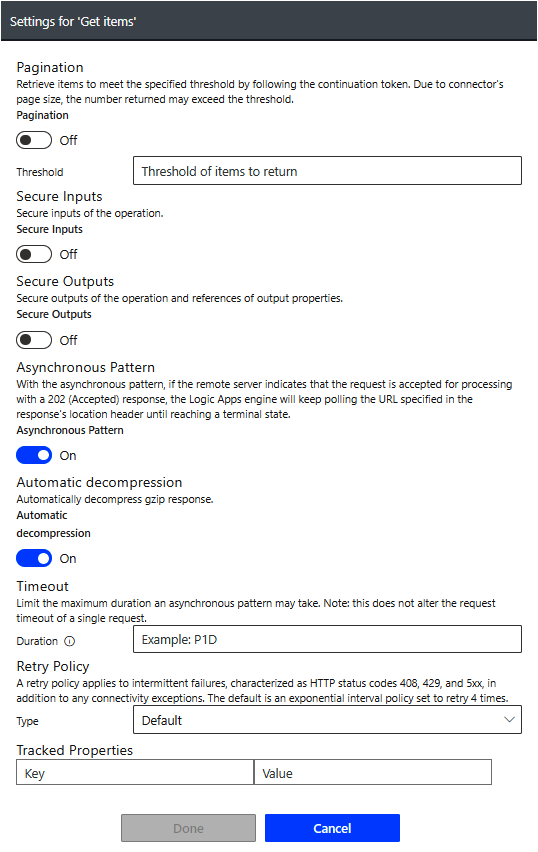
Figure 4-61. Settings panel
Following are explanations for most of the common settings you will find on the Settings panel.
Pagination
Actions that retrieve an array of records will default to retrieving the first 100 records. If you want to retrieve more than that, you will need to enable the Pagination feature on the Settings menu. Once Pagination is enabled using the toggle, you can set a threshold for the maximum number of items that will be retrieved. The action will then continue to retrieve records in batches until it reaches the maximum threshold value.
You need to be careful when enabling Pagination because it can have a significant impact on the performance of your flow. You also need to be aware that there are limits on how large an array you can process using loops, depending on your license level. These limits range from a low of 5,000 items to a high of 100,000.
Secure Inputs and Secure Outputs
Input and output parameters for your flow are always passed using HTTPS encryption. But they will show in the flow run history. So, if your flow actions use confidential data, you should enable the Secure Inputs and Outputs features in the action’s Settings. This will hide the inputs and outputs in the flow run history.
Asynchronous Pattern
The normal return status code for most APIs is 200. But some connector actions will return a 202 status code, which means they have accepted the task but haven’t completed it. The Asynchronous Pattern feature is enabled on actions by default. This tells the action to continue to poll the server until the action times out or receives a valid HTTP status termination code. It should not be disabled unless you know that the API doesn’t use a 202 status code.
Automatic Decompression
JSON responses are normally returned in a compressed state to minimize their size. Automatic Decompression is also enabled by default. This setting will decompress a GZIP response sent by a connector API. It shouldn’t be disabled unless you know the connector sends a raw JSON response.
Timeout
Running flows will time out after 30 days, but occasionally it’s helpful to time out an individual action. As we discussed, most actions will run in an Asynchronous mode—they continue to check the server until it completes the request. Using the Timeout setting, you can set a timeout for a specific action. The duration is set using an ISO 8601 duration. For example, setting the timeout of a “Start and wait for an Approval” action to P29DT12H will automatically time out an approval before the whole flow times out at 30 days. You can then relaunch the flow to create a new approval that will be good for another 30 days.
Note
ISO 8601 is an international standard that defines how to state a date and time or a duration as text. The duration format is as follows, where (n) is replaced by a number:
P(n)Y(n)M(n)DT(n)H(n)M(n)S
-
P is the duration designator and is always placed at the beginning of the duration.
-
Y is the year designator and is not used in Power Automate.
-
M is the month designator and is not used in Power Automate.
-
D is the day designator that follows the value for the number of days.
-
T is the time designator that precedes the time components.
-
H is the hour designator that follows the value for the number of hours.
-
M is the minute designator that follows the value for the number of minutes.
-
S is the second designator that follows the value for the number of seconds.
Retry Policy
Actions don’t always succeed the first time the API is called. The server may be down, or the service may be too busy to take more requests. To adjust for that, there are four different Retry Policy types:
- Default
- An exponential interval policy set to retry four times.
- None
- Do not retry an API call that fails.
- Fixed Interval
- Count establishes the number of times to retry the call, and Interval sets the amount of time to wait between tries.
- Exponential Interval
- Count establishes the number of times to retry the call, and Interval sets the maximum amount of time to wait for the first retry; successive retries will occur on a decreasing interval.
Tracked Properties
Tracked Properties can be used to store a particular key-value pair with a particular action. The value does not show in either the Input or Output of the action but can be retrieved in a later action using the actions() function. For example, if you create a Tracked Property called “My Tracked Property” in the Dataverse List Rows in Table action, you could retrieve the value of that property later in the flow with actions(List Rows in Table)?['TrackedProperties']?['My Tracked Property']. Tracked Properties let you store data that can then be retrieved in other steps of your flow. This may be more efficient than depending on dynamic content that must be processed each time it is used.
Trigger Settings
There are also a few settings that are specific to triggers. In addition to the settings already covered, these settings include the following:
-
Split On
-
Custom Tracking ID
-
Concurrency Control
-
Trigger Conditions
Figure 4-62 shows a typical Settings dialog for a trigger.

Figure 4-62. Trigger Settings dialog
Split On
Triggering events can often happen simultaneously. For example, when multiple users fill in a Microsoft form, they may submit forms at the same time. So, most triggers are designed to allow inclusion of one or more items in the data passed as part of the trigger. There is a trigger option called Split On that can be used to break this collection of data apart and start one flow instance for each item. Split On is enabled by default. Once enabled, select for each new instance which item level in the array is used. Turning off the Split On option lets you work with all the items triggered at the same time in one flow.
The Split On tracking ID lets you specify a value of the original item that will be used as a unique index to differentiate between the flow runs. This is related to the Custom Tracking ID, which we’ll cover next.
Custom Tracking ID
The Custom Tracking ID is a feature that was created for Azure Logic Apps. It’s still present in Power Automate because it is built on the foundation of Azure Logic Apps. Although you can set a Custom Tracking ID in the trigger settings, there is no way to view this value in Power Automate.
Controlling Concurrency
In most cases where Split On is enabled, Power Automate will generate as many instances of a flow as necessary to process the items in the incoming array of data. Each instance of the flow will be added to a queue and run one after another as each previous instance finishes. This guarantees that the flow instances run completely independent from each other. This is the default condition when the Concurrency control is disabled.
But running the flows one at a time can slow things down. So, an optional setting lets you tell Power Automate to run up to 100 flow instances in parallel threads. To do this, you enable the Concurrency Control toggle to On and set the Degree of Parallelism slider to the number of parallel threads you want to enable. The minimum is 1, which is the same as disabling Concurrency. The maximum is 100. If you have more than 100 items to process, then it will process the first 100 in parallel and start a new thread as each thread finishes. Enabling concurrency can significantly improve performance of flows if they have no interdependencies.
Implementing Trigger Conditions
Trigger Conditions let you specify conditions that must be met before your flow will trigger. For example, you may have an approval flow that shouldn’t run until all data entry is completed and the item is submitted for approval. If you are using a “When an item is modified” trigger, it will start on any modification. By adding a Trigger Condition, you can specify that the flow will only start when the item has been modified and a specific column value has been set to “Submit for Approval.” Trigger Conditions let you fine-tune when your flow will run instead of testing for specific values after the flow is triggered. Trigger Conditions are often used to prevent infinite loops that occur when using a “When an item is modified” trigger and then making a modification inside the flow—this will normally trigger the flow again.
Exercise 4-8. Preventing infinite loops with Trigger Conditions
In this example, we’ll create a flow that triggers when a SharePoint item is created or modified. To keep the flow from triggering in an infinite loop, we’ll add a Trigger Condition to keep the flow from triggering again when an update is made by the flow.
-
Log in to your SharePoint online tenant and create a custom list called “Trigger Condition Demo.” Add a “Multiple lines of text” column to the list called Updates. Under “More options,” enable “Append changes to existing text” (see Figure 4-63). Add a Choice column called “Status.” Set the three choices to Pending, Started, and Completed. Click the Save button.
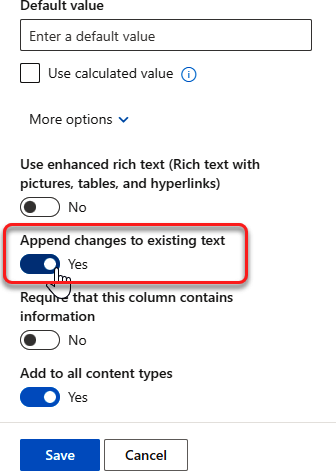
Figure 4-63. SharePoint updating column settings
-
Log in to https://make.powerautomate.com, and create a new automated cloud flow that uses the “When an item is created or modified” trigger (see Figure 4-64). Name the flow “Prevent Infinite Loop.”
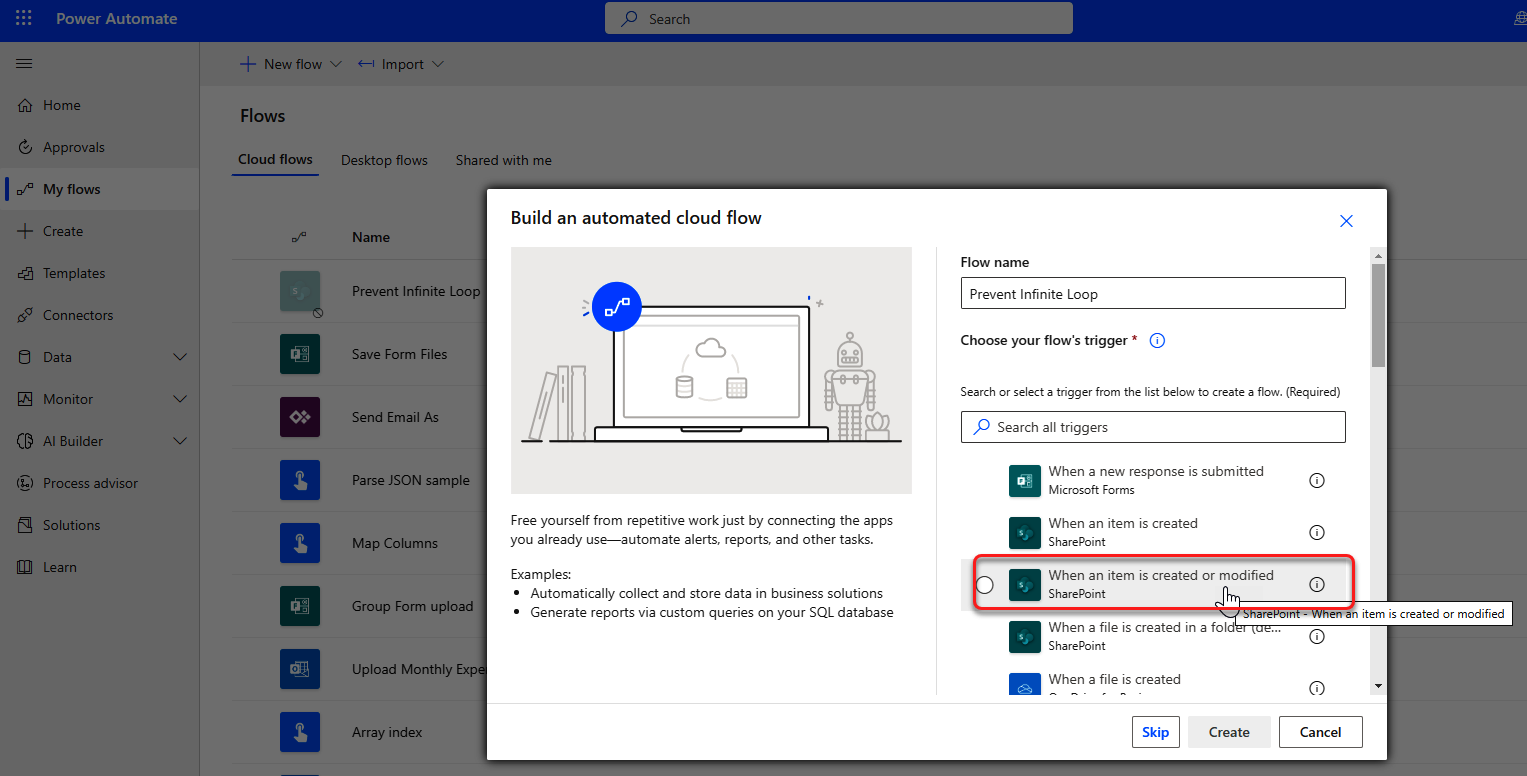
Figure 4-64. Creating “Prevent Infinite Loop” flow
-
Select the Site Address for the SharePoint site where you created the list in step 1. Select Trigger Condition Demo from the List Name drop-down (see Figure 4-65).
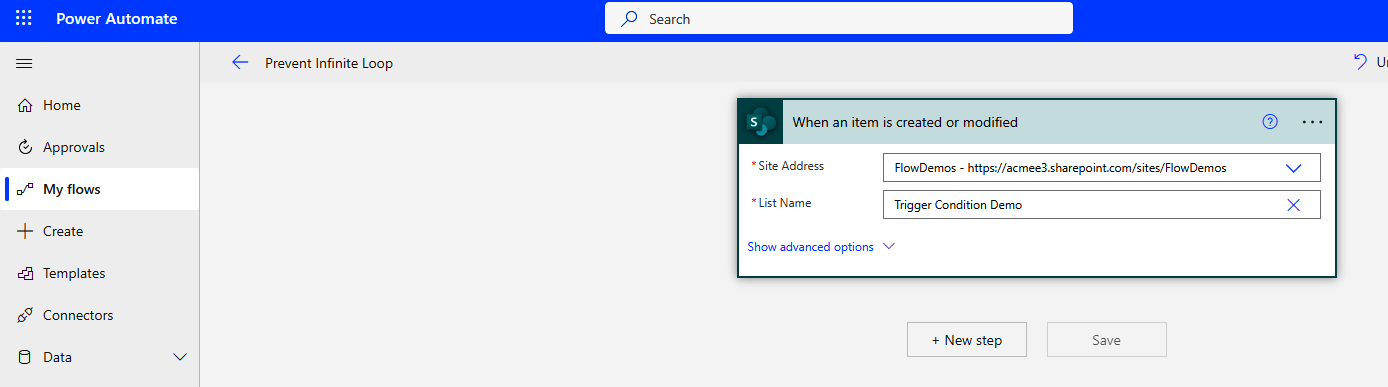
Figure 4-65. Configuring trigger
-
Click “+ New step” to add a Delay action from the built-in Schedule connector. Configure the Delay to wait for one minute. The delay is added to simulate work that the flow may be doing (see Figure 4-66).
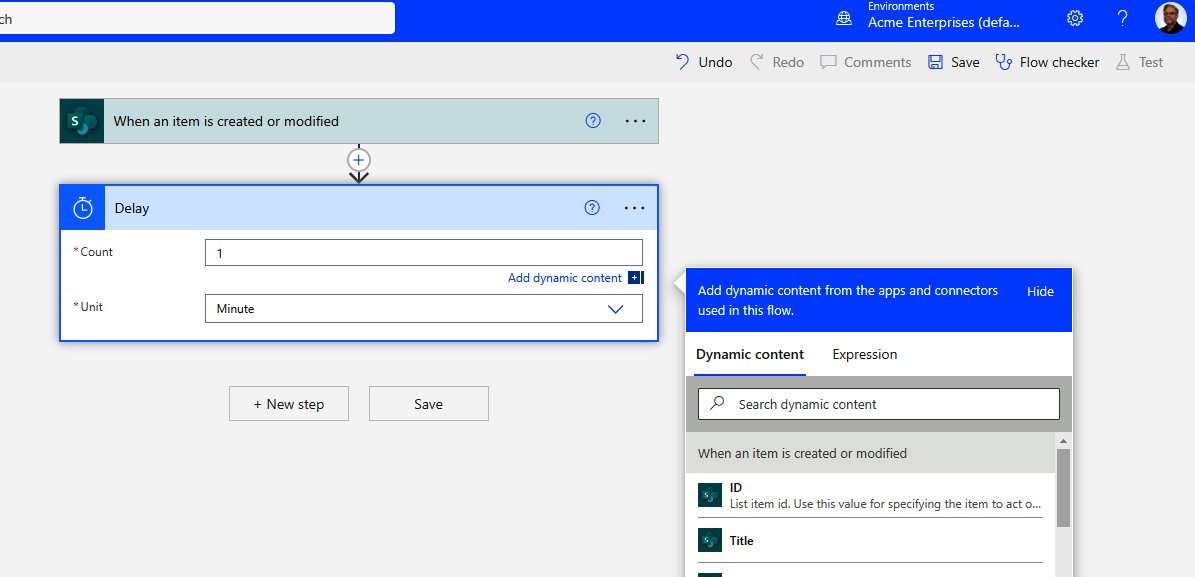
Figure 4-66. Configuring delay
Note
If an update comes immediately after the flow triggers, it may not cause the flow to re-trigger. But in many scenarios, for example, approvals, the updates don’t come until later. This will typically cause the flow to re-trigger.
-
Click “+ New step” to add an “Update item” action from the SharePoint connector. Configure the action to use the same Site Address and List Name as the trigger. Insert the ID and Title dynamic content from the trigger into the ID and Title fields. Type
Concat('Updated ' '', formatDateTime(UtcNow(),'hh:mm'))into the Expression tab and insert it into the Updates field (see Figure 4-67). Select Completed in the Status Value field.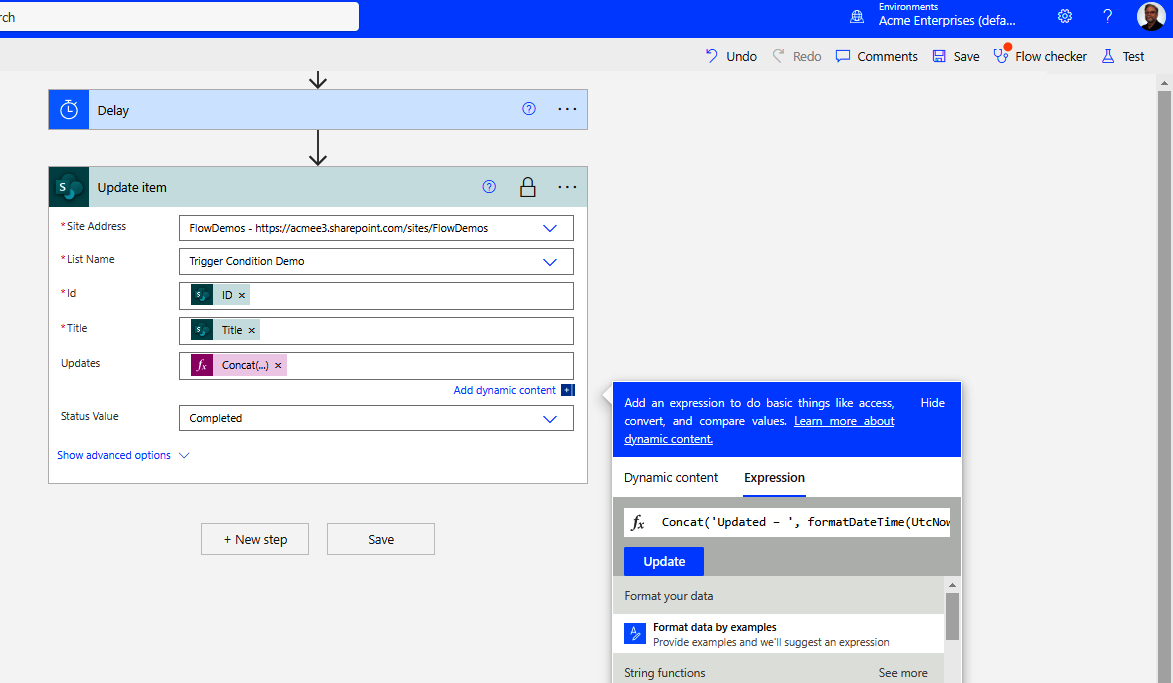
Figure 4-67. Adding “Update item” action
-
Save the flow and test it manually after starting the Test “Add a new item” to the Trigger Condition Demo list.
Note
Testing an automated flow still requires that you complete the action that will trigger the flow. If the flow is not in Test mode, it can take up to five minutes before the flow triggers.
-
Wait five minutes and then “Turn off” the flow from the flow description screen to keep it from starting additional runs (see Figure 4-68).
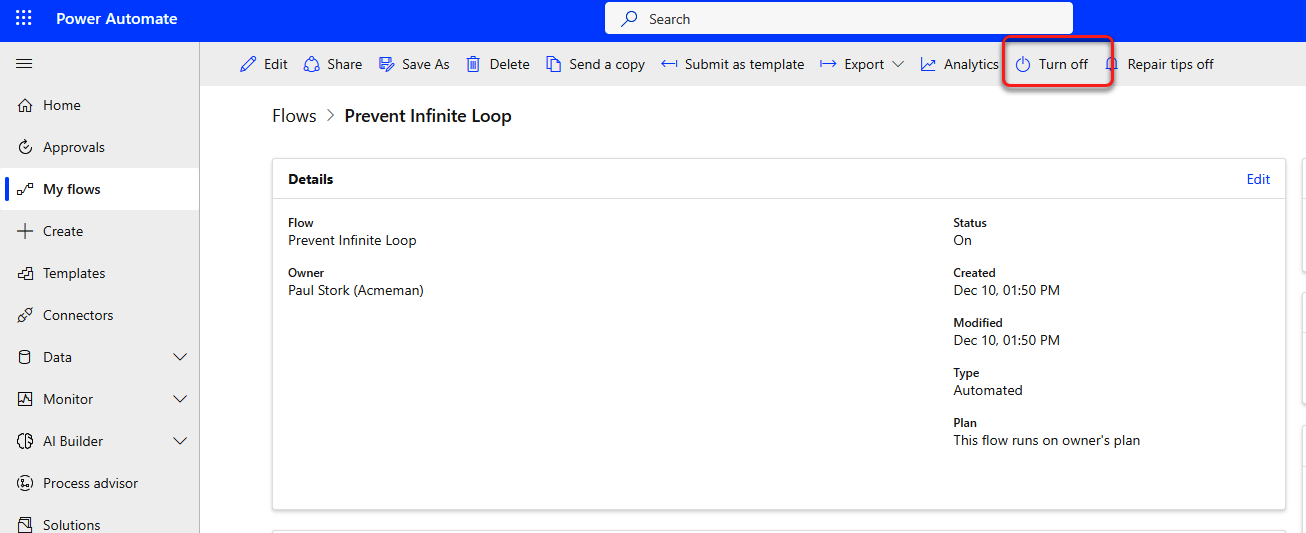
Figure 4-68. Turning off flow
If you look at the 28-day run history, you will see that the flow has run multiple times even though we only triggered it once. To fix this, we will add a Trigger Condition that will keep the flow from re-triggering when the flow makes the update.
-
Click “+ New step” and add a Filter Array action. Skip the From field for now. Add the Status Value dynamic content from the trigger to the left “Choose a value” field. Type “Completed” in the right side of the condition, and set the operation in the middle to “is not equal to.” Click “Edit in advanced mode” in the action. You should see the expression as shown in Figure 4-69. Copy the formula that is revealed. This is the expression that will need to be true for the trigger to fire. Select the whole line and copy it to the clipboard using Ctrl + C. Once you have copied it, delete the “Filter array” action.
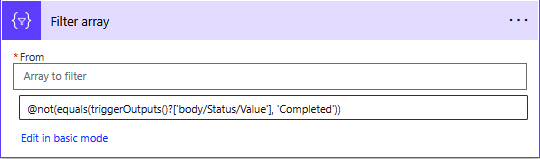
Figure 4-69. Trigger Condition expression using “Filter array”
-
Open Settings on the ellipsis menu. Click the plus sign (+) under Trigger Conditions and paste the expression you copied into the field using Ctrl + V (see Figure 4-70). Repeat the testing you did in steps 5 and 6. This time, there should be only one flow run.
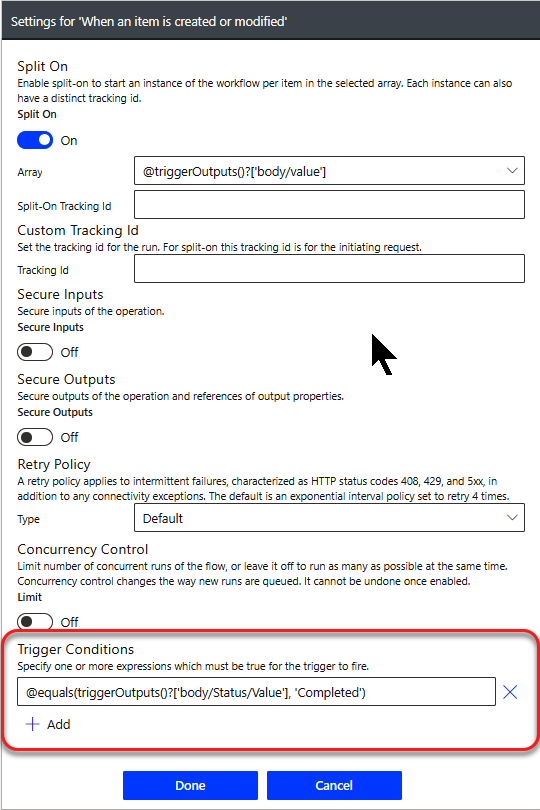
Figure 4-70. Adding Trigger Condition
Summary
In this chapter, you learned how to fill out the action fields in your flow using either static or dynamic content. You also learned how to manipulate those dynamic content values using function expressions. Finally, you looked through all the common advanced settings on the ellipsis menu that you can use to adjust the way that triggers and actions behave. I don’t have enough space in this book to show you how to use all the functions. But I did show you where to find detailed information on all the available functions. You’ll learn more about individual functions as you find use for them in your flows. You will continue to use a lot of the common functions as you progress through the book, but you’ll need to rely on Microsoft’s documentation to learn how to use some specific functions in the future.
So far, most of the flows we’ve built or examined are constructed in a single straight line of actions. But in the real world, things are seldom that simple. In the next chapter, we’ll look at how to choose different courses of action depending on the dynamic content values produced by the flow. I’ll also show you how to split your flow so it can run multiple concurrent branches simultaneously. Finally, I’ll show you how to loop through an array of values to do the same actions on each value. Once you are done, you’ll have all the basic tools you need to begin transforming business processes into Power Automate flows.
Get Learning Microsoft Power Automate now with the O’Reilly learning platform.
O’Reilly members experience books, live events, courses curated by job role, and more from O’Reilly and nearly 200 top publishers.

