Calibrating the Photo Match Image
After you've imported an image for Photo Match, as described on Importing a Photo for Photo Match, the Match Photo window appears on your screen (Figure 10-5). Many of the other menu commands are grayed out, meaning you can't use them. That's the case until you click the Done button in the Match Photo window. The assumption is that the first and most important thing you need to do at this moment is to calibrate the photo. If that's not the case, you can click Done and then reopen the Match Photo window later by choosing Camera → Edit Matched Photo → villa_savoye_front.jpg (or the name of your imported photo).
Photo Match needs your help identifying a few key elements in your photo. Armed with that information, SketchUp can set up a camera view that matches the photo, making it easy for you to trace over the two-dimensional image to create a three-dimensional model.
Here are the elements that Photo Match needs identified:
Origin point.
Blue axis.
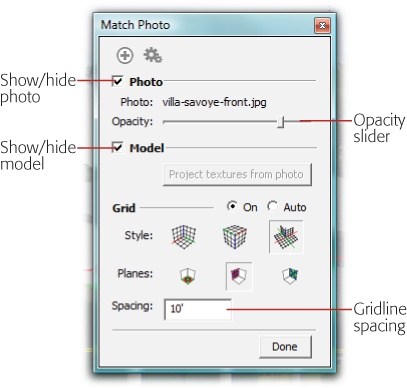
Figure 10-5. You use the Match Photo window as you calibrate SketchUp to work with an imported photo. The settings let you show and hide the photo and your model as well as the appearance of the gridlines shown over the photo. When you choose Done, the grid disappears.
Parallel lines on the green axis.
Parallel lines on the red axis.
You identify these elements by dragging parts of the grid that's superimposed over ...
Get Google SketchUp: The Missing Manual now with the O’Reilly learning platform.
O’Reilly members experience books, live events, courses curated by job role, and more from O’Reilly and nearly 200 top publishers.

