The Galaxy Tab also includes a very nifty keyboard called Swype. With this keyboard, you don’t tap individual keys when you want to enter text. Instead, you tap a key, then drag your finger over each letter in the word you want to input. Swype enters all the letters in the word, using built-in intelligence to figure out what you’re entering. It’s much faster than tapping individual letters. Yes, it takes some getting used to, but you can master it in a few minutes. Once you get used to the Swype, you may never go back to the standard keyboard.
The Swype keyboard takes a few minutes to get used to, but once you do, you’ll be amazed at how much faster you can enter text with it than the traditional keyboard. So put aside your trepidations and give it a try. Switch to it by tapping the Notification Panel, selecting Settings, and then choosing Language and input→Current Input method, and then tapping Swype.
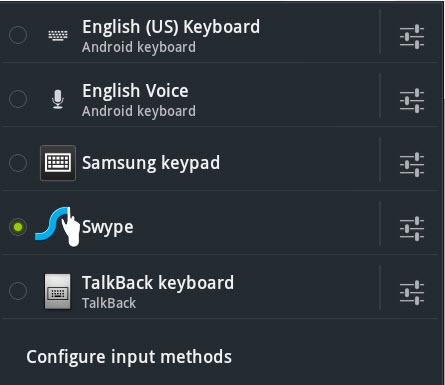
There’s another way to switch to the Swype keyboard. Whenever you’re using the Galaxy Tab’s keyboard, a keyboard icon appears in the Notification Panel. Tap the icon and you’ll come to a screen that lets you select which keyboard you want to use. Tap Swype.
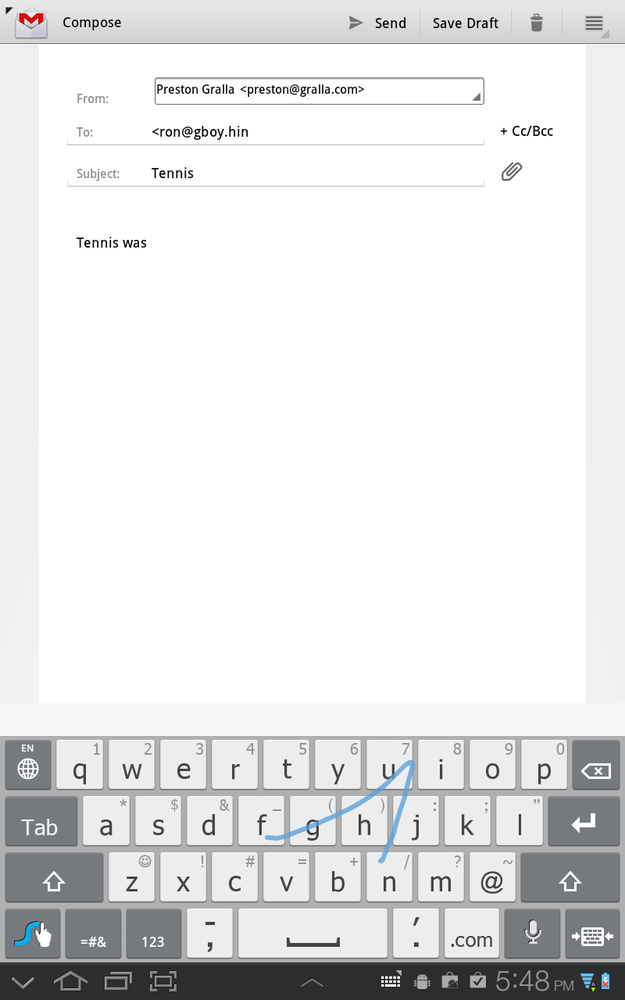
The Swype keyboard looks similar to the multitouch keyboard, although with some differences. The real difference, though, isn’t in the keyboard—it’s in the way you input text. Rather than tap each letter individually, you put your finger on the first letter of the word, and then with a single motion, move your finger from letter to letter of the word you want to in put. As you do so, you’ll see the path you’ve traced. Don’t worry too much about accuracy, because Swype does an exceptional job of interpreting the word you want to input, using its dictionary. Just try to get near each letter; it’s okay if you’re off a little bit. When you’ve finished tracing the word, lift your finger.
There are times when Swype might not know precisely what you’re trying to trace, and the trace might match multiple words. If that happens, Swype pops up a Word Choice window.
Note
If you’re entering numbers or special characters with Swype, you’ll have to tap on them, just like you have to with the multitouch keyboard. You won’t be able to move your finger across the keys in order to input them.
Tap the word you want. Press the arrow key at the bottom of the pop-up to see more choices. If you want to go with the first word on the list (the most likely choice), simply press the space key. If none of the words match, tap the X and start over. And remember, you can always tap the Swype keyboard in the same way that you can tap the multitouch keyboard if you simply can’t get Swype to recognize a word.
The Swype’s keyboard is laid out a bit differently than the normal keyboard. The basic keyboard is the same, although some special keys are in different locations. The real difference, though is in the Swype key  . This key does double-duty. Press and hold it, and a screen appears with a tip about Swype on it. If you just tap the key, it highlights the word directly to the left of the insertion point and brings up the Word Choice menu, so you can correct the word if you want. If you tap the key in an empty input box, it brings up a tip.
Swype uses its own dictionary for recognizing words and presenting them in the Word Choice pop-up screen. You can’t add words to this dictionary or delete them in the same way you can with the multitouch keyboard. The two dictionaries don’t share information.
Swype takes a much more aggressive approach to correcting your tapping than does the multitouch keyboard. As you drag your fingers across keys, it either enters a word from the dictionary—the closest match to what it thinks you want to type—or pops up Word Choice and presents a list of words from the dictionary. So if you carefully drag your finger across the letters t-h-i-m-k, Swype doesn’t enter “thimk.”
But what if you really do want to enter thimk? Simply tap the letters individually. Do that, and two things happen: The word is entered onscreen, and the word is added to the dictionary. Next time you drag your fingers across t-h-i-m-k, Swype dutifully enters thimk into the text box. And thimk also starts appearing in the Word Choice balloon.
If you don’t particularly think that having thimk in the dictionary is a good idea, you can remove it. Highlight the word onscreen by tapping it twice. The word turns blue, bracketed by two triangles. Tap the Swype key, and you’re asked if you want to delete the word from the dictionary. Tap OK.
Swype is a surprisingly full-featured little app. Here are some useful tips for getting the most out of it.
Don’t use the space key. After you enter a word using Swype, lift your finger and enter another word. Swype automatically puts a space between the two words.
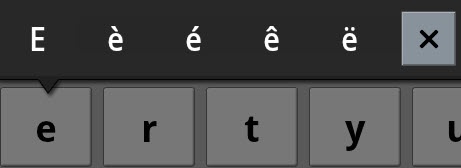
Swype usually recognizes when you want to add accented characters. Slide your finger across the letters, and the proper accent generally appears, as in the word café. However, you can still add accented characters if Swype doesn’t automatically recognize them. To add an Ö, for example, hold down the O key, and a menu of accented characters appears above the keyboard. Choose the character you want to use.
Circle or scribble for double letters. If you want to enter the word “tennis,” then when you get to the “n,” make a circle on the key with your finger, or scribble back and forth across the key. Then glide with your finger to the next letter.
Note
Swype offers an exceptional number of ways to customize how it works—for example, how long to display the Swype trace path onscreen, how to balance speed of word recognition versus accuracy, and so on. To customize Swype, press the Swype key and at the bottom of the help screen, tap Options. Then customize to your heart’s content.
Work quickly. Don’t slow down in an attempt to be more precise. Swype is built for speed. Move your finger quickly; you’ll be surprised at how well Swype recognizes words.
Once you get the hang of entering text, you have another challenge—moving the insertion point to go back and edit, delete, or add words or letters. You can tap where you want to place the insertion point, but that’s not always effective. Even with fine-tuned hand-eye coordination, it can be difficult to tap in the precise spot where you want the insertion point.
There’s a better way. Tap anywhere in the text, and a large blue polygon appears beneath a blinking insertion point. Drag the polygon to move the insertion point wherever you want it to go, then remove your finger.
What’s a computer without the ability to cut, copy, and paste? A computer at heart, the Tab lets you do all that, even though it has no mouse. For example, you can copy directions from Google Maps into an email to send to a friend, paste contact information into a note to yourself, and so on. You copy and paste text using the same basic techniques you use on a PC or a Mac. You select it, and then copy, cut, or paste it.
Note
This technique works only in areas where you enter or edit text, such as in email messages you’re composing, text messages you’re creating, contact information, and similar locations. You can’t copy and paste text from an incoming email. You can, however, copy and paste text from a web page, although using a different technique. See Managing Bookmarks for how to do it.
There are several ways to select text in an input box, depending on how much text you want to cut or copy:
Double-tap. Double-tap the first or last word in a selection of text that you want to cut or copy. The word is highlighted and bracketed by polygons—those are the handles. Drag each to include all the text you want to select, and then release.
Hold. Press your finger on a word and hold it there. The word is highlighted, but not bracketed by polygons, so you can’t expand the selection.
Select all. Whenever you select text, a Text Selection toolbar appears at the top of your screen. Tap Select all to select all the text in the text box, the body of an email message, and so on.
Once you’ve selected text, it’s time to do something with it. That’s what the Text selection toolbar is for:
Select all. Selects all the text in the text box. It overrides you if you’ve selected only some of the text in the text box.
Cut. Cuts the text you’ve selected and puts it onto the Galaxy Tab’s clipboard, so you can later paste it somewhere if you want. The clipboard works just like the one on your PC or Mac—it holds things you’ve copied until you want to paste them later. Unlike the PC or Mac, though, this clipboard holds multiple clips, not just a single one.
Copy. Copies the last piece of text you’ve put onto the clipboard, so that you can paste it somewhere.
Paste. Pastes the last piece of text you’ve put on the clipboard and replaces whatever text you’ve selected. So if you’ve selected all text in the text box, Paste deletes all that text, and replaces it with the last thing you put on the clipboard. If you’ve selected only a word or a few words, it deletes them and replaces them with the latest from the clipboard.
Clipboard. This shows you all the clips you’ve placed in the clipboard, including text as well as pictures. Tap the clip you want to insert. Note that in emails, you’ll only be able to insert text clips, not any pictures. Other apps, such as the built-in Pen Memo app, let you insert pictures from the Clipboard.
Note
Here’s an easy way to paste the last piece of text in the Clipboard anywhere you want. Tap where you want to paste text. The familiar blue polygon appears. Wait a second or so until the word Paste and an icon appears above the insertion point. Tap the icon and you’ll paste the last piece of text from the Clipboard into that location.
You can easily type in accented characters (such as é, Ö, Ü, and so on) with the Galaxy Tab keyboard. Press any one of a number of keys, and keep your finger on it for a second or so. A palette of accented characters appears. Tap the one you want to use, or tap the X to make the palette of characters go away. The following chart shows which keys let you enter special characters.
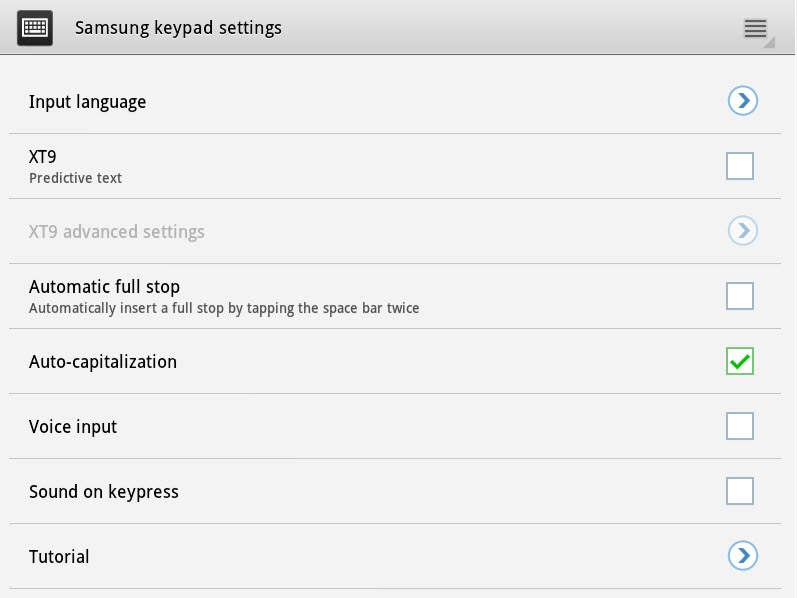
The keyboard that the Tab uses right out of the box isn’t the one built into Android. Rather, it’s a special Samsung keyboard. What’s so special about it? It’s equipped with predictive text—that is, as you type, it guesses what word you’re typing, and suggests common words to insert. You can then select a word from the options displayed. This feature can save you plenty of time, although some people find it distracting.
As a general rule, predictive text doesn’t work when you first turn on your Galaxy Tab. Instead, you have to turn it on. To turn it on:
From now on, your keyboard will be your best friend and recommend words for you. To turn predictive text off, head to this same location and uncheck the box.
You can configure how predictive text works; for example, you can control whether it corrects your spelling. To configure it, after you’ve turned on predictive text, tap “XT9 advanced settings” just below the “XT9 predictive settings” checkbox. You can then fiddle with the settings to your heart’s content.
Once you’ve turned on predictive text, your Samsung keyboard will go to work, suggesting words and text as you type. The words and text appear just above the keyboard. Tap any to paste it into the text area where you’re typing.
You can make your keyboard even smarter, and have it recognize words it doesn’t know yet. As it suggests words or text, you’ll notice a small down arrow all the way on the right. Tap that arrow and an “Add word” box appears. Tap that box, and in the screen that appears, type in your word and then tap Done. From now on, your keyboard will suggest that new word when you’re typing the appropriate letters.
What if you don’t like the Samsung keyboard and would prefer to use the one built into Android? It’s a snap to switch:
From now on, you’ll use the built-in Android keyboard.
Instead of the Android keyboard, you can choose other keyboards, including the Swype keyboard (see Using the Swype Keyboard) and the TalkBack keyboard, which is designed to allow people who are blind or who have low vision to use voice input to use the Tab.
Get Galaxy Tab: The Missing Manual now with the O’Reilly learning platform.
O’Reilly members experience books, live events, courses curated by job role, and more from O’Reilly and nearly 200 top publishers.


