A Flash panel is like a toolbar on steroids: bigger and loaded down with more options, but built for the same reason—to let you keep the stuff you work with the most visible, right there in front of you, where it's easy for you to find and use. Furthermore, unlike toolbars, panels offer options you can't find on any menu.
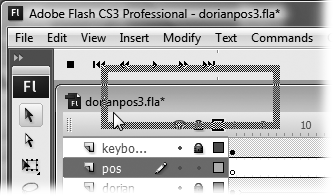
Figure 1-5. To conserve space on Flash's jam-packed interface, only one toolbar—the Edit Bar toolbar—appears automatically. It's positioned directly above the stage. To display the other two, select Window → Toolbars → Main (to display the Main toolbar) and Window →Toolbars → Controller (to display the Controller window). The checkmarks on the menu show when a toolbar is turned on. Choose the toolbar's name again to remove the checkmark and hide the toolbar.
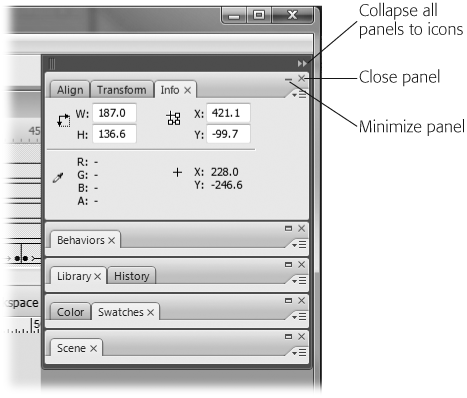
Flash offers you a ton of panels, each of which appears initially in one of two flavors: docked or floating. Docked panels appear outside your workspace, like the Align, Transform, and Info panels shown in Figure 1-6.
You can have as few or as many panels showing at a time as you like. The Window menu lists all of Flash's panels, and you show and hide them by selecting to turn their checkmarks on and off—exactly as with toolbars.
Figure 1-6. Panels like the ones shown here group useful options together, so you can find what you want quickly and easily. If all you see is a tab, the panel is collapsed and hiding its tools. To expand a collapsed panel and reveal its options, click the bar at the top. To collapse a panel, another click will do the trick. Click the double arrows to collapse all the panels so they take up less horizontal space. To remove a panel, click the X button.
Besides keyboard shortcuts, there's only one way to display a panel—from the Window menu—but you have plenty of options for getting them out of your way. For example, you can click the X in the upper-right corner of a floating panel, as shown in Figure 1-6.
For both docked and undocked panels, you can collapse (shrink) and expand them by clicking the bar at the top of the panel. There's also a collapse and expand button next to the X in the upper-right corner, but it's usually easier just to click the bar—you don't have to be quite the mouse marksman.
Figure 1-7. You can customize your workspace by positioning panels and toolbars where you want them. To move a toolbar, click a blank spot and drag it to a new location.
Tip
To hide all the panels you've displayed in one fell swoop, select Window →Hide Panels or press the F4 key. You can also click the arrows just beneath (and to the right of) the workspace scroll bars. Whoosh! The panels below the Stage (or to the right of it) disappear, and you get to see a lot more of your workspace.
Notice the bar at the top of the Panels Dock. On the left side, there are three vertical lines that look like they're begging to be clicked and dragged. On the right side are two triangular arrows pointing to the right. By clicking and dragging those lines, you can adjust the width of the entire Panels Dock. Click those arrows (or almost anywhere on the bar), and all the panels shrink down to icon-size. Another click, and you bring them back to their full glory.
Tip
In the upper-right corner of every panel, just below the close button (X), is a menu icon. When you click this icon, a menu of options appears—different options for each panel. For example, the Color Swatch panel lets you add and delete color swatches. You'll find many indispensable tools and commands on the options menus, so it's worth checking them out. You'll learn about different options throughout this book.
All animations start with a single drawing. And to draw something in Flash, you need drawing tools: pens, pencils, brushes, colors, erasers, and so on. The Tools panel, shown in Figure 1-8, is where you find Flash's drawing tools. Chapter 2 shows you how to use these tools to create a simple drawing; this section gives you a quick overview of the four different sections of the Tools panel, each of which focuses on a slightly different kind of drawing tool.
Figure 1-8. The Tools panel groups tools by different drawing chores. Selection and Transform tools are at the top, followed by Drawing tools. Next come the View tools. The Color tools include two swatches, one for strokes and one for fills. At the bottom you find the Options buttons, which change depending on the drawing tool you've selected. If you like, you can drag the docked Tools panel away from the edge of the workspace and turn it into a floating panel. If horizontal workspace is at premium, click the double arrow button in the upper-left corner of the Tools panel, and you have a single, skinny row of tools.
At the top of the Tools panel are the tools you need to create and modify a Flash drawing. For example, you might use the Pen tool to start a sketch, the Paint Bucket or Ink Bottle to apply color, and the Eraser to clean up mistakes.
At times, you'll find yourself drawing a picture so enormous you can't see it all on the Stage at one time. Or perhaps you'll find yourself drawing something you want to take a super-close look at so that you can modify it pixel by pixel. When either of these situations occurs, you can use the tools Flash displays in the View section of the Tools panel to zoom in, zoom out, and pan around the Stage. (You'll get to try your hand at using these tools later in this chapter; see Zooming In and Out.)
When you're creating in Flash, you're drawing one of two things, a stroke, which is a plain line or outline, or a fill, which is the area within an outline. Before you click one of the drawing icons to begin drawing (or afterwards, to change existing colors, as discussed in Chapter 2) you can use these tools to choose a color from the color palette, and Flash applies that color to the Stage as you draw.
Which icons appear in the Options section at any given time depends on which tool you've selected. For example, when you select the Zoom tool from the View section of the Tools panel, the Options section displays an Enlarge icon and a Reduce icon that you can use to change the way the Zoom tool works (Figure 1-9).
Figure 1-9. On the Tools panel, when you click each tool, the Options section shows you buttons that let you modify that particular tool. In the Tools panel's View section, for example, when you click the Zoom tool, the Options section changes to show you only zooming options: Enlarge (with the plus sign) and Reduce (with the minus sign).
Not everyone is blessed with perfect eyesight and hearing. To make sure vision-and hearing-impaired folks can enjoy the animations you create using Flash, you need to think about accessibility: the special techniques you can use to deliver your message via alternate means.
The Accessibility panel provides tools to help you create a design that provides at least some information to those whose vision or hearing is impaired. For example, using the Accessibility panel, you can give names and descriptions to certain sections of your drawings—descriptions that can be translated into speech by an assistive screen reader device, for example. Then, when a blind person surfing the Web loads your animation of a car crunching into a thick brick wall, the assistive reader can speak the words, "the car crashes into a brick wall."
Tip
Obviously, it's hard to translate any primarily visual medium like Flash into one that's spoken rather than seen. It's worth the effort it takes to try, though, because doing so gives impaired folks a chance to understand what you're trying to present. See the box on the next page for more information.
To display the Accessibility panel, select Window →Other Panels →Accessibility (or press Shift+F11).
ActionScript is a serious developer-level scripting language that lets you add interactivity to your animations by tying a graphic element (say, a button) to a specific action (say, opening up a specific Web page). In fact, that's how ActionScript got its name: it lets you tie an action to an object or element you designate. You use the Actions panel to build the ActionScript code that turns regular animations into interactive animations like clickable splash pages, navigation bars, and type-in forms.
The Actions panel lets you mix and match snippets of ActionScript code to build what's called an ActionScript script, which you can then attach to one of the objects in your drawing (or one of the frames in your animation) to make your animation "smart." After you create a script, the ActionScript debug panels let you trouble-shoot any scripting code that's giving you trouble. You use different debug tools depending on the flavor of ActionScript used by your Flash file: ActionScript 2.0 or ActionScript 3.0. You'll learn how to write and debug ActionScripts of your own in Part 3.
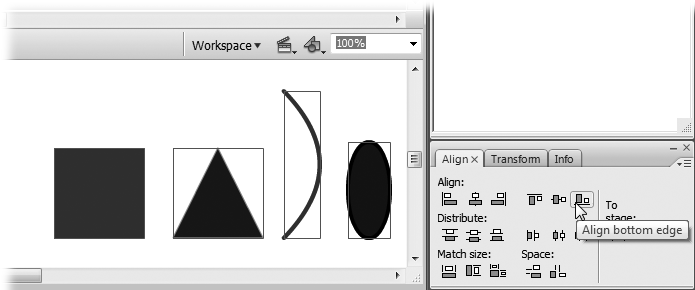
Sometimes dragging stuff around the stage and eyeballing it works just fine; other times, you want to position your graphic elements with pinpoint precision. Using the Align panel, you can align graphic elements based on their edges (top, bottom, right, left) or by their centers. And you can base this alignment on the objects themselves (for example, you can line up the tops of all your objects) or on the
Stage (useful if you want to position, say, the bottoms of all your objects at the bottom of the Stage, as shown in Figure 1-10). You can even distribute objects evenly with respect to each other.
To display the Align panel, select Window → Align or press Ctrl+K (Windows) or ⌘-K (Mac).
Tip
More help for aligning stuff on the Stage comes from Flash's grids, guides, and rulers, which you'll learn about in Chapter 2 (Aligning Objects with the Align Tools).
Figure 1-10. The Align panel gives you the opportunity to align a single object (or whole groups of selected objects) along the left side of the Stage, the right side, the top, the bottom, and more. Make sure you select the objects you want to align first; then click the alignment icon from the Align panel.
Flash comes with several common, pre-ActionScripted snippets of code called behaviors that you can add to your animations. You'll find a behavior for most of the really basic things you want to do with ActionScript, such as triggering a sound file or jumping to a specific section of an animation.
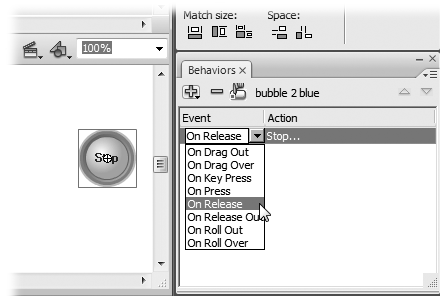
All you have to do to use a behavior is display the Behaviors panel (Window →Behavior) shown in Figure 1-11 and then click the Add Behavior icon to display a list of available behaviors. When you do, Flash pops up a helpful window (or two) to step you through the process of customizing the behavior.
Figure 1-11. The easiest way to add a behavior is to select a frame or object (such as the Stop button shown here) and then select Window → Behaviors. In the Behaviors panel, click the big + button to add a behavior to the selected object. For example, this Stop button can stop a video from playing. Point to Embedded Video on the drop-down menu, and then choose Stop from the next menu. To finish up, choose the event that triggers the behavior, such as "On Release" (in other words, the end of the mouse-click).
For example, if you want to trigger a sound file, you need to add the Play Sound behavior, tie it to an event—such as a button clicking or a frame appearing—and then customize your newly added behavior by telling Flash which sound file you want it to play when the event occurs.
A good painter can create custom colors by mixing and matching a bunch of other colors. In Flash, you can do that too, through the Color Mixer panel. And, if you like, you can save your custom color as a reusable color swatch in the Color Swatches tab. That way, when you get the urge to draw another puce-colored hedgehog, you'll be all set.
Note
Color in Flash is a huge topic. To explore it further (including how you can specify hue, saturation, and luminescence for a custom color) check out Chapter 5.
The three Common Libraries panels—Buttons, Classes, and Learning Interactions— display prebuilt clips (in other words, self-contained, preconstructed Flash documents) that you can add to your animations simply by dragging them to the Stage:
Buttons. Here you'll find a wealth of cool-looking customizable push buttons, each as different from a dull gray HTML button as you can get.
Classes. Useful only to heavy-duty ActionScript programmers, these compiled clips—DataBindingClasses, UtilsClasses, and WebServiceClasses—let you transfer information between your animation and server-side programs at runtime.
Note
To access the compiled classes that appear in the Common Libraries, you need to drag them from the Common Library to your document's Library; then you need to add specific ActionScript calls to your animation. Part 3 of this book introduces you to ActionScript and shows you how to add an action to your animation. You can find out more about the compiled classes Flash offers by choosing Help →Flash Help and searching All Books for the specific class you're interested in.
Learning Interactions. In this panel, you find customizable components designed specifically for folks creating Flash tutorials, including fill-in-the-blank, multiple choice, and true/false.
A Flash component is a reusable, self-contained, customizable, interactive graphic that you can add to your animation. Technically, you can create your own components using a combination of Flash and ActionScript. But right out of the box, the only components that appear on the Components panel are standard user interface components (buttons, lists, text fields, and so on), animation controller components (MediaController, PlayButton, PauseButton, that kind of thing), and the handful of other assorted components that ship with Flash. To view and change a component's settings, all you have to do is click the component to select it and then display the Component Inspector panel by selecting Window →Component Inspector (or pressing Alt+F7 or Option-F7 on the Mac).
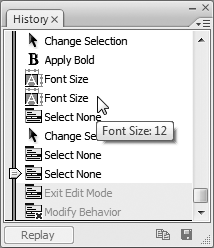
Flash keeps track of every little thing you do to a file, starting with the time you created (or last time you opened) it: every shape you draw, every file you import, every color you change. This behind-the-scenes tracking—which you can view using the History panel shown in Figure 1-12—comes in handy when you want to revert to an earlier version of an animation. For example, you may want to go back to one in which the cartoon rabbits you drew actually look like rabbits instead of overfed mice. To display the History panel, click Window →Other Panels →History (or press Ctrl+F10).
Figure 1-12. When you move your mouse over one of the changes, Flash pops up a helpful detailed description of the change. To revert to an earlier version of your file, drag the slider until it's next to the last change you want to appear. To replay one or more changes, select the changes you want to replay and press Replay. If you do want to revert to an earlier version of your file, don't put it off: every time you close the file, Flash erases the file's history.
Tip
Unless you tell it otherwise, Flash keeps track of the last 100 changes you made to a document starting with the last time you opened the document (or, if you've never saved the document, the last 100 changes since you created it). To increase this number, select Edit →Preferences. In the Preferences window that appears, select the General category. Then, in the Undo field, Specify Document-level Undo and type in the number of levels (changes) you want Flash to track. You can specify any number you like from 2 to 9,999.
The more complicated your Flash creations become, the more likely it is that at some point you'll want to know specific details about the objects on your Stage: details like the RGB values of one of the colors you used, the size of one of the objects in pixels, the XY coordinates of an object, and so on. This level of detail can be useful if you want to recreate a particular effect or if you want to rearrange objects on the Stage down to the last little pixel.
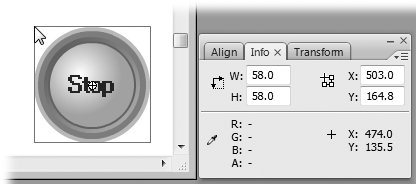
To display the Info panel, first head to the Stage and click an object to select it; then choose Window →Info or press Ctrl+I (Windows) or ⌘-I (Mac). As shown in Figure 1-13, the Info panel only displays information about the object you currently have selected.
Figure 1-13. Select an object on the Stage, and the Info panel shows you the object's width, height, XY coordinates, and color (expressed as RGB values and percentage of transparency). Move your mouse around the stage, and the bottom half of the Info panel shows you what color (and XY coordinates) your cursor is passing over.
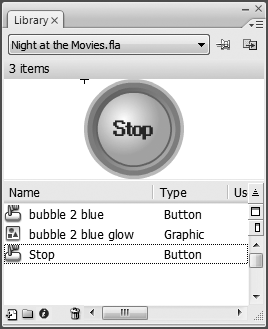
The Library panel (Figure 1-14) is similar to the Common Libraries panel described on Components Panel/Component Inspector Panel: both display reusable components you can add to your Flash animations. The difference between the two is that while the Common Libraries panel displays components you can add to any Flash file, the Library panel displays objects you can add only to the file you currently have open. To show the Library panel, click Window → Library or press Ctrl+L (Windows) or ⌘-L (Mac).
Another difference between the Library panel and the Common Libraries panel is that the Library panel doesn't come preloaded with helpful buttons and such. You have to add your own reusable objects to the Library panel (Chapter 7).
Let's say, for example, that you create a picture-perfect bubble, or sun, or snow-flake in one frame of your animation. (You'll learn more about frames on Scene Panel.) Now, if you want that bubble, sun, or snowflake to appear in 15 additional frames, you could draw it again and again, but it really makes more sense to store a copy in the current project library and just drag it to where it's needed on those other 15 frames. This trick saves time and ensures consistency to boot.
Figure 1-14. Storing simple images as reusable symbols in the Library panel does more than just save you time: it saves you file size, too. (You'll learn a lot more about symbols and file size in Chapter 7.) Using the Library panel you see here, you can preview symbols, add them to the Stage, and easily add symbols you created in one Flash document to another.
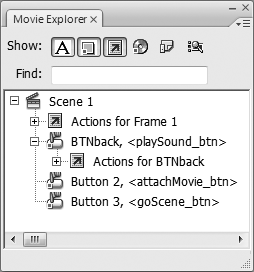
After you finish creating a Flash animation (which you see how to do in Chapter 3), you can find and edit specific animation details quickly and easily by using the Movie Explorer panel, shown in Figure 1-15. To display the Movie Explorer panel, select Window →Movie Explorer (or press Alt+F3, or for the Mac, Option-F3).
Note
The Movie Explorer panel only shows you one scene at a time regardless of how many scenes your animation contains. If you want to work with multiple scenes, use the Scene panel described on Scene Panel in conjunction with the Movie Explorer panel.
If you're familiar with the Explorer tool in Windows, you may recognize the Movie Explorer panel. Much as the Windows Explorer shows you a collapsible outline of all the folders and files on your computer, the Movie Explorer panel shows you all the components of your animation, organized by scene: the video clips, sound files, text, images, and so on. (For more about scenes, check out the box on Scene Panel.)
In addition to seeing an at-a-glance outline of your entire animation, you can use the Movie Explorer panel's Show icons to tell Flash which specific elements of your movie you want to view (just the buttons, say, or only the images, frames, and layers). Or you can use the Find box to view specific elements (for example, you can hunt for an ActionScript script named openNewBrowserWindow).
Figure 1-15. The Movie Explorer panel lets you view the overall structure of your animation; it also gives you a way to find and edit specific elements quickly and easily. To find a specific element, use the Show icons or type the name of the element you're trying to find in the Find box. Right-clicking an element pops up a menu you can use to edit that element.
When Flash has something to tell you about your animation, it uses the Output panel. To view the Output panel, select Window →Output or press F2. For example, when you export your Flash animation (Chapter 14) or when you add buggy ActionScript code to your animation, Flash displays any problems it encounters in the Output panel.
Tip
To tell Flash to include a file size report in the Output panel every time you publish your animation, select File →Publish Settings. Then, in the Publish Settings window that appears, click the Flash tab; finally, turn on the checkbox next to Generate Size Report. The next time you export your animation, Flash adds a file size report to the comments it displays in the Output panel. (You want to keep on top of file size if you plan to include your Flash animation in a Web page, because the larger the file size, the more likely folks will have problems viewing it over the Web.)
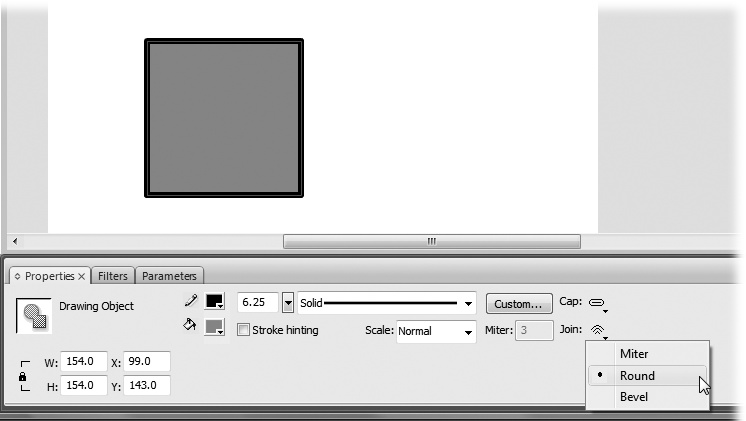
The Properties panel (also known as the Property Inspector) appears automatically beneath the Stage when you open a new document. If you don't see the Properties panel, you can display it by selecting Window →Properties →Properties or by typing Ctrl+F3.
As you can see in Figure 1-16, the Property Inspector displays specific information about whatever object you currently have selected on the Stage. These details can be helpful if, for example, you're planning to incorporate your finished work into a Web page and need to know the dimensions of a particular drawing. In addition to just viewing the properties of a selected object, you can also edit those properties using the Property Inspector, as you'll learn in the "Test Drive" section of this chapter (The Flash CS3 Test Drive).
You'll notice two additional panel tabs in Figure 1-16: Filters and Parameters. The Filters panel tab lets you add special effect filters to text, movie clips, and buttons (Chapter 7); the Parameters panel tab lets you customize component parameters (Chapter 12).
Figure 1-16. The Properties panel (Property Inspector) shows only those properties associated with the object you've selected on the Stage. Here, because a square is selected, the Property Inspector gives you options you can use to change the thickness and color of the square's outline, to tell Flash what kind of corners you want your square to have (round, pointy, or blunted), and more square-related characteristics.
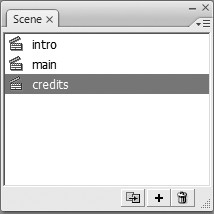
You can create an animation in Flash that comprises just one scene, but you can choose to break your animations up into multiple scenes, too, if you like. (See the box above for the skinny on scenes and why you might want to organize your animation into multiple scenes.)
To add a scene to your animation (or to rename or delete an existing scene), use the Scene panel, which you display by choosing Window →Other Panels →Scene. Figure 1-17 shows you what the Scene panel looks like.
Figure 1-17. Using the Scene panel, you can add a scene to your animation (either a duplicate of an existing scene, or a fresh, blank scene) or delete an existing scene. Just click the name of a scene and click Duplicate, Add, or Delete, respectively. To rename a scene, first double-click the name of the scene. Then, when you see an outline appear around the current name, click inside and type the new name.
Transform is a fancy word meaning "to mess with." When you have an existing object that you want to mess with selected on your Stage—to scale horizontally or vertically, rotate, compress, distort (pull out of shape like a wad of taffy), or skew (slant horizontally or vertically)—you want, in animation terms, to transform that object. You can learn how to do all these transformations in Chapter 5.
Get Flash CS3: The Missing Manual now with the O’Reilly learning platform.
O’Reilly members experience books, live events, courses curated by job role, and more from O’Reilly and nearly 200 top publishers.

