Chapter 4. The Device Lifecycle
By now, you’ve delved into the intricate world of IoT solutions, where hardware, software, and the cloud come together in a symphony of technology. Your choice of devices or their combinations hinges on the specific needs you’re aiming to address. In the previous chapter, we took a deep dive into the “try before you buy” concept, exploring avenues to determine the best fit for your device. However, it’s crucial to understand that acquiring a device and setting it in motion is merely the tip of the iceberg—I wish it were as simple as that! IoT solutions encompass far more than meets the eye.
Drawing a parallel to automobiles might help illustrate the point. A car’s core purpose is transportation from point A to B. This involves an engine, fuel, a steering mechanism, and seating for passengers. These aspects are the baseline functional requirements. Yet, you demand more from your car than the essentials—consider headlights, seat belts, climate control, and the like. Furthermore, the realm of maintenance comes into play, necessitating skilled mechanics, spare parts, safety assessments, and adherence to regulatory standards. All these facets are meticulously addressed well before a car graces a showroom floor.
While your IoT venture might not match the complexity of car manufacturing, it’s imperative to recognize that addressing both functional and nonfunctional requirements for your device is needed long before implementation. A systematic approach to this entails embedding these requirements within the device’s lifecycle management. Beyond just aiding in the orchestration of the device’s activities, this framework serves as a vessel to encapsulate functional and nonfunctional needs. The decisions surrounding device management post-deployment need to be made well in advance, even before the device takes its maiden voyage.
Hence, in this chapter, you will go through each phase of the device’s lifecycle. Within these stages, I’ll point out the requirements that warrant your attention.
Device Lifecycle Management
Device lifecycle management covers all of the tasks within a device’s life that pertain to its development, manufacturing, maintenance, and eventual retirement. In the broader context of the IoT Landscape discussed in Chapter 1, device lifecycle management is part of the cloud side of things on Azure, as shown in Figure 4-1.
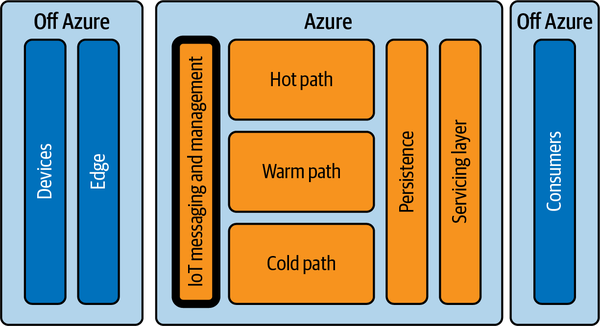
Figure 4-1. Device lifecycle management on the IoT Landscape
Think of everything that goes into lifecycle management as being part of a control plan. When you’re dealing with one or a few dozen devices, managing them with a control plan may seem like overkill, but if you’re dealing with thousands or millions of devices, a control plan makes the seemingly impossible manageable. Device lifecycle management is applicable for all devices, whether they are meant to be used by a single user or for a worldwide organization. The steps are the same, although done at different scales. The steps are depicted in Figure 4-2.
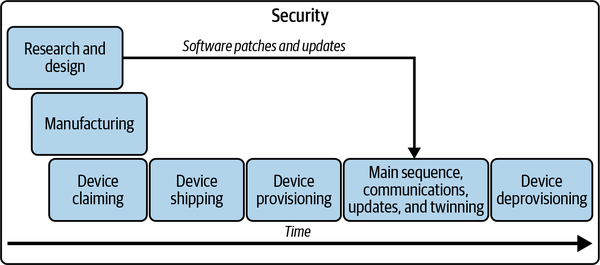
Figure 4-2. Device lifecycle management
A device’s lifecycle is chronologically broken into overlapping parts, marked by some significant events:
-
The research and design phase begins with an idea for a device, which is then developed until it becomes a thing that can be manufactured. You’ve already read quite a bit about this part in the last two chapters, but it also includes considering how you are going to maintain your device.
-
The manufacturing phase takes the plans made during the research and design phase and puts them into action to actually make the device.
-
Device claiming happens as a part of manufacturing and is a significant event within the manufacturing process wherein a device is registered with a device management solution. In the case of Azure, the solution is the Device Provisioning Service.
-
The device is shipped and considered ready for use after the manufacturing process has been completed.
-
-
The device provisioning phase happens once a device ships and is ready for deployment. Deployment brings that device online with a device management solution so it can securely communicate with the cloud.
-
The main sequence is when the device performs its primary function while communicating with the cloud through messaging, twinning, and receiving software updates. Software patches and updates are periodically applied to the device to keep it running optimally and securely.
-
The device deprovisioning phase is when the device is no longer useful for its intended purpose. It is then taken out of service and disposed of.
Security is a cross-cutting concern throughout the device lifecycle, which is why it appears as a box around everything else in Figure 4-2. This book has an entire chapter (Chapter 14) dedicated to security because it is such a cross-cutting concern.
Let’s go through each phase in more detail, starting with research and design.
Research and Design
Research and design (R&D) for devices, in most cases, focuses on planning how your device will solve a problem and deciding how it will do so. There are a myriad of seemingly disparate things you need to consider when designing your device during this phase, including hardware, operating systems, and SDKs, among other things, to use. This section will not cover everything you will need to think about for your device during its R&D phase, but it will give you a sense of where to start.
Let’s begin with the three phases of R&D.
Three Phases of R&D
During the R&D phase, the device will be developed until it gets to a state where there’s a clear plan for its feasibility and ultimate manufacturing. At a high level, the steps are proof of concept, prototyping, and finally, a minimal viable product as seen in Figure 4-3.
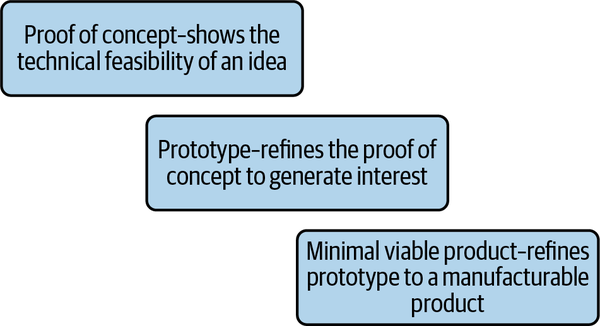
Figure 4-3. From design to manufacturing
Proof of concept
When you prepare a proof of concept for a device, it is little more than a technical demonstration of the feasibility of an idea for a device. It shows that the functional requirements of the device can be done, even if its methods are far from optimal, secure, scalable, or efficient. The point of a proof of concept is not to make an elegant product that one can start manufacturing, and it is usually quite raw. It may be just a breadboard with wires, sensors, servos, and other hardware running with a connected PC with output streaming to a monitor. In any case, these raw products are just there to give you the certainty that something can be done.
Sometimes, connecting things to Azure is part of this proof-of-concept process because you need to send data to the cloud to demonstrate how the data is used. This connectivity will likely support the functional requirements of your device with little thought to device lifecycle management.
Prototype
Once you have a proof of concept that shows the technical feasibility of a device, you make a prototype to show how the final product will look and function. The prototype takes on a product-oriented finish that demonstrates not just the functional requirements but also some of the nonfunctional requirements. If you’re planning an enterprise-wide solution, the prototype is typically something you may want to show to an investor or an external party to generate interest in the device. These prototypes may not be perfect, but they show that your plan will result in a functional device that can be manufactured and used.
While you develop the prototype, you may also start to think about, and perhaps even test, how your device will be managed during the rest of its lifecycle. You may want to create an Azure IoT Hub, connect the device to the IoT Hub, and send and receive data.
Minimum viable product
After you’ve refined your prototype, you then have a minimum viable product that has all of the functional and nonfunctional features needed for the device to be considered “complete.” By this time, you should have figured out how your device can be managed from the cloud with all the supporting cloud services. Sometimes, a minimum viable product is the most basic form of a product, or maybe slightly more than that. This is all you may need for some devices to ensure that the device is ready to be manufactured, at least for its first generation.
During the three R&D phases, you will be faced with making many decisions about your device and its many functional and nonfunctional requirements. You can go through each of the categories discussed in the following sections to identify what requirements you may want to consider for your device.
Hardware
Most of the hardware you choose for a device goes to support the primary function of your device. Using the car example from earlier, most of the hardware components—such as the wheels, the steering wheel, the engine, and so on—support the car’s functional requirements for transportation. The car’s nonfunctional requirements are reflected in the hardware as well. You have a way to change the oil with a plug and a removable oil filter. There’s a diagnostics port to plug into a computer to read codes from the car. These go into the nonfunctional requirements stemming from maintenance.
Here’s another example in the context of IoT: imagine an imaging device with a camera. The camera and the needed compute resources for image processing will drive the hardware selection. However, some devices, especially if they do not have a user interface like a touchscreen, may need a port to plug in a cable so a technician can log into the device and fix things. Sometimes, devices come with a special diagnostics mode that enables a technician or user to fix problems on the device.
When considering the hardware for your device, you’ll need to think about items such as the compute needed to power what you want the device to do, security measures it may require, and connectivity features it’ll need to access the cloud, which is almost assumed as an IoT device. You’ll also want to consider what hardware features will be the best for the device’s lifecycle management.
Compute
During the R&D phase, you’ll need to select compute resources that support both managing the device and your device’s primary function. On the low end of the compute range, you have the most basic, constrained devices that measure RAM storage in megabytes and speeds in megahertz. On the other end of the spectrum, you have hardware appliances that can feature hundreds of gigabytes of RAM, terabytes of storage, and multicore processors, and often have dedicated compute resources, such as GPUs, for specialized processing cases.
The trade-off for more compute power is power consumption. Even though constrained devices have minimal compute capabilities, they usually consume single-digit milliwatts or even microwatts of power. Some applications require minimal power consumption over time because the devices must be installed in an environment and run for long periods—perhaps years—without recharging the device.
For a device, you want to select just enough hardware to run your application plus some extra overhead with compute, RAM, and storage for nonfunctional requirements or in case a future update needs more compute. Your device will need enough storage to download an update and apply those changes over the existing code.
Security features
When considering the hardware for your device, you’ll want to think about security as well. Security is a major part of device lifecycle management, especially when it comes to code execution, device claiming, device provisioning, and security in general. Selecting the appropriate hardware-based security, therefore, is one of the best defenses against a number of security challenges and provisioning discussed later in this chapter.
One such security feature is a trusted platform module (TPM). TPMs have existed on computers since the early 2010s. These cryptographic microcontrollers provide a suite of functions used in cryptography and security on devices. One of the primary functions of a TPM is storing keys. Devices use these keys and store them in the TPM rather than memory. Once written, the keys cannot be removed without wiping the TPM. If the keys are lost, then many other things based on the keys will not work, such as encrypted storage. Another primary function of TPMs is to provide hardware-based attestation. Attestation validates that the device is indeed one that was created and shipped from a manufacturer. This is particularly useful in IoT devices. The TPM provides uniqueness to the device and authenticates the device against a provisioning service.
TPMs use an industry-published specification, currently on version 2.0 as of late 2023. TPMs are implemented in many different ways depending on the device, but most use a discrete microcontroller for this purpose. Hypervisors integrate a virtual TPM or use a host device’s TPM for virtual machines. Machines without a physical TPM can use software-based TPMs provided by the device’s firmware (BIOS, UEFI, etc.) or the operating system. Software TPMs may work for dev purposes, but these are not recommended for production apps. Use a hardware TPM instead.
Many security-hardened, constrained devices like Azure Sphere have built-in security features, and a TPM on these devices would not be necessary. However, using a TPM for attestation is advisable on unconstrained devices that use more commodity compute, such as x86- or ARM-based boards for a device, especially on devices with significant security concerns.
A TPM can be used as a solution to mitigate many common security threats, but it’s also used in device provisioning. This is discussed later in this chapter.
AI and ML
Artificial intelligence (AI) and machine learning (ML) are not always used in IoT solutions, but they are increasingly being adopted because they have many pertinent applications in IoT workloads. Sometimes it is hard to know if your IoT solution needs ML on the device while you are designing it. AI is a broad term used to cover a swath of different computer systems that attempt to do tasks that typically require human intelligence. ML is a subset of AI that focuses on creating and applying models developed from the analysis of large datasets to find the right models, and then applies those models to new inputs. My colleague, Jeff Prosise, has written an entire book on the topic.1
Some of the canonical use cases for AL and ML include signal processing, such as images, video, and audio, and identification of patterns in large datasets. In the past, IoT devices were typically not capable of running these kinds of workloads on a device. Data had to be relayed to the cloud or an edge device for processing. However, recent advancements in chip designs enable these workloads to run on IoT devices. Imaging and audio processing have broad applications in many different contexts, such as inventory management, self-driving cars, video surveillance, manufacturing, and smart homes. One of the more popular use cases involves notifying someone when a person (as opposed to an animal or a random object) arrives at one’s front door. This is because a model was trained to recognize people using computer vision. The model is implemented on the device so it can send the notification without having to send a video stream back to the internet for analysis there.
To support these kinds of workloads, two primary kinds of hardware are used in AI-based workloads: graphics processing units (GPUs) and AI accelerators. GPUs were the first broadly used computer hardware for AI processing because many PCs, such as workstations and gaming computers, had GPUs available. In 2007, NVIDIA began providing SDKs useful for AI-based workloads with CUDA. GPUs tend to work well for AI workloads on PC class hardware, but their cooling requirements, power draw, and size put them out of range of most IoT applications; however, GPUs can still work when a device is in some environments with edge applications.
One of the more popular examples is Google’s Tensor Processing Unit (TPU), which is now finding its way into devices like phones. A TPU works with Google’s TensorFlow library, allowing models designed for TensorFlow to run on a TPU. Google has built several kinds of TPUs, including single-board computers, USB-based devices, and PCIe-based devices.
AI workloads on IoT or edge devices were initially only possible on powerful, centralized computers like servers or cloud-based computers. This method is still relevant to IoT, but AI-enabled IoT devices have two primary advantages. First, AI-enabled IoT devices process data in real time with low latency and no risks of network outages. This allows IoT devices to make decisions more quickly and reliably. Second, AI on IoT devices reduces network loads. Data is processed locally and therefore does not need to be transmitted over a network to an edge device or the cloud for processing.
Widespread adoption of AI-enabled devices for IoT is yet to be realized. Still, the trickle-down effect of technology as it finds its way into mobile devices, single-board computers, and low-powered modules implies that AI on IoT devices will change the application architecture for IoT and hardware design.
Connectivity
Device connectivity hardware plays into how a device will communicate with the cloud to send and receive data on the cloud. Each form has different advantages, disadvantages, and security concerns.
Ethernet
Ethernet is a tried-and-true method for connecting devices to a network. Ethernet is still a widely supported means of connecting IoT devices. The major advantage of Ethernet is that it provides a great deal of convenience for a device’s connectivity needs because of its simplicity and ubiquity in networking. All one needs is an Ethernet cable, and the network takes care of the rest. Ethernet has the advantage of providing Power over Ethernet (POE), which can provide enough power to more constrained devices. Even though it is simple, Ethernet can cause security issues, as it does not provide hardware-level encryption like other media does. Network security, therefore, is imperative. You should secure a network port on a switch, isolate IoT devices through segmentation, and restrict physical access to a device.
WiFi
WiFi is the most common type of network connection used for devices because it is inexpensive, fast, secure, and widely supported. WiFi installation varies, and WiFi includes backward compatibility with devices going all the way back to the first generation of WiFi that started in the 1990s.
WiFi does have a few drawbacks. First, WiFi connections for constrained devices can be a strain on the power of a device. Second, WiFi networks can create an attack vector because they are accessible over the air (you don’t have to physically break into a building to access the network). Devices on WiFi networks should implement strong encryption and securely stored WiFi keys.
Cellular
Cellular connections to cellular networks make sense for devices that will not be near any kind of network installation. WiFi and Ethernet are typically restricted to buildings, but cellular coverage exists in most populated areas in the world. If it’s not the primary connection for a device, it can also serve as a backup for a device.
Cellular modems, like WiFi, can consume quite a bit of power for constrained devices. Also, even though cellular networks are usually tightly controlled by a cellular provider, one should never assume that a cellular network is secure in and of itself. Devices on a cellular network are on a public network and should therefore be security-hardened to the degree possible.
Bluetooth
Bluetooth does not usually provide connectivity to the internet, but it can relay information from one device to another device that has an internet connection. In many cases, the internet-connected device acts as a proxy, hub, and edge for several other Bluetooth-enabled devices. The Bluetooth device itself may be an IoT device or, in some cases, a phone or a laptop. Usually, these solutions use an app if it’s a consumer device or a security connection with Bluetooth between the device and its internet proxy.
Bluetooth is a relatively easy-to-implement protocol for developers, but this means that a device must have another device like a phone or laptop to proxy its connection to the internet. Moreover, Bluetooth has a relatively limited range.
Others
Ethernet, WiFi, cellular, and Bluetooth are common modes of connection, but IoT is by no means limited to these. Some device makers create specialized connections over media to provide connectivity, such as coaxial cables, electrical infrastructure, or a proprietary wireless protocol.
Regardless of how the device connects, it needs to consider security and other nonfunctional requirements like claiming, provisioning, updating, and deprovisioning to work with Azure, and these all require a network connection to work.
Software
Software as part of the IoT nexus provides all of the instructions that your device’s hardware executes for gathering and processing data before it ultimately sends it off to the cloud. The software needed to make that happen is layered with operating systems, SDKs, and ultimately your application code. Each layer has different aspects you should consider when selecting what software to use in your device.
Operating systems
An operating system provides a foundation for all of your other software to run. They’re all different, so you need to think about which operating system aligns with your design goals and hardware requirements. You would not be able to run a heavier operating system like Ubuntu IoT Core that you saw in Chapter 3 on something like an Arduino device, and you cannot expect FreeRTOS to work well on PC-class hardware. The bottom line is that an operating system needs to work for your device’s needs and fit with your device’s overall lifecycle.
Chapter 2 discussed a few operating systems related to Azure with Azure Sphere, Azure RTOS, and Windows IoT. Beyond the scope of an Azure-centric operating system, however, you may want to consider:
Security features
Regardless of the application, be it simple or complex, the operating system that you select for a device should be secure. Most operating systems intended explicitly for IoT use are built from the ground up with security in mind. Linux-based operating systems are known for having tight security controls and can be hardened for optimal device security. Additionally, they support security hardware features like TPMs. Chapter 14 covers different kinds of security considerations when building devices.
Compatibility
A major driver in selecting an operating system for a device is its compatibility with your planned software and hardware. For software, most unconstrained operating systems, like those based on Linux or Windows, will support a wide array of software platforms like .NET, Python, or JavaScript. More constrained devices will be much more selective, with some platforms especially built for specific languages. However, IoT devices can run C and C++ applications in most cases.
An OS’s hardware compatibility entails what CPUs are supported by a device and what other hardware, like network connectivity hardware, device integration through drivers, and hardware interfaces like GPIO, serial, and USB, are supported by an operating system. Linux-based operating systems enjoy broad support for a wide range of hardware. More constrained OSs, like FreeRTOS, have fewer options but generally do not heavy hardware requirements.
Simplicity
Simplicity, as it pertains to operating systems, is the one criterion likely to have the most significant impact because “simplicity” can have many meanings. An operating system should:
-
Be easy to use, build, and secure
-
Have a small footprint
-
Require fewer compute resources such as RAM and CPU
-
Be easy to update and maintain
-
Be more secure with a small attack surface
Simplicity does not imply that one is compromising on capabilities, though. A simple operating system starts with minimalism as a design goal and allows users to build upon that using tools like package managers and configuration scripts.
Consistency
When selecting an OS for a device, you should aim for consistency, which means that the OS should have regular, predictable lifecycle management. Many modern operating systems use a long-term support (LTS) model for managing updates. An LTS version of an operating system is a particular build that will bring system updates, usually security patches, until a published date. The version, however, may not receive new features. For OSs on devices that will not receive hardware upgrades, LTS versions are a boon: a device maker can deploy an OS and predictably patch that OS into the future without reimaging or upgrading the operating system. Moreover, devices do not always need the newest operating system features to continue performing the purpose they were designed for. Windows IoT and most Linux builds like Ubuntu Core and Yocto Linux provide LTS versions.
Operating systems provide the foundation for a device’s operation. Choosing the right one is not simple.
SDKs
Chapter 2 covered Azure SDKs for constrained and unconstrained devices for Azure connectivity. Those SDKs, however, will be only a few of the SDKs you will use for your device. If you are working with hardware from a hardware vendor, you’ll likely be supplied with SDKs for that hardware. Moreover, you can build an SDK for your device if you intend to extend it.
SDKs are a dependency for your application, but many SDKs have their own dependencies, too. They will rely on the application framework, such as Node.js, Python, or .NET, and likely will include packages and code that the SDK needs to run on top of what they provide. Software is constantly evolving, so it becomes necessary to update software and dependencies from time to time. Here are a few things to ensure:
-
Monitor SDKs and their dependencies for updates, especially security updates.
-
Develop automated regression tests and scan the latest code for security vulnerabilities with tools like SonarQube.
-
Include updates as part of a predictable device update lifecycle.
App isolation
Chapter 14 discusses security at length, but one way to significantly improve application security is by adopting app isolation. App isolation means that your app code, and usually the associated runtimes, run in an isolated environment away from the primary operating system. The operating system only exposes what is essential for an application to run.
One easy way to do this on Linux-based systems is to use chroot. The command chroot is short for “change” and “root.” It sets up an isolated file system for a process. The process cannot browse files on the host’s filesystem, only those inside the chroot context. This utility also provides some execution isolation and security around a process to isolate it from the rest of the operating system.
Docker is another way to isolate processes. Docker is more than simply isolation, though. It’s an entire ecosystem used for packaging and deploying software in containers. Docker images run on a host operating system in a completely isolated environment. They provide a convenient way to distribute apps because they are packaged and published to a container registry. The images are pulled from the registry and started as new instances of the image as containers. You can publish a new version of your container image if you need to update your app. Docker can install that image without needing to update the underlying operating system. Chapter 6 contains a complete explanation of Docker containers and the Docker container workflow.
A third way that works with many Linux distros leverages a project called Snapcraft. Snapcraft builds packages called “snaps” that deploy to a Linux device through a package manager. It uses an app isolation model similar to Docker with containers but provides a more declarative approach that includes both build and run instructions for the app and exposes different things more implicitly than explicitly, like network connectivity or access to particular hardware. Snapcraft lets the snapd daemon figure out the particulars of what these declarations mean. Snaps are widely supported on IoT-focused Linux distros like Yocto and Ubuntu Core.
Azure Sphere, while a constrained device, does provide app isolation to improve security on the device. The apps here run in a container that exposes the hardware through an API.
Build, test, and release
The process of building, testing, and releasing software for a device is multifaceted, as it involves operating systems, frameworks, SDKs, dependencies, and your software.
The most basic form of this process consists of manually building something and pushing it to a device. This, however, does not lend itself well to quality, secure code. To improve the quality and security of code, code must undergo a series of scans and tests before it is pushed out to the device. To expedite this process, developers use continuous integration and continuous delivery (CI/CD) through automation, typically called pipelines.
The CI/CD process involves building software from the source code, testing that software using automated testing with, for example, unit tests and device simulators for integration testing, packaging your software, and ultimately deploying that software to devices.
CI/CD through automation has the added benefit of additional layers of security that help improve code quality and security. Leveraging these security features through automation usually does not add time to a build process:
-
Ensure that users contributing to the code are trusted actors with appropriate permissions to view and contribute code.
-
Ensure that developers contribute code through a review process. This typically disallows committing code to a project’s “main” branch. Contributions should be submitted as a pull request, and only authorized agents, after reviewing the code, can commit the code to the main branch.
-
Ensure that code going through a build process does so with a trusted principal, usually one that is not a user principal.
-
Use code signing to ensure that the device can validate the code installed on a device before installing it using trusted certificate authorities.
-
Do not allow contributors to directly commit any releases to a build repository, such as a container registry.
Using tests, security scans, and security controls around a build and test process can help improve the overall quality of a product from the initial stages of development, through the prototyping phase, through the manufacturing process, and ultimately through the update process.
To the degree possible, you should build and test code without the need for devices because this allows code to “fail fast,” meaning that problems can be found in code before pushing that code to a device. If a device is needed, try using emulated hardware if it is available with a project like Qemu, which provides processor emulation for creating virtual machines of all varieties. Qemu can run on a Linux host as part of a CI/CD pipeline.
Chapter 3 discussed the use of device simulators in integration tests, regression tests, load tests, and performance tests as part of automation for cloud-side code. Code that runs on a device should go through a similar process with its integration tests, regression tests, load tests, and performance tests. Like all code, it should use unit tests to validate the code units (typically down to the method level) and scan for security vulnerabilities and patterns using tools like SonarQube.
Ultimately, the code will need to be tested on a physical device. To the degree possible, automate this process as well, but running tests off a device is usually preferable because it requires less time and fewer manual interventions between builds.
Once the code goes through a build and test phase, the code is built and packaged for a release. A release is simply a version of the code that could potentially run as a final version. This code may go through a few more checks, such as acceptance testing or similar tests, before it is pushed to an environment for publishing.
The last several sections have looked at the various nonfunctional requirements you must consider when building an IoT device with hardware and software concerns. As you begin to develop a prototype, you will likely spend as much time working on the nonfunctional requirements of the device as you do with the device’s primary function. This is quite natural. Devices, especially IoT devices, must consider these as part of a device’s backlog of features and tasks. Some of this can be “outsourced” by adopting more feature-complete platforms like Azure Sphere, but ultimately, a device is your creation—it is your design to fulfill a specific need that you envision. Even if you use services for some level of automation, these must be integrated with the device, even if you do not build them yourself.
Manufacturing
The manufacturing process involves taking a refined prototype and creating the actual product that will be used. The complexity of the process depends on the scope and scale of the device, and who will be using it. The manufacturing process for devices will look radically different for such applications. The commodity tags are produced by the thousands in a factory using a repeatable process. In contrast, more custom solutions may make only dozens of devices, with each one tailored to the user’s needs.
The manufacturing of IoT devices usually does not take raw materials and compose those into something useful; rather, manufacturing requires procuring hardware components and assembling those components, installing software, and preparing the device for provisioning. The process of manufacturing begins in parallel with research and design.
As a device moves from proof of concept toward a prototype and even a minimally viable product, device makers investigate possible solutions and begin procuring the hardware and facilities to make IoT devices. As a device moves closer to a production state, detailed plans for creating a device are crafted. A manufacturer will do a small batch of pre-production devices to ensure the devices meet the required specs. After that, the device is mass produced. Finally, the product is packaged and shipped to a user, who will set up the device or have a representative set it up.
Regardless of the process, the start of the first manufacturing production runs is the point in the product lifecycle that marks the end of the significant research and design phase as the device starts its main sequence with provisioning.
Shipping
After a device is manufactured, it’s moved from the manufacturer to its place of deployment. Depending on the kind of device, this might be as simple as taking it from the factory to the place of installation and deploying it to something much more involved, such as retail distribution. All of these imply some kind of shipping process.
I mention shipping here, not because it’s particularly technical, but rather because it’s a significant milestone in the life of a device. It is likely the last time that a device manufacturer will physically see the device. The device at this point has everything on it required to run, and it’s ready to perform its primary function.
Claiming and Provisioning
While device claiming is technically a step in the manufacturing process, it is a rather important step in device lifecycle management because it is the step where a device receives its initial set of credentials used in provisioning.
The two primary Azure services used in device provisioning are the Device Provisioning Service (DPS) and the associated IoT Hub associated with the device. Azure’s DPS is a connection broker between a device and an Azure IoT Hub. A DPS is not necessary for devices if the devices ship with the credentials to the IoT Hub already on the device. But a DPS is a great way to handle device provisioning because it automates device creation and management on an IoT Hub. Moreover, a single DPS can handle more than one IoT Hub, making it more conducive for large-scale IoT device deployments.
The IoT Hub on Azure facilitates many operations for device communication, twinning, updates, and messaging. It is the all-important cloud-side component for devices because of that. I’ll go over twinning and updates later in this chapter. Chapter 6 covers IoT Edge deployments, and Chapter 5 goes deep into the different kinds of messaging supported by IoT Hub. For now, think of messaging as one of the two sides of what the DPS is brokering.
Claiming and provisioning involve the following:
-
Claiming begins by creating an initial set of credentials to be loaded on a device. This action is performed cloud-side on the DPS. These credentials can be:
- Shared Access Signature (SAS) tokens
-
A SAS token uses a key stored on the device and in the cloud. The device uses the key to sign a token, and the DPS uses the same key to validate the token.
- X.509 certificates
-
An X.509 certificate uses Private Key Infrastructure (PKI) to create a certificate that uses a trusted certificate authority between the device and the cloud.
-
Both can be used, but certificates are probably more secure and will also be needed if you want to use a TPM-based device attestation. The credentials can be a unique set of credentials for a device, or the credentials can be shared as part of a group of devices, depending on the need. A single device needs to provide a device ID to identify the device properly.
-
Claiming continues after the credentials are created on the DPS. These credentials are saved on the device before it ships. The credentials can be a part of a build process and baked into the firmware or operating system installed on the device. The credentials also can be installed separately after the device has its firmware or operating system installed. Once these initial credentials are loaded, claiming is complete.
-
The device ships after the manufacturing process and after claiming. Shipping refers to the device moving from its manufacturing stage to being ready for installation.
-
Once a device is at the place intended for installation, it is ready for provisioning. Provisioning starts once the device is powered on and connected to a network. The device uses the preloaded credentials to contact the DPS through one of three different schemes:
- Shared Access Signature (SAS) tokens
-
SAS tokens are generated using the shared access key shipped on the device. The device’s ID and other metadata compose the SAS token, which is then signed using the key. The signature and metadata are returned to the DPS for authentication.
- X.509 certificates
-
Certificates provide a robust security mechanism because they use a third-party certificate authority to validate the certificates before using them. The certificate is issued from the DPS. Once validated, the certificate is presented to the DPS to authenticate the device against a root certificate.
- TPM-based attestation with certificates
-
TPM-based authentication provides a hardware-level authentication method that uses certificates stored on a TPM. The TPM uses its hardware IDs and the certificate to authenticate the device. This method is the most secure because it mitigates spoofing and other attacks against a cloud using IoT.
Once the credentials have been accepted, the DPS assigns a device to an IoT Hub. The IoT Hub assignment can be one of many different hubs assigned as part of a round-robin selection process or a specific hub for the provided credentials.
-
Once the device authenticates with the device credentials, the DPS creates a device-specific set of credentials for the IoT Hub. The device credentials on the IoT Hub can either be a connection string using a SAS token or an X.509 certificate derived from another certificate. At this point, the IoT Hub is ready for the device to connect. Provisioning is considered complete at this point.
-
After the credentials are created on the IoT Hub, the credentials are sent to the device by the DPS. These credentials are stored on the device and ought to be secured like any other set of credentials. The credentials contain information about where to find the IoT Hub as well. Also, the DPS sends an initial configuration for the device. This is the same data stored in the device twin on Azure.
-
The last step is to use the credentials provided by the IoT Hub.
Once the device has the credentials it needs for the IoT Hub, the DPS can step out of the way and let the device and IoT Hub communicate with one another directly. If a device should ever need to be reprovisioned, the device simply goes through the same process as provisioning. It receives a new set of credentials, which may or may not talk to the same Azure IoT Hub. In any case, device provisioning sets the stage for the device’s main sequence as part of its lifecycle.
Provision Devices with an IoT Hub through the Device Provisioning Service
Setting up a Device Provisioning Services and an IoT Hub on Azure is pretty straightforward. The template is also in the Chapter 4 folder of the book’s code repository if you want to deploy it some other way. In any case, the template takes two parameters: the Provisioning Service Name and the IoT Hub Name. These are part of the hostname for each, so they’ll need to be unique. Once you have a name you can populate the fields in the Azure portal. You’ll also need to select a subscription and a resource group, or you can create a new resource group. Select a region for the resource group.
Once you are ready, click on the “Review + create” button. The ARM template will link the IoT Hub to the Device Provisioning Service as part of the deployment. Wait a few moments for this to finish. You can monitor this under “Deployment is in progress.” Once it is finished, click on “Go to resource group” to finish the setup detailed here:
-
In the resource group, choose the Device Provisioning Service.
-
Select “Manage enrollments,” then choose “Add enrollment group.” An enrollment group allows multiple devices to register against one or more IoT Hubs. An individual enrollment is for a specific device.
-
The “Add Enrollment Group” blade has several fields to fill out. As of the writing of this book, there is no way to automate setting up an enrollment group using an ARM template.
-
For “Group name,” enter a descriptive name for the group.
-
For “Attestation Type,” select “Symmetric Key.” The symmetric key is suitable for the purposes of this walkthrough, but a Certificate is preferable for a more secure deployment.
-
Keep “Auto-generate keys” checked.
-
Keep “IoT Edge Device” set to false. In Chapter 5, you’ll set up an IoT Edge device using this DPS.
-
Take the default on the “Select how you want to assign devices to hubs.” Since there is only a single IoT Hub, this setting is fine. For larger device deployments, you can use a different method or even customize it with an Azure Function.
-
The blade will default to the IoT Hub you created when you created the DPS.
-
Take the defaults on “Select how you want device data to be handled on reprovisioning.”
-
For “Initial Device Twin State,” delete what is in the text box, and replace it with an empty set of curly braces
{}. -
Leave “Enable entry” on Enable.
-
Finally, click “Save.”
-
-
Now, select the enrollment group you just created.
-
Click the “Copy to clipboard” button next to the value for Primary Key.
-
In Visual Studio Code, open the folder for the device you worked with in Chapter 2. If you have not done so, you can create a sample device or a simulated device using the code in the repository. Follow the instructions in Chapter 2 for information on how to do this.
-
Open settings.json.
-
Paste the key you copied into the value for
symmetricKey. -
Now, navigate to the “Overview” blade in the Azure portal. You need to get some values off this tab:
-
Get the “ID Scope” value from the blade and paste it into the value for
idScopein settings.json. -
Get the “Service endpoint” value from the blade and paste it into the value for
provisioningHostin settings.json.When you’re done, you should have a settings.json that looks something like this:
{"start":"dps","telemetry":"simulator","camera":"simulator","pollFreq":5000,"connString":"","provisioningHost":"blaizedps1.azure-devices-provisioning.net","idScope":"0ne007C4D38","symmetricKey":"rREfrgOcrb7Bm4da…6WvRs2HzwLPcg==","registrationId":"device1"}
-
-
Save settings.json. This is essentially the claiming portion of a device’s lifecycle.
-
Now, start the device. The device will use the key against the Provisioning Service for attestation and complete the provisioning process. The device, whether you are using a sample device or a simulator, creates a file called conn.json in the root folder of the repository. This file contains the connection string for the device. Each subsequent time you run the device, it uses this file to know what IoT Hub to look for and how to connect.
-
In the Azure portal, browse the IoT Hub you created. There, under devices, you should see a device with the registration ID “device1” or whatever you changed it to in the settings.json file.
This demonstration shows the claiming process and the provisioning process through IoT Hub and the Device Provisioning Service. From here, the device enters its main sequence where it will receive updates, twinning data, and other messaging. Keep the device and resource around for other demonstrations for twinning and updates.
Main Sequence
The main sequence of the device starts after device provisioning and the device starts to perform its primary function. The main sequence of a device’s lifecycle has three primary functions when dealing with the cloud. First, a device has to communicate with the cloud. This entails all the telemetry, commands, and events that flow from a device to the cloud and the cloud to the device. Second, a device sends and receives twinning updates. And third, the primary sequence of a device includes software patches and updates.
Communication
Communication between a device and the cloud is critical to a device’s function. Whatever data devices collect or function the devices provide, the device needs to communicate with the cloud to do this. Even device provisioning updates are communications between the device and the cloud. For our purposes here, communication is the main communication sequence that involves transmitting events and telemetry from the device to the cloud and allowing the cloud to send commands and other data to the device. Chapter 5 covers communication in depth.
Twinning
In IoT, twinning means that the cloud stores a copy of a device’s configuration, state, or both on the cloud. This “twin” enables applications to query for information across all devices in an IoT workload without having to contact each device, a process that could take forever to complete, and even that might not be reliable. Device twins exist for several reasons, but the main reason is to enable cloud-side services and applications to query and report against device states without actually contacting every device that is part of an IoT deployment. This data allows device management to make decisions about a device. For instance, the device data may contain version information about the software installed on the device, such as its operating system, app version, SDK version, or hardware version. When new software becomes available, the cloud-side update mechanism can use the twinning data to know which devices it needs to update and then track the updates as they are applied.
Another everyday use for twinning is to enable centralized configuration management of a device for nonfunctional and functional aspects. When a device is provisioned, it may receive an initial configuration as part of that provisioning. However, as time progresses, a configuration may need to change. For instance, if a device is configured to report into the cloud once an hour with new data, a new configuration may be sent to tell the device to report every other hour to save on bandwidth.
Azure IoT Hub provides all the plumbing to manage the state of devices connected to an IoT Hub. The IoT Hub tracks the twinning state in a database that is part of the hub. Users can read data about devices using a SQL-like query language based on their twinning data. A digital twin comes with two sets of data: desired and reported. Desired reflects from the cloud to the machine what the cloud believes the state of the twinning data ought to be. Once the twinning data is changed, it fires an event that notifies a device that the twinning data has changed, and it passes the new data to the device as part of that event. On the flip side, devices will emit data about their state, which becomes the reported state portion of the twinning data.
Desired and reported data, however, do not have to match. How twinning data is used and reported depends on the solution. For instance, a device may report data about its state stored as part of the digital twin, but that state is inconsequential—it’s merely information about the device’s state.
In other conditions, a device should report a state consistent with the desired state. This is especially true for the configuration state. Consider the example I gave earlier about how often a device should report back to the cloud. If the desired state posts that the device should report every two hours, but the reported state comes back that the device is configured for every one hour, something is amiss for that device.
As a device designer, you must use state data and events appropriately. The Azure IoT Hub SDKs provide events you can wire up in your code to respond to event updates from the cloud. Likewise, it has special calls for posting reported twin data back to the cloud.
Device Twinning with IoT Hub
If you have not already done so, deploy the IoT Hub and Device Provisioning Service following the instructions given earlier in this chapter, and provision your device sample or simulator with the DPS so that it can talk to the IoT Hub. Once you are done with this, you can work with IoT Hub twinning:
-
In the IoT Hub, find the device you provisioned under devices. You can do this by looking at your IoT Hub, then selecting devices left. From here, you should see the device that you provisioned.
-
After you have located your device, start your device in Visual Studio Code. The device will start sending data to the IoT Hub on the default interval, which is once every 5,000 milliseconds.
-
On the device in the Azure portal, select “Device twin.”
-
There, you will see a bunch of JSON data. The JSON data contains data about your device, such as its name, status, and other bits of information. Under the properties section, you will see two objects: the
desiredobject andreportedobject. Thedesiredobject expresses the desired state of the device, andreportedreflects the actual state of the device.desiredhas no set properties, but reported should havepollFreqset with some metadata that looks like this:"reported":{"pollFreq":5000,"$metadata":{"$lastUpdated":"2022-10-08T00:43:52.339081Z","pollFreq":{"$lastUpdated":"2022-10-08T00:43:52.339081Z"}},"$version":9}The
$versionproperty is incremented every time the device reports its state. In this case, it is nine times. -
Under
desired, add the following code:"desired":{"pollFreq":7000}You can remove the metadata and version information.
-
Now, click the “Save” button. After saving, the portal will add metadata to the
desiredproperty:"desired":{"pollFreq":7000,"$metadata":{"$lastUpdated":"2022-10-08T00:55:39.6799755Z","$lastUpdatedVersion":2,"pollFreq":{"$lastUpdated":"2022-10-08T00:55:39.6799755Z","$lastUpdatedVersion":2}},"$version":2} -
The device will receive the new state and will start reporting at whatever interval you set. In the example, the interval is 7,000 milliseconds, or once every 7 seconds. You should see data in the console indicating that the property was updated:
new desired properties received:{"pollFreq":7000,"$version":2} -
Back in the Azure portal, navigate to your IoT Hub and select “Queries.”
-
In the “Query” box, enter the following SQL query, then click “Run query.” This query will select all the devices that have a desired property,
pollFreq, set to 7,000, which is probably only your device:SELECT*FROMdevicesWHEREdevices.properties.desired.pollFreq=7000 -
You can change the query if you want to look at reported properties or any other property in the twinning data. Experiment with different queries.
Querying the IoT Hub against the twinning data works for many use cases. If a device deployment uses several IoT Hubs, there’s no built-in way to query multiple IoT Hubs for the twinning data. You could query each hub, but that could be slow if many devices exist. It also requires that these separate queries be filtered or aggregated in the calling application. Moreover, if the data needs to be joined or aggregated in some way, there is no way to do that either. In these cases, the data needs to be exported to an external datastore to manage twinning data through a centralized database.
Twinning databases can be any kind of database, but one of the most widely used formats for tracking twinning data is a graph database, depicted in Figure 4-4. If you are unfamiliar with a graph database, it is rather simple to understand but its possibilities are profound. A graph database consists of any number of nodes and edges.
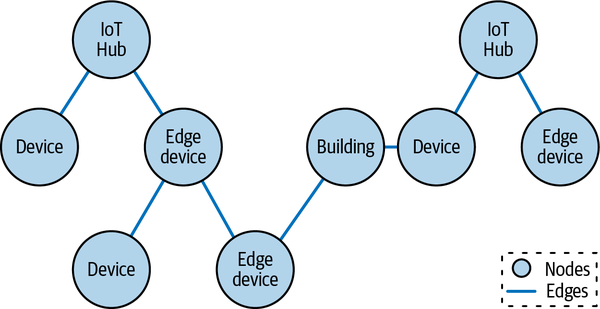
Figure 4-4. Graph database with nodes and edges
Nodes are essentially objects that have properties, typically expressed as a key-value pair for each property. An edge is a connection between two nodes. The edge itself can have properties, too, also expressed as key-value pairs. The power of a graph database is that it allows any node to connect to another node by way of an edge. There is no limit to how many other nodes a single node can relate to. This kind of database allows for arbitrary relationships between different nodes.
IoT works well with this database because twinning data is often expressed as a set of key-value pairs. Each device in the database acts as a node. IoT devices can connect to many other things in the database. These could be other nodes representing geographies, buildings, networks, other devices (IoT or otherwise), and edge devices, among others. These connections create a traversable graph so that datasets can be returned to show relationships between all the devices and allow for experiments for when a device’s data may change. Azure Digital Twin and Azure Cosmos DB are two excellent tools for doing just this with graph databases.
Azure Digital Twin
Azure Digital Twin (ADT) is the turnkey software-as-a-service (SaaS) solution for this purpose. It serves as a centralized graph database that tracks twinning data for deployed devices, but it also allows for complex topologies that reflect how devices and other assets, such as buildings, networks, cities, and edges, are connected beyond mere twinning data. These topologies allow users to run simulations with twinning data against ADT to answer “what-if” scenarios about the devices.
While ADT is turnkey, it does not, as of the writing of this book, provide any native integrations with IoT Hub to integrate device twinning changes into ADT. To do this, the user needs to define something that can respond to lifecycle events on a device that gets passed to IoT Hub and record the results in the database.
Azure Cosmos DB
If ADT does not seem like a good fit for your application, you can create a graph database using Azure Cosmos DB’s Graph API. The Graph API is based on Gremlin, a query language for graph traversals. Cosmos DB’s Graph API enables edges and nodes to store key-value pair data on the node or the edge for whatever it represents.
Chapter 6 will take up the database options, looking at how different database paradigms and architectures work with IoT workloads, including Cosmos DB and Azure Digital Twin.
Beyond twinning, there’s another type of update: software updates. This book has hinted about this already, but now it is time to have a closer look.
Updates
You know about device updates if you own a smartphone or a computer. Every so often, you’ll get a notification telling you that your phone has an update that needs to be downloaded and deployed to the device. Many of us put this off because it seems to happen at the worst time. Eventually, you begrudgingly let the device download the updates and render your device useless for some time until it completes. Sometimes, the update fails, and your device may no longer work. In any case, it’s never a fun experience.
Updates are needed mostly for nonfunctional requirements, such as fixing software bugs or enhancing security. Occasionally, updates can add functionality to a device that did not come on the device, but this is within the constraints of what hardware is already on the device.
Despite being no fun, device updates are a lifeline for devices. Through updates, devices receive software upgrades, new features, security patches, and other much-needed software maintenance that should make a device perform better and more securely. IoT updates are no different. Devices need occasional updates applied for all the same reasons laptops and phones need software updates. The biggest difference, however, is that IoT devices typically do not have a user component to the update and, therefore, must almost entirely be managed through remote management tools.
Devices need a few different kinds of software updates:
- Operating system updates
-
Operating system updates apply to the operating system running on the device if it has one. Some constrained devices do not have an OS, but even these may have a real-time operating system (RTOS). Other devices need OS updates that may update hardware drivers, kernel patches, and OS security fixes, among many others. Often, these kinds of updates are managed through a device’s package manager, if it has one, such as Aptitude for Ubuntu or Windows Update on Windows.
- Platform updates
-
Platform updates patches, upgrades, and fixes for anything related to the needed files for your app, such as a patch for Node.js or .NET. Sometimes these are managed through package manager the same way OS updates are managed. If not, you may need to consider how this impacts your application’s delivery. Platforms built around containers have a comprehensive set of tools for packaging platforms with an application and efficiently delivering these to a device.
- Software updates
-
Software updates relate to any code you write and maintain. This may range from simple scripts or agents responsible for gathering and relaying data to the cloud to something more robust with a complete user experience and complex logic. In any case, your app will likely need patching over time.
- Key rotations
-
Rotating security keys and certificates is a security best practice and works similarly to how other updates work. The update cycle can periodically push out new keys that replace old ones in the way that new software replaces old ones. These new keys enable connectivity to the platform, while the old ones are typically revoked once the new keys are in place.
As of late 2022, Azure has a feature in preview for doing “over the air” (OTA) updates. These updates provide three different kinds of updates for devices, through the device update agent installed as part of the code on a constrained device or as a daemon on unconstrained devices.
The Azure Device Update agent follows a pattern used for updating devices wherein a device will run a separate program or daemon that is not a part of the primary software, typically an entirely different process, that is responsible for doing updates. Using an update agent ensures that updates can more reliably be applied to a device. If an update fails, the agent can restart the update or recover.
Applying updates to the sample device in a Docker container
Containers are one of many ways to deploy device code and are one way to make a platform more extensible, similar to how IoT Edge works. While IoT Edge is covered in Chapter 6, here you will see how you might do this with Docker on an unconstrained device. Earlier in the chapter, you saw one way to deploy containerized code using Ubuntu Core with a snap through Snapcraft. Here, you’ll simply do a Docker build with the device, push it to an Azure container registry, and deploy it to a Linux host. Beyond this, you will see how Docker can also serve as an agent, using the Watchtower project, a Docker container that looks for updates and applies these to your Docker environment.
To run this, first, you’ll need a virtual machine with Ubuntu or a Raspberry Pi with Ubuntu. You can use Ubuntu Desktop for this, but Ubuntu Server is likely the easiest to set up and use. If you don’t want to bother with a local VM, an Azure VM works just as well. Deploy an Ubuntu VM on Azure using the marketplace image:
-
Before you get started, you’ll need some information from the Azure Container Registry that deployed with the ARM template you ran when you created the Device Provisioning Service and IoT Hub. Find your Container Registry in the resource group with your IoT Hub, navigate to Access Keys, and make note of the “Username,” “password,” and “Login server” fields. You may want to keep the tab open or copy the values to a text editor.
-
Once you have your virtual machine ready and you are connected to it, get root access with the sudo command:
sudo -i. -
Next, install Docker and its dependencies. You can use the script in the repository to install it. Use the following command:
bash <(curl -s \
    https://raw.githubusercontent.com/theonemule/
        azure-iot-architecture/main/Chapter%203/install-docker.sh)
You can check the Docker install with
docker psto ensure everything is installed OK. -
Now, you are ready to build a container. Clone the code repository from GitHub with a git command:
git clone https://github.com/theonemule/azure-iot-architecture.git
This will clone the code into the root home folder.
-
Change directories to the Chapter 2 directory:
cd azure-iot-architecture/Chapter\ 2
-
Now, you can build the image. Run the following Docker command, but replace
<loginserver>with the value from “Login server” from step 1:docker build -t <loginserver>/device-sample:latest
-
Before you can push the image, you need to log in to your Azure Container Registry with Docker. Again, replace
<loginserver>with the value from “Login server” from step 1:docker login <loginserver>
-
Now, you can push the image. Again, replace
<loginserver>with the value from “Login server” from step 1. It is not necessary to push the container to run it locally, but Watchtower checks the registry for updates so it can apply these updates once they are posted:docker push <loginserver>/device-sample:latest
-
Run the container:
docker run --name devicesample -it \
         -e POLLFREQ=7000 <loginserver>/device-sample
The container uses environment variables to configure the device. You can play with these values using the
-eparameter followed by the variable and value (i.e.,-e POLLFREQ=7000):- START
-
The connection type. Either “dps,” “connection_string,” or “offline.” “dps” requires you to set PROVISIONINGHOST, IDSCOPE, SYMMETRICKEY, and REGISTRATIONID with the values from the Device Provisioning Service as you did in the claiming and provisioning section. “connection_string” requires a device connection string from the IoT Hub be provided and populated on CONNSTR. The default is “offline.”
- TELEMETRY
-
Either set to “device” for real telemetry or “simulator” for simulated data.
- CAMERA
-
Either set to “device” for the device’s camera or “simulator” for a simulated camera. This will work only if the camera is attached and mapped to the host, then mapped to the container. Use the simulator, otherwise.
- POLLFREQ
-
This is a value in milliseconds for how often you want the devices to poll for data. The default is 5000.
- CONNSTR
-
Use this for a device’s connection string from the IoT Hub for the device if START is set to “connection_string.”
- PROVISIONINGHOST
-
Get the provisioning hostname from the Device Provisioning Service if START is set to “dps.”
- IDSCOPE
-
Get the ID scope from the Device Provisioning Service if START is set to “dps.”
- SYMMETRICKEY
-
Get the symmetric key from the Device Provisioning Service if START is set to “dps.”
- REGISTRATIONID
-
Create an ID for your device to identify it with the Device Provisioning Service.
-
Once the container is running, you are ready to start Watchtower. Watchtower takes a number of parameters explained in the documentation. Suffice it to say, the most relevant one is
WATCHTOWER_POLL_INTERVAL. This parameter sets how often Watchtower will poll the registry for changes. In the following example, it is set for every 60 seconds. In a production environment, you may want to check less often, maybe once a day or once every couple of hours:docker run --detach --name watchtower \ --volume /var/run/docker.sock:/var/run/docker.sock \ -e WATCHTOWER_DEBUG=true \ -e WATCHTOWER_NOTIFICATIONS_LEVEL=debug \ -e WATCHTOWER_CLEANUP=true \ -e WATCHTOWER_POLL_INTERVAL=60 \ -e WATCHTOWER_NO_PULL=false \ -e WATCHTOWER_MONITOR_ONLY=false \ containrrr/watchtower
-
Note the current run times for the
devicesamplecontainer and the watchtower containers withdocker ps -a. The command lists the running containers. Thedevicesamplecontainer should have been running longer than the watchtower container at this point. -
Now, make a trivial change to the code in the container. You can edit settings.json and add a line to the top of the file with
nano:nano settings.json
Change the file, then press Ctrl + O to save the file. Press Ctrl + X to leave
nanoback to the CLI. -
Rebuild the container:
docker build -t <loginserver>/device-sample:latest
-
Repush the container:
docker push <loginserver>/device-sample:latest
-
Wait for a few minutes. After a moment, run
docker ps -aagain. You should see that yourdevicesamplecontainer restarted. This is because Watchtower, your update agent, detected a change on your container registry. From there, it pulled the latest image and restarted your device sample with the latest image.
Docker updates are pretty straightforward. The only discrepancy is that Docker does not have an automatic way to check for new containers while they are running. Watchtower performs this essential role and acts as the device update agent for containers on your Docker host.
Device updates are a part of the device’s main sequence along with twinning updates and messaging. Once the main sequence winds down, a device will eventually fail or fall into obsolescence. In any case, it is good to have an exit strategy for devices, too, as a means to deprovision a device.
Deprovisioning
No device will last forever. Over time a device will break down, or the hardware becomes outdated to the point where it cannot run the latest software. There is no rule for how long a device should be in service. Some devices have a relatively short lifetime measured in weeks or even days, and others can last for years. Regardless of how long the device lasts, the device needs a deprovisioning process to ensure that the device is wiped and decommissioned.
Deprovisioning a device requires a few steps. First, if any keys are stored on the device, these keys should be revoked. Revoking the keys ensures that the device will be unable to connect to a cloud platform either in an attempt to send and receive a message or in an attempt to reprovision itself as a new device. Second, if the device stores data, the device’s data should be wiped. Wiping a device ensures that any residual data left on the device cannot be extracted for nefarious use or accidentally leaked.
Azure can revoke keys without any problem, but Azure does not provide specific services that can remotely wipe a device. This functionality should be built into the device and triggerable from the cloud to the device.
Lastly, as part of device provisioning, the device needs proper disposal. A responsible manufacturing plan includes ensuring that a device is either recycled or safely disposed of. Many devices contain toxic chemicals and materials that should not end up in landfills. The best course of action is recycling, which usually extracts reusable components from a device, such as batteries, removes any other components with harmful materials, and disposes of the rest.
Summary
Device lifecycle management is a broad topic, touching on all sorts of considerations you need to consider when making a device—so much so that getting a device to perform its primary function may seem like the easy part.
As you have seen, the journey from inception to deprovisioning starts with research and design and moves through manufacturing until, finally, a device is claimed and shipped. From there, a device is provisioned and enters its primary sequence, where it communicates with the cloud, receives updates, and sends and receives state through twinning. At some point (like this chapter!), it finally ends. Here are a few points to keep in mind from this chapter:
-
Device lifecycle management is a crucial part of designing and building a device. You start thinking about this long before you ever build a device.
-
Research and development is an interactive phase that moves the device from inception to a minimally viable product for manufacturing.
-
Once a device ships, it needs a way to register itself with the cloud. This process is device provisioning. Azure provides the Device Provisioning Service to associate your device with an IoT Hub.
-
While your devices are running, they need to receive software and configuration updates. Configuration updates are managed through twinning, and the software updates are managed through daemons on the device that download and install software.
Having equipped you with the essential insights to navigate pivotal decisions and understand Microsoft’s comprehensive support for the device creation journey, this chapter merely scratches the surface. Brace yourself, as the upcoming chapter delves deeper into the intricate workings of a device’s main sequence, decoding the intricate web of messaging details. Though focused, this discussion is a linchpin, weaving into the device’s operations and profoundly influencing how cloud-side elements manage device outputs. Your journey into the heart of device orchestration continues. You’re still in device management on the IoT Landscape, but don’t miss the chance to unveil the crucial details that lie ahead.
1 Jeff Prosise, Applied Machine Learning and AI for Engineers (O’Reilly, 2022).
Get Architecting IoT Solutions on Azure now with the O’Reilly learning platform.
O’Reilly members experience books, live events, courses curated by job role, and more from O’Reilly and nearly 200 top publishers.

