Windows XP gives you a quite a bit of control over the way you log on and what you can do with user accounts. Here's where you'll find out how to use your own customized picture for your user account, how to make sure you use a password no one can crack, and other insider secrets.
One of the best things about Windows XP is the way you can customize it to reflect your personality, not the collective wisdom of a Microsoft marketing committee. And one of the best ways to customize it is to use your own picture on your user account rather than one provided by Microsoft. Rubber duckies, soccer balls, plastic frogs, and Kung Fu masters are all well and good, but you might want something more personal (and attractive) next to your name. After all, you see that picture not only when you log on to your PC, but also every time you bring up the Start menu.
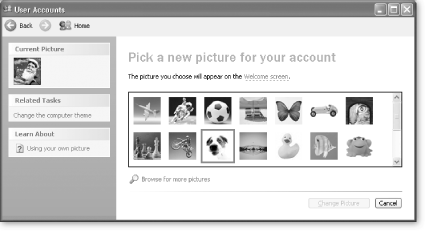
For your user account, you can use any picture as long as it's in .gif, .jpg, .png, or .bmp format. Once you've decided on the picture, choose Start → Control Panel → User Accounts, then select the account with the picture you want to change. Next, choose "Change my picture" and then "Browse for more pictures." Now navigate to the folder that contains the picture you've selected. Choose the picture, and then click OK. Your new picture appears in the Current Picture area of the User Accounts screen, as shown in Figure 1-14. It also turns up on your logon screen and on the Start menu.
Note
If you have a digital camera or scanner attached to your PC, a button appears on the User Accounts screen that lets you snap or scan a picture and then immediately use that picture for your user account.
Figure 1-14. Windows XP has a set of pictures you can use for your user account. The currently active picture appears in the upper-left part of the screen.
Tip
You can quickly get to the screen pictured in Figure 1-14 by going to the Start menu, then simply clicking the picture at the top. (On some systems, there may be no picture available.)
If several people use your PC and each person has a separate account, you can make it easy to snap from one account to another by turning on Windows XP's Fast User Switching feature. It lets several people log on simultaneously and then quickly switch between accounts without logging off the current account.
The cool thing is that whatever you're doing in the first account keeps running when you switch to another account. So for example, your account could be retrieving an email with a very large attachment. If someone else logs on to her account and uses the computer for word processing, your email download continues in the meantime.
Note
You may encounter performance trade-offs when you use Fast User Switching. Every active program uses up CPU cycles and RAM. Even idle accounts running in the background can suck up resources, too. As a result, you may notice a slowdown on your PC when more than one account at a time is logged in.
To turn on and use Fast User Switching:
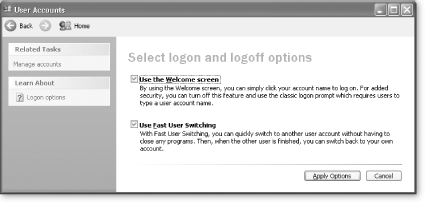
Log on as an administrator and choose Control Panel → User Accounts → "Change the way users log on or off."
The screen pictured in Figure 1-15 appears.
Turn on "Use Fast User Switching," and then click Apply Options.
Fast User Switching is now ready to roll. To switch to another account, press the Windows logo key+L. When the Welcome screen appears, you can log onto another account as you would normally.
Anyone who guesses your password can break into your account and have the run of your computer. Frequently, the passwords that people use for their PCs are very easy to guess. You'd be surprised at how many people, for example, use the word "password" for their user account. You don't have to be The Amazing Kreskin to guess that one.
The best way to keep yourself safe is to have Windows XP automatically create a random password for you that will be very hard for others to guess. Here's how to do it:
Choose Start → Run, type command in the Run box, and press Enter.
A command prompt appears, with a blinking cursor to the right.
Type the command net user username /random, but change username to the name of the account you're giving a new password.
A prompt appears, telling you the random password to use to log on to the account. Be sure to write it down somewhere safe in case you forget, ideally not on a Post-it stuck to your monitor.
It can be easy to forget your password, especially if you create one no one could guess—not even you. That leads to a major dilemma: What to do if you've forgotten your password and can't get into your account?
The best way to avoid this predicament is to create a Password Reset Disk. This disk allows you to change your password even if you can't remember your old password to log on to your PC. Just pop the disk into your computer when you forget your old password, and you can then log into your account.
Make sure to create the Password Reset Disk before you forget your old password, because you need to know your current password to create the disk.
To create the disk:
Make sure you're using the account for which you want to create the disk.
To be extra sure, you might want to log out and log back in to the right account.
Choose Control Panel → User Accounts.
A dialog box opens, offering a sort of command central for managing user accounts.
Click your account and choose "Prevent a forgotten password" from the Related Tasks pane.
The Forgotten Password Wizard launches. Follow its instructions for creating the disk.
From now on, if you enter the wrong password when you log on, Windows XP prompts you for the disk so you can get into your account. Keep in mind that you can only have one Password Reset Disk for each account, so if you create a new one, the old one won't work. Also make sure to keep the disk in a safe place...and remember where you put it.
When several people use the same PC, it's easy for the hard disk to become overrun with files. If a family member downloads digital music, videos, and movies, for example, that one space hog can quickly fill up a hard disk. However, you can solve the problem by setting limits on how much disk space any one person is allowed to occupy. You can also establish quotas on an individual basis.
Note
You can only set disk quotas on disks that use NTFS, a special Windows file system. To see if yours does, open Windows Explorer, then right-click your C: drive and choose Properties. On the General tab, look next to File System. It tells you whether your disk is NTFS.
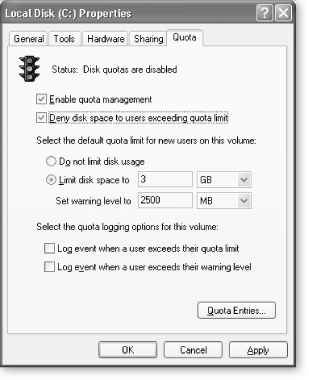
To set disk quotas, log on as an administrator, and right-click your C: drive (or whatever drive you're setting quotas on) and choose Properties → Quota. The screen pictured in Figure 1-16 appears.
Turn on Enable Quota Management to allow disk quotas. As shown in Figure 1-16, you can set a quota for each account, and you can also set a specific warning level so a person gets alerted when he's nearing his limit. If you select the checkbox next to "Deny disk space to users exceeding quota limit," folks will get an "insufficient disk space" error message when they try to save a file but have reached their limit.
When you click OK, you get a warning message that Windows is about to rescan your disk, which may take several minutes. Click OK, and after scanning, the quotas go into effect.
The quota limit above applies to every person who uses the PC, except for the administrator, who has no limits. However, you can set different quotas for each person who uses the PC as well. To do that, right-click the C: drive and choose Properties → Quota → Quota Entries. You get a list of all user accounts and details about their disk usage, including the amount of disk space used, the quota limit, the warning level, and the percent of their quota currently used.
To change the quota limit and warning level for a particular employee, student, or family member, double-click that account name. When the Quota Settings dialog box appears, set the quota limits here just as you did on the Quota tab of the disk's Properties panel, and then click OK. Repeat for each potential space-hogger you want to reign in.
Figure 1-16. You can limit the amount of storage each person who uses the computer gets, and even set warning levels so Windows will warn folks ahead of time when they approach their limit. Go a step further and have Windows create a log that tracks when anyone's account reaches its warning level or quota.
Get Windows XP Power Hound now with the O’Reilly learning platform.
O’Reilly members experience books, live events, courses curated by job role, and more from O’Reilly and nearly 200 top publishers.


