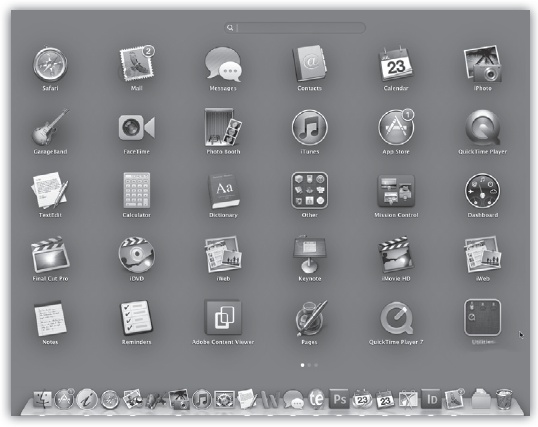
The Launchpad app presents a dark background with evenly spaced icons that represent all your programs (Figure 4-3). You can open one with a single click.
Why did Apple feel the need to create yet another way to open programs?
First, because Launchpad fits right into the general theme of Mountain Lion: making the Mac look and work more like the iPad. Launchpad is a dead ringer for the Home screens of an iPad, iPhone, or iPod Touch.
Second, it’s a much less intimidating place for technophobes to learn to love than, say, the Applications folder.
And third, it’s a lot quicker to get to than the Applications folder. You can summon it instantly, using any of these methods:
Put four fingers on your trackpad and pinch them together. The Launchpad appears instantly, no matter what program you were in; you don’t have to duck back into the Finder, navigate to the Applications folder, and so on.
Figure 4-3. You can open Launchpad by clicking its Dock icon (it’s the very next one after the Finder icon), or by using a four-finger pinching gesture on your trackpad. Launchpad covers your entire main monitor, hiding everything else. Use the arrow keys to navigate a page; press ⌘-arrow to move between pages; press Option to make the icons ready for deletion.
Press the Launchpad key. Recent Macs have a special Launchpad icon painted right on the F4 key (
 ).
).Click its icon on the Dock. It’s the second one, resembling a rocket (
 ).
).Press a keyboard shortcut of your choice. To set that up, choose
 →System Preferences→Keyboard. Click the
Keyboard Shortcuts tab, and then click Launchpad
& Dock in the left-side list. On the right, make sure Show
Launchpad is turned on—and then double-click in the blank space to
the right of it and press the key combination you want.
→System Preferences→Keyboard. Click the
Keyboard Shortcuts tab, and then click Launchpad
& Dock in the left-side list. On the right, make sure Show
Launchpad is turned on—and then double-click in the blank space to
the right of it and press the key combination you want.Move the cursor into one of the screen’s four corners. To set up these options, open
 →System Preferences→Mission Control. Click
Hot Corners to choose a corner of the screen for Launchpad.
→System Preferences→Mission Control. Click
Hot Corners to choose a corner of the screen for Launchpad.Open it as you would any other program. It’s in your Applications folder.
One thing’s for sure: Sooner or later, you’ll wind up in Launchpad.
Only three visual elements appear there:
Icons. Each icon represents one of your programs. Apple’s programs are listed first, in alphabetical order: App Store, Automator, Calculator, and so on. Then come all your other programs, again in A-to-Z order. Click one to open that program.
Search box. This box at the top of the screen lets you pluck one needle from your haystack of apps, no matter what page it’s on. You don’t have to click there first—just start typing when Launchpad is before you. With each letter you type, Launchpad hides everything but the matching app icons.
Home-page dots. As you install more and more programs, Launchpad makes room for them by creating additional screens. You can spread your new programs’ icons across an unlimited number of launch screens.
The little white dots are your map. Each represents one Launchpad screen. If the third one is “lit up,” then you’re on the third screen.
To move among the screens, press ⌘-arrow keys, or swipe horizontally with two fingers on the trackpad. (Magic Mouse: one finger.) Or tap directly on one of the little dots to jump to the corresponding screen.
Tip
To exit Launchpad without opening anything, click a blank spot, tap the Esc key, or—most fun of all—spread the same four fingers on the trackpad.
If you use Launchpad a lot, it’s worth taking a moment to arrange its icons into logical categories or a sensible sequence. As it turns out, you can freely drag them into new spots; the other icons scoot aside to make room.
You can create additional screens, too. To do that, drag an icon to the right edge of the screen; keep your mouse button down. The first screen slides off to the left, leaving you on a new, blank one, where you can deposit the icon.
You can organize your icons on these Home pages by category, frequency of use, color, or whatever tickles your fancy.
The Launchpad just wouldn’t be like the iPad if it didn’t also let you organize your apps into folders. Folders let you organize your apps, de-emphasize the ones you don’t use often, and restore order to that horribly flat, multipage display of icons.
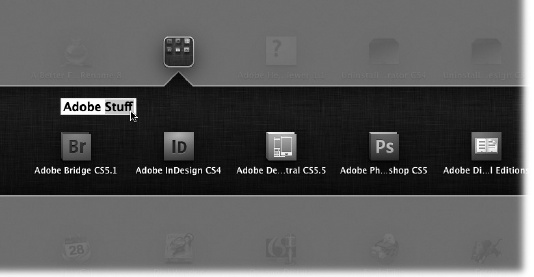
To create a folder, drag one app’s icon on top of another. Mountain Lion puts both of them into a single new folder (Figure 4-4). If they’re the same kind of app, it even tries to figure out what category they both belong to—and names the new folder accordingly (“Music,” “Photos,” “Games,” or whatever). This new name is only a proposal; an editing window also appears so that you can type a custom name you prefer.
Take an app out of a folder by dragging its icon anywhere else on the screen. The other icons scoot aside to make room. If you remove all but one app from a folder, the folder disappears.
Move a folder around by dragging, as you would any other icon.
If you’ve downloaded some apps from the App Store, you’ll find a bonus feature here in Launchpad: They’re especially fun to delete.
Start by holding the mouse down on any icon until, after about a second, all the icons begin to—what’s the correct term?—wiggle. (If you have an iPhone, iPad, or iPod Touch, this should look familiar.)
At this point, you may notice that some of them have sprouted little red X’s. Those are the ones you downloaded from the App Store.
To delete an App Store program you don’t need anymore, click that X to make it say bye-bye—instantly and for good. It doesn’t even have a layover in the Trash.
Get Switching to the Mac: The Missing Manual, Mountain Lion Edition now with the O’Reilly learning platform.
O’Reilly members experience books, live events, courses curated by job role, and more from O’Reilly and nearly 200 top publishers.


