Combine your love of Nintendo homebrews with your love of open source.
If you are reading this book, the odds are fairly good that you remember late nights in front of the television, gripping an ergonomically abusive NES controller in your hand, hoping against hope that the 127th time is the charm as you just try to slide underneath the fire-breathing Bowser and save that eternal damsel in distress, Princess Toadstool. Or maybe you remember checking your mailbox twice an hour for the latest edition of Nintendo Power magazine, certain that it would contain the necessary codes to allow you to finally finish Teenage Mutant Ninja Turtles II: The Arcade Game.
The purpose of this hack is to let you transport yourself back in time to the 1980’s, but you will not need a specially modified DeLorean; no, your trusty Linux box will serve in its stead (flux capacitor purely optional). Iwill take you through the process of installing, configuring, and using the best NES emulators available on the Unix platform. To determine which NES emulators were “the best,” I started with the Unix-only TuxNES, then consulted Emulator Zone’s NES Emulators page (http://www.emulator-zone.com/doc.php/nes/), which is nice enough to display average ratings, on the good old 10-star scale, culled from hundreds or thousands of votes from emulator fans just like you. So here they are, in order of popularity.
FCE Ultra (http://fceultra.sourceforge.net/) began its life as a DOS-only freeware program, but was subsequently open sourced and ported to Windows, and then to Unix. It stands as one of the best NES emulators now, though its Sourceforge page seems a bit bare.
To install FCE Ultra under Gentoo Linux, follow these steps:
Become the root user.
Run the command:
ACCEPT_KEYWORDS='~x86' emerge fceultra
To install FCE Ultra under other Linux or Unix distributions, first check your installation media or online package repositories to see if it’s already available. You should also check the project’s home page to see if a binary version is available. If not, you can install it from source, but you may need to install SDL (http://www.libsdl.org/) and OpenGL drivers first. At the time of this writing, the best place to get the FCE Ultra source code is from Gentoo (http://distfiles.gentoo.org/distfiles).
Look for a file called fceu-VERSION.src.tar.bz2 (for example fceu-0.98.12.src.tar.bz2).
Download the FCE Ultra source distribution into /tmp (be sure to remove any older versions of the file you have kicking around), and extract, configure, and compile FCE Ultra:
$
cd /tmp$tar xvjf fceu-*tar.bz2$rm fceu-*tar.bz2$cd fceu$./configure && makeNext, become root using su or sudo, and install it:
#
make install
FCE Ultra does not come with a fancy GUI like some of the other emulators, so if the command line is no friend of yours, you may want to install a generic emulator frontend such as Game Launcher (http://www.dribin.org/dave/game_launcher/). I will demonstrate the harder path (which seems fouler but feels fairer?) of invoking FCE Ultra from the command line.
Open a terminal window (no need to become root here) and change to your NES ROM directory. The first step is to configure your input devices [Hack #52] :
$ fceu -inputcfg gamepad1 SolarWars.NESYou must specify a ROM, as for some strange reason FCE Ultra will not let you just configure your controller without running a game. If you wish to configure other controllers as well, simply add an -inputcfg
<device_name> switch to the command line for each. Valid options for <device_name> are: “gamepad1”, “gamepad2”, “gamepad3”, “gamepad4”, “powerpad1”, and “powerpad2”. If you don’t want to play the game after configuring your controllers, simply press the Escape key to exit FCE Ultra.
To play a game, run the command:
fceu {<option>} <rom_name>Some of the more popular <option>s are:
- -pal
- -sound
enable sound
- -soundrate
sound playback rate, in Hz
- -inputcfg
configure an input device
- -opengl
enable OpenGL
- -doublebuf
enable double-buffering
- -xscale
- -yscale
scale display by this factor in the Y direction
- -xres
horizontal resolution, in fullscreen mode
- -yres
vertical resolution, in fullscreen mode
- -fs
enable fullscreen mode
For example, to run BombSweeper with OpenGL disabled (what can I say, OpenGL crawls on my laptop when using the Xfree86 built-in driver), sound enabled, and scaling the display by a factor of two in both the X and Y directions, run:
fceu -opengl 0 -sound 1 -xscale 2 -yscale 2 BombSweeper.new
Or maybe you want to run BoxBoy with OpenGL, in fullscreen mode (640x480), double-buffered, with sound:
	fceu -doublebuf 1 -fs 1 -opengl 1 -sound 1 \
		-xres 640 -yres 480 BOXBOY.NES
There do not appear to be any graphical frontends available for FCE Ultra on the Unix platform, so this may be a great opportunity for the Perl/Tk-or Tcl/Tk-savvy reader to whip one up and open source it. A chap from the Gentoo Forums has made a start of it in Perl/Tk (http://forums.gentoo.org/viewtopic-t-269497-highlight-fceultra.html).
FakeNES is an open source NES emulator written in C, as opposed to FCE Ultra, which makes heavy use of assembler. This makes FakeNES a bit more portable, as evidenced by the fact that it runs on everything: Windows 9x/2000/Me/XP, 32-bit DOS, Linux, FreeBSD, QNX, BeOS, and Mac OS X.
To install FakeNES under other Linux/Unix distributions, first check your installation media or package repository for a binary package. If one is not available, visit the FakeNES project’s SourceForge files page (http://sourceforge.net/project/showfiles.php?group_id=39844) and save the latest source tarball (fakenes-0.3.1.tar.gz, as of this writing) to your /tmp directory, and follow the instructions in the FCE Ultra section shown earlier in this hack.
Once FakeNES is installed, change to your NES ROMs directory and start it up by running:
fakenes <rom_name>FakeNES has a minimalist GUI that is toggled by pressing the Escape key. Press Escape now to show the menu bar, then access the Options menu and select Video, then Resolution. Set a decent resolution, like 640x480, which forces FakeNES into fullscreen mode. Now, select from the Options → Audio → Mixing. Set Speed to 11025 HZ, and Quality to Low. Now, access Options → Audio → Effects and de-select any effects that may be enabled. Set Options → Audio → Filters to None.
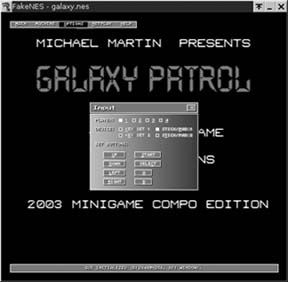
Now, click on the Options menu and select Input. If you have a joystick (see [Hack #52] and [Hack #51] ), select Stick/Pad 1 and click on the Start button under the Set Buttons header. FakeNES may not say anything, but it is waiting for you to press a button on your joystick/gamepad to map to the NES controller’s Start button. Do so, and then follow suit for the Select, A, and B buttons. Now, close the Input window, then hit Escape to hide the FakeNES GUI, shown in Figure 4-20. Now what are you waiting for? Start playing!
TuxNES (http://tuxnes.sourceforge.net/) was developed as a Unix-only NES emulator, based on the public-domain NEStra (covered later). It is released under the GNU General Public License (GPL), and works under Linux, FreeBSD, and NetBSD on the i386 (i.e., Intel-compatible) platform. It is a nifty little emulator, and has a nifty little graphical frontend, GTuxNES (http://www.scottweber.com/projects/gtuxnes/), which we will install alongside it.
To install TuxNES under Gentoo Linux, become root and use the command
emerge tuxnes gtuxnes. On other Linux/Unix distributions, you should check to see if a binary package is available on your installation media or your distribution’s package repository. If not, visit the TuxNES project’s download page (http://tuxnes.sourceforge.net/download.php) and save the latest source tarball to your /tmp directory. Now, visit the GTuxNES project’s home page (http://www.scottweber.com/projects/gtuxnes/) and save the source tarball (it is under the Download heading) to your /tmp directory. Then, compile and install both TuxNES and GTuxNES using the same procedure shown in the FCE Ultra section earlier in this hack.
To start GTuxNES, simply open a terminal as a normal user and run:
gtuxnes &
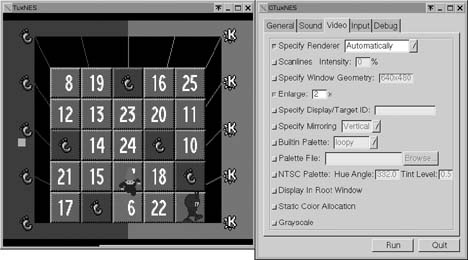
Before playing any games, you should set your preferences. Use the Browse button in the General tab to select a ROM, and then switch to the Sound tab. Select 8-bit Mu-Law as the sample format, and 11025 Hz as the sampling rate. Now click on the Video tab and check the Enlarge option, entering 2 into the text box to its right. Click on the Input tab and select the Enable Joystick 1 option (its default value, /dev/js0, should be fine). Finally, click on the Run button at the bottom of the window to launch TuxNES. Both programs are shown in Figure 4-21.
One great thing about GTuxNES is that it makes it very easy to try out different options to get an especially uncooperative ROM to run. And GTuxNES spews the TuxNES command line that it is using to standard error, so you can snag it and put it in a shell script so that you can easily launch those troublesome ROMs in the future without having to remember how the phases of the moon converged with your TuxNES options.
InfoNES is an emulator from the Land of the Rising Sun, where the keitai denwa (mobile phone) rules all. It is not surprising at all to read the following description on the InfoNES project’s home page (http://www.geocities.co.jp/SiliconValley/5604/infones/).
Tip
InfoNES is an open source NES emulator that runs on Win32, x86/Linux, PS2/Linux, WinCE(H/PC, P/PC, P/PC2002, l’genda, BE-300, BE-500), GBA(Game Boy Advance), GP32(GamePark 32), Zaurus/Linux, N-Gage(Nokia s60), OSASK, Pekoe, and PlayStation2. If you plan to create a NES emulator for embedded devices (i.e., Palm, Nokia 7650, SmartPhone 2002, etc.), InfoNES is one of the best choices.
To install TuxNES under Gentoo Linux, become root and use the command emerge infones. On other Linux/Unix distributions, you should check to see if a binary package is available on your installation media or in your distribution’s package repository. If not, go to the InfoNES project’s home page (http://www.geocities.co.jp/SiliconValley/5604/infones/), scroll down to the “What’s new?” section, and save the latest source tarball corresponding to your platform and OS (such as x86/Linux) to your /tmp directory. Then, compile and install it using the same procedure shown in the FCE Ultra section earlier in this hack.
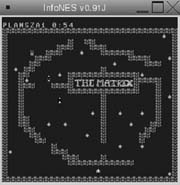
To use InfoNES (shown in Figure 4-22), open a terminal as a normal user, change to your NES ROMs directory, and run:
InfoNES <rom_name>The keys are mapped as follows: the arrow keys are the d-pad, the S key is Start, the X key is the A button, and the Z key is the B button. The I key pops up an information window, the V key pops up a version window, and the Q key quits.
As I said, TuxNES grew out of the NEStra codebase, which has not been updated since mid-December, 1999. Still, NEStra is a dependable, if unremarkable emulator, and you may do well to have it around.
To install NEStra under Gentoo Linux, become root and use the command emerge nestra. On other Linux/Unix distributions, you should check to see if a binary package is available on your installation media or in your distribution’s package repository. If not, go to the NEStra project’s home page (http://nestra.linuxgames.com/) and save the source tarball to your /tmp directory. Then compile and install it using the same procedure shown in the FCE Ultra section earlier in this hack.
NEStra is a no-frills emulator (which is a polite way of saying it does not do much), so it is both easy to use and blazingly fast! To run it, open a terminal as a normal user, change to your NES ROMs directory, and run:
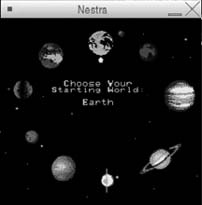
nestra <rom_name>The arrow keys map to the d-pad on the NES controller, the Enter key maps to Start, the space bar maps to the A button, and the X and Y keys map to the B button. The Escape key exits, as you may have suspected. Enjoy! Figure 4-23 shows NEStra playing the Solar Wars homebrew.
—Josh Glover
Get Retro Gaming Hacks now with the O’Reilly learning platform.
O’Reilly members experience books, live events, courses curated by job role, and more from O’Reilly and nearly 200 top publishers.


