Chapter 4. Using Ready-Made Software
4.1 Making a Media Center
Solution
To use your Raspberry Pi as a media center, you should go for the superior performance of the Raspberry Pi 4 B, as video playing is very processor intensive.
You can set up your Raspberry Pi as a media center while using the Raspberry Pi Imager (Recipe 1.6) to write to a microSD card. Instead of selecting Raspberry Pi OS as the distribution to install, select LibreELEC from the Media Player OS section of the Operating System button (Figure 4-1).

Figure 4-1. Using the Raspberry Pi Imager to write LibreELEC onto a microSD card
LibreELEC is a distribution that optimizes your Raspberry Pi as a media center. It incudes the Kodi media center software, which is based on the XBMC open source project that was originally developed to convert Xbox game consoles into media centers. The code has since been ported to many platforms, including the Raspberry Pi (Figure 4-2).

Figure 4-2. Raspberry Pi as a media center
Raspberry Pi is perfectly capable of playing full HD video as well as streamed music, MP3 files, and internet radio.
Discussion
Kodi is a powerful piece of software with many features and is very intuitive to set up. Perhaps the simplest way to check whether it is working is to put some music and/or video files onto a USB flash drive or external USB hard disk and connect it to the Raspberry Pi. You should be able to play them from Kodi.
Since the Raspberry Pi is likely to be sitting near your TV, you might find that your TV has a USB port that can provide enough current to run the Raspberry Pi. If this is the case, you wonât need a separate power supply.
A wireless keyboard and mouse are a good idea because, if you buy them as a pair, they will use a single USB port for the dongle, which avoids the need for wires trailing all over the place. You can also buy mini keyboards with built-in trackpads that are useful in this situation.
A wired network connection is generally higher performance and better than a WiFi connection, but it is not always convenient to have the Pi near an Ethernet socket. If this is the case, you can set up XBMC to use WiFi.
Setting up Kodi is very intuitive, and you can find full instructions on using the software at http://kodi.wiki.
See Also
A popular alternative to LibreELEC, which can also be installed from the Raspberry Pi Imager, is OSMC.
You can add an infrared (IR) remote to Raspberry Pi to control Kodi.
4.2 Installing Recommended Software
Solution
Use the Recommended Software tool (Figure 4-3), which you will find in the Preferences section of the Raspberry Menu.

Figure 4-3. The Recommended Software tool
This tool includes many pieces of software that in the past were pre-installed on Raspberry Pi OS. So, it has many of the most common and useful pieces of Raspberry Pi software in it. Use it to browse to the software that you want to install, select the checkbox for the desired programs, and click Apply.
The software will then be downloaded and installed. When the installer has finished, the new software will appear on your Raspberry Menu.
Discussion
If you canât find the software that you want using the Recommended Software tool, you can widen the net and use the similar Add/Remove Software tool, also in the Preferences section of the Raspberry Menu (Figure 4-4).
This tool has thousands of software packages and programs for you to install; sometimes it is easier to type something in the search area, rather than browse through all the packages.
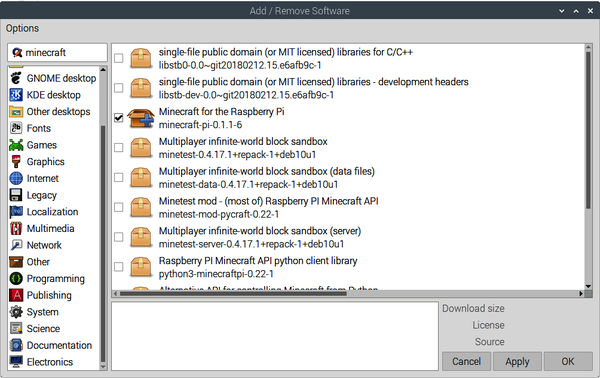
Figure 4-4. The Add/Remove Software tool
See Also
To install software using the apt command line tool, see Recipe 3.17.
4.3 Using Office Software
Solution
Install LibreOffice using the Recommended Software tool (Recipe 4.2).
Discussion
The LibreOffice suite of programs (Figure 4-5) makes a good (and free) alternative to Microsoft Office. It includes a word processor, spreadsheet, presentation, and drawing software. In fact, the LibreOffice Writer word processor will open and save Microsoft Word documents, and the spreadsheet and presentation programs are pretty compatible with their Microsoft counterparts.
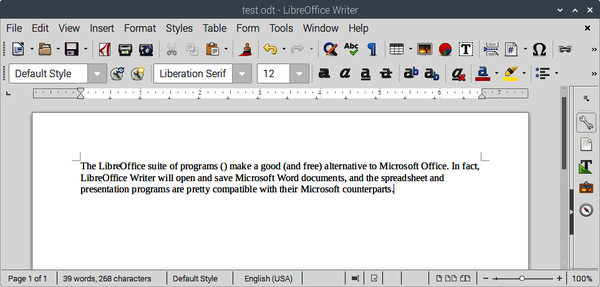
Figure 4-5. LibreOffice Writer
A Raspberry Pi 4 or 400 will run office applications much better than an older Raspberry Pi.
These days itâs often more convenient to keep your documents in the cloud and edit them in a browser. The most common examples of these services are Microsoft 365 and Google Docs. Both require you to sign up for an account, but the Chromium browser is perfectly capable of using these services (Figure 4-6).
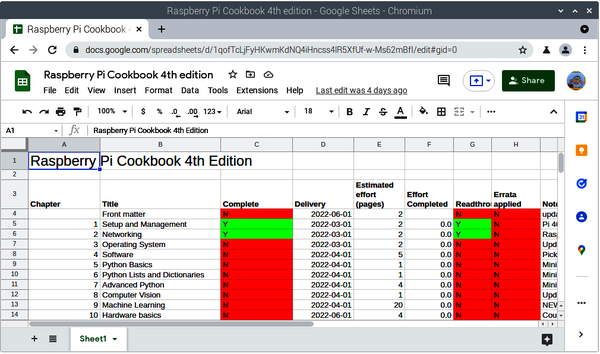
Figure 4-6. Using a Google Docs spreadsheet in the Chromium browser
See Also
Visit https://www.libreoffice.org for more information on the LibreOffice suite of software.
If you just want to edit an unformatted text file, you can use the nano editor (Recipe 3.7) or VisualStudio Code (Recipe 4.10).
4.4 Running a Vintage Game Console Emulator
Solution
If you fancy rediscovering your misspent youth and playing Asteroids on an emulator for the Atari 2600 (Figure 4-7), the RetroPie project will appeal to you.

Figure 4-7. Asteroids on the Stella Atari 2600 emulator
Many wonderful projects have been built that create custom consoles and game tables complete with retro game controllers.
Although you can install RetroPie on top of Raspberry Pi OS, the easiest way to use it is to write it onto a microSD card using the Raspberry Pi Imager (Recipe 1.6).
Warning
It is worth noting that even though these games are ancient, they are still owned by someone. The ROM image files that you need to play the games on an emulator, although easy to find on the internet, are not necessarily yours to take. So please stick to the law.
Discussion
The emulator uses a surprisingly large amount of the Raspberry Piâs meager resources, so you might find that you need to use a Raspberry Pi 4, 3, or 2. In an internet search, you can find many people who have taken this basic setup and added a retro USB controller, like the widely available and quite low-cost controllers, and built the Pi and a monitor into a big arcade-style housing. You can also buy a kit called the Picade from Pimoroni to make a lovely arcade machine (Figure 4-8).
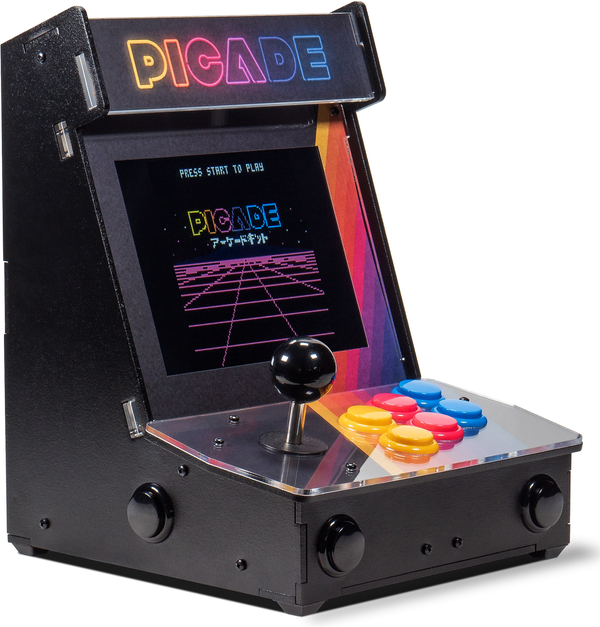
Figure 4-8. The Pimoroni Picade kit
See Also
Full RetroPie documentation is available on the RetroPie site.
4.5 Turning Your Raspberry Pi into a Radio Transmitter
Problem
You want to convert your Raspberry Pi into a low-powered FM transmitter that will send a radio signal to a normal FM radio receiver (Figure 4-9).
Solution
Back in the early days of the Raspberry Pi, some clever folks at Imperial College, London, created some C code that allows you to do just this. The download even plays the Star Wars theme as a sample. This project will still work if you have an original Raspberry Pi 1.
The project lives on for newer Raspberry Pis as an altogether more advanced project called rpitx.
All you need is a short length of wire attached to general-purpose input/output (GPIO) pin 4. A 10 cm female-to-male header lead will work just fine for this. In fact, it should work with a radio sitting right next to your Pi without any kind of antennaâsuch is the strength of the transmission.
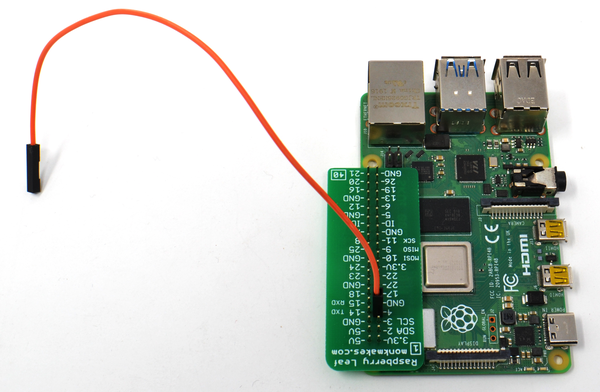
Figure 4-9. Raspberry Pi as an FM transmitter
The first step is to install the rpitx software using the following commands. Note that this installation will change some things about how your Raspberry Pi is configured, including the frequency at which the GPU (graphics process) works. So if this is your main Raspberry Pi, make sure you first back up anything precious. Hereâs the code you need:
$ git clone https://github.com/F5OEO/rpitx
$ cd rpitx
$ ./install.sh
You will now need to do something else for a good 15 minutes or so while the software installs. You might see what look like error messages and warnings, but these are normal. At the end of the installation, the installer script will ask:
In order to run properly, rpitx need to modify /boot/config.txt. Are you
      sure (y/n)
Press Y, and the script will then confirm the changes it has made with the following message:
Set GPU to 250Mhz in order to be stable
If you need to reverse this change, edit /boot/config.txt by removing the last line that says gpu_freq=250, then reboot.
Next, find yourself an FM radio receiver and tune it to 103.0 MHz. If this frequency is already occupied by some other transmission, pick another frequency and make note of it.
Now run the following command (changing the frequency parameter from 103.0 if you had to change frequency):
sudo ./pifmrds -freq "103.0" -audio src/pifmrds/stereo_44100.wav
If all is well, you should hear the voice of the developer talking about left and right channels.
Discussion
You need to know that this project may not be legal in your country. The power output is higher than that of FM transmitters used with MP3 players.
Were you to put a Raspberry Pi in your vehicle, this would be a great way to output sound through the vehicleâs audio system.
See Also
To learn more about the rpitx project, see https://oreil.ly/TrlO1.
4.6 Editing Bitmap Images
Solution
Install and run the GNU Image Manipulation Program (GIMP; see Figure 4-10).
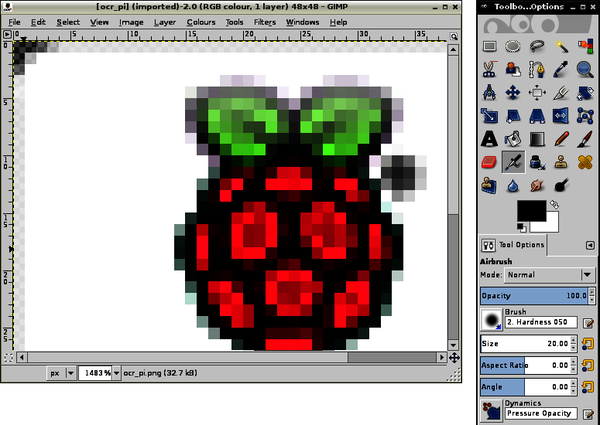
Figure 4-10. GIMP on the Raspberry Pi
GIMP is available to install from the Add/Remove Software tool (see Recipe 4.2). When you search for GIMP, a lot of results will come back for various GIMP utilities, so look for the package called âGNU Image Manipulation Program.â
If you prefer to install GIMP from the command line, open a Terminal session and type the following command:
$ sudo apt install gimp
Once GIMP is installed, youâll find an entry for GNU Image Manipulation Program in your Raspberry Menu under the Graphics heading.
Discussion
Despite being hungry for memory and processor power, GIMP is usable even on a Raspberry Pi 2 B, but there will be much less waiting around if you use a Raspberry Pi 4 or 400.
See Also
Find out more from the GIMP website.
GIMP has a lot of features and is a very sophisticated image-editing program, so it does take a little learning. Youâll find an online manual for the software at the GIMP website.
For more information on installing with apt, see Recipe 3.17.
For editing vector images, see Recipe 4.7.
4.7 Editing Vector Images
Solution
Inkscape is one of the packages available from the Add/Remove Software tool (see Recipe 4.2). Open the tool up and search for âInkscape.â
If you prefer to install Inkscape from the command line, you can do so with the following commands:
$ sudo apt update
$ sudo apt install inkscape
Once Inkscape is installed, its icon will appear in the Graphics section of your Raspberry Menu.
Discussion
Inkscape (Figure 4-11) is the most-used open source vector image editor. Vector drawing packages differ from bitmap image editors like GIMP (Recipe 4.6) in that the image is made up of shapes, lines, text, etc. that are stored as such, rather than being converted into pixels. This means that you can come back and edit those things (perhaps the position of a line), which is not possible in a bitmap editor.
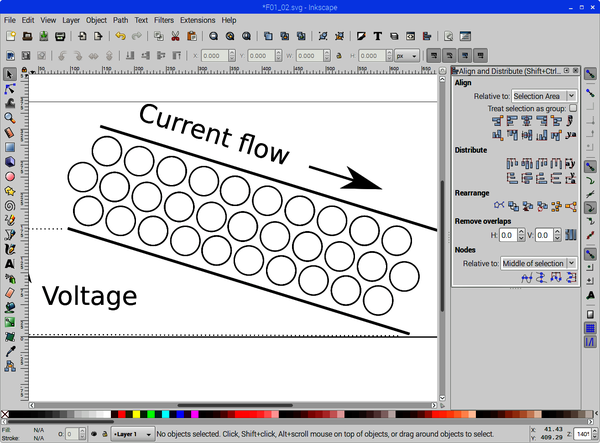
Figure 4-11. Inkscape on a Raspberry Pi
Inkscape is a very powerful piece of software with many features that can take some time to master, so donât be disheartened if it wonât do what you want at first. You will probably need to run through a few tutorials.
Inkscape is another program best run with the extra power of a Raspberry Pi 4 or 400.
See Also
For documentation on Inkscape, visit Inkscape.org.
For editing bitmap images such as photographs, see Recipe 4.6.
4.8 Using Bookshelf
Solution
Use the pre-installed Bookshelf application. You will find this application in the Help section of the Raspberry Menu. Open it and you will see (Figure 4-12) past issues of The MagPi, Wireframe, and HackSpace magazines, as well as books from the Raspberry Pi Press.
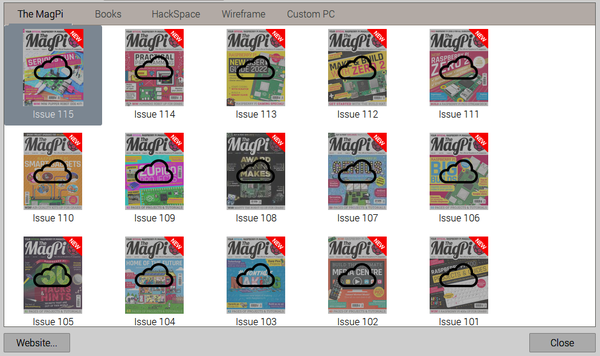
Figure 4-12. The Bookshelf application
Discussion
This is a really great resource. You will find lots of articles in The MagPi magazine to get started with various aspects of the Raspberry Pi. It is also a great source of inspiration for projects.
See Also
Lots of interesting Raspberry Pi resources are available at the Raspberry Pi Foundation.
You can also download back issues of The MagPi magazine in PDF or subscribe to the paper edition.
4.9 Playing Internet Radio
Solution
The VLC media player should be pre-installed with Raspberry Pi OS. You will find it under Sound & Video in the Raspberry Menu. If itâs not there, you can install it using the Preferred Software tool (Recipe 4.2).
If you prefer to install the VLC media player from the command line, you can do so by running the following command:
sudo apt install vlc
Run the program and then, on the Media menu, select the Open Network Stream option. This opens a dialog box (see Figure 4-13) in which you can enter the URL of the internet radio station that you want to play. You will need to plug headphones or amplified speakers into the audio socket on the Raspberry Pi.
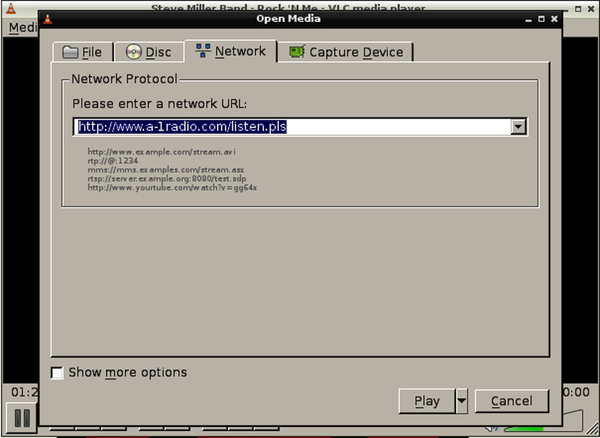
Figure 4-13. VLC on a Raspberry Pi
Discussion
You also can run VLC from the command line as follows:
$ vlc http://www.a-1radio.com/listen.pls -I dummy
VLC will probably produce a series of error messages but then play the audio just fine. The -I dummy option prevents a VLC window opening.
See Also
This recipe borrows heavily from this tutorial, in which Jan Holst Jensen takes things a step further and adds radio-style controls to the project.
For UK readers, you can find a list of the BBC radio stream URLs online.
4.10 Using Visual Studio Code
Problem
You want to use a light-weight programming editor.
Solution
Install Microsoftâs Visual Studio Code, or VS Code, as we shall refer to it from now on.
You will find VS Code in the Programming section of the Recommended Software tool (Recipe 4.2).
If you prefer to install it from the command line, you can use the following command:
$ sudo apt install code
Discussion
VS Code is much loved by programmers. It sits in a happy place, halfway between a simple text editor and a fully featured integrated development environment (IDE). Itâs very easy to use and offers helpful suggestions as you write your code, without you having to learn the ins and outs of a more complex IDE. It offers support for many programming languages and does nice things like color-code your programs to make them easier to read.
If you are a seasoned programmer, you may prefer to edit your Raspberry Pi Python code using Visual Studio Code rather than a beginnerâs Python IDE like Thonny or Mu (Recipes 5.3 and 5.4). This is particularly true if your project consists of multiple files. Figure 4-14 shows the file explorer area on the left, where you can see all the files in your project. Clicking on one makes it available in the editor area, and open files each have their own tab.
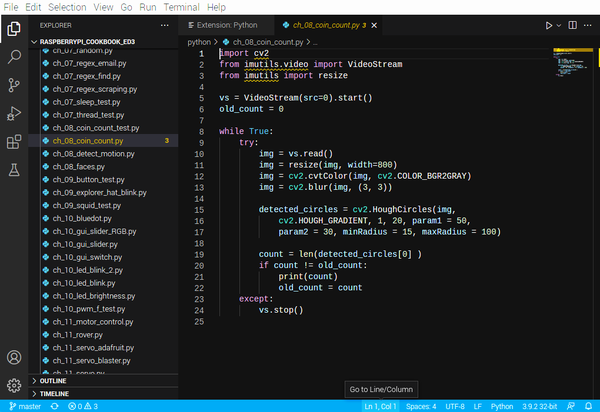
Figure 4-14. VS Code on a Raspberry Pi
As you can see, the editor highlights the language syntax, color-coding it to make it easier to read and spot mistakes.
Visual Studio Code is a useful tool to have around, whether programming in Python (see Chapter 5) or some other language.
See Also
The simple text editor nano is an easy way to edit code (see Recipe 3.7).
Thonny is a Python editor aimed at beginners (see Recipe 5.3).
4.11 Controlling a Laser Cutter
Solution
If you have one of the popular and low-cost Chinese laser cutters of the K40 variety (Figure 4-15), you can use the K40 Whisperer software to control it. Thus, instead of having to use a relatively expensive Windows computer to control your laser cutter, you can use a much lower cost Raspberry Pi.
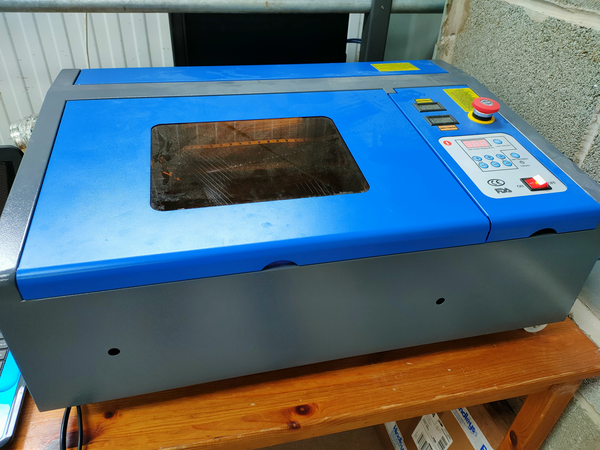
Figure 4-15. A K40 laser cutter
This software is written in Python, but also relies on the Inkscape vector drawing package. So if you have not already done so, install Inkscape by following Recipe 4.7.
Next, download the source code for the K40 Whisperer software. Select the latest download from the K40 Whisperer Source column. Double-click the downloaded ZIP file and extract it into your home directory (/home/pi). Inside the unzipped directory, you will find a file called README_Linux.txt. The instructions here are based on that file. The README is for Linux in general rather than being Raspberry Piâspecific.
First, run the following two commands to create a user group for the software. The first adds a new user group specifically for the laser cutter, and the second adds the user pi to that group. If you created a different username when setting up your Raspberry Pi, use that in place of pi:
$ sudo groupadd lasercutter
$ sudo usermod -a -G lasercutter pi
Make sure that your laser cutter is connected to your Raspberry Pi with its USB lead and the laser cutter is switched on. You now need to run the following commands to find out the USB vendor and product ID for the laser cutter. These will probably be 1a86 and 5512, respectively, but itâs worth checking in case the laser cutterâs manufacturer changed them. To do this, run the lsusb command:
$ lsusb
Bus 001 Device 004: ID 1a86:5512 QinHeng Electronics CH341 in EPP/MEM/I2C mode,
  EPP/I2C adapter
Bus 001 Device 005: ID 0424:7800 Microchip Technology, Inc. (formerly SMSC)
Bus 001 Device 003: ID 0424:2514 Microchip Technology, Inc. (formerly SMSC)
  USB 2.0 Hub
Bus 001 Device 002: ID 0424:2514 Microchip Technology, Inc. (formerly SMSC)
  USB 2.0 Hub
Bus 001 Device 001: ID 1d6b:0002 Linux Foundation 2.0 root hub
This will list all the USB devices connected to your Raspberry Pi; look for the entry that corresponds to your laser cutter. In this case, itâs the only Chinese name there (QinHeng). But you can confirm this if you need to by unplugging the laser cutter and running the lsusb command again and seeing which entry disappears.
On the line for this entry you can see the text 1a86:5512. The part before the : is the vendor ID and 5512 is the product ID. You need to know these because you are going to use them in a configuration file.
Create and edit a new file in nano using the command:
$ sudo nano /etc/udev/rules.d/97-ctc-lasercutter.rules
You can find information on editing files in Recipe 3.7. Paste the following text into the file. If your vendor and product IDs are different from mine, change the appropriate parts of the text to match your IDs:
SUBSYSTEM=="usb", ATTRS{idVendor}=="[1a86]", ATTRS{idProduct}=="[5512]",
  ENV{DEVTYPE}=="usb_device", MODE="0664", GROUP="lasercutter"
Reboot your Raspberry Pi and then continue the installation by running the following command to install some more modules that K40 Whisperer needs:
$ sudo apt install libxml2-dev libxslt-dev
$ sudo apt install libusb-1.0-0
$ sudo apt install libusb-1.0-0-dev
Make sure that you are in the directory where you downloaded the K40 Whisperer and run the following command:
$ pip3 install -r requirements.txt
You are now ready to run the program using the following command. This will open a window. Click the File menu and then Options to configure the software (Figure 4-16):
$ python3 k40_whisperer.py
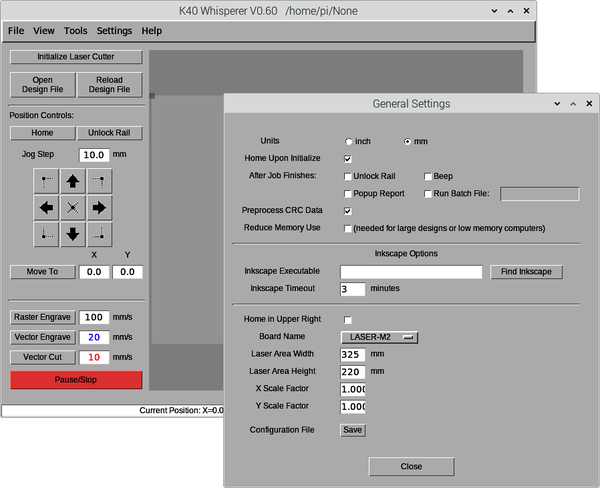
Figure 4-16. Configuring K40 Whisperer
Consult the manual that came with your laser cutter to find the version of the control board used in it. If you canât find this, you might need to try a few different options for the Board Name setting. You do not need to change any of the other settings.
With the Settings window closed, you can load an SVG file to cut (Figure 4-17).
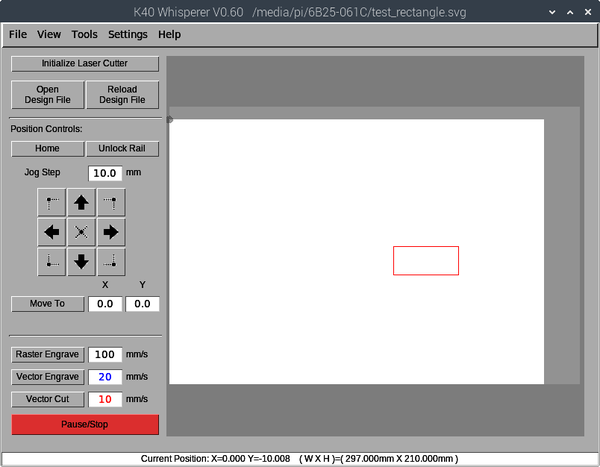
Figure 4-17. Ready to cut
Discussion
Laser cutters often come with their own proprietary software to control the cutter that is generally run on a Microsoft Windows computer. It may even have a hardware USB dongle designed to tie that piece of software to your computer.
The K40 Whisperer software cuts and engraves directly from SVG drawings. You just draw outlines in different colors with a line width of 0.1mm. Red lines mean cut, blue lines mean vector engrave (lightly burn an outline), and black lines mean raster engrave (scan back and forth to burn out an area of the surface).
See Also
For full information on K40 Whisperer, see https://oreil.ly/5RJth.
To create the SVG drawings for your laser cutting and etching, you can use InkScape (Recipe 4.7).
A Raspberry Pi also makes a great controller for a 3D printer using OctoPrint.
Get Raspberry Pi Cookbook, 4th Edition now with the O’Reilly learning platform.
O’Reilly members experience books, live events, courses curated by job role, and more from O’Reilly and nearly 200 top publishers.

