Chapter 1. Setup and Management
1.0 Introduction
When you buy a Raspberry Pi, you are essentially buying an assembled printed circuit board, or in the case of a Raspberry Pi 400, a circuit board in a keyboard case. For a fully functioning system, you are going to need at least a suitable power supply, operating system on microSD card, and mouse.
The recipes in this chapter are concerned with getting your Raspberry Pi set up and ready for use.
Because the Raspberry Pi uses standard USB and Bluetooth keyboards and mice, most of the setup is pretty straightforward, so youâll concentrate only on those tasks that are specific to the Raspberry Pi.
1.1 Selecting a Model of Raspberry Pi
Solution
The decision as to which Raspberry Pi model to use depends very much on what you plan to do with it. Table 1-1 lists some uses and my model recommendations.
| Usage | Suggested model | Notes |
|---|---|---|
| Desktop computer replacement | Raspberry Pi 400 or Raspberry Pi 4 model B (4 GB) | You will need the 4 GB of memory if you are web browsing. The Pi 400 offers the convenience being built into a keyboard case. |
| Electronics experimentation | Raspberry Pi 2 or 3 model B | Reasonably up-to-date hardware will minimize software problems. No need for more performance. |
| Computer vision | Raspberry Pi 4 model B (4 GB) | Maximum performance required. |
| Home automation | Raspberry Pi 2 or 3 model B | Low-power consumption and more than enough power. |
| Media center | Raspberry Pi 3 or 4 | For video performance. |
| Electronic display board | Any model | A model with WiFi, advantageous for remote access. |
| Embedded wireless electronics project | Raspberry Pi Zero 2 W or Pico W | Low cost and WiFi enabled for IoT (Internet of Things) and other wireless projects. |
| Embedded electronics project | Pico | Very low cost and little in common with most Raspberry Pis other than the name. See Chapter 19 for more information. |
If you want a good general-purpose Raspberry Pi, I recommend a Raspberry Pi 4 model B. With four times as much memory as the original Raspberry Pi and a quad-core processor, it will cope with most tasks much better than the Pi Zero, but it doesnât get as hot or use as much power as the Raspberry Pi 4. The Raspberry Pi 3 model B+ also has the great advantage of having WiFi and Bluetooth built in, so thereâs no need for an extra USB WiFi adapter or Bluetooth hardware.
If, on the other hand, you are embedding a Raspberry Pi in a project for a single purpose, using a compact Pi Zero W and saving a few dollars might well be an option.
Discussion
Figure 1-3 shows the Pi Zero W, the Raspberry Pi 3 B, and the Raspberry Pi 4.
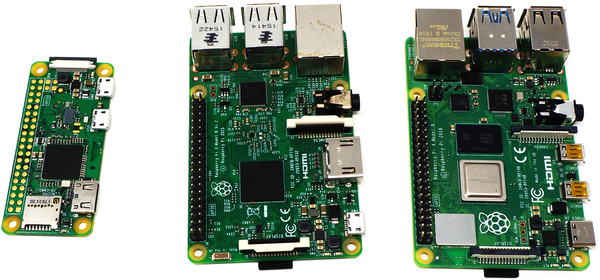
Figure 1-3. From left to right, the Raspberry Pi Zero W, the Raspberry Pi 3 B, and the Raspberry Pi 4 B
As you can see from Figure 1-3, the Pi Zero W is roughly half the size of the Pi 3 B or Pi 4 B, and it has a single micro-USB socket for communication and a second one for power. The Pi Zero W also saves space by using a mini-HDMI socket and micro-USB on-the-go socket. If you want to connect a keyboard, monitor, and mouse to a Pi Zero, youâll need adapters for both the USB and the HDMI ports before you can connect standard peripherals. The Raspberry Pi A+ is larger than the Pi Zero and has full-size USB and HDMI ports.
Table 1-2 summarizes the differences between all the Raspberry Pi models to date, with the most recently released models toward the top.
| Model | RAM | Processor (cores * clock) |
USB sockets | Ethernet port | Notes |
|---|---|---|---|---|---|
| 400 | 4 GB | 4 * 1.8 GHz | 4 (2 x USB3) | yes | Built into a keyboard |
| 4 B | 1/2/4/8 GB | 4 * 1.5 GHz | 4 (2 x USB3) | yes | 2 x micro-HDMI video |
| Compute 4 | 1/2/4/8 GB | 4 * 1.5 GHz | no | no | For embedding in products (see sidebar) |
| 3 A+ | 512 MB | 4 * 1.4 GHz | 1 | no | WiFi and Bluetooth |
| 3 B+ | 1 GB | 4 * 1.4 GHz | 4 | yes | WiFi and Bluetooth |
| 3 B | 1 GB | 4 * 1.2 GHz | 4 | yes | WiFi and Bluetooth |
| Zero 2 W | 512 MB | 4 * 1 GHz | 1 (micro) | no | WiFi and Bluetooth |
| Zero W | 512 MB | 1 * 1 GHz | 1 (micro) | no | WiFi and Bluetooth |
| Zero | 512 MB | 1 * 1 GHz | 1 (micro) | no | Low cost |
| 2 B | 1 GB | 4 * 900 MHz | 4 | yes | Â |
| A+ | 256 MB | 1 * 700 MHz | 1 | no | Â |
| B+ | 512 MB | 1 * 700 MHz | 4 | yes | Discontinued |
| A | 256 MB | 1 * 700 MHz | 1 | no | Discontinued |
|
B rev2 |
512 MB |
1 * 700 MHz |
2 |
yes |
Discontinued |
|
B rev1 |
256 MB |
1 * 700 MHz |
2 |
yes |
Discontinued |
If you have one of the older or discontinued Raspberry Pi models, it is still useful. Those models do not have quite the performance of the latest Raspberry Pi 4, but for many situations, that does not matter.
If you are buying a new Raspberry Pi, I consider the best choice for use as a general-purpose computer to be the Raspberry Pi 4 or 400. If you donât need WiFi or want a smaller device, also consider the 3 B, 2 B, or Zero W.
See Also
For more information on the Raspberry Pi models, see https://oreil.ly/oY-A_.
Take a look at the Raspberry Pi Compute Modules.
The low cost of the Pi Zero and Pi Zero W models makes them ideal for embedding in electronics projects without worrying about the expense. See Recipe 10.18.
1.2 Connecting the System
Solution
Unless you are embedding your Raspberry Pi in a project or using it as a media center, you need to attach a keyboard (unless you are using a Pi 400), a mouse, and a monitor.
Figure 1-5 shows a typical Raspberry Pi system. If you have a Raspberry Pi 4, you could (if you really wanted) connect a second monitor. However, if you have just one monitor, connect it to the micro-HDMI connector closest to the USB-C power connector.
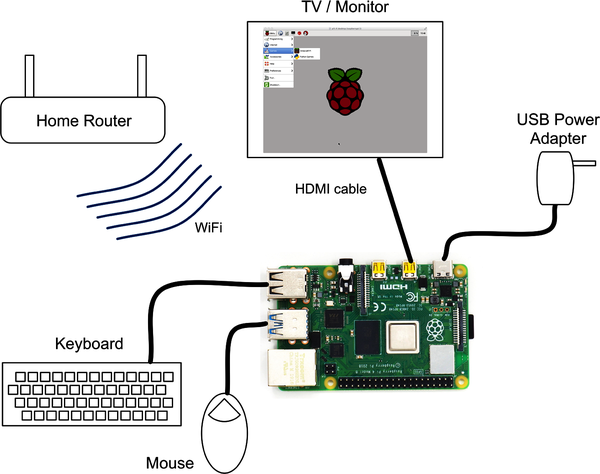
Figure 1-5. A typical Raspberry Pi system
Discussion
The Raspberry Pi is perfectly happy with pretty much any USB keyboard and mouse, wired or wireless.
The Raspberry Pi 4 lets you connect two monitors to your system at the same time. When you do so, youâll be able to move your mouse cursor between screens, but Raspberry Pi OS will need to know where the screens are relative to each other. To enable this, open the Raspberry Menu (the one with the Raspberry Pi icon), go to the Preferences section, and open the Screen Configuration tool (Figure 1-6).
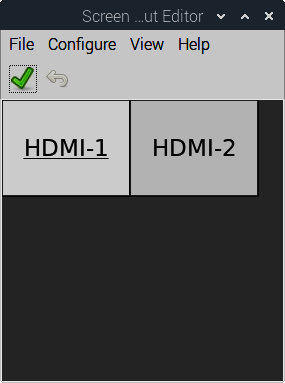
Figure 1-6. Arranging multiple screens
You can drag the two boxes labeled HDMI-1 and HDMI-2 around to represent the physical position of the two monitors. In Figure 1-6, the monitors are side by side, with the monitor connected to HDMI-1 on the left.
If you have an older Raspberry Pi or a model A or A+ and run out of USB sockets, you will also need a USB hub.
See Also
Check out the official Raspberry Pi Quick Start Guide.
1.3 Enclosing a Raspberry Pi
Solution
Apart from the Raspberry Pi 400, Raspberry Pis do not come with an enclosure unless you buy one as part of a kit. This makes it a little vulnerable, given that bare connections are on the underside of the circuit board that could easily be short-circuited if the Raspberry Pi is placed on something metal.
It is a good idea to buy some protection for your Raspberry Pi in the form of a case. If you intend to use the Raspberry Piâs general-purpose input/output (GPIO) pins (the pins that allow you to connect to external electronics), the Pibow Coupé shown in Figure 1-7 is a beautiful and practical design that is available for both the Raspberry Pi 4 and earlier versions.
Discussion
A vast array of case styles are available to choose from, including the following:
-
Simple, two-part, click-together plastic boxes
-
VESA mountable boxes (for attaching to the back of a monitor or TV)
-
LEGO-compatible boxes
-
3D-printed box designs
-
Laser-cut acrylic designs
-
Designs that act as a large heat sink for cooling
-
Designs with a built-in fan
-
DIN-rail designs for labs and workshops
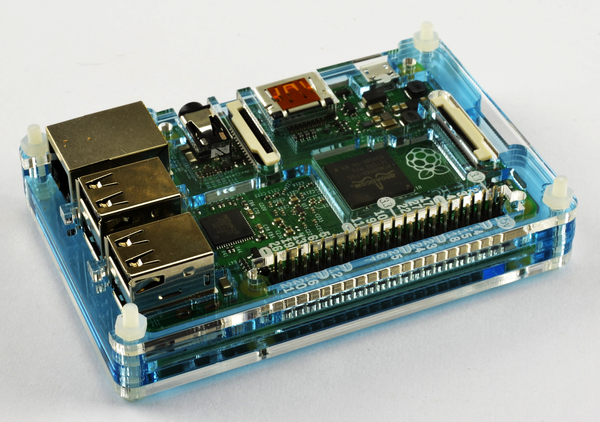
Figure 1-7. A Raspberry Pi 2 in a Pibow Coupé
The case you buy is very much a matter of personal taste. However, consider the following:
-
Do you need to have access to the GPIO connector? This is important if you plan to attach external electronics to your Raspberry Pi.
-
Is the case well ventilated? This is important if you plan to overclock your Raspberry Pi (Recipe 1.13) or run it hard playing videos or games, because these will all generate more heat.
-
Finally, make sure you get one that fits your model of Raspberry Pi.
If you have access to a 3D printer, you can also print your own case. Search for Raspberry Pi on Thingiverse or MyMiniFactory, and youâll find lots of designs.
You will also find kits that have tiny self-adhesive heat sinks to attach to the chips on the Raspberry Pi. These can be of some use if you are demanding a lot of your Raspberry Pi, say, by playing a lot of videos, but generally they are the equivalent of âgo-fasterâ stripes on a car.
If you have a Raspberry Pi 4, you can reduce the temperature by fitting a small fan such as the Pimoroni Fan SHIM, as shown in Figure 1-8.
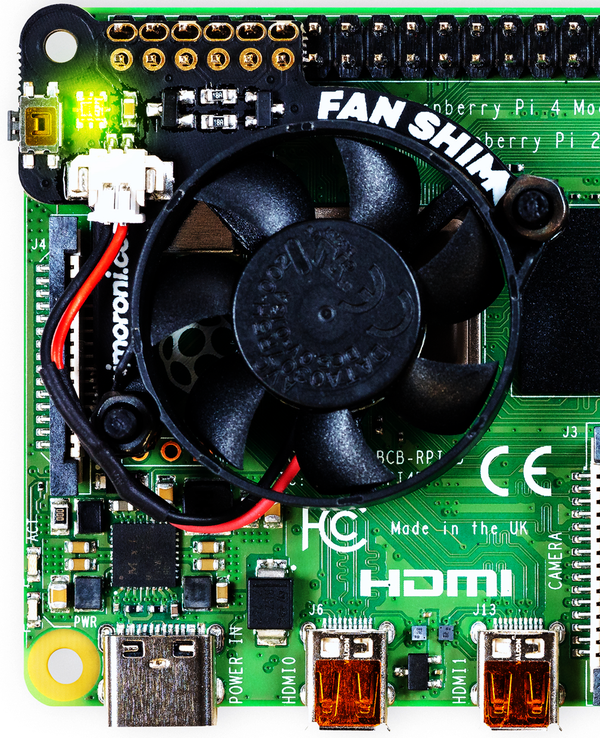
Figure 1-8. The Pimoroni Fan SHIM
1.4 Selecting a Power Supply
Solution
The basic electrical specification for a power supply suitable for a Raspberry Pi is that it provides a regulated 5V DC (direct current).
The amount of current that the power supply must be capable of providing depends both on the model of Raspberry Pi and on the peripherals attached to it. It is worth getting a power supply that can easily cope with the Raspberry Pi, and you should consider 1A to be a minimum for any model of Raspberry Pi.
If you buy your power supply from the same place that you buy the Raspberry Pi, the seller should be able to tell you whether it will work with the Raspberry Pi.
The Raspberry Pi 4 should be used with a 3A power supply. This is in part because its greater processing power than earlier models requires more electrical power, but also because its two USB3 ports are able to supply up to 1.2A to high-power USB peripherals such as external USB drives.
If you are going to be using WiFi or USB peripherals that require significant amounts of power with pre-Raspberry Pi 4 models, you should get a power supply capable of 1.5A or even 2A. Also beware of very low-cost power supplies that might not provide an accurate or reliable 5V.
Discussion
The Raspberry Pi 4 is the first Raspberry Pi to use the more modern USB-C connector. Unlike the micro-USB connector used on earlier boards, this connector is reversible (Figure 1-9).
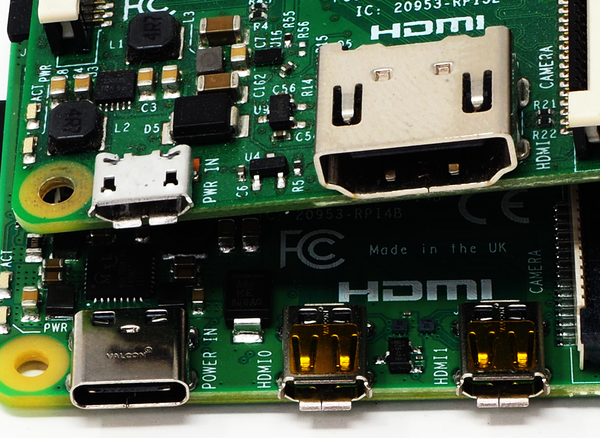
Figure 1-9. Power and video connections for the Raspberry Pi 3 (top) and 4 (bottom)
In Figure 1-9, you can see the USB-C power connector of a Raspberry Pi 4 below the micro-USB connector of a Raspberry Pi 3. As an aside, you can also see the pair of micro-HDMI video ports that replace the single full-size HDMI connector.
Whether your Raspberry Pi uses a USB-C connector or a micro-USB connector, the power supply and connectors are actually the same as those found in many smartphone chargers. If they terminate in a micro-USB plug, they are almost certainly 5V (but check). The only question, then, is whether they can supply enough current.
If they canât, a few bad things can happen:
-
They might become hot and be a potential fire risk.
-
They might simply fail.
-
At times of high load (say, when the Pi is using WiFi or playing video), the voltage might dip and the Raspberry Pi might reset itself.
If you are using a Raspberry Pi 3 or earlier, look for a power supply that says it can supply 1A or more. If it specifies a number of watts (W) rather than amps (A), divide the number of watts by 5 to get the number of amps. So a 5V 10W power supply can supply 2A (2,000mA).
Using a power supply with, say, a maximum current of 2A will not use any more electricity than a 700mA power supply. The Raspberry Pi takes only as much current as it needs.
In Figure 1-10, I measure the current taken by a Raspberry Pi model B and compare it with a Raspberry Pi 2 model B and a Raspberry Pi 4.
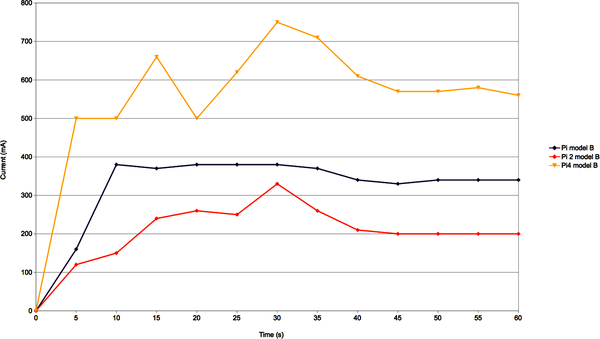
Figure 1-10. Raspberry Pi current consumption during booting
The newer Raspberry Pis (starting with the A+ and all the way through to the Pi 4) are far more power-efficient than the original Raspberry Pi 1 models, but when the processor is fully occupied and has a lot of peripherals attached, they can still reach similar current requirements, and, in the case of the Raspberry Pi 4, quite a lot more.
As you can see in Figure 1-10, if your Raspberry Pi is going to be on all the time, a Raspberry Pi 2 will run cooler and use a lot less power than the newest Raspberry Pi 4.
In Figure 1-10, you can see that the current rarely exceeds 700mA. However, the processor isnât really doing very much here. Were you to start playing HD video, the current would increase considerably. When it comes to power supplies, itâs always better to have something in reserve.
See Also
You can buy an uninterruptible power supply (UPS) for the Raspberry Pi. This ensures that the Pi can keep running for 10â30 minutes in the event of a power failure.
The Raspberry Pi has no on/off switch, but you can buy a module that will turn off the power when the Raspberry Pi shuts down.
1.5 Selecting an Operating System
Solution
The answer to this question depends on what you intend to do with your Raspberry Pi.
For general use as a computer or for using in electronic projects, you should use Raspberry Pi OS, the standard and official distribution for the Raspberry Pi.
If you plan to use your Raspberry Pi as a media center, a number of distributions (versions of Linux) are available specifically for that purpose (see Recipe 4.1).
In this book, we use Raspberry Pi OS almost exclusively, although most of the recipes will work with any Debian-based Linux distribution.
Discussion
If you are interested in trying out some different distributions, you can purchase some microSD cards, which are not expensive, and copy the various distributions onto them. If you do this, it is a good idea to keep your files that you donât want to lose on a USB flash drive plugged into your Raspberry Pi.
Note that if you are using one of the upcoming recipes to write your own SD card, you need to have a computer that has an SD card slot (and an SD-to-microSD adapter), or you can buy an inexpensive USB SD card reader.
See Also
Check out the official list of Raspberry Pi distributions.
1.6 Installing an Operating System Using Raspberry Pi Imager
Solution
Before you can use your Raspberry Pi, you must prepare a microSD card with the Raspberry Pi OS operating system by writing a disk image onto the microSD card.
The process of writing the disk image onto the microSD card is as follows:
- Using a Mac, Windows, or Linux computer (not your Raspberry Pi), download the Raspberry Pi Imager.
- Insert the microSD card into your computer. Itâs also a good idea to disconnect any other removable media so that you donât accidentally overwrite the wrong device.
- Start the Raspberry Pi Imager (Figure 1-11).Â
- Select the Operating System as Raspberry Pi OS (32-bit) and the SD card.
- Click Write and wait while the image file is copied onto the removable media.
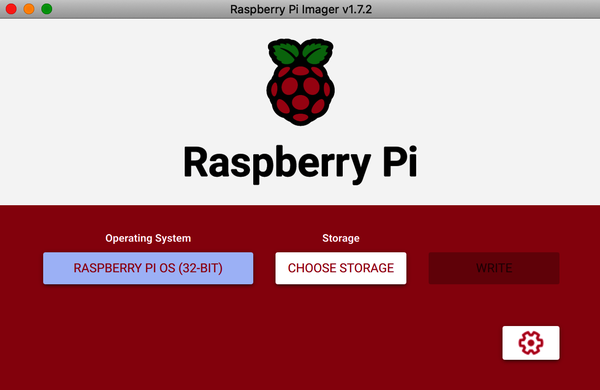
Figure 1-11. Using Raspberry Pi Imager to write an SD card
After the SD card or other removable media is prepared, you can plug it in to your Raspberry Pi, and when the Raspberry Pi is powered up, it will boot into whatever operating system distribution you installed.
Discussion
Vendors of hardware sometimes offer their own disk image that has support for their hardware built into it. Itâs best to avoid using such images because doing so means that you will not get all the benefits of using a standard Raspberry Pi OS distribution and all the pre-installed software. It also means that if you have a problem with a piece of software, it will be a lot more difficult to find support because you are using a nonstandard distribution.
The Raspberry Pi 4 and 400 hardware does have a 64-bit processor and a 64-bit version of the operating system is available, but at the time of writing using the default Raspberry Pi OS 32-bit option is much more stable.
See Also
The Raspberry Pi guide to installing Raspberry Pi OS can be found at https://www.raspberrypi.com/software.
1.7 Booting Up Your Raspberry Pi for the First Time
Solution
The first time that you boot up your Raspberry Pi (as shown in Figure 1-13), you will be taken through some setup questions.
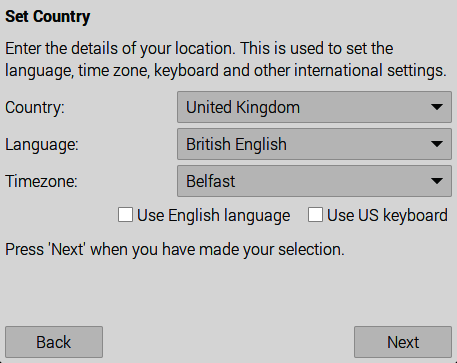
Figure 1-13. Configuring Raspberry Pi after installation
Clicking Next prompts you to create a new user account (Figure 1-14).

Figure 1-14. Creating a user account
Prior to April 2022 this step was not part of the setup procedure, as the username of âpiâ was automatically created for you. As a result many tutorials and books assume that your home directory is /home/pi. Unless you have strong feelings about your username, I would recommend sticking to the username âpiâ but create a strong password (not the default of âraspberryâ).
After you are up and running, the first thing you should do is connect your Raspberry Pi to the internet (Recipes 2.1 and 2.5), because next youâll be asked to connect to a WiFi network to check for updates. Updating requires an internet connection, so it wonât work unless you have connected to your network. If you are connected (either by WiFi or Ethernet), itâs a good idea to check for updates now. If not, you can always check later using Recipe 3.40.
See Also
The Raspberry Pi guide to installing Raspberry Pi OS can be found at https://www.raspberrypi.com/software.
1.8 Setting Up a Headless Raspberry Pi
Solution
Use the settings option on the Raspberry Pi Imager to start your Raspberry Pi with network credentials and enable SSH (Recipe 2.7) so that you can connect to the Raspberry Pi from another computer.
After you have selected the operating system in the Raspberry Pi Imager, a cog settings icon will appear. When you click on this, youâll be presented with a list of settings (Figure 1-15) that you can use to preconfigure your Raspberry Pi so that other computers on your network can connect to it.
To be able to access the Raspberry Pi remotely, as a minimum you must:
- Enable SSH (Secure Shell)
- Set the username and password
- Configure the wireless LAN with the name of your network (SSID, or service set identifier) and password
Itâs also not a bad idea to set the hostname, especially if you are going to have more than one Raspberry Pi on your network and you want to tell which is which.
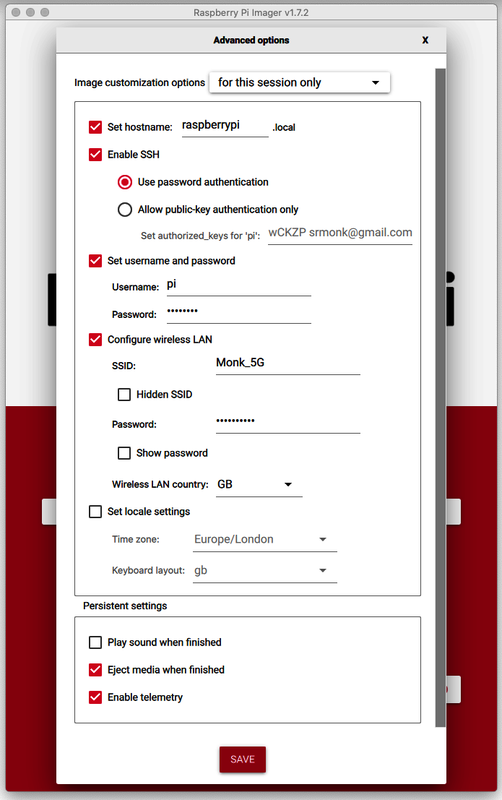
Figure 1-15. Preconfiguring a Raspberry Pi with the Pi Imager
Discussion
Once you put the microSD card into your Raspberry Pi and boot up, you can connect to your Raspberry Pi from another computer using SSH. The only obstacle to doing this is that you need to know the IP address that your home hub assigned to your Raspberry Pi when it connected to it. You can find this by temporarily connecting keyboard, mouse, and monitor and following Recipe 2.2, after which you should follow Recipe 2.3 so that the IP address will be fixed.
Sometimes it isnât convenient to attach all those things to your Raspberry Pi. In this case, you can use the various tools available on Android and iOS to scan your network from your mobile phone and report a list of connected computers along with their IP addresses (Figure 1-16).
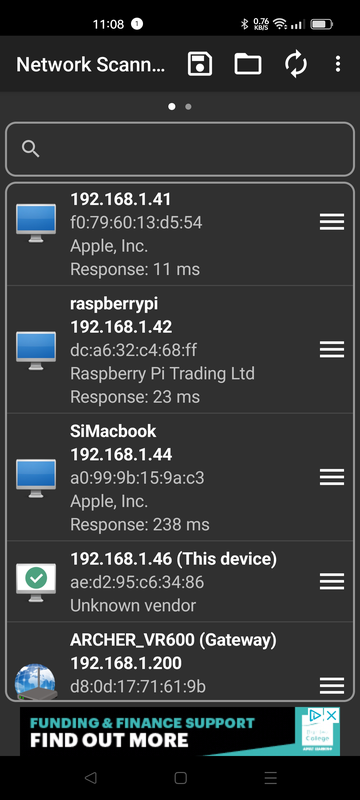
Figure 1-16. Scanning your network to find an IP address
See Also
For more information on connecting to your Raspberry Pi with SSH, see Recipe 2.7.
1.9 Booting from a Real Hard Disk or USB Flash Drive
Solution
Before the Raspberry Pi 4 and 400 came along, booting from a hard disk or flash drive was possible, but not very easy, involving some complex commands and the possibility of âbrickingâ your Raspberry Pi if you got it wrong. If you have a Raspberry Pi 4 or 400, then it is now really straightforward and starts with the Raspberry Pi Imager.
The process is similar to setting up a microSD card using the Raspberry Pi Imager. To follow this recipe, youâll need a Windows, Mac, or Linux computer; a USB SSD (solid state drive); and a microSD card. Even though the whole point of this recipe is to replace the microSD card as the boot device, you still need two microSD cards: one being your existing microSD boot device for your Raspberry Pi and a second blank microSD card.
- Insert the blank microSD card into your card reader.
- Start the Raspberry Pi Imager, and then from the Operating System drop-down, select Misc Utility Images and then Bootloader and then USB Boot (Figure 1-17). Note that if these options arenât present in your Raspberry Pi Imager, then you probably need to download the latest version.
- Select your microSD card from the Storage drop-down and then click Write.
- Put the newly written microSD card into your Raspberry Pi and power it up. The only purpose of this microSD card image is to reconfigure your Raspberry Pi for USB booting. Once itâs done its work, the screen will turn green.Â
- Power down your Raspberry Pi and swap the microSD cards, so that you now have your original microSD system card in the Raspberry Pi.Â
- Boot your Raspberry Pi and from the Raspberry Menu, select Accessories and then SD Card Copier (Figure 1-18). Select your system microSD card as the source and the external USB drive as the destination, then click Start.
- When the copy is complete, you can shut down your Raspberry Pi again and remove the microSD card. The next time you switch on your Raspberry Pi, it should boot from the USB drive.
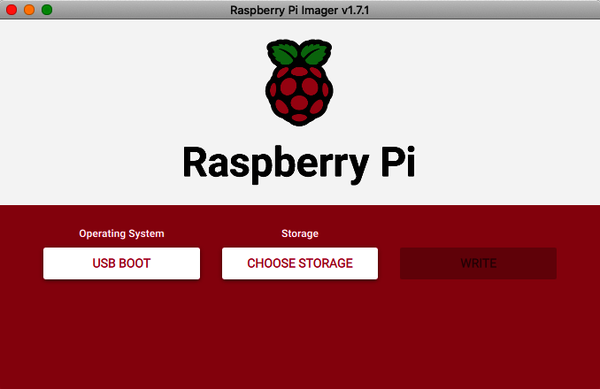
Figure 1-17. Using the Raspberry Pi Imager to configure USB booting
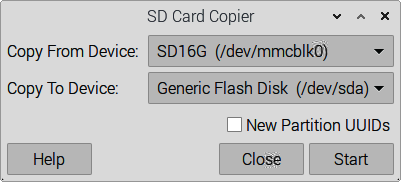
Figure 1-18. Copying your microSD card to an external flash drive
Discussion
If you are starting with a fresh image, rather than wanting to copy over the current contents of your microSD card, then you can get away with using just one microSD card. Between steps 4 and 5, set up the microSD card with a fresh Raspberry Pi OS image by following Recipe 1.6.
See Also
Check out the documentation for the Raspberry Pi Imager.
1.10 Connecting a DVI or VGA Monitor
Solution
Many people have been caught out by this problem. Fortunately, it is possible to buy adapters for monitors with a DVI or VGA input, but no HDMI connectors.
DVI adapters are the simplest and cheapest. They are available for less than $5 if you search for âHDMI male to DVI female converter.â
Discussion
Using VGA adapters is more complex because they require some electronics to convert the signal from digital to analog, so beware of leads that do not contain these. The official converter is called Pi-View and is available wherever the Raspberry Pi is sold. Pi-View has the advantage of having been tested and found to work with Raspberry Pi. You can find cheaper alternatives on the internet, but often these wonât work.
However, given that new monitors all have HDMI connectors, you are probably better off spending your money on a new monitor rather than an adapter.
See Also
eLinux has tips on what to look for in a converter.
1.11 Using a Composite Video Monitor/TV
Solution
You need to adjust the resolution of the Raspberry Pi for a small screen.
The Raspberry Pi has two types of video output: (1) HDMI, and (2) composite video from the audio jack, for which you need a special lead. Of these, the HDMI is by far the better-quality option. If youâre intending to use a composite video as your main screen, you might want to think again.
If you are using a composite video screenâsay, because you need a really small screenâyou need to make a few adjustments to fit the video output to the screen. You need to make some changes to the file /boot/config.txt.
You can edit this file on your Mac or PC by inserting the SD card back into an SD card reader, or you can edit it on the Raspberry Pi without having to remove the card. Editing files on the Raspberry Pi itself is normally done using the nano editor. This is a little tricky, and I suggest you read Recipe 3.7 thoroughly before you try editing your first file. If you are happy to go ahead and edit the file using nano, enter the following command in a Terminal session:
$ sudo nano /boot/config.txt
Note that to save and exit nano, press Ctrl-X, then press Y (to confirm), and then press Enter.
If the text is too small to read, itâs best to remove the SD card from the Raspberry Pi and insert it into your computer. The file will then be in the top-level directory on the SD card, and you can use a text editor on your PC (such as Notepad++) to modify it.
You need to know the resolution of your screen. For a lot of small screens, this will be 320 x 240 pixels. Find the two lines in the file that read as follows:
#framebuffer_width=1280
#framebuffer_height=720
Remove the # from the beginning of each line and change the two numbers to the width and height of your screen. Removing the # enables the line. In the following example, the screen size has been modified to be 320 by 240:
framebuffer_width=320
framebuffer_height=240
Save the file and restart your Raspberry Pi. You should find that everything has become a lot easier to read. Youâll probably also find that there is a big, thick border around the screen. To adjust this, see Recipe 1.12.
Discussion
Many low-cost CCTV monitors that can make a great companion for the Raspberry Pi are available when youâre making something like a retro game console (Recipe 4.4). However, these monitors are often very low resolution.
See Also
For another tutorial on using composite monitors, see this Adafruit tutorial.
Also, see Recipes 1.10 and 1.12 to adjust your picture when youâre using the HDMI video output.
1.12 Adjusting the Picture Size on Your Monitor
Solution
If your problem is that a large black border is around the picture, you can make the screen fill the whole area of the monitor using the Raspberry Piâs desktop Configuration tool (see Figure 1-19). To open this, go to the Raspberry Menu, select Preferences, click Raspberry Pi Configuration, and select the Display tab.
Click the toggle switch next to Underscan. Note that the change will not take effect until you have clicked OK and then rebooted your Raspberry Pi.
If you have the opposite problem and your text extends off the edges of the screen, the solution is the same: click the toggle switch for Underscan.
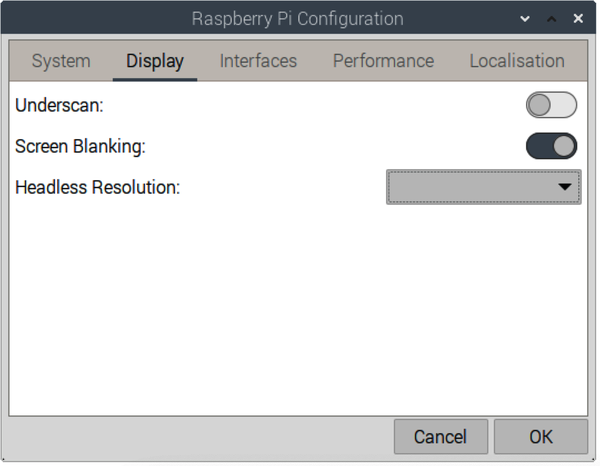
Figure 1-19. Using the Raspberry Pi Configuration tool to control underscan
The second step is to edit the file /boot/config.txt. You can do this either by removing the SD card and mounting it on your PC or Mac or by editing the SD card on the Raspberry Pi. Editing files on the Raspberry Pi itself is normally done using the nano editor. This is a little tricky; I suggest you read Recipe 3.7 thoroughly before you try editing your first file. If you are happy to go ahead and edit the file using nano, enter the following command in a Terminal session:
$ sudo nano /boot/config.txt
Look for the section dealing with overscan. The four lines you need to change are shown in the middle of Figure 1-20, each beginning with #overscan.
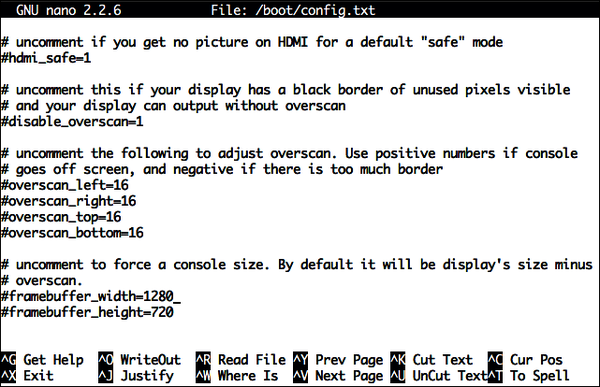
Figure 1-20. Adjusting overscan
For the lines to take effect, you need to enable them by removing the # character from the start of each line.
Then, using trial and error, change the settings until the screen fills as much of the monitor as possible. Note that the four numbers should be negative. Try setting them all to â20 to start with. This will decrease the area of the screen that is used.
To save and exit nano, press Ctrl-X, then press Y (to confirm), and then press Enter.
Discussion
Having to repeatedly restart the Raspberry Pi to see the effects of the changes in resolution is a little tedious. Fortunately, you need to do this procedure only once. Most monitors and TVs work just fine without any need for underscanning.
See Also
You can also configure underscanning using the raspi-config utility.
1.13 Maximizing Performance
Solution
If you have a Raspberry Pi 3, 4, or 400 with a quad-core processor, you are unlikely to find it to be too slow. However, older Raspberry Pis 1 and 2 can be pretty sluggish.
You can increase the clock frequency of a Raspberry Pi 1 or 2 to make it run a little faster. This will make it consume a bit more power and run a little hotter (see the Discussion section that follows).
The method of overclocking described here is called dynamic overclocking because it automatically monitors the temperature of the Raspberry Pi and drops the clock speed back down if things begin to get too hot. This is called throttling.
Run the raspi-config utility by issuing the following command in an SSH Terminal:
$ sudo raspi-config
Select the Overclock option. You are then presented with the options shown in Figure 1-21.
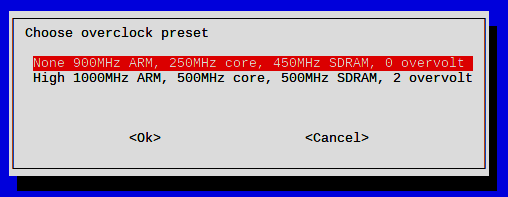
Figure 1-21. Configuring overclocking with the raspi-config utility from the command line
Select an option. If you find that your Raspberry Pi starts to become unstable and hangs unexpectedly, you might need to choose a more conservative option or turn overclocking off by setting it back to None.
Discussion
The performance improvements from overclocking can be quite dramatic. To measure these, I used a Raspberry Pi B, without a case, at an ambient room temperature of 60 degrees (15 degrees C).
The test program was the following Python script. This just hammers the processor (that is, makes it work really hard) and is not really representative of the other things that go on in a computer, such as writing to the SD card, graphics, and so on. However, it does give a good indication of raw CPU performance if you want to test the effect of overclocking on your Raspberry Pi:
importtimedeffactorial(n):ifn==0:return1else:returnn*factorial(n-1)before_time=time.process_time()foriinrange(1,10000):factorial(200)after_time=time.process_time()(after_time-before_time)
Note that we are jumping ahead a lot here, so if you are not familiar with Python, come back to this when you have read through Chapter 5.
Check out the results of the test in Table 1-3. The current and temperature were measured using test equipment.
| Â | Speed test | Current | Temperature (degrees C) |
|---|---|---|---|
| 700 MHz | 15.8 seconds | 360mA | 27 |
| 1 GHz | 10.5 seconds | 420mA | 30 |
As you can see, the performance has increased by 33% but at a cost of drawing more current and a slightly higher temperature.
A well-ventilated enclosure will help to keep your Raspberry Pi running at full speed. Some efforts to add water cooling to the Raspberry Pi have also been made. Frankly, this is just silly.
See Also
Much more information about the raspi-config utility is available at https://oreil.ly/1lwy6.
1.14 Changing Your Password
Solution
After you install Raspberry Pi OS onto your SD card, you are prompted to create a user account and associated password. You can change the password any time using the Raspberry Pi Configuration tool. To open this, go to the Raspberry Menu, select Preferences, and then click Raspberry Pi Configuration. Click the System tab. There, youâll find the Change Password option (Figure 1-22).

Figure 1-22. Changing your password with the Raspberry Pi Configuration tool
Changing your password is one setting for which you do not need to restart your Raspberry Pi for the change to take effect.
See Also
You can also change your password using the raspi-config utility.
1.15 Shutting Down Your Raspberry Pi
Solution
In the upper lefthand corner of the desktop, click the Raspberry Menu. A dialog box opens, offering three shutdown options (Figure 1-23):
- Shutdown
-
Shuts down the Raspberry Pi. You will need to unplug the power and then plug it back in to get the Raspberry Pi to boot up again. Or, if you have a Pi 400, press the Power button on the keyboard.
- Reboot
-
Reboots the Raspberry Pi.
- Logout
- Logs you out and displays a prompt to enter your login credentials so that you can log back in.
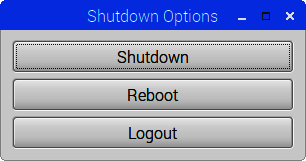
Figure 1-23. Shutting down your Raspberry Pi
You can also reboot using the Terminal by issuing the following command:
$ sudo reboot
You might need to do this after installing some software. When you do reboot, youâll see the message shown in Figure 1-24, which illustrates the multiuser nature of Linux and warns all users connected to the Pi.
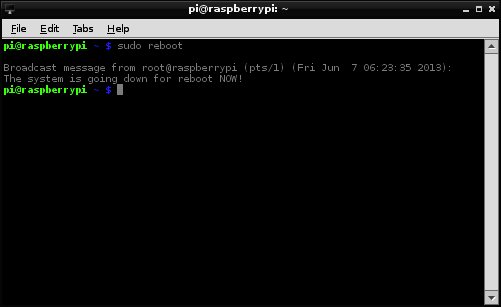
Figure 1-24. Shutting down your Raspberry Pi from the Terminal
Discussion
It is better to shut down your Raspberry Pi as described than to simply pull out the power plug because your Raspberry Pi might be in the middle of writing to the microSD card as you power it down. This could lead to file corruption.
Shutting down a Raspberry Pi does not actually turn off the power. It goes into a low-power modeâand it is a pretty low-power device anyway (but the Raspberry Pi hardware has no control over its power supply).
When a Raspberry Pi 400 (with its built-in keyboard) has been shut down, you can turn it on by pressing the F10 key, which also has an on/off icon on the key.
See Also
You can buy a module that will turn off the power when the Raspberry Pi shuts down.
For information on adding a Start button to your Raspberry Pi, see Recipe 13.13.
1.16 Installing the Raspberry Pi Camera Module
Solution
The Raspberry Pi Camera Module (Figure 1-25) is attached to a Raspberry Pi by a ribbon cable.
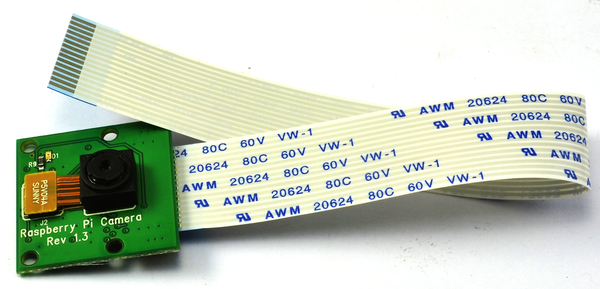
Figure 1-25. The Raspberry Pi Camera Module
There are three versions of the Pi Camera: the original version 1 (as shown in Figure 1-25); the newer, higher-resolution version 2; and the HQ (High Quality) camera, which takes interchangeable lenses and boasts a resolution of 12 megapixels.
The ribbon cable attaches to a special connector between the audio and HDMI sockets on a Raspberry Pi 2, 3, or 4. To fit the cable onto your Pi, gently pull up the levers on either side of the connector so that they unlock, and then press the cable into the slot with the shiny metal connector pads of the cable facing away from the Ethernet socket. Press the two levers of the connector back down to lock the cable in place (Figure 1-26).
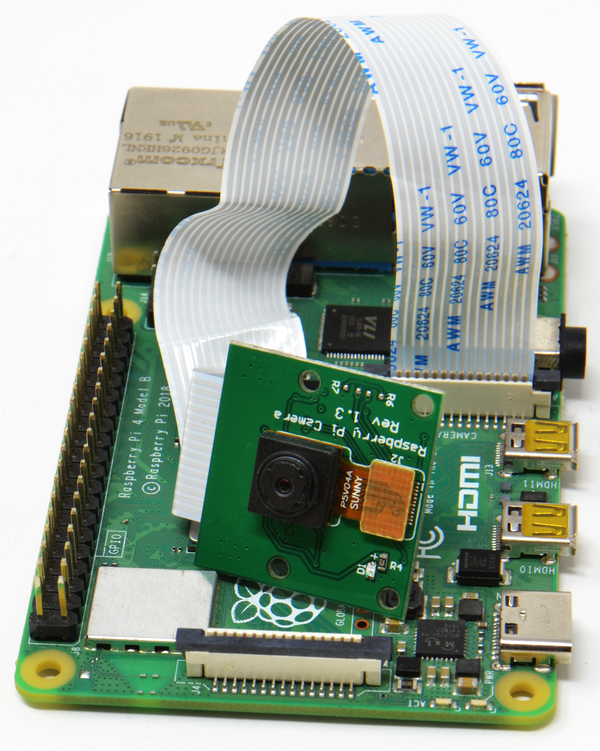
Figure 1-26. Attaching a Raspberry Pi Camera Module to a Raspberry Pi 4 model B
Warning
The Camera Module packaging states that it is sensitive to static. Before handling it, ground yourself by touching something grounded, like the metal case of a PC.
Note that the Raspberry Pi Zero requires a special cable or adapter because its Camera connector is smaller than that of a full-size Raspberry Pi (see âModulesâ).
The Camera Module requires some software configuration. At the time of writing, the camera interface is moving from Raspberry Piâspecific software to the libcamera library. So, before following the instructions, you may want to check to see the current status of the Camera Moduleâs software.
These instructions describe the âlegacyâ Raspberry Pi camera software that works on even quite ancient models of Raspberry Pi.
The graphical Raspberry Pi Configuration tool doesnât include an option to enable the camera, so you must start the raspi-config utility from a Terminal session.
$ sudo rasp-config
This will display options for configuring your Raspberry Pi.
Select Interfacing Options, and youâll see the Camera option (Figure 1-27). Select the first option to enable legacy support, and then reboot your Raspberry Pi.
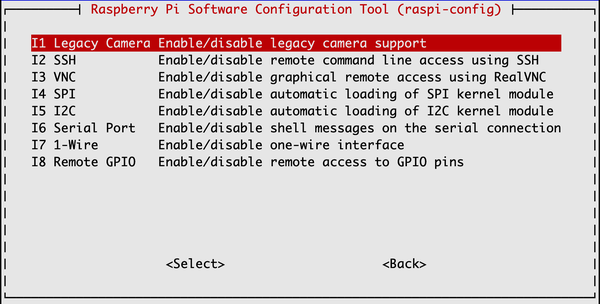
Figure 1-27. Enabling the camera using raspi-config from the command line
Two commands are available for capturing still images and videos: raspistill and raspivid.
To capture a single still image, use the raspistill command:
$ raspistill -o image1.jpg
A preview screen displays for about five seconds and then takes a photograph and stores it in the file image1.jpg in the current directory.
To capture video, use the command raspivid:
$ raspivid -o video.h264 -t 10000
The number at the end of the line is the recording duration in millisecondsâin this case, 10 seconds.
Discussion
Both raspistill and raspivid have a large number of options. If you type either command without any parameters, help text displays the available options.
You can also buy a NoIR (no infrared) version of the camera that has the infrared filter removed from the Camera Module to allow it to work at night under infrared illumination.
An alternative to the Camera Module is to use a USB webcam (see Recipe 8.2).
See Also
Find out more about the Raspberry Pi Camera Module at https://oreil.ly/diUuB.
1.17 Using Bluetooth
Solution
If you have a Raspberry Pi 3, 4, or 400, the good news is that along with WiFi, you also get Bluetooth hardware. If you have an older Raspberry Pi, you can attach a USB Bluetooth adapter to it. In both cases, the software that you need for Bluetooth is now included in Raspberry Pi OS.
If you have an older Raspberry Pi, be aware that not all Bluetooth adapters are compatible with the Raspberry Pi. Most are, but to be sure, buy one that is advertised as working with the Raspberry Pi. Figure 1-28 shows a Raspberry Pi 2 equipped with both a USB Bluetooth adapter (nearest to the camera) and a USB WiFi adapter.
Figure 1-28. Raspberry Pi 2 with USB Bluetooth and WiFi adapters
Bluetooth features are integrated into the Raspberry Pi OS desktop in much the same way as on a Mac. In the upper-right corner of the screen, you will see the Bluetooth icon (Figure 1-29). Click this to open a menu of Bluetooth options.
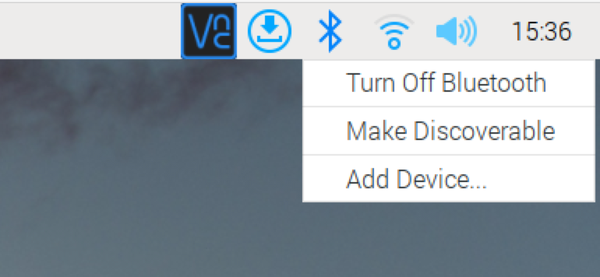
Figure 1-29. The Raspberry Pi OS Bluetooth menu
If you want to connect a Bluetooth peripheral such as a keyboard, click Add Device. The Add New Device dialog box opens, showing a list of available devices with which you can connect, or pair (Figure 1-30).
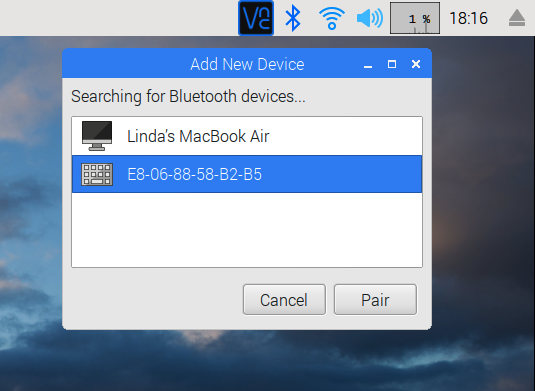
Figure 1-30. Pairing a Bluetooth device
You can then select the device that you want to pair with, and then follow the instructions that appear on your Raspberry Pi and the device you are pairing with.
Discussion
You can pair phones, Bluetooth speakers, keyboards, and mice to your Raspberry Pi. I find that connecting a new Bluetooth device doesnât always work the first time. So if you initially have a problem pairing with a device, try a few more times before you give up.
Most of the time, using the desktop interface to add Bluetooth devices to your Raspberry Pi system is convenient; however, you can also pair Bluetooth devices using the command-line interface.
To run Bluetooth commands from the command line, use the bluetoothctl command:
$ bluetoothctl [NEW] Controller B8:27:EB:50:37:8E raspberrypi [default] [NEW] Device 51:6D:A4:B8:D1:AA 51-6D-A4-B8-D1-AA [NEW] Device E8:06:88:58:B2:B5 siâs keyboard #1 [bluetooth]#
This scans for Bluetooth devices and also provides a pair command that will allow you to pair with the device using its IDâfor example:
[bluetooth]# pair E8:06:88:58:B2:B5
See Also
Take a look at a list of Bluetooth adapters that are compatible with the Raspberry Pi.
The Blue Dot software for Android phones enables you to control hardware attached to your Raspberry Pi using Bluetooth and your mobile phone. You will find an example of this in Recipe 11.8.
If you pair your Raspberry Pi with a Bluetooth speaker, you also need to set the speaker to be the output for sound (Recipe 16.2).
Get Raspberry Pi Cookbook, 4th Edition now with the O’Reilly learning platform.
O’Reilly members experience books, live events, courses curated by job role, and more from O’Reilly and nearly 200 top publishers.

