A number of hacks in this book use Perl scripts. This hack covers installing Perl, Perl modules, and Perl support in your web server.
Perl is a widely used scripting language that I use in this book to perform a variety of podcast-related tasks. Perl comes preinstalled on Mac OS X and Linux, and it’s easy to install on Windows.
If you have the time, it’s worth learning Perl. The language syntax can be a little confusing at first but becomes familiar quickly. A lot of the value of Perl comes from the CPAN library of modules (http://cpan.org/), which covers every conceivable need.
Here are some helpful Perl modules that should interest podcasters:
-
MP3::Info With
MP3::Infoyour script can read and write the ID3 tags in MP3 files.-
MP4::Info -
Ogg::Vorbis::Header This reads and writes information from an Ogg Vorbis file’s header.
-
LWP::Simple This library allows you to fetch any URL with a single function call.
-
LWP::UserAgent This is the more functional version of
LWP::Simple. With this module, you can simulate a web browser surfing to a site, logging in, getting cookies, making requests, and then leaving. You can automate any complex web task withLWP::UserAgent.-
Net::SFTP The
SFTPmodule gives you access to the full SFTP secure file-transfer standard. You can log into SSH hosts, navigate around, and upload and download files using simple function calls.-
Net::FTP This is similar to the
Net::SFTPmodule, but for the older FTP file-trans-fer standard.-
XML::RSS This supports building RSS 2.0 feeds with
enclosuretags using an object-oriented interface.-
XML::Atom This is the corresponding interface to
XML::RSSfor the Atom syndication standard.-
XML::DOM, XML::Parser, XML::Simple, and XML::XPath These modules, and many more in the XML family of modules, provide a wide variety of tools for reading, writing, and navigating XML documents.
-
XML::RSS::Parser This parses RSS feeds into objects to make it easier to navigate them.
-
Data::Dumper This is simply the easiest way to get a dump of the contents of any Perl variable. This is a very handy module when you are debugging Perl scripts.
-
Tk This is a free, platform-independent windowing toolkit that makes it easy to build graphical user interfaces (GUIs) that look reasonably good and respond well.
-
Mac::Glue This is a toolkit for using AppleScript automation to drive applications directly from Perl.
One of the best Perl modules is the CPAN module, which automatically downloads Perl modules and installs them. Even better, if the module you want depends on other modules, it will download those modules first and install them before installing the module you requested.
To run the CPAN module, invoke this command:
% sudo cpan
sudowill run the script as root so that you can install modules in the main Perl library directory. The shell portion of the command line instructs the CPAN module to go into interactive mode. From here, you can type in install commands to download and install modules.
Warning
If you have trouble running sudo, you need to use the
visudocommand to set yourself up as a “sudoer” with access to sudo. Thevisudocommand must be run as root. If you don’t have sudo installed, check the package repository for your Linux distribution.
The first time you run the CPAN module it will ask you a lot of questions about where it should look for modules. Make sure to specify a few sites so that if one or two go down you won’t have any problems downloading and installing modules.
Once the setup is done the CPAN module will download the tarball of the module you requested and install it for you.
If you want to forego the interactive shell, you can request a specific module right from the command line, with this syntax:
% sudo cpan install XML::Simple
Apache comes preinstalled on Mac OS X. You will need to enable it by using the Personal Web Sharing option in the Sharing section of System Preferences.
Once Apache is active, you can copy your Perl script to the/Library/ WebServer/CGI-Executables/directory. Make sure the script is executable by changing its Unix permissions. The following shell commands copy a file callednetwork.plto the CGI directory and change its permissions to enable execution:
%cp network.pl /%Library/WebServer/CGI-Executables/chmod 755 /Library/WebServer/CGI-Executables/network.pl
With this done, you should be able to use Safari to surf to the page on your local web server (http://localhost/cgi-bin/network.pl) and see the output of the script.
If you have trouble, you can try using this very simple script as a starting point:
    #!/usr/bin/perl
    print "Content-type: text/html\r\n\r\n";
    print "<html><body>Hello!</body></html>";
The output is a web page that says “Hello.”
Installing Perl scripts on a Linux-, Unix-, or Mac OS X-powered web server is similar to installing them on Mac OS X. You copy the script into your
cgi-bindirectory, and change its permissions to 755 to make it executable. Unfortunately, the name and location of yourcgi-bindirectory changes with each ISP.
The good news is that installing Perl scripts is a common issue for ISPs, so they will have documentation on how to install them in their Frequently Asked Questions (FAQ) document, or in their knowledge base.
Windows doesn’t come preinstalled with Perl. Can you believe it? Crazy. So, to run Perl scripts on Windows, you will need to install Perl first. The most direct way to do that is to install ActivePerl (http://activestate.com/). Use all the default options during the installation and you should have Perl installed inc:\perl.
Open a new command prompt so that you pick up the latest PATH setting, and run this command to test the Perl installation:
C:\> perl –v
If all is well, you will get a message that gives you the version of the Perl interpreter, some licensing information, and so on.
Another Perl installation option is to use Cygwin (http://cygwin.com/). Cygwin is a complete Unix environment for Windows that includes Perl among the available packages. You can use ActiveState or Cygwin Perl to run the scripts in this book, but ActivePerl integrates nicely with Internet Information Services (IIS). So, I recommend installing ActivePerl to use the scripts in this book. Thankfully the two Perls—ActivePerl and Cygwin Perl—do not conflict with one another if both are installed on the same machine.
The ActiveState alternative to the CPAN module is a utility named
ppm(Programmer’s Package Manager).ppmcan install any module in its repository. And there are a lot of modules in the repository! To see the complete list, go to the ppm site (http://ppm.activestate.com/).
To start an interactive session with ppm, type this at the command prompt:
C:\> ppmFrom here, you can use install commands to install new modules:
ppm> install Mail-Box This will install the
Mail::Box
Perl module. As with CPAN, the package manager will download any modules required to run the one you want to install, before installing yours.
One downside with
ppmis that you can’t specify the module name directly. Instead ofMail::Boxyou have to use the package filename,Mail-Box. Usually the translation is a simple conversion of the :: to -. However, you might find that you need to search for the package name that corresponds to the module. To search, use this syntax:
ppm> search XML::RSSYou will get back a list of qualifying packages.
Windows XP and earlier editions allow the installation of a cut-down version of the IIS web server. To install it, use the Add or Remove Programs control panel, and then select Add/Remove Windows Components and the Internet Information Services.
Once IIS is installed, you can use the Internet Information Services manager in the Administrative Tools portion of the control panel to configure the IIS server. The first step is to create a new virtual directory that will host the Perl scripts. Navigate down into the Web Sites section and into the Default Web Site item. Now, right-click the righthand portion of the window and select Virtual Directory… from the New submenu.
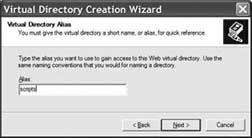
The first step in the Virtual Directory Creation Wizard is to give the new directory a name. I called minescripts. This is shown in Figure 1-15.
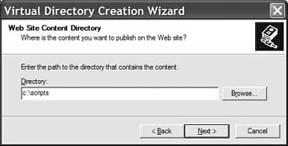
Then you have to assign it to a real directory on your hard drive that will host the scripts. I usedc:\scripts, as shown in Figure 1-16.
This means that any requests to http://localhost/scripts/ will invoke the corresponding Perl script in the c:\scriptsdirectory. So,http://localhost/scripts/myscript.pl becomes c:\scripts\myscript.pl.
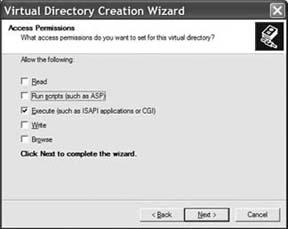
The last step is to set up the permissions on the virtual directory. I chose just to allow for execution of the scripts, by choosing the options shown in Figure 1-17.
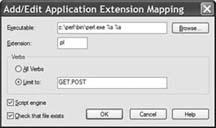
Once you have completed the wizard there is one last step. You need to tell IIS that scripts with the.plextension should be run with ActiveState Perl. The first step is to right-click the newscriptsvirtual directory and select Properties. From here, click the Configuration… button.
This brings up the set of application mappings that specify which extensions go to which interpreter. Click Add to create a new mapping and to specify the mapping, as shown in Figure 1-18.
Click OK on the dialog in Figure 1-18, and then OK again on the dialogs that follow, until you are back at the IIS manager. Now you can add Perl scripts into the c:\scripts\ directory and access them through your browser.
Use this simple test script to make sure everything is working properly:
print "Content-type: text/html\n\n";print "<html><body>Hello!</body></html>";
Save this file asc:\scripts\test.pl.Then use your web browser (hopefully the new Firefox browser, downloadable at http://firefox.com/) to surf to http://localhost/scripts/test.pl. If the web page shows the word Hello, you are cooking with gas.
Apache is an open source web server that provides an excellent alternative to IIS on Windows. Download the Windows installer for Apache (http://apache.org/). For the hacks in this book, I recommend using the 1.3 version of the server. Follow the installer and select that you want to run it as a service.
Next, create a script in the c:\Program Files\Apache Group\Apache\cgi-bindirectory calledtest.pl, with the following contents:
#!c:\perl\bin\perl.exe
                  print "Content-type: text/html\n\n";
print "<html><body>Hello!</body></html>";The trick here is to get the location of the Perl interpreter right. I used the default location for the ActiveState Perl interpreter. The location of your interpreter will vary if you installed it somewhere else.
After you have saved the test script in the cgi-bin directory, point your browser to http://localhost/cgi-bin/test.pl and you should see the word Hello.
How cool is that? Instant web serving with no muss or fuss.
Get Podcasting Hacks now with the O’Reilly learning platform.
O’Reilly members experience books, live events, courses curated by job role, and more from O’Reilly and nearly 200 top publishers.


