Chapter 1. Account Management
Introduction: Hacks #1-9
You can use PayPal to send and receive money, but you need a PayPal account to manage your payments and your business. There’s something comforting about having your own account. Sure, it’s yet another password to remember, but it’s all yours. You can visit a site like PayPal, log in, and see your settings, your name, and your history—proof that you’ve been there before and that someone (er, something) remembers you. But a PayPal account [Hack #1] , in particular, has the added bonus of being able to store cold, hard cash. You can’t really touch it, but it’s there, and it’s yours.
You can use your PayPal balance to pay for stuff [Hack #11] , or you can withdraw it [Hack #20] and add it to the shoebox under your mattress. You can also watch it grow, as your eBay bidders pay for your stuff, web site customers buy your products, or friends pay you back for sushi dinners.
But it’s not about sending and receiving money; it’s about finding new ways to handle transactions so that you can spend more time eating sushi (or curly fries, or whatever). The real power of PayPal is its invisibility; you can have strangers send you money and still keep your account all to yourself. Whether you’re selling a single product [Hack #28] , or a cart full of products [Hack #45] , PayPal can be as slick as you need it to be. If you take things even further, you can have PayPal notify your server [Hack #65] when you receive money, or even write a standalone application [Hack #88] to manage your sales without ever having to log into your account.
But it all begins with learning the ins and outs of your PayPal account, and that’s what this chapter is about. Chow down, and have fun, but don’t linger; there’s code to be written.
Create a PayPal Account
Sign up for your own PayPal account, which is necessary if you’ll be receiving payments or using just about any other hack in this book.
Although you can send money without creating a PayPal account [Hack #15] , there are advantages to having an account, including PayPal Buyer Protection, receiving payments, and viewing account history. And since there is no cost to create or maintain an account, the benefits easily outweigh the costs.
Here’s what you’ll need to get started:
Your email address
Your postal mailing address
Your phone number
You’ll also be asked to provide two of the following four pieces of personal information, which will be used to verify your identity if you ever forget your account password:
Your mother’s maiden name
The last four digits of your driver’s license
The last four digits of your Social Security number
Your city of birth
To sign up for a Personal PayPal account (see the introduction to Chapter 3 for information on Business accounts), follow these steps:
Go to http://www.paypal.com and click Sign Up.
Select the Personal Account option, select your country, and then click Continue.
On the Account Signup page, enter your postal mailing address. PayPal will double-check the city, state, and Zip Code, so they must be valid. The address you provide should be the same as the billing address of the credit card you plan on adding to your account, although you will be given the opportunity to change it later.
Enter your telephone number, email address, and password. The email address must correspond to a valid email account to which you have immediate access, because you won’t be able to use your PayPal account until you respond to the verification email that PayPal sends you.
Warning
For security reasons, do not use the same password for your PayPal account and your email account. Otherwise, anyone who has access to your email account will also have access to your PayPal account and the money within.
You should also enter a real phone number, since it’s one of the ways PayPal allows you to regain access to your account if you forget your password [Hack #4] .
Enter your Security Question answers. If you’re concerned about divulging real information here, then don’t enter it! You can put any secret words or phrases into these fields, provided that you’ll be able to remember them later on.
When asked if you’d like this to be a Premier Account, select No.
Tip
If anyone sends you a payment funded with a credit card, PayPal will require that you upgrade to a Premier (or Business) account at that time to accept the payment. Although there are advantages to these account types, you’ll be charged a small fee for each subsequent payment you receive, regardless of the funding source. See the introduction to Chapter 3 for further details.
Select Yes to indicate that you agree with the User Agreement and Privacy Policy, and check Yes again to indicate that you’ve read the Legal Disputes section. Enter the Security Measure characters as shown in the box [Hack #15] .
Click Signup when you’re done.
The next page instructs you how to confirm your email address, which involves nothing more than opening the email message PayPal has just sent you and clicking the link inside.
After you confirm your email address, you will be able to use your account. However, you will have limited abilities until you verify your PayPal account [Hack #2] .
Verify Your PayPal Account
Provide PayPal with your necessary account information without waiting for your monthly bank statements.
Federal banking regulations require financial institutions to obtain proof of your identity before allowing you to open a bank account, and PayPal uses this fact to add security to their system. If you have a bank account, it proves you are a real person, at least in the eyes of PayPal. To unlock all the features of a new PayPal account, you’ll have to attach a bank account and confirm it.
Once you do this, your account will be verified and the following will happen:
You’ll become eligible for Seller Protection [Hack #25] .
You’ll be able to send as much money as you like. Unverified accounts are otherwise limited in the total amount of money that can be sent ($2,000 for U.S. accounts, for instance).
You’ll be able to pay instantly from your checking account, rather than having to wait for eChecks to clear [Hack #11] .
You’ll be able to withdraw money to your bank account [Hack #20] .
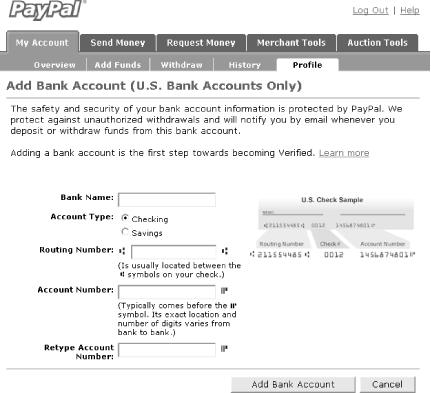
Add a Bank Account
Here’s how to become verified:
Log into your PayPal account, click the My Account tab and then click Profile.
Click the Bank Accounts link under the Financial Information heading.
Type the name of the bank that holds your checking account, and choose either Checking or Savings to indicate the type of account you’re adding.
Grab one of the checks from your checkbook and type your bank’s routing number and your account number, as illustrated in Figure 1-1.
Retype the account number in the next field to ensure there are no typos.
Click Add Bank Account when you’re finished here.
The next page that appears will inform you that your bank account was successfully added, but you’re not done yet; you still need to confirm your bank account.
Confirm an Account and Get Free Cash
PayPal makes two small deposits into your bank account, each in an amount between $.01 and $.99. Because you alone have access to your bank statement, only you and PayPal have access to the exact amounts deposited. When you receive your bank statement, return to PayPal and confirm your account by typing the respective amounts of the two deposits made to your account.
Tip
These two random deposits are yours to keep, so you can earn between two cents and $1.98 just by confirming your bank account.
Now, if you’re the patient type, waiting up to a month for your paper bank statement to arrive in the mail should be no problem. However, in most cases, you won’t have to. If your bank provides online access to your account (most do), all you need to do is log in and retrieve the two deposit amounts.
Tip
PayPal initiates these two small deposits into your bank account right away, but the banking system typically requires three to four business days to process them. So, even if you have online banking, you won’t be able to confirm a bank account the same day you add it to PayPal. Instead, give it a few days and log into your bank’s web site on the third or fourth day.
Once you have the amounts of the two deposits, log into your PayPal account. Click the My Account tab, click Profile, and then click Bank Accounts (under the Financial Information heading). Your newly added bank account should be listed here; select the account (if there’s more than one), and then click Confirm. Enter the amounts of the deposits into the Confirm Bank Account page (as shown in Figure 1-2), and click Submit when you’re done.

Your account is now verified, and you’re ready to start sending as much money as you like.
Confirm Your Mailing Address
Add a credit card and a confirmed shipping address to your PayPal account to have your payments accepted by more sellers.
Whenever you buy something online using a credit card, the store from which you made the purchase checks that the address you provided matches the address on file with your credit card company. Retailers do this as a security precaution to guard against payments made with stolen credit cards; otherwise, a thief could use your credit card number to purchase something and have it shipped anywhere.
Address matching is done through a standard system called Address Verification System/Service (AVS), which is set up by all the credit card companies. PayPal does the same thing when you add a credit card to your PayPal account:
Log into PayPal, click the My Account tab, and then click Profile.
Select Credit Cards under Financial Information.
Any credit cards currently attached to your account will be shown here. Click Add to attach a new card.
Fill in your credit card number and mailing address; make sure the address matches the one on file with your credit card company as precisely as possible.
Click Add Card when you’re done.
If PayPal is able to match the address through AVS, it will designate your address as Confirmed and you’ll be able to use your credit card to fund payments right away. Plus, your payments will be eligible for PayPal’s Seller Protection Policy [Hack #25] , and sellers (especially on eBay) will be much more likely to accept your payments.
Tip
If you’re an online seller, you’ll need to decide if and when you’ll consider shipping items to an unconfirmed address. See the introduction to Chapter 3 and [Hack #25] for account settings related to accepting payments from unconfirmed addresses.
Expanded Use Enrollment
If PayPal is unable to confirm your address through AVS, it will remain Unconfirmed and you won’t be able to make credit card payments until you complete the Expanded Use Enrollment. Essentially, PayPal initiates the process by charging your credit card US$1.95 (don’t worry; you’ll get it back). When you receive your next credit card statement, a unique, randomly generated four-digit Expanded Use Number will accompany the charge.
Tip
If you have online access to your credit card account, check your statement online after three to four business days to view the Expanded Use Number. Otherwise, you’ll have to wait for your credit card statement to arrive in the mail.
Once you obtain the Expanded Use Number, enter it into PayPal. Your address will be confirmed and you’ll be able to make payments with your credit card. Plus, you’ll get your $1.95 back in the form of a credit to your PayPal account.
Tip
If you can’t complete the Expanded Use Enrollment, you’ll have to complete Alternate Address Confirmation, which involves faxing several documents to PayPal. To qualify, you must be verified [Hack #2] , a PayPal member for more than 90 days, and a U.S. member in good standing. You also must have a Buyer Participation buyer number [Hack #7] of more than 10.
Confirming a Second Address
Although some sellers ship anywhere you ask them to, most want to abide by PayPal’s Seller Protection Policy [Hack #25] and thus will ship only to a confirmed address. Naturally, you might want to have more than one confirmed mailing address on your PayPal account.
There are two ways to go about this. The best way is to contact your credit card company and request that a second address be added to your credit card account. Most credit card banks will add an address to your credit card account for this purpose. You usually need to call your bank directly and provide them with the address. Some banks require you to fax or mail the request.
Once you have worked with your bank to have the new address added to your credit card account, you’ll need to have it confirmed by PayPal:
Log into PayPal, click the My Account tab, and then click Profile.
Select Street Address under Account Information.
Click Add, fill in the new address, and click Save when you’re done.
Select the address you just entered and click Confirm.
Fill in your credit card information and click Continue.
If everything goes smoothly, PayPal will now designate that address as Confirmed and you’ll get all the benefits of using a confirmed address.
Alternatively, if the need arises, you can use the Alternative Address Confirmation (AAC) process described on the PayPal web site.
—Patrick Breitenbach
Pay When You’ve Forgotten Your Password
Use an extra credit card to pay when you can’t get into your account and don’t have time to recover a forgotten password
If you find you have forgotten your password, PayPal can help. But if you need to make a payment now and don’t have time to recover your password (a process that can take from a minute to over a week, depending on how much you know about your own account and how current that information is), there is a shortcut: use a credit card that is not already attached to a PayPal account to make your purchase.
Warning
You can’t use a credit card already attached to an existing PayPal account; the system won’t allow it. If you have only one credit card, you’re out of luck and will need to recover your password before you can make another payment.
Note that if your debit card doubles as a credit card, you can use it with PayPal, either for a one-time purchase or, more permanently, by attaching it to your PayPal account.
Here’s how to do it:
Clear the cookies in your web browser.
Click the appropriate button to make the payment, such as a Buy Now button on a seller’s web site or an eBay checkout flow.
Choose the option for paying with a credit card if you do not have a PayPal account (“If you don’t have a PayPal account and want to pay with a credit card...”).
You will be prompted to complete your payment.
Now that you have made your purchase, don’t forget to recover your password! You have several choices at this point, depending on how much you know about your account and how current your account information is:
- Password reset by email
If one of your current email addresses is registered with your PayPal account, start the process by clicking the “Forget your password?” link in the Member Log In box on the PayPal home page. Type in your email address (one to which you currently have access), click Submit, and follow the further instructions in the email message you’ll receive shortly. Click the link in the email to go to a page where you can answer questions about the bank and credit card accounts listed on your account or your personalized security questions (see the “Security Questions and Answers” sidebar). Once your identity has been verified, you’ll be given the opportunity to choose a new password.
Tip
If you don’t receive the email message, you might have an overly aggressive spam filter. Make sure to check your incoming spam folder or temporarily disable your spam filter (or your ISP’s filter) and try again if you suspect that PayPal’s confirmation email was deleted.
- Telephone password recovery process
If you no longer use any of the email addresses registered with your PayPal account, but you do know the answer to your security questions and still use a telephone number registered with your account, you can use the telephone password recovery process:
First, click the “Forget your password?” link and enter your old email address as though you were still using it.
Next, click “I no longer have access to this email address.” The system then verifies your identity by asking you to fill in some personal information. Provide this information and then click Submit.
On the Password Recovery by Phone page, select the telephone number where you would like to be called and provide a current email address. Click Continue. A PayPal Confirmation PIN will be shown.
Next, PayPal places an automated telephone call to the phone number associated with your account. Assuming you’re able to answer, you’ll be asked to enter the PIN provided by PayPal into the telephone keypad, followed by the pound key (#).
Once you have done so, hang up and click Continue. You will be prompted to enter (and reenter) a new password and select and answer two security questions. Remember this password. Use it with the email address you just added to log in to your PayPal account.
- If all else fails
If neither of these solutions works, you can recover your password by postal mail and other means. At this point, it’s best to contact PayPal directly and have customer service help you recover your password.
Obviously, it’s best to keep all your information (email addresses, postal addresses, and phone numbers) current, so that if you ever need to recover an inaccessible account, you can do so in minutes rather than days.
Restore Your Account if It Has Been Limited
In the event that PayPal limits your account as a result of suspected fraud or other problem, you can restore it to its original, unrestricted state.
If PayPal determines that you have been engaging in fraudulent or high-risk activity (such as selling fake merchandise or using stolen credit cards) or that you have not been abiding by the terms of the user agreement (e.g., you’ve been using PayPal to sell pornographic material or weapons), PayPal will impose limits on your account. Your account might also be limited if you initiate a bank transfer that then fails due to insufficient funds or if you accept a payment that is later disputed by its sender.
PayPal often limits the account’s access to certain features, such as sending, withdrawing, or even receiving money. This helps protect any other PayPal users with whom you’ve been dealing and helps reduce subsequent losses that PayPal would otherwise have to incur.
Tip
You know that PayPal has limited your account when your Account Overview page has a pink box that says Account Access Limited. As you might expect, click the “Click here for details” link for an explanation.
PayPal prides itself on being good at spotting high-risk behavior, but they also recognize that not all high-risk transactions are necessarily fraudulent or bad and not all disputes are the seller’s fault. Thus, PayPal has an appeals process for those who have had their accounts limited.
Filing an Appeal
Needless to say, the best thing you can do if your account has been limited is to precisely follow the instructions on the web site and in the notification email you receive. Often, this entails completing a sequence of steps to provide PayPal with evidence of ownership of the PayPal account, ownership of the financials attached to the account, and verification of your own identity and address.
Warning
Only after you have completed all the required steps will a PayPal Account Review Representative review your account. For instance, if PayPal asks you to fax several documents, your account will not be reviewed until you submit all requested documents and have completed all the remaining steps.
In addition, make sure to double-check the email you received notifying you of your account’s limited access, because the PayPal Account Review Representative might have added extra steps for you to complete that are not listed on the web site. For instance, if you are a seller on eBay, PayPal will likely request tracking information for items you’ve delivered and proof of inventory for additional items you’re currently selling.
A Last Resort
If you’re really in a bind and cannot complete the steps requested of you for legitimate reasons, you can always escalate your issue by writing a letter to a PayPal executive, contacting the Better Business Bureau, or working with a legal representative.
Escalation in itself is not a guarantee that your issue will be resolved, but if your issue is legitimate, it is likely that a new pair of eyes, perhaps with more experience and background, will look at your issue and help reach a fair resolution.
Avoiding Suspicion
To prevent your account from being limited in the first place, keep your account in order by following these guidelines:
Treat your PayPal account as you would your bank account: use secret passwords and keep them to yourself!
Make sure your true name is on your PayPal account and that it matches the name on your bank and credit card accounts. If you are a business, make sure the bank account and credit card on your account are also in your business name.
Use accurate addresses and phone numbers that match those on your credit card and bank account, and keep them current. False contact information can raise suspicion on your account and make it more difficult to regain access.
Delete old or obsolete bank accounts and credit cards from your account. If you do not keep your account up-to-date, you might find yourself in a bind when your account is limited and PayPal asks you to prove ownership of a bank account with an old address.
If you are a seller, always use electronically trackable shipping methods [Hack #24] so that if the shipment or receipt of a physical good is in doubt, you can easily prove your case. Also make sure to keep proof of inventory or merchandise, such as receipts, invoices, or proof of authenticity for older, collectible items. Maintain good relationships with your suppliers so that you can easily access this information when you need it.
If you have any old or abandoned PayPal accounts, make sure to resolve your issues with those accounts and then close them. If your account has been limited and PayPal sees linked accounts with issues, such as a negative balance or outstanding buyer complaints, PayPal will probably ask you to resolve those issues as well before they’ll be willing to lift the limitation on your active account.
See Also
There are lots of things you can do to protect yourself and your account, both before and after you encounter a problem. See the following hacks for more details:
Create a Separate Login for Each Employee
Use PayPal’s Multi-User Access feature to provide a separate login for each employee in your organization.
Even though you might trust your employees to take care of your kids for the weekend, you might have second thoughts about giving them full access your organization’s PayPal account. To that end, the Multi-User Access system enables you to add up to 200 different users to a single account, each with configurable account privileges. Each user is assigned a separate login ID and password.
Adding a New User
PayPal first has you establish an Administrative email address. PayPal will send all email notifications related to your account Profile to this email address. This is a security precaution so that PayPal can alert you at a different email address if someone tries to change the primary email address on your account.
PayPal steers you in this direction the first time you try to create a new user. Even before that, you should make sure you have at least two email addresses registered and confirmed in your account [Hack #8] .
Once you have your two email addresses, you are ready:
Log in to PayPal, and go to Profile→Multi-User Access.
Select an address from the list; note that you won’t be able to select your Primary address.
To create your first login, click Add and type in the user’s name when prompted. It’s best to use the person’s actual name, but you could also consider using a job function or other nickname (e.g., Customer Service 1).
Choose a User ID (must be 10-16 characters).
Tip
The length requirement and restriction against special characters make choosing a user ID is less than optimal. Further compounding the problem, these user IDs need to be unique for all of PayPal, not just for your account (e.g., customerservice and jennifersmith were taken a long time ago). A good approach is to think up a short prefix to append to the front of each user ID, perhaps something related to your business name—for example, abcJohnSmith and abcMaryJones. User IDs are not case sensitive, so you’ll be able to log in with abcJohnSmith and abcjohnsmith.
Choose a password (must be eight characters or longer).
Check off the boxes that correspond to the privileges you want to grant this user. A good rule of thumb is to initially grant the fewest privileges possible when setting up a new user. You can always add more privileges later. But you can’t undo mishaps!
Click Save when you’re done.
You should now see something like Figure 1-3.
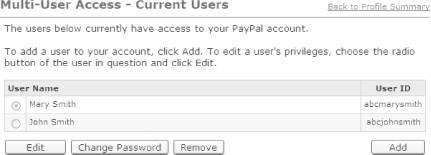
You can add up to 200 users to your account, each with different login privileges.
Setting Privileges
You have a lot of flexibility in setting up different privileges for different users, as shown in Figure 1-4. To allow read-only access, leave all boxes unchecked.
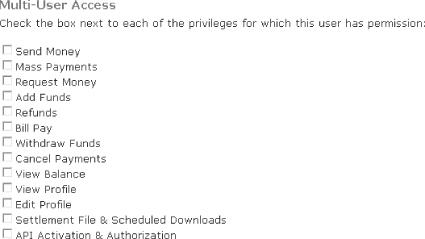
Obviously, the users and privileges you assign depends on how many employees you have and how you run your business. A typical medium-sized business might use the following setup:
- Customer Service Rep
Leave all boxes unchecked for read-only access.
- Refund Rep
Check the Refunds option.
- Financial Reconciliation
Turn on the View Balance and Settlement File options.
- Head of Finance
Check View Balance and Withdraw Funds.
If your employees or partners used to log in with your password, it’s a good idea to change it once you get everyone set up.
Adding an Administrative Account
An additional benefit of Multi-User Access is that you can create a username-based login for yourself. Traditionally, a user logs into PayPal with an email address and a password. I don’t know about you, but my email address is pretty lengthy, and having to type the ampersand (@) and dot (.) characters gets annoying.
Just add a new user to your account, and check all the boxes to give yourself full access.
Tip
You’ll probably want to leave API Activation unchecked; that setting is needed only for using the PayPal API [Hack #88] .
Responding if Something Goes Wrong
If you spot unexpected account activity, it’s best to do some research before starting to point fingers. Review all the users and their privileges. If none appear to have the privilege to perform the activity you discovered, someone else might have used your login.
Unfortunately, the PayPal site doesn’t indicate the name of the person who performed any given activity on your account. If you really get into a bind, you can contact PayPal’s Customer Service and they will be able to pull up a list of user activity. PayPal usually also has the IP address of the computer that was used, so you might be able to match it to one of your company’s PCs or determine that the activity was performed from outside your company.
—Patrick Breitenbach
Access Member Information
Use the information PayPal publishes about members to scope out sellers and buyers, and see what they can learn about you.
While all human relationships are built on trust, you might not want to rely on blind faith alone when your money is at stake. To help you determine which vendors and customers to trust and which to avoid, PayPal offers information about its members’ standing with PayPal.
Looking Up a User’s Status
You can check any PayPal account’s User Status by initiating (but not necessarily completing) a transaction with that user:
Log in to your PayPal account.
Click the Request Money tab.
Enter the email address of your prospective buyer, enter an amount to request (a single penny will do), and select the type Goods (other).
Click Continue.
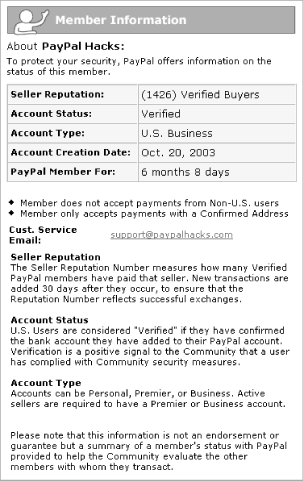
The Request Money—Confirm page that appears (shown in Figure 1-5) will tell you the account type, Seller Reputation Number, and verification status of your buyer. Click the reputation link after Recipient Status: for information on the age of the account.
Because you are just making an inquiry here and don’t actually intend to request money, click Cancel.
If you don’t complete the transaction, the would-be recipient will not be notified.
Understanding the User Status
Here are some of the things you’ll see in the Member Information box:
- Seller Reputation
Although PayPal refers to these scores as reputation numbers, they are based solely on the number of transactions completed. Unlike feedback scores at eBay and other community-oriented sites, PayPal reputation numbers are not in any way based on ratings from other PayPal members.
- Account Status
This field shows whether or not the account is verified [Hack #2] .
- Account Type
This shows the country in which the account is registered and whether it is a Personal, Premier, or Business account (the differences between these account types are described in the introduction to Chapter 3).
- Account Creation Date
This field is self-explanatory: the date that the PayPal account was created. (This information is restated in the PayPal Member For field.)
Checking Your Reputation as a Seller
Before conducting business or making payments with your PayPal account, you’d be wise to know what others can learn about you through PayPal.
If you have a Premier or Business account, a number will appear in parentheses after the word Verified or Unverified in the Account Overview page. Click the number to display your Member Information Box, the same box others see when they use the procedure in the beginning of this hack.
To find the Member Information Box for your Personal account, you’ll need to use another PayPal account (either your own or a friend’s) and follow the same procedure.
Checking Your Reputation as a Buyer
To find out your Buyer Reputation Number, go to https://www.paypal.com/REPNUM. If you have not logged in, you will be prompted to do so. Click “View your Buyer and Seller Reputation Numbers” near the bottom of the page to display your Buyer and Seller Reputation Numbers.
As confusing as it might be, your Buyer Reputation Number is not the same as your Seller Reputation Number. See the “Why Is My Seller Reputation Zero?” sidebar for more information.
Manage PayPal Email
Set up multiple email accounts and filtering to manage PayPal email notifications more efficiently.
PayPal sends a lot of email to its members, ranging from payment notifications to PayPal news and account updates. It’s not uncommon for important emails to get lost in the shuffle. But there are several things you can do to make PayPal emails more manageable.
There are two primary strategies to make email more manageable:
Set up multiple email accounts for different purposes.
Use the routing and filtering capabilities of your email reader to segregate the different types of email.
Setting Up Multiple Email Addresses
As you’ve probably figured out, email addresses are very important at PayPal. You log in with an email address, send money to other email addresses, and receive “You’ve got cash” emails (the most-read email messages on the Internet, by the way!) in your own email inbox.
But PayPal doesn’t limit you to one email address, and with good reason: by associating multiple email addresses with a single account, it can be easier to deal with incoming payments and the associated orders that need to be filled.
The first thing you can do is register a second email address to be used to notify you of changes to your account Profile. If you are using PayPal’s Multi-User Access feature [Hack #6] , you’ve already set up an administrative email address. But if not, consider doing so anyway, even if you don’t intend to use the Multi-User Access feature.
PayPal uses the administrative email address to send notices when you make changes to your Profile. This is primarily a security measure intended to make it more difficult for a thief or phisher to gain access to your account and change your primary email address.
Before setting up an administrative email address, you should have access to at least two email accounts. Many ISPs allow single users to hold multiple email accounts, and if you have your own domain name, so much the better. Otherwise, you can use one of the free providers, such as Yahoo, Hotmail or Gmail.
Log into PayPal and click Profile.
Go to Email under Account Information.
Make sure you have at least two confirmed email addresses listed (there’s no indicator that an email address is confirmed, but an Unconfirmed label will appear next to unconfirmed addresses). If you need to confirm an address, do so now by selecting an address and clicking Confirm. Or, click Add to enter a new address, and then confirm it.
PayPal sends an email to the new account; open it, click the link inside, and enter your password at the PayPal web site when prompted.
Next, set up your administrative email by returning to the Profile page and clicking Multi-User Access.
Select the email address that you want to use as the administrative email address and click Save.
Using Different Email Addresses
Probably the most beneficial aspect to using more than one email address is that you can more easily separate payments made for different purposes. For instance, you might have both website@paypalhacks.com and ebay@paypalhacks.com registered to a single PayPal account, one for web site payments and the other for eBay auction payments.
Tip
Not only does PayPal send the “You’ve got cash” notification to the email address to which the payment was sent, but PayPal also keeps track of that address for future reference. For example, in PayPal’s downloadable logs, one of the columns lists which email address received the payment that was sent, making it easy to sort and group payments.
You can type either email address into your web site payment buttons [Hack #28] , into eBay’s Sell Your Item form, or even in text links [Hack #17] .
Regardless of how you end up using them, you’ll most likely want to filter your email so that different payment notifications are sent to different places.
Filtering Your Incoming Email
After setting up a second address, you’ll still receive a lot of email from PayPal; it’ll just be divided across both addresses. Most email applications, as well as many web-based email services, offer ways to filter, route, and automatically file emails in different folders.
A basic filter in Outlook Express, shown in Figure 1-6, sorts messages into different folders depending on the email address to which the payment was sent.
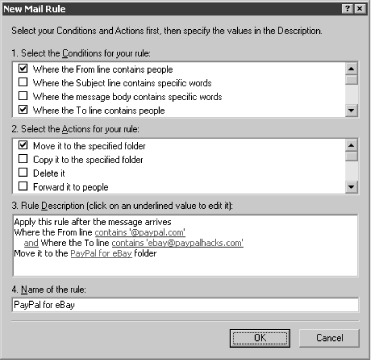
Here’s how to set up a Mail Rule in Outlook Express for Windows to separate your PayPal email:
Start Outlook Express
Right-click on Local Folders and select New Folder.
Type
PayPal for eBayand press Enter to create a new mail folder.Go to Tools→Message Rules→Mail.
Turn on both the “Where the From line contains people” and “Where the To line contains people” option in box 1.
Turn on the “Move it to the specified folder” option in box 2.
In box 3, next to “Where the From line,” click “contains people” and type
@paypal.com. Click Add and then OK when you’re done here.In box 3, next to “Where the To line,” click “contains people” and type the first of your email addresses on file with PayPal (e.g., ebay@paypalhacks.com). Click Add and then OK when you’re done here, too.
Click “specified” in box 3, and select the new PayPal folder you created in step 3.
Name the rule something like PayPal in box 4, click OK, and then click OK again when you’re done.
Repeat these steps for each additional email address you have on file for PayPal, specifying a different folder for each address.
That’s just a start; you can be creative, doing such things as automatically sending “Thank you for your purchase” emails to all your eBay customers, for instance.
You can also prioritize your mail by severity: set up a mail rule that looks for “Notification of Reversed Transaction” in the Subject line and route it to a Reversals folder.
Setting Notification Preferences
PayPal sends out a lot of email to its members, but luckily, most of it can be turned off by using the Notifications settings in your account Profile, as shown in Figure 1-7.
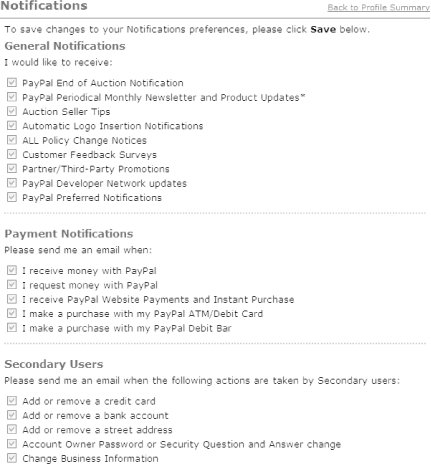
Tip
As desirable as it might be, you won’t be able to turn off every single notification. PayPal will still send the occasional email describing changes to the Terms of Use and major product changes.
Some PayPal users actually prefer to receive every email that PayPal sends, and given the sensitive nature of the business, this is understandable. Since you can automatically filter the various email messages PayPal sends you, you might be more inclined to sign up for all of PayPal’s emails. Of course, if a message subsequently sneaks through the Mail Rule, you can easily modify the rule or create a new filter to catch it the next time. That way, you’ll always have an archive of messages relating to your account, without having them clutter up your Inbox.
—Patrick Breitenbach
Get Help from PayPal
When things go wrong, don’t run screaming for the hills. Use PayPal’s various forms and phone numbers to get help fast.
Even if you aren’t much of a fan of online help systems, it’s probably the best place to start if you run into a problem with your account. PayPal Help is especially useful when it comes to PayPal’s vast assortment of policies and procedures.
You’ll find a link to Help in the upper-right corner of every page of the PayPal site. There are two main ways to use PayPal Help:
Browse by category (e.g., Making Payments, Seller Tools, etc.)
Search using natural language questions (e.g., “how do I earn interest?”)
As with most search engines, you don’t have to type a whole question to get good results. “add email” works just as well as “Can I add another email address?”
Tip
If the answer you find is particularly good or bad, you can do your good deed for the PayPal community by pressing the “Was the answer helpful?” buttons. We’re told that PayPal actually does modify the Help system based on this feedback. In fact, PayPal performed a large-scale redesign of the Help system in early 2004.
Unfortunately PayPal’s Help URLs do not remain constant, so don’t try to bookmark specific pages for future reference. If you need to refer a friend or customer to a PayPal Help page, it’s best to indicate a search term that brings up the article in question.
Email Support
Like many companies, PayPal doesn’t let you send a regular email directly to Customer Service. You must navigate through some web forms and give the web site the chance to answer your question. But eventually, you can write an open-ended question to PayPal. PayPal has a large support staff in Omaha, Nebraska, as well as in Omaha’s unofficial sister city, Dublin, Ireland, to answer your questions and process your requests.
Tip
If you have a PayPal account (and are able to log in), you should always log in before sending your message. Doing so makes it much easier for PayPal to locate and reference your account.
As with any email inquiry, it’s crucial that you provide as specific and clear information about your situation as you can. Instead of paraphrasing error messages or web page text, copy and paste the exact passage. PayPal gives you up to 1,000 characters with which to write your question, which should cover most situations.
Telephone Support
Let’s be honest; some situations require talking to an actual person on the phone:
If you’re in the U.S., call PayPal toll-free at 888-221-1161.
If you are outside the U.S. or for any reason need to use a non-toll-free number, call 402-935-2050. European customers can call 0870-730-7191.
PayPal Customer Service representatives can talk only to the primary contact listed on the account. To verify this, they will likely ask you for your telephone number, email address, or last four digits from your credit card or bank account number, so make sure to have these on hand when you call.
If you don’t have access to a live Internet connection while calling, try to prepare for the call ahead of time by collecting all the specific information about your inquiry. This information might include such details as the PayPal transaction ID, payment date and amount, payment recipient, eBay auction number and username, online store web site address, and so on.
Support Forums
There are several online support forums that can also be good places to ask questions and get answers. PayPal has two official forums:
The PayPal forum at the eBay Discussion Boards (http://forums.ebay.com/db2/forum.jsp?forum=97)
The PayPal Developer Forums (http://developer.paypal.com)
Good independent forums include:
- Fatwallet (http://www.fatwallet.com)
For general information about a variety of online commerce topics.
- Vendio Community (http://www.vendio.com/mesg/)
For discussions about online auctions. See the eBay boards, as well as the PayPal board under Vendio Partner Services.
- PayPalDev.org (http://www.paypaldev.org)
eBay University
Finally, eBay offers hands-on courses in which you can learn a lot about trading on eBay from expert instructors. While eBay University is heavily focused on eBay, PayPal is becoming an increasingly popular topic. Furthermore, instructors usually stick around after the course to answer any PayPal questions you might have. To find out when eBay University will be in your area, check the eBay site (http://www.ebay.com/university/).
—Patrick Breitenbach
Get PayPal Hacks now with the O’Reilly learning platform.
O’Reilly members experience books, live events, courses curated by job role, and more from O’Reilly and nearly 200 top publishers.

