For the longest time, the success of Mac OS X was up in the air. It all boiled down to one thing: programs. Without applications, no operating system can survive, and for most people, switching to Mac OS X meant having to buy all new, Mac OS X-compatible programs.
Fortunately, the tide has turned at last. All of the big-name programs have finally been made over in the Mac OS X mold, and thousands of smaller, lesser-known programs are sprouting up to make this operating system more interesting, useful, and fun.
All you need to do now is figure out how to use them.
As you start using all your marvelous Mac OS X programs, you could find yourself spending more time sifting through open windows than breathing. The following hints can help you manage the window glut. (Also be sure to read the Exposé hints section of this chapter, where you’ll learn to master the hidden tricks of Panther’s new window management tool.)
If there are a lot of open windows cluttering your screen, you can minimize them individually to the Dock as a housekeeping measure. Hiding them one by one, however, takes a lot of time that would be better spent playing Bugdom, for example.
It’s easier to use the Hide Others command, which appears in each program’s Application menu (the boldfaced menu that bears its name). Choosing Hide Others instantly hides the windows of all programs except the one you’re currently using—an especially likeable trick if your program offers the semi-standard Option-
-H keyboard equivalent.
Hiding other programs isn’t the same thing as quitting them (which takes time) or even minimizing their windows (which entails a good deal of clicking to bring them back later). It’s simply an invisibility mode unto itself.
Alas, not every program offers the Option-
-H keyboard shortcut, and in those situations, mousing up to the Hide Others command is a lot of trouble.
Fortunately, that shortcut has a shortcut of its own: rather than using the Hide Others command, you may find it faster simply to Option-
-click the Dock icon of the program you want to keep around. (Option-
-clicking the icon for the Finder is an especially useful tactic.) All other programs make themselves scarce.
Tip
Shareware launcher programs like DragThing (http://www.dragthing.com) can also perform this “other program hiding” service automatically every time you switch programs.
If you’re still not convinced of the benefits of hiding applications (see the previous two hints), consider this fact: hidden applications demand considerably less CPU power than visible applications. It’s especially true for programs that perform a lot of window updating, such as iMovie (when it’s rendering), Safari (when you’re downloading), and iDVD (when it’s showing motion menus).
However, there’s a program you should nearly always hide: Software Update. When it has just downloaded an update and reached the “optimizing” stage, the Software Update window can use up to 50 percent of your computer’s processor speed. The next time you install an update, then, try hiding the Software Update application—the entire installation process should go significantly faster.
This tip may sound like heresy to old-time Mac mavens, but here it is: get into the habit of opening your most-used programs and leaving them open forever. Most open programs in Mac OS X don’t occupy much memory or use up much of your processor’s attention, especially when they’re in the background. Sure, there are a few exceptionally memory-hungry programs (Microsoft Word comes to mind), but most sit just nicely in the background, awaiting your next command (see Figure 4-1).
Note
If you plan to leave numerous programs open, it’s best to make sure you’ve got more than the Apple-mandated 128 MB of RAM. See Sidebar 1.2 for details.

Figure 4-1. This Dock (shown here split to fit) depicts a workload of open applications, including some major programs like Photoshop Elements, Microsoft Word and Excel, iPhoto, and Keynote. In a lesser operating system, this scenario would be a recipe for crash soufflé; in Mac OS X, it just means you’ve learned to stop fearing system instability and are focused on getting your work done.
Learning to leave programs running is part of the adjustment that Mac OS 9 devotees make in adapting to Mac OS X. In the bad old days, many folks’ Mac OS 9 workflow involved opening a program, doing what needed to be done, saving the file, and quitting the application.
No longer. In Mac OS X, individual programs do crash (rarely), but they don’t sabotage your entire computer in the process. In fact, Apple’s engineers are so proud of this improvement, they actually point it out when an application does crash (see Figure 4-2).

Although the Dock provides an easy way to switch among open programs (by clicking their icons), there are two reasons why you might use the keyboard combination
-Tab instead. First, the true efficiency expert grows to detest the time it takes to remove his hands from the keyboard to grab the mouse and click a Dock icon. Second, if you leave multiple programs running, it can be hard to find the Dock icon you want.
When you press
-Tab, an attractive semi-transparent application switcher pops onto the screen, as seen in Figure 4-3.

Figure 4-3. To switch programs without using the Dock, press ![]() -Tab to display this handy application switcher. Keep
-Tab to display this handy application switcher. Keep ![]() pressed, and then use Tab and ` (next to the 1 key) to cycle forward and backward through the list.
pressed, and then use Tab and ` (next to the 1 key) to cycle forward and backward through the list.
The switcher will stay onscreen as long as you hold down
. From here on, there are a number of actions you can take:
While still holding
, press Tab and ` (next to the 1 key) to cycle forward and backward through the list of running programs. Release
when the program you wish to switch to is highlighted.
Move your mouse’s scroll wheel up and down to scroll across the list of running programs. Release
when the program you wish to switch to is highlighted.
Move your mouse over the program you want to bring forward, and click the mouse button to activate it.
With any program highlighted, press H to hide all of its windows.
With any program highlighted, press Q to quit it.
You can also use the
-Tab application switcher with Exposé, Apple’s new screen organization tool. (See Section 4.2 for the corresponding hints.)
The best part of the
-Tab trick is that a single press of
-Tab takes you to the program you used most recently, and then another single press returns you to the program you started in. Imagine that, for example, you’re often switching between two programs—your Web browser and your word processor, for example. Well, with the
-Tab method, if you have five other programs open, you won’t be wasting your time
-Tabbing your way through all open programs just to “get back” to your Web browser.
If you use keyboard shortcuts a lot, chances are you’ve accidentally hit
-W for the wrong program a few times. For instance, if you browse the Web and use iChat at the same time, you may lose track of which window is active and accidentally close the wrong one.
Using Mac OS X 10.3’s ability to create new keyboard shortcuts, though, you can easily prevent such unwanted window closures—and not just in iChat and Safari. To do so, you redefine the keyboard shortcut for the Close command to something you’re less likely to hit accidentally. Assuming you’re interested in changing the shortcut for iChat, here’s what you do:
Quit iChat if it’s running.
Although this step isn’t strictly necessary, it’s always a good idea to make sure a program you’re modifying isn’t running.
Open System Preferences → Keyboard → & Mouse → > Keyboard Shortcuts tab.
While you may know that this feature can be used to create new keyboard shortcuts, you may not know that it can also be used to redefine existing shortcuts. That’s the trick you’ll use to protect your iChat windows from accidental closure.
Click the plus sign in the lower-left part of the window to add a new keyboard shortcut.
Select iChat from the pop-up menu at the top of the dialog box.
Type “Close” in the Menu Title box. Then click in the Keyboard Shortcut box and press Shift-
-W to define your new keystroke.
At this point, the dialog box should look like Figure 4-4. Click Add to save your changes.
When you launch iChat the next time, the File → Close menu item will display the Shift-
-W shortcut that you created. You can use this same trick with any application, as well as with nearly any menu item. (Just make sure you know the exact spelling of the menu item within the program—some may use Close Window instead of just Close.) For example, you could reassign
-Q (Quit) to Shift-
-Q in programs that you’d like to leave running all of the time. There, no more accidental quitting!
Unfortunately, not every program will accept customized shortcuts. The Keyboard Shortcuts pane, though, will alert you if you choose a non-customizable application (such as Photoshop Elements).
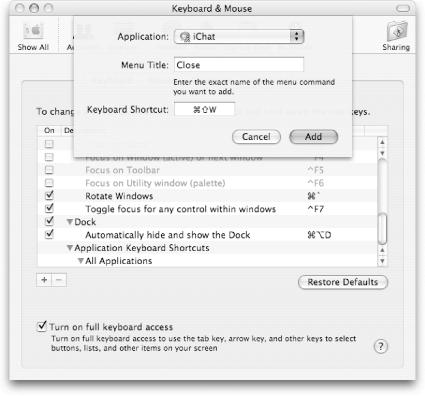
Figure 4-4. If you want the new Close shortcut to be ![]() -Shift-W, this is what the dialog box should look like. You can set the shortcut to whatever you want, though—it doesn’t need to include the
-Shift-W, this is what the dialog box should look like. You can set the shortcut to whatever you want, though—it doesn’t need to include the ![]() key. If you often find yourself choosing Font Styles in TextEdit, for example, you might want to assign the F8 key as its shortcut.
key. If you often find yourself choosing Font Styles in TextEdit, for example, you might want to assign the F8 key as its shortcut.
Get Mac OS X Power Hound, Second Edition now with the O’Reilly learning platform.
O’Reilly members experience books, live events, courses curated by job role, and more from O’Reilly and nearly 200 top publishers.

