Chapter 1. Getting Started with Kubernetes
In this first chapter we present recipes that will help you get started with Kubernetes. We show you how to use Kubernetes without installing it and introduce components such as the command-line interface (CLI) and the dashboard, which allow you to interact with a cluster, as well as Minikube, an all-in-one solution you can run on your laptop.
1.1 Installing the Kubernetes CLI, kubectl
Solution
The easiest option is to download the latest official release. For example, on a Linux system, to get the latest stable version, enter the following:
$ wget https://dl.k8s.io/release/$(wget -qO - https://dl.k8s.io/release/
stable.txt)/bin/linux/amd64/kubectl

$ sudo install -m 755 kubectl /usr/local/bin/kubectl
Using the Homebrew package manager, Linux and macOS users can also install kubectl:
$ brew install kubectl
After installation, make sure you have a working kubectl by listing its version:
$ kubectl version --client
Client Version: v1.28.0
Kustomize Version: v5.0.4-0.20230...
Discussion
kubectl is the official Kubernetes CLI and is available as open source software, which means you could build the kubectl binary yourself if you needed. See Recipe 15.1 to learn about compiling the Kubernetes source code locally.
It’s useful to note that Google Kubernetes Engine users (see Recipe 2.11) can install kubectl using gcloud:
$ gcloud components install kubectl
Also note that in the latest versions of Minikube (see Recipe 1.2), you can invoke kubectl as a subcommand of minikube to run a kubectl binary that matches the cluster version:
$ minikube kubectl -- version --client
Client Version: version.Info{Major:"1", Minor:"27", GitVersion:"v1.27.4", ...}
Kustomize Version: v5.0.1
See Also
-
Documentation on installing
kubectl
1.2 Installing Minikube to Run a Local Kubernetes Instance
Solution
Minikube is a tool that lets you easily use Kubernetes on your local machine.
To install the Minikube CLI locally, you can get the latest prebuilt release or build from source. To install the latest release of minikube on a Linux-based machine,
do this:
$ wget https://storage.googleapis.com/minikube/releases/latest/
minikube-linux-amd64 -O minikube


$ sudo install -m 755 minikube /usr/local/bin/minikube
This will put the minikube binary in your path and make it accessible from
everywhere.
Once it’s installed, you can verify the Minikube version with the following command:
$ minikube version
minikube version: v1.31.2
commit: fd7ecd...
Discussion
Minikube can be deployed as a virtual machine, a container, or bare metal. This is configured using the --driver flag while creating a cluster on Minikube. When this flag is not specified, Minikube will automatically select the best available runtime environment.
A hypervisor is a software or hardware component that creates and manages virtual machines. It is responsible for allocating and managing the physical resources (CPU, memory, storage, network) of a host system and allowing multiple virtual machines (VMs) to run concurrently on the same physical hardware. Minikube supports a range of hypervisors, such as VirtualBox, Hyperkit, Docker Desktop, Hyper-V, and so on. The drivers page gives an overview of the supported runtimes.
Minikube can also use a container runtime to create a cluster on a host machine. This driver is available only on a Linux-based host, where it’s possible to run Linux containers natively without having to use a VM. While a container-based runtime does not offer the same level of isolation as a virtual machine, it does offer the best performance and resource utilization. At the time of writing, Minikube has support for Docker Engine and Podman (experimental).
Other tools that can be used for running local Kubernetes clusters using Linux containers are as follows:
-
Kubernetes in Docker Desktop (see Recipe 1.6)
-
kind (see Recipe 1.5)
See Also
-
minikubesource on GitHub
1.3 Using Minikube Locally for Development
Problem
You want to use Minikube locally for testing and development of your Kubernetes application. You have installed and started minikube (see Recipe 1.2) and want to know a few extra commands to simplify your development experience.
Solution
Use the minikube start command to create a Kubernetes cluster locally:
$ minikube start
By default the cluster will be allocated 2 GB of RAM. If you don’t like the defaults, you can override parameters such as the memory and number of CPUs, as well as picking a certain Kubernetes version for the Minikube VM—for example:
$ minikube start --cpus=4 --memory=4096 --kubernetes-version=v1.27.0
Additionally, you can specify the number of cluster nodes by overriding the default value of one node:
$ minikube start --cpus=2 --memory=4096 --nodes=2
To inspect the status of the Minikube cluster, do this:
$ minikube status
minikube
type: Control Plane
host: Running
kubelet: Running
apiserver: Running
kubeconfig: Configured

minikube-m02
type: Worker
host: Running
kubelet: Running
Similarly, to inspect the status of the Kubernetes cluster running inside Minikube, do this:
$ kubectl cluster-info
Kubernetes control plane is running at https://192.168.64.72:8443
CoreDNS is running at https://192.168.64.72:8443/api/v1/namespaces/
kube-system/services/kube-dns:dns/proxy

To further debug and diagnose cluster problems, use 'kubectl cluster-info dump'.
The Kubernetes cluster created with Minikube utilizes resources of the host machine, so you need to make sure your host has the resources available. More importantly, when you are done, do not forget to stop it with minikube stop to release the system resources.
Discussion
The Minikube CLI offers commands that make your life easier. The CLI has built-in help that you can use to discover the subcommands on your own—here’s a snippet:
$ minikube
...
Basic Commands:
  start            Starts a local Kubernetes cluster
  status           Gets the status of a local Kubernetes cluster
  stop             Stops a running local Kubernetes cluster
  delete           Deletes a local Kubernetes cluster
...
Configuration and Management Commands:
  addons           Enable or disable a minikube addon
...
Aside from start, stop, and delete, you should become familiar with the ip, ssh, tunnel, dashboard, and docker-env commands.
Tip
If for any reason your Minikube becomes unstable or you want to start fresh, you can remove it with minikube stop and minikube delete. Then minikube start will give you a fresh installation.
1.4 Starting Your First Application on Minikube
Problem
You’ve started Minikube (see Recipe 1.3), and now you want to launch your first application on Kubernetes.
Solution
As an example, you can start the Ghost microblogging platform on Minikube using two kubectl commands:
$ kubectl run ghost --image=ghost:5.59.4 --env="NODE_ENV=development"
$ kubectl expose pod ghost --port=2368 --type=NodePort
Monitor the pod manually to see when it starts running:
$ kubectl get pods
NAME                     READY     STATUS    RESTARTS   AGE
ghost-8449997474-kn86m   1/1       Running   0          24s
Now you can use the minikube service command to automatically load the application service URL in the web browser:
$ minikube service ghost
Discussion
The kubectl run command is called a generator; it is a convenience command to create a Pod object (see Recipe 4.4). The kubectl expose command is also a generator, a convenience command to create a Service object (see Recipe 5.1) that routes network traffic to the containers started by your deployment.
When you do not need the application anymore, you can remove the Pod to release the cluster resources:
$ kubectl delete pod ghost
Additionally, you should delete the ghost service that was created by the kubectl expose command:
$ kubectl delete svc ghost
1.5 Using kind to Run Kubernetes Locally
Problem
kind is an alternative way to run Kubernetes locally. It was originally designed for testing Kubernetes but is now also often used as a way to try Kubernetes-native solutions on a laptop with minimal fuss. You want to use kind locally for testing and developing your Kubernetes application.
Solution
The minimum requirements for using kind are Go and a Docker runtime. kind is easy to install on any platform, for example using brew:
$ brew install kind
Then, creating a cluster is as simple as doing this:
$ kind create cluster
Deleting it is just as easy:
$ kind delete cluster
Discussion
Because kind was originally developed for testing Kubernetes, one of its core design principles is that it should lend itself well to automation. You might want to consider using kind if you plan on automatically deploying Kubernetes clusters for testing purposes.
See Also
-
The official kind Quick Start guide
1.6 Using Kubernetes in Docker Desktop
Problem
Docker Desktop is an offering built on top of Docker Engine that provides a number of useful developer tools, including a built-in version of Kubernetes and an associated load balancer to route traffic into the cluster. This means you can install a single tool and have access to pretty much everything you need to get started locally. You want to use Docker Desktop locally for testing and developing your Kubernetes application.
Solution
Install Docker Desktop and make sure to enable Kubernetes during the installation process.
You can activate and deactivate Kubernetes from Docker Desktop’s settings panel, as shown in Figure 1-1. You might want to do this if you’re using Docker Desktop for its Docker Engine but aren’t using Kubernetes, as this will save resources on your computer. As shown here, the settings panel also shows you which version of Kubernetes is provided by Docker Desktop, which can be useful when debugging as certain solutions might have requirements on the minimum or maximum version of Kubernetes that they can run on.

Figure 1-1. Snapshot of the Docker Desktop Kubernetes settings panel
It is worth noting that the version of Kubernetes embedded into Docker Desktop lags behind the latest Kubernetes release by a few versions, whereas Minikube tends to be more up to date.
As shown in Figure 1-2, the Docker Desktop toolbar menu lets you easily switch kubectl contexts between different local clusters, which means you can have Minikube and Docker Desktop’s Kubernetes running at the same time but switch between them (not that we recommend doing this). For information on how to do this directly from kubectl, see Recipe 1.7.
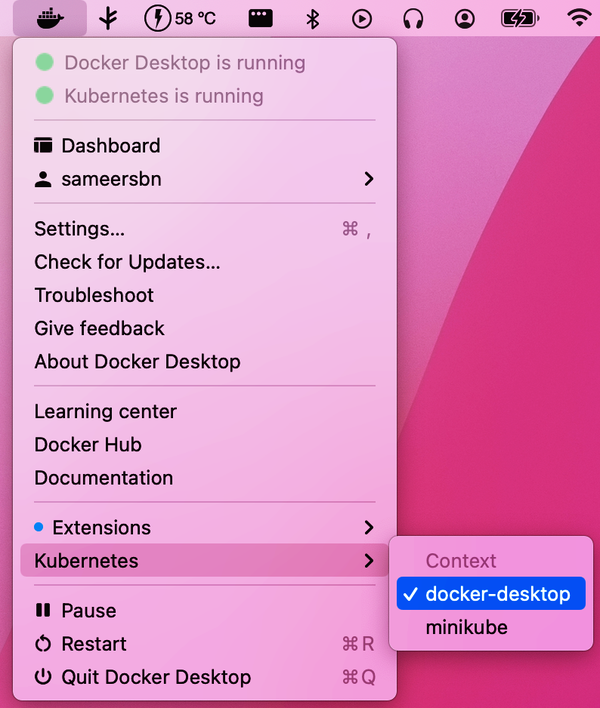
Figure 1-2. Snapshot of the Docker Desktop context switcher for kubectl
Discussion
Although it is a quick and easy way to get started with Kubernetes, be aware that Docker Desktop is not open source, and that the free version is restricted for use by individuals, small businesses, students and educators, and non-commercial open source developers.
Docker Engine, on the other hand, which can be used to run Minikube, has an Apache 2.0 license, as does Minikube itself.
1.7 Switching kubectl Contexts
Problem
kubectl is always configured to speak to a given Kubernetes cluster by default, and this configuration is part of something called the context. If you’ve forgotten which cluster kubectl is set to, want to switch between clusters, or want to change other context-related parameters, then this recipe is for you.
Solution
To view the contexts available to kubectl, use the kubectl config get-contexts command:
$ kubectl config get-contexts
CURRENT   NAME             CLUSTER          AUTHINFO         NAMESPACE
          docker-desktop   docker-desktop   docker-desktop
          kind-kind        kind-kind        kind-kind
*         minikube         minikube         minikube         default
As you can see from the output, in this case there are three Kubernetes clusters available to kubectl, and the current context is set to speak to the minikube cluster.
To switch to the kind-kind cluster, execute the following command:
$ kubectl config use-context kind-kind
Switched to context "kind-kind".
Discussion
If you want to use your local kubectl to access a remote cluster, you can do so by editing the kubeconfig file. Learn more about the kubeconfig file in the official documentation.
1.8 Switching Contexts and Namespaces Using kubectx and kubens
Solution
kubectx and kubens are a couple of popular open source scripts that make it much easier to switch contexts for kubectl and to switch namespaces so that you don’t have to explicitly set the namespace name for every command.
There are plenty of available installation options. If you’re able to use brew, then you can try this:
$ brew install kubectx
You can then easily list the available kubectl contexts like so:
$ kubectx
docker-desktop
kind-kind
minikube
and switch contexts just as easily:
$ kubectx minikube
Switched to context "minikube".
Similarly, kubens lets you easily list and switch namespaces:
$ kubens
default
kube-node-lease
kube-public
kube-system
test
$ kubens test
default
Context "minikube" modified.
Active namespace is "test".
All commands from then onward will be performed in the context of the chosen namespace:
$ kubectl get pods
default
No resources found in test namespace.
See Also
Get Kubernetes Cookbook, 2nd Edition now with the O’Reilly learning platform.
O’Reilly members experience books, live events, courses curated by job role, and more from O’Reilly and nearly 200 top publishers.

