Chapter 4. Creating and Modifying Fundamental Workloads
In this chapter, we present recipes that show you how to manage fundamental Kubernetes workload types: pods and deployments. We show how to create deployments and pods via CLI commands and from a YAML manifest and explain how to scale and update a deployment.
4.1 Creating a Pod Using kubectl run
Discussion
The kubectl run command can take a number of arguments to configure additional parameters of the pods. For example, you can do the following:
-
Set environment variables with
--env. -
Define container ports with
--port. -
Define a command to run using
--command. -
Automatically create an associated service with
--expose. -
Test a run without actually running anything with
--dry-run=client.
Typical usages are as follows. To launch NGINX serving on port 2368 and create a service along with it, enter the following:
$ kubectl run nginx --image=nginx --port=2368 --expose
To launch MySQL with the root password set, enter this:
$ kubectl run mysql --image=mysql --env=MYSQL_ROOT_PASSWORD=root
To launch a busybox container and execute the command sleep 3600 on start, enter this:
$ kubectl run myshell --image=busybox:1.36 --command -- sh -c "sleep 3600"
See also kubectl run --help for more details about the available arguments.
4.2 Creating a Deployment Using kubectl create
Solution
Use kubectl create deployment to create a deployment manifest on the fly. For example, to create a deployment that runs the WordPress content management
system, do the following:
$ kubectl create deployment wordpress --image wordpress:6.3.1

$ kubectl get deployments.apps/wordpress
NAME        READY   UP-TO-DATE   AVAILABLE   AGE
wordpress   1/1     1            1           90s
Discussion
The kubectl create deployment command can take a number of arguments to configure additional parameters of the deployments. For example, you can do the following:
-
Define container ports with
--port. -
Define the number of replicas using
--replicas. -
Test a run without actually running anything with
--dry-run=client. -
Provide the created manifest using
--output yaml.
See also kubectl create deployment --help for more details about the available arguments.
4.3 Creating Objects from File Manifests
Solution
Use kubectl apply like so:
$ kubectl apply -f <manifest>
In Recipe 7.3 you’ll see how to create a namespace using a YAML manifest. This is one of the simplest examples as the manifest is very short. It can be written in YAML or JSON—for example, with a YAML manifest file myns.yaml like so:
apiVersion:v1kind:Namespacemetadata:name:myns
You can create this object with this:
$ kubectl apply -f myns.yaml
Check that the namespace was created with this:
$ kubectl get namespaces
Discussion
You can point kubectl apply to a URL instead of a filename in your local filesystem. For example, to create the frontend for the canonical Guestbook application, get the URL of the raw YAML that defines the application in a single manifest and enter this:
$ kubectl apply -f https://raw.githubusercontent.com/kubernetes/examples/
    master/guestbook/all-in-one/guestbook-all-in-one.yaml
Check to see the resources that were created by this operation, for example with this:
$ kubectl get all
4.4 Writing a Pod Manifest from Scratch
Solution
A pod is an /api/v1 object, and like any other Kubernetes object, its manifest file contains the following fields:
-
apiVersion, which specifies the API version -
kind, which indicates the type of the object -
metadata, which provides some metadata about the object -
spec, which provides the object specification
The pod manifest contains an array of containers and an optional array of volumes (see Chapter 8). In its simplest form, with a single container and no volume, it looks something like this:
apiVersion:v1kind:Podmetadata:name:oreillyspec:containers:-name:oreillyimage:nginx:1.25.2
Save this YAML manifest in a file called oreilly.yaml and then use kubectl to create it:
$ kubectl apply -f oreilly.yaml
Check to see the resources that were created by this operation, for example with this:
$ kubectl get all
Discussion
The API specification of a pod is much richer than what is shown in the Solution, which is the most basic functioning pod. For example, a pod can contain multiple containers, as shown here:
apiVersion:v1kind:Podmetadata:name:oreillyspec:containers:-name:oreillyimage:nginx:1.25.2-name:safariimage:redis:7.2.0
A pod can also contain volume definitions to load data in the containers (see Recipe 8.1), as well as probes to check the health of the containerized application (see Recipes 11.2 and 11.3).
A description of the thinking behind many of the specification fields and a link to the full API object specification are detailed in the documentation.
Note
Unless for very specific reasons, never create a pod on its own. Use a Deployment object (see Recipe 4.5) to supervise pods—it will watch over the pods through another object called a ReplicaSet.
4.5 Launching a Deployment Using a Manifest
Solution
Write a deployment manifest. For the basics, see also Recipe 4.4.
Let’s say you have manifest file called fancyapp.yaml with the following contents:
apiVersion:apps/v1kind:Deploymentmetadata:name:fancyappspec:replicas:5selector:matchLabels:app:fancytemplate:metadata:labels:app:fancyenv:developmentspec:containers:-name:siseimage:gcr.io/google-samples/hello-app:2.0ports:-containerPort:8080env:-name:SIMPLE_SERVICE_VERSIONvalue:"2.0"
As you can see, there are a couple of things you might want to do explicitly when launching the app:
-
Set the number of pods (
replicas), or identical copies, that should be launched and supervised. -
Label it, such as with
env=development(see also Recipes 7.5 and 7.6). -
Set environment variables, such as
SIMPLE_SERVICE_VERSION.
Now let’s look at what the deployment entails:
$ kubectl apply -f fancyapp.yaml
deployment.apps/fancyapp created

$ kubectl get deployments
NAME       READY   UP-TO-DATE   AVAILABLE   AGE
fancyapp   5/5     5            5           57s

$ kubectl get replicasets
NAME                  DESIRED   CURRENT   READY     AGE
fancyapp-1223770997   5         5         0         59s

$ kubectl get pods -l app=fancy
NAME                                 READY   STATUS    RESTARTS      AGE
fancyapp-74c6f7cfd7-98d97            1/1     Running   0             115s
fancyapp-74c6f7cfd7-9gm2l            1/1     Running   0             115s
fancyapp-74c6f7cfd7-kggsx            1/1     Running   0             115s
fancyapp-74c6f7cfd7-xfs6v            1/1     Running   0             115s
fancyapp-74c6f7cfd7-xntk2            1/1     Running   0             115s
Warning
When you want to get rid of a deployment, and with it the replica sets and pods it supervises, execute a command like kubectl delete deploy/fancyapp. Do not try to delete individual pods, as they will be re-created by the deployment. This is something that often confuses beginners.
Deployments allow you to scale the app (see Recipe 9.1) as well as roll out a new version or roll back a ReplicaSet to a previous version. They are, in general, good for stateless apps that require pods with identical characteristics.
Discussion
A deployment is a supervisor for pods and replica sets (RSs), giving you fine-grained control over how and when a new pod version is rolled out or rolled back to a previous state. The RSs and pods that a deployment supervises are generally of no interest to you unless, for example, you need to debug a pod (see Recipe 12.5). Figure 4-1 illustrates how you can move back and forth between deployment revisions.
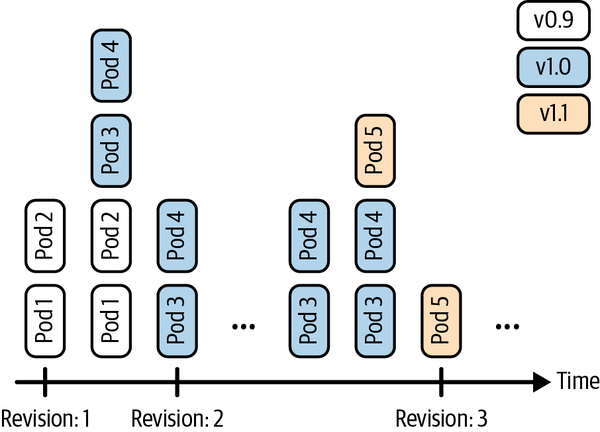
Figure 4-1. Deployment revisions
To generate the manifest for a deployment, you can use the kubectl create command and the --dry-run=client option. This will allow you to generate the manifest in YAML or JSON format and save the manifest for later use. For example, to create the manifest of a deployment called fancy-app using the container image nginx, issue the following command:
$ kubectl create deployment fancyapp --image nginx:1.25.2 -o yaml \
    --dry-run=client
kind: Deployment
apiVersion: apps/v1
metadata:
  name: fancyapp
  creationTimestamp:
  labels:
    app: fancyapp
...
See Also
-
Kubernetes
Deploymentdocumentation
4.6 Updating a Deployment
Solution
Update your deployment and let the default update strategy, RollingUpdate, automatically handle the rollout.
For example, if you create a new container image and want to update the deployment based on it, you can do this:
$ kubectl create deployment myapp --image=gcr.io/google-samples/hello-app:1.0
deployment.apps/myapp created

$ kubectl set image deployment/myapp \
    hello-app=gcr.io/google-samples/hello-app:2.0
deployment.apps/myapp image updated

$ kubectl rollout status deployment myapp
deployment "myapp" successfully rolled out

$ kubectl rollout history deployment myapp
deployment.apps/myapp
REVISION        CHANGE-CAUSE
1               <none>
2               <none>
You’ve now successfully rolled out a new revision of your deployment where only the container image used has changed. All other properties of the deployment, such as the number of replicas, stay unchanged. But what if you want to update other aspects of the deployment, such as changing environment variables? You can use a number of kubectl commands to update the deployment. For example, to add a port definition to the current deployment, you can use kubectl edit:
$ kubectl edit deploy myapp
This command will open the current deployment in your default editor or, when set and exported, in the editor specified by the environment variable KUBE_EDITOR.
Say you want to add the following port definition (see Figure 4-2 for the full file):
...ports:-containerPort:9876...
The result of the editing process (in this case, with KUBE_EDITOR set to vi) is shown in Figure 4-2.
Once you save and exit the editor, Kubernetes kicks off a new deployment, now with the port defined. Let’s verify that:
$ kubectl rollout history deployment myapp
deployments "sise"
REVISION        CHANGE-CAUSE
1               <none>
2               <none>
3               <none>
Indeed, we see that revision 3 has been rolled out with the changes we introduced with kubectl edit. However, the CHANGE-CAUSE column is empty. You can specify a change cause for a revision by using a special annotation. The following is an example of setting a change cause for the most recent revision:
$ kubectl annotate deployment/myapp \
    kubernetes.io/change-cause="Added port definition."
deployment.apps/myapp annotate
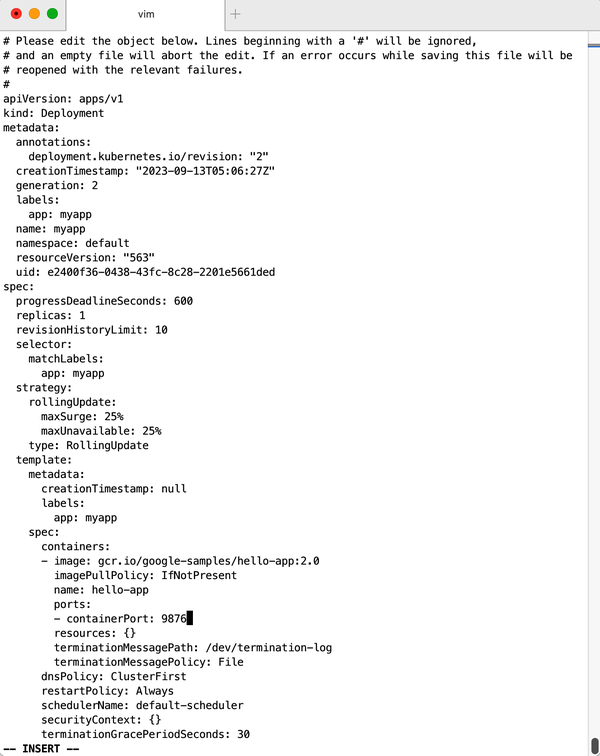
Figure 4-2. Editing a deployment
As mentioned earlier, there are more kubectl commands that you can use to update your deployment:
-
Use
kubectl applyto update a deployment (or create it if it doesn’t exist) from a manifest file—for example,kubectl apply -f simpleservice.yaml. -
Use
kubectl replaceto replace a deployment from a manifest file—for example,kubectl replace -f simpleservice.yaml. Note that unlike withapply, to usereplace, the deployment must already exist. -
Use
kubectl patchto update a specific key—for example:kubectl patch deployment myapp -p '{"spec": {"template": {"spec": {"containers": [{"name": "sise", "image": "gcr.io/google-samples/hello-app:2.0"}]}}}}'
What if you make a mistake or experience issues with the new version of the deployment? Luckily, Kubernetes makes it really easy to roll back to a known good state using the kubectl rollout undo command. For example, suppose the last edit was a mistake and you want to roll back to revision 2. You can do this with the following command:
$ kubectl rollout undo deployment myapp ‐‐to‐revision 2
You can then verify that the port definition has been removed with kubectl get deploy/myapp -o yaml.
4.7 Running a Batch Job
Solution
Use a Kubernetes Job to launch and supervise the pod(s) that will carry out the batch process.
First, define the Kubernetes manifest for the job in a file called counter-batch-job.yaml:
apiVersion:batch/v1kind:Jobmetadata:name:counterspec:template:metadata:name:counterspec:containers:-name:counterimage:busybox:1.36command:-"sh"-"-c"-"foriin123;doecho$i;done"restartPolicy:Never
Then launch the job and take a look at its status:
$ kubectl apply -f counter-batch-job.yaml
job.batch/counter created

$ kubectl get jobs
NAME      COMPLETIONS   DURATION   AGE
counter   1/1           7s         12s

$ kubectl describe jobs/counter
Name:             counter
Namespace:        default
Selector:         controller-uid=2d21031e-7263-4ff1-becd-48406393edd5
Labels:           controller-uid=2d21031e-7263-4ff1-becd-48406393edd5
                  job-name=counter
Annotations:      batch.kubernetes.io/job-tracking:
Parallelism:      1
Completions:      1
Completion Mode:  NonIndexed
Start Time:       Mon, 03 Apr 2023 18:19:13 +0530
Completed At:     Mon, 03 Apr 2023 18:19:20 +0530
Duration:         7s
Pods Statuses:    0 Active (0 Ready) / 1 Succeeded / 0 Failed
Pod Template:
  Labels:  controller-uid=2d21031e-7263-4ff1-becd-48406393edd5
           job-name=counter
  Containers:
   counter:
    Image:      busybox:1.36
    Port:       <none>
    Host Port:  <none>
    Command:
      sh
      -c
      for i in 1 2 3 ; do echo $i ; done
    Environment:  <none>
    Mounts:       <none>
  Volumes:        <none>
Events:
  Type    Reason            Age   From            Message
  ----    ------            ----  ----            -------
  Normal  SuccessfulCreate  30s   job-controller  Created pod: counter-5c8s5
  Normal  Completed         23s   job-controller  Job completed
Finally, you want to verify that it actually carried out the task (counting from 1 to 3):
$ kubectl logs jobs/counter
1
2
3
Indeed, as you can see, the counter job counted as expected.
Discussion
After a job has executed successfully, the pod that was created by the job will be in the Completed state. You can delete the job if you don’t need it anymore, which will clean up the pods it created:
$ kubectl delete jobs/counter
You can also temporarily suspend a job’s execution and resume it later. Suspending a job will also clean up the pods it created:
$ kubectl patch jobs/counter --type=strategic --patch '{"spec":{"suspend":true}}'
To resume the job, simply flip the suspend flag:
$ kubectl patch jobs/counter --type=strategic \
    --patch '{"spec":{"suspend":false}}'
4.8 Running a Task on a Schedule Within a Pod
Solution
Use Kubernetes CronJob objects. The CronJob object is a derivative of the more generic Job object (see Recipe 4.7).
You can periodically schedule a job by writing a manifest similar to the one shown here. In the spec, you see a schedule section that follows the crontab format. You can also use some macros, such as @hourly, @daily, @weekly, @monthly, and @yearly. The template section describes the pod that will run and the command that will get executed (this one prints the current date and time every hour to stdout):
apiVersion:batch/v1kind:CronJobmetadata:name:hourly-datespec:schedule:"0****"jobTemplate:spec:template:spec:containers:-name:dateimage:busybox:1.36command:-"sh"-"-c"-"date"restartPolicy:OnFailure
Discussion
Just like a job, a cron job can be also be suspended and resumed by flipping the suspend flag. For example:
$ kubectl patch cronjob.batch/hourly-date --type=strategic \
    --patch '{"spec":{"suspend":true}}'
If you don’t need the cron job anymore, delete it to clean up the pods that it created:
$ kubectl delete cronjob.batch/hourly-date
See Also
4.9 Running Infrastructure Daemons per Node
Solution
Use a DaemonSet to launch and supervise the daemon process. For example, to launch a Fluentd agent on each node in your cluster, create a file named fluentd-daemonset.yaml with the following contents:
kind:DaemonSetapiVersion:apps/v1metadata:name:fluentdspec:selector:matchLabels:app:fluentdtemplate:metadata:labels:app:fluentdname:fluentdspec:containers:-name:fluentdimage:gcr.io/google_containers/fluentd-elasticsearch:1.3env:-name:FLUENTD_ARGSvalue:volumeMounts:-name:varlogmountPath:/varlog-name:containersmountPath:/var/lib/docker/containersvolumes:-hostPath:path:/var/logname:varlog-hostPath:path:/var/lib/docker/containersname:containers
Now launch the DaemonSet, like so:
$ kubectl apply -f fluentd-daemonset.yaml
daemonset.apps/fluentd created

$ kubectl get ds
NAME     DESIRED   CURRENT   READY   UP-TO-DATE   AVAILABLE   NODE SELECTOR   AGE
fluentd  1         1         1       1            1           <none>          60s

$ kubectl describe ds/fluentd
Name:           fluentd
Selector:       app=fluentd
Node-Selector:  <none>
Labels:         <none>
Annotations:    deprecated.daemonset.template.generation: 1
Desired Number of Nodes Scheduled: 1
Current Number of Nodes Scheduled: 1
Number of Nodes Scheduled with Up-to-date Pods: 1
Number of Nodes Scheduled with Available Pods: 1
Number of Nodes Misscheduled: 0
Pods Status:  1 Running / 0 Waiting / 0 Succeeded / 0 Failed
...
Discussion
Note that in the preceding output, because the command is executed on Minikube, you see only one pod running as there’s only one node in this setup. If you had 15 nodes in your cluster, you’d have 15 pods overall with 1 pod per node running. You can also restrict the daemon to certain nodes using the nodeSelector section in the spec of the DaemonSet manifest.
Get Kubernetes Cookbook, 2nd Edition now with the O’Reilly learning platform.
O’Reilly members experience books, live events, courses curated by job role, and more from O’Reilly and nearly 200 top publishers.

