jQuery UI is a set of plug-ins for jQuery that add new functionalities to the jQuery core library. In this chapter, we will install the jQuery UI library and briefly examine its content. The following chapters will detail each of the jQuery UI features.
You can download the library at http://jqueryui.com. Click the Stable link. This leads directly to a ZIP file containing the sources, examples, and documentation for jQuery UI. Once the file is downloaded, transfer the contents to a jqueryui directory.
This jqueryui directory now contains the following:
A css subdirectory containing the CSS files associated with jQuery UI. You will see that jQuery UI handles CSS themes to give a custom look to the interface elements it manages. For example, the display of sliders may be different from one theme to another, as well as other items like calendars and tabs.
A js subdirectory containing the JavaScript files for jQuery UI. This directory contains a compressed file of all jQuery UI features and the jQuery library file.
A development-bundle subdirectory containing various subdirectories—demos (jQuery UI sample files), docs (files containing the jQuery UI documentation), themes (files for each of the CSS themes associated with jQuery UI), and ui (jQuery UI JavaScript files).
An index.html file that allows you to view some of the features of jQuery UI in a browser.
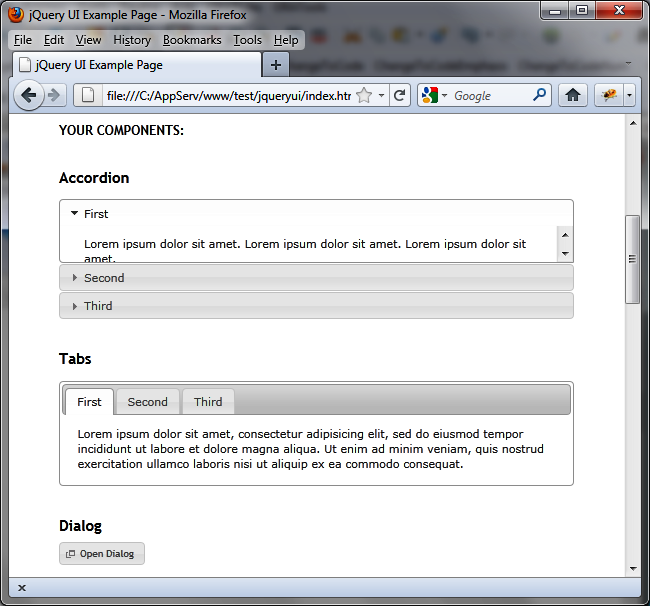
For an overview of jQuery UI, open the index.html file in a browser (Figure 1-1).
In this file, you can see the different features that jQuery UI adds (Figure 1-2), including the following:
Accordion menus
Autocompletion mechanism for input fields
Buttons and checkboxes of the nicest aspects
A tabs mechanism to facilitate the display in the page
Dialog boxes that are superimposed on top of the page
Custom icons
Sliders
Calendars
Progress bars
These are all possibilities that we will discuss later in the book. We will also consider other mechanisms such as drag-and-drop, new visual effects, CSS theme files, and more.
What are the CSS themes we talked about earlier? To find out, just download a new customized version of jQuery UI, depending on the chosen theme. For that, go to http://jqueryui.com/download, which displays the page shown in Figure 1-3.
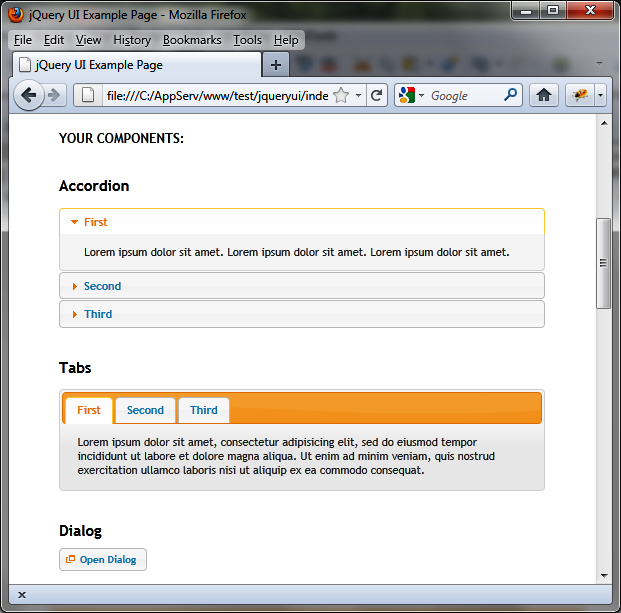
Choose the UI lightness theme from the list on the right, then retrieve the ZIP file for jQuery UI associated with this theme by clicking the Download button. This ZIP file contains the same directory, but the CSS files included in css directory are adapted to the new theme. To see the look of this theme, view the new index.html file included in the queryui directory (this file will have overwritten the previous one). An example of a theme is shown in Figure 1-4.
Each theme provides a unique combination of background colors, fonts, and other screen elements. If we look at the css directory, we see two subdirectories containing each of the themes that we have downloaded:
smoothness is the default theme downloaded with jQuery UI
ui-lightness is the theme we just downloaded from the http://jqueryui.com/download page.
In the previous sections, we have seen that jQuery UI is made up of different CSS and JavaScript files. In addition, some files are compressed, while others are not. Hence the question: which files should we include in our HTML pages to make use of jQuery UI?
Uncompressed files are located in the development-bundle directory, under the jQuery UI installation directory (jqueryui).
The ui directory (located under development-bundle) contains the JavaScript files. The jquery.ui.core.js file includes the basic features (mandatory), while other files will be included only if required. The file ending in custom.js (e.g., jquery-ui-1.8.16.custom.js) brings together all the JavaScript files and eliminates the need to include each separately. The minified directory (located under ui) contains the same files in compressed format.
The themes directory (located under development-bundle) contains the CSS files. It consists of various directories, each containing themes (e.g., the base, smoothness, and ui-lightness directories). Each theme includes an images directory and other CSS files.
The jquery.ui.core.css file contains basic functionality (required), while other files will be included only if they are required. The jquery.ui.theme.css file contains the definition of the theme itself (required).
The jquery.ui.base.css file includes all of the files in the development-bundle directory except jquery.ui.theme.css. The jquery.ui.all.css file includes all files (that is to say, jquery.ui.base.css and jquery.ui.theme.css).
Finally, the file ending with custom.css (e.g., jquery-ui-1.8.16.custom.css) includes all CSS files and eliminates the need to include each separately (it is identical to jquery.ui.all.css, except that it includes other files via CSS directives, while custom.css physically includes every line of all files).
Here we want to display a simple page with two tabs. The main JavaScript file will be jquery.ui.tabs.js and the main CSS file will be jquery.ui.tabs.css. The main page will include the following base files:
<script src = "jquery.js"></script>
<script src = "jqueryui/development-bundle/ui/jquery.ui.core.js"></script>
<script src = "jqueryui/development-bundle/ui/jquery.ui.widget.js"></script>
<script src = "jqueryui/development-bundle/ui/jquery.ui.tabs.js"></script>

<link rel=stylesheet type=text/css
      href=jqueryui/development-bundle/themes/smoothness/jquery.ui.core.css />
<link rel=stylesheet type=text/css
      href=jqueryui/development-bundle/themes/smoothness/jquery.ui.theme.css />
<link rel=stylesheet type=text/css
      href=jqueryui/development-bundle/themes/smoothness/jquery.ui.tabs.css />
The jquery.js file is here at the same level as the jqueryui directory. This file is the standard jQuery JavaScript file.
The core.js file is mandatory, while the tabs.js file requires the inclusion of widget.js (as indicated in the tabs.js file).
The core.css file is mandatory, as is the theme.css file. The tabs.css file contains specific tabs definitions.
Now that we have the basic building blocks for the page, let’s create and label two tabs and place some text in each. The following code goes directly below the previous code that calls the base files.
<div id=tabs>
  <ul>
    <li><a href=#tab1>Tab 1</a></li>
    <li><a href=#tab2>Tab 2</a></li>
  </ul>
  <div id=tab1>Contents of first tab</div>
  <div id=tab2>Contents of the second tab</div>
</div>

<script>

$("#tabs").tabs();

</script>
The result of this script (an HTML page with two tabs) is shown in Figure 1-5.
The use of compressed files reduces the load time of HTML pages.
The js directory (located under the jQuery UI installation directory, here jqueryui) contains the JavaScript files. Only the jquery-ui-1.8.16.custom.min.js file is needed here. The other file in the directory is the compressed version of jQuery.
The css directory (located under the jQuery UI installation directory, here jqueryui) contains a subdirectory for each CSS theme installed (e.g., the smoothness and ui-lightness directories).
Each theme includes an images directory and a CSS file to be included in the HTML page. This is the same file ending with custom.css (e.g., jquery-ui-1.8.16.custom.css) as in the compressed version.
Here, we want to display a simple page with two tabs (as before):
<script src = jquery.js></script>
<script src = jqueryui/js/jquery-ui-1.8.16.custom.min.js></script>

<link rel=stylesheet type=text/css
      href=jqueryui/css/smoothness/jquery-ui-1.8.16.custom.css />
Only two files are now required in addition to the jquery.js file:
The jQuery UI JavaScript global file (jquery-ui-1.8.16.custom.min.js)
The overall CSS jQuery UI file associated to the style used (smoothness/jquery-ui-1.8.16.custom.css, associated with smoothness theme)
Now add the same HTML code that we used earlier to create, label, and populate the tabs:
<div id=tabs>
  <ul>
    <li><a href=#tab1>Tab 1</a></li>
    <li><a href=#tab2>Tab 2</a></li>
  </ul>
  <div id=tab1>Contents of first tab</div>
  <div id=tab2>Contents of the second tab</div>
</div>

<script>

$("#tabs").tabs();

</script>
The result is the same as before.
The great thing about CSS themes is that they allow you change the look of your page easily—just change the directory name to that of the theme you want to use. For example, let’s replace smoothness with ui-lightness.
For each base file in the uncompressed version of the page, simply replace the smoothness directory with ui-lightness (shown in bold here):
<link rel=stylesheet type=text/css
      href=jqueryui/development-bundle/themes/ui-lightness/jquery.ui.core.css />
<link rel=stylesheet type=text/css
      href=jqueryui/development-bundle/themes/ui-lightness/jquery.ui.theme.css />
<link rel=stylesheet type=text/css
      href=jqueryui/development-bundle/themes/ui-lightness/jquery.ui.tabs.css />
For the base file in the compressed version of the page, replace the smoothness directory with ui-lightness (shown in bold here):
<link rel=stylesheet type=text/css
      href=jqueryui/css/ui-lightness/jquery-ui-1.8.16.custom.css />
The HTML page will now use the new theme (shown in Figure 1-6).
Get jQuery UI now with the O’Reilly learning platform.
O’Reilly members experience books, live events, courses curated by job role, and more from O’Reilly and nearly 200 top publishers.


