Whether you’re completing your 400-page novel or just polishing a three-page letter, you often have to change a word, a phrase, or even just a character that appears repeatedly throughout the text. For example, as newsletter editor for Up & Away, Megaville’s leading outfitter for superheroes, you’ve been asked to write a book, Fighting Crime with Super Powers: The Missing Manual. As you zoom into your final chapters, your editor asks you to make a few changes:
You use Captain Fantastic as an example throughout the book, but the famously litigious hero threatened to sue to protect his action-figure and theme-park trademarks. Now you have to change all 273 mentions of Captain Fantastic to Mister Nice Guy, a lesser known but less lawyer-prone hero.
The word “Kryptonite” is capitalized, who knew? Not you, unfortunately, and now you have to fix your many lowercase lapses.
Your personal Kryptonite is spelling—throughout the book you’ve confused heroin (a drug) with heroine (a female hero), a slip certain to irritate your female following…and copy editors everywhere.
Half your mentions of Costumed Quarterly magazine are in quotation marks, but you should instead italicize them with the Emphasis style, no quotes.
It’s Find & Replace to the rescue! Hunting through hundreds of manuscript pages for these changes would require superhuman patience, but Find & Replace saves you the trouble, sifting through your document and making the changes in a split second.
Find & Replace is really two commands rolled into one: Find and Find & Replace. Sometimes you just need to find a word or phrase in your document. For example, you might want to find the pages where you use the term, “rocket belt malfunctions”:
Choose Edit → Find → Find or press ⌘-F.
The Find & Replace window appears (Figure 4-1). Click Advanced to open the window to its full size. (You can sometimes use the Simple tab, but for most searches you’ll appreciate the extra options available in the Advanced tab.)
Enter the word or phrase you’re looking for in the Find box: rocket belt malfunctions.
Turn off the checkbox for “Match case”—because you want to find both capitalized and non-capitalized occurrences of this phrase. In some cases, you’ll also want to turn on the checkbox for “Whole words” to prevent the search from turning up words that merely include your search term (like caper or escaped when searching for “cape”).
Click Next (or press Return), and Pages jumps to the next spot in your document where you mention rocket belt malfunctions.
The Next button tells Pages to search forward from your current selection. When you turn on the “Search previous text (loop)” option, Pages automatically starts over at the beginning of the document when it hits the end. You can also search backward from your present location by clicking Previous.
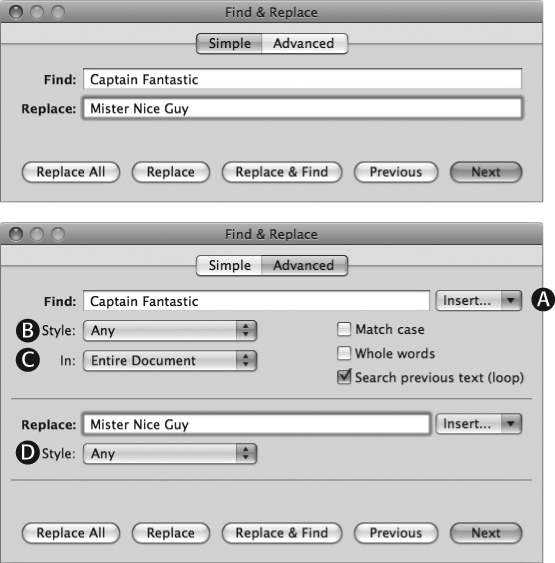
Figure 4-1. The Find & Replace window in its Simple (top) and Advanced forms. The Insert pop-up menus (A) let you specify invisible formatting characters like tabs, line breaks, page breaks, and so on. The Style pop-up menu (B) allows you to limit your search to text in a specific text style—for example, Body Text or Caption. The In pop-up menu (C) lets you search in the Entire Document, including headers, footers, and footnotes; or just in the Main Text Body. In the Replace box, type whatever you want Pages to insert in place of whatever it finds. In the second Style pop-up menu (D) choose the style, if any, you want Pages to apply to the found text when it makes a replacement. If you’re certain about the terms you’ve set up for your Find & Replace, click Replace All and Pages makes the change and tells you how many occurrences it found. Click Replace to replace only the currently highlighted word; click Replace & Find to replace the current word and move on so you can evaluate the next occurrence. The Previous and Next buttons control the direction in which Pages searches through your document, and the “Search previous text (loop)” checkbox starts searching at the top of the document after the search reaches the end.
Tip
If you can’t see the found word highlighted in your document, it could be hidden behind the Find & Replace window. To prevent this inconvenience, arrange the windows so the dialog box doesn’t overlap your text before launching your search.
Work your way through your whole document by clicking Next repeatedly (or press ⌘-G), leaping from result to result in a single bound. In fact, you don’t even need the Find & Replace window at this point—close the window and keep pressing ⌘-G to hop through the matches.
Tip
For simple searches like this, an alternative to the Find tool is the Search sidebar (Thumbnail view). Choose either View → Show Search or Edit → Find → Search, and type the text you’re looking for in the Search box. Instead of taking you to each occurrence one by one, Pages lists all the results at once in the Search sidebar—like a table of contents. Unlike the Find tool, however, the Search sidebar doesn’t let you specify searches for styles or invisible characters. More on that shortly.
On its own, the Find tool is a nifty way to zip straight to specific portions of your document. But when you mix in Replace, things get interesting. Find & Replace can save you so much time and hassle that a better name might be Search & Rescue—it lets you motor through edits, telling Pages to automatically change matching words to some other text. You can review each of these changes before applying them, or you can just take the leap and tell Pages to go ahead and change all matches across the board.
Some changes require a yes-or-no decision from you. For example, you might want to review every occurrence of the words “heroin” and “heroine” to make sure you’re using the right word for the specific context. When you find a mistake, you want to tell Pages to correct it; otherwise you want to leave the text untouched. Here’s how:
Choose Edit → Find → Find or press ⌘-F to call up the Find & Replace window.
Enter the word you’re looking for in the Find box: for example, heroin.
In the Replace box, enter the word that you may wish to use instead: heroine.
Click Next (or press Return), and Pages jumps to the first occurrence of “heroin” in your search text.
Heroic woman or nefarious drug? After examining the word in context, click Next to leave it as is and jump to the next occurrence; or click Replace & Find to replace “heroin” with “heroine” and then move to the next occurrence. (This has the same effect as clicking the Replace button and then Next.)
Be aware that the Replace and Replace & Find buttons both do exactly what they say they do: They replace the current selection with the text in the Replace box. That’s perfect when the text that you want to replace is already selected. But when you’re just starting a search, that’s probably not the case, and you’ll get an unwanted result: Clicking Replace & Find adds the replacement word at your current insertion point before looking for the word you want to find. To avoid surprises, always begin a session by pressing the Next button before pressing either Replace button.
Some circumstances don’t require your review for every change. When you know that you definitely want to replace all instances of a word or phrase, the Replace All button is the answer. To capitalize every lowercase instance of “kryptonite” in your document, for example, type kryptonite in the Find box and Kryptonite in the Replace box, and click Replace All. Pages instantly processes all the Kryptonite in your document, without asking you to review each occurrence.
When working with Replace All, it’s particularly important to be clear about what you’re replacing. Turn on the checkbox for “Whole words” when you want to change a specific word. This tells Pages not to confuse the word you’re searching for with parts of other words. That way, when you want to change Sue to Betty, the words issue and Suez don’t turn into isBetty and Bettyz.
Pages’ search features don’t limit you to “normal” words and characters—you can just as easily search for spaces, tabs, line breaks, and a range of other invisible characters (for more on “invisibles,” see Spaces, Invisibles, and Special Characters). Say that you want to sweep out extra spaces from your document, replacing two or more spaces with a single space. In the Find box, type two spaces and then type one space in the Replace box. Make sure the “Search previous text (loop)” checkbox is turned on, and then click Replace All. Pages replaces all your double-spaces with one—but what if, in a spacebar-addled frenzy, you typed three or more spaces? Just click Replace All again to replace those extra spaces. Continue clicking Replace All until the indicator above that button says, “0 Found.”
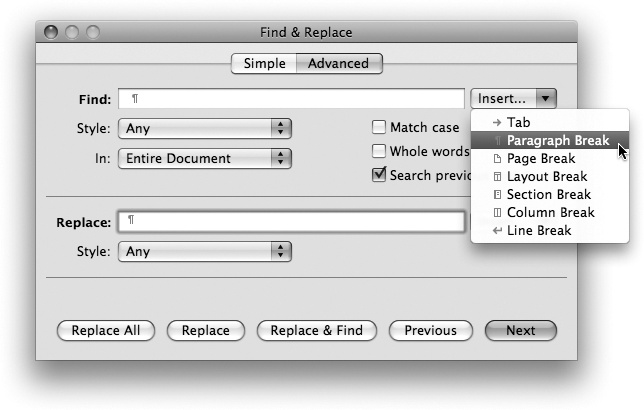
You can likewise nip spaces trailing at the end of paragraphs: In the Find box, type one space and then select Paragraph Break from the Insert pop-up menu next door (see Figure 4-2). In the Replace box, choose a Paragraph Break from the other Insert pop-up menu (no space this time). Click Replace All until you get the “0 found” message.
You can use the same technique to find and replace other invisible characters, too. For example, you might want to replace every layout break with a section break (more on what that means in Chapter 5).
Find & Replace lets you target your search to text formatted in a certain style. For example, say that you want to add the “®” symbol to all instances of “Captain Fantastic,” but only when the name appears in a heading: Enter Captain Fantastic in the Find box, and Captain Fantastic® in the Replace box. Then limit the search to headings by selecting the Heading 1 style from the Style pop-up menu under the Find box. Click Replace All, and Pages updates every occurrence of “Captain Fantastic” in the Heading style. (Of course, to take advantage of this feature, you actually have to use styles in the first place. Head back to Chapter 3 to review the details.)
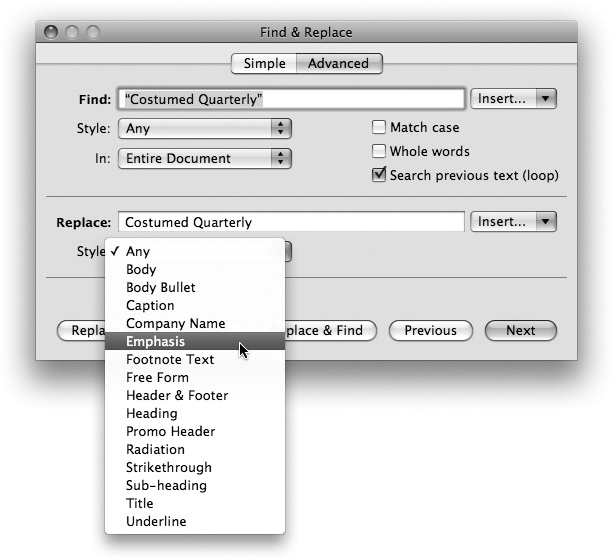
You can likewise apply a style to found text. For example, if you want to replace every quoted mention of “Costumed Quarterly” with italicized text in the Emphasis style, Find & Replace can help: Enter “Costumed Quarterly” (with quotes) in the Find box and Costumed Quarterly (no quotes) in the Replace box. In the Style pop-up menu under the Replace box, choose Emphasis as shown in Figure 4-3. Click Replace All, and Pages removes the quotes and adds the style to every occurrence of “Costumed Quarterly.”
Tip
You don’t even have to be looking for specific text. If you just want to find every instance of a certain style, leave the Find box blank and choose the sought-after style from the Style menu under Find—choose Heading 2, for example. Click Next, and Pages takes you to the next subheading. Want to change all Heading 2 text to the Heading 1 style? Choose Heading in the Style menu under Replace. Be sure to leave the Replace box empty, and click Replace All. (Finding and Copying Styles also describes another way to replace styles, using the options in the Styles Drawer.)
Get iWork '09: The Missing Manual now with the O’Reilly learning platform.
O’Reilly members experience books, live events, courses curated by job role, and more from O’Reilly and nearly 200 top publishers.

