In iMovie-speak, a project is a movie you’re editing. You’ll actually edit your movie beginning in Chapter 5, but this chapter reviews the basics of how projects work, how you manage them, and how you customize your workspace before you start editing. Think of this as learning how a car works before you learn how to drive it.
The way you build a video in iMovie is pretty neat, technically speaking: You select the footage you like from your raw material and then add it to your movie-in-progress.
While it may seem like you’re copying video from an event library to your project, that’s not the case. Behind the scenes, iMovie works much more efficiently—when you choose a clip, iMovie doesn’t move the clip anywhere, it simply points to where it is on your hard drive. Then, when you play back your movie, iMovie instantly reads the clip from its place on your drive and displays it in the playback window, just as though the clip were physically embedded in your project. In effect, your project is a list of instructions telling iMovie what video to play when.
Historically speaking, this was a big leap forward from the old days of iMovie. In iMovie HD and older, projects showed up as icons on your desktop. In reality, they were cleverly disguised folders, and inside, you’d find all the gigantic movie clips you used in the movie. This was convenient in one way: It made projects fully self-contained, so you could, for example, easily back up a project or move the whole thing to another computer. But in another way, it wasn’t ideal. If you wanted to use a clip in more than one project, you had to duplicate the clip (by pasting it into the second project), which ate up a lot of hard drive space.
The pointer-based approach has a number of implications:
You can use the same clip in dozens of movie projects, without ever eating up more disk space (see Figure 4-1).
You can create multiple versions of the same project—a director’s cut and a short version, for example—without worrying about filling up your hard drive.
Backing up or moving a single project is no longer simply a matter of copying a file. Instead, as you learned in Chapter 3, iMovie stores all your events—and everything in them—as a single file, in what iMovie calls a library. (Your first library is the iMovie Library, found in the Finder at Home→Movies. If you created any other libraries, you’ll find them here, too.) This means you can’t simply drag a small project file from one Mac to another. (There is, however, a way to move or copy a project to another folder or disk, together with all its event footage. Create a Project tells all.)
Each project takes up disk space, but only an infinitesimal amount—about as much as a word processor document. It contains only a text list of pointers to bits of video on your hard drive.
Figure 4-1. An orange line along the bottom of a source clip lets you know which chunks of the clip you used in a project. When you work on a different project, where you use different parts of the same clip, you’ll see the orange lines jump around.
But things change when you finish a project and you want to send it somewhere—to, say, YouTube, or a DVD, or a QuickTime movie. Only then does iMovie fetch the video stored in your event library, implement your edits, and stitch the footage together into a single, sharable file.
You’ll spend most of your time in iMovie editing clips from within a project, but as your projects grow in number, it helps to know how iMovie manages them.
If you’re used to iMovie ’11, you might be confused about where to find your projects in the new iMovie. That’s because you’re expecting a Project Library where iMovie keeps all your videos. But the new program stores projects inside events. Apple figures that most movies you create are based on events, so why not keep the raw footage and your working movie together? A Walker Reunion project, for example, will use clips from the Walker Reunion event, so iMovie stores the project in that event.
This is just iMovie’s way of organizing things, and it doesn’t—and shouldn’t—stop you from using footage from one event in another. You can even use footage across libraries (though in that case, iMovie abandons the pointer system and actually copies the footage from Library 1 to Library 2).
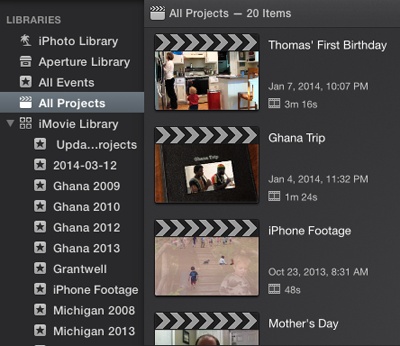
If you can’t remember which event holds the project you want, don’t waste time hunting for it—choose All Projects in the Libraries list (Figure 4-2). iMovie displays every project in every event in every library. Double-click a project name to get working on it.
Figure 4-2. The easiest way to see every project in every event in every library in iMovie is to choose, well, All Projects in the Libraries list.
Tip
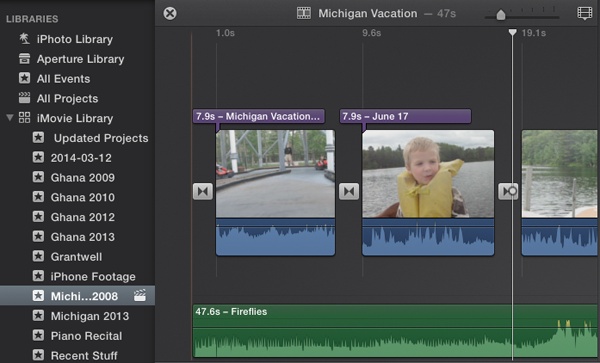
If you open a project from the All Projects library, you don’t go to the event where iMovie stores the project. To know where a project lives, look for a little film-clapper icon next to an event in your libraries (Figure 4-3). That’s the event that stores your project.
To create a new project, you can do this:
Tip
You click the + button to create trailers for your movies, too, but, sensibly enough, you select Trailer from the drop-down menu instead of Movie. Chapter 13 has the details.
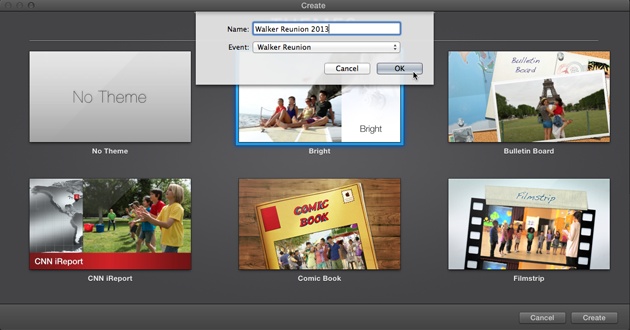
Whichever method you choose, iMovie launches a Themes window (Figure 4-4). Themes, covered in detail on Cross Zoom, give your movie a common look and matching soundtrack. Fortunately for the creative minded, iMovie offers a No Theme option, giving you free reign over your creations.
Once you select a theme (or not), iMovie prompts you to name your project and choose (or create) an event as your video’s home.
It’s often useful to create several versions of the same project. You could have several differently edited cuts so you can get feedback on which one works best, for example. The beauty of iMovie is that you can duplicate projects easily and simply, without filling up your hard drive with duplicate video files since each version of the project calls upon the same underlying clips.
To duplicate a project, click its name, and then choose Edit→Duplicate Movie. You’ll see the new project appear in the same event, next to the original project, and complete with a temporary name (for example, if you called the original project “Baby Spaghetti on Head,” iMovie calls the new one “Baby Spaghetti on Head 1.” If you make a duplicate of the duplicate, iMovie is smart enough to call the newest copy “Baby Spaghetti on Head 2.”) Feel free to rename your project using the method described in the next section.
To rename a project, click its name in the Event browser. iMovie highlights the old name, ready for a new title.
To move a project from one event to another (say you started the project in the wrong event), select the project and then drag it to the correct event.
To get rid of a project, click its name and then choose File→“Move to Trash,” or press ⌘-Delete. Alternatively, right-click its thumbnail in the Event browser and then select “Move to Trash.”
If you delete a project by mistake, you can get it back by selecting Edit→“Undo Move to Trash” or by pressing ⌘-Z immediately after deleting it. But if you do a bunch of stuff before you realize your mistake, you have to backtrack by repeatedly selecting the Undo command until your project is restored.
Tip
In prior versions of iMovie, you could salvage a deleted project from the Finder’s Trash. Now, if you delete a project, the Edit→Undo command (⌘-Z) is the only reliable way to get it back. But even that option goes Poof! once you quit iMovie. That’s because iMovie sticks trashed projects in a hidden, temporary folder where you can retrieve them—so long as the program’s open. Once you quit iMovie, that deletion becomes permanent. (To learn more about this hidden folder, see the box on Behind the Scenes of iMovie.)
With how libraries work in iMovie (Move Individual Clips to Another Event), you can use footage from multiple libraries to piece a project together. To make sure all the footage is in the same library as your project, select the project and choose File→Consolidate Project Media (or “Library Media” if you select a library to do this for all projects in that library). iMovie will make copies of the wayward footage into the same library holding your project.
Every project you create in iMovie has some basic settings that dictate the way your movie plays back. These settings include things like the project theme (Chapter 7), transition timings (Chapter 7), and default photo treatment (Chapter 12). Future chapters will show you how to change these settings, but for now it’s important to know how to find them.
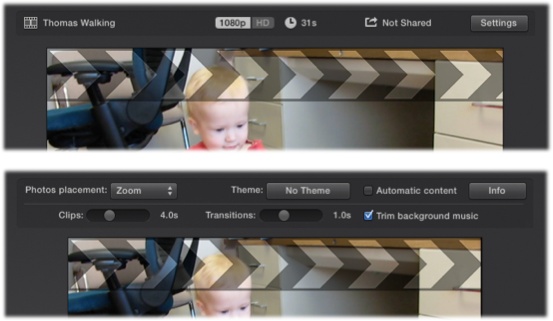
Choose View→Movie Properties (⌘-J). iMovie displays basic information about your movie, including its name, quality, length, and whether you’ve shared it (Figure 4-5).
Figure 4-5. Top: iMovie displays the basic properties of your project in the playback window. Bottom: Click Settings and you’ll see the behavior for various elements of your movie: the standard clip length (Chapter 5), factory setting for transition length (Chapter 7), whether you trimmed the background music (Chapter 11), the photo treatment you applied (Chapter 12), the theme (Chapter 7), and whether you included Automatic content (Chapter 7).
One of iMovie’s strengths is how refreshingly respectful it is of your screen real estate. It offers a bunch of ways to maximize your work area without the hassle of buying a new monitor.
Once you start working on a movie, you probably don’t need your Libraries list staring you in the face. Even without a project open, you might want to devote your whole screen to sorting through event footage. iMovie gets this and is happy to give you the extra room.
You hide the Libraries list by choosing Window→Hide Libraries, pressing Shift-⌘-1, or clicking the Show/Hide Libraries button (Figure 4-6). iMovie hides the list and expands the video-clip area.
To bring the list back, reverse any of these procedures.
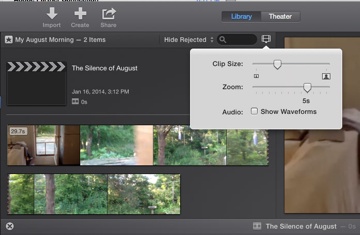
iMovie represents your video clips as filmstrips—multiframe, horizontal strips whose lengths are proportional to the clip’s duration. (You’ll read more about filmstrips in Chapter 5.) You can make these filmstrips smaller, or show more of the frames for each one, by clicking the filmstrip icon in the upper-left corner of the Event browser (see Figure 4-7). Once there, adjust the Clip Size and Zoom settings to your liking.
Note
When you drag the Zoom slider to its extreme left, iMovie represents every video clip by only one frame; it no longer indicates the filmstrips’ lengths relative to one another. That makes it easy to move and resequence clips (and it makes this version of iMovie more familiar to people used to working in iMovie HD and older).
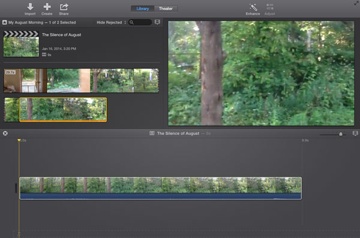
To see the audio waveforms for both event and project footage, turn on the Audio Waveforms checkbox in the same window (Figure 4-7). A graph of blue peaks and valleys sprouts under your clips (Figure 4-8). (You’ll find waveforms discussed in detail on Volume Adjustments.)
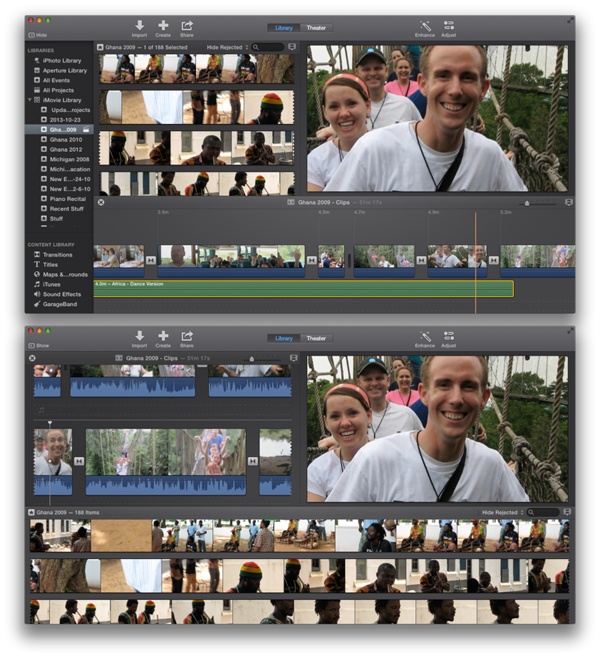
Figure 4-6. Top: The standard iMovie window. Bottom: You can radically change the way iMovie looks. To swap the Project pane and Event browser, as has been done here, choose Window→“Swap Project and Event.” To switch to a wrapping timeline, select View→Wrapping Timeline. You can also hide the Libraries list and adjust the size of your clips.
iMovie calls the movie playback window the Viewer. It sits in the upper-right corner of the screen. You can’t reposition it, but you can change its size by dragging the top border of the Project pane.
The advantage of a large Viewer is, of course, that you get the best view of your movie as you work. The disadvantage is that it eats up screen space. On smaller screens, it squishes the Event browser so much that you have to do a lot more scrolling to review your clips.
When you first start editing a project, the Project pane, where you actually build your movie, replaces your event footage. That’s nice, because it gives you plenty of room to work on your movie, but it comes at a cost. iMovie moves your event clips up, wedged between the Project pane and the top of the Event browser (see Figure 4-9).
Figure 4-9. When you start a project, iMovie gives you plenty of room to work on it, but it reduces the size of the Event browser.
As you work on a movie, you may wish you could swap the two windows to make it easier to review your footage. Good news: You can, by choosing Window→“Swap Project and Event.” Now you have a lot more room to work with your clips (see Figure 4-6).
Tip
It probably goes without saying, but you should make the iMovie window itself as big as you can. Do that by choosing Window→Zoom, or click the little round, green Zoom button in the upper-left corner of the iMovie window. Better yet, go full-screen, OS X style (without any Mac menu bar) by clicking ![]() in the top-right corner of the iMovie window.
in the top-right corner of the iMovie window.
If you’ve used a video-editing program other than iMovie, you’ve used a timeline before. It’s a horizontally scrolling depiction of your movie-in-progress, showing the video and audio tracks you’ve assembled as long strips, punctuated by any transitions you added.
But if you’ve used iMovie ’08, ’09, or ’11, you might have become accustomed to the wrapping timeline. In a somewhat controversial move (don’t laugh—video-editing interfaces can get pretty controversial), iMovie ’08 dumped the classic timeline and replaced it with one that worked more like a word processor. In that design, the “filmstrips” representing your project wrapped at the edge of the window, just like sentences wrap at the end of a line in a word processor. You had to scroll vertically instead of horizontally to review your project.
This got under the skin of people accustomed to the traditional timeline, so Apple restored that timeline to the new iMovie and made it the factory setting.
If you like the wrapping timeline better, choose View→Wrapping Timeline. While this removes the time codes that mark a clip’s duration, everything else behaves pretty much the same way.
To go back to traditional timeline editing, choose View→Wrapping Timeline again.
Get iMovie: The Missing Manual now with the O’Reilly learning platform.
O’Reilly members experience books, live events, courses curated by job role, and more from O’Reilly and nearly 200 top publishers.

