Chapter 4. Securing the Login with
OAuth 2 and OpenID Connect
In this chapter, we discuss the concepts behind the two standards—OAuth 2.0 and OpenID Connect—in order to provide a comprehensive overview of current authentication and authorization standards. To do so, the difference between authentication and authorization is outlined, followed by an explanation of OAuth’s evolution throughout the years. Afterward, we sketch out a basic implementation of an OAuth 2.0 server and client that leverages OpenID Connect functionality.
The Difference Between Authentication and Authorization
A common issue is seeing authentication and authorization as one and the same. In fact, they are very different and can be used in different scenarios or combined to allow access to different kinds of information. This section provides a basic understanding of the main differences and discusses why multiple standards exist and are being pushed forward at the same time.
Authentication
Authentication is the process of identifying a user against a service. OpenID was the first standard that aimed at providing a decentralized protocol for identifying users across multiple sites. The idea behind this was very simple: avoiding the tedious task of re-entering information over and over. Basically the login process is being delegated to another site.
OpenID was introduced in 2005 and saw enormous growth, totaling over 1 billion user accounts in 2009.1 Recent development showed less demand for OpenID and central identity platforms. Instead, hybrid approaches were being introduced that offered both user authentication and authorization at the same time.
Authorization
While authentication aims at user identity, authorization tries to solve the issue of providing access to a user’s protected resources. This can involve providing access to user profiles—which blurs the line between authentication and authorization—or simple anomynous access to data.
Authorization standards like OAuth are often used as a more convenient and more secure way of handling sign-in than regular basic authentication flows using usernames and passwords. Authorization relies on third-party authentication systems and is often used for various social login scenarios using service providers like Facebook, Google+, or Twitter.
What Are OAuth and OpenID Connect?
The first draft of the OAuth 1.0 Core was released in December 2007. The idea behind OAuth was to provide an authentication technology that would allow for anonymous resource sharing with third parties. Anonymous resource sharing can be seen as a way of providing access to information and resources without the need to provide information about the user’s identity.
In the OAuth process, the server side is referred to as the Service Provider, and the client is called the Consumer. In order to allow for resource sharing and accessing a user’s protected resources, a process called OAuth authorization flow is initiated that consists of eight steps:
-
Consumer: Retrieve a Request Token
-
Service Provider: Grant Request Token
-
Consumer: Direct user to the Service Provider in order to sign in
-
Service Provider: Obtain authorization
-
Service Provider: Redirect the user to the Consumer
-
Consumer: Request an Access Token
-
Service Provider: Grant Access Token
-
Consumer: Use Access Token to access protected resources
This flow—as outlined in the official specification—is known as three-legged OAuth. Three-legged OAuth requires using a web browser to obtain a user’s authorization. The three parties involved in the process are as follows:
-
The Consumer (which we also identify as the Client)
-
The Service Provider
-
The End User
The whole reason for this convoluted process comes from the desire to prevent the Consumer from ever handling the user’s credentials (username and password). By involving all three parties, only a minimum of information is provided in order to grant access to a User’s resources. By implementing OAuth, a potentially insecure password is replaced by an opaque token that can be revoked by the application and the End User. This results in avoiding the password anti-pattern.
Users should have access to their data and should be allowed to bring it from one site to another. Social sites shouldn’t propagate bad behavior by teaching users that it’s OK to give any site their usernames and passwords for all the sites to which they belong.2
Designing Social Interfaces
An alternative flow, known as two-legged OAuth (Figure 4-1), skips obtaining the user’s authorization because no user data is being requested or involved. User data can be filled within the Consumer and stored afterward within the Service Provider. The two-legged OAuth flow can be used as a replacement for traditional basic authentication.

Figure 4-1. OAuth 1.0a authorization flow
The Internet Engineering Task Force (IETF) started supporting OAuth in November 2008. The official Request for Comments was published in 2010.3
OAuth 1.0a
Revision 1.0a of OAuth was released in June 2009. It serves as a hotfix for possible session fixation attacks that allowed access to the victim’s resources.
Eran Hammer, one of the coauthors of OAuth 1.0, wrote a blog post about the possible exploit and how OAuth 1.0a fixes this attack vector.4
In this book we use OAuth 1.0a as a base for any discussion regarding the first version of OAuth.
From a security perspective, the first version of OAuth relies heavily on signing the request on the Consumer’s side using HMAC-SHA1, RSA-SHA1, or PLAINTEXT. A Service Provider is allowed to implement other signing methods. The signature is being passed as the oauth_signature parameter, while the method used to sign the signature is being provided via oauth_signature_method. Nonces and timestamps are being leveraged as additional security mechanisms that aim at avoiding replay attacks.
The process of signing requests and the bloated process of retrieving an Access Token are among the main reasons behind criticism for OAuth 1.0a. Developers often feel like they have to rely on libraries in order to implement OAuth 1.0-based authentication and feel like the standard is not approachable.
Introducing OAuth 2.0
Since the Web changed heavily and new form factors were released, new authentication scenarios had to be introduced in order to accommodate web applications, native applications for desktop and mobile, and even interfaceless Consumers such as Internet of Things devices. Furthermore, demand for more simplicity has been rising among the developer community. Both reasons led to the introduction of the first draft of OAuth 2.0 in April 2010.5 The main framework for OAuth 2.0 RFC6 and a RFC discussing OAuth 2.0 Bearer Token Usage7 were published in 2012.
To address some of the main differences between OAuth 1.0a and 2.0, the following details were updated:
-
Access Tokens are now subject to a time to live (TTL)/expiry time.
-
No more client-side cryptography.
-
Different flows to accommodate different authentication scenarios.
Drama around OAuth 2.0
If you are aware of the ongoing discussion between the OAuth 2.0 stakeholders or you simply don’t care, feel free to skip to the next section!
While OAuth 2.0 fixes a lot of the issues that OAuth 1.0 had, it is far from perfect and saw its biggest critique coming from Eran Hammer, who participated in the OAuth 2.0 working group. In a post called “OAuth 2.0 and the Road to Hell,” Hammer writes about his frustration with a standard that often lacks concrete implementation strategies and leaves a lot of decision making to the implementer.8 One of the points he touches on is that Bearer Tokens are not encrypted per se and therefore are inherently less secure than specified. OAuth 2.0 puts the trust into TLS and SSL and doesn’t add additional security mechanisms on top of these protocols in order to control token ownership.
Other contributors, such as Tim Bray, on the other hand, raise valid points about OAuth 2.0 being usable already, working in its core, and not necessarily having the need for interoperability.
Having said all that, OAuth 2 may not be perfect, and may have been harmed by the Enterprise crap, but the core of Web functionality (all I care about) seems to have survived.9
Tim Bray, “On the Deadness of OAuth 2”
OAuth 1.0 versus OAuth 2.0
Overall the industry seems to agree that OAuth 2.0 is a better standard than its predecessor by offering an easier implementation and more flexibility in terms of defining access to resources. Many developers are heavily challenged when implementing OAuth 1.0’s signatures and often run into outdated or even deprecated libraries. When you are able to use secure connections (which we highly recommend and explain in Chapter 7), it makes sense to go for the slimmer OAuth 2.0—otherwise, we’d recommend taking a deeper look into OAuth 1.0a.
Looking at the tech landscape, there are only few active companies remaining that still build upon OAuth 1.0 (such as Evernote10). Twitter, another prominent implementer of OAuth 1.0a, nowadays offers a hybrid implementation that uses both OAuth 1.0a and OAuth 2.011 based on the API you wish to use. Google, on the other hand, announced that its OAuth 1.0 support has been deprecated as of April 20, 2012 and actively encourages developers to start using OAuth 2.0 instead.12
Handling Authorization with OAuth 2.0
In OAuth 2.0 the classical OAuth authorization flow, also known as the OAuth dance, was simplified in order to require fewer steps:
-
Consumer: Direct user to the Service Provider in order to sign in
-
Service Provider: Obtain authorization
-
Service Provider: Redirect the user to the Consumer
-
Consumer: Use Authorization Code to request Access Token
-
Service Provider: Grant Access Token
-
Consumer: Use Access Token to access protected resources
This flow is a very basic summary of the process that happens when users aim to authorize clients through OAuth 2.0. Figure 4-2 illustrates a more comprehensive version of the OAuth dance.
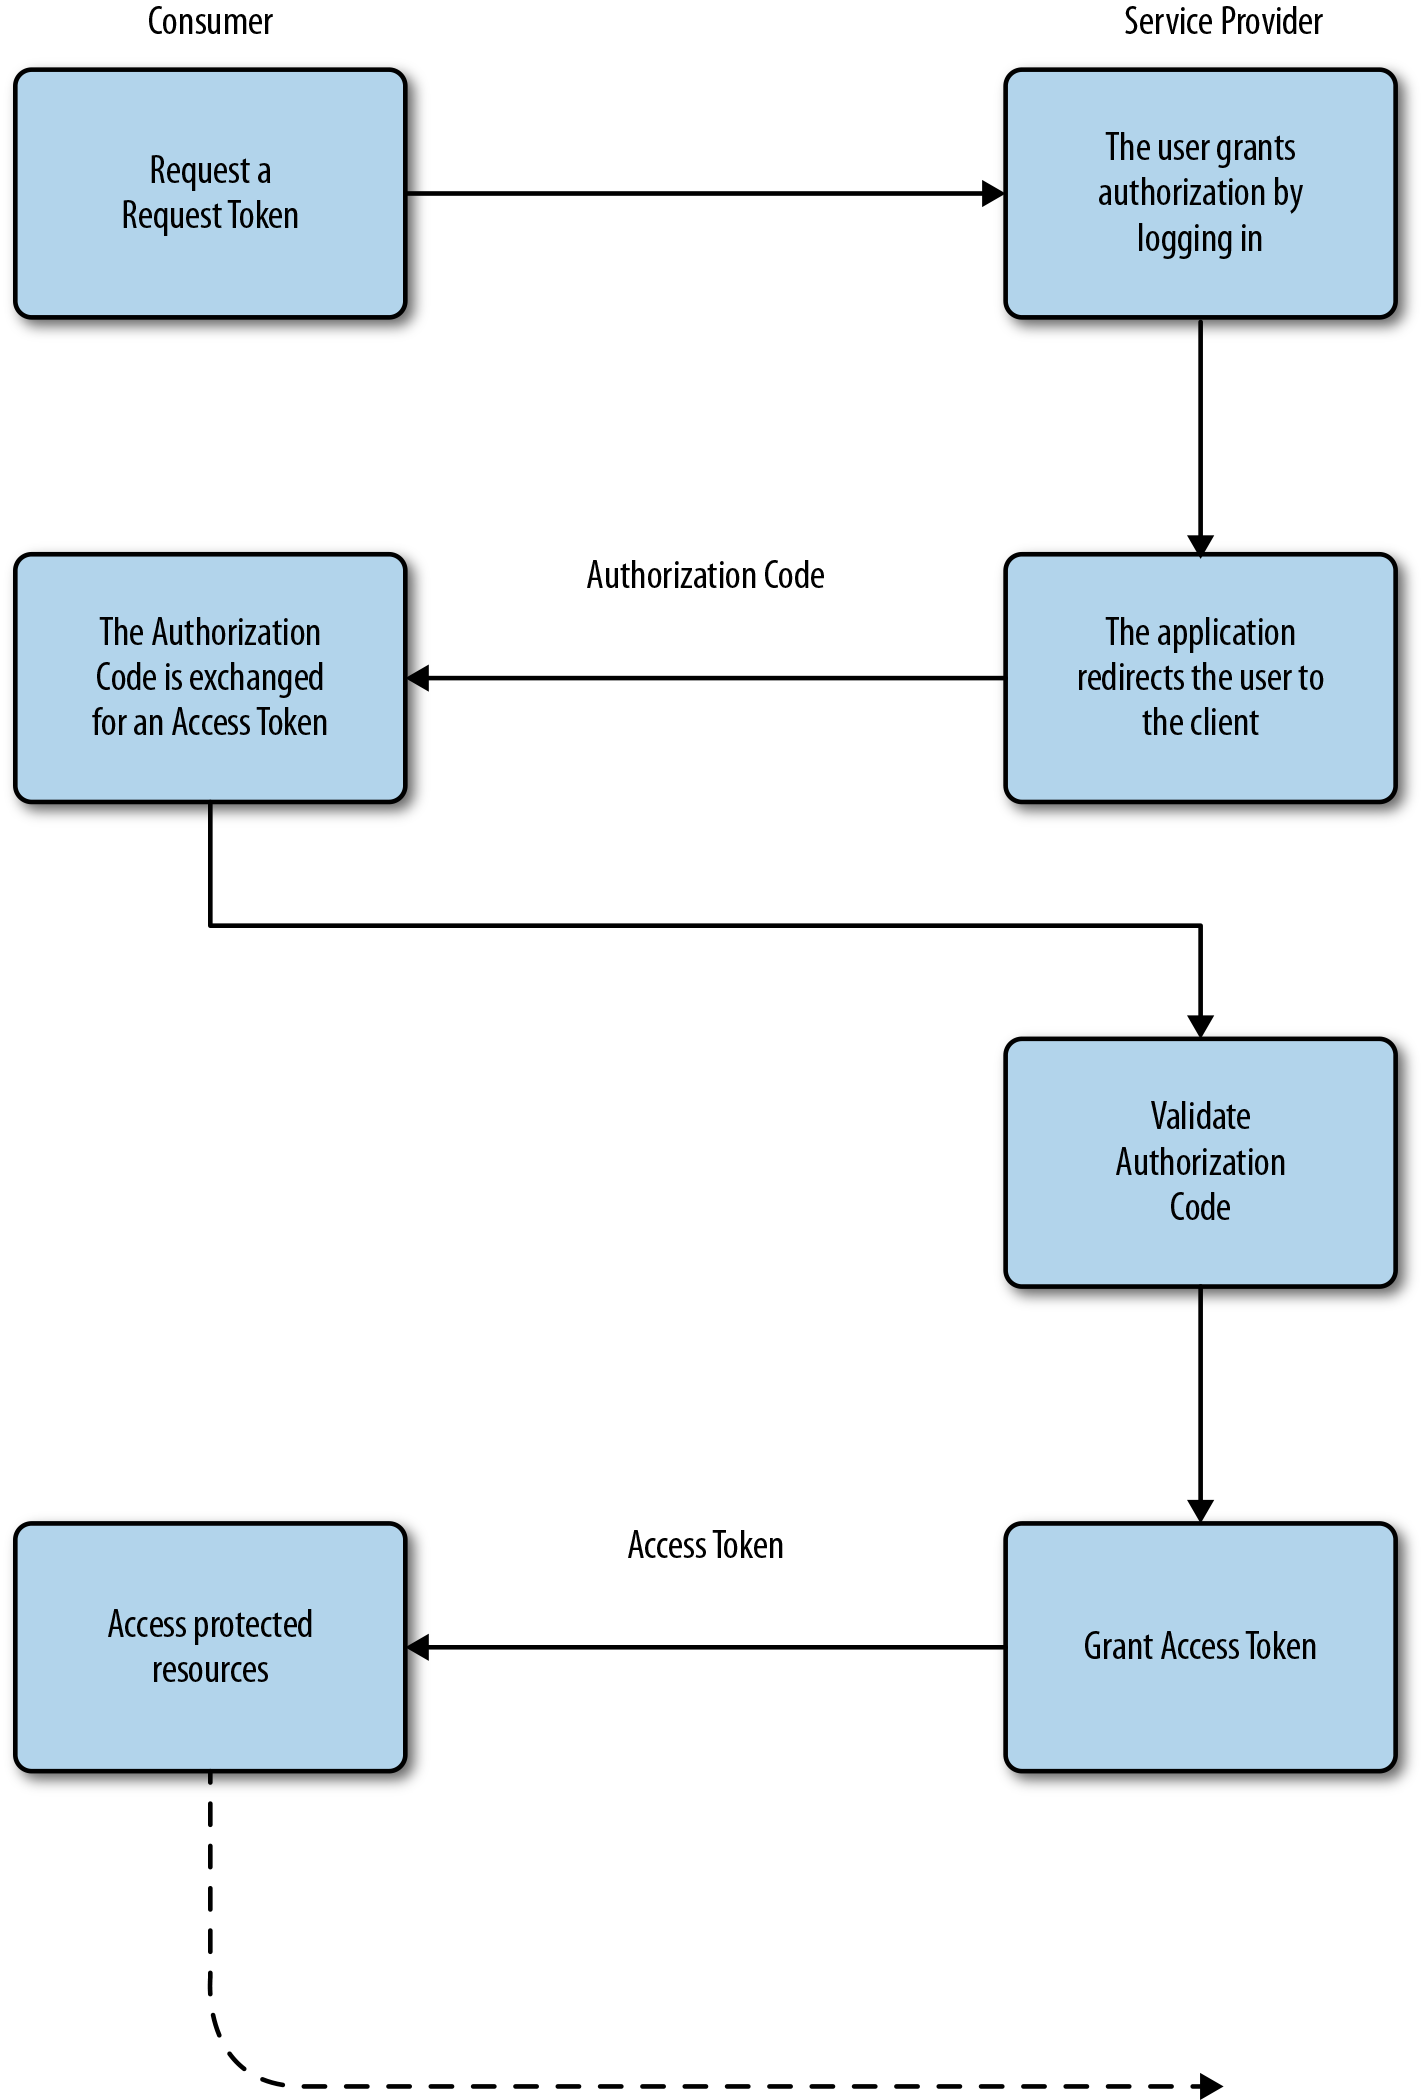
Figure 4-2. OAuth 2.0 authorization dance
Using the Bearer Token
The Bearer Token is one of the most used default token types in the OAuth 2.0 standard. When the server’s token endpoint retrieves a request for a new token, it recognizes the type bearer and provides a default Access Token according to the specification. This token is not further encrypted or signed—if this is something you are interested in, the token type MAC (which stands for Message Authentication Code) is what you’re looking for.15 An alternative to this type is utilizing JSON Web Tokens.16
There are three different ways to use Bearer Tokens in practice. The first option is using Request Header Fields to provide the Access Token: Authorization: Bearer 4ae6ce68-4c59-4313-94e2-fcc2932cf5ca.
Second, the token can be passed in the request’s body as a form-encoded parameter named access_token. In order for this to work, the request’s Content-Type header needs to be set to application/x-www-form-urlencoded and all further body parameters need to comply to the encoding requirements—JavaScript’s method encodeURIComponent() comes in handy here.
When providing the Access Token as a URI query parameter, use access_token followed by the Access Token itself. This last method is least desirable, because URLs might be logged. If neither using the Authorization header nor passing the Access Token via the request body is an option for you, make sure to send a Cache-Control header that is set to no-store. Further security considerations are being outlined in Section 5 of the official Bearer Token RFC.17
Authorization and Authentication with OpenID Connect
Now that we have discussed OAuth 2.0 in detail, it is time to highlight OpenID Connect. OpenID traditionally stands for an authentication framework that was widely adopted in the pre-2010 era. With the rise of OAuth and the users’ wish to adopt multiple identities based on the authentication use case, a variety of hybrid extensions and so-called pseudo-authentication using OAuth became popular. OpenID Connect is a standard issued by the OpenID Foundation in February 2014 and resembles an extra layer on top of the OAuth 2.0 core that handles user authentication in a standardized REST-like manner.18 All data being transmitted is formatted using JSON. While OAuth is supposed to be a standard for authorization, OpenID Connect enables authentication use cases leveraging the OAuth 2.0 protocol. This pretty much means that OpenID Connect is a superset of OAuth 2.0.
UserInfo endpoint and Claims
Next to OAuth’s authorization and token endpoint, OpenID Connect relies on an additional endpoint called UserInfo. This endpoint provides Claims about the authenticated user. Claims are a predefined set of profile information about the user such as the user’s name, the profile’s URL, or whether the user’s email address has been verified.19 Additionally, an Address Claim can be requested and custom Claims can be defined.
The ID Token
A central part of the OpenID Connect specification is the ID Token.20 The token’s functionality revolves around the following details:
-
It serves as security token.
-
It contains authentication information.
-
It is signed using JSON Web Signatures (JWS).21
-
It can be encrypted using JSON Web Encryption (JWE).22
Note
At the time of writing this book, both JWS and JWE are still works in progress.
Security Considerations Between OAuth 2 and OAuth 1.0a
As highlighted in this chapter’s introduction, OAuth 1.0a’s security relies heavily on client-side cryptography mechanisms. Use of TLS or SSL is not enforced and important credentials like the consumer secret and token secret are stored in plain text. Phishing attacks are a possibility and require the user to verify the authenticity of websites before providing any credentials.23
OAuth 2.0, on the other hand, relies on TLS version 1.0 as a security mechanism.24 Additionally, protection against cross-site request forgery, known as CSRF attacks, can be achieved by utilizing the state parameter as outlined under the Authorization Codes section of the specification.25
Building an OAuth 2.0 Server
This section covers an implementation of OAuth 2.0 for the Node.js web application framework Express. Express serves as base for many web projects and is listed as one of the most popular packages hosted on npm, the Node package manager.
To allow for seamless authentication and authorization mechanisms between the server’s different routes, a feature called middleware will be leveraged. Middleware can be used on an application level, a route level, and to handle errors. You can imagine middleware as a function that can be plugged into your application’s routes and is able to interact with the request and response objects. Popular examples for third-party middleware are cookie-parser, which enables parsing cookie headers, and passport, which is a popular middleware for handling user authentication.
Note
Since version 4.x of Express, the only built-in middleware is express.static; this function is responsible for serving static assets.26
Creating the Express Application
Before we can get started with the OAuth 2.0 server integration, we need to take a few minutes to set up our environment. Please refer to Appendix B for instructions on installing and setting up Node.js and the Express generator accordingly.
Following the installation of the generator, we will create our first Express application:
express oauth
cd oauth
npm install
npm start
This creates a new Express application in the folder oauth and installs the required dependencies. The command npm start runs our application, which will be served on http://localhost:3000/ (unless specified otherwise).
That’s all it takes to create our first Express application! We will use this knowledge in our upcoming samples throughout this book.
Setting Up Our Server’s Database
To allow for interaction with MongoDB, our project’s database, we will use the database connector mongoose.js. To install the package, execute npm install mongoose --save from the root folder of your application. The --save option for the npm install command makes sure that an entry for Mongoose is added to our project’s package.json file as a runtime dependency. This is important because the node_modules folder, where all the installed modules reside, is usually not pushed to the server.
First, we need to set up the code that allows us to connect to our MongoDB database. Add the following code snippet to the app.js file that the Express generator created for you:
var mongoose = require('mongoose');
mongoose.connect('mongodb://localhost/book');
For development purposes, we will use a local database (obviously this would change when deploying this application onto a different environment). By connecting to Mongoose within app.js, we provide application-wide access to the database itself—a necessity for having the ability to handle database queries and object manipulation within our application’s routes.
Generating Authorization Codes and Tokens
Two types of tokens are relevant for our OAuth 2.0 integration. A key requirement for OAuth Tokens is that they need to be unique, nonsequential, and nonguessable.
Authorization Codes
Authorization Codes are used in redirection-based authorization flows. A code can be used only once, and a maximum lifetime of 10 minutes is recommended by the official specification.27
A typical authorization server response contains the parameters listed in Table 4-1.
| Parameter | Necessity | Description |
|---|---|---|
|
Required |
An access grant that is bound to the client’s redirect URL and identifier |
|
Requireda |
Used to prevent cross-site request forgery |
a Providing the | ||
Access Tokens
Access Tokens are tokens with a short lifetime that are used to access protected resources. The short lifetime is a built-in security mechanism that tries to prevent any fraudulent usage of resources. Using the Access Token to access resources consumes the token. Securing HTTP requests to access OAuth 2.0–protected resources is also known as Bearer Token usage. Table 4-2 contains a complete overview of an Access Token endpoint response.
Access Tokens in OAuth 1.0
An Access Token in OAuth 1.0 is valid until it is revoked manually.
| Parameter | Necessity | Description |
|---|---|---|
|
Required |
The Access Token issued by the authorization server |
|
Required |
Helps the client utilize the Access Token with resource requests |
|
Recommended |
Lifetime in seconds |
|
Optional |
The scope of resources that can be accessed |
|
Optional |
Used to refresh the Access Token with the same authorization grant |
Refresh Tokens
Refresh Tokens allow refreshing Access Tokens after they are consumed or expired. In order to allow for refreshing the Access Tokens, Refresh Tokens are long-lived and expire after they have been used to refresh the Access Token. This feature can also be used to request Access Tokens with a narrower scope, and its implementation is optional.
Generation of codes and tokens
To ensure complete uniqueness of tokens and authorization codes, various packages for Node.js can be leveraged in order to generate UUIDs. Two of the popular modules to generate UUIDs are hat and node-uuid.
In order to use hat, we will use npm:
npm install hat --save
After the module is installed and the entry added to our package.json file, we can start working with hat to create UUIDs:
var hat = require('hat');
var token = hat();
To avoid collisions, the function rack() can be used:
var hat = require('hat');
var rack = hat.rack();
var token = rack();
node-uuid, another solution to generate UUIDs, can be installed using npm, too:
npm install node-uuid --save
Next, we obtain access to the module and generate UUIDs using the v4 method:
var uuid = require('node-uuid');
var token = uuid.v4(); // Unique token
Both hat and node-uuid allow for passing additional parameters to further randomize the generated tokens. Please refer to the individual documentation for more details. For any further examples in this book, we will stick with using node-uuid. Both modules can be exchanged mutually based on your own preference.
If we were to generate a unique string using a self-implemented method, we might consider JavaScript’s Math.random() as a feasible choice to build upon. Considering its pseudorandom nature a different method like hat or node-uuid should be used, though.28 Adam Hyland published a fantastic article on the nature of Math.random() in 2013—you should definitely read it when considering the use of this method.29
The correct implementation if UUIDs requires three criteria:
-
They must be universally unique.
-
They must be nonsequential.
-
They must be nonguessable.
Using a database’s identifier like MongoDB’s ObjectId is not recommended because we cannot guarantee the preceding requirements will be met. ObjectId is a 12-byte BSON type and consists of the following elements:30
-
A 4-byte value representing the seconds since the Unix epoch
-
A 3-byte machine identifier
-
A 2-byte process ID
-
A 3-byte counter, starting with a random value
The Authorization Endpoint
As discussed in the introductory section for OAuth 2.0, the Authorization Code flow requires two endpoints to be implemented in order to work. First, we will look at implementing the authorization endpoint:
var uuid = require('node-uuid');
var Client = require('../lib/models/client');
var AuthCode = require('../lib/models/authcode');

router.get('/authorize', function(req, res, next) {
  var responseType = req.query.response_type;
  var clientId = req.query.client_id;
  var redirectUri = req.query.redirect_uri;
  var scope = req.query.scope;
  var state = req.query.state;

  if (!responseType) {
    // cancel the request - we miss the response type
  }

  if (responseType !== 'code') {
    // notify the user about an unsupported response type
  }

  if (!clientId) {
    // cancel the request - client id is missing
  }

  Client.findOne({
    clientId: clientId
  }, function (err, client) {
    if (err) {
      // handle the error by passing it to the middleware
      next(err);
    }

    if (!client) {
      // cancel the request - the client does not exist
    }

    if (redirectUri !== client.redirectUri) {
      // cancel the request
    }

    if (scope !== client.scope) {
      // handle the scope
    }

    var authCode = new AuthCode({
      clientId: clientId,
      userId: client.userId,
      redirectUri: redirectUri
    });
    authCode.save();

    var response = {
      state: state,
      code: authCode.code
    };

    if (redirectUri) {
      var redirect = redirectUri +
        '?code=' + response.code +
        (state === undefined ? '' : '&state=' + state);
      res.redirect(redirect);
    } else {
      res.json(response);
    }
  });
});
The preceding code assumes that there is a Mongoose model called Client. A client consists of an ID, a secret, a user ID, and a few other attributes like the redirect URI it uses in order to communicate with the Consumer.
When the redirect client flow is being used, the code is provided as query parameter—in case of a resource request, a JSON object containing both the state and the code is returned.
One of the attributes of a client is also the scope. The scope tells the Service Provider which kind of attributes the Consumer is allowed to access. When obtaining the user’s authorization, clients usually display the scopes in order to make sure that users understand what kind of information they share.
Our application requires client credentials to be passed in both the /authorization and /token routes. Client IDs, secrets, and names are required to be unique in order to avoid any issues. We will build upon MongoDB’s schema mechanisms to realize this challenge. One mechanism is that properties can be flagged as unique in order to avoid duplicate keys in the database:
var mongoose = require('mongoose');
var uuid = require('node-uuid');

var ClientModel = function() {
  var clientSchema = mongoose.Schema({
    clientId:     { type: String, default: uuid.v4(), unique: true },
    clientSecret: { type: String, default: uuid.v4(), unique: true },
    createdAt:    { type: Date,   default: Date.now },
    name:         { type: String, unique: true },
    scope:        { type: String },
    userId:       { type: String },
    redirectUri:  { type: String }
  });

  return mongoose.model('Client', clientSchema);
};

module.exports = new ClientModel();
In ClientModel we use MongoDB’s default initialization to our advantage. Instead of having to pass a client ID and secret whenever we create a client, this process is shifted to the database schema itself.
When dealing with attributes that are flagged as unique—such as the client’s name—we need to check whether the database entry was created successfully. When using the save() method, you’ll notice that mongoose and the underlying MongoDB won’t provide feedback on whether the operation was successful. This is where a callback mechanism can be used. By checking whether an error occurred before rendering the client’s details, we can ensure that we avoid confusion and problems:
router.get('/', function(req, res, next) {
  var client = new Client({
    name: 'Test',
    userId: 1,
    redirectUri: 'http://localhost:5000/callback'
  });
  client.save(function(err) {
    if (err) {
      next(new Error('Client name exists already'));
    } else {
      res.json(client);
    }
  });
});
When implementing this route, you’ll want to pair it with a form that allows users to enter a client name, select scopes (which will be required for OpenID Connect), and the client’s redirect URI.
AuthCode, another Mongoose model we rely on, is implemented in a similar manner. It represents the authorization codes our application issues in /authorize:
var mongoose = require('mongoose');
var uuid = require('node-uuid');

var AuthCodeModel = function() {
  var authCodeSchema = mongoose.Schema({
    code:         { type: String,   default: uuid.v4() },
    createdAt:    { type: Date,     default: Date.now, expires: '10m' },
    consumed:     { type: Boolean,  default: false },
    clientId:     { type: String },
    userId:       { type: String },
    redirectUri:  { type: String }
  });

  return mongoose.model('AuthCode', authCodeSchema);
};

module.exports = new AuthCodeModel();
Handling a Token’s Lifetime
In this example, we will look at creating and storing tokens using mongoose.js, handling the token’s lifetime, and consuming the token afterward. For our application, we will use a Token TTL of 3 minutes.
First we will set up a new Mongoose schema31 called Token. The schema will consist of the details outlined in the OAuth 2.0 specification:
var mongoose = require('mongoose');
var uuid = require('node-uuid');

var TokenModel = function() {
  var tokenSchema = mongoose.Schema({
    userId:       { type: String },
    refreshToken: { type: String,   unique: true },
    accessToken:  { type: String,   default: uuid.v4() },
    expiresIn:    { type: String,   default: '10800' },
    tokenType:    { type: String,   default: 'bearer' },
    consumed:     { type: Boolean,  default: false },
    createdAt:    { type: Date,     default: Date.now,  expires: '3m' }
  });

  return mongoose.model('Token', tokenSchema);
};

module.exports = new TokenModel();
You will notice that an expires flag has been defined. It’s set to 3 minutes and will cause the database entry to be deleted (other values like 1h or simple integers for seconds can be used here too). In order to make creating Access Tokens as easy as writing a few lines of code, sensible default values for fields like tokenType are being used.
The Access Token is initialized using the node-uuid module in order to populate the accessToken and refreshToken fields. userId identifies the resource owner and can be used to consume all Access Tokens that were assigned to the user.
By providing the user’s ID to both the RefreshToken and Token objects, we can ensure that we are able to consume all issued tokens at once:
var mongoose = require('mongoose');
var uuid = require('node-uuid');

var RefreshTokenModel = function() {
  var refreshTokenSchema = mongoose.Schema({
    userId:     { type: String },
    token:      { type: String,   default: uuid.v4() },
    createdAt:  { type: Date,     default: Date.now },
    consumed:   { type: Boolean,  default: false }
  });

  return mongoose.model('RefreshToken', refreshTokenSchema);
};

module.exports = new RefreshTokenModel();
After defining the Access Token and Refresh Token schema, we’re able to generate both of them like this:
var uuid = require('node-uuid');
var Token = require('../lib/models/token');
var RefreshToken = require('../lib/models/refreshtoken');

var userId = 1; // some id

var refreshToken = new RefreshToken({
  userId: userId
});
refreshToken.save();

var token = new Token({
  refreshToken: refreshToken.token,
  userId: userId
});
token.save();
If we put all of this together, we can begin implementing our token endpoint. For the first implementation of this route, we will refrain from handling Refresh Tokens that were obtained before—we cover handling them in “Using Refresh Tokens” after covering some more basics. Here’s the code for our first draft:
var AuthCode = require('../lib/models/authcode');
var Client = require('../lib/models/client');
var Token = require('../lib/models/token');
var RefreshToken = require('../lib/models/refreshtoken');

router.post('/token', function (req, res) {
  var grantType = req.body.grant_type;
  var authCode = req.body.code;
  var redirectUri = req.body.redirect_uri;
  var clientId = req.body.client_id;

  if (!grantType) {
    // no grant type passed - cancel this request
  }

  if (grantType === 'authorization_code') {
    AuthCode.findOne({
      code: authCode
    }, function(err, code) {
      if (err) {
        // handle the error
      }

      if (!code) {
        // no valid authorization code provided - cancel
      }

      if (code.consumed) {
        // the code got consumed already - cancel
      }

      code.consumed = true;
      code.save();

      if (code.redirectUri !== redirectUri) {
        // cancel the request
      }

      // validate the client id - an extra security measure
      Client.findOne({
        clientId: clientId
      }, function(error, client) {
        if (error) {
          // the client id provided was a mismatch or does not exist
        }

        if (!client) {
          // the client id provided was a mismatch or does not exist
        }

        var _refreshToken = new RefreshToken({
          userId: code.userId
        });
        _refreshToken.save();

        var _token = new Token({
          refreshToken: _refreshToken.token,
          userId: code.userId
        });
        _token.save();

        // send the new token to the consumer
        var response = {
          access_token: _token.accessToken,
          refresh_token: _token.refreshToken,
          expires_in: _token.expiresIn,
          token_type: _token.tokenType
        };

        res.json(response);
      });
    });
  }
});
Now our server is ready to issue Access Tokens in order to allow the Consumer to access protected resources.
Handling Resource Requests
Whenever a resource is accessed using the Access Token, the token needs to be consumed in order to make sure no more resource requests are made using this token:
var Token = require('../lib/models/token');
var accessToken = 'some uuid';

Token.findOne({
  accessToken: accessToken
}, function(err, token) {
  if (err) {
    // handle the error
  }

  if (!token) {
    // no token found - cancel
  }

  if (token.consumed) {
    // the token got consumed already - cancel
  }

  // consume all tokens - including the one used
  Token.update({
    userId: token.userId,
    consumed: false
  }, {
    $set: { consumed: true }
  });
});
Mongoose’s findOne and update functions are practical when dealing with tokens because we can easily consume all tokens for a certain user or check whether a token is still valid.
This method makes for convenient middleware that protects our application’s resources. Let’s apply this to an Express route:
var Token = require('../models/token');

var authorize = function(req, res, next) {
  var accessToken;

  // check the authorization header
  if (req.headers.authorization) {
    // validate the authorization header
    var parts = req.headers.authorization.split(' ');

    if (parts.length < 2) {
      // no access token got provided - cancel
      res.set('WWW-Authenticate', 'Bearer');
      res.sendStatus('401');
      return;
    }

    accessToken = parts[1];
  } else {
    // access token URI query parameter or entity body
    accessToken = req.query.access_token || req.body.access_token;
  }

  if (!accessToken) {
    // no access token got provided - cancel with a 401
  }

  Token.findOne({
    accessToken: accessToken
  }, function(err, token) {
    // Same as in above example
    ...

    // consume all tokens - including the one used
    Token.update({
      userId: token.userId,
      consumed: false
    }, {
      $set: { consumed: true }
    });

    // ready to access protected resources
    next();
  });
};

module.exports = authorize;
After the authorization middleware has processed the request, the request is passed on to the next middleware or the route itself by executing next().
Authorizing requests using the authorization middleware we just implemented is as easy as adding it to our resources route:
var express = require('express');
var router = express.Router();
var authorize = require('../lib/middleware/authorize');

router.get('/user', authorize, function (req, res) {
  var user = {
    name: 'Tim Messerschmidt',
    country: 'Germany'
  }
  res.json(user);
});

module.exports = router;
Additional middleware can be passed by using array-syntax instead. If we were to use another middleware that logs all requests, the /user definition would change to the following:
router.get('/user', [logger, authorize], function (req, res) {
  var user = {
    name: 'Tim Messerschmidt',
    country: 'Germany'
  }
  res.json(user);
});
Using Refresh Tokens
The Refresh Token is being used to obtain a new Access Token. In order to do so, the Consumer communicates with the Service Provider’s token endpoint. In the next example, we will continue working on the token endpoint we have implemented in order to issue Access Tokens in exchange for Authorization Codes.
The key difference for this scenario is the different Grant Type refresh_token; it indicates that the client obtained an Access Token before and is now trying to obtain new credentials in order to continue accessing protected resources:
var AuthCode = require('../lib/models/authcode');
var Token = require('../lib/models/token');
var RefreshToken = require('../lib/models/refreshtoken');

router.post('/token', function(req, res) {
  var grantType = req.body.grant_type;
  var refreshToken = req.body.refresh_token;
  var authCode = req.body.code;
  var redirectUri = req.body.redirect_uri;
  var clientId = req.body.client_id;

  if (!grantType) {
    // no grant type provided - cancel
  }

  if (grantType === 'authorization_code') {
    ...
  } else if (grantType === 'refresh_token') {
    if (!refreshToken) {
      // no refresh token provided - cancel
    }

    RefreshToken.findOne({
      token: refreshToken
    }, function (err, token) {
      if (err) {
        // handle the error
      }

      if (!token) {
        // no refresh token found
      }

      if (token.consumed) {
        // the token got consumed already
      }

      // consume all previous refresh tokens
      RefreshToken.update({
        userId: token.userId,
        consumed: false
      }, {
        $set: {consumed: true}
      });

      var _refreshToken = new RefreshToken({
        userId: token.userId
      });
      _refreshToken.save();

      var _token = new Token({
        refreshToken: _refreshToken.token,
        userId: token.userId
      });
      _token.save();

      var response = {
        access_token: _token.accessToken,
        refresh_token: _token.refreshToken,
        expires_in: _token.expiresIn,
        token_type: _token.tokenType
      };

      // send the new token to the consumer
      res.json(response);
    });
  }
});
You will notice that using the token endpoint with Refresh Tokens is very similar to the code we have used before to authorize requests using Access Tokens. After applying some basic parameter checks, the tokens are being consumed using the update-mechanism, and the next action—in this case, issuing a new Access Token—is executed.
Handling Errors
In this section’s code listings, we’ve mostly looked at success cases and covered error-handling through comments. This subsection covers how to handle errors according to the OAuth spec utilizing Express’s response object.
Before we dive into OAuth’s specification again, a quick look into HTTP status32 codes reveals that there is a selection of codes (Table 4-3) that will be interesting for us.
| Code | Name | Description |
|---|---|---|
|
Found |
The user agent must not automatically redirect. Can be used in routes such as the Authorization Request. |
|
Bad Request |
Malformed request. |
|
Unauthorized |
Authentication failed or not provided. Response must contain |
|
Forbidden |
Even though an authentication might have happened, the requesting party is not authorized to access the underlying resources. |
|
Internal Server Error |
An unexpected condition occurred and the server cannot handle the request. |
|
Service Unavailable |
The server might be overloaded and cannot handle the request at this time. |
These status codes provide us with a toolkit to handle different use cases in the authentication and authorization we encounter throughout the OAuth flow. OAuth’s specification provides error codes that need to be provided in order to help the implementer identify potential sources of errors33 (Table 4-4).
| Code | Description |
|---|---|
|
Parameters missing, invalid parameter value provided, or parameters might be duplicates. |
|
Malformed request. |
|
The resource owner or authorization server denied the request. |
|
The authorization server does not support obtaining an authorization code using this method. |
|
The requested scope is invalid, unknown, or malformed. |
|
The provided authorization grant or Refresh Token is invalid, expired, or the client details don’t match those defined in the authorization request (redirect URI, different client). |
|
Internal server error that can be used when a 500 error cannot be returned to the client. |
|
The server is currently unable to handle the request. Can be used in redirect scenarios where a 503 cannot be returned. |
Please note that these error codes differ based on the current step in the authentication flow.
Using the knowledge we’ve acquired about the tools that both HTTP/1.1 and OAuth 2.0 provide, we can advance to building our own error-handling class:
var util = require('util');

function OAuthError(code, message, err) {
  Error.call(this);
  Error.captureStackTrace(this, this.constructor);

  if (err instanceof Error) {
    this.stack = err.stack;
    this.message = message || err.message;
  } else {
    this.message = message || '';
  }
  this.code = code;

  switch (code) {
    case 'unsupported_grant_type':
      this.status = 400;
      break;
    case 'invalid_grant':
      this.status = 400;
      break;
    case 'invalid_request':
      this.status = 400;
      break;
    case 'invalid_client':
      this.status = 401;
      break;
    case 'invalid_token':
      this.status = 401;
      break;
    case 'server_error':
      this.status = 503;
      break;
    default:
      // Leave all other errors to the default error handler
      this.status = 500;
      break;
  }

  return this;
}

util.inherits(OAuthError, Error);

module.exports = OAuthError;
Because OAuthError is an extension of Error and is supposed to be used toward Express’s error-handling mechanism (via using next or throwing an error), Node’s util module is used in order to inherit all Error methods and properties. The OAuth specification allows us to define custom error codes (such as invalid_token) to refine the interaction with clients.
Because the routes handling POST requests don’t have access to the next parameter, we set up a new handler:
function handleError(err, res) {
  res.set('Cache-Control', 'no-store');
  res.set('Pragma', 'no-cache');

  if (err.code === 'invalid_client') {
    var header = 'Bearer realm="book", error="invalid_token",' +
      'error_description="No access token provided"';
    res.set('WWW-Authenticate', header);
  }
  res.status(err.status).send({
    error: err.code,
    description: err.message
  });
}

module.exports = handleError;
The default behavior is to turn off caching by providing both the Cache-Control and Pragma (nowadays mostly obsolete) headers to the client. This ensures the freshness of information provided.
Using error handlers
After we’ve extended the Error class to be able to provide more meaningful feedback to the client, we can implement this accordingly to handle all cases that apply to our current scenarios.
The first step is to make both the OAuthError class and the handleError function available via require:
// Require custom error handling
var OAuthError = require('../lib/errors/oautherror');
var errorHandler = require('../lib/errors/handler');
For GET requests, we can build upon middleware once more. By using the command-chain, we simply hand over the OAuthError to the appropriate handler—the Express generator creates one by default that renders the status code and error message (when running in a development environment):
// development error handler
// will print stacktrace
if (app.get('env') === 'development') {
  app.use(function(err, req, res) {
    console.log('error');
    res.status(err.status || 500);
    res.render('error', {
      message: err.message,
      error: err
    });
  });
}

// production error handler
// no stacktraces leaked to user
app.use(function(err, req, res) {
  console.log('error');
  res.status(err.status || 500);
  res.render('error', {
    message: err.message,
    error: {}
  });
});
When checking whether the GET request was populated according to OAuth’s requirements, we can simply invoke the error handler like this:
if (!responseType) {
  next(new OAuthError('invalid_request',
    'Missing parameter: response_type'));
}
For POST requests, we alter the code slightly. In this example, we validate that the Authorization Code has been consumed before issuing a new Access Token:
if (code.consumed) {
  return errorHandler(new OAuthError('invalid_grant',
    'Authorization Code expired'), res);
}
You will notice that this time we invoke the errorHandler and pass the response object in order to set the status and error message accordingly.
Adding OpenID Connect Functionality to the Server
Now that we’ve discussed how to implement OAuth 2.0 on the server by adding both the /token and /authorize endpoints, this section highlights how to build upon our existing implementation by adding OpenID Connect functionality on top. Before we add the userinfo endpoint, we should examine the ID Token (Table 4-5), OpenID Connect’s security mechanism of proving authentication and authorization.
| Parameter | Necessity | Description |
|---|---|---|
|
Required |
Issuer Identifier—comes as URL using |
|
Required |
Subject Identifier—must not exceed 255 ASCII characters |
|
Required |
The ID Token’s audience—must contain the OAuth |
|
Required |
Expiration time |
|
Required |
Time at which the token was issued |
|
Required* |
If present the nonce must be verified |
|
Optional |
Time at which the user authentication occurred |
|
Optional |
Authentication Context Class Reference |
|
Optional |
Authentication Methods References |
|
Optional |
Authorized party—must contain the OAuth |
a http://openid.net/specs/openid-connect-core-1_0.html#IDToken | ||
OpenID Connect tokens are JSON Web Tokens that must be signed using JWS and can then be optionally signed and encrypted using JWS and JWE. One popular module choice to handle JWT with Node is njwt, which handles signing tokens via HS256 per default.34
The ID Token Schema
As with the other tokens that we’ve been using in this example so far, we will create a new Mongoose schema that will handle the generation and expiry of our ID Token:
var mongoose = require('mongoose');
var uuid = require('node-uuid');

var IdTokenModel = function() {
  var idTokenSchema = mongoose.Schema({
    createdAt:  { type: Date,   default: Date.now, expires: '1m' },
    iat:        { type: String, default: Math.floor(new Date() / 1000) },
    exp:        { type: String, default: Math.floor(new Date() / 1000) + 180 },
    sub:        { type: String, default: uuid.v4(), maxlength: 255 },
    iss:        { type: String },
    aud:        { type: String },
    userId:     { type: String }
  });

  return mongoose.model('IdToken', idTokenSchema);
};

module.exports = new IdTokenModel();
The ID Token specification requires the iat and exp values to represent the seconds since 1970-01-01T0:0:0Z UTC.35 We achieve this by using JavaScript’s Date class, which returns the milliseconds since Unix Epoch and get the seconds by dividing the result by 1,000.36 Math.floor rounds down the result to the next integer.
Modifying the Authorization Endpoint
When dealing with a regular OAuth 2 authorization flow, the scope parameter is considered optional and serves the purpose of defining resources that will be accessed on top of handling a simple login with OAuth. This behavior changes when we decide to use OpenID Connect as our Authorization and Authentication framework, though. OpenID Connect’s specification defines multiple scope values that can be passed in order to specify which pieces of profile information are required by the client. The minimum scope that needs to be passed is openid; this tells the server that an OpenID Connect authorization attempt is being made.
Considering the required scope as just outlined, we will go ahead and modify the authorization endpoint accordingly:
router.get('/authorize', function(req, res, next) {
  var responseType = req.query.response_type;
  var clientId = req.query.client_id;
  var redirectUri = req.query.redirect_uri;
  var scope = req.query.scope;
  var state = req.query.state;
  var userId = req.query.user_id;

  // Same as in above example
  ...

  if (!scope || scope.indexOf('openid') < 0) {
      next(new OAuthError('invalid_scope',
        'Scope is missing or not well-defined'));
  }

  Client.findOne({
    clientId: clientId
  }, function (err, client) {
    ...

    if (scope !== client.scope) {
      next(new OAuthError('invalid_scope',
        'Scope is missing or not well-defined'));
    }

    ...
  });
});
In this example, we have made the basic assumption that each request to the endpoint is an OpenID Connect authentication request. Another way of handling the request is handling all requests with a scope containing openid as OpenID Connect, and all other requests as OAuth 2.
Instead of checking the scope parameter in the initial statements, we move the conditional statement down to the Client section and will check if we are dealing with an OpenID Connect authentication request. The OpenID Connect specification does not specify how to handle non-openid scope requests—the fallback to OAuth 2 seems to be a sensible choice, though:
if (scope && scope.indexOf('openid') >= 0) {
  // OpenID Connect Authentication request - generate an ID Token
}
Adjusting the Token Endpoint
While the changes to the authorization endpoint are minimal and easy to handle, we need to make a few more changes to our token endpoint. The client’s request will practically stay the same, but we’ll need to create the ID Token, store that token, and pass it to the client with our Access Token response.
One of the new requirements for the token endpoint is verifying if the Grant Type (the Authorization Code we pass to the token endpoint) is the result of an OpenID Connect authentication request—otherwise, the endpoint is not supposed to return an ID Token:
router.post('/token', function (req, res) {
  var grantType = req.body.grant_type;
  var refreshToken = req.body.refresh_token;
  var authCode = req.body.code;
  var redirectUri = req.body.redirect_uri;
  var clientId = req.body.client_id;

  if (!grantType) {
    return errorHandler(
      new OAuthError('invalid_request',
      'Missing parameter: grant_type'),
      res);
  }

  if (grantType === 'authorization_code') {
    AuthCode.findOne({
      code: authCode
    }, function (err, code) {
      // the same validation as for the OAuth 2 flow
      ...

      Client.findOne({
        clientId: clientId
      }, function (error, client) {
        // same as in the OAuth 2 example
        ...

        var _token;
        var response;
        if (client.scope && (client.scope.indexOf('openid') >= 0)) {
          // An OpenID Connect request
          var _idToken = new IdToken({
            iss: client.redirectUri,
            aud: client.clientId,
            userId: code.userId
          });
          _idToken.save();

          _token = new Token({
            refreshToken: _refreshToken.token,
            idToken: _idToken.sub,
            userId: code.userId
          });
          _token.save();

          // send the token to the consumer
          response = {
            access_token: _token.accessToken,
            refresh_token: _token.refreshToken,
            id_token: _idToken.sub,
            expires_in: _token.expiresIn,
            token_type: _token.tokenType
          };

          res.json(response);
        } else {
          // An OAuth 2 request
          _token = new Token({
            refreshToken: _refreshToken.token,
            userId: code.userId
          });
          _token.save();

          // send the token to the consumer
          response = {
            access_token: _token.accessToken,
            refresh_token: _token.refreshToken,
            expires_in: _token.expiresIn,
            token_type: _token.tokenType
          };

          res.json(response);
        }
      });
    });
  });
});
The UserInfo Endpoint
After we have adjusted the authentication and token endpoints, the last adjustment we need to handle is adding a new endpoint called UserInfo. The UserInfo endpoint shares the resource owner’s profile information with the client. All requests to this endpoint must be signed using the OAuth 2 Access Token provided as the Authorization header.
Because we have already written the middleware that handles OAuth 2–based authorization, adding the UserInfo endpoint is as easy as adding this new route:
router.get('/userinfo', authorize, function(req, res) {
  // The request got authorized - share profile information
  ...
});
This example outlines the power of middleware. Instead of writing duplicate code to handle simple tasks like checking the Authorization header, we simply mount a middleware that handles this task for all relevant routes.
Session Management with OpenID Connect
OpenID Connect Session Management is a draft that proposes the ability to control end-user sessions to the OpenID Connect stack.37 This would enable the functionality to not just log in the user (as a lot of OAuth 2 clients do) but also handle the termination of sessions—the actual logout process.
The specification proposes to pass three parameters to the Service Provider in order to allow for logging out the user. id_token_hint is a required parameter that matches the previously issued ID Token and identifies the authenticated end-user plus the user’s session. The parameter post_logout_redirect_uri will be used for redirects after the logout and is optional. Finally, the parameter state can be passed as an additional security mechanism; after the logout, it will be passed on to the post_logout_redirect_uri as a query parameter. state is an optional parameter, too.
Building an OAuth 2 Client
Client-side OAuth 2.0 varies based on our client’s use case and flow. In the following sections, we discuss the redirection-based Authorization Code flow and how to use the credentials-based flow.
Using Authorization Codes
Authorization Codes are one of the most common OAuth 2.0 grant types. They find their usage in multiple web and mobile applications that leverage redirects in order to exchange the necessary information.
In this example, we implement another Express server that will act as the Consumer. The sample will leverage Jade, a Node template engine, and show a simple button that allows us to authorize the user.
The first step is enabling session support for Express. To do so, execute npm install express-session --save to install the required node module and add the following lines to your app.js or index.js file that handles the Express initialization:
var session = require('express-session');

app.use(session({
  secret: 'your session secret',
  resave: false,
  saveUninitialized: false,
  cookie: { maxAge: 60000 }
}));
The resave option ensures that sessions are saved even if they didn’t get modified. saveUninitialized doesn’t save new sessions before they are modified—especially when dealing with authentication and authorization purposes, it is recommended to disable this option (the default value is true according to the documentation38):
var express = require('express');
var router = express.Router();
var uuid = require('node-uuid');

var SEVER_URL = 'YOUR SERVER URL';
var REDIRECT_SERVER_URL = 'REDIRECT URL';

var CLIENT_ID = 'YOUR_CLIENT_ID';

router.get('/', function(req, res) {
  var state = uuid.v4();
  req.session.state = state;

  var options = {
    url: SERVER_URL + '/authorize',
    client_id: CLIENT_ID,
    redirect_uri: REDIRECT_SERVER_URL + '/callback',
    state: state,
    response_type: 'code',
    user_id: 1
  };

  var authorizationURL = options.url +
    '?redirect_uri=' + options.redirect_uri +
    '&user_id=' + options.user_id +
    '&client_id=' + options.client_id +
    '&response_type=' + options.response_type +
    '&state=' + options.state;

  res.render('index', {
    authorizationURL: authorizationURL
  });
});
Our Express route renders a template called index and provides the authorizationURL to the template in order to avoid hardcoding the Client’s details into the template itself:
extends layout

block content
  h1 OAuth 2 Client
  a(href="#{authorizationURL}")
    button Authorize
After the Service Provider authorizes our client, it redirects to the specified redirect_uri and provides the state query parameter (if sent to the server in the previous request) and the Authorization Code itself as code.
We leverage request—a module that eases making HTTP requests—in order to request the Access Token. Install request by executing npm install request --save:
var express = require('express');
var router = express.Router();

var request = require('request');

router.get('/callback', function(req, res, next) {
  var state = req.query.state;
  var code = req.query.code;

  // Compare the state with the session's state
  if (state !== req.session.state) {
    next(new Error('State does not match'));
  }

  request.post({
    url: SEVER_URL + '/token',
    form: {
      code: code,
      grant_type: 'authorization_code',
      redirect_uri: REDIRECT_SERVER_URL + '/callback',
      client_id: CLIENT_ID
    }}, function(error, response, body) {
    if (error) {
      // handle the error
      next(error);
    }

    var resp = JSON.parse(body);
    var accessToken = resp.access_token;

    // Use the Access Token for a protected resource request
    ...
  });
});
Node is able to perform HTTP requests without leveraging the help of any third-party modules. We chose request over implementing requests manually with the http module for simplicity and better readability.
Storing tokens on the Client
There is a big discussion about finding the most secure and most conveniently accessible storage for tokens. Realistically, an Access Token expires after a few minutes, so we can take that lifetime into consideration. For the Refresh Token, on the other hand, we deal with a far longer lifecycle and have to handle the token appropriately. From a security standpoint, we want to ensure that our tokens are not vulnerable to XSS (cross-site scripting), which means that they shouldn’t be accessible from JavaScript (injections) that runs on our client. This reasoning would rule out utilizing HTML5 Web Storage. HTML5 Web Storage offers both local storage that can be accessed via window.localStorage and doesn’t expire, and window.sessionStorage, a session-based storage mechanism that gets wiped as soon as the user closes the browser’s tab.
Classic cookies can be flagged with the HttpOnly option, which ensures that the cookie’s value can be accessed only from the server side. This serves as a protection mechanism against XSS attacks and leaves XSRF/CSRF attacks for discussion—a big risk that often is not accounted for. Gladly, modern web frameworks often offer security mechanisms (Which might have to be enabled in their configuration) in order to handle the threat of replay attacks and more. We discuss these concepts in depth in Chapter 6.
Custom schemes
On mobile platforms, it has become quite popular to use a custom URL scheme in order to make server-to-application calls. A URL can be broken into the following components: scheme://host/path?query. This allows apps to define callbacks from the Web like myoauthapp://book/auth?callback.
Authorization Using Resource Owner Credentials or Client Credentials
Next to the Authorization Code Grant Flow, another popular OAuth 2.0 Grant is known as the Resource Owner Password Credentials Grant, as defined in section 4.3 of the OAuth 2.0 specification. This flow, illustrated in Figure 4-3, represents a simplified way to obtain an Access Token and involves fewer steps in doing so.
The specification describes this flow as viable for scenarios in which the user deeply trusts the client—this could be a device’s operating system or a highly privileged application.

Figure 4-3. OAuth 2.0 Resource Owner Credentials Grant
The Resource Owner Credentials Grant Type (Figure 4-4) is similar to the Client Credentials Grant Type, in which the Client provides its credentials to the Service Provider. The difference is that in the first case the user trusts the client and therefore submits his details, whereas in the latter example the client owns the resources himself and therefore another step in the authentication scenario can be removed.
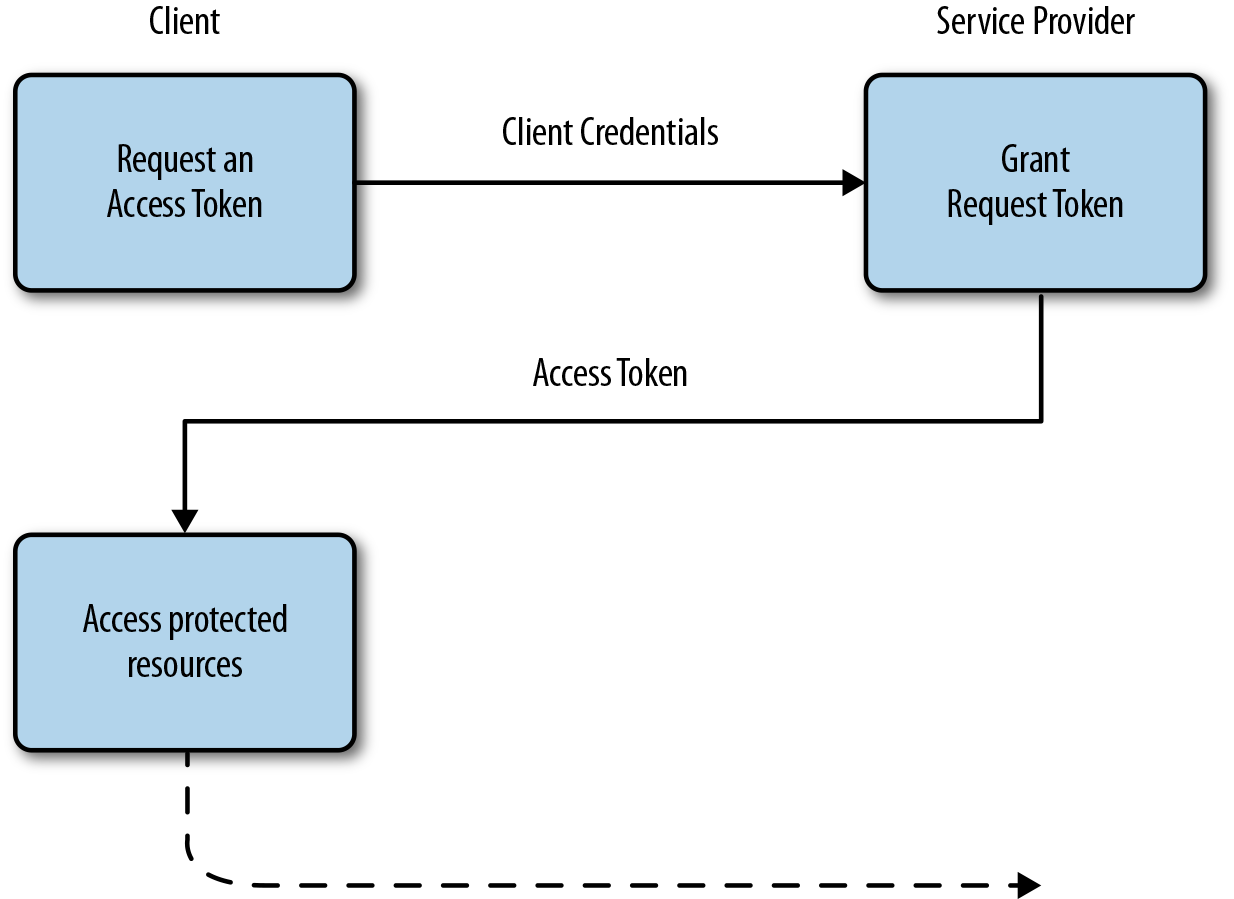
Figure 4-4. OAuth 2.0 Client Credentials Grant
As you might have guessed, in this flow the client simply asks for the user’s credentials. A popular example for a Client Credentials–driven API is PayPal’s REST API, which uses client credentials in order to authorize a merchant’s application to accept payments.39
Adding OpenID Connect Functionality to the Client
Because OpenID Connect heavily relies on OAuth 2.0 in terms of communication and security mechanisms, only a few changes or additions to our client-side OAuth 2.0 example are needed in order to add support for OpenID Connect.
OpenID Connect provides two ways to handle the consumer and service provider communication. The first flow is known as Basic Client and is detailed in the Basic Client Implementer’s Guide.40 The second flow, the Implicit Client, is detailed in the Implicit Client Implementer’s Guide.41 The implicit flow is known as client-side flow or implicit grant flow and removes the need for an authorization token; the Access Token is simply sent back to the server and no Refresh Token is issued. This flow is generally seen as less secure than the basic flow and will therefore not be outlined in detail. A great post covering the OAuth 2.0 implicit flow has been written by Sven Haiges.42
The OpenID Connect Basic Flow
When dealing with OpenID Connect’s Basic flow, we’ll need to adjust the client-side OAuth 2.0 requests for authentication and accessing resources. For OAuth 2.0, the scope parameter is optional and needs to be used when added to the initial authentication request. When adding OpenID Connect functionality to the client, scope becomes a required parameter that needs to be set to cover at least openid as a scope value.43 Table 4-6 provides an overview of common scopes that can be used.
| Scope value | Necessity | Description |
|---|---|---|
|
Required |
Specifies that the Client is making an OpenID Connect request |
|
Optional |
Access to the User’s profile Claims, such as |
|
Optional |
Access to the |
|
Optional |
Access to the |
|
Optional |
Access to the |
|
Optional |
Request that an OAuth 2.0 Refresh Token is issued in order to allow for obtaining a new Access Token and therefore allowing to access the UserInfo endpoint even when the user is not present |
The request to handle the client’s authentication will be altered to this form:
var options = {
  url: SERVER_URL + '/authorize',
  client_id: CLIENT_ID,
  redirect_uri: REDIRECT_SERVER_URL + '/callback',
  state: state,
  scope: 'openid',
  response_type: 'code',
  user_id: 1
};

var authorizationURL = options.url +
  '?redirect_uri=' + options.redirect_uri +
  '&user_id=' + options.user_id +
  '&client_id=' + options.client_id +
  '&scope=' + options.scope +
  '&response_type=' + options.response_type +
  '&state=' + options.state;

res.render('index', {
  authorizationURL: authorizationURL
});
The difference compared to the OAuth 2 client is that this time we are required to pass the scope parameter (set to at least openid) in order to match the specifcation’s minimum requirements.
After obtaining the user’s authorization, the authorization code is issued and exchanged for the actual token. The token endpoint’s response will differ slightly and will also contain an id_token attribute:
{
  "access_token": "71518132-d27b-4828-9317-5571a46c89fb",
  "refresh_token": "3ae3e757-7c32-492d-8af5-8dba943d2ec3",
  "id_token": "ee0b16a5-5be7-4629-8d1b-bf3fd7ea64a9",
  "expires_in": "10800",
  "token_type": "bearer"
}
The ID Token can be used as an additional security mechanism. It contains claims about the authentication of an end user as defined in the OpenID Connect specification.44 An example value that can be easily validated is azp (authorized party) that must match the Consumer’s client_id.
The OpenID Connect specification provides a list of all 21 standard Claims that can be returned by the server’s UserInfo endpoint.45 Claims must be returned in JSON format unless the format was defined differently during the client’s registration.46
Beyond OAuth 2.0 and OpenID Connect
In this chapter, we have discussed the ins and outs of both OAuth 2.0 and OpenID Connect. Both protocols find strong adoption within the industry and empower millions of users and a multitude of applications. Still, with the rise of mobile apps and especially mobile authentication and authorization, the need to provide a better user experience is even more prominent than on the desktop. In the following chapter, we discuss current multifactor authentication systems and viable alternatives, such as biometrics, to identify users and grant authorization for certain actions or information.
1 http://openid.net/2009/12/16/openid-2009-year-in-review/
2 http://designingsocialinterfaces.com/patterns/The_Password_Anti-Pattern
3 http://tools.ietf.org/html/rfc5849
4 http://hueniverse.com/2009/04/23/explaining-the-oauth-session-fixation-attack
5 http://tools.ietf.org/html/draft-ietf-oauth-v2-01
6 http://tools.ietf.org/html/rfc6749
7 http://tools.ietf.org/html/rfc6750
8 http://hueniverse.com/2012/07/26/oauth-2-0-and-the-road-to-hell
9 https://www.tbray.org/ongoing/When/201x/2012/07/28/Oauth2-dead
10 http://dev.evernote.com/doc/articles/authentication.php
11 http://dev.twitter.com/oauth/reference/post/oauth2/token
12 https://developers.google.com/identity/protocols/OAuthForWebApps
13 https://aaronparecki.com/2012/07/29/2/oauth2-simplified#authorization
14 http://tools.ietf.org/html/rfc6749#Section-1.3
15 https://tools.ietf.org/html/draft-ietf-oauth-v2-http-mac-05
16 http://tools.ietf.org/html/rfc7519
17 https://tools.ietf.org/html/rfc6750#Section-5
18 http://openid.net/2014/02/26/the-openid-foundation-launches-the-openid-connect-standard
19 http://openid.net/specs/openid-connect-core-1_0.html#StandardClaims
20 http://openid.net/specs/openid-connect-core-1_0.html#IDToken
21 https://tools.ietf.org/html/draft-ietf-jose-json-web-signature-41
22 https://tools.ietf.org/html/draft-ietf-jose-json-web-encryption-40
23 http://oauth.net/core/1.0a/#anchor32
24 http://tools.ietf.org/html/rfc6749#Section-1.6
25 https://tools.ietf.org/html/rfc6749#section-10.12
26 http://expressjs.com/en/guide/using-middleware.html#middleware.built-in
27 http://tools.ietf.org/html/rfc6749#Section-4.1.2
28 See the documentation here, http://es5.github.io/x15.8.html#x15.8.2.14
29 https://bocoup.com/weblog/random-numbers
30 See the documentation here, http://docs.mongodb.org/manual/reference/object-id
31 http://mongoosejs.com/docs/guide.html
32 https://www.w3.org/Protocols/rfc2616/rfc2616-sec10.html
33 http://tools.ietf.org/html/rfc6749#section-4.1.1
34 https://www.npmjs.com/package/njwt
35 http://openid.net/specs/openid-connect-core-1_0.html#IDToken
36 https://developer.mozilla.org/en-US/docs/Web/JavaScript/Reference/Global_Objects/Date
37 https://openid.net/specs/openid-connect-session-1_0.html
38 https://github.com/expressjs/session#saveuninitialized
39 https://developer.paypal.com/docs/api/#authentication—headers
40 http://openid.net/specs/openid-connect-basic-1_0.html
41 http://openid.net/specs/openid-connect-implicit-1_0.html
42 https://labs.hybris.com/2012/06/05/oauth2-the-implicit-flow-aka-as-the-client-side-flow
43 http://openid.net/specs/openid-connect-basic-1_0.html#RequestParameters
44 http://openid.net/specs/openid-connect-core-1_0.html#IDTokenValidation
45 http://openid.net/specs/openid-connect-basic-1_0.html#StandardClaims
46 http://openid.net/specs/openid-connect-registration-1_0.html
Get Identity and Data Security for Web Development now with the O’Reilly learning platform.
O’Reilly members experience books, live events, courses curated by job role, and more from O’Reilly and nearly 200 top publishers.

