I have a little Flip video camera that I use to take videos. It’s a cute little thing, and easy to use. Unfortunately, it’s been discontinued because so many smart phones have built-in video capability that meets or exceeds the Flip’s capability.
My Flip, and most video phones and other cameras, take video in the MP4 format. In addition, most of our devices now support HD video, which means large video files that may or may not be useful for web access. Once you have a video—your own, or a CC or public domain video you found online—you need to provide conversions of the video for all of your target browsers and environments. This means, on average, creating smaller or edited versions of the video, and converting the resulting video into either Ogg or WebM format (or H.264 if the video is a WAV or other video format).
In addition, you may have a WMA (Windows Media Audio) file that doesn’t play on the web, which you need to convert into a web-friendly format.
The number of tools to edit both audio and video files can fill a book, so I’ll leave that for another book. Instead I’m going to introduce you to some useful tools you can use to create video and audio conversions for various browsers and environments.
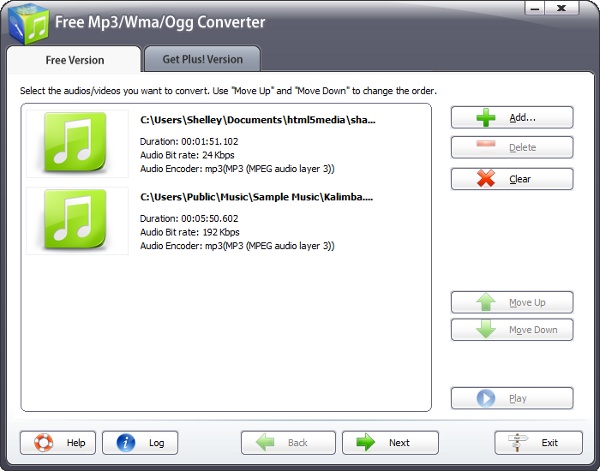
The tool I used for most of the audio conversions for this book is the Free Mp3/Wma/Ogg Converter, by Cyberpower. This tool is extremely easy to use, and can convert one audio file or do batch conversions.
Note
Download the Free Mp3/Wma/Ogg Converter from http://www.freemp3wmaconverter.com/.
When you start the tool, you’re presented with a blank workspace, and buttons to the right for adding source video files. The tool can work with Ogg Vorbis, WMA, and MP3 source files, and you can add more than one source file, as shown in Figure 1-5.
Clicking the Next button at the bottom of the window leads to the next page, where you can select from several audio output formats. For instance, you can pick from a list of Ogg Vorbis quality conversion choices, as shown in Figure 1-6.

For video, I use two different tools: Miro Video Converter, and Handbrake.
The Miro Video Converter is even simpler to use than Free Mp3/Wma/Ogg. When you open the application, you have a space where you can either drag a file for conversion, or open the utility to find the file, as shown in Figure 1-7.

After loading a source file, you then pick which container and profile you want the video file to be converted to. In Figure 1-8, I’ve selected the Android Droid preset.
It can take a little time to do the conversion, depending on how much juice your machine has. However, the simplicity of the conversion process makes it an ideal tool for those just getting started.

If you want a little more sophistication with H.264 files, I recommend Handbrake. It doesn’t do any conversions to WebM or Ogg, but it does give you more finite control over your H.264 conversion, especially for web content.
Note
The Miro Video Converter can be found at http://www.mirovideoconverter.com/. Downloads and documentation for Handbrake can be found at http://handbrake.fr/.
Once you start up Handbrake, you’ll need to provide a source file. This can be a DVD (unless protected), or it can be a video file or folder, as shown in Figure 1-9. In the figure, the source file is the Ogg Theora 854 × 480 video of Big Buck Bunny.

At this point you can choose a preset in the right column, or you can manually choose your settings from several different tab pages. For instance, you can set the video resolution (width and height) and aspect ratio in the first tab page, and in the tab page labeled “Video” you can pick the framerate and bitrate, as well as selecting the 2 pass encoding option. You can adjust the audio in the tab page labeled “Audio”, and add subtitles via the tab page labeled “Subtitles”. If you want to provide closed captioning within the file, this is where you’ll add the subtitles. You can even choose to “burn in” the subtitles if you want them to be available for everyone.
For the sample, I picked the iPhone & iPod Touch preset. Doing so removed some options, such as the 2 pass Encoding, which I would normally pick if the preset allows it (or I was manually setting all of the encoding values). I also checked the Web Optimized option, which means that the video loads progressively (the video can start playing before it’s completely loaded.) Always, always, pick the Web Optimized option if the file is meant for HTML5 video access.
Figure 1-10 shows the front page of Handbrake during the encoding process.

One last tool I used for the book is a frame
grabber. Frame grabbers allow you to traverse through your
video file while the video is running, or frame by frame, or both. You
can then grab a static copy of whatever frame interests you. I used the
freely available Avidemux as a
frame grabber (though it does more than just grab frames), to get a
static image for the poster attribute
example earlier in the chapter.
Note
You can download Avidemux and access the Wiki documents at http://avidemux.sourceforge.net/.
Once Avidemux is opened, select and open your video file. Unless the frame is close to the beginning of the file, click the play button to run the video to the approximate place in the video for the frame you’re interested in. Stop the video, and then use the frame buttons to move forwards or backwards, a frame at a time, to find the frame you want, as shown in Figure 1-11.
Once you have the frame you want in the viewfinder, select the
File menu option, then the Save and Save JPEG menu options, and give the
tool a location and file name for the grabbed frame in the dialog that
opens. Avidemux only saves frames as BMP or JPEG, but the JPEG should be
sufficient for a frame that you want to use as a poster image for your video.

Once you have your static frame copy, you can then edit it in your favorite image editor, and add text or other effects. Even though the file is a JPEG, and a lossy compression format, opening the file once, adding effects, and saving a new copy won’t degrade the copy enough to be noticeable.
There are dozens of tools for every environment for creating, editing, and converting audio, video, or both. My recommendation is try out several to see which ones work for you. Once you have your files, and your basic HTML5 (including all of the containers/codecs you want to support), check out what you can do with HTML5 audio and video out of the box, in Chapter .
Note
Mark Pilgrim provides excellent coverage of the HTML5 media elements, the codecs (and their related issues), as well as tools—including some open source command line tools good for batch processing—either in his book, HTML5: Up and Running (O’Reilly), or freely available at http://diveintohtml5.org/video.html.
Get HTML5 Media now with the O’Reilly learning platform.
O’Reilly members experience books, live events, courses curated by job role, and more from O’Reilly and nearly 200 top publishers.

