Chapter 1. Start Building Apps with C# Build something great...fast!
Want to build great apps...right now?
With C#, you’ve got a modern programming language and a valuable tool at your fingertips. And with Visual Studio, you’ve got an amazing development environment with highly intuitive features that make coding as easy as possible. Not only is Visual Studio a great tool for writing code, it’s also a really effective learning tool for exploring C#. Sound appealing? Let’s get coding!
Learn C#...and learn to become a great developer
Do you want to become a great developer? Yes? Then you came to the right book! You can become a great developer, and C# is the perfect language to help you get there. Here’s why:
⋆ C# is a powerful, modern language that lets you do incredible things. You can use it to build everything from games to websites to serious business applications. You name it, C# can do it.
⋆ C# skills are in demand. Are you looking to land a programming job? C# is one of the most in-demand programming languages around because companies all over the world use C# to build their desktop applications and websites.
⋆ C# is cross-platform. You can write apps that run on Windows, macOS, Linux, and even on your Android and iPhone devices.
...with a learning system that’s effective and fun

When you learn C#—when you learn to really be effective with it—you’re learning more than just a language. You’re learning a whole new way of thinking... and that’s where we come in. We’ve spent more than 15 years developing, experimenting with, and testing out new and different ways to help you get C# ideas into your brain. You’ll use powerful programming environments to build real projects and write lots of code. You’ll learn and practice important development ideas and patterns that help you write great code. You’ll learn how to use modern AI tools to superpower your code and level up your learning skills. By the time you’re done, you’ll have the foundation for successful and satisfying software development.
Welcome to the world of C#. Let’s dive in!
Note
Many people who used previous editions of this book have reached out to us over the years to tell us how our book helped them start their development careers. We’re looking forward to hearing from you too!
“Head First C# started my career as a software engineer and backend developer. I am now leading a team in a tech company and an open source contributor.”
—Zakaria Soleymani, Development Team Lead
“Thank you so much! Your books have helped me to launch my career.”
—Ryan White, Game Developer
Write code and explore C# with Visual Studio
The best way to get started with C# is to write lots of code.
This book uses pictures, puzzles, quizzes, stories, and games to help you learn C# in a way that suits your brain. Every one of those elements is built to help you with a single goal: to keep things interesting while we help you get C# concepts, ideas, and skills into your brain.
This book is also full of C# projects that are specifically designed to give you lots of different ways to explore C# and learn about important ideas and concepts that will help you become a great developer. We designed those projects to be engaging, fun, and interactive to give you lots of opportunities to put those concepts, ideas, and skills into practice.
Visual Studio is your free gateway to C#
Learning C# is all about exploring and growing your skills at your own pace, and that’s where Visual Studio comes in. It’s an amazing tool built by Microsoft. At its heart, it’s an editor for your C# code and projects, but it’s much more than that. It’s a creative tool that helps you with every aspect of C# development. We’ll use Visual Studio throughout this book as an important tool to help you learn and explore C#.
Visual Studio is an IDE—that’s short for integrated development environment—a text editor, visual designer, file manager, and debugger...it’s like a multitool for everything you need to write code.

Here are just a few of the things that Visual Studio helps you do:
⋆ It’s a file and project manager. C# projects are often made up of a lot of files. Visual Studio makes it easy to see exactly where they are, and integrates with version control systems like Git to make sure you never lose a line of code.
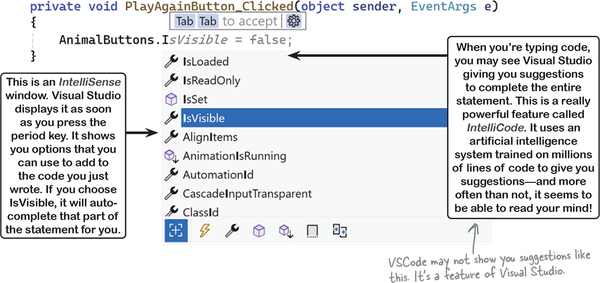
⋆ It helps you edit and manage your code. Visual Studio has many intuitive features to help you edit your code and C# projects, including powerful AI-driven tools like IntelliSense pop-ups and IntelliCode code completion that give you great suggestions to help keep you in the flow.
⋆ It’s a debugger that lets you see your code in action. When you debug your apps in Visual Studio, you can see exactly what your code is doing while it runs—which is a great way to really understand how C# code works.
Visual Studio is a powerful development environment, and it’s an amazing learning tool to help you explore C#.
Note
If you decide to use Visual Studio Code instead of Visual Studio, that’s your IDE. They’re both IDEs!
Install Visual Studio Community Edition
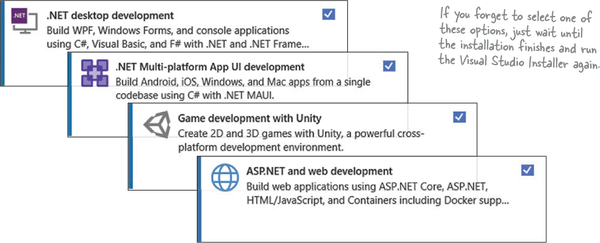
Open https://visualstudio.microsoft.com and download Visual Studio Community Edition. It’s available for both Windows and macOS. The installers look a little different depending on which platform you’re using. Make sure you install the .NET desktop development tools and .NET Multi-platform App UI (or .NET MAUI) development tools. We’ll be doing 3D game development with Unity, so make sure you check that option too.
When you run the Visual Studio installer, select the “.NET desktop development,” “.NET Multi-platform App UI development (MAUI),” and “Game development with Unity” options to install the Visual Studio tools you’ll use in this book. You should also select “ASP.NET and web development” if you plan to download the Head First C# Blazor Learner’s Guide and learn about web development with C#.
Note
This book was written on a Mac. All of the Visual Studio and Unity screenshots in this book were taken running Windows 11 in a Parallels Desktop virtual machine.
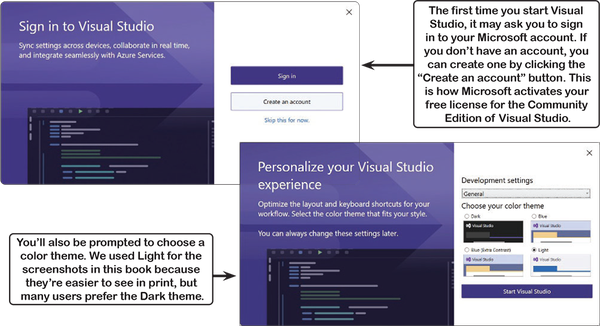
Run Visual Studio
We’re going to jump right into code! Once the installer finishes, run Visual Studio.
Note
Keep an eye out for these “relax” boxes—they point out some common issues that a lot of readers run into, so you know they’re coming and don’t have to worry about them.
Create and run your first C# project in Visual Studio
The best way to learn C# is to start writing code, so you’re going to write a lot of code—and create a lot of apps!—throughout this book. Each app will get its own project, or a folder that Visual Studio creates with special files to organize all of the code.
![]() Tell Visual Studio to create a new project.
Tell Visual Studio to create a new project.
When you launch Visual Studio, the first thing you’ll see is a Get Started window with four options. Click “Create a new project” to create a new project.
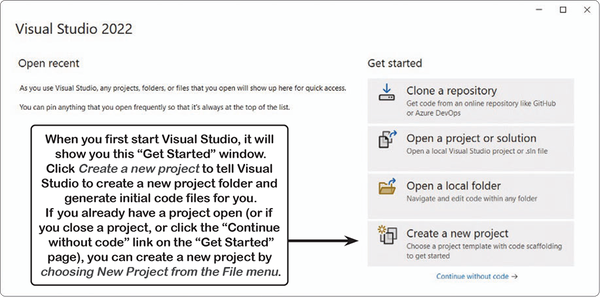
When you create a new project, Visual Studio will ask you which of its project templates you want to use. Every C# project consists of a set of folders and files. Visual Studio has many built-in templates that it can use to generate different kinds of projects. In this book, you’ll use Visual Studio’s templates to create three kinds of projects: Console App projects, .NET MAUI projects, and MSTest unit test projects. (You’ll also create Unity projects, but you won’t use Visual Studio to create them.)
![]() Choose a project template for Visual Studio to use.
Choose a project template for Visual Studio to use.
Visual Studio creates new projects using a template that determines what files to create. Choose the Console App template and click Next.

![]() Enter a name for your project and click Next.
Enter a name for your project and click Next.
Your project’s name is important—it determines file and folder names, and you’ll see it inside some of the code that Visual Studio generates for you. If we ask you to pick a specific name, make sure you do; otherwise, the code in your project may not match screenshots in the book.

![]() Make sure you’re using the current version of .NET.
Make sure you’re using the current version of .NET.
The current version of .NET at the time we’re writing this is 8.0—make sure the version that you’re using is 8.0 (or higher). Then click the Create button to create your project.

Once Visual Studio creates your project, it will open a file called Program.cs with this code:

The app Visual Studio created for you is ready to run. At the top of the Visual Studio IDE, find the button with a green triangle and your app’s name and click it:

![]() Look at your app’s output.
Look at your app’s output.
When you run your program, the Microsoft Visual Studio Debug Console window will pop up and show you the output of the program:
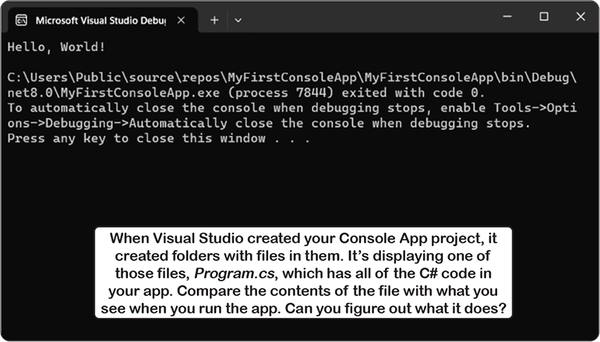
At the top of the window is the output of the program:
Hello, World!
Then there’s a line break, followed by some additional text:
C:\path-to-your-project-folder\MyFirstConsoleApp\MyFirstConsoleApp\bin\Debug\
net8.0\MyFirstConsoleApp.exe (process ####) exited with code 0.
To automatically close the console when debugging stops, enable Tools->Options-
>Debugging->Automatically close the console when debugging stops.
Press any key to close this window . . .
You’ll see the same message at the bottom of every Debug Console window. Your program printed a single line of text (Hello, World!) and then exited. Visual Studio is keeping the output window open until you press a key to close it so you can see the output before the window disappears.
Press a key to close the window. Then run your program again.
This is how you’ll run all of the Console App projects that you’ll build throughout the book.
Try moving the panels in Visual Studio around. Click the pushpin button (![]() ) to collapse the Solution Explorer window into the side panel. Reset the layout by choosing Reset Window Layout from the View menu, then choosing Output from the View menu.
) to collapse the Solution Explorer window into the side panel. Reset the layout by choosing Reset Window Layout from the View menu, then choosing Output from the View menu.
Visual Studio will generate code you can use as a starting point for your applications. Making sure the app does what it’s supposed to do is entirely up to you.
You can use Visual Studio Code with Head First C#
If you’re using Visual Studio (and not VSCode), you can skip ahead to “Let’s Build a Game!”
If you’ve been around the development world at all over the last few years, you’ve probably heard a lot of buzz and excitement about Visual Studio Code (often called VSCode). It’s a powerful code editor that runs on Windows, Mac, and Linux, and it’s gotten very popular among developers because it’s easy to use, versatile, fast, and intuitive.
If you’re using Windows, we recommend that you consider using Visual Studio (not VSCode) because it’s specifically built for C# and has some built-in tools that VSCode currently lacks. However, all of the projects in this book can be done with VSCode. Most of the screenshots in this book will show Visual Studio, but we’ll also tell you how to do the same thing in VSCode where it differs from Visual Studio.
To use this book with Visual Studio Code, start by downloading it from https://code.visualstudio.com. Run the installer, and choose all of the default options. After the installer finishes, open VSCode. It will prompt you to choose a color theme. We chose Dark Modern for our screenshots because we used a light theme for Visual Studio, so choosing a dark theme for VSCode will help make it easier to tell the screenshots apart.
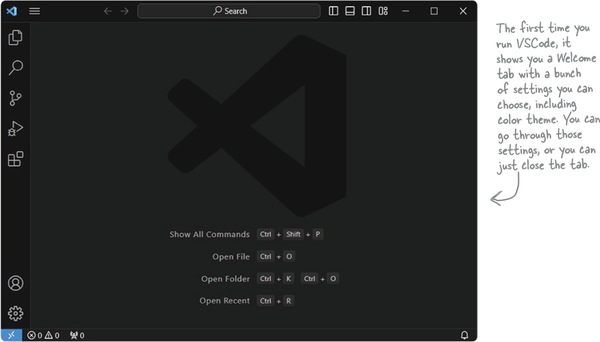
Using Visual Studio Code is optional. You can use VSCode to do all of the projects in this book on Windows or macOS. (Linux readers may need to run an Android emulator to do the .NET MAUI—we’ll talk about that later.)
If you have trouble installing VS Code or running your first project, head to our YouTube channel (https://www.youtube.com/@headfirstcsharp) to see videos of the entire Windows or macOS installation process.
Install the C# extensions
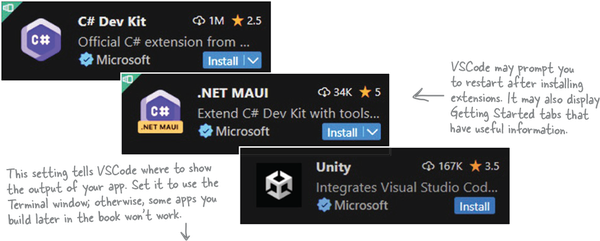
Click the Extensions button ![]() on the left side of the VSCode window to open the Extensions panel. At the top of the panel is a search box with the text “Search Extensions in the Marketplace.” Search for each of these extensions:
on the left side of the VSCode window to open the Extensions panel. At the top of the panel is a search box with the text “Search Extensions in the Marketplace.” Search for each of these extensions:
⋆ C# Dev Kit: This extension has the tools you need to create, edit, and debug C# and .NET projects.
⋆ .NET MAUI: Most chapters in this book have a project that uses .NET MAUI, a framework for creating desktop and mobile apps in C#.
⋆ Unity: The Unity Labs give you a chance to practice your C# skills by building 3D games and simulations.
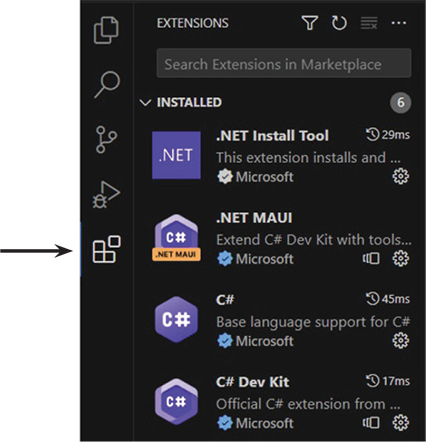
Make sure each extension is the official one from Microsoft. Click the Install button on each extension to install it.
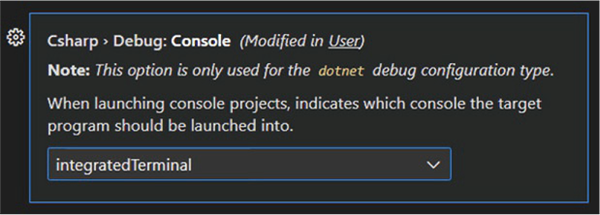
Change the C# debug console setting
Once you have your extensions set up, click the gear icon in the lower-left corner of the VSCode window and choose Settings (or press Ctrl comma or ![]() comma). Search for the setting csharp.debug.console—you should see a dropdown with several options. Change the setting to integratedTerminal.
comma). Search for the setting csharp.debug.console—you should see a dropdown with several options. Change the setting to integratedTerminal.
Now you’re ready to write some C# code!
Create and run your first project in Visual Studio Code
Visual Studio Code is first and foremost an editor, which means its features are specialized for opening and editing many different kinds of files. A VSCode window is typically used to edit files in a folder and its subfolders. When you open VSCode, it remembers the most recent folder you opened. But when you first open it, you’ll need to select a folder. We’ll walk you through the steps for creating a folder with a new .NET project in it.
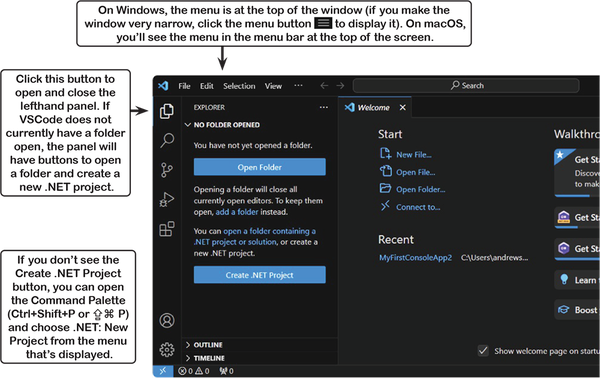
![]() Click the Create .NET Project button.
Click the Create .NET Project button.
A box will appear at the top of the VSCode window with a list of project types, and a search box with the prompt “Select a template to create a new .NET Project.” Type Console into the search box, then choose Console App from the list of templates to create a new .NET Console App project.

![]() Select a folder for your new project.
Select a folder for your new project.
VSCode will display a folder browser window. Choose a location for your new project. The folder browser window has a “New folder” button. You’ll be creating a lot of projects throughout this book, so we suggest creating a folder called “Projects” underneath your home folder or Documents folder to hold them.
Create a new folder inside the folder where you keep your projects and name it MyFirstConsoleApp. Then navigate to the MyFirstConsoleApp folder that you just created and click Select Folder.
![]() Give your project a name.
Give your project a name.
Every C# project has a name. You’ll usually give the project folder the same name as the project. After you select your folder, VSCode will prompt you for a project name:

Type MyFirstConsoleApp into the box, then press the Enter key to create the project. VSCode may ask you if you trust the authors of the folder. This is a really useful security feature, because it prevents you from accidentally opening malicious code. Click the “Yes, I trust the authors” button. You have the option of checking a box to always trust everything in your projects folder.
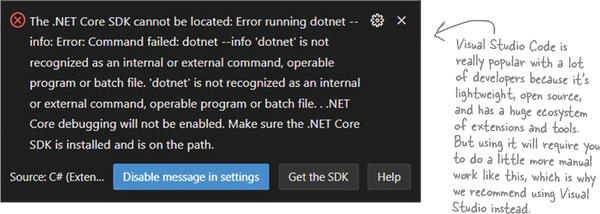
![]() Install the .NET Core SDK. (You only need to do this once!)
Install the .NET Core SDK. (You only need to do this once!)
Before you can create and run C# and .NET apps, you need to install the .NET Core SDK. The easiest way to do this on Windows is to install Visual Studio 2022. If you don’t have the SDK installed, VSCode will display a window prompting you to get it. Click the “Get the SDK” button—this opens a browser window with the page https://dot.net/core-sdk-vscode. Follow the instructions to download the latest version of your SDK for your operating system. Be careful to choose the architecture that matches your computer. For Mac users: if your Mac was made after 2019, choose Arm64; if you’re using an older Intel Mac, choose Intel.
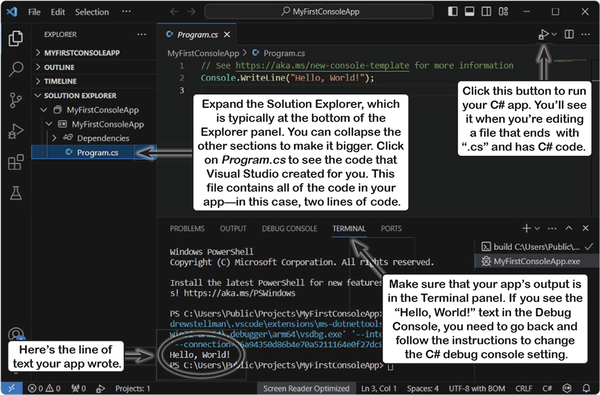
![]() Expand the Solution Explorer and open Program.cs.
Expand the Solution Explorer and open Program.cs.
After VSCode creates your C# project, the Explorer panel on the left will contain several collapsible sections. VSCode is file- and folder-based, and the Explorer is used to browse those files and open them for editing.
Expand the Solution Explorer section at the bottom of the Explorer. The Solution Explorer is part of the C# Dev Kit, which lets VSCode work with C# projects. It shows you all of the files and subfolders that VSCode created for your project—in this case, your app has one file with C# code called Program.cs. Click Program.cs in the Solution Explorer to open the file.
![]() Run your app.
Run your app.
When you have a C# code file (a file that ends with .cs) open in the Solution Explorer, you’ll see a Run button (![]() ) in the upper-right corner of the window. Click that button to run the app.
) in the upper-right corner of the window. Click that button to run the app.
You can also press F5 and choose “Start Debugging” from the Run menu to run your app. VSCode may prompt you to select a debugger. If it does, choose C#. If it asks for a launch configuration, choose the one that matches the project name. You can press F5 any time you want to run your app.Your app will start running, and Visual Studio will open the Debug Console panel to show you the output and let you interact with it. This is how you’ll run all of the Console App projects that you’ll build throughout the book.
Set up Visual Studio Code for the next project
VSCode is a great code editor! But unlike Visual Studio, it’s not designed specifically for C# and .NET projects. It does a great job with C#, but you need to do a little extra work to get it up and running.
First open a folder, then add a project
VSCode is extremely flexible, and there are many ways to use it. If you’re new to VSCode, we recommend that you create a new folder for every project in the book. When you start a new project, choose Close Folder from the File menu to close the current folder, then create a new folder and open it.
Note
This is how you reset VSCode so you can start a new project.
The Command Palette
All of the actions that you need to do to create and run projects can be run from the Command Palette, the centralized hub for all of the VSCode features. Press Ctrl+Shift+P (or ![]() P on a Mac) to display the Command Palette. Use the .NET: New Project to create a new project in the current folder. There are also commands to open and close .NET solutions. You’ll learn more about solutions throughout this chapter.
P on a Mac) to display the Command Palette. Use the .NET: New Project to create a new project in the current folder. There are also commands to open and close .NET solutions. You’ll learn more about solutions throughout this chapter.
When you have a .NET app’s project folder open, you can run it by choosing Debug: Start Debugging from the Command Palette. Choose the C# option to start running your Console App project.

Install .NET MAUI before reading the rest of this chapter
In the rest of this chapter, you’ll build a game using .NET MAUI (Multi-platform App UI), a powerful cross-platform framework that lets you create visual apps in .NET and C# that can run on Windows, macOS, Android, and iOS.
Note
You’ll need to install .NET MAUI before you move on to the rest of the chapter. If you’re using Visual Studio 2022 you already installed it, but if you’re using VSCode you’ll need to do it manually.
Before you can install and run your .NET MAUI apps, you’ll need to install the .NET MAUI workload for .NET. The easiest way to do this on Windows is to install Visual Studio 2022 and choose the .NET MAUI option.
You can also install .NET MAUI from the command line. Typically it looks like this:
dotnet workload install maui |
or | sudo dotnet workload install maui |
If you’re using a Mac or Linux, you may need to use sudo to run with elevated privileges. If you’re on a Mac, you’ll also need to install XCode. You can install the Android SDK as well (but it’s optional). See this page for more details: https://learn.microsoft.com/dotnet/maui/get-started/installation?tabs=visual-studio-code
If you’re using Linux, you’ll need an Android device for the .NET MAUI projects
.NET MAUI does not run natively on Linux. If you have an Android device, you can debug directly on it. This page shows you how to set up an Android device so you can connect it to your computer and run your MAUI apps on it: https://learn.microsoft.com/dotnet/maui/android/device/setup
As an alternative, every MAUI project in this book has a Blazor alternative, where you’ll build a web app version that runs in a browser. Download the Head First C# Blazor Learner’s Guide from our GitHub page for more information—you can get it as a free PDF: https://github.com/head-first-csharp/fifth-edition
Break up large projects into smaller parts
Our goal in this book is to help you to learn C#, but we also help you become a great developer, and one of the most important skills great developers work on is tackling large projects. You’ll build a lot of projects throughout this book. They’ll be smaller starting with the next chapter, but they’ll get bigger as you go further. As the projects get bigger, we’ll show you how to break them up into smaller parts that you can work on one after another. This project is no exception—it’s a larger project, like the ones you’ll do later in the book—so you’ll do it in five parts.

The goal of this project is to help get you used to writing C# and using the IDE. If you run into any trouble with this project, you can watch a full video walkthrough on our YouTube channel: https://www.youtube.com/@headfirstcsharp
You can download all of the code and a PDF of this chapter from our GitHub page: https://github.com/head-first-csharp/fifth-edition
Here’s how you’ll build your game
You’ll build your animal matching game using .NET MAUI (which stands for .NET Multi-platform App UI, or just MAUI). MAUI is a technology that you can use to create apps in C# that run natively as desktop apps on Windows and macOS, or as mobile apps on your Android or iOS mobile devices.
The rest of this chapter will walk you through building the game. You’ll be doing it in a series of separate parts:
![]() First you’ll create a new .NET MAUI project in Visual Studio.
First you’ll create a new .NET MAUI project in Visual Studio.
You just created a new console application. Now you’ll create a new MAUI app.
![]() Then you’ll use XAML to design the page.
Then you’ll use XAML to design the page.
Individual screens in MAUI apps are called pages. You’ll design them using XAML, a design language you’ll use to define how those pages work.
![]() You’ll write C# code to add random animal emoji to the page.
You’ll write C# code to add random animal emoji to the page.
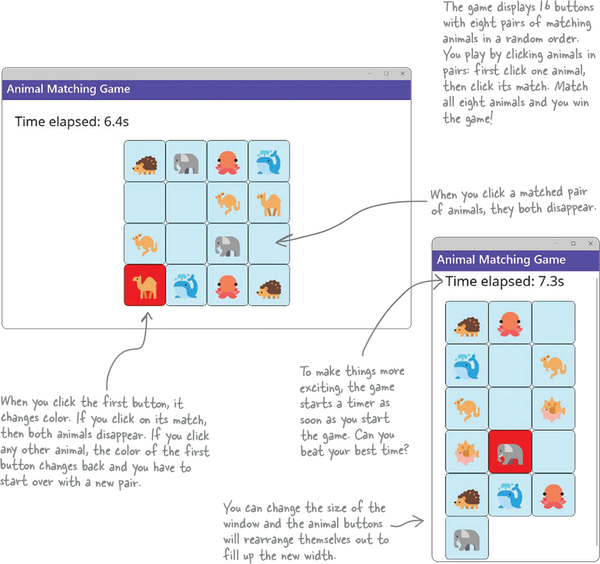
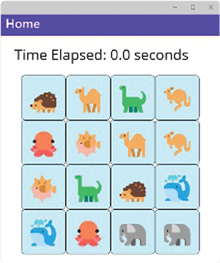
When your app first loads, it will run that code to display 16 buttons with eight pairs of animal emoji in a random order.
![]() You’ll make the gameplay work.
You’ll make the gameplay work.
The game needs to detect when the user clicks on pairs of emoji, keep track of the pairs, and end the game when they’ve found all of the matches. You’ll write that code too.

![]() Finally, you’ll make the game more exciting by adding a timer.
Finally, you’ll make the game more exciting by adding a timer.
Your timer will start when the player starts the game, and keep track of how long it takes the player to find all eight pairs of animals.
Create a .NET MAUI project in Visual Studio
You can create a .NET MAUI app in Visual Studio just like you did with the console app at the beginning of the chapter, using the “Create a new project” button displayed when you first open Visual Studio. If it’s already open, choose New >> Project (Ctrl+Shift+N) from the File menu to bring up the “Create a new project” window.
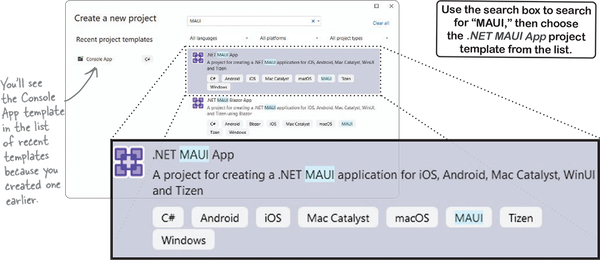
Choose the .NET MAUI App project template and click Next. Visual Studio will prompt you for a project name, just like it did when you created a Console App project.
Enter AnimalMatchingGame as the project name and click Next.

Finally, Visual Studio will ask you to choose a version of .NET—choose the latest version, just like you did when you created the Console App project. Then click the Create button to create your new .NET MAUI project.
Create a .NET MAUI project in Visual Studio Code
If you’re using Visual Studio Code, creating a .NET MAUI project is really similar to creating the Console App project, just like you did at the beginning of the chapter. First, close your current app by choosing File >> Close Folder (Ctrl+K F or ![]() K F). It’s really important to close your folder; otherwise, you’ll add a new project to the same solution.
K F). It’s really important to close your folder; otherwise, you’ll add a new project to the same solution.
Next, create the .NET MAUI App project. Use Ctrl+Shift+P or ![]() P to open the Command Palette. Choose the command .NET: NEW Project to create a new project. VSCode will prompt for the project type.
P to open the Command Palette. Choose the command .NET: NEW Project to create a new project. VSCode will prompt for the project type.
Choose the .NET MAUI App project type. You can type “MAUI” to filter the options.

VSCode will ask you to give the project a name. Name your project AnimalMatchingGame.

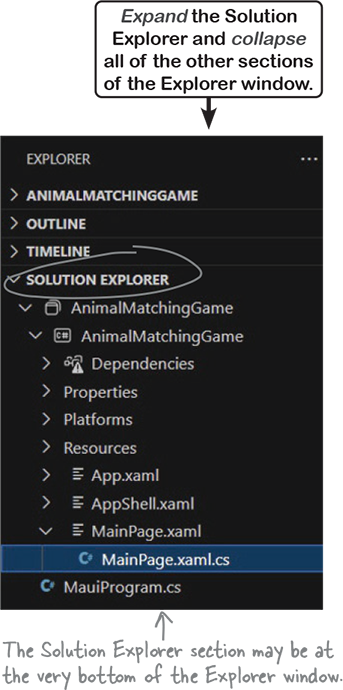
VSCode will prompt you for a directory. Choose the default directory.
You should now see your project in the Solution Explorer at the bottom of the Explorer panel.
When it comes time to run your project, do the following—this is different from running a Console App:
Expand the Solution Explorer in the Explorer panel.
Expand the file MainPage.xaml to reveal MainPage.xaml.cs (it may be expanded already).
Click on MainPage.xaml.cs to select it.
Open the Command Palette (Ctrl+Shift+P or
 P) and choose Debug: Start Debugging. You can also open MainPage.xaml and either press F5 or choose Start Debugging fom the Run menu.
VSCode may prompt you to select a debugger. Select .NET MAUI. Once you do that, your app should start running in a new window.

Run your new .NET MAUI app
In Visual Studio: click ![]() in the toolbar or choose Start Debugging (F5) from the Debug menu.
in the toolbar or choose Start Debugging (F5) from the Debug menu.
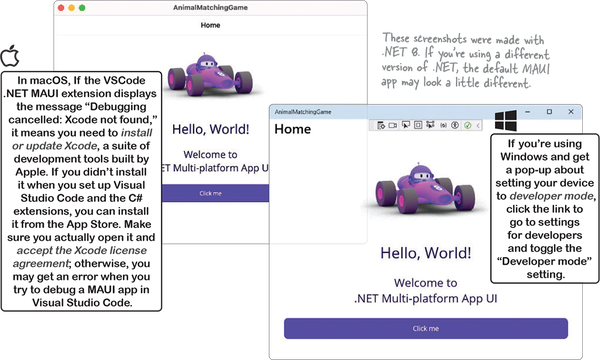
In Visual Studio Code: open MainPage.xaml and choose Start Debugging (F5) from the Run menu. If it prompts you to select a debugger, choose .NET MAUI from the list. On macOS you may see a prompt warning that AnimalMatchingGame is from an unidentified developer, and asking if you’re sure you want to open it. Click Open Anyway.
The IDE will build your code, which means converting it to an executable program that your operating system can run. Then it will start your app:
Stop your MAUI app
You can stop your app by closing the app window. You can also choose Stop Debugging (Shift+F5) from the Debug menu in Visual Studio or Run menu in VSCode, or click the square Stop button in the IDE’s toolbar.
You can start or stop your app at any time. If there are syntax errors (like typos or invalid keywords) in the C# or XAML code, the IDE won’t be able to run the app.
For tips on running your app, see https://github.com/head-first-csharp/fifth-edition.
MAUI apps work on all of your devices
MAUI is a cross-platform framework for building visual apps, which means the apps that you build can run on your Android and iOS devices. Many of the chapters in this book include .NET MAUI projects so you can learn to build more visual apps.
You can run MAUI apps on an Android device directly from Visual Studio. This page shows you how to set up an Android device so you can connect it to your computer and run your MAUI apps on it: https://learn.microsoft.com/dotnet/maui/android/device/setup
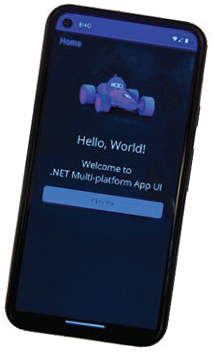
You can also run MAUI apps on your iOS device, but it requires a little more setup—and it costs money because you need to join the Apple Developer Program. This page walks you through the process: https://learn.microsoft.com/dotnet/maui/ios/device-provisioning

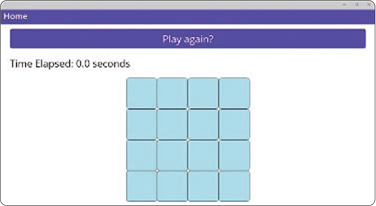
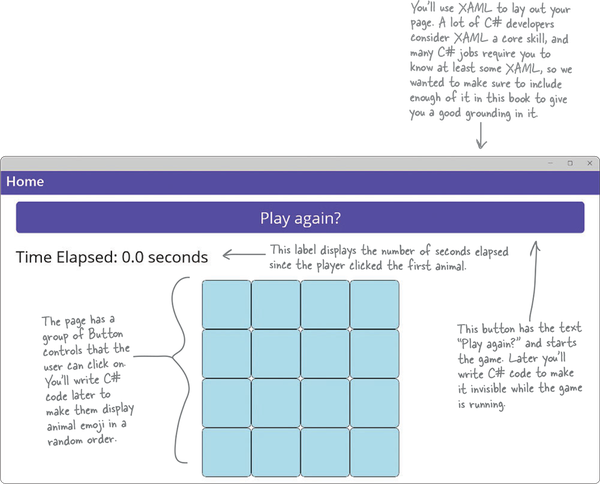
Here’s the page that you’ll build
When you start a project, the first thing you always want to do is take a few minutes to understand the big picture. What are you going to create? How will it work? Let’s take a look at the page you’re about to build.
When you open an app built with .NET MAUI, the first thing it shows you is a page that you interact with. That page uses controls, or visual widgets like buttons and labels, to create a user interface (or UI) that you can interact with. Here’s the page that you’re going to design:
Start editing your XAML code
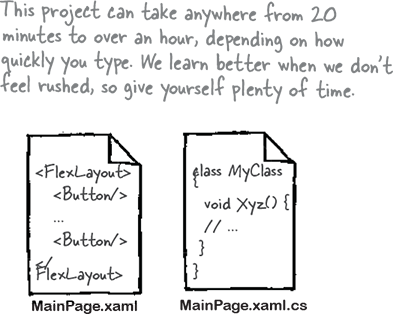
The Solution Explorer lets you edit code files by double-clicking on them (or single-clicking in VSCode). We’ll work with two files: MainPage.xaml (which contains your XAML code) and MainPage.xaml.cs (which has the C# code for your game). This is what it looks like in Visual Studio:
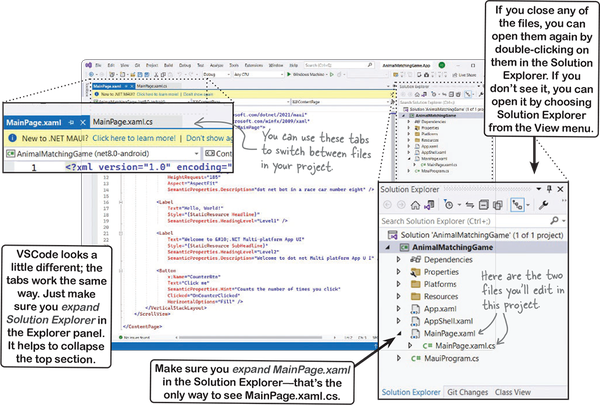
Add the XAML for a Button and a Label
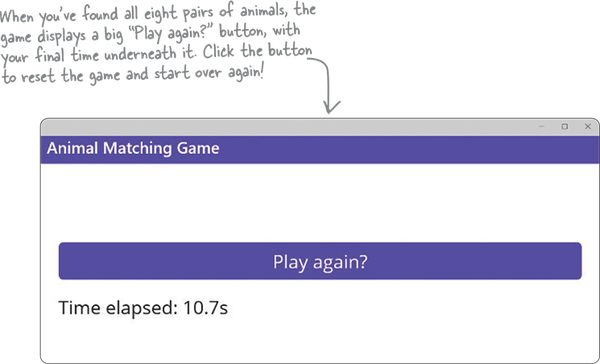
The first thing we’ll do is design the page for the game. It will have 16 buttons to display the animal emoji, plus a “Play again?” button to restart the game when the player wins.

![]() Delete everything between the opening and closing VerticalStackLayout tags.
Delete everything between the opening and closing VerticalStackLayout tags.
XAML is a tag-based markup language. That means your XAML code uses tags to define everything that appears in your app. Here’s an example of a tag—you can find it near the top of MainPage.xaml:
<ScrollView>
That’s an opening tag. You can find its matching closing tag near the end of the file:
</ScrollView>.
These tags add a ScrollView control to the page. If your app is in a window that’s smaller than its contents, everything between the opening and closing tag can be scrolled up and down.
Find the opening VerticalStackLayout tag. It’s on the next few lines of the file, and it looks like this:
       <VerticalStackLayout
            Padding="30,0"
            Spacing="25">
Next, find the closing VerticalStackLayout tag:
</VerticalStackLayout>
Now carefully delete all of the lines between those two tags. The XAML code in your MainPage.xaml file should now look like this:
<?xml version="1.0" encoding="utf-8" ?>
<ContentPage xmlns="http://schemas.microsoft.com/dotnet/2021/maui"
             xmlns:x="http://schemas.microsoft.com/winfx/2009/xaml"
             x:Class="AnimalMatchingGame.MainPage">

    <ScrollView>

       <VerticalStackLayout
            Padding="30,0"
            Spacing="25">

        </VerticalStackLayout>
    </ScrollView>

</ContentPage>
Note
In the next step, you’ll put your new XAML code right here, where you deleted the old code.
![]() Delete the C# code that goes with the XAML that you just deleted.
Delete the C# code that goes with the XAML that you just deleted.
If you try to run your app right now, Visual Studio will give you an error message and refuse to run it, because the C# code depends on things you just deleted. Expand MainPage.xaml in the Solution Explorer and open MainPage.xaml.cs and find this code:
private void OnCounterClicked(object sender, EventArgs e)
Delete it, and the next 10 lines of code, up to and including the closing curly brace }. Be careful not to delete the final closing } at the end of the file. Then delete this line of code: int count = 0;

![]() Go back to MainPage.xaml and use the Toolbox to add the “Play Again?” button.
Go back to MainPage.xaml and use the Toolbox to add the “Play Again?” button.
You’ll be editing the XAML code again, so switch back to the MainPage.xaml tab. If you don’t see the Toolbox panel, expand it by clicking the tab on the side of the window. Add a few extra blank lines where you deleted the code between the opening and closing VerticalStackLayout tags. Then drag the Button out of the Toolbox and drop it onto one of the lines that you added.
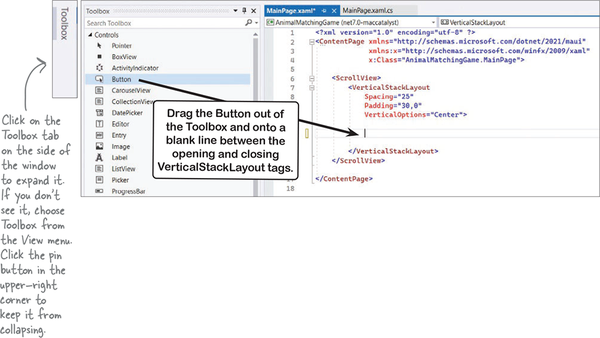
You should now see a new Button tag between the VerticalStackLayout tags—it’s OK if the spacing or indenting is a little different, because extra spaces or lines don’t matter in XAML:
        <VerticalStackLayout
            Padding="30,0"
            Spacing="25">

          <Button Text="" />

        </VerticalStackLayout>
Note
When you dragged the Button out of the toolbox and into your code, Visual Studio added this Button tag. If you’re using VSCode, you may not have a Toolbox, so type this in exactly like it appears here.

If you’re using Visual Studio Code, you may not have a Toolbox panel or Properties window. You’ll need to type the XAML into the MainPage.xaml file so it exactly matches our code.
![]() Add properties to the XAML tag for the “Play again?” button.
Add properties to the XAML tag for the “Play again?” button.
XAML tags have properties that let you set options to customize how they’re displayed on the page. The Properties window in Visual Studio makes it easier to edit them.
Click on the code for the Button tag in MainPage.xaml, so your cursor is somewhere between the opening < and closing > angle brackets. Then look at the Properties window—it’s usually docked in the lower-right corner of Visual Studio. If you don’t see it, choose Properties or Properties Window from the View menu. Make sure it says “Type Button” at the top, so you know that you’re editing the button.
Find the Text property and set it to “Play again?”
Then find the FontSize property and set it to “Large.”

When you’re done editing the button, the XAML for it should look like this:
<Button Text="Play again?" FontSize="Large" />
The Button tag now has Text and FontSize properties.
![]() Edit the XAML code by hand for your button to give it a name.
Edit the XAML code by hand for your button to give it a name.
You can also edit XAML code by hand—for example, if you run into trouble with the Properties window, you could type the XAML directly into the editor. You need to make sure that you copy all of the brackets, quotes, etc. exactly, otherwise your code won’t run!
In the next part of the project, you’ll write C# code to make your “Play again?” button visible when the game is over, and invisible while the game is running. You’ll give it a name that the C# code can use to tell it to show or hide itself.
Use the editor to add an x:Name property to give your button a name. It should look like this:
<Button x:Name="PlayAgainButton" Text="Play again?" FontSize="Large" />
XAML tags have properties that let you set options to customize how they’re displayed on the page.
![]() Add an event handler so your button does something.
Add an event handler so your button does something.
When you click a button, it executes C# code called an event handler. Visual Studio makes it easy to add one. Place your mouse cursor just before the /> at the end of the Button tag and start typing Clicked. Visual Studio will pop up an IntelliSense window:

Choose Clicked from the list and either click on it or press Enter. Visual Studio will then show you this:

Press Enter to add a new event handler. Your XAML tag should now look like this:
<Button x:Name="PlayAgainButton" Text="Play again?" FontSize="Large"
        Clicked="PlayAgainButton_Clicked" />
Note
A XAML tag can be on a single line or split across multiple lines. Make sure you put the break in a space (not the space in “Play again”).
Switch to the MainPage.xaml.cs tab. You can see the code that Visual Studio added, which looks like this:


If you’re using Visual Studio Code, you might not get the <New Event Handler> pop-up, so you’ll need to add this code to MainPage.xaml.cs by hand. Your app will still work just fine.
Note
When you see an exercise, that’s your chance to get some practice on your own. Make sure you do every exercise—they’re an important part of the book. If an exercise is part of a project, then the project won’t work until you get it right. But don’t worry—we’ll always give you the solution. And if you get stuck, it’s always OK to peek at the solution!
Note
These Brain Power boxes are here to give you something to think about. When you see one, don’t just go on to the next section. Take a few minutes and actually think about what you’re being asked. That will really help you get this material into your brain faster!
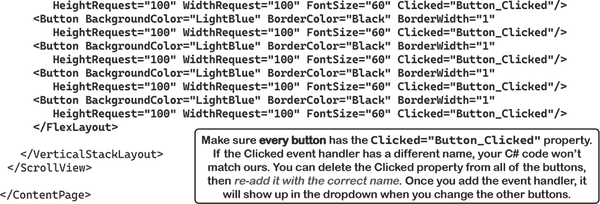
Use a FlexLayout to make a grid of animal buttons
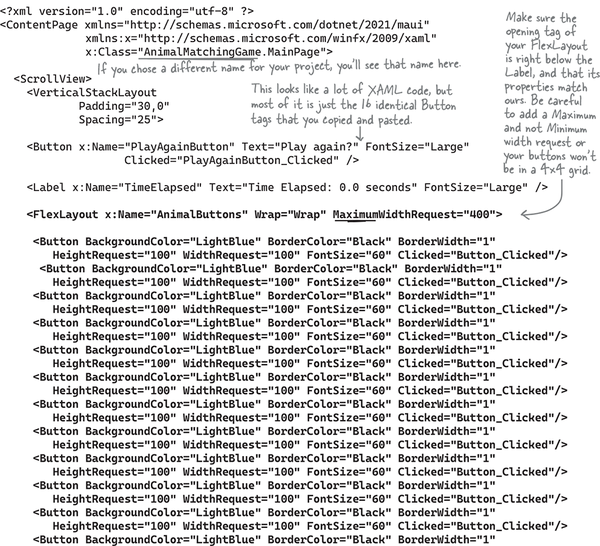
The XAML for your page currently has three tags that determine its layout: there’s a ContentPage tag on the outside that displays the whole view. It contains a ScrollView—everything nested between its start and end tags will scroll if it goes off the bottom of the page. Inside it is a VerticalStackLayout, which causes everything between its start and end tags to be stacked on top of each other in the order that they appear. Inside all of those tags are self-closing Button and Label tags.
The next thing you’ll do is add a FlexLayout, which arranges anything inside of it in rows, wrapping them to the next row so they all fit inside its total width. You’ll add 16 Button tags inside the FlexLayout. You’ll get them to display in a 4x4 grid by setting the width of each button to 100 and the width of the FlexLayout to 400, so exactly four buttons will fit on each row.
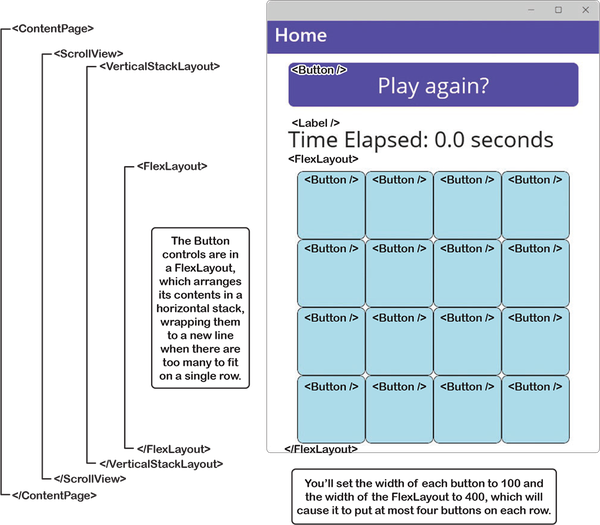
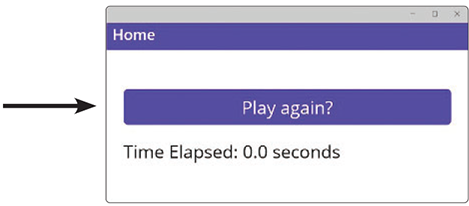
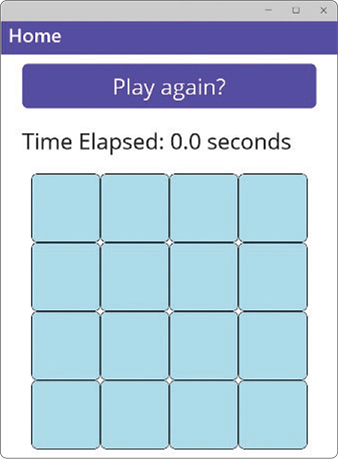
If your app looks like this screenshot when you run it, you got things right. There’s just one more thing you need to check: make sure that the x:Name properties match the ones in our solution exactly—the C# code you write will use them.

Write C# code to add the animals to the buttons
You started this book to learn C#. You’ve done all the preparation: creating the project, and designing the page for your app. Now it’s time to get started writing C# code.
We’ll give you all of the code for this project, and show you exactly where it goes. But the goal is to get you started learning C#, so we’ll also work with you to help you understand how it all works—and that will provide you with a solid foundation to start writing code on your own.
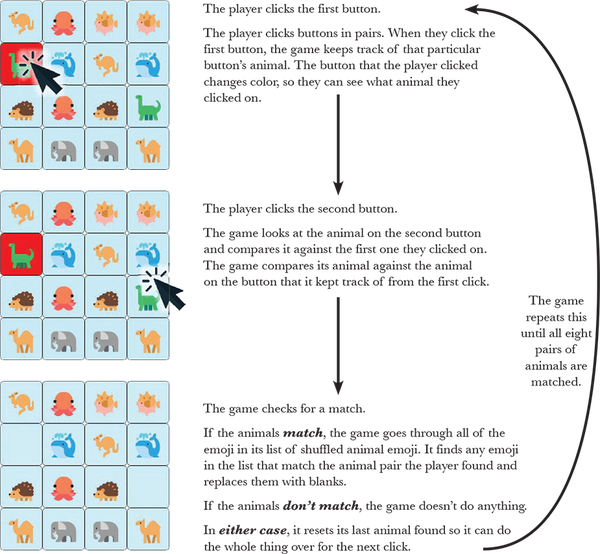
You’ll add code that’s run every time the “Play again?” button is clicked. Here’s what it will do:

Start editing the PlayAgainButton event handler method
When you were writing the XAML code for the “Play again?” button, you added an event handler:

When you did this, Visual Studio added Clicked="PlayAgainButton_Clicked" to the XAML tag for the button. It also added this C# code to MainPage.xaml.cs:
    private void PlayAgainButton_Clicked(object sender, EventArgs e)
    {

    }
That’s a method. C# code is made up of statements, or specific tasks that you’re telling your app to execute. Those statements are bundled into methods. Methods have a name—this method is named PlayAgainButton_Clicked.
Visual Studio generated that method for you automatically when you added the Clicked event handler to your XAML code to give you a place to add the statements that will tell it what to do when the “Play again?” button is clicked.

Add a C# statement to the event handler method
Place your cursor on the line between the opening { curly bracket and closing } curly bracket of the method. Then start typing the following line of code to make the animal buttons visible:
AnimalButtons.IsVisible = true;

As you’re typing, you’ll see some of Visual Studio’s really powerful tools that help you write code:
Add more statements to your event handler
When the player clicks the “Play again?” button, the app will display the animal buttons, hide the “Play again?” button, and then fill the animal buttons with eight pairs of animal emoji in a random order. You’re going to add statements to the PlayAgainButton_Clicked event handler method to do all that.

![]() Add a statement to make the “Play again?” button invisible.
Add a statement to make the “Play again?” button invisible.
Do you remember how you used the x:Name property in your XAML code to give names to the “Play again?” button and the FlexLayout that contains the 16 animal buttons? Take a minute and go back to that XAML code—you gave the FlexLayout the name “AnimalButtons,” and you just added a line of code that used that name.
You also used an x:Name to give the “Play again?” button the name “PlayAgainButton.” Now add a second line of code to your event handler method:

That statement turns the “Play again?” button invisible.
![]() Make the animal buttons invisible when the app starts.
Make the animal buttons invisible when the app starts.
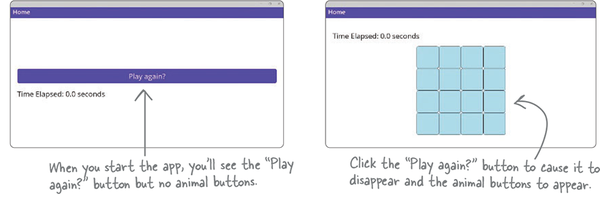
Take a closer look at the first statement that you added to your event handler method. It makes the FlexLayout that contains the animal buttons visible. But wait a minute—it’s already visible! You saw it when you ran your app. Let’s do something about that.
Go back to the XAML code in MainPage.xaml and set the IsVisible property to "false":
<FlexLayout x:Name="AnimalButtons" Wrap="Wrap"
            MaximumWidthRequest="400" IsVisible="false">
Did you notice that you’re setting the same IsVisible property in both the C# code and XAML? When the app starts, the IsVisible="false" in the XAML causes the page to display without the FlexLayout and its buttons. When you click the “Play Again?” button, the first line of code in its Clicked event handler method sets that property to true, causing the FlexLayout and its buttons to appear on the page.
Now your app will make the animal buttons invisible when it starts up. As soon as the player clicks the “Play again?” button to start the game, it will show the animal buttons and hide the “Play again?” button.
The properties on controls can be set in both XAML and C# code.
![]() Run your app and make sure it works so far.
Run your app and make sure it works so far.
When you’re writing code, you don’t just write a complete app from beginning to end, and then run it to see if it works. That’s not how it works at all! Writing code is a creative process. There are many, many ways to make your code do a specific thing, and in a lot of cases, the only way you can really be sure you’re happy with it is to try writing it one way—and if you don’t like it, change it.
Plus, it’s easy to make syntax errors in your code. A syntax error means that you wrote something that isn’t valid C# code, like using a keyword or symbol incorrectly or using a name that doesn’t exist. For example, if you enter an extra } closing curly brace at the end of a method and then try to run it, Visual Studio will give you an error telling you that it can’t build your code (which is what it does to turn your C# code into something that your computer can actually execute).
What does all that mean?
It means that you’ll run your apps all the time, over and over again. And that’s perfectly fine! It’s absolutely OK to run your app after even a tiny change, just to see what that change did. The more comfortable you are running your app, the more you’ll feel like you can experiment and make changes—and the more fun you’ll have with it.
So go ahead and run your app now. Make sure it starts out with the “Play again?” button visible and the animal buttons invisible. Click the “Play again?” button and make sure it hides itself and shows the animal buttons. When you’re done, close the app (or stop it from inside Visual Studio).
Add animals to your buttons
This game won’t be much fun without animals to click on. Let’s update the “Play again?” button’s event handler method to set up the buttons with eight pairs of emoji positioned randomly on the buttons.
![]() Start creating a List of animal emoji.
Start creating a List of animal emoji.
Your event handler method needs to start with eight pairs of emoji, so you’re going to write a statement that creates them and stores them in something called a List (you’ll learn a lot more about that in Chapter 8).
Switch back to MainPage.xaml.cs and start typing this line of code right after the statements that you just added—but don’t end it with a semicolon, because that’s not the end of the statement yet:
List<string> animalEmoji = [
While you’re typing, you’ll see IntelliSense windows pop up to help you enter that code. The text that you type will be in a bold color, followed by a suggestion generated by IntelliCode:
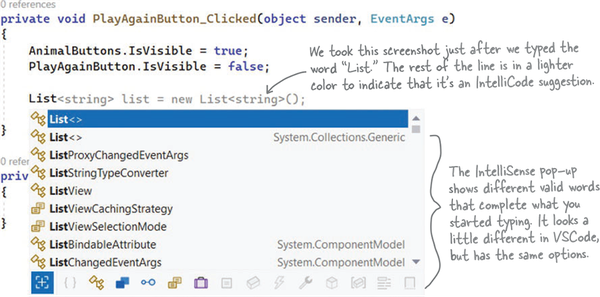
As soon as you typed the opening square bracket ], Visual Studio added a matching one, placing your mouse cursor between the two brackets.:
List<string> animalEmoji = [|]
Note
The mouse cursor should now be between the [ brackets ].
Press Enter, then add a semicolon to the end. Your PlayAgainButton_Clicked method should now look like this:
    private void PlayAgainButton_Clicked(object sender, EventArgs e)
    {
        AnimalButtons.IsVisible = true;
        PlayAgainButton.IsVisible = false;

        List<string> animalEmoji = [

        ];
Note
Make sure you add the semicolon after the closing ] bracket.
![]() Add a pair of animal emoji to your list.
Add a pair of animal emoji to your list.
Note
Some people think the plural emoji is emoji, others think it’s emojis. We went with emoji—but both ways are fine!
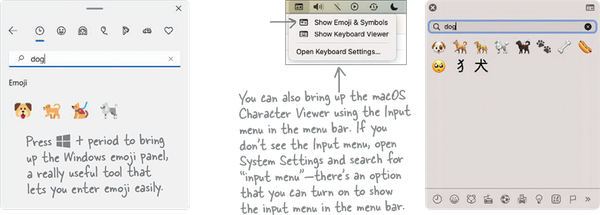
Your C# statement isn’t done yet. Make sure your cursor is placed on the blank line you added between the brackets. Now let’s add eight pairs of animal emoji. You can find emoji by going to your favorite emoji website (for example, https://emojipedia.org/nature) and copying individual emoji characters. Alternately...
If you’re using Windows, use the Windows emoji panel (press Windows logo key + period). If you’re using a Mac, use the Character Viewer panel (press the fn key, or Ctrl + ![]() + Space on older Macs).
+ Space on older Macs).
Go back to your code and add a double quote " then paste the character—we used an octopus—followed by another " and a comma, a space, another ", the same character again, and one more " and comma. You might notice Visual Studio helping you enter this list—for example, when you enter a double quote, it adds the closing quote.
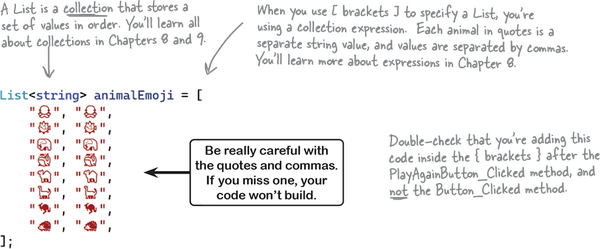
Here’s what your list should look like now:

![]() Add the rest of the animal emoji pairs to your list.
Add the rest of the animal emoji pairs to your list.
Then do the same thing for seven more emoji so you end up with eight pairs of animal emoji between the brackets. We added a blowfish, elephant, whale, camel, brontosaurus, kangaroo, and porcupine—but you can add whatever animals (or other emoji!) that you want.
Add a ; after the closing curly bracket. This is what your statement should look like now:
![]() Finish the method.
Finish the method.
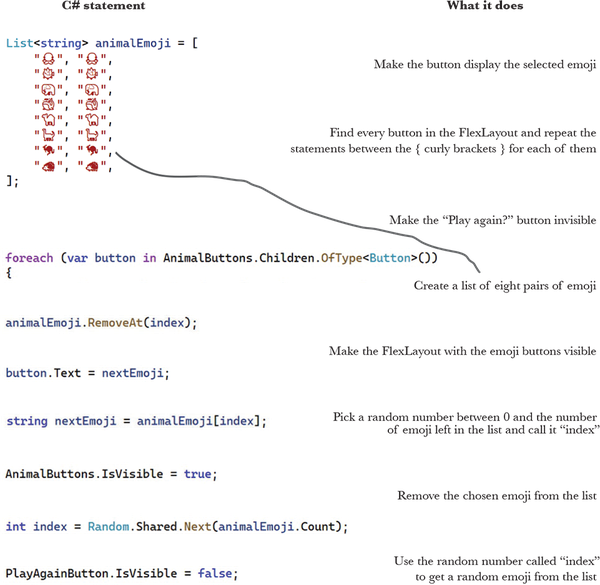
Add the rest of the code to add random animal emoji to the buttons—this code goes after the closing ]; at the end of the collection expression and before the } at the end of the method:
Note
You’ll learn more about loops in the next chapter.

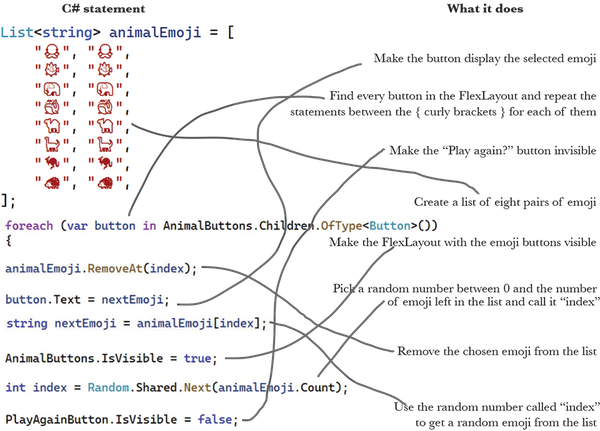
Before you run your app, read through the code that you just added. It’s OK if you don’t understand everything that’s going on with it yet. An important part of learning C# is starting to make the code make sense, and reading through it is a great way to do that.
Reading through C# code—even if you don’t understand all of it yet—is a great way to make it all start to make sense.
![]() Make sure your code matches ours.
Make sure your code matches ours.
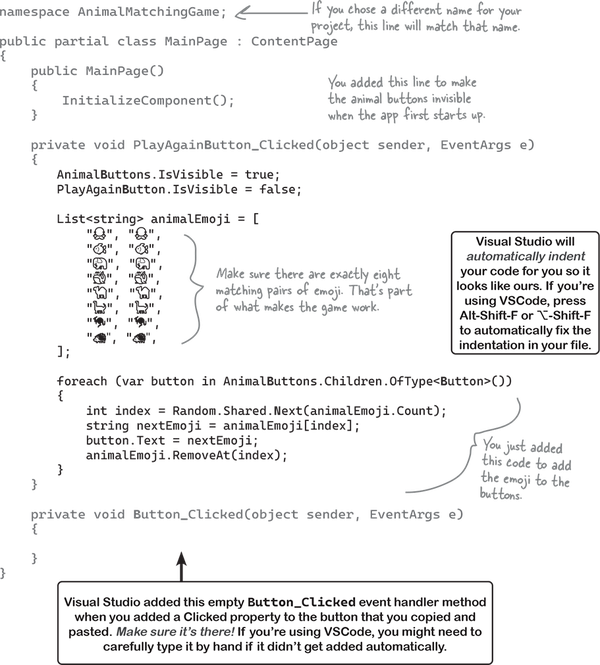
Here’s all of the C# code that you’ve added so far. We gave the parts that Visual Studio generated for you automatically a lighter color so you can see the code that you entered yourself.
Run your app!
Run your app again. The first thing you’ll see is the “Play again?” button. Click the button—you should now see eight pairs of animals in random positions:
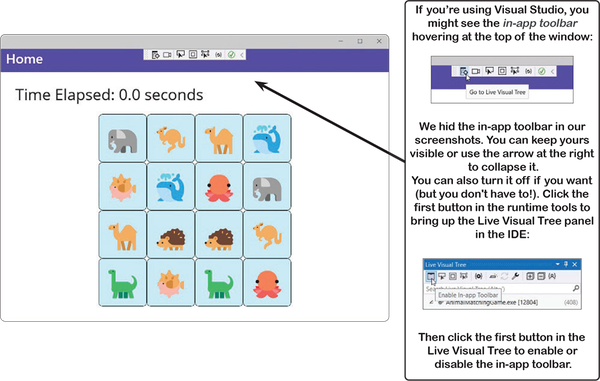
Stop it and run it again a few times. The animals should get reshuffled in a different order every time you click the “Play again?” button.

You’ve set the stage for the next part that you’ll add.
When you build a new game, you’re not just writing code. You’re also running a project. A really effective way to run a project is to build it in small increments, taking stock along the way to make sure things are going in a good direction. That way you have plenty of opportunities to change course.
Working on your code comprehension skills will make you a better developer.
The pencil-and-paper exercises are not optional. They give your brain a different way to absorb the information. But they do something even more important: they give you opportunities to make mistakes. Making mistakes is a part of learning, and we’ve all made plenty of mistakes (you may even find one or two typos in this book!). Nobody writes perfect code the first time—really good programmers always assume that the code that they write today will probably need to change tomorrow. In fact, later in the book you’ll learn about refactoring, a name for programming techniques that are all about improving your code after you’ve written it.
Note
We’re serious—take the time to do the pencil-and-paper exercises. They’re carefully designed to reinforce important concepts, and they’re the fastest way to get the ideas in this book into your brain.
You can use Git to save all of your code, and Visual Studio will help make it easy.
You’re going to write a lot of code in this book! Wouldn’t it be great if there was a convenient place to put that code so you can always go back to it?
We bet that you’ll write some apps that you really like, and you’ll want to share them with your friends so they can see the great things you’ve built.
Do you have a desktop and a laptop? A computer at home and at an office? Wouldn’t it be great if you could start a project on one computer, then finish it on another one?
Imagine you’re working on a project. You’ve spent hours getting the code right, and you’re really happy with it. Then you make a few changes, and...oh no! Something went completely wrong, your code is broken, and you don’t remember exactly what you changed. It would be great if you could see a history of all the changes you made, right?
Git can help you do all of those things!
Here are just a few things Git can do for you
⋆ It can save your files somewhere that you can access them from anywhere, any time.
⋆ It lets you save snapshots of your work so you can go back and see exactly what changed.
⋆ It lets you share your code with anyone (or keep it private!).
⋆ It lets a group of people collaborate on a project together—so if you’re learning C# with your friends, you can all work on code together.
Visual Studio makes it easy to use Git
Git is a really powerful and flexible tool that can help you save, manage, and share the code and files for all of your projects. It can also be complex and confusing at times! Luckily, Visual Studio has built-in Git support that takes care of the complexity. It helps you with Git, so you can concentrate on your code.
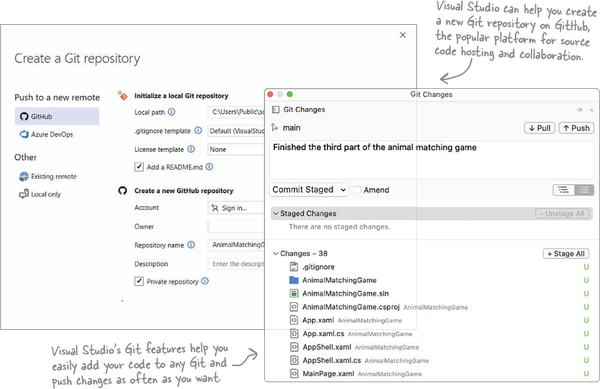
We recommend that you create a GitHub account and use it to save the code for each of the projects in this book. That will make it easy for you to go back and revisit past projects any time!
Our free Head First C# Guide to Git PDF gives you a simple, step-by-step guide to saving your code in Git with Visual Studio. Download it from https://github.com/head-first-csharp/fifth-edition.


Enter the code for the event handler
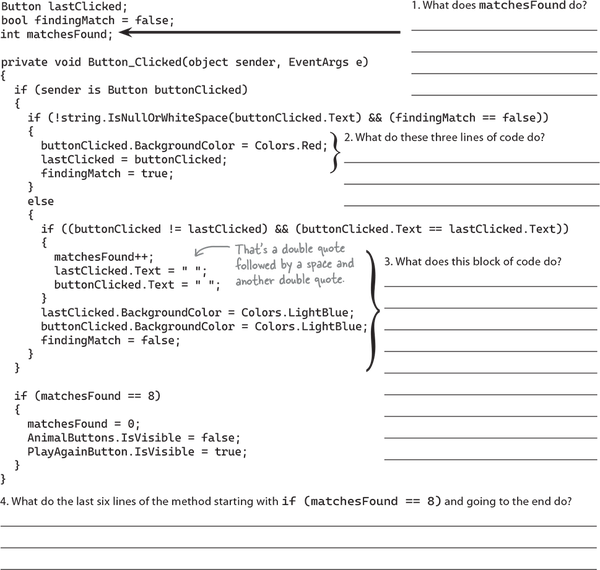
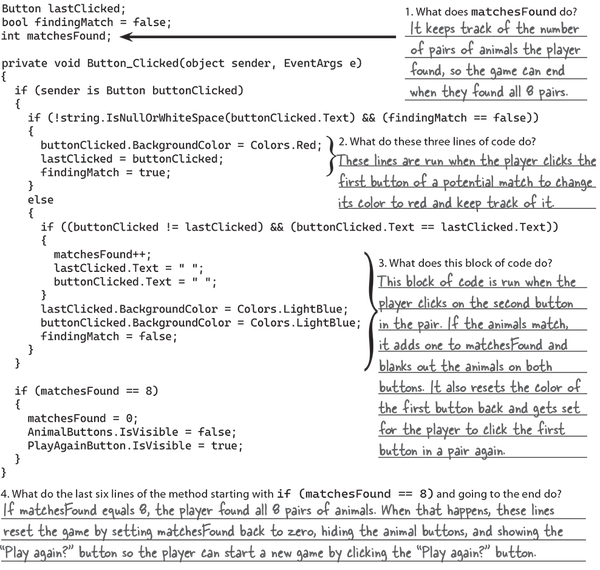
Did you do the “Sharpen your pencil” exercise? If not, take a few minutes and do it—you may not understand 100% of the code in the Button_Clicked event handler method yet, but you should at least have a basic sense of what’s going on. And, more importantly, you’ve had a chance to look at it closely enough so that it should be familiar.
That familiarity will make it easier to use the IDE to type the code into the method. Stop your app if it’s running—close the window or choose Stop Debugging (Shift+F5) from the Debug or Run menu—then edit MainPage.xaml.cs, find the Button_Clicked event handler method that Visual Studio added for you, and click on the line between its opening { and closing } curly brackets.
Now start typing the code from the “Sharpen” solution line by line. If you haven’t used an IDE like Visual Studio or VSCode to write code, it may be a little weird seeing its IntelliSense and IntelliCode suggestions pop up. Use them if you can—the more you get used to them, the faster and easier it will be to write code later on in the book.
You need to be really careful when you’re entering code, because if your opening parentheses or brackets don’t have matches, or if you miss a semicolon at the end of a statement, your code won’t build. Luckily, Visual Studio has a lot of features to help you write code that builds:
⋆ When you enter if it automatically adds the opening and closing parentheses () so you don’t accidentally leave them out.
⋆ If you put your cursor in front of an opening parenthesis or bracket, it will highlight the closing one so you can easily see its match.
⋆ A lot of the time, when you enter code that has problems—like writing matchesFnd instead of matchesFound, for example—it will often point out the error by drawing a red squiggly line underneath it.
Run your app and find all the pairs
Try running your app. If you entered all of the code correctly, it should start up and show you the “Play again?” button. Click the button to see a random list of animals. Then click each pair of animals one by one—each pair will disappear after you click it. Once you click the last pair of animals, the buttons will disappear and you’ll see the “Play again?” button again.

Try experimenting with your app. Click mismatched pairs. Click in the window but outside the buttons. Click on the “Time elapsed” label. Click an empty button. Is your app working?
Uh-oh—there’s a bug in your code
If you typed in all of the code correctly, you may have noticed a problem. Start your app, click the “Play again?” button to show the random animals, and click on a pair to make the animals disappear from their buttons. Now click the one of the blank buttons, then the other—and repeat that seven times. Wait, what happened? Did the animal buttons disappear and the “Play again?” button appear, as if you’d won the game? That’s not supposed to happen! Your game has a bug.
Don’t worry, this bug is not your fault!
We left that bug in your code on purpose. You’re going to be writing a lot of code throughout this book. Every chapter has several projects for you to work on...and there are opportunities for bugs in every one of those projects. Finding and fixing bugs is a normal and healthy part of writing code—and a really valuable skill for you to practice.
Every bug is caused by a problem in the code, so the first step in fixing a bug is figuring out what’s causing it.
When you find a bug, you need to sleuth it out
Every bug is different. Code can break in many different ways. But there’s one thing all bugs have common: every one of them is caused by a problem in the code. So when there’s a bug, your job is to figure out what’s causing it, because you can’t fix the problem until you know why it’s happening.
If you’ve ever read a mystery novel or watched a detective show, you know that to solve a mystery, you need to find the culprit. So let’s do that right now. It’s time to put on your Sherlock Holmes cap, grab your magnifying glass, and sleuth out what’s causing the bug.
Finish the game by adding a timer
Our animal match game will be more exciting if players can try to beat their best time. We’ll add a timer that “ticks” after a fixed interval by repeatedly calling a method.
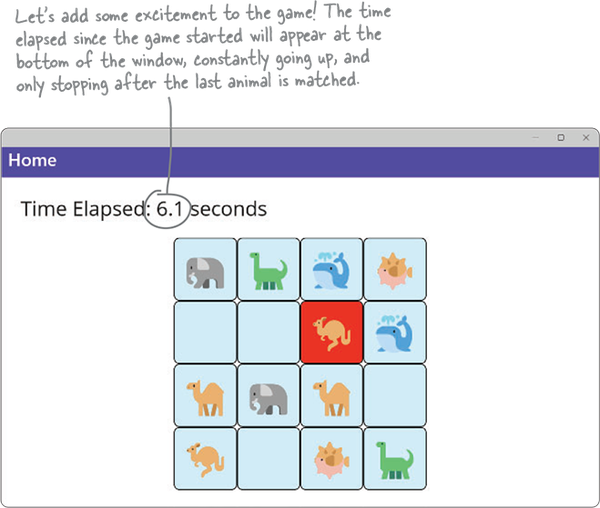

Timers “tick” every time interval by calling methods over and over again. You’ll use a timer that starts when the player starts the game and ends when the last animal is matched.
Add a timer to your game’s code
In this last part of your project, you’ll add a timer to your game to make it more exciting. It will keep track of the time elapsed (in tenths of seconds), starting when the player clicks the “Play again?” button and stopping when they find the last match.

![]() Add a line of code to the end of the PlayAgainButton_Clicked event handler to start a timer.
Add a line of code to the end of the PlayAgainButton_Clicked event handler to start a timer.
Go to the very end of the PlayAgainButton_Clicked event handler. There are two closing curly brackets } at the end of the method on separate lines. Add three lines between the brackets, then add the following line of code into that space that you created:
    foreach (var button in AnimalButtons.Children.OfType<Button>())
    {
        int index = Random.Shared.Next(animalEmoji.Count);
        string nextEmoji = animalEmoji[index];
        button.Text = nextEmoji;
        animalEmoji.RemoveAt(index);
    }

    Dispatcher.StartTimer(TimeSpan.FromSeconds(.1), TimerTick);
}
The line of code that you just added causes your app to start a timer that executes a method called TimerTick every 0.1 of a second.
![]() Examine the error and click on “TimerTick” in the code you just added.
Examine the error and click on “TimerTick” in the code you just added.
You just added a line of code to start a timer that “ticks” every 10th of a second. Every time it ticks, it calls a method called TimerTick. But hold on—your C# code doesn’t have a TimerTick method. If you try to build your code, you’ll see an error in the Error List window:

And there will be a red squiggly line underneath TimerTick in the line of code that you added. Click on TimerTick in the C# code—when you click on it, Visual Studio will display an icon shaped like a light bulb or screwdriver in the left margin.

![]() Use Visual Studio to generate a new TimerTick method.
Use Visual Studio to generate a new TimerTick method.
The code that you added has an error because it refers to a method called TimerTick that doesn’t exist. When you click on it, a light bulb or screwdriver icon shows up in the lefthand margin. If you hover over it, you can see an error message and icon directly underneath it as well:

Clicking the icon brings up the Quick Actions menu, which gives you some suggested potential fixes for the error. You can also click on TimerTick and press Alt+Enter or Ctrl+. on Windows or ![]() +. on a Mac—that’s a Control or
+. on a Mac—that’s a Control or ![]() plus period—to on a Mac to bring up the menu:
plus period—to on a Mac to bring up the menu:
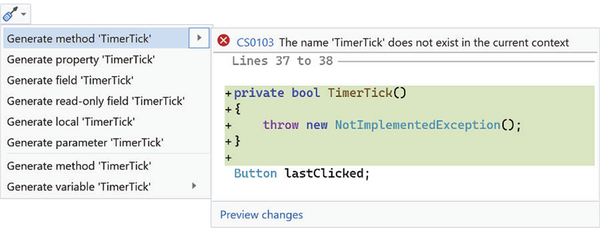
The first option in the Quick Actions menu should be “Generate method ‘TimerTick’”—and if you select that option, you’ll see a preview to the right. Choose that option.
Visual Studio will generate the TimerTick method for you. Look through your C# code in MainPage.xaml.cs and find the TimerTick method that Visual Studio added:
private bool TimerTick()
{
    throw new NotImplementedException();
}
When your C# code has errors, Visual Studio sometimes has suggestions for potential fixes that can generate code to fix the error.
Finish the code for your game
In this last part of your project, you’ll add a timer to your game to make it more exciting. It will keep track of the time elapsed (in tenths of seconds), starting when the player clicks the “Play again?” button and stopping when they find the last match.
Add a field to hold the time elapsed
Find the first line of the TimerTick method that you just generated. Place your mouse cursor at the beginning of the line, then press Enter twice to add two spaces above it.

Add this line of code right above the TimerTick method you just added:
int tenthsOfSecondsElapsed = 0;
Note
This is a field. You’ll learn more about how fields work in Chapter 3.
private bool TimerTick()
Finish your TimerTick method
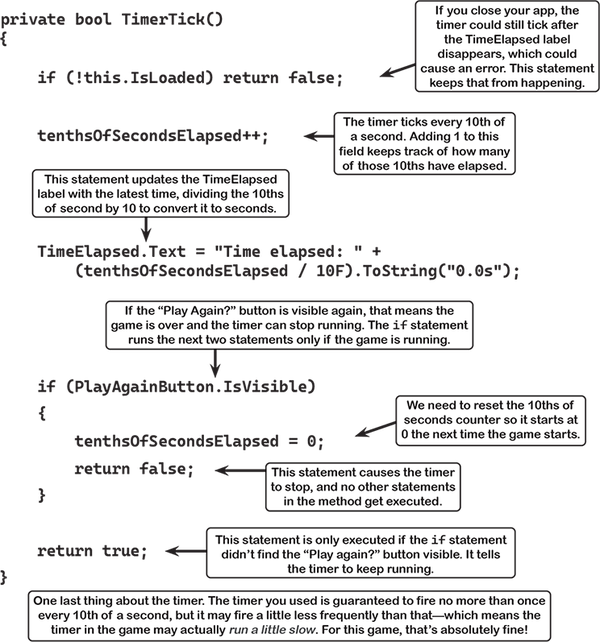
Now you have everything you need to finish the TimerTick method. Here’s the code for it:
private bool TimerTick()
{
    if (!this.IsLoaded) return false;

    tenthsOfSecondsElapsed++;

    TimeElapsed.Text = "Time elapsed: " +
        (tenthsOfSecondsElapsed / 10F).ToString("0.0s");

    if (PlayAgainButton.IsVisible)
    {
        tenthsOfSecondsElapsed = 0;
        return false;
    }

    return true;
}
Note
We put an extra line break in this statement so it would fit on the page in the printed book, but you can put it all on one line if you want. Make sure the parentheses match exactly.
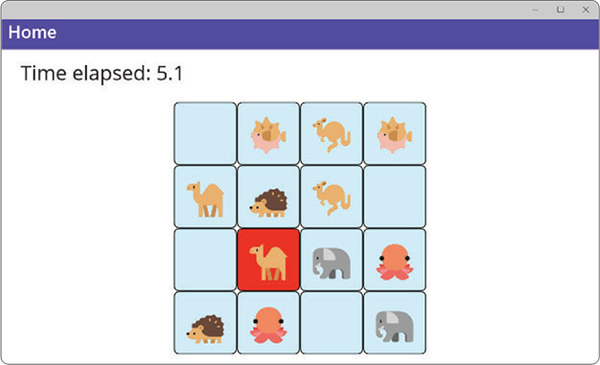
Run your game. Now the timer works!
Even better ifs...
Your game is pretty good. Nice work! Every game—in fact, pretty much every program—can be improved. Here are a few things that we thought of that could make the game better:
⋆ Add different kinds of animals so the same ones don’t show up each time.
⋆ Keep track of the player’s best time so they can try to beat it.
⋆ Make the timer count down instead of counting up so the player has a limited amount of time.
Note
We’re serious—take a few minutes and do this. Stepping back and thinking about the project you just finished is a great way to seal the lessons you learned into your brain.
Did you add your code to a Git repo?
If you did, this is a great time to commit all of your changes and push it to the repository!
And if you still haven’t, take a few minutes and check out our free Head First C# Guide to Git PDF. It gives you step-by-step instructions for keeping your code safe in Git.
Download it today from our own GitHub page: https://github.com/head-first-csharp/fifth-edition
Get Head First C#, 5th Edition now with the O’Reilly learning platform.
O’Reilly members experience books, live events, courses curated by job role, and more from O’Reilly and nearly 200 top publishers.
