Blinking an LED was easy, but I don't think you would stay sane if your desk lamp were to continuously blink while you were trying to read a book. Therefore, you need to learn how to control it. In our previous example, the LED was our actuator, and our Arduino was controlling it. What is missing to complete the picture is a sensor.
In this case, we're going to use the simplest form of sensor available: a pushbutton.
If you were to take apart a pushbutton, you would see that it is a very simple device: two bits of metal kept apart by a spring, and a plastic cap that when pressed brings the two bits of metal into contact. When the bits of metal are apart, there is no circulation of current in the pushbutton (a bit like when a water valve is closed); when we press it, we make a connection.
To monitor the state of a switch, there's a new Arduino instruction that you're going to learn: the digitalRead() function.
digitalRead() checks to see whether there is any voltage applied to the pin that you specify between parentheses, and returns a value of HIGH or LOW, depending on its findings. The other instructions that we've used so far haven't returned any information—they just executed what we asked them to do. But that kind of function is a bit limited, because it will force us to stick with very predictable sequences of instructions, with no input from the outside world. With digitalRead(), we can "ask a question" of Arduino and receive an answer that can be stored in memory somewhere and used to make decisions immediately or later.
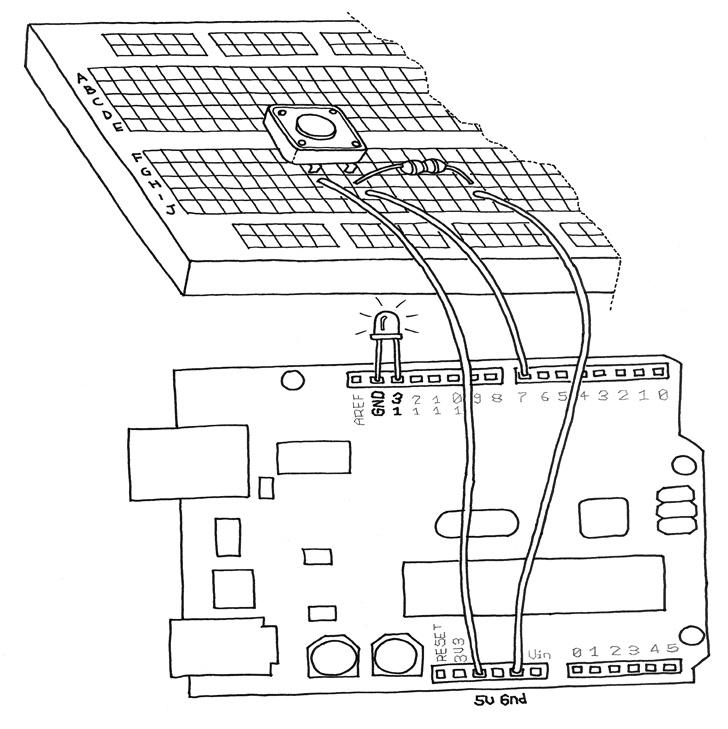
Build the circuit shown in Figure 4-6. To build this, you'll need to obtain some parts (these will come in handy as you work on other projects as well):
Solderless breadboard: RadioShack (www.radioshack.com) part number 276–002, Maker Shed (www.makershed.com) part number MKKN3. Appendix A is an introduction to the solderless breadboard.
Pre-cut jumper wire kit: RadioShack 276–173, Maker Shed MKKN4
One 10K Ohm resistor: RadioShack 271–1335 (5-pack), SparkFun (www.sparkfun.com) COM-08374
Note
instead of buying precut jumper wire, you can also buy 22 AWG solid-core hookup wire in small spools and cut and strip it using wire cutters and wire strippers.
Let's have a look at the code that we'll be using to control the LED with our pushbutton:
Example 4-2. Turn on LED while the button is pressed
#define LED 13   // the pin for the LED
#define BUTTON 7 // the input pin where the
                 // pushbutton is connected
int val = 0;     // val will be used to store the state
                 // of the input pin

void setup() {
  pinMode(LED, OUTPUT);    // tell Arduino LED is an output
  pinMode(BUTTON, INPUT);  // and BUTTON is an input
}

void loop(){
  val = digitalRead(BUTTON);  // read input value and store it

  // check whether the input is HIGH (button pressed)
  if (val == HIGH) {
    digitalWrite(LED, HIGH); // turn LED ON
  } else {
    digitalWrite(LED, LOW);
  }
}
In Arduino, select File > New (if you have another sketch open, you may want to save it first). When Arduino asks you to name your new sketch folder, type PushButtonControl. Type the Example 4-2 code into Arduino (or download it from www.makezine.com/getstartedarduino and paste it into the Arduino IDE). If everything is correct, the LED will light up when you press the button.
Get Getting Started with Arduino now with the O’Reilly learning platform.
O’Reilly members experience books, live events, courses curated by job role, and more from O’Reilly and nearly 200 top publishers.

