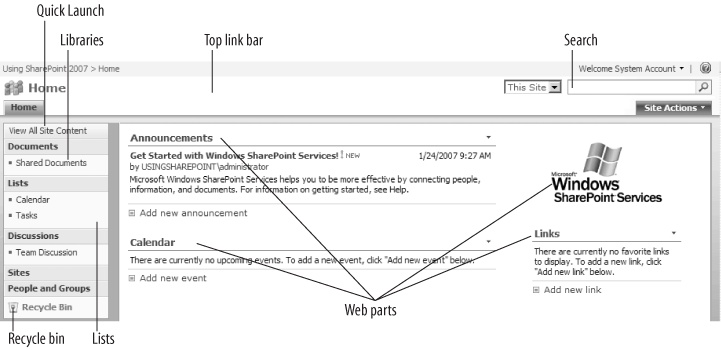
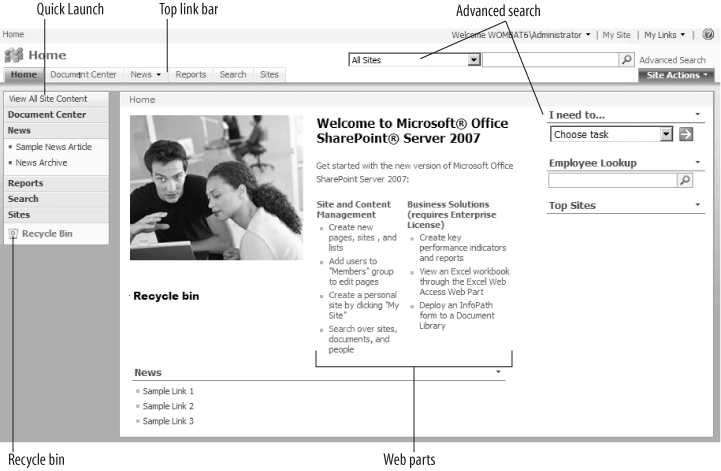
SharePoint setup creates a new, mostly empty web site with a default home page that looks like Figure 1-4 or Figure 1-5, depending on which product you installed.
The parts of a page labeled in Figure 1-4 and Figure 1-5 are common throughout SharePoint:
- Top link bar
Contains tabs that link to subsites within SharePoint. Use subsites to organize content and control who can see or change that content.
- Quick Launch
- Libraries
Collections of documents within a web site.
- Lists
Are tables of data.
- Recycle Bin
Allows you to restore content that was recently deleted — much the same as the Windows Recycle Bin.
- Search
Is used to find information within a web site.
- Advanced search
Finds information across web sites or by topic. This feature is only in MOSS.
- Web parts
Display views of lists, libraries, or other content on a page.
The Basic installations of WSS and MOSS create the default top-level sites shown in Figure 1-4 and Figure 1-5. Those two sites are very different, and it's a good idea to keep those default sites intact for a while so you can use them as a reference as you learn. For those reasons, it's a good idea to create a test site at this point.
To create a test site in WSS:
Click Site Actions → Create in the upper-right corner of the page.
Click Sites and Workspaces under the Web Pages heading on the right side of the page.
Enter a Title and URL for the site, select the Team Site template, and click Create. SharePoint creates the site and displays its home page.
To create a test site in MOSS:
Click Site Actions → Create Site in the upper-right corner of the page.
Enter a Title and URL for the site, select the Team Site template, and click Create. SharePoint creates the site and displays its home page. SharePoint creates the site and displays its home page.
You can use this test site to try the procedures in this chapter and to experiment on your own. If you mess up and want to start over, simply delete the site and create a new one.
To delete the test site:
On the site's home page, click Site Actions → Site Settings.
Click "Delete this site" under the Site Administration heading.
Verify that you are deleting the correct site, and then click Delete. SharePoint deletes the site.
Click the Back button and then click one of the navigational links to return to the parent site.
The procedures in the rest of this section assume that you are working from a test site based on the Team Site template. Each site template creates different lists and libraries, so if you use a different site template, some of these procedures may not work exactly as stated.
SharePoint pages are made up almost entirely of web parts. Some of those parts can be edited directly through the browser while others (like the link bar and Quick Launch) are controlled by site settings.
To edit a SharePoint page:
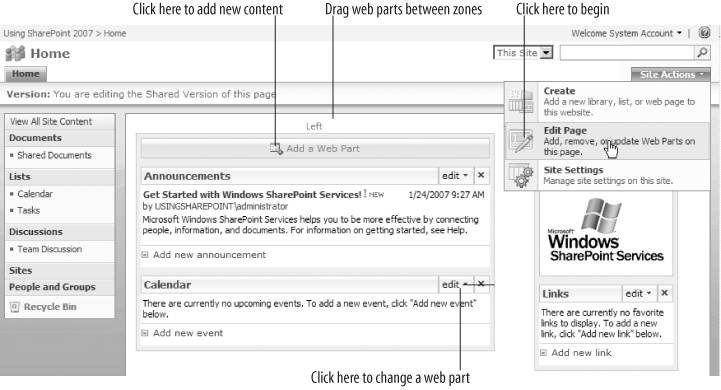
Click Site Actions → Edit Page in the upper-right corner of the page. SharePoint changes the page to Edit mode as shown in Figure 1-6.
Drag web parts between web part zones (marked Left and Right) to move them on the page, or click Edit on the web part's title bar to change the appearance of the web part.
Click Add a Web Part to include new content from a list or library on the page.
When you're done, click Exit Edit Mode in the upper-right corner of the page.
The top link bar and Quick Launch are static web parts—they are controlled by site settings rather than by the page editor. The procedure for changing these links varies a bit between WSS and MOSS, so I include both approaches here.
To change the links on the top link bar in WSS:
Click Site Actions → Site Settings in the upper-right corner of the page.
Click Top link bar under the Look and Feel heading in the middle of the Site Settings page.
Click New Link on the toolbar of the Top Link Bar page to add a new tab, or click "Use Links from Parent" to import the tabs that appear on the web site that contains the current site.
To change the links on Quick Launch in WSS:
Click Site Actions → Site Settings in the upper-right corner of the page.
Click Quick Launch under the Look and Feel heading in the middle of the Site Settings page.
Click New Link on the toolbar of the Quick Launch page to add a new tab, or click New Heading to add a new section on Quick Launch.
To change the links on either the top link bar or Quick Launch in MOSS:
Click Site Actions → Site Settings in the upper-right corner of the page.
Click Navigation under the Look and Feel heading on the Site Settings page.
In the Global Navigation section, select "Display the navigation items below the current site." That setting causes the site to have a unique top link bar, rather than inheriting the link bar from its parent site.
In the Navigation Editing and Sorting section, select Global Navigation and click Add Link to add a new tab to the top link bar.
Select Current Navigation in the Navigation Editing and Sorting section and click Add Link to add a new item to the Quick Launch.
Click OK to apply the changes.
MOSS refers to the top link bar as Global Navigation, and it calls the Quick Launch Current Navigation. You can also use the Site Navigation Settings page in MOSS to group and reorder the links that appear on the top link bar and Quick Launch.
SharePoint stores the content you want to share in lists and libraries. To add a new link to the Links list:
Return to your test site's home page.
Click the "Add new link" at the bottom of the Links web part on the right side of the page. SharePoint displays a web form for you to fill out for the new list item.
Fill out the fields and click OK to save the item. SharePoint adds the link to the list and displays it in the Links web part on the home page.
To add a new document to a library:
On your test site's home page, click "Add new document" at the bottom of the Shared Documents web part in the middle of the page. SharePoint displays the Upload Document page.
Click Browse and select a Word or Excel document from your computer to upload.
Click OK to upload the document. SharePoint copies the file from your computer to SharePoint and displays the new file in the Shared Documents web part.
List items and documents uploaded to a site are available to anyone who has access to the site. For example, you can open the document you just uploaded by clicking on it in the Shared Documents web part. SharePoint keeps track of user's permissions so only authorized users can see or change items.
Lists and libraries are stored in folders within each site. What you see on the home page is just a view of the list or library displayed as a web part. Every list and library has a web part associated with it that you can use to display different views on the site's home page and elsewhere.
To view the actual list or library:
Click on the title of the web part.
Or:
Click on the link to the list or library in the Quick Launch area.
Or:
Click View All Site Content, and then click on the list or library shown on that page.
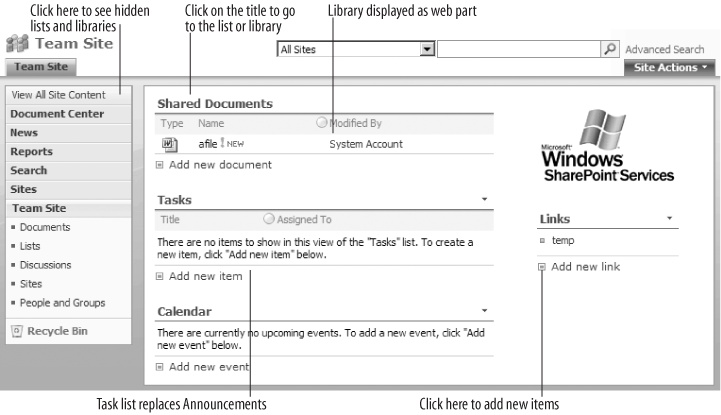
The View All Site Content link lets you get at lists and libraries not shown on the site's home page. You choose what to put on the home page based on what is most important for others to see. For instance, you might want to feature the Task list on the home page instead of Announcements. To make that change:
Navigate to the home page of your test site.
Click Site Actions → Edit Page in the upper-right corner of the page. SharePoint changes the page to Edit mode.
On the Announcements web part, click Edit → Delete and click OK. SharePoint removes the Announcements web part, but does not delete the Announcements list (it becomes hidden).
Click Add a Web Part. SharePoint displays the Add Web Parts web page dialog box.
Select Tasks and click Add. SharePoint adds the Tasks list web part to the page.
Drag the web parts to change their order on the page.
Click Exit Edit Mode in the upper-right corner of the page when you are done. The completed page should appear as shown in Figure 1-7
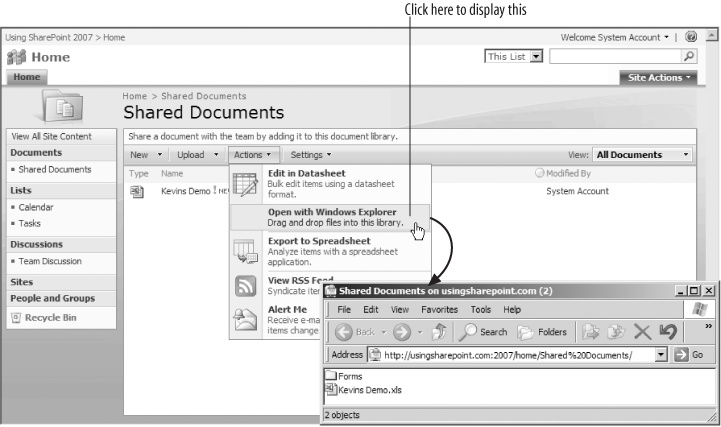
SharePoint libraries are very similar to file folders in Windows. In fact, you can view them in the Windows Explorer! To do that:
From the test web site home page, click on the title of the Shared Documents web part. SharePoint displays the Shared Documents library.
On the library toolbar, click Actions → Open with Windows Explorer. SharePoint opens the library folder as shown in Figure 1-8.
Using the Windows Explorer, you can create new folders, cut and paste files between the library and your desktop, or move whole folders from your desktop to SharePoint. This is the quickest way to upload a large number of files into SharePoint and preserve their organization.
There are a few restrictions on what you can upload:
File and folder names can't include the following characters: &, ?, %, or .. (two periods together). Those characters have special meaning on the Web.
Executable file types are blocked by default to avoid the spread of malicious code. To share executables, DLLs, and other file types, ZIP them before uploading.
Files over 50 MB are blocked by default.
The blocked file types and maximum upload sizes can be changed through the SharePoint Central Administration settings. However, it's a good idea to stick with the defaults initially.
Tip
Since SharePoint lists and libraries are shown as web pages, you may need to Refresh (F5) the page in your browser to see newly created items. That's always true if others are uploading items—you'll need to refresh to see their changes.
Get Essential SharePoint 2007, 2nd Edition now with the O’Reilly learning platform.
O’Reilly members experience books, live events, courses curated by job role, and more from O’Reilly and nearly 200 top publishers.
