Exposure is a film term describing the way light interacts with a negative to create an image. Too much or too little light produces images that are either too dark or too light. In DV camcorders, exposure works in a very similar way. Depending on the aperture you set, greater or lesser amounts of light reach the sensors that produce an image in a DV camera (if you have a digital still camera, it works the same way). Wider apertures let in more light, and smaller apertures allow less light to pass. Prosumer DV cameras allow cinematographers to manually set an aperture, rather than rely on an automatic setting. To some people, manually setting the aperture may seem like extra work—to a professional, manual exposure settings provide precise control over one of the most important camera settings. (Racecar drivers don’t have automatic transmissions under the hood at the Indianapolis 500.) Even if you’re not shooting the most important shot of your life, manual aperture settings provide valuable control. The aperture of a camcorder functions much like the iris in a human eye—both expand to let more light in or contract to keep light out. For this reason, filmmakers often say “iris up,” to capture more light in a darker environment, or “iris down,” to close a camcorder’s aperture setting in a bright area.
Note
The key to using zebra lines is to adjust your exposure so the lines are just barely visible in the brightest areas. If you can see zebra lines all over your frame, your aperture is set to allow too much light. If you don’t see any lines at all, the exposure may be darker than it needs to be. If you open up the aperture until you see lots of zebra lines and then gently stop down, or close the aperture, until they begin disappear, the point at which they’re just barely visible will provide the exposure you want.
As I mentioned in Chapter 2, different parts of a frame often require different exposure settings. If you let the camcorder set the aperture for you, you have no control over which part of the frame is properly exposed and which is not. If you set the aperture yourself, you increase the available possibilities. For example, you can film someone standing in front of a bright area and set the aperture so he is properly exposed, while the area behind him appears as an abstract image. Alternatively, you can expose for the bright area behind the person, and the person will appear in silhouette. Depending on the situation, it may also be possible for you to split the difference and choose an aperture that properly exposes the foreground and background of your composition.
Prosumer camcorders offer the option of zebra lines that display a visual warning in overly bright parts of a frame, as shown in Figure 4-3. For example, if you’re shooting an actor outdoors against a blue sky on a sunny day, and properly expose for the actor, the sky will likely appear blown out, or over exposed. A camcorder set to display zebra lines would show thin, diagonal lines to indicate a problem. You could then either recompose your framing, or stop down and choose a smaller aperture, which lets in less light. When the zebra lines disappear, it means you’re good to go. If, instead, you let the camcorder automatically choose an exposure setting for you, you narrow the range of possible shots.
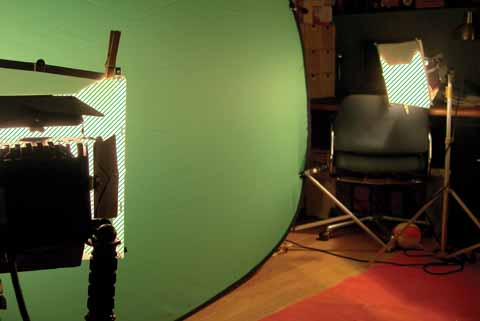
Figure 4-3. The diagonal green lines in this image are called zebra lines, and indicate areas of the frame that are too bright (not surprisingly, it’s the area around the lights).
Careful lighting and subtle shadows give an image texture and depth, but many video images are painfully flat. Sometimes filmmakers take such pains to evenly expose all areas of a frame, especially when lighting interviews, that a shot loses all its shading and nuance. I once read an interview with a restaurant owner who said the only thing worse than a restaurant that’s too loud is a restaurant that’s too quiet, because it has no customers. I have similar thoughts about video images—out-of-control shadows and areas of impenetrable darkness are no good, but a complete absence of shadows isn’t the greatest thing either. (Keep in mind that after you learn the rules here, you might want to occasionally break them for an effect. Sometimes—not often, but sometimes—you might want out-of-control shadows and areas of impenetrable darkness. Especially if you’re shooting a horror film; see the discussion of darkness in Open Water in Chapter 16.)
More often than not, the lighting in a particular environment may not be bright enough to accommodate a video shoot. In that case, you’ll either need to buy or rent a light kit. Each lighting kit is configured differently, depending on the kinds of lights and stands you’re using, but they all follow some basic principles. All lights fold up for storage and transport, so the first step in lighting a shoot is taking your lights out of the kit and setting them up.
The base of a light stand is, essentially, a tripod folds up like an umbrella. The light stand in Figure 4-4 is shown in the open position. When the leg extended into the widest position possible, the stand is at its most stable.
To open a closed stand, slide the part labeled A until the legs open to their widest possible position, as shown in Figure 4-4. This stand is now ready to us close it, slide the part labeled A up until the legs fold in flush against the body of the stand.)
If you need to raise the light higher, loosen the that releases the lowest telescoping section (labeled B in Figure 4-4), extend the height of the stand retighten the screw to hold the stand in its extended position. If you need even more height, extend the next highest section.

Note
Be sure to tighten the screw well enough that the stand will not collapse when you place a light on top, but don’t over tighten because you can damage the threads in the screw.
Always extend a light stand from the bottom section up. The lower telescopic sections are thicker and more stable, so they can safely support more weight.
Once you have adjusted the stand to your desired height, you can add the light itself. Figure 4-5 shows how to do this.
Lights contain a housing (labeled C in Figure 4-5) that fits over the top of a light stand. The housing contains a screw that holds the light in place (D). Loosen the screw until there’s enough room to comfortably fit the housing over the top of the light stand. When the light stand has been mounted on the stand, retighten the screw so that the light is securely attached to the stand.
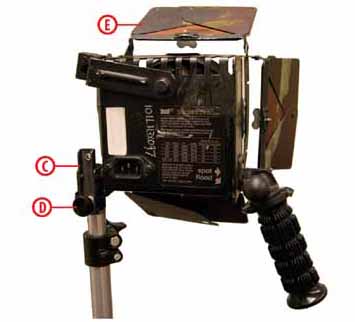
The metal flaps hinged to the edges of the light (E) are called barn doors. When they’re open, more light comes out; when they’re closed, less light comes out. Operating a light with the barn doors completely closed can very easily cause the light to catch fire—always open the doors before turning on the light.
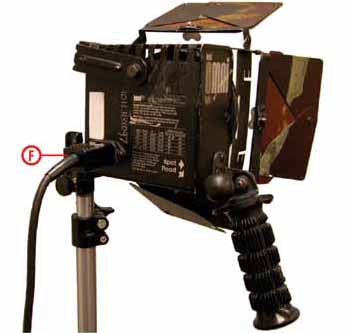
Next, connect the power cable, as shown in Figure 4-6. Most often, a light’s power cables are not permanently attached. The light pictured here has a power cable (F) that completely detaches during storage. Always connect the power cable to the light before plugging it into the power source.
Now you can safely plug the light into a power source. Production lights use large amounts of electricity, so try to avoid plugging more than one light into the same outlet—you can easily blow a fuse or trip a circuit breaker. Depending on the lights you’re working with, some will turn on as soon as you plug them in; others will have an on/off switch.
The keys to interview lighting are diffusion and light source placement. In film terms, diffusion is a fabric made of spun glass that goes in front of a light to soften the output. Diffusion doesn’t change the color of the light, it just makes the light softer and more manageable to a cinematographer. If you place a person in front of a light source without any type of diffusion, the light simultaneously creates very bright areas and very dark shadows. The same light source with a sheet of diffusion applied creates a more even light: the bright spots appear as pleasant highlights, and the dark areas show detail and contour while remaining light enough for a cinematographer to work with. The downside to using this type of diffusion is that lights get very hot, and sheets of diffusion can catch fire—not what you want during a shoot.
Until recently, filmmakers went to great lengths to produce diffuse lighting effects—for example, bouncing a light off a reflective umbrella or placing squares of spun glass material over the face of a light (both of which can easily cause a fire if you’re not careful). Around the mid-1990s, lighting companies began introducing soft lighting kits, such as the Chimera, made by Chimera Lighting (shown in Figure 4-7), or the Lowell Rifa-lite, which are basically tents that enclose a light and have diffusion built into a front panel. The diffuse light of the Chimera allows a cinematographer to create intricately sculpted lighting effects that fade from light to dark under the control of the filmmaker. The goal of the cinematographer may be to create strikingly eye-catching lighting scenarios, or to subtly highlight a person’s facial features and gently capture the audience’s attention by drawing a viewer in to the person on screen. Good control of lighting enables a number of approaches.
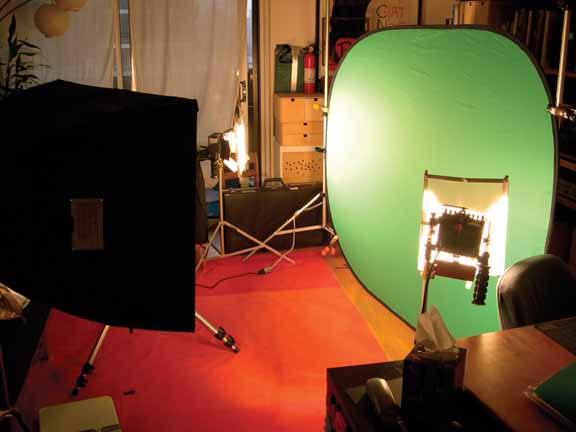
Figure 4-7. Using a diffuse light source, such as a Chimera, enables you to create a soft, even light.
To use a Chimera to greatest effect, filmmakers often place one at an angle, pointed at the face of the person being filmed. Placing the Chimera at an angle helps make sure the person on camera doesn’t have to stare directly into a light source (your actors will thank you). It also maximizes the light’s ability to generate highlights and shadows, creating pleasant and attractive contour effects. To make sure the side farthest from the Chimera doesn’t become overly dark, a filmmaker would likely place another light on the subject from another angle. For example, if a person is looking into the camera, I might use a Chimera to light them from one side and a smaller light source to light them from the other. The smaller light is used to fill in any unintentional shadows, and for that reason, it is called a fill light. The Chimera serves as my primary light, creating highlights, and is called a key light. This method is called the key and fill light combination. Placing both lights in the right spots ensures you don’t get any shadows that are overly dark or unmanageable, and also creates nice highlights so your video doesn’t look too flat. See Figure 7-8.
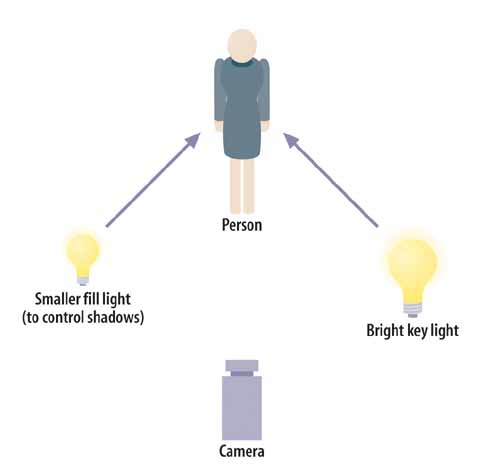
Figure 4-8. The main, or “key,” light source is very often a diffuse light such as a Chimera or similar type of production light. The smaller “fill” light is used to fill in areas of shadow that might otherwise get too dark.
The next time you watch a well-produced interview show on television, check out the lighting. You may notice the techniques described in this chapter. More than likely, you’ve seen them before—audiences generally don’t notice good lighting on a conscious level, it’s just something they expect to see. Bad lighting, of course, stands out instantly, indoors or out.
Note
If you’re working in a controlled interview situation, and you want to make a shoot look really sharp, you can add a hair light. A hair light adds a nice, crescent-shaped shine to the head of a person being interviewed. The shine not only makes your interviewee look attractive and healthy, but it helps differentiate the edge of her head from the background, making her the clear focus of your frame. Filmmakers go to great lengths to light their interviews, because the better an interview looks, the more effective it is in a film. For a very nice example of a hair light, go to http://www.digitaldocumentary.org/america and click on the clip labeled “Christmas,” or the one labeled “bathroom” (don’t worry; it’s nothing inappropriate).
People learning to shoot film or video often think that bright, sunny days are the best time to film outdoors. Although bright, sunny days are great times to be outside, they don’t offer the best shooting environment—bright sunshine creates dark shadows. If your framing contains areas of bright sun and dark shadow in the same shot, say a sidewalk partially shaded by a tree, it’s hard to expose for both. If your shot involves action that moves from the shadowed area into the sun, it becomes even harder to film. Bright sunshine also creates bright reflections. If your shot contains reflected sunlight in windows or on shiny cars, these areas may be blown out if you expose for the rest of the frame.
Overcast days, on the other hand, offer nice, even lighting and very few shadows. Even very cloudy days offer ample sunlight for shooting, while avoiding the problems of glare and unworkable shadow. Unfortunately, not even the most talented director has control of the weather. The solution? A neutral density (ND) filter and a bounce card.
An ND filter is a glass filter you place over the lens of your camcorder (some prosumer cameras offer a built-in ND function; check your manual). An ND filter doesn’t change the color cast of your shot, that’s why it’s called neutral density, it just makes things darker. If you’re filming on a very sunny day, it may be too bright to get a good exposure, even at the smallest aperture setting. Using an ND filter evenly darkens the objects in your shot to make them more workable (I once went out for brunch on a cloudy day and a friend remarked that the weather looked like a perfect ND filter). Because an ND filter doesn’t change the color of your shots, the audience will never know you’re using one—this filter simply gives you the ability to capture images in a wider variety of settings. Once you get exposure under control, you can then even out shadows using a bounce card. If you live in a sunny region, you may have a folding reflective screen you place in the windshield of your car to keep the inside from getting too hot when you park in the sun. A bounce card works the same way, it reflects sunlight, and on a film shoot, you can use one to redirect sunlight where you want it. The same way you use a key and fill light combination indoors, you can work with natural sunlight and a bounce card to get the lighting effect you want. You don’t have to go out and buy an expensive product to do this; you can use the same type of reflector sunbathers use to reflect light onto their faces, or you can even use the reflector from your car windshield (I’ve done it myself)—even if your car gets hot, it’s worth it if it makes your film better. Compose the shot you want, and if you notice shadows that are too dark to work with, use a reflector to bounce light where you need it.
Another situation in which an ND filter and a bounce card come in handy is when filming actors in wide-brimmed hats and baseball caps, which can be very hard to work with on camera because they create areas of dark shade. In Figure 4-9, the image at left was shot on a sunny day, so the shaded area of the person’s face is significantly darker than the rest of the frame. If the cinematographer exposes for the person’s face, the rest of the frame will be too bright. If the cinematographer exposes to keep the majority of the frame usable, the area around the person’s eyes will be too dark to see, as in Figure 4-9. In the image at right, the cinematographer has applied an ND filter, making the whole image darker, and positioned a bounce card under the person’s face to redirect light where it’s needed and lessen the impact of the shadows.
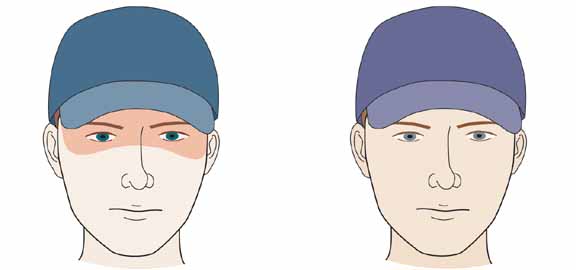
Figure 4-9. Here are two drawn figures of a person wearing a baseball cap. In the first figure, the camcorder exposes for the dark part of the person’s face, shaded by the brim, so the rest of the image is blown out. In the second figure, the entire image is more evenly exposed.
As a director, you always have the option of asking someone to remove his hat. If you think the hat adds to the shot, or if you feel uncomfortable asking, an ND filter and a Flex-fill are good tools to have at the ready.
Shooting outside at night presents an entirely different set of issues. As opposed to midday shoots on a sunny day, where a director has to worry about too much light, a filmmaker shooting at night has to make sure there’s enough light to get a decent exposure. A good workaround technique is to shoot at the end of the day, just after sunset. There’s a time at dusk, between sunset and the full arrival of nighttime, when there’s still enough daylight to shoot. Because daylight looks especially blue at this time of day (take a look next time you’re outside just after sunset), it looks like night on screen. If your shot includes any traffic, the effect is reinforced by drivers who turn on their headlights—the light from the cars won’t change your exposure, but when audiences see cars with their lights on, it further establishes the shot as taking place at night.
The time immediately before and after a sunset is referred to as golden hour, because the setting sun gives off an especially warm glow. This glow looks great onscreen: landscapes look scenic, and people look healthy and attractive. Many directors intentionally wait until the end of the day and schedule shots at golden hour to make their lead actors look especially good. Next time you go to the beach, bring a camera and take some snapshots of the people you’re with at sunset—when they see the results, they’ll love how good you made them look.
In low-light settings, including shoots at night, in fog, or on particularly dark and rainy days, manual exposure settings, careful focus, and a high-contrast viewfinder become especially important. Video camcorders can record images in increasingly dark settings, but the images don’t always look that good. In very dark environments, some camcorders produce images that look grainy or appear to be made of very small moving spots. If a location is too dark, you may come away with an image that’s too grainy to use. A good quality viewfinder can help you avoid this problem. If you see grain in the viewfinder, try to recompose your shot in a brighter area or subtly add lighting to your current location. Large-scale film productions heavily light locations at night, often lighting the facades of all the buildings on a street. If your story necessitates shooting at night, this may be something to consider. I’m not suggesting you bring in floodlights to light up your entire neighborhood, but nighttime outdoor shoots entail specific technical challenges.
Note
If you shoot video of a person driving in a car at night, lighting can be a particular challenge. Unless you’re in a very bright area, the car may be too dark to get a good exposure. Because the inside of a car offers a limited amount of space, lighting your subject without casting shadows or blinding her can be a challenge (and if you’re shooting the driver of a car, blinding her is something to avoid at all costs). One solution filmmakers often employ is to light a driver from below the dashboard. Using a battery-powered light, even a wide-beam flashlight, you can create a light source that makes the shot look like it’s being lit by the instrumentation in the car’s dash. Positioning the light takes some finesse: putting it in the wrong spot will make your diver look like she’s telling scary stories at a campfire. Once you get it right, the results are worth the effort.
In darker shots, depth of field becomes particularly limited (for a detailed discussion of depth of field, see Chapter 2). In bright daylight, a cinematographer can much more easily keep the foreground and background of an image in focus at the same time. At night, the depth of field is more shallow, which may provide you with an effect you like, but also makes it harder to keep all areas of a frame in focus. Automatic focus settings on a camcorder make things even more difficult. If you have objects at different focal lengths—for example, a person closer to the camera lens speaking to someone farther back—the camcorder may not know which person to focus on. In this situation, the camcorder might not focus on the person you want, or even worse, the camcorder’s auto focus might shift between the two, changing focus from one to the other at precisely the wrong time. I once worked on a shoot where we interviewed a man sitting in a shady area of his garden. To save money, my boss shot the video himself and left the auto focus on. The shade was dark enough to narrow the depth of field considerably, and the auto focus kept drifting back and forth between the man we were interviewing and the flowers blowing in the breeze around him. It looked like the lens was breathing. This rendered the entire shoot unusable; the changes in focus would have made audiences seasick.
Note
Problems with focus and severe over or under exposure are not repairable in postproduction. No matter how good the material is, if it’s technically flawed at the most fundamental levels, there’s only so much you can do with it. Some white balance problems can be fixed in the color-correction phase, but life is much less complicated (and less expensive) when things go right from the beginning.
Ultimately, my boss and I used the interview of the man in his garden as voiceover. In the editing room, we paired his recorded audio with a combination of observational footage and still images. On the dry erase board behind us, the editor of a previous project had written:
| “You have to kill your darlings.” —Faulkner |
| “It’s not the pearls that make a necklace; it’s the thread.” —Flaubert |
| “We’ll fix it in post.” —Anonymous |
In this chapter, we covered color casts (daylight is blue, indoor light is yellow) and the ultimate importance of white balance (it calibrates your cam-era’s color balance to the light in your shooting environment). The chapter also discussed aperture settings and why you should always make all the adjustments yourself instead of relying on your camcorder’s automatic functions. This chapter also provided tips on shooting outdoors (cloudy days are great) and for lighting indoor shoots (turn off incandescent and fluorescent lights, try using a Chimera and hair lights in interviews).
The next chapter explores shooting for effects. Working with digital video enables you to create complicated special effects that would have been unimaginably expensive only a few years ago. Today, if you have access to a digital camcorder and some editing equipment, you can make anything you want—especially if you take the time to carefully plan your effects sequences before you shoot.
Get DV Filmmaking now with the O’Reilly learning platform.
O’Reilly members experience books, live events, courses curated by job role, and more from O’Reilly and nearly 200 top publishers.

