Dreamweaver’s windows let you add and modify elements of a Web page. Macromedia refers to most of these windows as panels, and Dreamweaver has an almost overwhelming number of them.
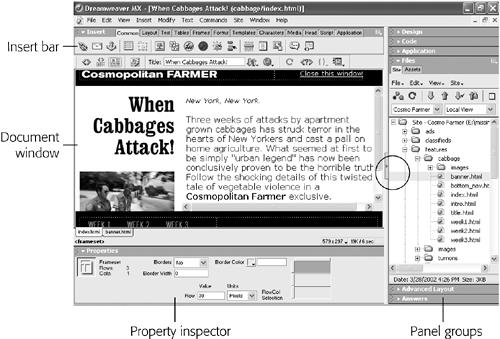
Many of these windows are used to assist with specific tasks, like building style sheets, and are described in the relevant chapters. But you’ll frequently interact with four main groups of windows: the document window, the Insert bar, the Property inspector, and panel groups.
Note
The look of these windows depends on what kind of computer you’re using (Windows or Macintosh) and what changes you’ve made to the program’s preference settings.
Even so, the features and functions generally work identically no matter what your situation. In this book, where the program’s operation differs dramatically in one operating system or the other, special boxes and illustrations (labeled “For Macs Only” or “For Windows Only”) will let you know.
You build your Web pages in the document window. As in a word processor, you can simply click inside the body of the document window and type to add text to the page. You’ll work in this window as you build a page, and you’ll open new document windows as you add or edit pages for your site.
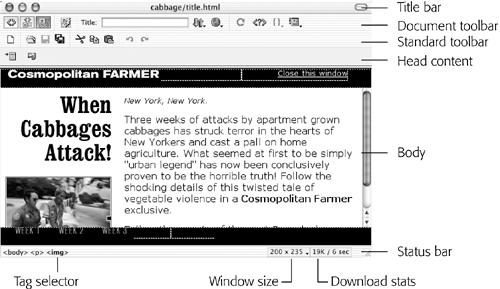
Several other screen components provide useful information about your document. They may appear in different locations in Windows or on the Mac (see Figures 1-1 and 1-2), but work the same. For example:
Figure 1-1. In Windows, you switch between documents by clicking a document tab that appears immediately below the document window. In this example, clicking the banner.html tab brings that page to the front. (This nifty feature works only if the docu- ment window is maximized.) You can also hide the Panels (the stack at the right edge of the window) by clicking the Hide Panels button (circled). To show the panels, click the button again.
Figure 1-2. A document window represents each Web page; here’s where you add text, graphics and other objects to a page. The Standard toolbar is new in Dreamweaver MX; it’s useful for frequent file and editing tasks like saving and creating files. (The elements of each Dreamweaver window are in the same places in Mac OS 9 and Mac OS X—it’s just that Mac OS X is prettier.)
Title bar. The title bar shows the title of the Web page you’re currently working on, and, in parentheses, the name of the underlying file and what folder it’s in. For instance, in the example shown in Figure 1-1, the Web page called When Cabbages Attack! is saved as an HTML file called title.html in a folder called cabbage. (In Windows, the title bar appears on the top of the screen; on the Mac, it’s at the top of the document window.)
Document toolbar. The Document toolbar lets you change the title of a page, switch between Design and Code views, preview and debug the page in different Web browsers, access a context-sensitive reference (help) system, and change the look of the document window. You’ll be reading about its various buttons and menus in the relevant chapters of this book. (To make the toolbar visible if it’s not already, choose View→Toolbars→Document.)
The Standard toolbar. The Standard toolbar, new in MX, includes buttons for frequent file and editing tasks like creating a new page, opening a page, saving one or all open documents, cutting, copying, pasting, and undoing and redoing actions. (This toolbar is hidden until you summon it by choosing View→Toolbars→Standard.)
Head content. Most of what you put on a Web page winds up on the body of the page, but some elements are specific to the region of the page called the head. Here you put things like the title of the page, meta tags (keywords) that provide information for some search engines and browsers, JavaScript scripts, and Cascading Style Sheet information (Chapter 8).
None of this information is actually visible on your Web page once it’s “live” on the Internet. But while working in Dreamweaver, you can have a look at it by choosing View→Head Content. You’ll see a row of icons representing the different bits of information in the head.
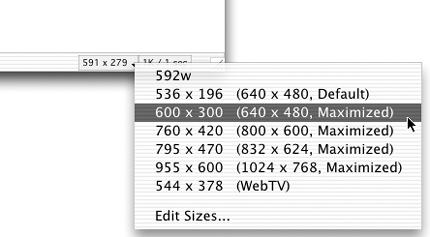
The status bar provides useful information about your page. It appears at the bottom of the document.
The tag selector (shown in Figure 1-2) is also extremely useful. It provides a sneak peek at the HTML codes that, behind the scenes, compose your Web page. It indicates how tags are nested in the document, based on what you’ve selected or where the insertion point is. You can also use the tag selector to select an HTML tag and all of the information nested inside it. For instance, clicking the <p> selects the paragraph and everything inside it. This feature is very useful when you want to set properties (see the Property inspector below), add behaviors (Chapter 11) or precisely control the application of styles (Chapter 8).
You’ll make good use of the tag selector in the tutorials to come. For experienced Dreamweaver users, it’s one of the program’s most used tools.
If the document window is your canvas, the Insert bar holds your brushes and paints, as shown in Figure 1-3. (It was called the Objects panel in Dreamweaver 4.)
Figure 1-3. See the arrow next to the word Insert? When the arrow points down, the Insert bar (shown split in half to fit the page) displays all the tabs and available objects. When the arrow points to the right, the window is reduced to a thin bar, with only the word Insert visible.
While you can add text to a Web page simply by typing in the document window, adding elements like images, horizontal rules, forms, and multimedia elements is simplified by the click-to-add approach of the Insert bar. Want to put a picture on your Web page? Just click the Image icon.
Note
Adding elements to your Web page this way may feel like magic, but the Insert bar is really just a quick way to add code to a page, whether it’s HTML, XHTML, JavaScript, or server-side code like Visual Basic (see Part 6 of this book). Clicking the horizontal rule icon, for instance, simply inserts the <hr> tag into the underlying HTML of your page. Of course, Dreamweaver’s visual approach hides that messy code, and cheerfully displays a gray horizontal bar on the page.
When you first start Dreamweaver MX, the Insert bar is open (see Figure 1-3). If you ever close it by mistake, you can open it again by choosing Window→Insert or by pressing Ctrl+F2 (![]() -F2). On the other hand, if space is at a premium on your screen, you can close the Insert bar and use the Insert menu instead. Its commands duplicate all of the objects available from the Insert bar.
-F2). On the other hand, if space is at a premium on your screen, you can close the Insert bar and use the Insert menu instead. Its commands duplicate all of the objects available from the Insert bar.
The strange-looking button at the top-right corner is actually a menu that lets you access a Help screen, close or maximize the window, or even rename the window. (If you don’t like the name Insert, you can change it to HTML thingies, for all Dreamweaver cares.) On the Mac, you have the added option of displaying this window vertically at the side of your monitor, exactly as in Dreamweaver 4; just click the Orientation icon (circled in Figure 1-3).
Twelve different sets of objects are available from the Insert bar, each under a different tab. Click one of these tabs to see the corresponding category of objects worth inserting:
Common objects. In addition to objects like images, tables, and horizontal rules, which you’ll use frequently in everyday Web design, this tab of the Insert bar offers objects that may not be part of your daily routine: Flash files or Web pages produced by Macromedia’s Web graphics program, Fireworks.
Layout objects. The objects in this tab help you control the layout of a Web page by organizing a page’s contents using HTML tables or layers. In addition, this tab lets you use Dreamweaver’s Layout View—a customized approach to building complex table designs that’s covered in Chapter 6.
Text objects. For formatting type, making it bold or italic, for instance, you can turn to the Text tab. Most of the buttons on this tab aren’t technically objects; they don’t insert new objects onto the page. Instead, they format text already present on the page. For the most part, the Property Inspector offers the same formatting options and is a more common tool for formatting text.
Tip
Using the Text Objects tab can be disorienting. Some “text objects” create incomplete HTML and actually dump you into the raw HTML of the page, leaving the nice visual design view behind. In general, the Property inspector and Text menu let you do everything in this tab—more quickly and more safely.
Table objects. If you like to hand write the code that produces HTML tables, this tab is for you. It inserts HTML tags for creating tables, table captions, table heads, and other table-related tags. With one exception—the table object, which you can also find on the Common Objects tab—these objects only function when you’re in Code view. Truth is, you’ll probably find it easier to create tables using the tools in the Common objects tab or the Layout tab, as described in Chapter 6.
Frame objects. It’s possible to display several Web pages in one browser window at the same time, thanks to an HTML mechanism called frames; see Chapter 7 for complete details.
Form objects. Want to get some input from visitors to your Web site? You’ll use forms when you want to receive visitor feedback, collect credit card information for online sales, or gather any other kind of data on your Web site. The Forms tab lets you add form elements like radio buttons, pull-down menus, and text boxes. (For more on forms, see Chapter 10.) You’ll also use this tab a lot when building the dynamic Web pages discussed in Part 6.
Template objects. Dreamweaver’s Templates feature lets you build basic Web page designs that you can use over and over again in your site, speeding up your production process and facilitating easy updates. In Dreamweaver MX, the Templates tab also offers advanced features for building complex logic into your templates that let you easily modify the look and content of template pages. See Chapter 18 for details.
Character objects. These are special symbols, like copyright and trademark symbols, that you can pop onto your page.
Media objects. Use the Media tab to insert multimedia elements like Shockwave, Java applets, plug-ins, Active X controls, and Dreamweaver’s own Flash objects (Flash Text and Flash Buttons). Multimedia objects are discussed in Chapter 13; you’ll find more info on Flash Text and Buttons on page 128.
Head objects. The Head tab lets you insert objects that don’t actually appear on your Web page: what alphabet the browser should use to display the page (Cyrillic or Japanese, for example), or a description of the page for use by search engines.
Script objects. This tab lets you add server-side include files (files that a Web server merges into a Web page before delivering it to the browser) as well as your own JavaScript programs.
Application objects. Dreamweaver MX makes connecting your Web pages to databases as easy as clicking a few buttons. (OK, almost that easy; see Part 6.) The Application tab adds many powerful tools for building dynamic pages: controls that add records to your database, for example, or update information already in a database.
After dropping in an image, table, or anything else from the Insert bar, you can use the Property inspector to fine-tune its appearance and attributes. Suppose, for example, that your boss has decided he wants his picture centered in the middle of the page. After highlighting his picture in the document window, you would then use the Property inspector to change its alignment.
The Property inspector is a chameleon. It’s aware of what you’re working on in the document window—a table, an image, some text—and displays the appropriate set of properties (that is, options). You’ll use the Property inspector extensively in Dreamweaver.
Tip
Double-click any blank gray area in the Property inspector—or striped area in Mac OS X—to hide or show the bottom half of the palette, where Dreamweaver displays an additional set of advanced options. (It’s a good idea to leave the inspector fully expanded most of the time, since you may otherwise miss some useful options.)
Figure 1-4. The Property inspector changes depending on what’s selected in the document window, but certain options are always available.
The Property inspector appears the first time you run Dreamweaver MX. But if you don’t see it, you can reopen it by choosing Window→Properties, or by pressing Ctrl+F3 (![]() -F3).
-F3).
Tip
At its heart, the Property inspector is simply a display of the attributes of HTML tags. The src (source) attribute of the img (image) tag, for instance, tells a Web browser where to look for an image file. The best way to make sure you’re setting the properties of the correct object is to click its tag in the tag selector (see page 19).
So far, this chapter has described the Insert bar, Property inspector, and document window—but those are just the beginning of Dreamweaver’s windows. In Dreamweaver 4, in fact, it was easy to wind up with window sprawl: multiple floating windows cluttering up your screen. In Dreamweaver MX, most of the remaining windows—called panels—sit in tidy groups on the right edge of your screen.
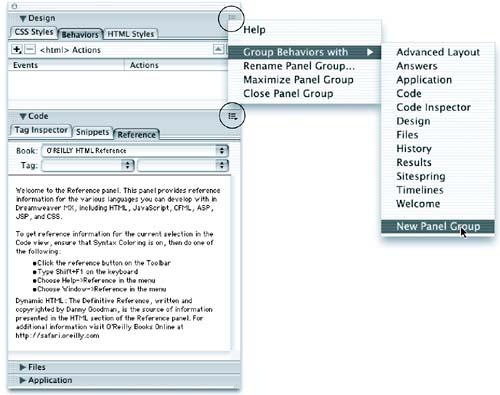
For example, a panel group named Design harbors panels for working with Cascading Style Sheets, HTML Styles, and Dreamweaver Behaviors (see Figure 1-5).
Figure 1-5. To open a panel, click the arrow next to the panel group name (Application or Files, for example). Clicking a tab brings the corresponding panel forward. Each panel group has its own Context menu button (circled). Clicking the button reveals a contextual menu that lets you move a panel to another group, create a new panel group, rename a group, or completely hide a group of panels.
Tip
To view the panels in a group, click the expander arrow or the panel group’s name; to hide the panels, click the arrow (or name) again.
The various panels and their uses will come up in relevant sections of this book. But a few tips concerning Dreamweaver’s panels are worth noting here:
Double-click anywhere in a panel group’s gray title bar to open that panel group and expand it to fill the maximum space available.
This is really the best way to open a panel group. Not only is the title bar a larger target, but most panels contain a lot of information. You’ll want to see as much of it as possible.
You can even rename a panel group. Maybe the name Code doesn’t make sense as the name of a panel group; after all, there are plenty of different kinds of codes involved in building Web sites.
To rename a group, open its contextual menu, either by clicking the context menu icon (see Figure 1-5) or by right-clicking (Windows) or Control-clicking (Mac) the title bar. In the contextual menu, choose Rename Panel Group. Type the new name into the resulting window—HTML , in this example—and then click OK.
If you want to hide all windows except documents, choose Window→Hide Panels (or press F4)—a useful trick when you want to maximize the amount of your screen dedicated to showing the actual Web page you’re working on. To bring back all of Dreamweaver MX’s administrative windows, press F4 again, or choose Window→Show Panels.
Tip
Dreamweaver for Windows includes a button for hiding only the panel groups. See Figure 1-1 for this handy trick.
If you’ve really made a mess of your screen, having dragged Dreamweaver windows all over the place, you can make them snap back into a tidy arrangement by choosing Window→Arrange Panels. (Unfortunately, this command arranges only tool panels and inspector windows. It doesn’t arrange your document windows or, on the Mac, the Site window.)
Get Dreamweaver MX: The Missing Manual now with the O’Reilly learning platform.
O’Reilly members experience books, live events, courses curated by job role, and more from O’Reilly and nearly 200 top publishers.


