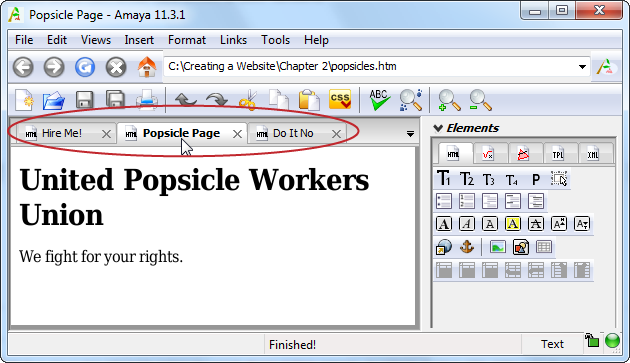
Most web page editors don’t limit you to working on a single page at a time. Dream-weaver, Expression Web, BlueGriffon, and Amaya all let you open more than one document simultaneously and switch among them using tabs at the top of the document window (see Figure 4-7). This is particularly handy if you need to make the same change to a whole batch of pages, or if you want to cut a bit of content from one page and paste it into another.
Figure 4-7. With tabbed editing, your web page editor creates a new tab each time you open a file. You can switch from one page to another by clicking the tabs, which usually sit above the top of the page (and underneath the editor’s menus and toolbars). Here, Amaya has three web pages open at once. To close a document, click the X on the right side of the tab.
Along with the ability to edit more than one web page at once, many editors also let you manage your entire website. The following sections describe the process for Dreamweaver and Expression Web. In both cases, your first step is to define your site’s folders and files so your editor knows just which documents make up your site.
Note
A website is simply a collection of one or more web pages, along with any related files (like pictures). It’s often useful to manage all these files together in a web page editor. In some programs, creating a website makes available advanced features, like templates, link checking, and website uploading.
To create a website in Expression Web, follow these steps:
Select Site→Open Site.
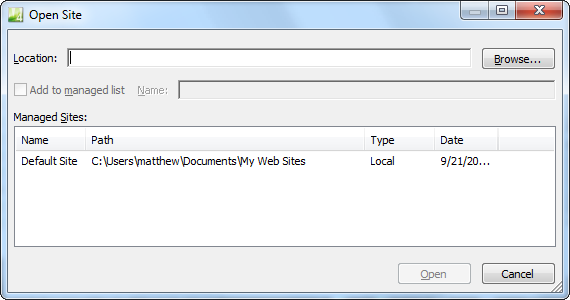
The Open Site dialog box appears (Figure 4-8).
Click Browse to search for your website folder.
Opening a website is just like browsing for a file, except that you’ll see only folders listed, not file names.
Browse to the folder you want to open, select it, and then click Open.
You can download the Chapter 2 folder from the Missing CD page (www.missingmanuals.com/cds/caw3) to get a ready-made folder and set of files (the résumé files you worked on earlier).
Clicking Open returns you to the Open Site dialog box. If you want to store the location of this website so you can open it more quickly next time, click “Add to managed list.” Once you do, Expression Web adds the folder to its Managed Sites list.
Figure 4-8. The Open Site dialog box lists all the websites Expression Web knows about. When you run Expression Web for the first time, this list will be empty (except for a nearly useless default website that Expression Web creates the first time you install it). To hunt down one of your sites, you need to click Browse.
Click Open to load your website into Expression Web.
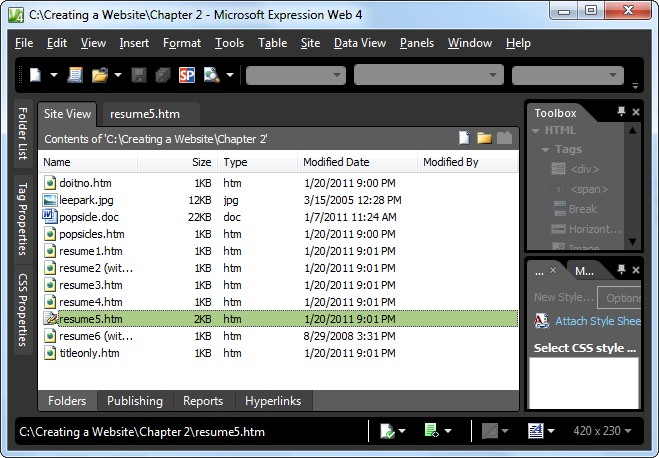
After you click Open, the editor displays a Site View tab listing all the files in your site (see Figure 4-9).
Add the Expression Web metadata folders. To do so, choose Site→Site Settings, choose “Maintain the website using hidden metadata files,” and then click OK.
Many of Expression Web’s site-management features require tracking information, which Expression Web stores in hidden subfolders. However, Expression Web doesn’t create these folders automatically; you need to opt in to get the program to produce them.
The word metadata means “data about data.” In other words, Expression Web’s metadata folders store data about the data in your website. If you’re curious, you can see these subfolders in Windows Explorer—they have names like _private, _vti_cnf, and _vti_pvt. (Web trivia: The VTI acronym stands for Vermeer Technologies Inc.—the company that originally created FrontPage and sold it to Microsoft.)
These folders have several purposes. First, they keep track of what files you uploaded to your web server. This tracking makes it incredibly easy for you to update a website, because Expression Web transfers only changed files to your server, not the entire site. The folders also track information about your site’s pages and resources, which Expression Web uses for handy features like link-checking (Site Management) and templates (Creating a New Page Template).
Figure 4-9. When you open a website folder (here, it’s a folder named C:\Creating a Website\Chapter 2), Expression Web adds a tab that displays all the files in that folder. You can do basic file management here—for example, you can right-click a file to pop open a menu with options to rename or delete the file. You can also double-click a page to open it for editing. At the bottom of the Site View tab, you’ll see buttons that let you publish your website, run a report, or check your links.
One of Expression Web’s most popular features lets you update your website without the need for a separate FTP program to transfer site files to your server. Before you can take advantage of this, you need to follow the steps described above to tell Expression Web that your folder of web pages represents a complete website. Then, you can update your site with these steps:
Choose Site→Publishing (or click Publishing at the bottom of the Site View tab).
You can’t publish your website until you fill in some basic information about your web hosting company,
Click the big “Add a publishing destination” link in the middle of the Site View tab.
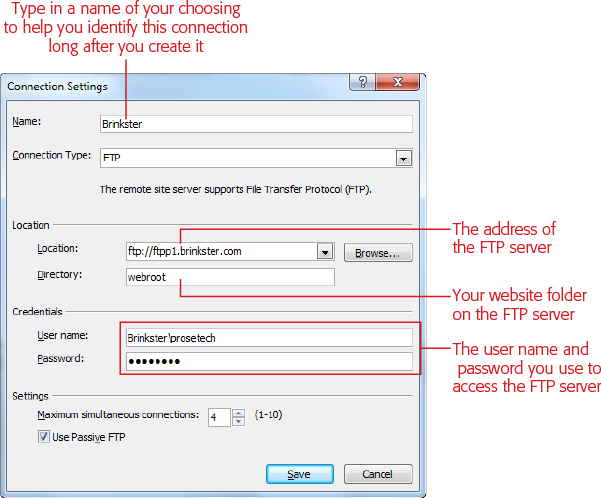
The Connection Settings window appears (see Figure 4-10).
Figure 4-10. Your web hosting company should tell you the exact choices to make in the Connection Settings window. Typically, you need to supply the address of your host’s FTP server, the directory (folder name) of your website on the server, and your user name and password. You need to complete this form only once. If you’re successful, Expression Web uses this information the next time you publish your site (although you have to type in your password each time).
Fill in the information that tells Expression Web how to connect to your server, and then click Add.
Expression Web saves the info and connects to your web host. The next time you use Expression Web’s publishing feature, you’ll see a “Connect to publishing destination” link instead of the “Add a publishing destination” link. Just click once to connect, with no extra work.
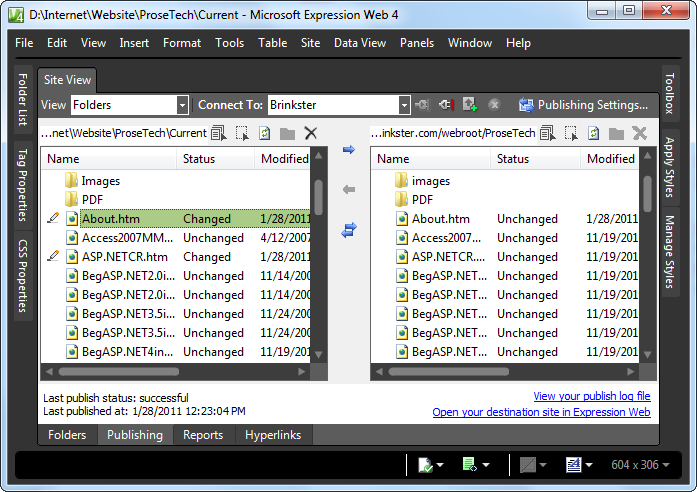
Once you’re connected, Expression Web shows you a side-by-side file list that compares the contents of the website stored on your computer with that located on the server, so you can tell at a glance which files have changed (Figure 4-11).
To bring your web server up to date, choose Site→Publish Changed Files.
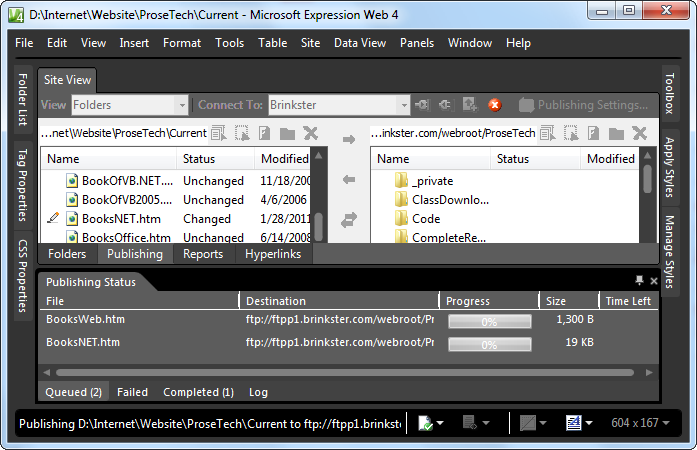
This choice starts the publishing process (see Figure 4-12).
You can also transfer individual files using the arrows that appear between the two file lists. To transfer files from your computer to the server, select them on the left list and click the right-facing arrow. To download a file from your server, select it from the right list and click the left-facing arrow. The two-way arrow underneath (“Synchronize files”) is like both operations rolled into one; it examines each file you select and makes sure it updates any old versions on either your computer or web server.
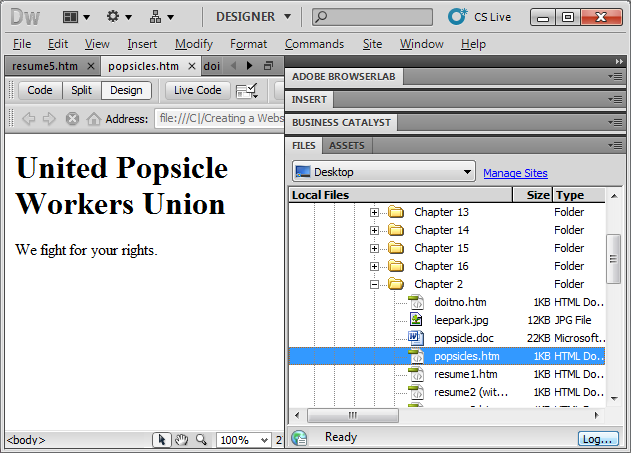
Dreamweaver gives you two ways to work with a website. The simplest is to use the Files panel to look at the files in any folder on your computer (see Figure 4-13).
Figure 4-13. Using Dreamweaver’s Files panel, you can browse all the files on your site without leaving the program.
Although using the Files panel is convenient, it’s also limiting. The problem is that Dreamweaver can’t tell what folders and files make up your website. To support website uploading and a few other tools, you need to define a folder as a website. Here’s how:
Click the Manage Sites link in the Files panel, or just select Site→Manage Sites.
Dreamweaver displays the Manage Sites dialog box, which lists all the websites you’ve configured so far. Initially, this list is empty.
To define a new site, click New.
Dreamweaver fires up a Site Setup window, where you fill in information about your new site.
Enter a descriptive name in the Site Name box.
The site name is just the one you use to keep track of your site, so use whatever name you want. This example uses LeeParkSite. The site name also appears in the Files panel.
In the Local Site Folder box, fill in the full file path for your website folder (usually something like C:\Creating a Website\Chapter 2).
If you aren’t sure where your site folder is, you can click the folder icon next to the text box to browse for it. Or, you can enter a path to a folder that doesn’t exist yet; Dreamweaver creates a new, empty folder so you can start building your new website.
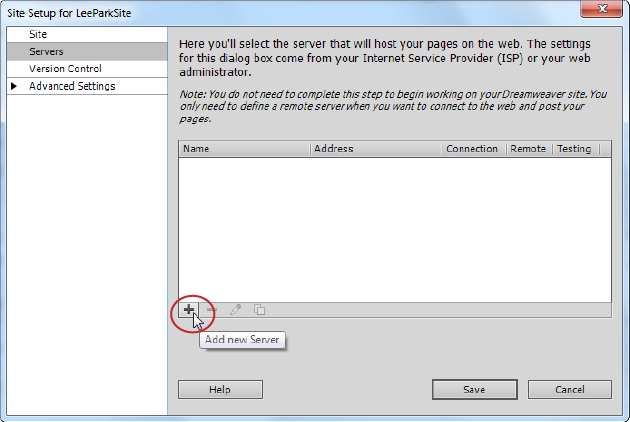
In the list on the left, click Servers. Then, click the tiny plus icon in the bottom-right corner of the web server list (Figure 4-14).
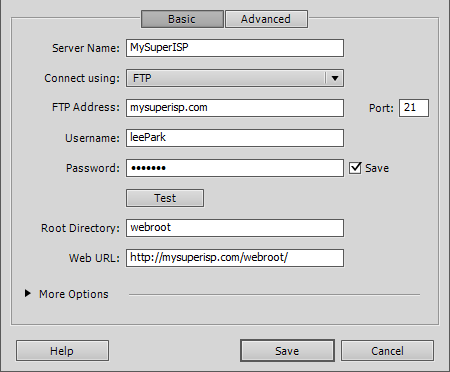
A dialog box appears where you fill in your connection information (see Figure 4-15).
When you finish entering your web server information, click Save.
You return to the Site Setup window. Dreamweaver stores your connection information so you won’t need to enter it again.
Click Save again to close the Site Setup window.
You return to the Manage Sites dialog box.
Click Done.
You return to the Dreamweaver main window.
Once you define your website, you’ll see it in the Files panel, and you can browse your remote web server for files, or transfer files back and forth from your computer to the server.
To transfer files from your local computer to your server, you use an operation that FTP jargon calls a put. It works like this:
In the Files panel, choose your website from the drop-down menu at the top left.
Choose “Local view” from the drop-down menu at the top right.
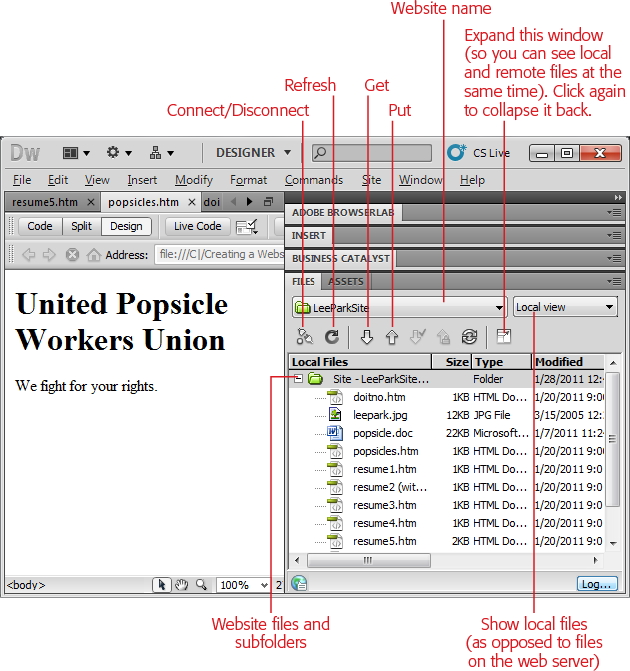
The Files panel lists the files on your computer (see Figure 4-16).
Tip
Initially, the file view is crammed into a small corner of the Dreamweaver window. If you want to expand it to fill the entire window, and show both the files on your local hard drive and those on the web server, click the expand button shown in Figure 4-16. This gives you a view that’s similar to the Site View tab in Expression Web.
Select the files you want to transfer to the web server.
You can select multiple files by holding down Ctrl (⌘) while you click each file’s icon.
Click the Put arrow (the blue arrow icon pointing up), or right-click the files, and then choose Put from the drop-down menu.
Dreamweaver asks if you want to copy dependent files.
Choose Yes if you want to copy all the files linked to your site pages. For example, if you upload a page that uses <img> elements to display graphics, click Yes to make sure Dreamweaver uploads the graphics files as well as the pages themselves. If you don’t have any dependent files, your choice has no effect.
Dreamweaver connects to your web server and transfers the files.
Figure 4-16. This is the local view of a website named LeeParkSite. It lists all the files in the site folder on your computer. Using the icons in this window, you can quickly transfer files to and from your server.
To perform the reverse trick and transfer files from your server to your computer, you use a get operation. Follow these steps:
In the Files panel, choose your website from the drop-down menu at the top left.
Choose “Remote view” from the drop-down menu at the top right.
Dreamweaver doesn’t automatically display the list of files on your server, because getting that list could take a little time. So you need to specifically ask Dreamweaver for an updated view of the files on the server, which you’ll learn to do in the next step.
Click the Refresh button, which looks like a circular arrow icon.
Dreamweaver connects to the web server, retrieves the list of files on your site, and displays it.
Select the files you want to transfer to your computer.
You can select multiple files by holding down Ctrl (⌘) while you click each file’s name.
Once you select the files, click the Get arrow (the green arrow icon pointing down), or right-click the files, and then choose Get from the drop-down menu.
Choose Yes if you want to copy linked files. For example, if you download a page that uses <img> elements to display graphics, click Yes to make sure Dreamweaver also downloads the graphics. If your page doesn’t have any dependent files, your choice has no effect.
Dreamweaver connects to your web server and copies the files to the site folder on your computer.
Tip
Once you’re comfortable transferring small batches of files, you can try out Dreamweaver’s Synchronize button. It works like the website publishing feature in Expression Web. When you click it, Dreamweaver examines the web page files on your computer, determines which ones you updated, and transfers just those to your server.
Get Creating a Website: The Missing Manual, 3rd Edition now with the O’Reilly learning platform.
O’Reilly members experience books, live events, courses curated by job role, and more from O’Reilly and nearly 200 top publishers.
