Chapter 4. Working with a Relational Database
By now, you should have a good idea of what Cloud Run is and how you can use it to run and scale your container-based applications. However, Cloud Run needs data in order to be interesting; whether that data comes from blob storage, a database, or another API, even a serverless container needs data. In this chapter, I’ll show you how to use a relational database with Cloud Run.
A relational database is the most common way to store data for your application. I want to show you how to work with Cloud SQL, a managed relational database on Google Cloud. As a managed service, Cloud SQL takes a lot of operational tasks off your plate. It supports MySQL, PostgreSQL, and SQL Server, common database engines you can run anywhere. If you ever decide to migrate to another vendor, you’ll have a way out.
In this chapter, I’ll help you get started with Cloud SQL, show you how to deploy my to-do list demo application, and explore the various ways to connect a Cloud Run service to Cloud SQL.
Cloud Run can potentially scale up to one thousand (or more) containers very quickly. This can create performance bottlenecks in downstream systems, such as your Cloud SQL database. In the final part of this chapter, I’ll explain why and show the various controls you have available to keep your database running when a traffic burst comes.
Introducing the Demo Application
The demo application for this chapter and the next is a to-do list. It has a browser-based frontend and persists the to-do items in a MySQL database. There are a lot of applications out there that feature a similar design; if you have worked with a project that had a similar architecture, you should feel right at home (Figure 4-1).
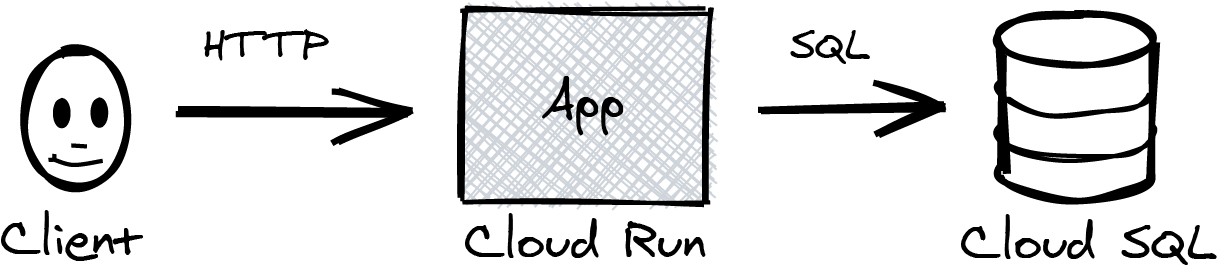
Figure 4-1. A Cloud Run service backed by a Cloud SQL database
I didn’t build the frontend myself. I am using Todo-Backend, a project that lets you showcase a backend technology stack. I only implemented their backend API on Cloud Run with a Go app—this allows me to use the prebuilt user interface with it.
The source code to build the demo application is on GitHub. All you have to do is clone the repository and set up the infrastructure. I will guide you step-by-step through setting up your own version of the application (Figure 4-2).
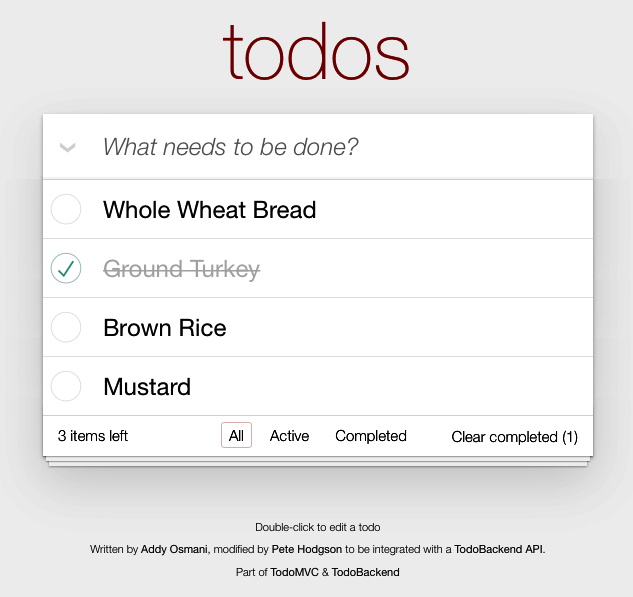
Figure 4-2. The demo application for this chapter
This is what you will do:
Set up the prerequisites.
Create a MySQL Cloud SQL instance.
Connect to Cloud SQL to initialize the schema.
Deploy the demo application to Cloud Run.
While I guide you through the various steps, I’ll illustrate what happens and explain how things work under the hood.
You can run the entire app locally using Docker Compose without a dependency on Google Cloud. Chapter 6 explores Docker Compose in more depth. If you just want to try it out, you can start the app by running docker-compose up in the directory.
Creating the Cloud SQL Instance
The data for the to-do list will persist in MySQL, which is an open source, traditional relational database server that has been used to power web applications for over two decades. Cloud SQL also supports PostgreSQL and SQL Server—you’re not limited to MySQL. As a first step, enable Cloud SQL in your Google Cloud project:
gcloud services enable sqladmin.googleapis.com
gcloud services enable sql-component.googleapis.com
The next step is to create the Cloud SQL instance. A Cloud SQL instance is a virtual machine that runs a database server. The database server can be either one of MySQL, PostgreSQL, or SQL Server, and it manages one or more databases (the actual tables and rows of data).
This create command can take some time (three to five minutes) to complete. Make sure to use the same region where you deploy your Cloud Run services (us-central1 in this example). While you can run your Cloud SQL instance and Cloud Run service in different regions, it will increase query latency and costs:
gcloud sql instances create sql-db \
  --tier db-f1-micro \
  --database-version MYSQL_8_0 \
  --region us-central1
The command creates a MySQL (version 8) instance named sql-db with the smallest machine type (tier) available—db-f1-micro—using MySQL as the database server. While we wouldn’t use this as a production instance, it’s perfect for our sample application.
The machine type (tier) is important: the amount of CPU, RAM, and disk space you provision plays a significant role in the performance of your application. Generally, larger disks have more available input/output operations per second (IOPS); it often makes sense to provision large disks to take advantage of that. Don’t worry too much about picking the right tier and disk size, though. You can resize the instance later and turn on automatic storage increase.
Note
Cloud SQL is not serverless: you’re charged for every minute this instance is active. As of September 2020, a db-f1-micro instance costs around $9 (USD) if left running for a full month in us-central1. Check the pricing for up-to-date information. As soon as you remove the instance, you won’t be charged anymore (to learn how, see “Shutting Down”).
Understanding Cloud SQL Proxy
You can connect to Cloud SQL using a direct connection or through the Cloud SQL Proxy, which I think is the best way to connect. I will explain why it is better later. First, I want to explain how the Cloud SQL Proxy works (Figure 4-3).
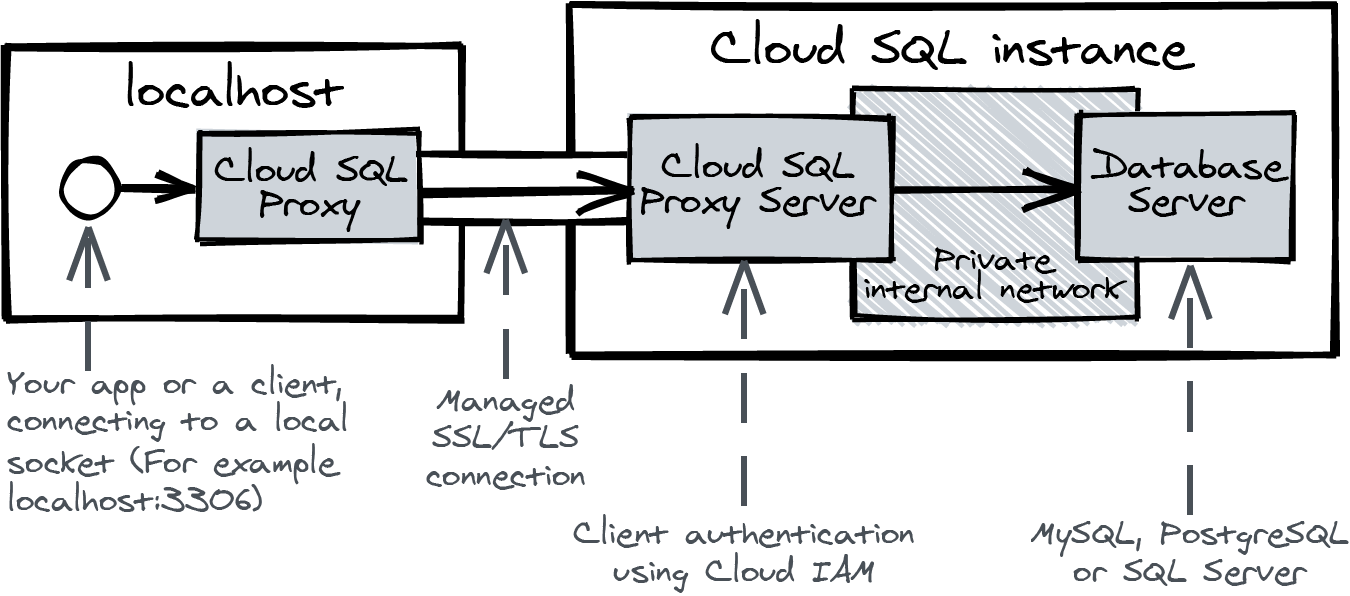
Figure 4-3. Understanding Cloud SQL Proxy
Cloud SQL Proxy is a program you can run on your local machine. It will automatically set up a secure SSL/TLS connection to the Cloud SQL Proxy Server, which runs on the Cloud SQL instance next to the database server.
The Cloud SQL Proxy Server authenticates incoming connections using Cloud IAM. I will dive deeper into Cloud IAM in Chapter 6, but here’s what you need to know to understand this chapter: you use Cloud IAM to bind roles to an identity. A role contains a list of permissions (things you are allowed to do). An identity is your user account, and every Cloud Run service also has an assigned identity, a service account. Service accounts are non-personal (robot) identities on Google Cloud. A Compute Engine virtual machine is also associated with a service account.
One of those roles is “Cloud SQL Client.” If an identity has this role, it can connect to all Cloud SQL database instances in the project. Because you created the Google Cloud project, you have the “Owner” role on the project, which includes the permissions to connect to Cloud SQL instances.
Connecting and Loading the Schema
You’re now going to create the tables the application needs to run. Start with installing the Cloud SQL Proxy on your local machine using gcloud:
gcloud components install cloud_sql_proxy
Using the Cloud SQL Proxy, you can set up a connection to the MySQL database server. You’ll still need the MySQL client to send SQL commands. Mac users can install the client through Homebrew:
brew install mysql-client
If you’re on a different OS, follow the steps in the MySQL documentation to install the MySQL command-line client.
Now you should be able to start the cloud_sql_proxy program and connect using the MySQL client. However, as a convenience, you can have gcloud handle this for you. (Why install the tools and not use them? Because gcloud uses them under the hood.) If you are prompted to enter a password, you can leave the prompt blank and press Enter immediately:
gcloud beta sql connect sql-db --user root
By default, a MySQL Cloud SQL instance will have a root user without a password. I’ll show you to fix this soon—don’t worry. You should be able to log in and get a MySQL prompt. Enter the show databases command to list all databases just to be sure everything works:
mysql> show databases;
+--------------------+
| Database           |
+--------------------+
| information_schema |
| mysql              |
| performance_schema |
| sys                |
+--------------------+
4 rows in set (0.13 sec)
Type exit to close the prompt and log out.
Now that you’ve tested the connection, you can load the database schema to initialize the tables. First, create the database, called todo:
gcloud sql databases create todo --instance sql-db
The schema is in the repository with the source code of the app. Clone the repository and open the directory. Now load the file schema.sql using gcloud (press Enter again at the password prompt):
gcloud beta sql connect sql-db --user root < schema.sql
You’ve now created the tables that the application needs to run. It’s time to make some improvements to the security of the Cloud SQL instance.
Securing the Default User
By default, the MySQL instance has a super user, root, without a password, and any host (%) can connect:
$: gcloud sql users list --instance sql-db
NAME  HOST
root  %
You’re protected by a firewall on the Cloud SQL instance, which stops all incoming traffic by default. However, there still is a MySQL super user without a password that is accessible to any host behind that firewall. I don’t know about you, but this makes me feel uncomfortable. Delete the user with this command:
$: gcloud sql users delete root --host % --instance sql-db
root@% will be deleted. New connections can no longer be made using
this user. Existing connections are not affected.

Do you want to continue (Y/n)?

Deleting Cloud SQL user...done.
Now you can recreate the user on the MySQL database, and they can only log in through the Cloud SQL Proxy:
$: gcloud sql users create root \
  --host "cloudsqlproxy~%" \
  --instance sql-db
Creating Cloud SQL user...done.
Created user [root].
Using the --host flag, I restrict the user to only log in through the network called cloudsqlproxy. This takes advantage of the fact that the MySQL database server and the Cloud SQL Proxy Server share the same private internal network on the Cloud SQL instance, called cloudsqlproxy (as you saw in Figure 4-3).
What this means is that the Cloud SQL Proxy handles authentication for us. If the root user logs in on the MySQL instance, you’re now certain that the login originated from an identity with the Cloud IAM role “Cloud SQL Client.”
Note
The new root user you created has super user privileges. In the example in this chapter, I’ll let the demo application connect using this user; in a production system, you should apply the principle of least privilege and create a separate user without administrative permissions for your application and set a password on the root user.
I’ll now dive a bit deeper into the various options for connecting to Cloud SQL from Cloud Run. When you know how that works, I’ll show you how to deploy the demo application.
Connecting Cloud Run to Cloud SQL
The Cloud SQL Proxy you just used to connect and load the schema is also available on Cloud Run as a built-in and managed service (Figure 4-4). There is another way to connect to Cloud SQL: using a direct connection. I don’t think you should use that, as it requires more orchestration to use securely.
If you deploy or update a Cloud Run service, you can connect it to Cloud SQL using the flag --add-cloudsql-instances. This will add a special file to your container in the directory /cloudsql/.
I know this might sound confusing, but on a UNIX-based system, you can use a file instead of a port to listen for incoming connections. It’s similar to opening a port (such as localhost:3306) and listening for new connections. The file is called a UNIX Domain Socket. I will show you how to use it when you deploy the demo application.
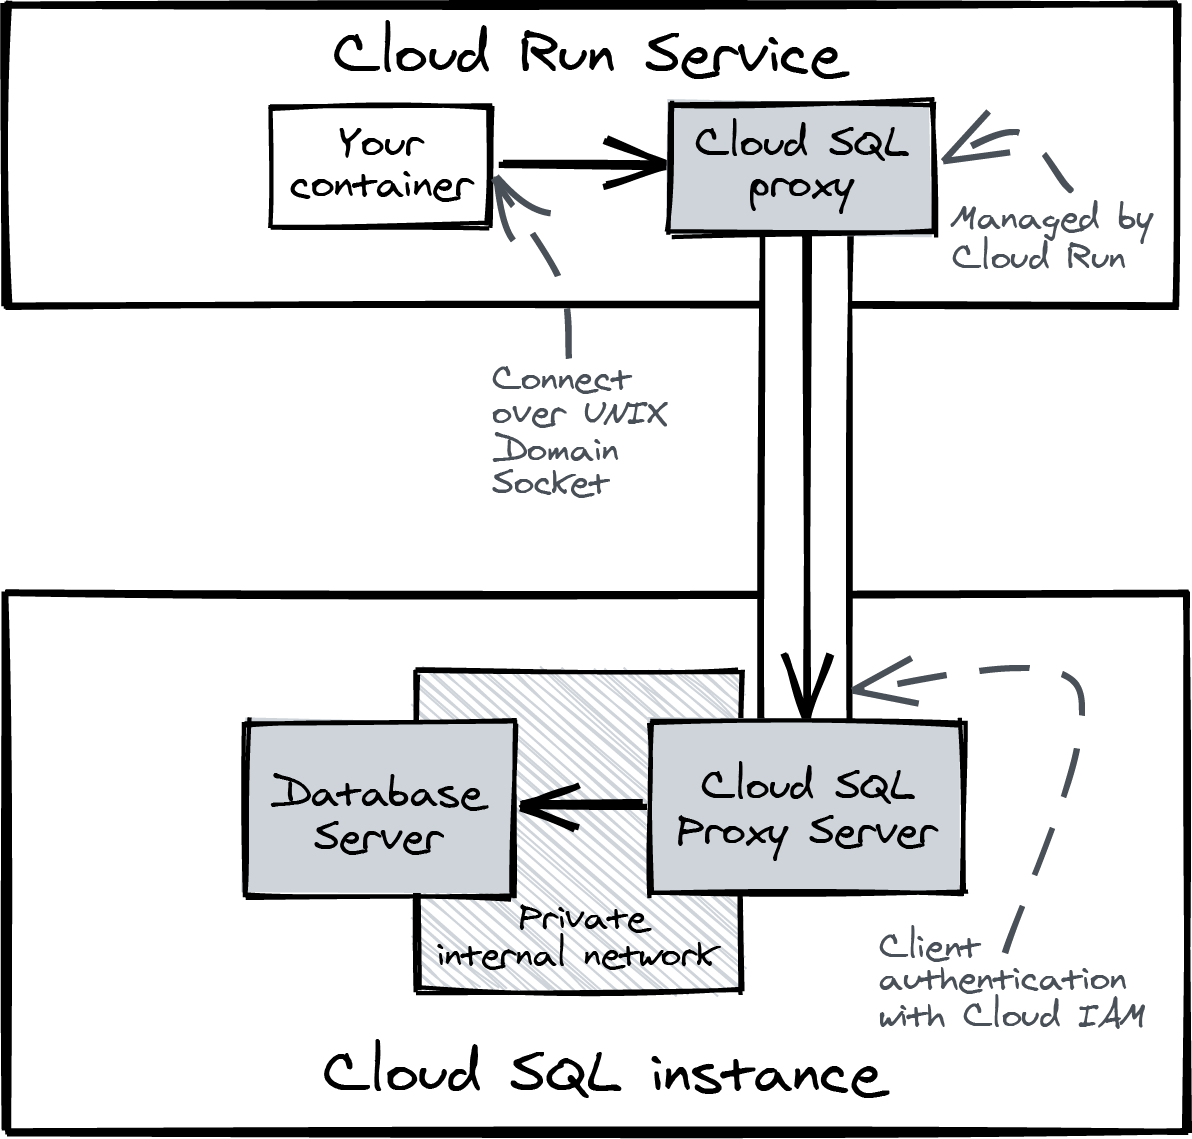
Figure 4-4. Connecting to Cloud SQL using the managed Cloud SQL Proxy
Disabling the Direct Connection
The other way to connect from Cloud Run is through a direct connection (straight to the IP of the Cloud SQL instance). While there are certainly use cases for a direct connection, I don’t recommend using it from Cloud Run.1 The direct connection is not encrypted by default; you can require SSL/TLS, but that means you’ll need to generate client certificates and get them to your Cloud Run container securely. The direct connection will always bypass Cloud IAM, and you’ll need to start managing the firewall rules of your Cloud SQL instance.
I think you’ll agree with me that using the Cloud SQL Proxy is more convenient and secure than using the direct connection. To add another barrier to prevent direct connections, you can require SSL/TLS for those:
gcloud sql instances patch --require-ssl sql-db
With require-ssl set, as long as you don’t generate client certificates, nobody can use a direct connection to log in.
Deploying the Demo Application
With the database in place and the schema loaded, you’re now ready to build the container and deploy the demo application. Build the container and submit it to Artifact Registry using Cloud Build (I’m using the cloud-run-book repository we created in Chapter 3). It can take a while to build the container:
PROJECT=$(gcloud config get-value project)
IMAGE=us-docker.pkg.dev/$PROJECT/cloud-run-book/todo

gcloud builds submit --tag $IMAGE
You can now deploy the container to Cloud Run. Pay attention to REGION. Make sure it matches the region where you deployed the Cloud SQL database instance:
REGION=us-central1
DB_INSTANCE=$PROJECT\:$REGION\:sql-db

gcloud run deploy todo \
  --add-cloudsql-instances $DB_INSTANCE \
  --image $IMAGE \
  --region $REGION \
  --allow-unauthenticated \
  --set-env-vars DB="mysql://root@unix(/cloudsql/$DB_INSTANCE)/todo"
The --add-cloudsql-instances flag instructs Cloud Run to connect to a Cloud SQL instance, identified by its full name, which is formatted like this: (<project>:<region>:<instance>).
The app itself will know how to connect to CloudSQL over the UNIX Domain Socket because you are passing a connection string in the environment variable DB (--set-env-vars DB=...). I’ll talk more about this in the next section, but first, you should check if the demo application works.
As soon as the deploy is successful, you can open the URL of your new service and fill in your to-dos. You can check if they actually show up in the database with this command:
$: gcloud beta sql connect sql-db --user root
Starting Cloud SQL Proxy
[..SNIP..]
mysql> SELECT * FROM todo.todos;
If it does show your to-do items, you’ve successfully created the Cloud SQL database, loaded the schema, and connected the Cloud Run service.
Connection String
The format I use for this connection string is from the Go-MySQL-Driver package. You’ll notice that it includes the path of the domain socket: unix(/cloudsql/<project>:<region>:<instance>). I like to use environment variables to pass connection strings because it makes the app more portable. An example is in the docker-compose.yml file (I’ll explain Docker Compose in more detail in Chapter 6.)
Public and Private IP
You can create a Cloud SQL instance with a public IP and a private IP. The default is to use a public IP—your instances will be accessible from the public internet and protected by the Cloud SQL Proxy server, the built-in firewall, and SSL/TLS with a client certificate (if you require SSL). If you want to improve the security posture of your Cloud SQL instance and potentially improve latency, you can choose to assign only a private IP to your Cloud SQL instance.
A private IP is accessible only from within your Virtual Private Cloud (VPC) network. It provides private networking for resources in your Google Cloud project, such as a Cloud SQL instance, a Memorystore instance (we’ll take a look at that in Chapter 5), Compute Engine virtual machines, and containers on Google Kubernetes Engine.
Since a Cloud Run service is not part of the VPC, you’ll need a VPC Connector to communicate with private IPs (Figure 4-5). A VPC Connector creates a network path between the containers in your Cloud Run service and private IPs in the VPC (including the Cloud SQL private IP). I know this might be a lot to take in right now. In the next chapter, you’ll find a hands-on guide to working with a VPC Connector.
You can connect Cloud Run to Cloud SQL using --add-cloudsql-instances and the UNIX Domain Socket, protected by IAM, regardless of whether you use a private or public IP.
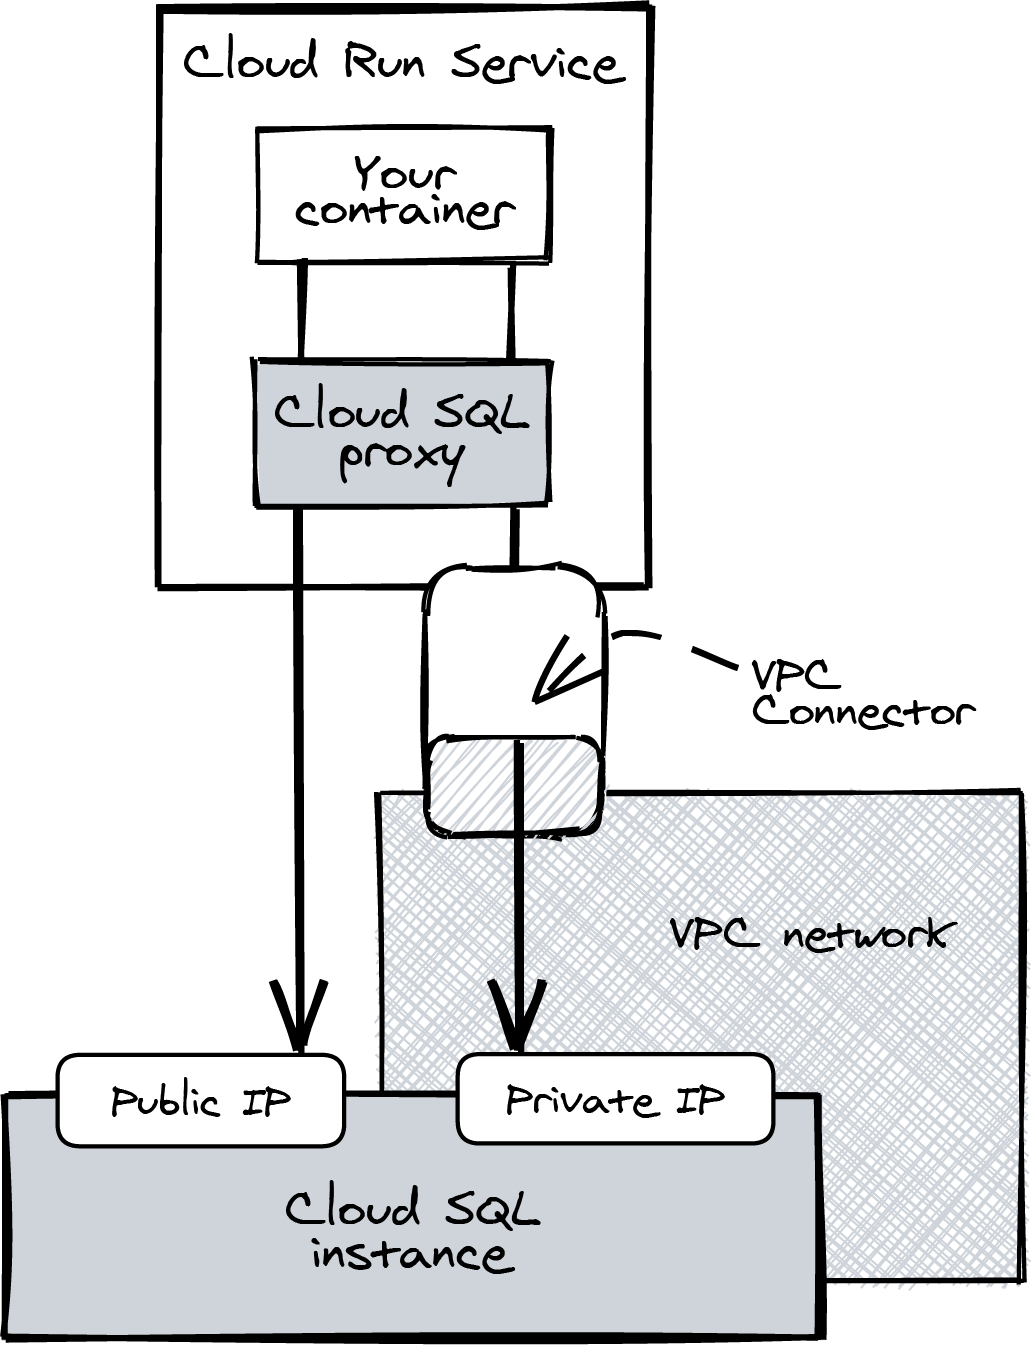
Figure 4-5. Using a VPC Connector to communicate with private IPs
Limiting Concurrency
Cloud Run, with its ability to scale up rapidly, can potentially cause issues with downstream systems that don’t have the capacity to handle a lot of requests at the same time. A traditional relational database server, such as MySQL, PostgreSQL, or SQL Server, is a great example: while even a small database server can easily handle 10,000 transactions per second, it doesn’t do well if the transaction concurrency goes beyond 200.
Transaction concurrency is the number of transactions (queries) that the database server is handling at the same time. When more clients are showing up to use your database at the same time, transaction concurrency goes up. To get good performance from your database server, you’ll want to have low concurrency, rather than high. The optimal transaction concurrency is different for every workload, but a common heuristic is that it is a small multiple of the number of vCPUs of the machine.
Cloud Run can scale up quickly to one thousand instances (or more via quota increase) and overload your relational database. In this section, I’ll explain the mechanics and show how you can manage concurrency.
Transaction Concurrency
Figure 4-6 shows how transaction concurrency and transaction rate relate to each other. Transaction rate is expressed as transactions completed per second (TPS). This is a simplified chart, but the general principles hold for all relational database servers you can use on Cloud SQL.

Figure 4-6. Saturating a relational database with concurrent transactions
The chart shows what happens when you start to increase transaction concurrency by adding more clients. At first, as concurrency increases, transaction rate steadily increases. However, at some point, the transaction rate curve starts to level out toward a maximum as transaction duration starts to increase. At some point, the transaction rate can even begin to decrease when transaction timeouts start to happen and new connections are refused.
It is hard to find an exact number for optimal transaction concurrency. It depends on the database (version), the shape and size of your data, and the queries your application sends. Large transactions with a lot of queries impact your database server in a different way than a lot of small and focused SELECT statements. To make matters worse, all of these factors change over time, as does your application.
Resource Contention
As you saw in Figure 4-6, when concurrency increases, transaction duration starts to climb after a certain point. The reason is resource contention. Resource contention happens when multiple transactions want to use a shared resource at the same time. A shared resource can be data (such as a row, table, or index) or system resources (such as CPU or disk). The system needs to spend additional processing time resolving resource contention, increasing the duration of transactions.
Locks are a common cause of resource contention. If a transaction needs exclusive access to a piece of data, the database engine locks the data. If another transaction needs exclusive access at the same time, it needs to wait.
Scaling Boundaries and Connection Pooling
I’ll show you the various controls you can use to limit concurrency. You’ll have to figure out good settings for your system by experimenting on your production system and monitoring metrics continuously.
There are two ways to limit transaction concurrency using standard settings. Take a look at Figure 4-7.
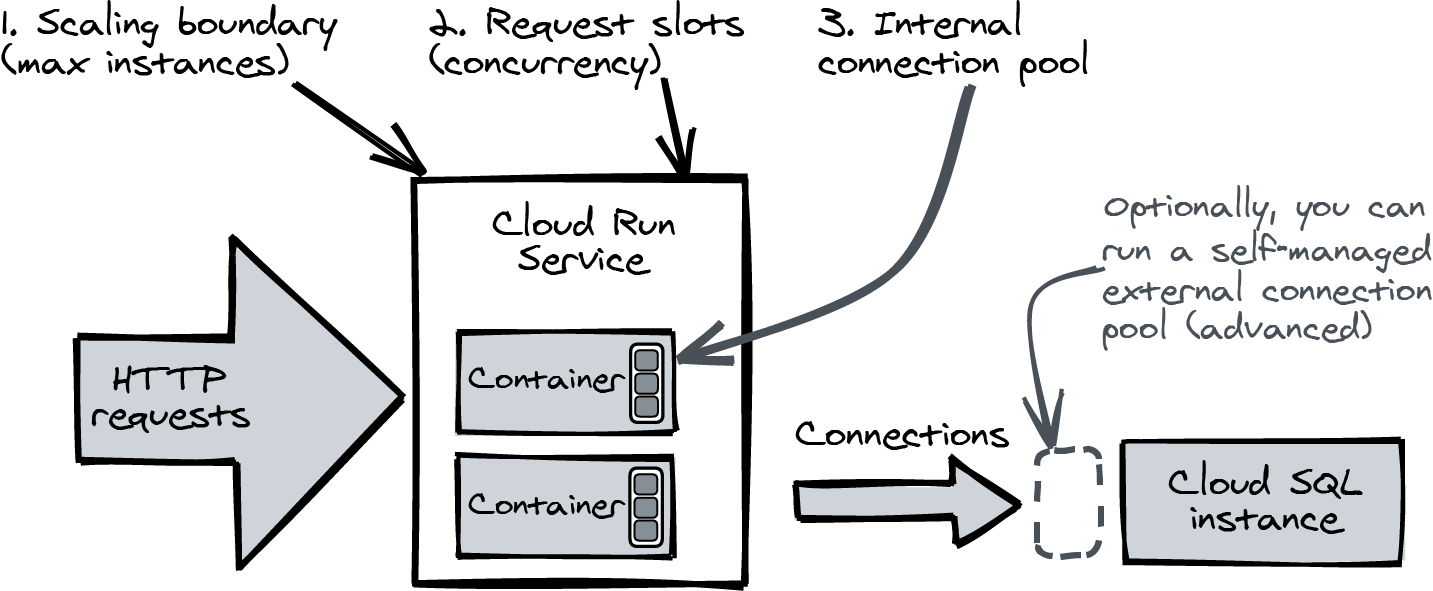
Figure 4-7. Managing transaction concurrency with scaling boundaries and connection pools
The scaling boundary of your Cloud Run service is the first control. It limits the maximum number of containers Cloud Run will add, which in turn limits the amount of HTTP requests that can be handled concurrently by a Cloud Run service.
This gcloud command sets the maximum number of containers to 100 for the service named todo:
gcloud run services update todo \
  --max-instances 100
If all containers are in use, requests are held in the request queue until a request slot frees up on a container. If the load increases further, you might see rejected requests with an HTTP response status 429.
From your application, you can further limit concurrency using an internal connection pool. A connection pool maintains long-running connections to the database server. If your application code wants to send a query, it borrows a connection from the connection pool exclusively and returns the connection when it is done. This way, you can share a connection between multiple request threads. In the demo app, I set the maximum number of open connections like this:
db.SetMaxOpenConns(2)
This setting will limit the total number of active connections to Cloud SQL to max instances × 2. A small connection pool will make sure that there will always be request threads ready to use a connection when it is freed, so in this case, “active connections” equals transaction concurrency.
External Connection Pool
You might run into a situation where you can’t effectively use internal connection pools to limit concurrency. In this case, you can benefit from using an external connection pool, such as PgBouncer, on a Compute Engine virtual machine in front of your PostgreSQL Cloud SQL instance. This is an advanced setup, but I didn’t want to keep the solution from you—you might need it.
An external connection pool runs on a server and accepts connections from your application. It will transparently interleave your transactions on a limited set of existing connections to the downstream database, just like an internal connection pool does.
Chris Tippett has made available a very well-documented GitHub repository that shows you how that’s done (for PostgreSQL). You’ll need to understand Terraform first to make sense of the repository (see Chapter 8).
A Real-World Example
To put all of this in perspective with some real-world numbers, I want to share a real-world example. One of our clients is www.yoursurprise.eu, which manufactures and sells personalized gifts, such as custom-printed mugs, T-shirts, and photo albums and champagne glasses with custom engravings. They ship products all over Europe (their site is localized in 18 languages).
I helped them move to Google Cloud when they were leaving their on-premises datacenter. The gifts business experiences strong seasonality. Around Mother’s Day, a lot of heart-shaped gifts with custom photo prints leave YourSurprise’s production facilities. The holiday season is another period of peak demand. In December 2019 that meant that during peak time, they completed around 10,000 MySQL transactions per second. They run MySQL on the db-n1-standard-16 tier, a Cloud SQL machine with 16 vCPUs. Their optimal transaction concurrency turns out to be around 110, which is a small multiple of the number of vCPUs of the Cloud SQL instance.
Cloud SQL in Production
Cloud SQL is a managed product, and you get production-ready features from it. The following sections explore some of the highlights.
Monitoring
Using a managed product such as Cloud SQL does not free you from all operational tasks. You’ll need to monitor the instances. You can use Cloud Monitoring to set up alerts on CPU usage. If you see a sustained increase above a certain level, you might need to move to a bigger instance tier.
High Availability
When you enable high availability, Cloud SQL will create two instances in different zones within the same region. When the primary instance becomes unresponsive, the secondary takes over. This failover process can take some time, but it’s faster than a reboot of the entire server.
For this demo application, a single zone deployment was fine (it’s the default), but in a production environment, you should enable high availability.
Making Your Application Resilient Against Short Downtime
There is one important caveat: even in a high-availability setup, your application should be designed to be resilient to short downtimes of around a minute. This can happen during a failover or during maintenance. I am mentioning this because it is easy to assume that downtime will not happen in a high-availability setup.
Using a managed product like Cloud SQL does not free you from operational tasks. If you do only one thing, make sure to enable automated backups.
Shutting Down
The Cloud SQL database you created in this chapter is always on. If you forget to stop it, you will be charged.
With gcloud sql instances list, you can list your Cloud SQL instances that are active right now. It should list just the one you created in this chapter: sql-db. Remove the Cloud SQL instance:
gcloud sql instances delete sql-db
You also created another Cloud Run service. You can keep it around—as long as you don’t send requests to it, you won’t be charged.
Summary
In this chapter, you deployed a Cloud SQL instance and connected that to a Cloud Run service. You learned about the Cloud SQL Proxy: how you can use it from your local machine and that it’s built in to Cloud Run.
The Cloud SQL Proxy automatically encrypts your connection and performs client authentication using Cloud IAM. It’s convenient that you don’t need to manage the certificates yourself.
You also learned that limiting concurrency is key to managing the performance of your downstream systems. You discovered what control mechanisms you can use in the Cloud Run service and your application to prevent your Cloud SQL instance from overloading when your service suddenly handles a traffic burst.
In the next chapter, I will show you how to deal with HTTP sessions—another important aspect of web applications. Because Cloud Run uses disposable containers, you need to store session data in a database (or, alternatively, on the client). One way to persist sessions on Google Cloud is with Memorystore, a managed Redis database. I’ll show you how to connect Memorystore to your Cloud Run service using a VPC Connector.
1 Even when you’re using a private IP, it’s not recommended to use unencrypted connections.
Get Building Serverless Applications with Google Cloud Run now with the O’Reilly learning platform.
O’Reilly members experience books, live events, courses curated by job role, and more from O’Reilly and nearly 200 top publishers.

