Chapter 4. Persisting Data
Almost every application needs to persist data in some form, and cloud applications are no exception. The data could be in one of the following forms:
-
Binary or text files, such as images, videos, music, Apache Avro, CSV, or JSON formats
-
Structured or semi-structured data stored in relational or NoSQL databases
In Chapter 3, we talked about Azure Storage, which can store unstructured data such as blob files (text, binary, etc.). In this chapter, we will talk about databases offered by Azure to persist relational and NoSQL data.
The first option is to go with IaaS database offerings. You can provision an Azure VM and install any database engine that you like, including Microsoft SQL Server, MySQL, or even MongoDB. This option gives you great flexibility because you own the underlying virtual machine; however, it requires a lot of administrative overhead. You are responsible for maintaining, securing, and patching the VM operating system and the database engine.
A second (and better) option, and the one we’ll focus on in this chapter, is to go with the Azure managed databases. These are PaaS (platform as a service) offerings, also called managed databases, which allow you to provision a ready-to-use database in minutes. Azure takes care of the underlying VM OS patching and security and many other administrative tasks such as scaling.
Azure SQL, Azure Cosmos DB, and Azure Database for PostgreSQL are a few Azure PaaS databases available to you. Having native integration with other Azure services such as Azure Virtual Networks, Azure Key Vault, and Azure Monitor enables you to easily integrate these databases with your Azure solutions.
This chapter’s focus is on the two main managed Azure databases: Azure Cosmos DB and Azure SQL. Topics you will learn about include:
-
Enabling customer-managed keys for Cosmos DB encryption at rest
-
Working with Azure Cosmos DB and Azure SQL firewalls
-
Granting Cosmos DB access to other Azure services using managed identities and RBAC
-
Configuring auto-scaling for Azure Cosmos DB
Tip
Azure continuously improves both Azure Cosmos DB and Azure SQL services. Keep an eye on the Azure updates page for the latest and greatest features.
Workstation Configuration
You will need to prepare your workstation before starting on the recipes in this chapter. Follow “What You Will Need” to set up your machine to run Azure CLI commands. You can clone the book’s GitHub repository using the following command:
git clone https://github.com/zaalion/AzureCookbook.git
Creating a Cosmos DB NoSQL API Account
Solution
Create a new Azure Cosmos DB NoSQL API account, create a database, and store your JSON data in the containers within the database, as shown in Figure 4-1.
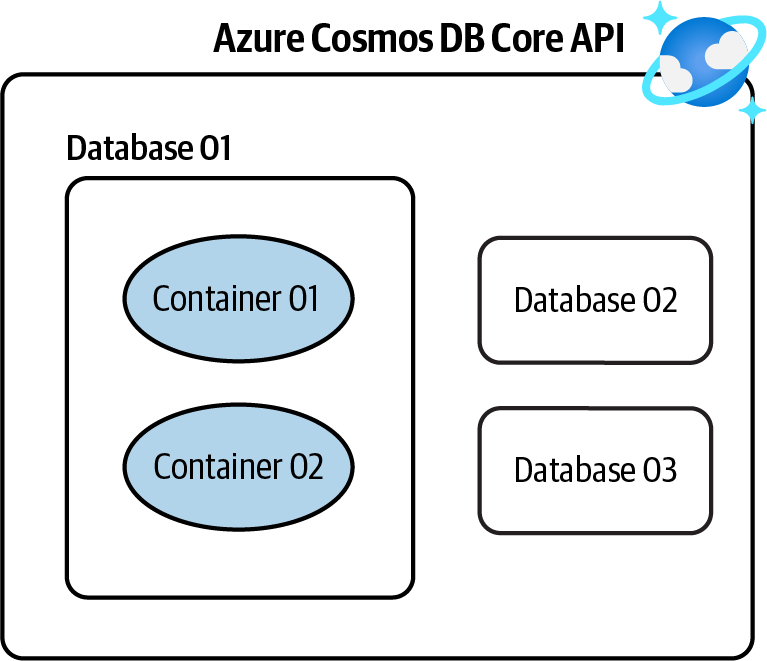
Figure 4-1. Storing NoSQL data in an Azure Cosmos DB NoSQL API account
Steps
-
Log in to your Azure subscription in the Owner role and create a new resource group for this recipe. See “General Workstation Setup Instructions” for details.
-
Create a new Azure Cosmos DB NoSQL API account. Replace <
cosmos-account-name> with the desired Cosmos DB account name. This script also configures periodic backups to be created every 240 minutes (4 hours) and to be kept for 12 hours:cosmosAccountName="<cosmos-account-name>" az cosmosdb create \ --name $cosmosAccountName \ --resource-group $rgName \ --backup-policy-type Periodic \ --backup-interval 240 \ --backup-retention 12
-
Next, you need to create a database to host your data. You can assign a fixed throughput (RU/s) to your database and/or assign desired throughput at the container (collection) level later. See the Azure documentation for details. Use this command to create a database named
MyCompanyDBin your Cosmos DB account:az cosmosdb sql database create \ --account-name $cosmosAccountName \ --name MyCompanyDB \ --throughput 1000 \ --resource-group $rgName
Note
Assigning a fixed (provisioned) throughput to a database is not mandatory. You have the option to assign throughput to child containers later. Cosmos DB also offers the autoscale and serverless deployments, which adjust resources based on the traffic and load. See the Cosmos DB documentation for more details.
-
Now the stage is set for you to create your first container (collection) in your database. Think of a container as a table in a relational database. Each container should have a partition key, which helps with distributing container documents over logical partitions for better performance. Use the following command to create a new collection named
Peoplewith the fixed throughput of 400 RU/s (request units):MSYS_NO_PATHCONV=1 az cosmosdb sql container create \ --name People \ --partition-key-path "/id" \ --throughput 400 \ --database-name MyCompanyDB \ --account-name $cosmosAccountName \ --resource-group $rgName
Tip
Put MSYS_NO_PATHCONV=1 before the Bash command so that /id is not converted in a Linux path.
-
Run the following command to delete the resources you created in this recipe:
az group delete --name $rgName
In this recipe, you created an Azure Cosmos DB NoSQL API account and a database with a container in it. Now you can persist your NoSQL documents in this database.
Discussion
Azure Cosmos DB is Microsoft’s primary NoSQL database offering in the cloud. Cosmos DB is a globally distributed, secure, multi-model database. At the time of writing this book, Cosmos DB offers the following APIs (models):
- SQL (Core) API
- Gremlin (Graph) API
-
We recommend this API if you need to persist the graph data structure in your database. For instance, you may want to do this for a social media application.
- API for MongoDB
-
Use this API if you are migrating data from MongoDB to Azure Cosmos DB and would like no, or minimal, changes to your application code.
- Cassandra API
-
Use this API if you are migrating from Cassandra to Azure Cosmos DB and would like your application to work with Cosmos DB without code changes.
- Table API
-
A premium alternative for Azure Table storage users. Migrate your data to Azure Cosmos DB Table API, and your code will work without any required changes.
Check the Azure Cosmos DB SQL (Core) API documentation for details.
In this recipe, we created a SQL (Core) API. This API stores data in JSON document format. You have full control over the interface, service, and the SDK client libraries.
Cosmos DB offers the following capabilities as well:
-
Global distribution and multi-region writes so data can be served to clients all over the globe with great performance
-
Adjustable consistency level for different consistency and performance requirements
-
Zone redundancy for better protection against zonal failures
-
Security features such as encryption at rest, encryption in transit, an easy-to-configure firewall, and support for Azure Active Directory authentication
In this chapter, we will go over several Cosmos DB features and capabilities.
Creating a Cosmos DB Apache Gremlin (Graph) API Account
Solution
Create a new Azure Cosmos DB Gremlin API account, create a database, and use it to store your graph objects. See Figure 4-2.
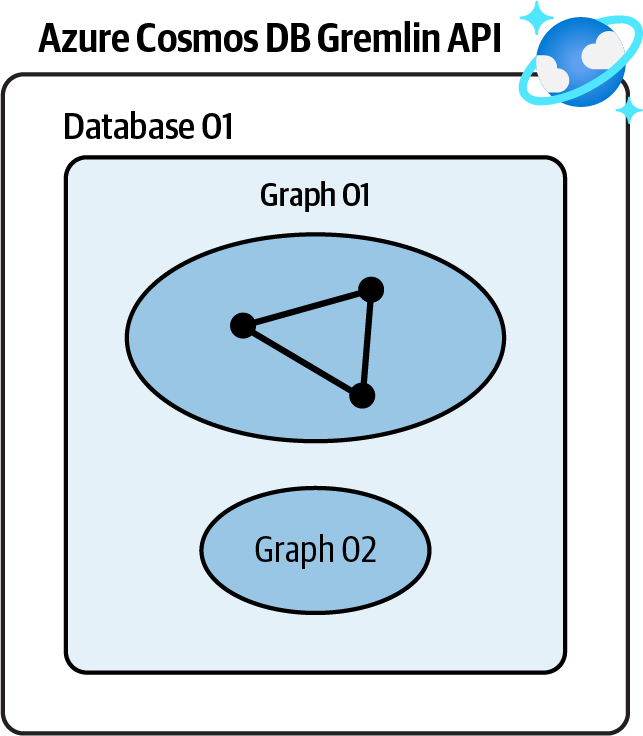
Figure 4-2. Storing graph data in an Azure Cosmos DB Gremlin API account
Steps
-
Log in to your Azure subscription in the Owner role and create a new resource group for this recipe. See “General Workstation Setup Instructions” for details.
-
Create a new Azure Cosmos DB Gremlin API account. Replace <
cosmos-account-name> with the desired Cosmos DB account name:cosmosAccountName="<cosmos-account-name>" az cosmosdb create \ --name $cosmosAccountName \ --resource-group $rgName \ --capabilities EnableGremlin
-
Use this command to create a database named
MyGraphDBin your Cosmos DB account:az cosmosdb gremlin database create \ --account-name $cosmosAccountName \ --resource-group $rgName \ --name MyGraphDB
-
Now you can create one or more graphs in
MyGraphDB. As with containers, each graph should have a partition key, which helps with distributing graph data over logical partitions for better performance. Use the following command to create a new graph namedPeople:MSYS_NO_PATHCONV=1 az cosmosdb gremlin graph create \ --resource-group $rgName \ --account-name $cosmosAccountName \ --database-name MyGraphDB \ --name People \ --partition-key-path "/age"
Tip
Put MSYS_NO_PATHCONV=1 before the Bash command so that /id is not converted to a Linux path.
-
Run the following command to delete the resources you created in this recipe:
az group delete --name $rgName
You successfully created an Azure Cosmos DB Gremlin API account and a database with a graph in it.
Discussion
Graph databases are NoSQL data stores, which are optimized to persist the graph data structure and query it. Azure Cosmos DB Gremlin API is Microsoft’s primary graph database offering in the cloud. It offers high availability, flexible consistency levels, global distribution, and SDKs for many frameworks and languages.
Graph databases are ideal for the following scenarios:
- Internet of Things
- Social networks
-
Model the relationship between people, places, and other entities
- Recommendation engines in the retail industry
- Geospatial
-
Find optimized routes in location-enabled applications and products
Check the Azure Cosmos DB Gremlin documentation for more details.
Configuring Azure Cosmos DB Firewall
Solution
Configure the Azure Cosmos DB service firewall to allow access by trusted IP addresses, virtual networks, and private endpoints, while denying all other traffic (see Figure 4-3).
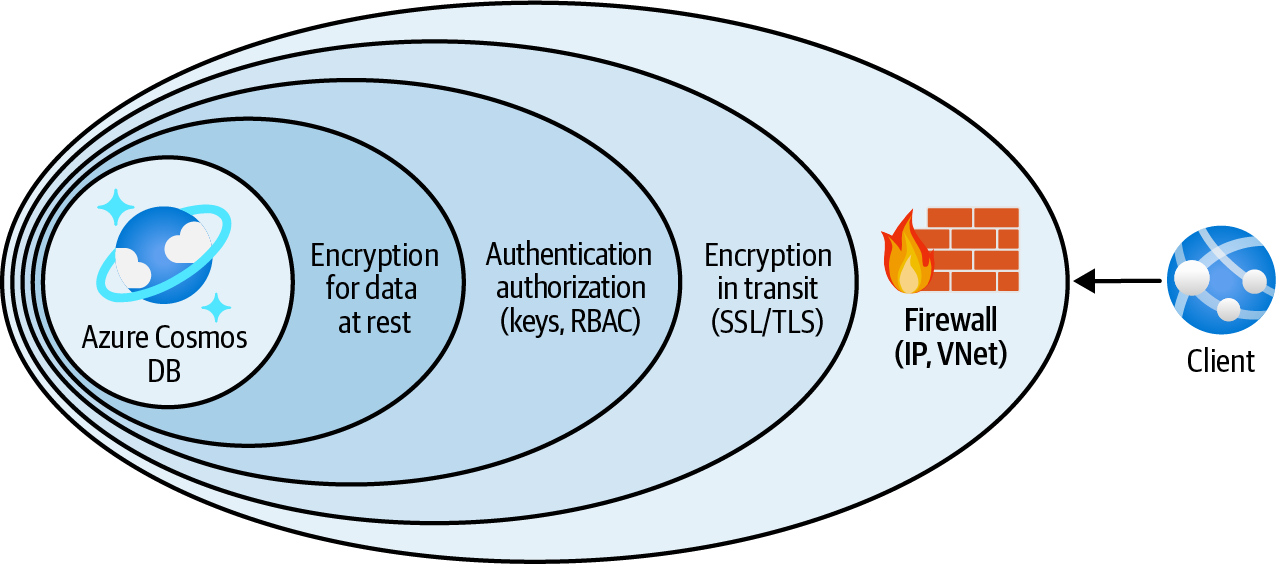
Figure 4-3. Protecting Azure Cosmos DB using the service firewall
Steps
-
Log in to your Azure subscription in the Owner role and create a new resource group for this recipe. See “General Workstation Setup Instructions” for details.
-
Create a new Azure Cosmos DB account. The service firewall is available for all Cosmos DB APIs. In this recipe, let’s go with the SQL (Core) API. Replace <
cosmos-account-name> with the desired Cosmos DB account name:cosmosAccountName="<cosmos-account-name>" az cosmosdb create \ --name $cosmosAccountName \ --resource-group $rgName
-
First, let’s add a new IP filter rule. After adding this rule, clients will be rejected unless their IP address is present in the rule. Replace <
allowed-ip-range> with an IP range, comma-separated list of IPs, or a single IP address:allowedIPRange="<allowed-ip-range>" az cosmosdb update \ --resource-group $rgName \ --name $cosmosAccountName \ --ip-range-filter $allowedIPRange
Note
Updating Azure Cosmos DB can take a few minutes. Please wait until the command completes.
-
You can also create Cosmos DB network rules to allow traffic from select Azure VNets. First, use the following command to create a new Azure VNet. Replace <
vnet-name> with your desired network name:vnetName="<vnet-name>" az network vnet create \ --resource-group $rgName \ --name $vnetName \ --address-prefix 10.0.0.0/16 \ --subnet-name Subnet01 \ --subnet-prefix 10.0.0.0/26
-
Your goal is to enable clients in the specified subnet to see and use Azure Cosmos DB. To achieve this, you need to start by adding the
Microsoft.AzureCosmosDBservice endpoint to the subnet:az network vnet subnet update \ --resource-group $rgName \ --name Subnet01 \ --vnet-name $vnetName \ --service-endpoints Microsoft.AzureCosmosDB
-
Then enable Azure VNet filtering for your Cosmos DB account:
az cosmosdb update \ --resource-group $rgName \ --name $cosmosAccountName \ --enable-virtual-network true
-
At this point, your Cosmos DB account only accepts traffic from the IPs specified with
$allowedIPRange. Now the stage is set for you to allow traffic originating fromSubnet01:az cosmosdb network-rule add \ --resource-group $rgName \ --virtual-network $vnetName \ --subnet Subnet01 \ --name $cosmosAccountName
Tip
This command might take a few minutes to complete. If you get the message “VirtualNetworkRules should be specified only if IsVirtualNetworkFilterEnabled is True,” make sure the previous step completed successfully.
-
Use the following command to confirm the Cosmos DB network rule was created:
az cosmosdb network-rule list \ --name $cosmosAccountName \ --resource-group $rgName
-
Run the following command to delete the resources you created in this recipe:
az group delete --name $rgName
You successfully configured the Azure Cosmos DB firewall to allow client traffic only from your desired IP addresses and Azure VNets.
Discussion
Many Azure services provide service-level firewalls that provide defense in depth to protect your data. Azure SQL, Azure Storage, and Azure Cosmos DB are among these services.
It is a good security practice to always configure service-level firewalls on top of other security safeguards (such as Azure Active Directory authentication). This ensures no unauthorized user from the internet or other networks can access your Azure Cosmos DB data.
Azure Cosmos DB firewall enables you to configure the following restrictions individually or combined:
-
Allow traffic based on the client IP address using IP rules
-
Allow traffic based on the client virtual network
-
Allow private traffic via Azure private endpoints
Use IP rules for clients that have static IP addresses, such as public virtual machines, or when you need to access Cosmos DB from your own local machine. Use virtual network rules to allow services such as Azure virtual machines or App Service Environments, which are deployed to an Azure VNet subnet.
Configuring Azure Cosmos DB Private Access
Solution
Create a private endpoint for your Azure Cosmos DB account and then disable public network access for Azure Cosmos DB, as shown in Figure 4-4.
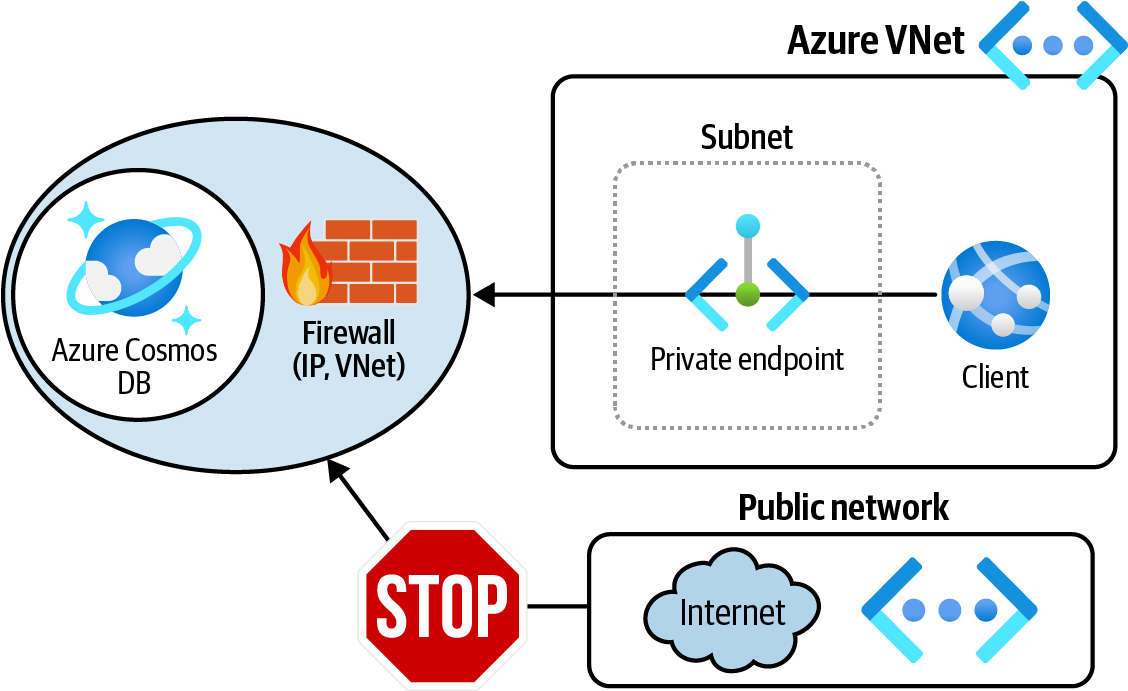
Figure 4-4. Allowing only private traffic to Azure Cosmos DB using private endpoints
Steps
-
Log in to your Azure subscription in the Owner role and create a new resource group for this recipe. See “General Workstation Setup Instructions” for details.
-
Create a new Azure Cosmos DB account. The service firewall is available for all Cosmos DB APIs. In this recipe, let’s go with the SQL (Core) API. Replace <
cosmos-account-name> with the desired Cosmos DB account name:cosmosAccountName="<cosmos-account-name>" az cosmosdb create \ --name $cosmosAccountName \ --resource-group $rgName
-
Use the following command to create a new Azure VNet. Replace <
vnet-name> with your desired network name:vnetName="<vnet-name>" az network vnet create \ --resource-group $rgName \ --name $vnetName \ --address-prefix 10.0.0.0/20 \ --subnet-name PLSubnet \ --subnet-prefix 10.0.0.0/26
-
Now, grab the Cosmos DB account ID and store it in a variable. You will use the variable in the next step:
cosmosAccountId=$(az cosmosdb show \ --name $cosmosAccountName \ --resource-group $rgName \ --query id --output tsv)
-
Now you are ready to create a private endpoint for your Cosmos DB account:
MSYS_NO_PATHCONV=1 az network private-endpoint create \ --name MyCosmosPrivateEndpoint \ --resource-group $rgName \ --vnet-name $vnetName \ --subnet PLSubnet \ --connection-name MyEndpointConnection \ --private-connection-resource-id $cosmosAccountId \ --group-id Sql
-
Your clients can use the new private endpoint in the PLSubnet subnet to communicate with your Cosmos DB account, but this does not prevent public network access. Use the following command to explicitly disable public network access for your Cosmos DB account:
az cosmosdb update \ --resource-group $rgName \ --name $cosmosAccountName \ --enable-public-network false
-
Run the following command to delete the resources you created in this recipe:
az group delete --name $rgName
In this recipe, you configured the Azure Cosmos DB firewall to allow client traffic only from a private endpoint.
Discussion
In “Configuring Azure Cosmos DB Firewall” we discussed Azure Cosmos DB network access options. We talked about restricting traffic by IP address or the client Azure VNet. Both of these options still allow traffic to go over the public network, which might not be desirable for many organizations.
In this recipe, you configured Azure Cosmos DB to disable public network access and only accept network traffic from a private endpoint. This is by far the most secure option from a networking point of view. Take a look at the Azure Cosmos DB documentation for more details.
Microsoft defines a private endpoint as “a network interface that uses a private IP address from your virtual network.” This network interface connects you privately to a service that is powered by Azure Private Link. The private endpoint network traffic does not go over the public internet; rather, it uses only Azure’s private network infrastructure. You can use private endpoints to connect to many services including:
-
Azure Storage
-
Azure Cosmos DB
-
Azure SQL Database
-
Azure App Services
-
Azure Function Apps
Granting Function Apps Access to Cosmos DB Using RBAC
Solution
Create a custom Cosmos DB role definition with the desired permissions (actions) and assign it to the Function App identity for the Cosmos DB account scope as illustrated in Figure 4-5.
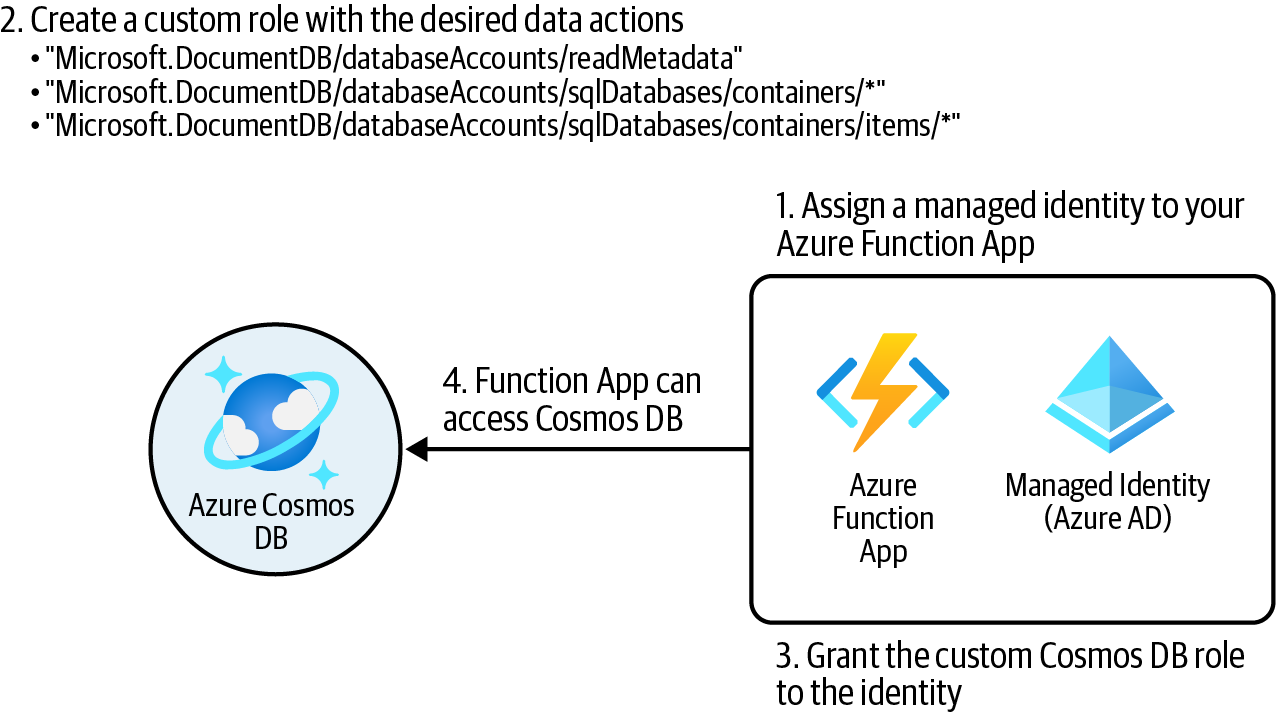
Figure 4-5. Granting Cosmos DB data access to Azure Function App
Steps
-
Log in to your Azure subscription in the Owner role and create a new resource group for this recipe. See “General Workstation Setup Instructions” for details.
-
Use the following CLI command to create a new Azure Cosmos DB account:
cosmosAccountName="<cosmos-account-name>"

az cosmosdb create \
  --name $cosmosAccountName \
  --resource-group $rgName
-
Use the following command to create a new Azure Function App and assign a system-assigned managed identity to it:
funcStorageAccount="<func-storage-account-name>" planName="<appservice-plan-name>" funcAppName="<function-app-name>" az storage account create \ --name $funcStorageAccount \ --resource-group $rgName \ --location $region \ --sku Standard_LRS az appservice plan create \ --resource-group $rgName \ --name $planName \ --sku S1 \ --location $region az functionapp create \ --resource-group $rgName \ --name $funcAppName \ --storage-account $funcStorageAccount \ --assign-identity [system] \ --functions-version 3 \ --plan $planName -
Use the following command to obtain the Function App managed identity ID (GUID) and the Cosmos DB account resource ID. You will need these later:
cosmosAccountId=$(az cosmosdb show \ --name $cosmosAccountName \ --resource-group $rgName \ --query id \ --output tsv) funcObjectId=$(az functionapp show \ --name $funcAppName \ --resource-group $rgName \ --query identity.principalId \ --output tsv) -
You need to create a custom RBAC role with the desired Cosmos DB permissions. First, create a JSON file with the following content and name it MyCosmosDBReadWriteRole.json:
{ "RoleName": "MyCosmosDBReadWriteRole", "Type": "CustomRole", "AssignableScopes": ["/"], "Permissions": [ { "DataActions": [ "Microsoft.DocumentDB/databaseAccounts/readMetadata", "Microsoft.DocumentDB/databaseAccounts/sqlDatabases /containers/*", "Microsoft.DocumentDB/databaseAccounts/sqlDatabases /containers/items/*" ] } ] } -
Next, you will create the Cosmos DB role definition. Replace <
path-to-MyCosmosDBReadWriteRole.json> with the Linux-style path to your JSON file, for example C:/Data/MyCosmosDBReadWriteRole.json:az cosmosdb sql role definition create \ --account-name $cosmosAccountName \ --resource-group $rgName \ --body <path-to-MyCosmosDBReadWriteRole.json>
-
Now you can assign the new MyCosmosDBReadWriteRole custom role to your Function App:
MSYS_NO_PATHCONV=1 az cosmosdb sql role assignment create \ --account-name $cosmosAccountName \ --resource-group $rgName \ --role-definition-name MyCosmosDBReadWriteRole \ --principal-id $funcObjectId \ --scope "/dbs"
Tip
You can narrow down the scope to a single database or even a container in the Cosmos DB account, such as /dbs/mydb/colls/mycontainer. In our case, /dbs, you are assigning the role to all the databases within your Cosmos DB account.
-
Use the following commands to get the role definition ID and pass it to
azcosmosdbsql roledefinition show` to confirm that your role is successfully assigned:# Assuming there is only one role assignment in this Cosmos DB account roleDefinitionId=$(az cosmosdb sql role assignment list \ --account-name $cosmosAccountName \ --resource-group $rgName \ --query [0].roleDefinitionId --output tsv) # The last 36 characters will be the role definition ID (GUID) roleDefinitionGUID=${roleDefinitionId: -36} az cosmosdb sql role definition show \ --account-name $cosmosAccountName \ --resource-group $rgName \ --id $roleDefinitionGUID
Note
At the time of writing this book, you are not able to see Cosmos DB custom role assignments in the Azure portal!
-
Run the following command to delete the resources you created in this recipe:
az group delete --name $rgName
You successfully granted Azure Cosmos DB access to a Function App without sharing any Cosmos DB keys. Any code deployed to your Function App can have read/write access to Cosmos DB without providing Cosmos DB account keys.
Discussion
Similar to Azure Storage, Azure Cosmos DB supports Azure Active Directory (Azure AD) authentication through RBAC. This enables you to grant Cosmos DB access to security principals, such as Function app managed identities or Application Registrations, without exposing Cosmos DB account keys. This is a recommended security practice.
Azure Cosmos DB supports RBAC access to the following planes:
- Management plane
-
This is so that the assignee can manage the Azure Cosmos DB account—for example, configuring backup and restore. The assignee does not have access to the data stored in the database. Azure Cosmos DB provides built-in roles to work with the management plane. If necessary, you have the option to create your own custom roles.
- Data plane
-
This is so that the assignee can access the data in the database. In this recipe, you created a custom data plane RBAC role and assigned it to a security principal (Azure Function identity). At the time of writing this book, there are two built-in RBAC roles available for data access, Cosmos DB Built-in Data Reader and Cosmos DB Built-in Data Contributor, in addition to the option of creating custom roles.
We recommend exploring the built-in Cosmos DB RBAC roles for management and data planes before creating your own custom role. You can create custom roles if:
-
There is no built-in role for the access you need to grant
-
The built-in roles give too much access
Although the Cosmos DB Built-in Data Contributor role grants the necessary permissions for our Function App, we decided to create a custom RBAC role for the purpose of learning in this recipe.
Storing Tabular Data in Azure Storage Tables
Solution
Create a general-purpose v2 storage account and store your tabular NoSQL data in Azure storage tables as shown in Figure 4-6.
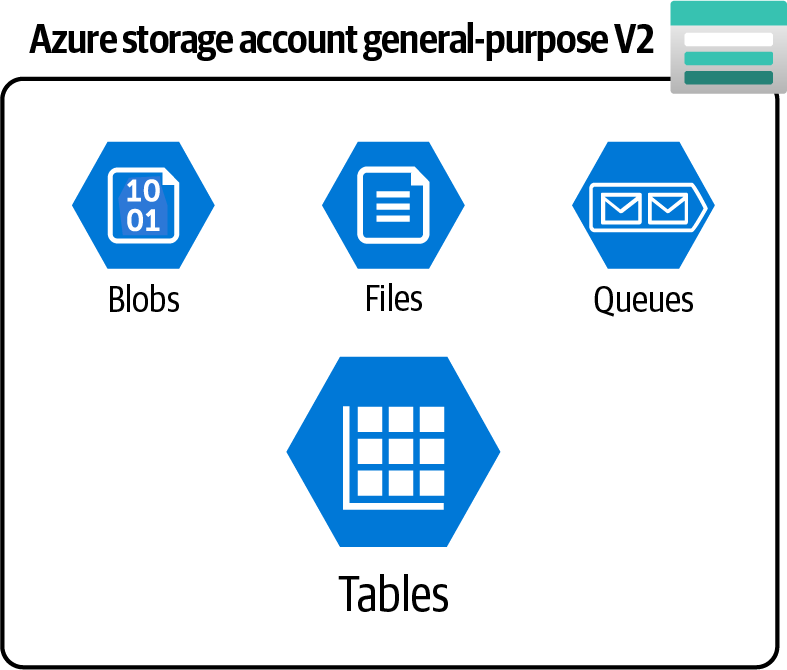
Figure 4-6. Azure storage account general-purpose v2 offers table service
Steps
-
Log in to your Azure subscription in the Owner role and create a new resource group for this recipe. See “General Workstation Setup Instructions” for details.
-
Create a new Azure storage account using this command. This will be the source of our migration. Replace <
storage-account-name> with the desired globally unique name:storageName="<storage-account-name>" az storage account create \ --name $storageName \ --resource-group $rgName \ --location $region \ --sku Standard_LRS
-
Save one of the storage account keys in a variable:
storageKey1=$(az storage account keys list \ --resource-group $rgName \ --account-name $storageName \ --query [0].value \ --output tsv) -
Now, create a table in your storage account, name it
People, and seed it with two data rows:# creating a table az storage table create \ --account-name $storageName \ --account-key $storageKey1 \ --name People # inserting a new row az storage entity insert \ --account-name $storageName \ --account-key $storageKey1 \ --table-name People \ --entity PartitionKey=Canada RowKey=reza@contoso.com Name=Reza # inserting another new row az storage entity insert \ --account-name $storageName \ --account-key $storageKey1 \ --table-name People \ --entity PartitionKey=U.S.A. RowKey=john@contoso.com Name=John Last=Smith
Note
Each data row in an Azure storage table should have both PartitionKey and RowKey properties. Rows with the same PartitionKey will be placed into the same partition for better load balancing. The RowKey should be unique within each partition. Check the Azure Table service data model documentation for more details. Make sure you choose the right entities to avoid hot or cold partitions. In this recipe, we chose the country name as the PartitionKey and email address as the RowKey.
-
Use the following command to confirm the two rows were inserted as expected:
az storage entity query \ --table-name People \ --account-name $storageName \ --account-key $storageKey1
-
Run the following command to delete the resources you created in this recipe:
az group delete --name $rgName
In this recipe you stored tabular data in Azure storage tables. You can use Azure Storage SDKs, REST APIs, and Azure Storage Explorer to manage your tables and manipulate the data.
Discussion
At the time of writing this book, Microsoft Azure offers two main managed services to store tabular NoSQL data: Azure Cosmos DB for Table API and Azure Table storage. While Cosmos DB offers premium performance, latency, and SLA (service level agreements), Azure Table is a more affordable option for many projects.
Check the Azure documentation for a detailed list of differences between these two table offerings. You can also find Microsoft Azure’s introduction on table storage offerings in the Azure documentation.
You have a few options to migrate your data from Azure Table storage to Azure Cosmos DB to benefit from global distribution, SLA, and the performance Cosmos DB offers. Depending on the size and nature of your data migration, you can use the Cosmos DB Data Migration Tool, Azure Data Factory, or even custom migrations. See the Azure Cosmos DB documentation for details.
Configuring Autoscale for an Azure Cosmos DB NoSQL API Container
Solution
Configure autoscale on the Cosmos DB collection (container) and specify the maximum allowed RU/s.
Steps
-
Log in to your Azure subscription in the Owner role and create a new resource group for this recipe. See “General Workstation Setup Instructions” for details.
-
Use the following command to create a new Azure Cosmos DB NoSQL API account:
cosmosAccountName="<cosmos-account-name>" az cosmosdb create \ --name $cosmosAccountName \ --resource-group $rgName
-
Now, create a new database in your Cosmos DB account. We are not adding any throughput at the database level:
az cosmosdb sql database create \ --account-name $cosmosAccountName \ --resource-group $rgName \ --name db01
-
Next, use this command to create a new collection (container) in this database and name it
People. We are creating this container with a fixed provisioned throughput. This means the container will always have 1000 RU/s to use:MSYS_NO_PATHCONV=1 az cosmosdb sql container create \ --resource-group $rgName \ --account-name $cosmosAccountName \ --database-name db01 \ --name People \ --partition-key-path "/id" \ --throughput "1000"
-
Use this command to see the throughput details for the new container. The output should show that the value for the
throughputproperty is 1000 RU/s:az cosmosdb sql container throughput show \ --resource-group $rgName \ --account-name $cosmosAccountName \ --database-name db01 \ --name People
-
In step 4, we could have passed the
--max-throughputparameter instead of--throughputto enable autoscaling for the container. Since we didn’t, in this step we will migrate the container from provisioned (fixed) throughput to autoscale using the following command:az cosmosdb sql container throughput migrate \ --resource-group $rgName \ --account-name $cosmosAccountName \ --database-name db01 \ --name People \ --throughput "autoscale"
-
Run the
az cosmosdb sql container throughput showcommand again to see the updated throughput settings. Confirm that themaxThroughputproperty reads 1,000 RU/s:az cosmosdb sql container throughput show \ --resource-group $rgName \ --account-name $cosmosAccountName \ --database-name db01 \ --name People
-
Finally, let’s update the container maximum allowed throughput to 2,000 RU/s:
az cosmosdb sql container throughput update \ --resource-group $rgName \ --account-name $cosmosAccountName \ --database-name db01 \ --name People \ --max-throughput 2000
-
Run the following command to delete the resources you created in this recipe:
az group delete --name $rgName
In this recipe, you created a Cosmos DB SQL API container with a fixed throughput, enabled autoscaling for it, and finally set its maximum allowed throughput.
Discussion
All Azure Cosmos DB APIs, including the SQL API, allow you to set a fixed provisioned throughput at both the database and the container level. This is an SLA-backed throughput that will be always assigned to your databases and containers.
Setting up a fixed throughput on containers (and/or databases) gives you a predictable bill at the end of the month; however, spikes in incoming requests might result in poor performance, request throttling, or drops. To make sure that your Cosmos DB databases and containers can scale to accommodate more requests, you can set up autoscaling on databases, containers, or both.
In this recipe, we created a container with a fixed throughput and later migrated it to the autoscale model. You can change the minimum and maximum RU/s to meet your project needs.
Note
Azure Cosmos DB also has a serverless (consumption-based) offering. When selecting this option, you don’t have to worry about setting minimum and maximum RU/s anymore. Azure Cosmos DB will scale up and down based on your database/container traffic. See the Azure Cosmos DB documentation for details.
Saving Costs on Multiple Azure SQL Single Databases with Varying and Unpredictable Usage Demands
Solution
Place your single databases into an Azure SQL Database elastic pool. Pooled databases are a cost-effective alternative to multiple single databases with unpredictable resource demands, as illustrated in Figure 4-7.
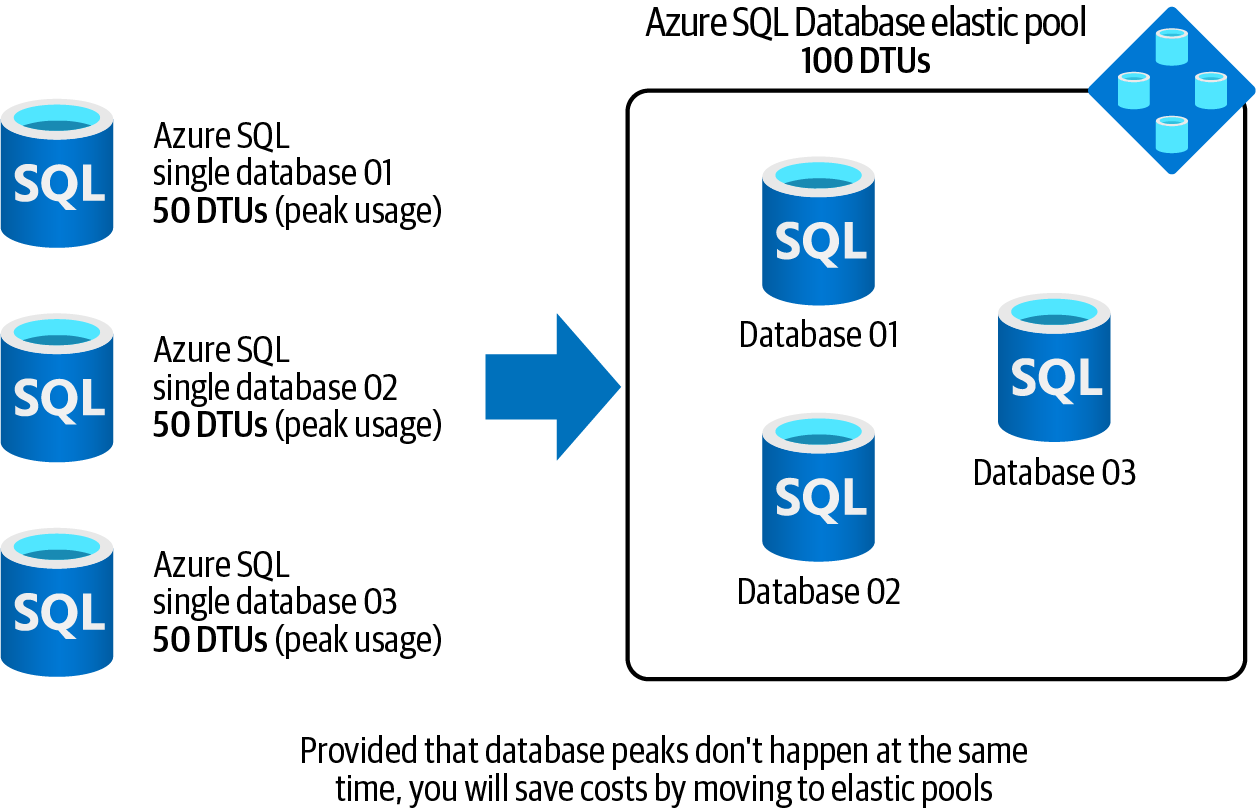
Figure 4-7. Using Azure SQL Database elastic pools to save costs
Steps
-
Log in to your Azure subscription in the Owner role and create a new resource group for this recipe. See “General Workstation Setup Instructions” for details.
-
First, you need to provision a logical Azure SQL server using the following command. Replace <
logical-sql-server-name> with the desired server name, <admin-user> with the admin username, and <admin-pass> with the admin password:logicalServerName="<logical-sql-server-name>" sqlAdminUser="<admin-user>" # Use a complex password with numbers, upper case characters and symbols. sqlAdminPass="<admin-pass>" az sql server create \ --resource-group $rgName \ --name $logicalServerName \ --admin-user $sqlAdminUser \ --admin-password $sqlAdminPass
-
Now, let’s create a new elastic pool. The resources, such as memory and CPU, are allocated to the pool. Use the following command to allocate two vCores (CPU virtual cores) to your new pool:
sqlPoolName="MyPool01" az sql elastic-pool create \ --resource-group $rgName \ --server $logicalServerName \ --name $sqlPoolName \ --edition GeneralPurpose \ --family Gen5 \ --capacity 2
-
Let’s add two single databases into your new pool. These databases will share the resources assigned to the parent pool:
az sql db create \ --resource-group $rgName \ --server $logicalServerName \ --name db01 \ --elastic-pool $sqlPoolName az sql db create \ --resource-group $rgName \ --server $logicalServerName \ --name db02 \ --elastic-pool $sqlPoolName
-
You can see all the databases within a given pool by running the following command:
az sql elastic-pool list-dbs \ --resource-group $rgName \ --name $sqlPoolName \ --server $logicalServerName \ --query [].name
-
Run the following command to delete the resources you created in this recipe:
az group delete --name $rgName
In this recipe, you provisioned an Azure SQL Database elastic pool and added two databases to it.
Warning
Azure SQL resources can get expensive. Make sure you clean up the provisioned resources including the elastic pool after concluding this recipe. Check the clean-up section in the chapter repository for details.
Discussion
Azure SQL offers the following types:
-
Azure SQL single database
-
Azure SQL Database elastic pools
-
Azure SQL Managed Instance
Azure SQL Managed Instance is the most compatible Azure SQL offering with Microsoft SQL Server and is beyond the scope of this recipe.
As the name implies, Azure SQL single database is an independent database with the resources, such as CPU and memory, directly allocated to it. This works perfectly for many scenarios, such as a database with a predictable usage pattern. You simply choose the correct tier (database transaction unit (DTU) or vCore) and the database will perform as expected.
Now imagine you have three single databases for customers in Japan, the EU, and the Eastern US. Each database needs 50 DTUs at its usage peak. Due to the time difference, none of the databases reaches its peak usage at the same time, but you are paying for 150 DTUs 24x7 that you will not fully use. Azure SQL Database elastic pool is one way to address this issue. (The other way is to go with the serverless tier, which we’ll discuss in “Configuring Serverless Compute Tier for Azure SQL Single Databases”.)
Choosing elastic pools, you simply create a new elastic pool, assign 100 DTUs to it, and then add the three databases to the pool. This setup will perform well assuming the three databases never reach their usage peak at the same time.
Configuring Serverless Compute Tier for Azure SQL Single Databases
Solution
Provision your Azure SQL single databases in the serverless compute tier. Azure will take care of allocating required resources to your database based on the load, as illustrated in Figure 4-8.
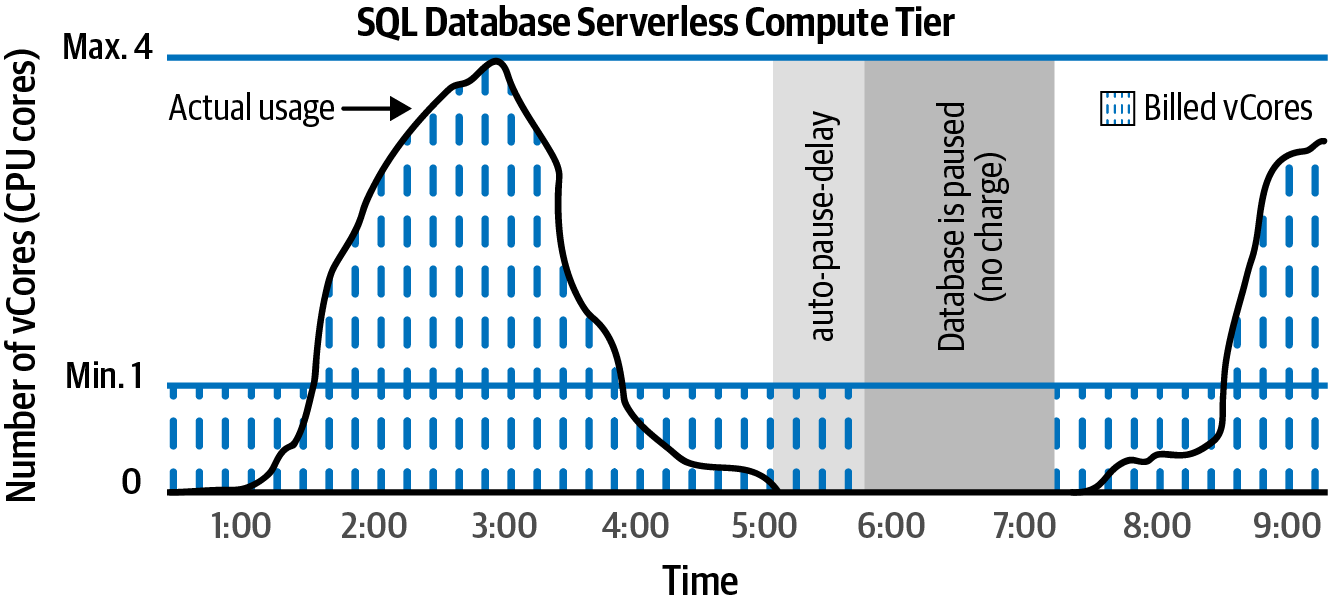
Figure 4-8. Azure SQL single database serverless compute tier
Steps
-
Log in to your Azure subscription in the Owner role and create a new resource group for this recipe. See “General Workstation Setup Instructions” for details.
-
First provision a logical Azure SQL server. Replace <
logical-sql-server-name>, <admin-user>, and <admin-pass> with the desired values:logicalServerName="<logical-sql-server-name>" sqlAdminUser="<admin-user>" sqlAdminPass="<admin-pass>" az sql server create \ --resource-group $rgName \ --name $logicalServerName \ --admin-user $sqlAdminUser \ --admin-password $sqlAdminPass
-
Now, let’s create a new single database. The following command sets both minimum and maximum limits on the number of vCores (CPU cores) allocated to your database and will configure the database to pause after two hours (120 minutes) of inactivity. The database will automatically scale down and up when needed:
# The minimum vCore limit is 1 and the maximum is 4. az sql db create \ --resource-group $rgName \ --server $logicalServerName \ --name db01 \ --compute-model Serverless \ --edition GeneralPurpose \ --family Gen5 \ --auto-pause-delay 120 \ --min-capacity 1 \ --capacity 4
Tip
At the time of writing this book, the serverless compute tier is available only for the Gen5 hardware family. Check Azure SQL single database documentation for details on minimum and maximum supported vCores.
-
Finally, use the following command to get the details of your new database:
az sql db show \ --resource-group $rgName \ --server $logicalServerName \ --name db01 \ --query \ "{Name: name, Sku: currentSku, Edition: edition, MinCapacity: minCapacity}" -
Run the following command to delete the resources you created in this recipe:
az group delete --name $rgName
In this recipe, you provisioned an Azure SQL single database using the serverless compute tier. You can also move existing Azure SQL single databases from the provisioned tier to the serverless tier if needed. Check the Azure SQL documentation for the command details.
Discussion
When you choose the vCore purchasing model for your Azure SQL single database (as opposed to DTU-based), you will have two options for the compute tier: provisioned and serverless.
The provisioned tier requires that you allocate a fixed amount of resources (vCores, memory, etc.) to your database. You will be charged for these resources on a 24x7 basis. The cost does not change if your database is under- or overused. This might result in performance issues when your database receives more requests than expected. You will also keep paying the full bill when your database is not at its usage peak or even when it’s completely idle. However, the provisioned compute tier is a great option if you know the exact usage pattern of your database, or when you expect the database will be at the full load most of the time.
Choose the serverless compute tier when you want Azure to take responsibility for resource allocation. You will set the minimum and maximum vCores to be assigned to your single database and leave the rest to Azure. You can also configure auto-pause delay, so your database will be paused if it’s idle for a specified period. By choosing the serverless tier, you will only get billed when the database is used. Check out the Azure documentation for details on the serverless compute tier.
Configuring Azure SQL Firewall IP Rules
Solution
Configure Azure SQL service firewall to allow only clients with trusted IP addresses, as shown in Figure 4-9.
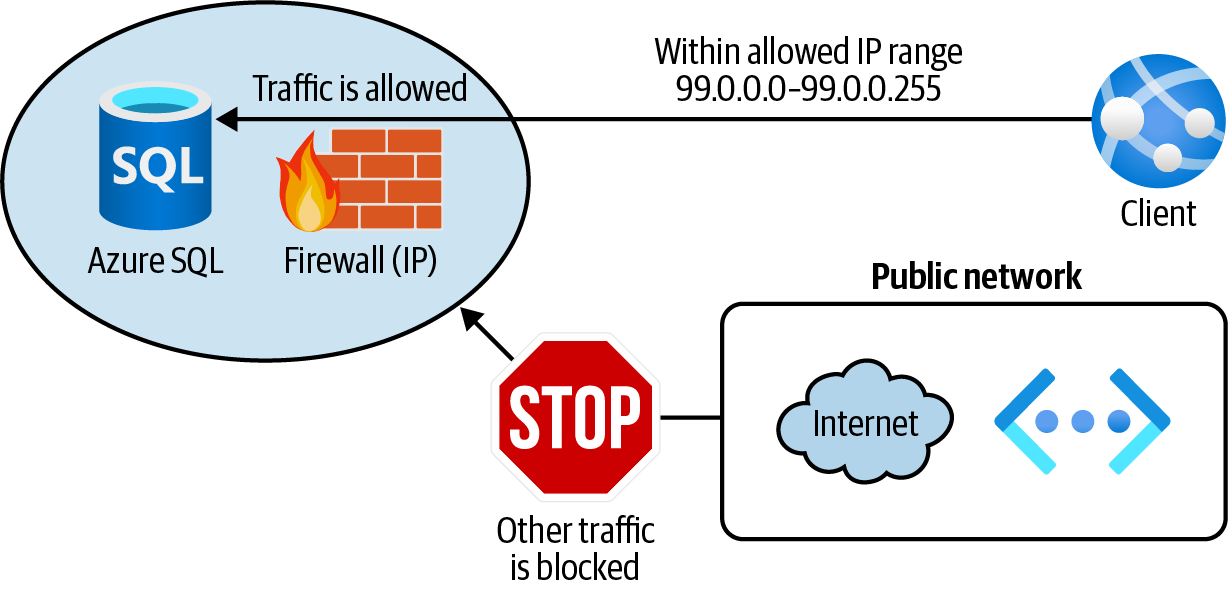
Figure 4-9. Protecting an Azure SQL Database using firewall IP rules
Steps
-
Log in to your Azure subscription in the Owner role and create a new resource group for this recipe. See “General Workstation Setup Instructions” for details.
-
First, let’s provision a logical Azure SQL server and an Azure SQL single database. Replace <
logical-sql-server-name>, <admin-user>, and <admin-pass> with the desired values:logicalServerName="<logical-sql-server-name>" sqlAdminUser="<admin-user>" sqlAdminPass="<admin-pass>" az sql server create \ --resource-group $rgName \ --name $logicalServerName \ --admin-user $sqlAdminUser \ --admin-password $sqlAdminPass az sql db create \ --resource-group $rgName \ --server $logicalServerName \ --name db01 \ --compute-model Serverless \ --edition GeneralPurpose \ --family Gen5 \ --auto-pause-delay 60 \ --min-capacity 1 \ --capacity 2
-
Your goal is to allow clients within an IP range to access Azure SQL. Other requests should be rejected. Use the following command to create the firewall server rule:
az sql server firewall-rule create \ --resource-group $rgName \ --server $logicalServerName \ --name allowTrustedClients \ --start-ip-address 99.0.0.0 \ --end-ip-address 99.0.0.255
Tip
This firewall rule is assigned to the logical Azure SQL server, and it is applied to all the child databases under this server. You can also create database-level-only IP firewall rules by using Transact-SQL statements after the server-level firewall is configured. See the Azure documentation for details.
-
So far you allowed a trusted IP range. What if you need to allow all Azure services to access your Azure SQL databases? You can achieve this with the special IP address, 0.0.0.0. Let’s add this rule using Azure CLI:
az sql server firewall-rule create \ --resource-group $rgName \ --server $logicalServerName \ --name allowAzureServices \ --start-ip-address 0.0.0.0 \ --end-ip-address 0.0.0.0
-
You can see the firewall rules assigned to your logical Azure SQL server using the following command:
az sql server firewall-rule list \ --resource-group $rgName \ --server $logicalServerName
-
Run the following command to delete the resources you created in this recipe:
az group delete --name $rgName
In this recipe, you configured Azure SQL firewall to allow clients from a trusted IP range as well as connections from IP addresses allocated to any Azure service or assets.
Discussion
Several Azure data services, including Azure Storage, Azure Cosmos DB, Azure Synapse Analytics, and Azure SQL, offer a service-level firewall. Use this firewall to improve the security posture of your Azure data services. Azure SQL firewall is a powerful tool to prevent unwanted clients from accessing your data.
When you assign a firewall rule to the logical Azure SQL server, all the child databases will also be protected. Keep in mind that you can also create database-level firewall rules, such that only the database for which the rule is created will be protected. Check the Azure SQL documentation for details.
Note
You can also allow traffic from Azure virtual networks using VNet rules. We will discuss this option in “Configuring Azure SQL Firewall VNet Rules”.
Configuring Azure SQL Firewall VNet Rules
Solution
Configure Azure SQL service firewall to allow clients within a trusted Azure VNet subnet as illustrated in Figure 4-10.
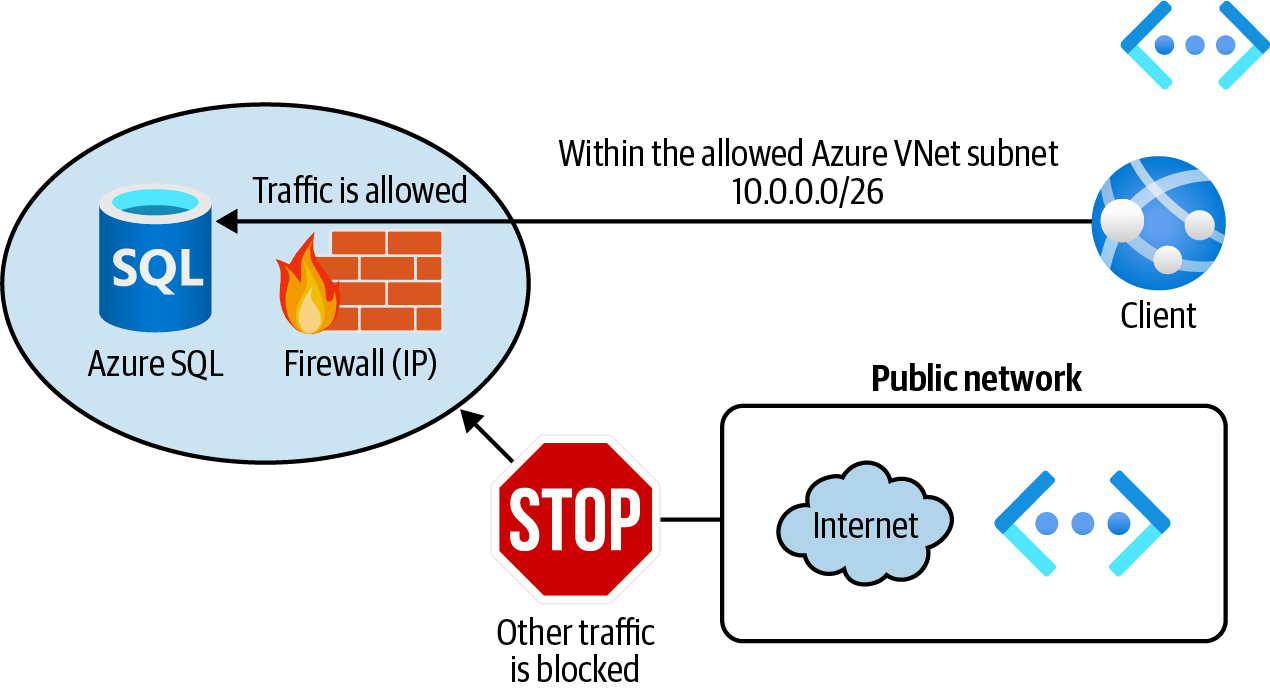
Figure 4-10. Protecting an Azure SQL Database using the firewall VNet rules
Steps
-
Log in to your Azure subscription in the Owner role and create a new resource group for this recipe. See “General Workstation Setup Instructions” for details.
-
Follow step 1 in “Configuring Azure SQL Firewall IP Rules” to create a new logical Azure SQL server and a single database.
-
Your goal is to allow clients within a trusted Azure VNet subnet to access Azure SQL. Let’s create a new Azure VNet and a child subnet:
vnetName="<vnet-name>"

az network vnet create \
  --resource-group $rgName \
  --name $vnetName \
  --address-prefix 10.0.0.0/16 \
  --subnet-name Subnet01 \
  --subnet-prefix 10.0.0.0/26
-
To enable clients in this subnet to access the Azure SQL Database, we need to add the
Microsoft.Sqlservice endpoint to the subnet:az network vnet subnet update \ --resource-group $rgName \ --name Subnet01 \ --vnet-name $vnetName \ --service-endpoints Microsoft.Sql
-
Finally, use the following command to create a new VNet rule for
Subnet01:az sql server vnet-rule create \ --resource-group $rgName \ --server $logicalServerName \ --name allowTrustedSubnet \ --vnet-name $vnetName \ --subnet Subnet01
-
Run the following command to delete the resources you created in this recipe:
az group delete --name $rgName
You successfully configured Azure SQL firewall to allow clients within Subnet01 to work with your Azure SQL Database. See the Azure SQL service firewall documentation for details.
Discussion
Use Azure SQL firewall VNet rules with IP rules to provide protection from incoming requests based on the client IP address and virtual network.
In Recipes 4.10 and 4.11, we talked about Azure SQL firewall IP and VNet rules. These rules protect your Azure SQL Databases against inbound requests. Azure SQL firewall also offers outbound rules to limit egress traffic from your database. See the Azure Firewall documentation for implementation details.
Backing Up Azure SQL Single Databases into Azure Storage Blobs
Solution
Store Azure SQL backups into Azure Storage blobs using Azure CLI, as shown in Figure 4-11.
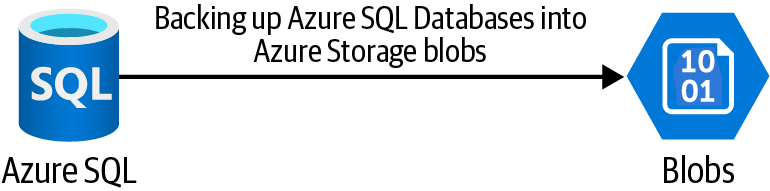
Figure 4-11. Backing up an Azure SQL Database into Azure Storage blobs
Steps
-
Log in to your Azure subscription in the Owner role and create a new resource group for this recipe. See “General Workstation Setup Instructions” for details.
-
First, let’s provision a new Azure SQL single database and seed it with the AdventureWorks sample database. Replace <
logical-sql-server-name>, <admin-user>, and <admin-pass> with the desired values:logicalServerName="<logical-sql-server-name>" sqlAdminUser="<admin-user>" sqlAdminPass="<admin-pass>" az sql server create \ --resource-group $rgName \ --name $logicalServerName \ --admin-user $sqlAdminUser \ --admin-password $sqlAdminPass az sql db create \ --resource-group $rgName \ --server $logicalServerName \ --name db01 \ --compute-model Serverless \ --edition GeneralPurpose \ --family Gen5 \ --auto-pause-delay 60 \ --min-capacity 0.5 \ --capacity 2 \ --sample-name AdventureWorksLT
-
You need to allow Azure services to access the new Azure SQL databases for the backup to be created and saved. Use the following command to configure Azure SQL firewall:
az sql server firewall-rule create \
  --resource-group $rgName \
  --server $logicalServerName \
  --name allowAzureServices  \
  --start-ip-address 0.0.0.0 \
  --end-ip-address 0.0.0.0
-
Now you need to create a new Azure storage account and a child container:
storageName="<storage-account-name>" bakContainerName="sqlbackups" # we chose the locally redundant storage (LRS) sku but you may need # to choose a better redundancy for your Azure SQL backups. az storage account create \ --name $storageName \ --resource-group $rgName \ --sku Standard_LRS storageKey1=$(az storage account keys list \ --resource-group $rgName \ --account-name $storageName \ --query [0].value \ --output tsv) MSYS_NO_PATHCONV=1 az storage container create \ --name $bakContainerName \ --account-name $storageName \ --account-key $storageKey1 -
You need write permission to your Azure Storage container. Here we will use the storage account key for authentication. You can also use storage account SAS tokens as an authentication method. See the Azure CLI documentation for details. Use the following command to create the database backup:
storageURL= \ "https://$storageName.blob.core.windows.net/\$bakContainerName /sqlbackup01.bacpac" MSYS_NO_PATHCONV=1 az sql db export \ --resource-group $rgName \ --server $logicalServerName \ --name db01 \ --admin-user $sqlAdminUser \ --admin-password $sqlAdminPass \ --storage-key $storageKey1 \ --storage-key-type StorageAccessKey \ --storage-uri $storageURL -
You can confirm the backup file is created by listing all the files and their sizes in the storage container:
MSYS_NO_PATHCONV=1 az storage blob list \
  --container-name $bakContainerName \
  --account-key $storageKey1 \
  --account-name $storageName \
  --query "[].{Name: name, Length: properties.contentLength}"
Tip
Because our storage account key contains a forward slash (/), it will be converted to a Linux path in the Bash environment, which causes the CLI command to fail. So we used MSYS_NO_PATHCONV=1 before the CLI scripts to prevent this issue! You can alternatively prefix your commands with two forward slashes (//).
-
Run the following command to delete the resources you created in this recipe:
az group delete --name $rgName
In this recipe, you successfully backed up an Azure SQL single database into an Azure Storage container.
Discussion
Azure Storage offers an affordable, scalable, and secure storage service in the cloud. As you saw in Chapter 3, you can protect your files against accidental deletion by enabling soft delete protection.
The backup files can be stored in the hot, cool, or even archive access tiers to save costs.
In this recipe, we used the cheapest Azure Storage redundancy option, which is locally redundant storage (LRS). If you plan to back up production SQL databases, it is recommended that you choose an option with better redundancy, such as zone-redundant storage (ZRS), geo-redundant storage (GRS), or geo-zone-redundant storage (GZRS). Refer to Chapter 3 or the Azure Storage documentation for details.
Get Azure Cookbook now with the O’Reilly learning platform.
O’Reilly members experience books, live events, courses curated by job role, and more from O’Reilly and nearly 200 top publishers.

