Chapter 1. Security
Data breaches happen frequently these days. Hacker and malicious users target IT systems in small, mid-sized, and big organizations. These attacks cost millions of dollars every year, but cost is not the only damage. Targeted companies will be on the news for days, weeks, or even years, and they may suffer permanent damage to their reputation and customer base. In most cases, lawsuits will follow.
You might be under the impression that public cloud services are very secure. After all, companies such as Microsoft spend millions of dollars improving their platform security. But applications and data systems hosted in Microsoft’s public cloud (as well as clouds of other providers) are not immune to cyberattacks. In fact, they are more prone to data breaches because of the public nature of the cloud.
It is critical to understand that cloud security is a common responsibility shared between Microsoft Azure and you. Azure provides data center physical security, guidelines, documentation, and powerful tools and services to help you protect your workloads. It is your responsibility to correctly configure resource security. For example, Azure Cosmos DB can be configured to accept traffic from only a specific network, but the default behavior allows all clients, even from the public internet.
Tip
Cloud security is an evolving subject. Microsoft Azure continues to introduce new security features to protect your workloads against new threats. Microsoft maintains the Azure security best practices and patterns documentation, which you can consult for the most up-to-date security best practices.
We chose security as the topic for the first chapter of this book to deliver this important message: Security must come first! You should have security in mind while designing, implementing, and supporting your cloud projects. In this chapter, we’ll share useful recipes showing how to secure key Azure services and then use these recipes’ outcomes throughout the book.
Warning
We cover important Azure security topics in this chapter. However, it is not possible to cover all topics related to Azure security. Azure services and capabilities continue to evolve on a daily basis. You must consult the Microsoft documentation for a complete and updated list.
Workstation Configuration
You will need to prepare your workstation before starting on the recipes in this chapter. Follow “What You Will Need” to set up your machine to run Azure CLI commands. Clone the book’s GitHub repository using the following command:
git clone https://github.com/zaalion/AzureCookbook.git
Creating a New User in Your Azure Account
Solution
First, create a new user in your Azure Active Directory (Azure AD). Then assign the Contributor role-based access control (RBAC) role to that user, so enough permissions are assigned without granting this user the same permission level as the Owner. An architecture solution diagram is shown in Figure 1-1.

Figure 1-1. Assigning a built-in role to Azure AD users/groups
Steps
-
Log in to your Azure subscription in the Owner role. See “General Workstation Setup Instructions” for details.
-
Visit the Default Directory | Overview page in the Azure portal to find your primary Azure Active Directory tenant domain name, as shown in Figure 1-2.
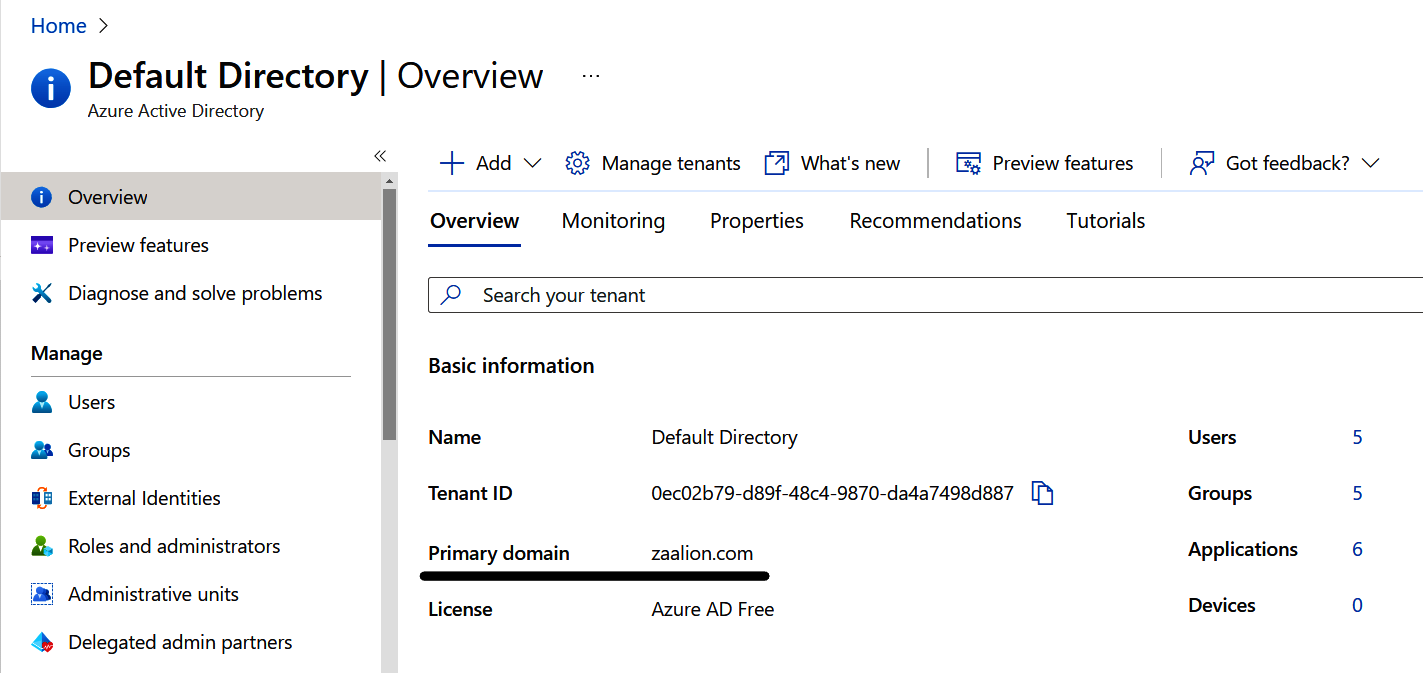
Figure 1-2. Finding your Azure AD tenant primary domain
-
Create a new user in Azure AD. Replace <
password> with the desired password and <aad-tenant-name> with your Azure AD tenant domain name. This could be the default domain name ending with onmicrosoft.com, or a custom domain registered in your Azure Active Directory (e.g., zaalion.com):password="<password>" az ad user create \ --display-name developer \ --password $password \ --user-principal-name developer@<aad-tenant-name>
Warning
Use a strong password with lowercase and uppercase letters, numbers, and special characters. Choosing a strong password is the first, and the most important, step to protect your Azure subscription.
-
The user account you created does not have any permissions. You can fix that by assigning an Azure RBAC role to it. In this recipe, we go with the Contributor built-in role, but you can choose any role that matches your needs. The Contributor RBAC role grants full access to resources but does not allow assigning roles in Azure RBAC or managing Azure Blueprints assignments. You assign an RBAC role to an assignee, over a scope. In our case, the assignee is the user you just created, the role name is Contributor, and the scope is the current Azure subscription. First, store your subscription ID in a variable:
subscriptionId=$(az account show \
  --query "id" --output tsv)

subscriptionScope="/subscriptions/"$subscriptionId
-
Use the following CLI command to assign the Contributor role to the developer@<aad-tenant-name> user account. If you’re prompted to install the Account extension, answer Y. You can now use the new developer account to complete this book’s recipes:
MSYS_NO_PATHCONV=1 az role assignment create \
  --assignee "developer@<aad-tenant-name>" \
  --role "Contributor" \
  --scope $subscriptionScope
Tip
Git Bash automatically translates resource IDs to Windows paths, which causes this command to fail. Simply add MSYS_NO_PATHCONV=1 in front of the command to temporarily disable this behavior. See the Bash documentation for more details.
-
Run the following command to check the new role assignment. In the output, look for the
roleDefinitionIdfield. Its value should end with/roleDefinitions/b24988ac-6180-42a0-ab88-20f7382dd24c, which is the Contributor role definition ID:az role assignment list \ --assignee developer@<aad-tenant-name>
Discussion
It is not a security best practice to use a high-privileged account, such as the Owner (administrator), to perform day-to-day development, monitoring, and testing tasks. For example, a developer tasked only with reading a Cosmos DB container data does not need permission over other resources in the subscription.
Azure has several built-in RBAC roles for general and specific services. The Contributor RBAC role gives access to all Azure services. You could use service-specific roles if your user only needs to work with a single service. For example, the Cosmos DB Operator role only allows managing a Cosmos DB database. Check the Microsoft documentation for a complete list of built-in roles.
Warning
Granting a higher access level than needed to a user is a recipe for disaster. You have to identify which tasks a user needs to perform, and only grant the required access to their account. This is referred to as the principle of least privilege.
In this recipe, we assigned the Contributor role to our developer user account. This enables our user to manage all Azure services except RBAC roles and assigning Blueprints. See the Contributor RBAC role documentation for more details. If the Azure built-in RBAC roles do not exactly align with your needs, you can create custom RBAC roles and assign them to users. We will look at this in the next recipe.
Creating a New Custom Role for Our User
Solution
First create a custom Azure role, then assign the role to the users, groups, or principals (see Figure 1-3).
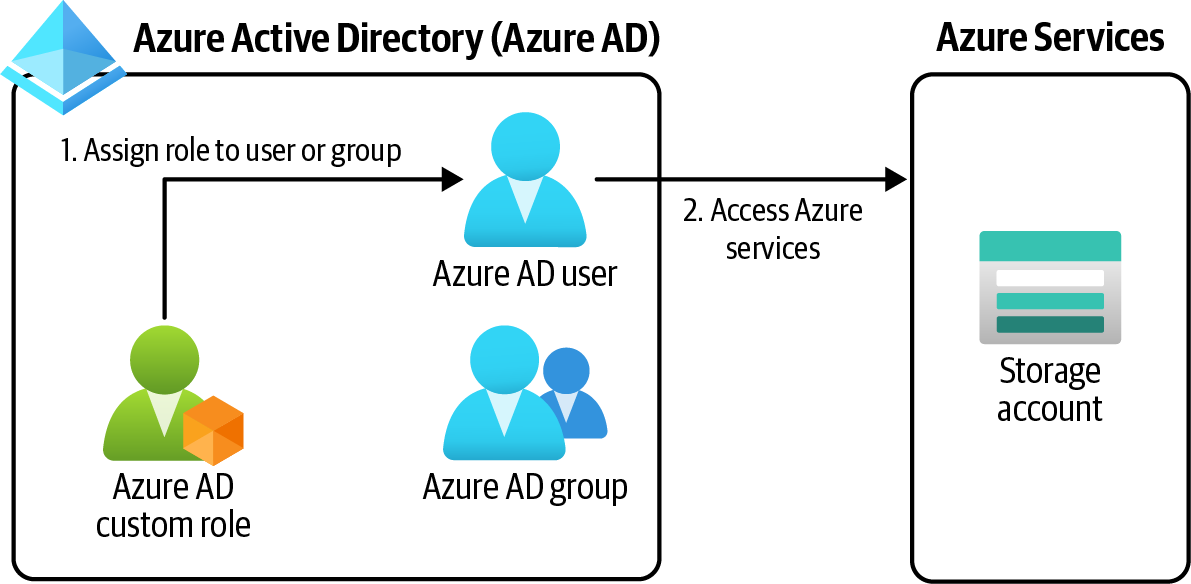
Figure 1-3. Assigning a custom role to an Azure AD user/group
Steps
-
Log in to your Azure subscription in the Owner role. See “General Workstation Setup Instructions” for details.
-
Take note of the user account you created in “Creating a New User in Your Azure Account”. Later in this recipe, we will assign our custom role to this user.
-
When defining a custom role, you need to specify a scope. The new role will only be available in the passed scopes. A scope can be one or more Azure subscriptions or management groups. Run the following command to find your current subscription ID:
subscriptionId=$(az account show \
  --query "id" --output tsv)

subscriptionScope="/subscriptions/"$subscriptionId

echo $subscriptionScope
-
We need a custom Azure role that enables users to read data blobs in Azure storage accounts. Create a JSON file with the following content, name the file CustomStorageDataReader.json, and save it on your machine. Next, replace <
subscription-scope> with the value of the$subscriptionScopevariable from the previous step. Since we only need to read blobs, the only action we need to add isMicrosoft.Storage/storageAccounts/blobServices/containers/blobs/read. Check the Microsoft documentation for the complete list ofActionsandDataActionsyou can use in your custom roles:{ "Name": "Custom Storage Data Reader", "IsCustom": true, "Description": "Read access to Azure storage accounts", "DataActions": [ "Microsoft.Storage/storageAccounts/blobServices/containers/blobs/read" ], "AssignableScopes": [ "<subscription-scope>" ] }
Tip
Make sure that the Actions are added to the correct section in the JSON file. These sections include Actions, DataActions, NotActions, and NotDataActions. See “Understand Azure role definitions” for more detail on role sections.
-
We have the custom role definition ready, so now we can create the custom role:
az role definition create \
  --role-definition CustomStorageDataReader.json
-
Your custom RBAC role is now created and can be assigned to users or groups the same way the built-in roles are assigned. In our case, the assignee is the user you previously created, the role name is Custom Storage Data Reader, and the scope is the current Azure subscription. In addition to users and groups, you can assign Azure roles to other Azure AD principals, such as managed identities and app registrations.
-
Use the following CLI command to assign the Custom Storage Data Reader role to the developer user account:
MSYS_NO_PATHCONV=1 az role assignment create \
  --assignee "developer@<aad-tenant-name>" \
  --role "Custom Storage Data Reader" \
  --scope $subscriptionScope
The developer user now has read access to all Azure Storage Account blobs within your subscription.
Discussion
Custom roles are perfect for situations in which you need to assign exactly the right amount of permissions to a user. Access to multiple services can also be granted using custom roles. The role definition JSON files can be stored in a source control system and deployed using Azure CLI, Azure PowerShell, or even ARM templates. You can assign multiple RBAC roles to a user or group. Our test user has both Contributor and Custom Storage Data Reader assigned. In real-world scenarios, you will need to remove the Contributor role from your user, because it gives many more permissions compared to the custom role.
Note
There might be an existing built-in role that satisfies the user needs and does not give more permissions than needed. Make sure to check the Microsoft documentation for built-in roles before investing time in creating a custom role.
Assigning Allowed Azure Resource Types in a Subscription
Solution
Assign the “Allowed resource type” Azure policy to the management group, subscription, or resource group scopes, with the list of allowed resource types as the policy parameter. An architecture diagram of this solution is shown in Figure 1-4.

Figure 1-4. Assigning an Azure policy to a scope
Steps
-
Log in to your Azure subscription in the Owner role. See “General Workstation Setup Instructions” for details.
-
First you need to find the Azure policy ID for “Allowed resource types.” Use the following command to get this ID:
policyName=$(az policy definition list \
  --query "[?displayName == 'Allowed resource types'].name" --output tsv)
-
Use the following command to get the list of available policy IDs and names:
az policy definition list \ --query "[].{Name: name, DisplayName: displayName}" -
If your policy definition has parameters, you need to provide them at assignment time. In our case, we need to tell the policy which resources we intend to allow in our subscription. Create a JSON file with the following content and name it allowedResourcesParams.json:
{ "listOfResourceTypesAllowed": { "value": [ "Microsoft.Storage/storageAccounts" ] } } -
Now we have all we need to create the policy assignment. Use the following command to assign the policy definition to your subscription. For simplicity, we are only allowing the creation of Azure storage accounts in this subscription. In most cases, you need to allow multiple resources for your projects:
az policy assignment create \
  --name 'Allowed resource types in my subscription' \
  --enforcement-mode Default \
  --policy $policyName \
  --params allowedResourcesParams.json
Note
We set the policy --enforcement-mode to Default. This prevents new resources from being created if they are not in
the allowed list. You can also set the enforcement mode to
DoNotEnforce, which allows the resources to be created, and only reports policy noncompliance in the logs and policy overview page.
-
If you leave this policy assignment in place, only Azure storage accounts can be deployed to your subscription. We need to deploy several other resource types in this cookbook, so let’s delete this policy assignment now:
az policy assignment delete \
  --name 'Allowed resource types in my subscription'
Discussion
Use Azure policy to govern your Azure resources and enforce compliance. Say you only want to allow your team to deploy Azure storage accounts and Cosmos DB to the development subscription. You could rely on your team to follow these guidelines, and hope that they comply, or you could use policies to enforce them. The latter is a safer approach.
There are numerous built-in policies, which you can assign to desired scopes. You can use these policies to allow or deny provisioning certain resource types, or to limit the regions that resources can be deployed to.
Note
If you need enforcement, make sure the --enforcement-mode value is set to Default, not DoNotEnforce.
Several built-in policies are designed to improve your Azure subscription security. You can find the built-in policy definitions and names in the Azure portal, or by using tools such as Azure CLI. Azure also offers policies targeting specific Azure resource types; for instance, the “Storage account keys should not be expired” policy, when assigned, makes sure the Storage Account keys don’t expire. Take a look at the Microsoft documentation for more details on policies.
Assigning Allowed Locations for Azure Resources
Solution
Assign the “Allowed locations” policy to the management group, subscription, or resource group, with the list of allowed Azure regions as the policy parameter.
Steps
-
Log in to your Azure subscription in the Owner role. See “General Workstation Setup Instructions” for details.
-
First you need to find the ID of the “Allowed locations” Azure policy. Use the following command to get this ID:
policyName=$(az policy definition list \
  --query "[?displayName == 'Allowed locations'].name" --output tsv)
-
If your policy definition has parameters, you need to provide them at assignment time. In our case, we need to tell the policy which Azure regions we intend to allow in our subscription. Create a JSON file with the following content and name it allowedLocationParams.json:
{ "listOfAllowedLocations": { "value": [ "eastus", "westus" ] } } -
Use the following command to assign the policy definition to the active subscription:
az policy assignment create \
  --name 'Allowed regions for my resources' \
  --enforcement-mode Default \
  --policy $policyName \
  --params allowedLocationParams.json
-
You can modify the allowedLocationsParams.json parameter file to pass your desired locations to the policy assignment. Use the following CLI command to get the list of available locations:
az account list-locations --query "[].name"
Note
Use the --scope parameter with az policy assignment
create command to define the scope for the policy assignment. The scope can be one or more management groups, subscriptions, resource groups, or a combination of these. If not mentioned, the default scope will be the current active subscription.
-
You can use the following command to delete this policy assignment:
az policy assignment delete \
  --name 'Allowed regions for my resources'
You successfully assigned the “Allowed locations” policy definition to our subscription. From now on, the resources can only be deployed to the eastus and westus Azure regions.
Discussion
Many countries and regions have data residency laws in effect. This means the user data should not leave its geographical jurisdiction. The EU’s General Data Protection Regulation (GDPR), which prohibits EU residents’ data leaving EU boundaries, is an example of such a law. The “Allowed locations” Azure policy is the perfect tool to enforce compliance to standards such as GDPR.
Connecting to a Private Azure Virtual Machine Using Azure Bastion
Solution
Deploy an Azure Bastion host resource to the same virtual network (VNet) as your Azure VM. Then, you can use SSH or RDP to access your Azure VM. A private Azure VM has no public IP address, making it invisible to the public internet. See the solution architecture diagram in Figure 1-5.

Figure 1-5. Using Azure Bastion to connect to a private Azure VM
Steps
-
Log in to your Azure subscription in the Owner role and create a new resource group for this recipe. See “General Workstation Setup Instructions” for details.
-
Now, let’s create a new Azure VM. Every Azure VM is deployed to an Azure VNet. The following command provisions a new Azure VM and places it into a new VNet with the 10.0.0.0/16 address space. By passing an empty string for
--public-ip-address, you create a private Azure VM, with no public IP address. The--nsg-rule SSHparameter configures SSH connectivity for your new VM:az vm create --name MyLinuxVM01 \ --resource-group $rgName \ --image UbuntuLTS \ --vnet-address-prefix 10.0.0.0/16 \ --admin-username linuxadmin \ --generate-ssh-keys \ --authentication-type ssh \ --public-ip-address "" \ --nsg-rule SSH \ --nsg "MyLinuxVM01-NSG"
Note
It is recommended to use SSH keys to authenticate into Linux VMs. You can also use a username/password combination. By passing
--authentication-type ssh, you configured this VM to only allow authentication using SSH keys. See the CLI documentation and “Connect to a Linux VM” for details.
-
The previous command generated a new SSH key pair (both private and public keys) and saved them on your machine. The path to the private key can be found in the command output, for example /home/reza/.ssh/id_rsa, as shown in Figure 1-6. Make a note of the private key filepath. You will need to upload this key to the Bastion service to log in to your new VM.

Figure 1-6. Saving the SSH key on your local machine
-
Use the following command to get the details of the new virtual network created as part of your VM provisioning. You will need this name to configure your new Azure Bastion host in the next steps:
vnetName=$(az network vnet list \
  --resource-group $rgName \
  --query "[].name" --output tsv)
-
For security reasons, the Azure VM we created does not have a public IP address. One option you have for connecting to this VM is to use Azure Bastion. This service allows both SSH and RDP connections. Before creating an Azure Bastion host, you need to create a public IP resource and a new subnet in the VNet named
AzureBastionSubnet. This IP will be assigned to the Bastion host—not the Azure VM:ipName="BastionPublicIP01" az network public-ip create \ --resource-group $rgName \ --name $ipName \ --sku Standard
-
Now create the new subnet,
AzureBastionSubnet, using the following command. Azure Bastion will be deployed to this subnet:az network vnet subnet create \ --resource-group $rgName \ --vnet-name $vnetName \ --name 'AzureBastionSubnet' \ --address-prefixes 10.0.1.0/24
Tip
The subnet name must be exactly AzureBastionSubnet; otherwise, the bastion create CLI command returns a validation error.
-
Now, you can create an Azure Bastion resource using the following command. Make sure the
$regionvariable is populated. See “General Workstation Setup Instructions” for more details. If you’re prompted to install the Bastion extension, answer Y:az network bastion create \ --location $region \ --name MyBastionHost01 \ --public-ip-address $ipName \ --resource-group $rgName \ --vnet-name $vnetName
Note
Provisioning of Azure Bastion may take up to 10 minutes.
-
Wait for the preceding command to succeed. Now, you can connect to the VM using the Bastion host. Log in to the Azure portal and find your new Virtual Machine. Click on it, and from the top left menu, select Connect > Bastion, as shown in Figure 1-7.
-
Fill in the username. For Authentication type, choose SSH Private Key from Local File and choose your private SSH key file. Then click on the Connect button, as shown in Figure 1-8.

Figure 1-7. Choosing Bastion as the connection method

Figure 1-8. Entering the VM username and uploading the SSH key
-
You should see the Linux command prompt, as shown in Figure 1-9.

Figure 1-9. Logging in to the Azure VM using Azure Bastion
-
Run the following command to delete the resources you created in this recipe:
az group delete --name $rgName
Warning
Azure Bastion is a paid service. Make sure that you run the command in this step to delete the VM, the Bastion host, and their dependencies.
In this recipe, you connected to a private VM using an Azure Bastion host.
Discussion
Azure Bastion acts as a managed jump server, jump box, or jump host. You use it to manage private Azure VMs. Before the Bastion service was introduced, Azure administrators had to create their own jump box machines, or even expose the Azure VM to the internet via a public IP address. Features such as JIT access or Azure Firewall could be used to improve the security to the connection, but exposing a VM via public IP address is never a good idea.
Protecting Azure VM Disks Using Azure Disk Encryption
Solution
Create an encryption key in Azure Key Vault, and use it to configure BitLocker (Windows VM) or dm-crypt (Linux VM) encryption for your Azure VMs (see Figure 1-10).

Figure 1-10. Using Azure Disk Encryption to protect an Azure VM
Steps
-
Log in to your Azure subscription in the Owner role and create a new resource group for this recipe. See “General Workstation Setup Instructions” for details.
-
Create a new Windows VM using the following CLI command. Replace <
vm-password> with a secure password:vmName="MyWinVM01" az vm create \ --resource-group $rgName \ --name $vmName \ --image win2016datacenter \ --admin-username cookbookuser \ --admin-password <vm-password> -
You need an Azure Key Vault resource to store your disk encryption key in. You can create an Azure Key Vault resource with the following CLI command. The
--enabled-for-disk-encryptionparameter makes this Key Vault accessible to Azure VMs. Replace <key-vault-name> with a unique name for your new Azure Key Vault resource:kvName="<key-vault-name>" az keyvault create \ --name $kvName \ --resource-group $rgName \ --location $region \ --enabled-for-disk-encryption
-
Now the stage is set to enable Azure Disk Encryption for our Windows VM:
az vm encryption enable \
  --resource-group $rgName \
  --name $vmName \
  --disk-encryption-keyvault $kvName
-
You can confirm Azure Disk Encryption is enabled by logging in to the machine, and check the BitLocker status, or by using the following CLI command:
az vm encryption show \
  --name $vmName \
  --resource-group $rgName
-
Run the following command to delete the resources you created in this recipe:
az group delete --name $rgName
We successfully enabled Azure Disk Encryption for our Windows VM using Azure Key Vault and BitLocker. Azure Disk Encryption automatically created a new secret in the Key Vault to store the disk encryption key. This encryption is also available for Linux VMs (via dm-crypt). Refer to the Microsoft documentation for greater details.
Discussion
In this scenario, we enabled Azure Disk Encryption for an Azure Windows VM. This encryption happens at the Windows OS level using the familiar BitLocker technology.
Azure VM disks are stored as blob objects in Azure Storage. Microsoft Azure offers another encryption type for Azure VMs as well. This encryption is called server-side encryption (SSE) and happens at the Azure disk storage level. You can enable both Azure Disk Encryption and SSE for greater protection.
Encrypting your Azure VM OS and data disks protects your data in the highly unlikely event that the Azure data center machines are compromised. In addition, many organizations require VM disks to be encrypted to meet their compliance and security commitments.
Blocking Anonymous Access to Azure Storage Blobs
Solution
Set the --allow-blob-public-access flag to false programmatically, or set the “Allow Blob public access” field to Disabled in the Azure portal (see Figure 1-11). This can be set for both new and existing storage accounts.

Figure 1-11. Disabling blob public access in the Azure portal
Steps
-
Log in to your Azure subscription in the Owner role and create a new resource group for this recipe. See “General Workstation Setup Instructions” for details.
-
Create a new Azure storage account. Replace <
storage-account-name> with the desired name. See the storage account naming documentation for naming rules and restrictions. Set--allow-blob-public-accesstofalseso that developers can’t allow anonymous blob and container access:storageName="<storage-account-name>" az storage account create \ --name $storageName \ --resource-group $rgName \ --location $region \ --sku Standard_LRS \ --allow-blob-public-access false
-
You can use the following CLI command to configure the same safeguard for an existing storage account:
az storage account update \
  --name $storageName \
  --resource-group $rgName \
  --allow-blob-public-access false
-
Run the following command to delete the resources you created in this recipe:
az group delete --name $rgName
Refer to “Configure Anonymous Public Read Access for Containers and Blobs” for more details.
Discussion
When a storage account container or blob is configured for public access, any user on the web can access it without any credentials. Disabling --allow-blob-public-access prevents developers from accidentally removing protection from storage account blobs and containers.
Setting the --allow-blob-public-access flag to true does not enable anonymous access for container and blobs. It leaves the door open for developers to accidentally, or intentionally, enable that access.
In some scenarios, you might need to make your blobs publicly available to the web (for example, to host images used by a public website). In these scenarios, it is recommended to create a separate storage account meant only for public access. Never use the same storage account for a mixture of public and private blobs.
Tip
You can assign the Azure policy “Storage account public access should be disallowed” to govern disabling anonymous public access.
Configuring an Azure Storage Account to Exclusively Use Azure AD Authorization
Solution
Set the --allow-shared-key-access flag to false programmatically, or set the “Allow storage account key access” field to Disabled in the Azure portal (see Figure 1-12). This can be configured for both new and existing storage accounts.
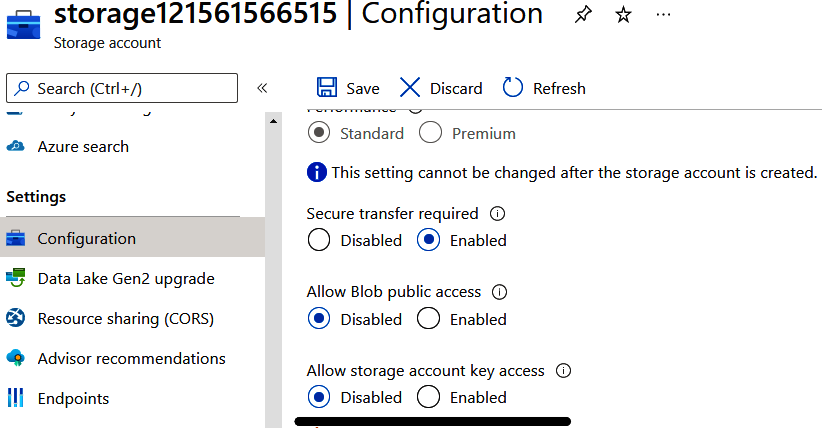
Figure 1-12. Setting “Allow storage account key access” to Disabled in the Azure portal
Steps
-
Log in to your Azure subscription in the Owner role and create a new resource group for this recipe. See “General Workstation Setup Instructions” for details.
-
If you have an existing storage account, skip to the next step. If not, use this command to create a new storage account. Replace <
storage-account-name> with the desired name and set the--allow-shared-key-accessflag tofalse:storageName="<storage-account-name>" az storage account create \ --name $storageName \ --resource-group $rgName \ --location $region \ --sku Standard_LRS \ --allow-shared-key-access false
-
You can use the following CLI command to configure this setting for an existing storage account:
az storage account update \
  --name $storageName \
  --resource-group $rgName \
  --allow-shared-key-access false
-
Run the following command to delete the resources you created in this recipe:
az group delete --name $rgName
You disabled Allow storage account key access for your storage account. This means that clients such as Azure Functions, App Services, etc. can access this storage account using only Azure AD authentication/authorization. Any request using storage account keys or SAS tokens will be denied.
Discussion
Azure storage accounts support multiple authorization methods, which fall into two groups:
-
Key-based access, such as using storage account keys, or SAS tokens
-
Azure Active Directory access using an Azure AD principal, user, or group, and an RBAC role
Some organizations prefer the second method, because no password, account key, or SAS token needs to be stored or maintained, resulting in a more secure solution.
See the Azure documentation for greater details on storage account authentication and authorization.
Tip
You can assign the Azure policy “Storage accounts should prevent shared key access” to govern storage accounts to only accept Azure AD-based requests. See the Azure documentation to read more about this policy.
Storing and Retrieving Secrets from Azure Key Vault
Solution
Store your secrets, keys, and certificates in the Azure Key Vault service. Give access to clients to read the secrets from the Key Vault when needed. The flow is shown in Figure 1-13.

Figure 1-13. Storing and accessing keys, secrets, and certificates in Azure Key Vault
Steps
-
Log in to your Azure subscription in the Owner role and create a new resource group for this recipe. See “General Workstation Setup Instructions” for details.
-
First create a new Azure Key Vault service using this CLI command. Replace <
key-vault-name> with a valid, globally unique name:kvName="<
key-vault-name>" az keyvault create --name $kvName \ --resource-group $rgName \ --location $region -
Now use this command to create a secret in the Key Vault:
az keyvault secret set \
  --name MyDatabasePassword \
  --vault-name $kvName \
  --value P@$$w0rd
-
Your secret is now stored in the Azure Key Vault. Only clients with “Get” secret access policy can read this secret from the vault. This permission can be given to managed identities, Azure AD service principals, or even user and groups. You already logged in to the CLI as the Owner account, so you should be able to read the secret value back. Look for the
valueproperty in the command output:az keyvault secret show \ --name MyDatabasePassword \ --vault-name $kvName
-
Run the following command to delete the resources you created in this recipe:
az group delete --name $rgName
Discussion
Azure Key Vault is Azure’s safe to store sensitive data. Three types of entities can be stored in a vault:
- Secrets
-
Any custom value you need to safeguard, such as database connection strings or account passwords
- Keys
-
Encryption keys used by other Azure services to encrypt disks, databases, or storage accounts
- Certificates
-
X.509 certificates used to secure communications between other services
Entities stored in the Key Vault can be accessed by other client Azure services, provided that the client has the right access to the vault. This access can be defined by either the Azure Key Vault Access Policy or the Azure Key Vault RBAC.
Here are a few of these client services and what they are used for:
-
Azure Function Apps and App Services, so secrets such as database connection strings can be fetched from the Key Vault at runtime
-
Azure Cosmos DB or Azure Storage, so customer managed keys for encryption can be used for Cosmos DB encryption at rest
-
Azure VMs, so encryption keys from the vault can be used to encrypt VM managed disks
-
Azure Application Gateway, so SSL certificates in the key vault can be used to secure HTTPS communications
There are several other use cases for Azure Key Vault, which we will discuss throughout this book.
Enabling Web Application Firewall (WAF) with Azure Application Gateway
Solution
Deploy an Azure Application Gateway resource in front of your web application, and enable WAF on it, as shown in Figure 1-14.

Figure 1-14. Protecting your web applications with Azure Application Gateway WAF
Note
WAF is one of the Azure Application Gateway features. Azure Application Gateway is a web load balancer with a rich set of capabilities. Setting up an Azure Application Gateway involves creating HTTP listeners, routing rules, etc. See Application Gateway CLI documentation for details.
Steps
-
Log in to your Azure subscription in the Owner role and create a new resource group for this recipe. See “General Workstation Setup Instructions” for details.
-
First create a simple App Service plan and an Azure web app in it. Your goal is to protect this web application from common web attacks. Replace <
web-app-name> with the desired name:appName="<web-app-name>" planName=$appName"-plan" az appservice plan create \ --resource-group $rgName \ --name $planName az webapp create \ --resource-group $rgName \ --plan $planName \ --name $appName
-
With the web application created, use this command to save its URL in a variable. We will use this variable when configuring Application Gateway:
appURL=$(az webapp show \
  --name $appName \
  --resource-group $rgName \
  --query "defaultHostName" \
  --output tsv)
-
Azure Application Gateway is deployed to an Azure VNet. So, first use this command to create a new Azure VNet, with a default subnet:
vnetName="AppGWVnet"

az network vnet create \
  --resource-group $rgName \
  --name $vnetName \
  --address-prefix 10.0.0.0/16 \
  --subnet-name Default \
  --subnet-prefix 10.0.0.0/24
-
Your Azure App Service web application will be accessible through the new Azure Application Gateway, so you need to create a new public IP address to be assigned to the Application Gateway. Use the following command to provision the public IP address:
gwIPName="appgatewayPublicIP"

az network public-ip create \
  --resource-group $rgName \
  --name $gwIPName \
  --sku Standard
-
Web Application Firewall Policies contain all the Application Gateway WAF settings and configurations, including managed security rules, exclusions, and custom rules. Let’s use the following command to create a new WAF policy resource with the default settings:
wafPolicyName="appgatewayWAFPolicy"

az network application-gateway waf-policy create \
  --name $wafPolicyName \
  --resource-group $rgName
-
You have all the resources needed to create a new Azure Application Gateway. Make sure to deploy the WAF_Medium, WAF_Large, or WAF_v2 SKUs. The WAF_v2 SKU is the latest WAF release—see the WAF SKUs documentation for details. Replace <
app-gateway-name> with the desired name:appGWName="<app-gateway-name>" az network application-gateway create \ --resource-group $rgName \ --name $appGWName \ --capacity 1 \ --sku WAF_v2 \ --vnet-name $vnetName \ --subnet Default \ --servers $appURL \ --public-ip-address $ipName \ --priority 1001 \ --waf-policy $policyName
Note
An Azure Application Gateway deployment can take up to 15 minutes.
-
You successfully provisioned a new WAF-enabled Azure Application Gateway. Now configure your web application to accept traffic only from the Application Gateway subnet so that end users can’t directly access the App Service web app anymore. See “Restricting Network Access to an Azure App Service” for a step-by-step guide. Accessing your web application through Azure Application Gateway (with WAF) protects it from common web attacks such as SQL injection. Run the following command to get the public IP address for your Application Gateway. This IP address (as well as custom domain names) can be used to access your web application through Azure Application Gateway:
IPAddress=$(az network public-ip show \
  --resource-group $rgName \
  --name $gwIPName \
  --query ipAddress \
  --output tsv)

  echo $IPAddress
Note
Before your App Service can be accessed through Azure Application Gateway, HTTP listeners, health probes, routing rules, and backends should be properly configured. Check the Azure Application Gateway documentation and Application Gateway HTTP settings configuration for details.
-
Run the following command to delete the resources you created in this recipe:
az group delete --name $rgName
Discussion
At the time of authoring this book, two Azure services support the WAF feature:
-
Azure Application Gateway for backends in the same Azure region
-
Azure Front Door for backends in different regions
WAF protects your web applications against common web attacks such as:
-
SQL injection
-
Cross-site scripting
-
Command injection
-
HTTP request smuggling
-
HTTP response splitting
-
Remote file inclusion
-
HTTP protocol violations
Check the WAF features documentation for a complete list of supported features.
Get Azure Cookbook now with the O’Reilly learning platform.
O’Reilly members experience books, live events, courses curated by job role, and more from O’Reilly and nearly 200 top publishers.

