Build an occulting eyepiece.
Almost any modern eyepiece provides reasonably good contrast and minimum glare. There are times, though, when even the best standard eyepiece isn’t quite good enough to show an extremely dim object in close proximity to an extremely bright object. For those special situations, you need an occulting eyepiece, which you can make at no cost by temporarily modifying a standard eyepiece.
For example, you may be trying to observe Deimos and Phobos, the tiny moons of Mars. (Phobos is about 26 x 22 kilometers and Deimos only about 15 x 12 kilometers.) The problem is that these tiny moons are located within a few arcseconds of Mars and are 13 to 15 magnitudes—nearly 1,000,000 times—dimmer than the planet.
Tip
Imagine a 1,000,000 candlepower searchlight pointed at you from 10 miles away, with someone standing two feet from the searchlight holding a lit candle. Resolving the Martian moons without being swamped by the light from Mars is harder than resolving the candle flame without being blinded by the searchlight.
Similarly, you may be trying to view a very tight double star with a primary that is many magnitudes brighter than the companion. Even the best standard eyepiece isn’t good enough to separate the dim companion from the glaring primary because the light from the primary star flares in your eyepiece, subsuming the tiny amount of light from the companion. Or, you may be trying to view a dim DSO near a bright star, for example the dim galaxy NGC 404 in Andromeda, which is located only seven arcminutes from the bright star Mirach.
In all of these situations, the problem is that there is a very bright object in the same field of view as the very dim object you want to see. Your first thought might be simply to put the bright object just outside the field of view of the eyepiece, leaving only the dim object in the field of view. There are two problems with that idea:
All eyepieces provide inferior images of objects near the edges of their fields of view compared to an object located near the center of the field. (Premium eyepieces have excellent edge performance, but it is still inferior to the best they can do with the object centered in the field.)
Many eyepieces exhibit severe ghosting and flaring of objects located just outside their fields of view.
The solution is to build an occulting eyepiece. An occulting eyepiece uses a small piece of opaque material—we use aluminum foil or thin plastic—at the field stop of the eyepiece to provide an occulting bar. Because the occulting bar is in the same plane as the field stop, it is sharply focused when the object is in focus. By moving the scope and rotating the occulting eyepiece as necessary, you can use the occulting bar to block the bright object, leaving the dim object visible, and in the center of the field.
It takes about five minutes to convert a standard eyepiece to an occulting eyepiece, costs nothing, and the process is easily reversible. What more could you want? There are a couple of caveats, though:
Some eyepieces are unsuitable because their field stops are inside the optical assembly of the eyepiece. Although it’s sometimes possible to modify such an eyepiece, it’s generally a very bad idea to take apart the optical assembly of an eyepiece. Use a different eyepiece instead, one that has an accessible field stop.
Whatever material you use for the occulting bar, make sure it can provide a sharp edge. Minor bumps or unevenness on the edge are OK, and, in fact, can be useful in getting the occulting bar arranged just so to cover the bright object. What you want to avoid are fuzzy edges, such as those produced with paper, cardboard, and similar materials.
For this example, we used aluminum foil for visibility in the photographs. Although we have used aluminum foil in the past, its bright surfaces introduce reflection and flaring problems unless you darken them. We’ve used black spray paint or a felt-tip marker to darken the foil. Thin, flexible, opaque black plastic is generally easier to work with, although it can be difficult to get as sharp an edge with plastic as you can with foil.
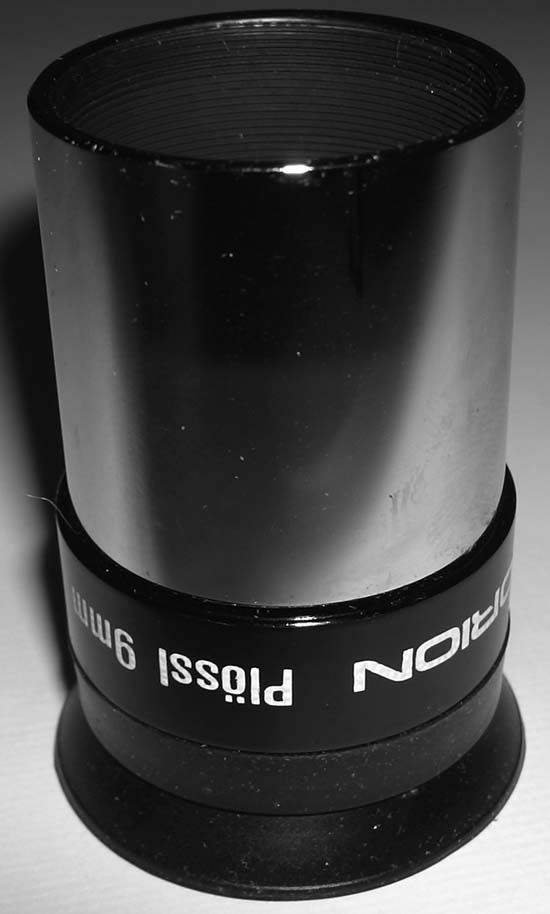
Figure 4-13 shows the inexpensive Chinese 9mm Plössl that we used to build our occulting eyepiece.
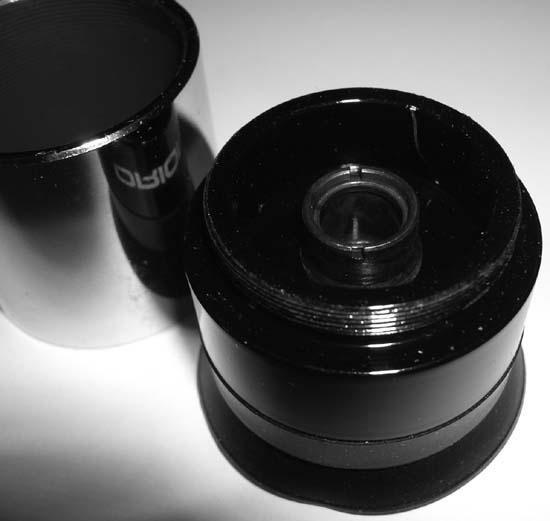
Plössl eyepiece that we started with stops are outside the lens assembly and are easily accessible. To begin, unscrew the barrel from the eyepiece to reveal the field lens assembly and field stop, visible at the center of the disassembled eyepiece in Figure 4-14.
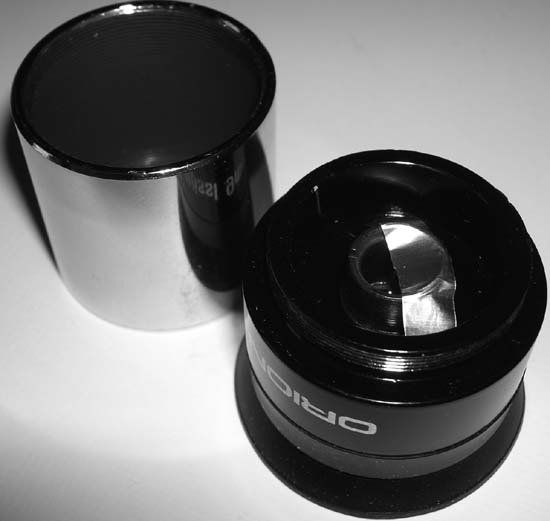
Trim a small piece of material to form the occulting bar, making sure that at least one edge is cut sharply. Depending on your needs and the size of the field lens assembly, you can use a bar that occults only a small section of the field lens or, as shown in Figure 4-15, a bar that covers an entire hemisphere of the field lens. Press the occulting bar gently into place, securing it with a small dab of glue or a piece of tape. There’s no mechanical stress on the occulting bar, so all you need is enough adhesion to keep it from falling out of the eyepiece under its own weight. We generally use a tiny dab of house-hold glue—just enough to cover the tip of a toothpick—to secure each side of the occulting bar.
If you can determine the exact plane of the field stop, and you are using foil or a similarly flexible material, you can gently press down on the occulting bar to force it a bit deeper into the field lens assembly, to put it exactly in the plane of the field stop. That’s what we did for this eyepiece, as you can see from the slight downward curve in the foil.
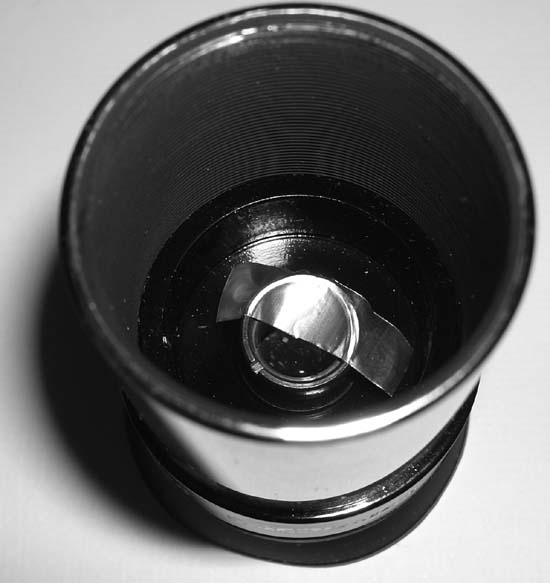
Once you have the occulting bar secured, simply screw the barrel back into the lens assembly, as shown in Figure 4-16. That’s all there is to it. You can return the eyepiece to its original state simply by removing the barrel, peeling off the occulting bar, and reinstalling the barrel.
During the 2001 Mars close approach, we used this eyepiece in our attempt to bag Deimos and Phobos. It’s a mediocre eyepiece, certainly. It doesn’t have the best coatings, and the polish isn’t up to the standard of world-class eyepieces of similar design like the Tele Vue Plössls, Orion Ultrascopics, or Celestron Ultimas. But it was what we had available (and, frankly, the only one of our eyepieces we were willing to disassemble). It yields about 280X magnification when used with our 2X Barlow in our 10” f/5 Dob, and about 420X when used with our 3X Barlow.
And it worked! Although Phobos—orbiting so very close to Mars—eluded us, we were able to bag the dimmer, smaller Deimos, which orbits Mars at a greater distance. Next time, we’ll be prepared with an eyepiece with better coatings, and perhaps we’ll be able to bag Phobos as well.
Tip
If you attempt to bag the Martian moons, understand that they are an extremely challenging target. Although it has been done with smaller scopes, we consider an 8” or 10” scope a realistic minimum. Everything must be perfect if you are to succeed. The atmosphere must be extremely transparent and stable, the site very dark, and your scope collimated perfectly [Hack #40]. It’s also critical that your entire optical train be scrupulously clean [Hack #34] [Hack #52]. Even small smudges or dust particles scatter light, reducing contrast and contributing to flare.
Get Astronomy Hacks now with the O’Reilly learning platform.
O’Reilly members experience books, live events, courses curated by job role, and more from O’Reilly and nearly 200 top publishers.


