Note
You may have a basic understanding of iTunes Connect if you were the one who registered for the iOS Developer Program. In any case, this section assumes you have an Apple ID that provides you access to iTunes Connect and allows you to add a new application. For related information, see this book’s Appendix.
There is, of course, more to the submission process than just having the App Store binary. Potential users of your application need to be convinced that your app is worthy of being installed on their device (i.e., that they are willing to ante up less than the price of a cup of coffee for your blood, sweat, and tears). You will try to convince them through words and through images, which is what the App Store listing for your app contains. Table 7-1 lists the items you’ll need as you proceed with the submission process.
Table 7-1. App Store checklist
Although there are other elements to submitting the app (which I’ll cover in a moment), having these sorts of materials queued up will make the process easier and faster.
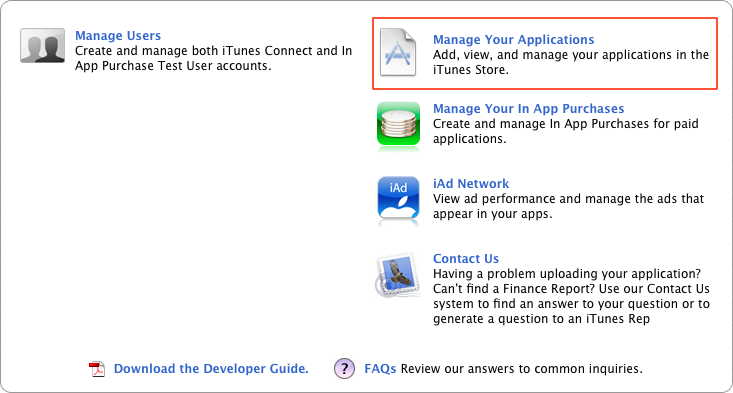
Now the big moment...time to get your app submitted to Apple! Browse to iTunes Connect (http://itunesconnect.apple.com) and log in using the appropriate Apple ID. Assuming you have the appropriate permissions, you should see the Manage Your Applications link on the home screen (see Figure 7-3). Click it and then click the Add New Application button on the next screen. At this point, you are officially at the beginning of the submission process. By having your checklist assets close at hand, you should be less than five minutes away from submitting your app.
Figure 7-3. Clicking the Manage Your Applications link in iTunes Connect to begin the application submission process
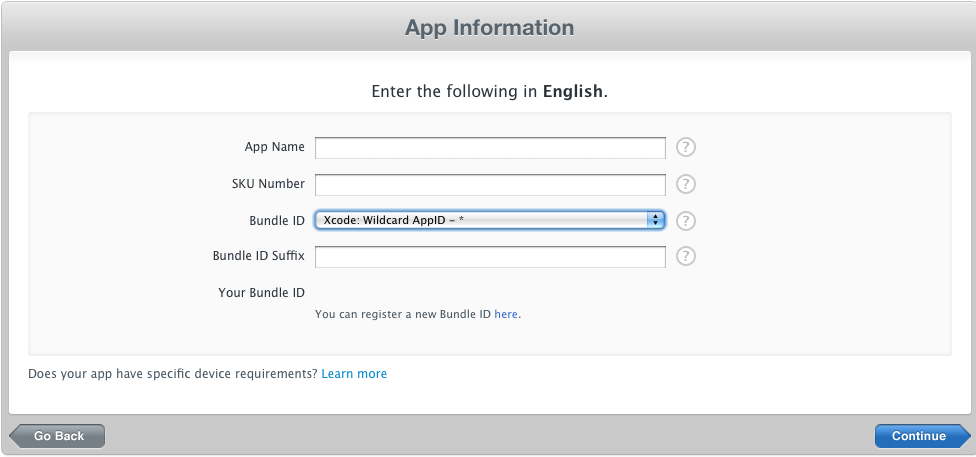
Aside from the application name and SKU number (a unique number you assign to your app) the App Information screen focuses on slightly more developer-centric information (see Figure 7-4). In particular, you’ll want to work with your developer to complete all the bundle-related fields.
Figure 7-4. The App Information screen, which has several key bundle fields that your developer will need to provide to you
From your checklist, you should already have your application name and should be able to easily fill that in to the App Name field. The SKU Number field is more for your benefit than anyone else’s. This number, among other uses, will help you differentiate the sales for this app from others. Try to use some logic in creating it, such as incorporating the app name initials and year, but don’t overthink it.
Apple doesn’t allow you to enter a price for an app. Instead, it uses a Price Tier, with Tier 1 representing $0.99 and Tier 85 representing $999.99. The tiers generally increment by $1, but in the upper tiers they increase by $5, $10, $50, and eventually $100. By selecting a different tier, you’ll see the Customer Price in other regions in the Pricing Matrix, as well as Your Proceeds, which is the amount you’ll receive after Apple takes its 30%.
Note
The Rights and Pricing screen looks different and is less functional during an initial submission of your application. For example, you’ll have to click See Pricing Matrix to view the Customer Price and Your Proceeds. More important is that during the initial submission, you will not see the Price Tier Effective Date and Price Tier End Date (described shortly). Come back to the Rights and Pricing screen either after you submit your application or after you submitted it without the binary to edit these options.
The Rights and Pricing screen contains three additional key elements: the Availability Date, price tier change dates, and stores where you want the application available. The Availability Date is deceivingly tricky. It provides you with an opportunity to set a date in the future for your app, but does not guarantee it will be available by that time. So, if you are trying to plan a marketing event around the launch of your app, don’t base it on what you enter in the Availability Date section, unless that date is far enough in the future that you can guarantee it will be approved (usually three or more weeks into the future should suffice).
If you want to be available to support the app once it is launched, you may also want to avoid choosing a weekend date, though there may be some advantage to this approach, in that there would be less competition at that time (but you’d need to be available off normal business hours). There’s also some advantage to launching an app at the end of the week, since sales are normally higher then and it’s the time when Apple refreshes its Featured apps.
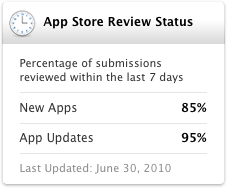
If your Availability Date passes and the app is still not approved, it will be made available in the App Store as soon as it is approved—that is, unless you edit the date before this occurs. To have better control of your marketing efforts, you will want to come back to change this date if that’s the situation you find yourself experiencing. Apple provides a somewhat frequently updated App Store Review Status (see Figure 7-5) in the App Store Resource Center of the iOS Dev Center. It provides high-level information regarding how quickly new and updated apps are being approved. You may want to use this information as guidance for influencing your Availability Date (https://developer.apple.com/iphone/appstore/approval.html).
Figure 7-5. The App Store Review Status, available in the App Store Resource Center, which shows the number of submissions reviewed within the past seven days
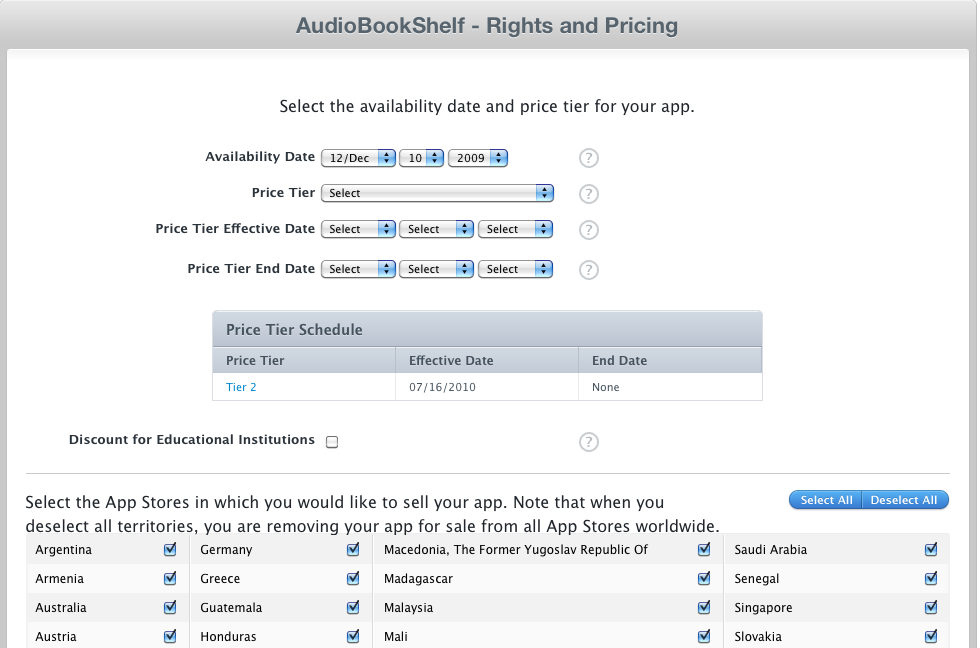
Two items that won’t show on this screen when you first submit your app are the Price Tier Effective Date and Price Tier End Date. They are related and can be used to create periods of time where you either drop or increase the price of your app. Apple included this feature because many developers will offer promotional pricing for an app for a specified period of time. Previously, you would have to log in to iTunes Connect to drop and subsequently increase the price, but that’s no longer the case with Price Tier Effective Date and Price Tier End Date (shown in Figure 7-6). If you don’t have any promotions planned yet, don’t concern yourself with these items. As with everything in iTunes Connect, you can make edits and updates later.
Figure 7-6. The Price Tier Effective Date and Price Tier End Date, which will initially not show on the Rights and Pricing screen
By default, Apple will make your app available to App Stores worldwide to increase the app’s exposure and revenue potential. The distribution of your app can definitely be a strategic decision. There can be issues with how the app functions internationally, such as date formats impacting functionality or language barriers if the app description is not localized. You’ll likely have assessed those issues before coming into iTunes Connect. To change the geographic availability, you’ll need to click the “here” link in the text that reads “Or, you can select specific stores here” at the bottom of the Rights and Pricing screen. Deselect the App Stores where you do not want your app published.
Note
There’s a trend among more sophisticated developers to launch an app into a smaller comparable market before launching it globally. For example, many game developers focused on the U.S. market are first launching in Canada, improving the app, and then releasing it to the rest of the stores. This strategy is addressed more fully in the TapMetrics interview at the end of the chapter.
The Version Information screen is arguably the most important of the submission process and is broken down into four sections: Metadata, Rating, EULA, and Images. The first and last sections will mostly be completed by having your App Store checklist assets handy. It’s extremely uncommon to alter the EULA, so I will not be addressing that section at this time.
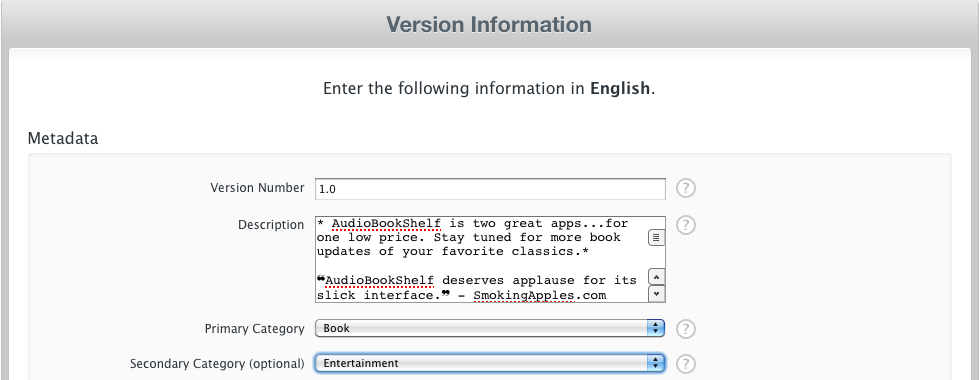
For the Metadata section (see Figure 7-7), you’ll use the text portions of your App Store checklist. You’ll be using your application description and keywords in this section and should be able to just copy and paste them into the relevant fields. You’ll also be assigning your app to its primary and secondary categories (see Chapter 1 and the TapMetrics interview at the end of this chapter for information about choosing your category).
Figure 7-7. The Metadata section on the Version Information screen, which contains most of the textual content for your application
There are two Apple-centric fields in the Metadata section: Version and Copyright. The version number can be whatever you want, but it is exposed to your users and is unique to a specific version of your application. It’s typical to number your first version of the app as “1.0,” and then increment that number with each app update (e.g., “1.1.2” or “2.0”). As described in Chapter 5, most developers use version systems that include three digits (see the Release Numbering sidebar in Chapter 5). For the Copyright entry, add the individual or entity that owns the copyrights to the application. Apple prefers the format to be the year followed by the individual or entity (e.g., 2010 Ken Yarmosh).
Apple has made the Rating section easier for you by creating the app rating through a combination of selections for different categories. The ratings include 4+, 9+, 12+, and 17+. As you toggle the radio buttons for each category, you’ll see the rating update.
Along with the Metadata section, the Images section is another place where you’ll be happy to have all the App Store checklist items ready. You should be able to quickly match your checklist assets with the app icon and screenshots. Although it’s not required, you’ll definitely want to use all the screenshots available to you. As needed, be sure to reorder them to have some logical flow and focus. After completing the image-related fields, you can click the Save Changes button.
Upon saving the details for your app, you will be taken to the App Summary screen. This screen represents the area you will visit for each of your submitted or approved applications. It will allow you to access and edit the details of your application going forward.
While you are at the App Summary screen, you are still not quite done with submitting your application to Apple. For starters, if you are enabling In App Purchases or iAds for this particular app, you will need to click either the Manage In App Purchases or the Set Up iAd Network button on the App Summary screen. A button for enabling Game Center is also present in the same area. At a more basic level, though, you will need to revisit the Version Information screen to add any desired localizations and submit your application binary.
Access the Version Information screen again by clicking the View Details button under Versions on the App Summary screen. This screen will look different than it did previously. Among other differences, in the top righthand corner, you’ll see two buttons, Ready to Upload Binary and Manage Localizations. I’ll address the second button first.
Most apps are launched worldwide without localizing the App Store content. If you have a specific target market, however, you may want to add a new language through the Manage Localizations button. Once in the localizations area, you can reuse much of the information from the Version Information screen, but you will now have the opportunity to create the metadata content in an alternative language.
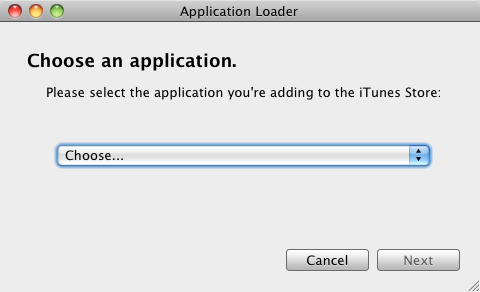
Assuming you have completed all other required items, click the Ready to Upload Binary button on the Version Information screen. Provide an answer for the Export Compliance question regarding encryption, which in all likelihood should be “No.” Note that you will need to upload your binary through the Application Loader tool (Mac only, shown in Figure 7-8). Beginning in iOS SDK 3.2, the Application Loader comes bundled with the software (see the iOS SDK section in this book’s Appendix). Apple will surface a direct download of this tool after the Export Compliance question is answered. You can also find a download link at the bottom of the Manage Your Applications page, which reads Download Application Loader.
Once you have completed the binary upload, your application will move into its first phase of the App Store approval process: Waiting for Review. The next section will help you understand the approval process a bit more. Although it’s important to understand this process, it’s vital to use the approval waiting time for other activities that will help you make your app more successful. See Chapter 8 to get started on some of those items, if you haven’t done so already.
In the short existence of the App Store, Apple has taken a tremendous amount of criticism about its approval process. Developers complained about the lack of transparency into and consistency of the process. More broadly, their concerns centered on the fact that approving apps affected their ability to keep their software updated and functioning properly.
Today, Apple has not solved all of these problems, but is has significantly lessened the uproar. The biggest areas of improvement have been providing greater visibility into the approval process and reducing the time it takes to approve an app.
Your app can be in one of 11 statuses at any one time. These statuses vary from your needing to wait for Apple to Apple waiting for you. The most common statuses are as follows:
- Waiting for Upload
This status indicates that Apple is ready to receive your app’s binary through the Application Loader.
- Waiting for Review
As mentioned previously, this state will occur upon your submission of a fully completed app. Once in this state, you will await Apple’s review of your app.
- In Review
This status indicates that Apple has begun reviewing your application.
- Rejected
Not fun; this status indicates that your application has been rejected and requires you to address one or more items and resubmit your app to Apple.
- Ready for Sale
Your app has been approved by Apple; depending on what you selected for your app’s Availability Date, it can be eligible to begin appearing in the App Store shortly.
A full listing of all 11 statuses is available from Apple in the App Store Resource Center of the iOS Dev Center (http://developer.apple.com/ios/appstore/approval.html).
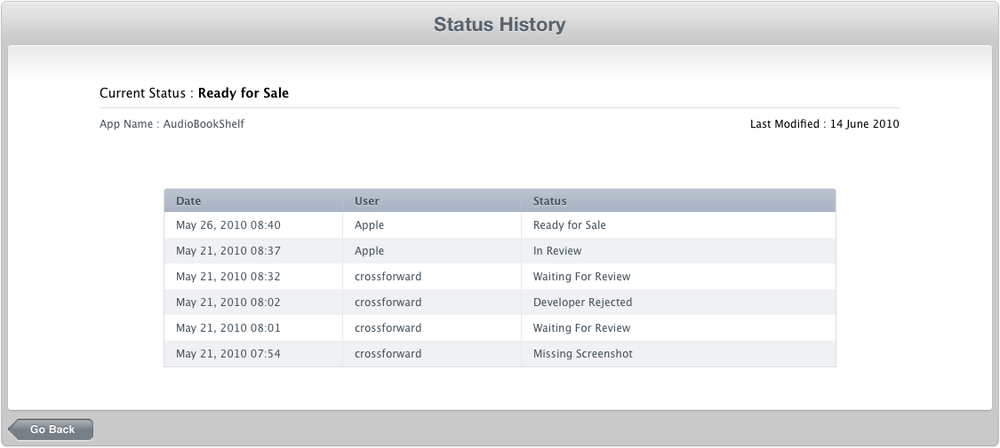
If you have opted to receive notifications (iTunes Connect✓Manage Users✓Edit Profile✓Notifications) you will get an email whenever your app changes status. You can also see the current status and status history of an app by clicking on the Status History link (see Figure 7-9) from the Version Information screen. The Status History page will include an audit trail of when the app was submitted, when it went into review, when it was ready for sale, and any other status changes.
I want to make two final comments regarding statuses. First, remain calm if your app gets rejected. Second, when your app becomes Ready for Sale and you choose for it to start appearing in the App Store (see the Availability Date discussion earlier in this chapter), it will likely take some time—possibly several hours or more—before it begins appearing in the App Store. Although you’ll be eager to see it start showing, use this time wisely. Whether it’s prepping your final marketing push or readying support channels, there are better things to do than constantly look for your app in the App Store (these “better things” are covered in the Launching Your App (Phase 5) section in Chapter 8). Your app will show in the App Store...eventually.
Thankfully, you are joining the App Store at a time when rejections are both less common and easier to resolve. Although there was no official change in policy or announcement from Apple, anecdotally the approval process has seemed less stringent and faster since the beginning of 2010.
Rejection emails have also generally been more helpful. Members of the App Review Team from the iOS Developer Program often will give specific scenarios that cause crashes and may even include crash logs your developer can use to identify issues. The bottom line is that unless your application was rejected for more ideological reasons, such as Apple deeming it to have duplicated similar functionality to its own apps (e.g., the iPod app) or due to questionable content, having an app rejected is just part of your App Store journey.
Note
If your app gets rejected more than once, you might consider using one of your Technical Support Incidents (TSIs) by sending an email to idp-dts@apple.com. Most memberships include two TSIs, but more can be purchased. You can access information about your TSIs from the Technical Support section of the Programs & Add-ons tab, which is part of the Member Center of the Apple Developer program portal (http://developer.apple.com/membercenter/index.action#techSupport).
Once your developer has resolved the issue and you’ve tested it (particularly in relation to why the iOS Developer Program stated it was rejected), use the Application Loader to replace the app’s binary.
If you’ve followed your marketing checkups to this point, once your app has attained the Ready for Sale status, you’ll have the option to launch it into the App Store. Or, if your Availability Date has already lapsed, your app will be published to the App Store shortly. In either case, go directly to the Launching Your App (Phase 5) section of Chapter 8.
Get App Savvy now with the O’Reilly learning platform.
O’Reilly members experience books, live events, courses curated by job role, and more from O’Reilly and nearly 200 top publishers.
