This is an idea book. It’s a compendium of solutions and suggestions devoted to making your work with Microsoft Access more productive. If you’re using Access and you aspire to create database applications that are more than wizard-created clones of every other database application, this is the book for you.
If, on the other hand, you’re looking for a book that shows you how to create a form, or how to write your first Visual Basic for Applications (VBA) function, or how to use the Crosstab Query Wizard, this may not be the book you need. For those kinds of things, we recommend one of the many Access books geared toward the first-time user.
Rather than rehashing the manuals, Access Cookbook offers you solutions to problems you may have already encountered, have yet to encounter, or perhaps have never even considered. Some of the issues discussed in this book are in direct response to questions posted in the Microsoft Access newsgroups online (at news://msnews.microsoft.com); others are problems we’ve encountered while developing our own applications. In any case, our goal is to show you how to push the edges of the product, making it do things you might not even have thought possible.
For example, you’ll learn how to create a query that joins tables based on some condition besides equality, how to size a form’s controls to match the form’s size, how to store and retrieve the locations and sizes of forms from session to session, and how to create a page-range indicator on every report page. You’ll see how to use some of the common Windows dialogs from your Access application, how to internationalize your messages, how to really control your printer, and how to store the username and date last edited for each row. There are tips for securing your database, filling list boxes a number of different ways, and optimizing your applications. You’ll find details on using Access in multiuser environments, creating transaction logs, adjusting database options depending on who’s logged in, and programmatically keeping track of users and groups. There are instructions for using the Windows API to restrict mouse movement to a specific area of a form, exiting Windows under program control, and checking the status of and shutting down another Windows application. You’ll see how, using COM and Automation, you can use Access together with other applications such as Word, Excel, PowerPoint, and Outlook.
If you’ve never tried data access pages (DAPs), you’re in for a treat—this feature makes it simple for you to display and edit data using a web browser. You’ll learn enough to really get you started with this exciting technology, and you’ll learn solutions to common but tricky problems. You’ll find tips and techniques for using Access and SQL Server together, taking advantage of Access Data Projects (ADPs). You’ll learn how smart tags have been implemented in Access 2003, and how to create your own smart tags. And you’ll also see how you how Access allows you to work with XML data. You’ll explore how to work with SharePoint lists from within Access as well as how to use SharePoint and FrontPage to publish Access data on the Internet or an intranet. Finally, you’ll discover how easy it is to interoperate with Microsoft .NET from Access, learning both how to call .NET programs and Web services from Access and how to work with Access data and reports from .NET programs.
You won’t, however, find that this book pushes you into using new technology just because it’s new. Many of the techniques in this book are “old chestnuts” that Access developers have used for years to solve common problems. Most of the VBA code that performs data manipulation chiefly uses the older technology, DAO, rather than the newer ADO, because DAO is still the most efficient way to work with Access data. When ADO provides a better approach to solving a particular problem, you’ll learn how to use it for that purpose. For example, you’ll learn how you can use an ADO recordset to retrieve a list of all the users logged on to your application—something that was never possible with DAO.
This book focuses on using the right tool for each problem. Some solutions here require no programming, while others require a little (or a lot) of VBA coding. Sometimes even plain VBA code isn’t sufficient, and you’ll need to use the Windows API or other available code libraries. In each case, we’ve tried to make the implementation of the technique as simple, yet generic, as possible.
We did, however, decide to focus the data access features of this book squarely on using the Jet database engine (instead of SQL Server). There are several reasons why we made this choice, but first and foremost is that most Access developers still prefer the convenience and simplicity of using Jet. The Jet database engine remains a cost-effective and capable solution for database applications used by small workgroups, which make up the vast majority of the Access user base. Most of the techniques described in this book, however, will work just as effectively with data from SQL Server or from other ODBC data sources, even if the example uses a Jet database. And if you are working with non-Access data sources, you’ll find plenty of tips focused on helping you do so more efficiently.
The structure of this book is simple. The chapters are arranged by categories: queries, forms, reports, application design, printing, data manipulation, VBA, optimization, user interface, multiuser, Windows API, Automation, DAPs, and SQL Server applications. Each section consists of a single problem and its solution, followed by a discussion. Each solution contains a sample database (e.g., 01-01.MDB) with complete construction details, indicating which modules you’ll need to import, what controls you’ll need to create, and what events you’ll need to handle. In one case, Recipe 4-10, any MDB file used elsewhere in the chapter will do. To use certain Chapter 14 examples, you will need to be connected to either the Northwind or Pubs databases that ship with SQL Server. All the code, bitmaps, sample data, and necessary tools are included with the CD-ROM that accompanies this book. (CD content is available online at http://examples.oreilly.com/accesscook.)
You don’t have to be a VBA whiz to use this book. It’s designed for all levels of readers: end users, power users, and developers.
In every case, we’ve made the steps needed to implement our solution as simple as possible. When VBA is involved, we’ve recommended which modules to import from the sample database and discussed the important features of the code within the text. You shouldn’t have to retype any of the code unless you care to—in fact, you shouldn’t retype the code, since we rarely include every single line of code here in the book. We’ve pointed out the important code here but left much of the support code on the CD-ROM (see http://examples.oreilly.com/accesscook). What’s more, you don’t actually have to understand the solutions to most of the problems covered in this book in order to make use of them. In each case, you’ll find a sample database that demonstrates the technique and explicit instructions on how to implement the same technique in your own applications. Of course, you’ll learn the most by digging into the samples to see how they work, and each solution includes comments to help you understand the underlying technology.
To use this book, you’ll need a computer capable of running Windows 98 (or later), Windows Me, Windows NT 4.0 SP5 (or later), Windows 2000, or Windows XP, and Microsoft Access 2003 or Microsoft Access 2002 (part of Office XP). You’ll find, however, that most of the solutions work just as effectively with prior versions of Access, in case you are supporting mixed-user environments. (We’ve provided all the solutions for the first 14 chapters in Access 2000 format, so that you can open them in Access 2000, Access 2002, or Access 2003. Some of the code will only run in Access 2002 or later).
The final four chapters include features new to Access 2003, and the samples there are guaranteed not to run in Access 2000, although some may work in Access 2002. To demonstrate the topics in Chapter 12, Automation, you’ll need to have copies of Microsoft Excel, Word, PowerPoint, and Outlook. These applications aren’t strictly necessary, but having them installed on your system will allow you to try out the example databases. Chapter 14 uses tools that are part of SQL Server, which you may also want to have accessible, along with the Northwind and Pubs sample databases that ship with SQL Server. Some of the solutions in Chapter 15 require you to own a copy of FrontPage and have access to a SharePoint Web server. You’ll need a copy of Visual Basic 6.0 to complete the custom smart tag DLL sample shown in Chapter 16. The solutions in Chapter 17 require the Microsoft .NET Framework 1.1 and Visual Studio .NET 2003. .NET Framework 1.1 is available as a free download through the Microsoft Developer Network (MSDN) (See http://msdn.microsoft.com/netframework/technologyinfo/howtoget/). A 60-day Trial Edition of Visual Studio .NET 2003 that includes a copy of SQL Server Developer Edition (MSDE) is also available (See http://msdn.microsoft.com/vstudio/productinfo/trial/default.aspx).
This book is organized into 18 chapters, each of which focuses on a particular Access programming topic.
- Chapter 1
This chapter covers the many types of queries and the power you have over the Access environment through the use of queries. From simple select queries through parameter, crosstab, totals, and Data Definition Language (DDL) queries, this chapter will show many different ways to use queries in your applications. Queries are the real heart of Access, and learning to use them intelligently will make your work in Access go much more smoothly.
- Chapter 2
Most database applications require some sort of user interface, and in Access, that user interface is almost always centered around forms. This chapter demonstrates some useful ways to make forms do your bidding, whether in terms of controlling data or making forms do things you didn’t think were possible. We demonstrate how to create multipaged forms and how to create an incremental search list box. We also show how to create your own pop-up forms, with a technique you can use in many situations. Forms can do much more than you might have imagined, and this chapter is a good place to look for some new ideas.
- Chapter 3
It seems as though reports ought to be simple: just place some data on the design surface and “let her rip!” That’s true for simple reports, but Access’s report writer is incredibly flexible and allows a great deal of customization. In addition, the report writer is quite subtle in its use of properties and events. The topics in this chapter will advance your understanding of Access’s report writer, from creating snaking column reports to printing alternating gray bars. Some of the solutions in the chapter will require programming, but many don’t. If you need to create attractive reports (and everyone working with Access does, sooner or later), the topics in this chapter will make your work a lot easier.
- Chapter 4
This chapter is a compendium of tips and suggestions for making your application development go more smoothly, more professionally, and more internationally. Rather than focusing on specific topics, this chapter brings up a number of issues that many developers run across as they ready their applications for distribution. How do you build a list of objects? How do you make sure all your objects’ settings are similar? How do you translate text in your application? How do you use the common Windows dialogs? All these questions, and more, make up this group of tips for the application developer.
- Chapter 5
Many developers need to gain tight control over printed output, but earlier versions of Access made this quite difficult. Starting with Access 2002, you’ll find direct support for selecting a specific printer device, changing print layout settings, and more. This chapter introduces the Printer object and its properties, allowing you to perform tricks that were difficult, if not impossible, in earlier versions. (Although many of the chapter databases will work in Access 2000, this chapter’s examples will not. Because the functionality presented here was new in Access 2002, the samples simply won’t do anything useful in Access 2000.)
- Chapter 6
This chapter concentrates on working with data in ways that traditional database operations don’t support. You’ll learn how to filter your data, back it up, locate it on the filesystem, calculate a median, perform sound-alike searches, save housekeeping information, and more. Most examples in this chapter use some form of VBA, but they are clearly explained, and “testbed” applications are supplied to show you how each technique works.
- Chapter 7
The solutions in this chapter cover some of the details of VBA that you might not find in the Access online help. We’ve included topics on several issues that plague many Access developers, from handling embedded quotes in strings and creating procedure stacks and code profilers, to programmatically filling list boxes, to working with objects and properties. We’ve included code to sort an array and solutions that combine several of the previous topics, such as filling a list box with a sorted list of filenames. If you’re an intermediate VBA programmer, this chapter is a good place to expand your skills. If you’re already an expert, this chapter can add some new tools to your toolbox.
- Chapter 8
Access is a big application, and when designing applications you have a number of choices to make, each of which can affect the application’s performance. Unless you’re creating only the most trivial of applications, you’ll have to spend some time optimizing your applications. This chapter’s topics work through several different areas of optimization—steps you can take to make your databases work as smoothly as possible. The topics range from optimizing queries, forms, and VBA, to testing the speed of various optimization techniques, to accelerating client/server applications. If you want your applications to run as quickly as possible, this chapter is a good place to look for tips.
- Chapter 9
This chapter presents a compendium of user interface tips and techniques. By implementing the ideas and techniques in this chapter, you’ll be able to create a user interface that stands out and works well. You’ll find some simple, but not obvious, techniques for controlling the Access environment, such as altering your global keyboard mappings as you move from one component of your application to another and creating forms that hide the menus and toolbars when they’re active. The chapter shows how to create combo boxes that accept new entries and how to provide animated images on buttons. You’ll also find useful tips on working with data on your forms, using an ActiveX control to improve your interface.
- Chapter 10
Few modern database applications run on standalone machines; most must be able to coordinate with multiple users. This chapter offers solutions to some of the common problems of networking and coordinating multiple simultaneous users. The most important issues are security and locking, and this chapter has examples that cover each. In addition, the topics in this chapter focus on replication, transaction logging, password control, and keeping users from holding locks on data. If you’re working in a shared environment, you won’t want to miss this chapter!
- Chapter 11
No matter how much you’ve avoided using the Windows API in Access applications, in this chapter you’ll discover that it’s really not a major hurdle. We’ll present some interesting uses of the Windows API, with example forms and modules for each solution. In most cases, using these examples in your own applications takes little more work than importing a module or two and calling some functions. You’ll learn how to restrict the mouse movement to a specific area on the screen, how to run another program from your VBA code, and how to wait until that program is done before continuing. We’ll demonstrate a method for exiting Windows under program control and how to retrieve information about your Access installation and the current Windows environment. The possibilities are endless once you start diving into the Windows API, and this chapter is an excellent place to start.
- Chapter 12
This chapter gives you examples of using Automation to interact with most of the Microsoft Office applications. One solution uses the statistical, analytical, and financial prowess of the Excel function libraries, directly from Access; another shows how to programmatically create an Excel chart. You’ll learn how to retrieve document summary information for any selected Word document and how to perform mail merges using Access data. Other examples demonstrate how to use Access to control PowerPoint and how to add contacts in Outlook.
- Chapter 13
Distributing Access applications normally means that your users have to install Access (or the Access runtime version, available as part of Microsoft Office XP Developer) on their local machines. What if users could run your applications over a corporate intranet, without requiring Access to be installed? That’s the goal of DAPs. This chapter introduces some of the concepts you’ll need to understand in order to take advantage of this feature, which was added in Access 2000 and significantly improved in Access 2002. You’ll learn how to customize the navigation controls and how to use your own controls for navigation. You’ll find tips on creating pages that allow users to update data and valuable techniques for managing your data connections, and you’ll learn how to adjust the default settings for the different sections of new DAPs to give your applications a consistent look.
- Chapter 14
This chapter shows you how to take advantage of the new data options available in Access Data Projects, which connect directly to a SQL Server database, and provides solutions that address traditional MDB databases linked to SQL Server data. You’ll learn how to dynamically connect to SQL Server at runtime, whether you are using an ADP or an MDB, and you’ll learn how to allow multiple users to share a single ADP. You’ll see how to make the most of the Server Filter By Form feature in ADPs and how to pass parameters to stored procedures in both ADPs and MDBs. You’ll also discover how you can use an ADP to connect to multiple SQL Server databases at once, even though the ADP seems to force you to select a single one.
- Chapter 15
As powerful as Data Access Pages are, they only represent one way to gain access to your Access data from a browser. This chapter introduces you to other Microsoft Office web technologies you can use to “webify” your Access databases. You’ll learn how to use Microsoft FrontPage to create a web form that posts its data to an Access database. You’ll also learn how to use the FrontPage Database Interface Wizard to create an ASP or ASP.NET front end to an Access database. You’ll learn how to use Windows SharePoint Services along with FrontPage to create web pages that draw data from Access databases without writing any code. You will also learn how to use Access as a frontend for managing SharePoint lists.
- Chapter 16
Smart Tags were introduced in Office XP, but they weren’t available in Access until now. This chapter shows you how to use the built-in smart tags in your applications, attaching them to form controls or to fields in a table. You’ll learn to configure smart tags interactively or by writing code. You’ll also learn how to extend smart tag functionality by creating your own custom smart tags.
- Chapter 17
Microsoft .NET and Access live in two different programming worlds, but you can use a set of interoperability tools to bridge the two worlds. This chapter shows you how to take advantage of these tools to call a .NET component from an Access application. You’ll also learn how to call a .NET web service from Access, and how to manipulate the .NET objects returned by some web services. You’ll learn how to retrieve data from an Access database using ADO.NET. And you’ll learn how to automate an Access report from a .NET application.
- Chapter 18
One of the strengths of Access is its ability to work with data from many disparate sources. XML has emerged as a dominant standard for exchanging data between applications, and Access now enables you to work with this data. In this chapter you’ll learn how to import and export XML data and schema, and how you can use XSLT to reformat XML data. For example, you’ll see how to use XML technologies to export a report to an HTML or ASP Web page, preserving the look and feel of the original Access report.
To keep this book to a reasonable length, we have made some
assumptions about your skills. First and foremost, we take it for
granted that you are interested in using Microsoft Access and are
willing to research the basics in other resources. This
isn’t a reference manual or a
“getting started” book, so we
assume you have access to that information elsewhere. We expect that
you’ve dabbled in creating Access objects (tables,
queries, forms, reports, and pages) and that you’ve
at least considered working with VBA (Visual Basic for Applications,
the programming language included with Access). We encourage you to
look in other resources for answers to routine questions, such as
“What does this Option
Explicit statement do?” For
example, see Access Database Design & Programming, Third Edition,
by Steven Roman (O’Reilly) or VB & VBA in a
Nutshell by Paul Lomax (O’Reilly)
To get you started, though, following are basic instructions for what you’ll need in order to use the solutions in this book. For example, you’ll encounter requests to “create a new event procedure.” Rather than including specific steps for doing this in each case, we have gathered the most common techniques you’ll need into this section. For each technique we’ve included a help topic name from the Access online help, so you can get more information. The procedures here are not the only way to get the desired results, but rather are single methods for achieving the required goals.
In the steps for many of the solutions in this book, you’ll be asked to assign properties to objects on forms or reports. This is a basic concept in creating any Access application, and you should thoroughly understand it. To assign properties to a control (or group of controls), follow these steps:
In design mode, select the control or group of controls. You can use any of the following methods (each of the items here refers to form controls but works just as well with reports):
- Single control
Click on a single control. Access will mark it with up to eight sizing handles—one in each corner, and one in the middle of each side of the control, if possible.
- Multiple controls
Click on a single control, then Shift+Click on each of the other controls you want to select. Access will mark each of them with sizing handles.
- Multiple controls
Drag the mouse through the ruler (either horizontal or vertical). Access will select each of the controls in the path you dragged over. If partially selected controls don’t become part of the selection and you’d like them to, open Tools→ Options → Forms/Reports and look at the Selection Behavior option. It should be set to Partially Enclosed.
- Multiple controls
If you need to select all but a few controls, select them all and then remove the ones you don’t want. To do this, choose the Edit → Select All menu item. Then Shift+Click on the controls you don’t want included.
Make sure the properties window is visible. If it’s not, use View → Properties (or the corresponding toolbar button).
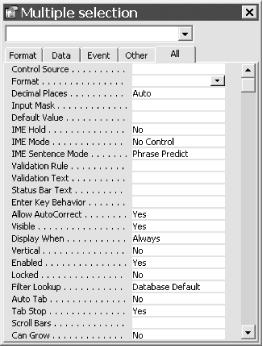
If you’ve selected a single control, all the properties will be available in the properties window. If you’ve selected multiple controls, only the intersection of the selected controls’ properties will be available in the properties window. That is, only the properties all the selected controls have in common will appear in the list. As shown in Figure P-1. Select a property group and then assign the value you need to the selected property. Repeat this process for any other properties you’d like to set for the same control or group of controls.
VBA code is stored in containers called modules, each consisting of a single declarations section, perhaps followed by one or more procedures. There are two kinds of modules in Access: global modules and class modules. Global modules are the ones you see in the database window, once you choose the Modules tab. Class modules are stored with either a form or a report and never appear in the database window. (Actually, you can also create standalone class modules, which do appear in the database window. The use of these types of modules, which allow you to define the behavior for your own objects, is beyond the scope of this book.) There are various reasons to use one or the other of the two module types, but the most important consideration is the availability of procedures and variables. Procedures that exist in global modules can, for the most part, be called from any place in Access. Procedures that exist in a class module generally can be called only from that particular form or report and never from anywhere else in Access.
You’ll never have to create a form or report module, because Access creates those kinds of modules for you when you create the objects to which they’re attached. To create a global module, follow these steps:
From the Database Explorer, click on the Modules tab to select the collection of modules, then click on the New button (or just choose the Insert ‡ Module menu item).
When Access first creates the module, it places you in the declarations section. A discussion of all the possible items in the declarations section is beyond the scope of this Preface, but you should always take one particular step at this point: if you don’t see
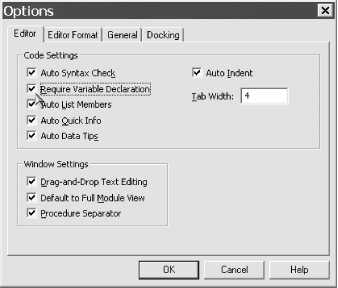
OptionExplicitat the top of the module, insert it yourself. Then use the Tools → Options menu from within the VBA editor to turn on the Require Variable Declaration option (see Figure P-2). With this option turned on, all new modules you create will automatically include theOptionExplicitstatement. If you don’t insert this statement and Access encounters a reference to an unknown variable, Access will create the variable for you. With theOptionExplicitstatement, Access forces you to declare each variable before you use it.Although this may seem like an unnecessary burden for a beginner, it’s not. It’s an incredible time saver for all levels of users. With the
OptionExplicitstatement in place, you can let Access check your code for misspellings. Without it, if you misspell a variable name, Access will just create a new one with the new name and go about its business.
Figure P-2. Use the Tools → Options dialog from within VBA to turn on the Require Variable Declaration option
If you are asked to create a new function or subroutine, the simplest way to do so is to use Insert → Procedure. For example, if the solution instructs you to enter this new procedure:
Function SomeFunction(intX as Integer, varY as Variant)
you can use Insert → Procedure to help you create the function.
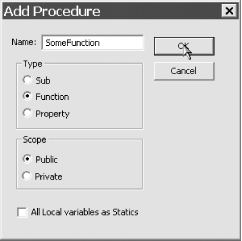
Click OK in the Add Procedure dialog, as shown in Figure P-3. Access will create the new procedure and place the cursor in it. For the example in Step 3, you must also supply some function parameters, so you’ll need to move back up to the first line and enter
intXasInteger,varYasVariantbetween the two parentheses.
In this book’s solutions, you’ll often be asked to import an object from one of the sample databases. Follow these steps:
With your database open on the Access desktop, select the database window by pressing F11. (If you’re in the VBA editor, first press Alt+F11 to get back to Access.)
Choose File → Get External Data → Import, or right-click on the database window and choose Import.
Find the database from which you want to import a module, and click Import.
In the Import Objects dialog, select all of the objects you’d like to import, moving from object type to object type. When you’ve selected all the objects you want to import, click OK.
If a solution instructs you to import a module from one of the sample databases that you’ve already imported (for a different solution), you can ignore the instruction. Any modules with matching names in the sample database contain the exact same code, so you needn’t import it again.
Programming in Access often depends on having macros or VBA procedures reacting to events that occur as you interact with forms. You’ll find that most of the solutions in this book use VBA code rather than macros, because code provides better control and safety. But occasionally a macro is the right tool for the job. To create a macro that will react to a user event, follow these steps:
Select the appropriate object (report, form, or control) and make sure the properties window is displayed.
Choose the Event properties page on the properties window, or just scroll down the list until you find the event property you need.
Click on the ellipsis (...) button to the right of the event name, as shown in Figure P-4. This is the Build button; it appears next to properties window items that have associated builders. In this case, clicking the Build button displays the Choose Builder dialog, shown in Figure P-5. Choose the Macro Builder item to create a new macro. (If you don’t often use macros, in the Tools → Options dialog, on the Forms/Reports page, you can choose to “Always use event procedures”. The Build button will immediately take you to the Visual Basic Editor.)
Give the macro a name, so Access can save it and place its name in the properties window. You can always delete it later if you change your mind. Give your new macro the name suggested in the solution, and fill in the rows as directed. When you’re done, save the macro and put it away.
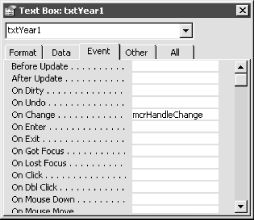
Once you’re done, you’ll see the name of the macro in the properties window, as shown in Figure P-6. Whenever the event occurs (the Change event, in this case), Access will run the associated macro (
mcrHandleChange).
If you want to call an existing macro from a given event property, click on the drop-down arrow next to the event name, rather than the Build button. Choose from the displayed list of available macros (including macros that exist as part of a macro group).
Programming in Access often depends on having VBA procedures react to events that occur as you interact with forms or reports. To create a VBA procedure that will react to a user event, follow these steps:
Select the appropriate object (report, form, or control) and make sure the properties window is displayed.
Choose the Event Properties page on the properties window, or just scroll down the list until you find the event property you need.
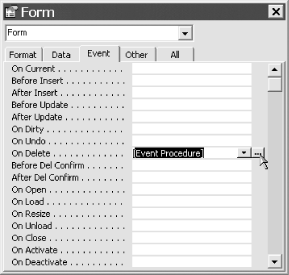
Select the property, then click the down arrow button next to the property. Select [Event Procedure] from the list of options.
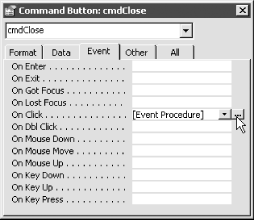
Click the “...” button to the right of the event name, as shown in Figure P-7. This is the Build button, and it appears next to properties window items that have associated builders. In this case, clicking the Build button takes you to a stub for the event procedure you need to create.
Now follow these steps to complete the process:
If the solution asks you to enter code into the event procedure, enter it between the lines of code that Access has created for you. Usually, the code example in the solution will include the
SubandEndSubstatements, so don’t enter them again.When you’re done, close the module window and save the form. By saving the form or report, you also save the form’s module.
When a solution asks you to place a procedure in a form or report’s module that isn’t directly called from an event, follow these simple steps:
With the form or report open in design mode, choose View → Code, press F7, or click on the Code button on the toolbar, as shown in Figure P-8.
To create a new procedure, follow the steps in How Do I Create a New Module?, starting at Step 3.
Choose File → Save, close the module, then save the form, or just click on the Save icon on the toolbar.
In most cases, the solutions suggest that you import a module (or multiple modules) from the sample database for the particular solution, rather than typing in code yourself. In fact, code that isn’t referenced as part of the discussion doesn’t show up at all in the body of the solution. Therefore, you should count on importing modules as directed. Then follow the instructions in each solution to finish working with and studying the code.
If the solution tells you to place some code in a form’s module, follow the steps in How Do I Place Code in a Form or Report’s Module?. If you are instructed to place code in a global module, follow the steps in How Do I Create a New Module?. In most cases, you’ll just import an existing module and won’t type anything at all.
By default, new databases that you create in Access 2000 and later assume that you’ll want to use ActiveX Data Objects (ADO) rather than the older set of objects for accessing data, DAO. Many of the examples in this book take advantage of DAO, because it’s simpler, more consistent with earlier programming techniques, and is in general just as efficient (or more efficient) than using ADO for programming against Access data (that is, data stored in an MDB or MDE file). Both ADO and DAO are simply ActiveX/COM components provided for you by Windows and Microsoft Office, and before you can use either, you must set a reference to the appropriate type library.
If you use the projects that come with this book, you’ll find that the code already includes a reference to the necessary type library so that each example works. If you create your own projects that use the techniques you find here, you may need to set a reference to the DAO type library yourself. Follow these steps to set the reference:
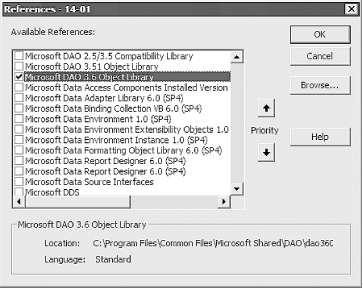
Within the VBA code editor, select the Tools → References menu to display the References dialog box, shown in Figure P-9.
Figure P-9. Set a reference to the Microsoft DAO type library, which allows you to use DAO within applications in Access 2000 and later
Scroll down within the dialog box until you find the reference to Microsoft DAO, and select it.
Click OK to dismiss the dialog box.
You’ll use this same technique to set a reference to any external component (including Word, Excel, PowerPoint, and Outlook, in Chapter 14), but you’ll need to set a reference to DAO as shown here for many of the samples in other chapters.
Throughout this book, we’ve used the following typographic conventions:
-
Constantwidth Constant width in body text indicates a language construct, such as the name of a stored procedure, a SQL statement, a VBA statement, an enumeration, an intrinsic or user-defined constant, a structure (i.e., a user-defined type), or an expression (e.g.,
dblElapTime=Timer-dblStartTime). Code fragments and code examples appear exclusively in constant-width text. In syntax statements and prototypes, text set in constant width indicates such language elements as the function or procedure name and any invariable elements required by the syntax.-
Constant width italic Constant width italic is used in body text for variables and parameter names. In syntax statements or prototypes, constant width italic indicates replaceable parameters.
- Italic
Italicized words in the text indicate intrinsic or user-defined function and procedure names. Example URLs are also italicized, as are many system elements, such as paths and filenames. Finally, italics are used the first time a new term appears.
Please address comments and questions concerning this book to the publisher:
| O’Reilly & Associates, Inc. |
| 1005 Gravenstein Highway North |
| Sebastopol, CA 95472 |
| (800) 998-9938 (in the United States or Canada) |
| (707) 829-0515 (international/local) |
| (707) 829-0104 (fax) |
There is a web page for this book, which lists errata, examples, or any additional information. You can access this page at:
| http://www.oreilly.com/catalog/accesscook/ |
To comment or ask technical questions about this book, send email to:
| bookquestions@oreilly.com |
For more information about books, conferences, Resource Centers, and the O’Reilly Network, see the O’Reilly web site at:
| http://www.oreilly.com |
No book is written without some help from outside sources, and this one is no exception. In this case, we had special help: Mary Chipman did the bulk of the conversion work for the previous edition, making sure each topic worked in Access 2002, creating current screen captures, and rewriting code when necessary. We continued to rely on Mary’s work for this edition. Needless to say, without Mary’s help, this book would never have been completed.
In addition, we’d like to thank Helen Feddema, Mike Gunderloy, and Dan Haught for their contributions to the first edition of this book, some of which remain (though altered for Access 2002). This book also went through a second edition, for Access 95, but was never revised for Access 97 or Access 2000. We appreciate the support of John Osborn and the editorial team at O’Reilly and Associates (including our editor, David Clark) for having the faith in the book, and in Access, to allow us to revise and publish this edition. We would also like to thank those fervent readers who sent many, many emails asking about Access 97 and Access 2000 versions of the book, which were never published. You know who you are, and we hope this revision satisfies your requests!
Special thanks also go to those who contributed suggestions and read chapters in their early stages, including Joe Maki, Sue Hoegemeier, and Jim Newman.
We also wish to acknowledge all the hard-working people at Microsoft who’ve given us these great products. In particular, Bill Ramos, Tim Getsch, Christina Storm, and Rita Nikas were very helpful to us as we prepared this latest edition.
Jan Fransen did a terrific job creating the chapter covering data access pages—we’re very grateful to Jan for this important contribution.
We’d like to thank Michael Kaplan, a technical editor on the Access 95 edition of this book, who reviewed every word and every byte on the CD for that edition with loving care. The success of this book will be, in part, due to Michael’s diligence.
Finally, the authors would like to acknowledge the constant support of their families and loved ones, especially Peter, Suzanne, and Mary.
Get Access Cookbook, 2nd Edition now with the O’Reilly learning platform.
O’Reilly members experience books, live events, courses curated by job role, and more from O’Reilly and nearly 200 top publishers.
