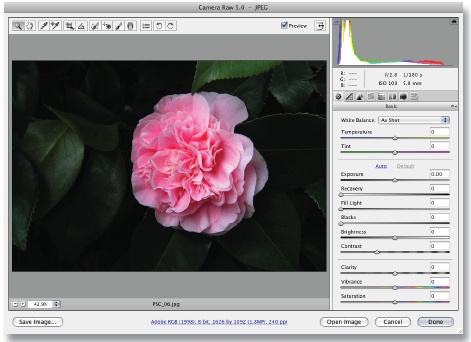
Now that you know a little more about ACR, let's put it to work. Keep in mind that while you make these adjustments, Photoshop remains idle. In all honesty, you don't need it yet. Right now, you're going to use the Bridge/ACR combination to improve the appearance of your images.
While you're working in Bridge, you can open an image in ACR in a few different ways. A simple method is to right-click (or Control-click if you're still on a one-button Mac mouse) a thumbnail and choose Open in Camera Raw from the contextual menu.
Another approach is to click a thumbnail and press ⌘-R (Ctrl-R). There's also an ACR icon in the upper-left corner of the Bridge toolbar. It's a little round icon that looks like a lens aperture. When you click it, you'll open any selected image in ACR. Finally, you can set a preference in Bridge that lets you simply double-click a picture to open it in ACR. Just go to Bridge Preferences, click General, and turn on the Double-Click Edits Camera Raw Settings in Bridge checkbox. Your image will open in the ACR interface, and you're ready to get to work.
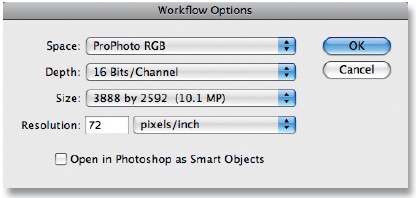
At the bottom of the ACR interface you'll notice a line of text between the Save Image and Open Image buttons. These are your workflow options. Click on the text to reveal a dialog box.
Figure 4-3. ACR workflow options set to maximum color space size (ProPhoto RGB) and bit depth (16). You may want to swtich your bit depth to 8 for smaller files.
You have five basic options in this dialog box:
Color space You have four different color spaces to choose from. And between you and me, there are 10 times that number of theories as to which one you should choose. Generally speaking, if you're editing for print output, choose Adobe RGB. If your destination is the Web, choose sRGB. And if you want to retain the maximum amount of color information while you decide what you're going to do with the image, select ProPhoto RGB. You can always change your mind later.
Bit depth For bit depth, you have the option of 8 or 16 bits per channel. If you're working with JPEGs, your files already have an 8-bit depth. So, you might as well keep it there. If you're working with raw files, though, you may want to consider choosing 16 bits for your initial editing because this lets you retain the maximum amount of information through the early stages of the process. But be warned: 16-bit files are about twice as large as 8-bit files. So, for noncritical use, you may want to choose 8 bits per channel, even for your raw files.
Size As for size, I recommend that you stick with your camera's native resolution. So if you have a 10-megapixel camera, leave the 10-megapixel option selected in the Size pop-up menu. The native resolution should already be selected for you.
Resolution The resolution setting isn't that important at this stage of the workflow. Resolution doesn't matter until you output your file. So you can have the resolution set at 240 or 72—either is fine. Resolution does matter when you get ready to make a print. But you won't be doing that in ACR.
Smart Objects You have the option of using Smart Objects when opening your files in Photoshop. When you select this option the Open button at the bottom of the ACR interface changes to Open Object. Smart Objects have the benefit of letting you use ACR adjustments even after you've opened the object in Photoshop. But when you take this route you're creating larger file sizes. I'll talk more about Smart Objects in the next chapter. For now, leave this box unchecked.
Your workflow options are now in order, and ACR will retain them. However, keep in mind that you can change them whenever you want by simply clicking the text link again. Once you're done setting these options, don't forget to click OK.
Earlier, I mentioned a few of the buttons at the bottom of the ACR interface. Each has a specific function:
Save Image This button should really be Save As, in my opinion. Once you've finished editing an image in ACR, click the Save Image button if you want to save a copy of it in another format. Your basic options are JPEG, TIFF, Photoshop, and Digital Negative. You can also click this button to choose the location for your saved file. This is very handy when you're working with a raw file and you want to save a JPEG copy of it to send to a friend.
If you hold down the Option key (Alt for Windows), Save Image simply becomes Save. In this case, ACR will bypass the dialog box and save your image to the location and in the format of your previous settings. This can be a timesaver when you're saving a number of images using the same settings.
Open Image The Open Image button opens your ACR file in Photoshop so that you can continue to perfect it using the specialized tools in Photoshop.
Cancel (and Reset) The Cancel button is self-explanatory. However, when you simultaneously hold down the Option key (Alt on Windows) and the Cancel button, the Cancel button turns into a Reset button. This is handy when you're playing with image adjustments in ACR, and you decide you don't like the changes you've made. The Reset button lets you "reset" your entire set of edits, returning the picture to its original state.
Done The Done button saves your changes as data and associates the data with the original file. After you click Done, you should see your thumbnail updated in Bridge. This operation demonstrates the nondestructive nature of ACR. Even though your image now reflects the changes you've made, you can go back and make more adjustments, or remove them altogether, without compromising the picture itself.
Get The Photoshop CS4 Companion for Photographers now with the O’Reilly learning platform.
O’Reilly members experience books, live events, courses curated by job role, and more from O’Reilly and nearly 200 top publishers.


