Chapter 4. Advanced Techniques for Text Generation with LangChain
Using simple prompt engineering techniques will often work for most tasks, but occasionally you’ll need to use a more powerful toolkit to solve complex generative AI problems. Such problems and tasks include:
- Context length
-
Summarizing an entire book into a digestible synopsis.
- Combining sequential LLM inputs/outputs
-
Creating a story for a book including the characters, plot, and world building.
- Performing complex reasoning tasks
-
LLMs acting as an agent. For example, you could create an LLM agent to help you achieve your personal fitness goals.
To skillfully tackle such complex generative AI challenges, becoming acquainted with LangChain, an open source framework, is highly beneficial. This tool simplifies and enhances your LLM’s workflows substantially.
Introduction to LangChain
LangChain is a versatile framework that enables the creation of applications utilizing LLMs and is available as both a Python and a TypeScript package. Its central tenet is that the most impactful and distinct applications won’t merely interface with a language model via an API, but will also:
- Enhance data awareness
-
The framework aims to establish a seamless connection between a language model and external data sources.
- Enhance agency
-
It strives to equip language models with the ability to engage with and influence their environment.
The LangChain framework illustrated in Figure 4-1 provides a range of modular abstractions that are essential for working with LLMs, along with a broad selection of implementations for these abstractions.
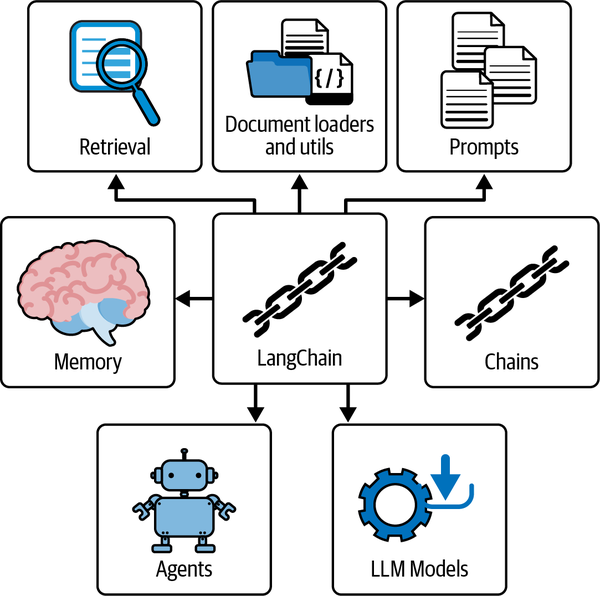
Figure 4-1. The major modules of the LangChain LLM framework
Each module is designed to be user-friendly and can be efficiently utilized independently or together. There are currently six common modules within LangChain:
- Model I/O
-
Handles input/output operations related to the model
- Retrieval
-
Focuses on retrieving relevant text for the LLM
- Chains
-
Also known as LangChain runnables, chains enable the construction of sequences of LLM operations or function calls
- Agents
-
Allows chains to make decisions on which tools to use based on high-level directives or instructions
- Memory
-
Persists the state of an application between different runs of a chain
- Callbacks
-
For running additional code on specific events, such as when every new token is generated
Environment Setup
You can install LangChain on your terminal with either of these commands:
-
pip install langchain langchain-openai -
conda install -c conda-forge langchain langchain-openai
If you would prefer to install the package requirements for the entire book, you can use the requirements.txt file from the GitHub repository.
It’s recommended to install the packages within a virtual environment:
- Create a virtual environment
-
python -m venv venv - Activate the virtual environment
-
source venv/bin/activate - Install the dependencies
-
pip install -r requirements.txt
LangChain requires integrations with one or more model providers. For example, to use OpenAI’s model APIs, you’ll need to install their Python package with pip install openai.
As discussed in Chapter 1, it’s best practice to set an environment variable called OPENAI_API_KEY in your terminal or load it from an .env file using python-dotenv. However, for prototyping you can choose to skip this step by passing in your API key directly when loading a chat model in LangChain:
fromlangchain_openai.chat_modelsimportChatOpenAIchat=ChatOpenAI(api_key="api_key")
Warning
Hardcoding API keys in scripts is not recommended due to security reasons. Instead, utilize environment variables or configuration files to manage your keys.
In the constantly evolving landscape of LLMs, you can encounter the challenge of disparities across different model APIs. The lack of standardization in interfaces can induce extra layers of complexity in prompt engineering and obstruct the seamless integration of diverse models into your projects.
This is where LangChain comes into play. As a comprehensive framework, LangChain allows you to easily consume the varying interfaces of different models.
LangChain’s functionality ensures that you aren’t required to reinvent your prompts or code every time you switch between models. Its platform-agnostic approach promotes rapid experimentation with a broad range of models, such as Anthropic, Vertex AI, OpenAI, and BedrockChat. This not only expedites the model evaluation process but also saves critical time and resources by simplifying complex model integrations.
In the sections that follow, you’ll be using the OpenAI package and their API in LangChain.
Chat Models
Chat models such as GPT-4 have become the primary way to interface with OpenAI’s API. Instead of offering a straightforward “input text, output text” response, they propose an interaction method where chat messages are the input and output elements.
Generating LLM responses using chat models involves inputting one or more messages into the chat model. In the context of LangChain, the currently accepted message types are AIMessage, HumanMessage, and SystemMessage. The output from a chat model will always be an AIMessage.
- SystemMessage
-
Represents information that should be instructions to the AI system. These are used to guide the AI’s behavior or actions in some way.
- HumanMessage
-
Represents information coming from a human interacting with the AI system. This could be a question, a command, or any other input from a human user that the AI needs to process and respond to.
- AIMessage
-
Represents information coming from the AI system itself. This is typically the AI’s response to a
HumanMessageor the result of aSystemMessageinstruction.
Note
Make sure to leverage the SystemMessage for delivering explicit directions. OpenAI has refined GPT-4 and upcoming LLM models to pay particular attention to the guidelines given within this type of message.
Let’s create a joke generator in LangChain.
Input:
fromlangchain_openai.chat_modelsimportChatOpenAIfromlangchain.schemaimportAIMessage,HumanMessage,SystemMessagechat=ChatOpenAI(temperature=0.5)messages=[SystemMessage(content='''Act as a senior software engineerat a startup company.'''),HumanMessage(content='''Please can you provide a funny jokeabout software engineers?''')]response=chat.invoke(input=messages)(response.content)
Output:
Sure,here's a lighthearted joke for you:Whydidthesoftwareengineergobroke?Becausehelosthisdomaininabetandcouldn't afford to renew it.
First, you’ll import ChatOpenAI, AIMessage, HumanMessage, and SystemMessage. Then create an instance of the ChatOpenAI class with a temperature parameter of 0.5 (randomness).
After creating a model, a list named messages is populated with a SystemMessage object, defining the role for the LLM, and a HumanMessage object, which asks for a software engineer—related joke.
Calling the chat model with .invoke(input=messages) feeds the LLM with a list of messages, and then you retrieve the LLM’s response with response.content.
There is a legacy method that allows you to directly call the chat object with chat(messages=messages):
response=chat(messages=messages)
Streaming Chat Models
You might have observed while using ChatGPT how words are sequentially returned to you, one character at a time. This distinct pattern of response generation is referred to as streaming, and it plays a crucial role in enhancing the performance of chat-based applications:
forchunkinchat.stream(messages):(chunk.content,end="",flush=True)
When you call chat.stream(messages), it yields chunks of the message one at a time. This means each segment of the chat message is individually returned. As each chunk arrives, it is then instantaneously printed to the terminal and flushed. This way, streaming allows for minimal latency from your LLM responses.
Streaming holds several benefits from an end-user perspective. First, it dramatically reduces the waiting time for users. As soon as the text starts generating character by character, users can start interpreting the message. There’s no need for a full message to be constructed before it is seen. This, in turn, significantly enhances user interactivity and minimizes latency.
Nevertheless, this technique comes with its own set of challenges. One significant challenge is parsing the outputs while they are being streamed. Understanding and appropriately responding to the message as it is being formed can prove to be intricate, especially when the content is complex and detailed.
Creating Multiple LLM Generations
There may be scenarios where you find it useful to generate multiple responses from LLMs. This is particularly true while creating dynamic content like social media posts. Rather than providing a list of messages, you provide a list of message lists.
Input:
# 2x lists of messages, which is the same as [messages, messages]synchronous_llm_result=chat.batch([messages]*2)(synchronous_llm_result)
Output:
[AIMessage(content='''Sure, here's a lighthearted joke for you:\n\nWhy didthe software engineer go broke?\n\nBecause he kept forgetting to Ctrl+ Zhis expenses!'''),AIMessage(content='''Sure, here\'s a lighthearted joke for you:\n\nWhy dosoftware engineers prefer dark mode?\n\nBecause it\'s easier on their"byte" vision!''')]
The benefit of using .batch() over .invoke() is that you can parallelize the number of API requests made to OpenAI.
For any runnable in LangChain, you can add a RunnableConfig argument to the batch function that contains many configurable parameters, including max_concurrency:
fromlangchain_core.runnables.configimportRunnableConfig# Create a RunnableConfig with the desired concurrency limit:config=RunnableConfig(max_concurrency=5)# Call the .batch() method with the inputs and config:results=chat.batch([messages,messages],config=config)
Note
In computer science, asynchronous (async) functions are those that operate independently of other processes, thereby enabling several API requests to be run concurrently without waiting for each other. In LangChain, these async functions let you make many API requests all at once, not one after the other. This is especially helpful in more complex workflows and decreases the overall latency to your users.
Most of the asynchronous functions within LangChain are simply prefixed with the letter a, such as .ainvoke() and .abatch(). If you would like to use the async API for more efficient task performance, then utilize these functions.
LangChain Prompt Templates
Up until this point, you’ve been hardcoding the strings in the ChatOpenAI objects. As your LLM applications grow in size, it becomes increasingly important to utilize prompt templates.
Prompt templates are good for generating reproducible prompts for AI language models. They consist of a template, a text string that can take in parameters, and construct a text prompt for a language model.
Without prompt templates, you would likely use Python f-string formatting:
language="Python"prompt=f"What is the best way to learn coding in{language}?"(prompt)# What is the best way to learn coding in Python?
But why not simply use an f-string for prompt templating? Using LangChain’s prompt templates instead allows you to easily:
LangChain Expression Language (LCEL)
The | pipe operator is a key component of LangChain Expression Language (LCEL) that allows you to chain together different components or runnables in a data processing pipeline.
In LCEL, the | operator is similar to the Unix pipe operator. It takes the output of one component and feeds it as input to the next component in the chain. This allows you to easily connect and combine different components to create a complex chain of operations:
chain=prompt|model
The | operator is used to chain together the prompt and model components. The output of the prompt component is passed as input to the model component. This chaining mechanism allows you to build complex chains from basic components and enables the seamless flow of data between different stages of the processing pipeline.
Additionally, the order matters, so you could technically create this chain:
bad_order_chain=model|prompt
But it would produce an error after using the invoke function, because the values returned from model are not compatible with the expected inputs for the prompt.
Let’s create a business name generator using prompt templates that will return five to seven relevant business names:
fromlangchain_openai.chat_modelsimportChatOpenAIfromlangchain_core.promptsimport(SystemMessagePromptTemplate,ChatPromptTemplate)template="""You are a creative consultant brainstorming names for businesses.You must follow the following principles:{principles}Please generate a numerical list of five catchy names for a start-up in the{industry}industry that deals with{context}?Here is an example of the format:1. Name12. Name23. Name34. Name45. Name5"""model=ChatOpenAI()system_prompt=SystemMessagePromptTemplate.from_template(template)chat_prompt=ChatPromptTemplate.from_messages([system_prompt])chain=chat_prompt|modelresult=chain.invoke({"industry":"medical","context":'''creating AI solutions by automatically summarizing patientrecords''',"principles":'''1. Each name should be short and easy toremember. 2. Each name should be easy to pronounce.3. Each name should be unique and not already taken by another company.'''})(result.content)
Output:
1. SummarAI
2. MediSummar
3. AutoDocs
4. RecordAI
5. SmartSummarize
First, you’ll import ChatOpenAI, SystemMessagePromptTemplate, and ChatPromptTemplate. Then, you’ll define a prompt template with specific guidelines under template, instructing the LLM to generate business names. ChatOpenAI() initializes the chat, while SystemMessagePromptTemplate.from_template(template) and ChatPromptTemplate.from_messages([system_prompt]) create your prompt template.
You create an LCEL chain by piping together chat_prompt and the model, which is then invoked. This replaces the {industries}, {context}, and {principles} placeholders in the prompt with the dictionary values within the invoke function.
Finally, you extract the LLM’s response as a string accessing the .content property on the result variable.
Give Direction and Specify Format
Carefully crafted instructions might include things like “You are a creative consultant brainstorming names for businesses” and “Please generate a numerical list of five to seven catchy names for a start-up.” Cues like these guide your LLM to perform the exact task you require from it.
Using PromptTemplate with Chat Models
LangChain provides a more traditional template called PromptTemplate, which requires input_variables and template arguments.
Input:
fromlangchain_core.promptsimportPromptTemplatefromlangchain.prompts.chatimportSystemMessagePromptTemplatefromlangchain_openai.chat_modelsimportChatOpenAIprompt=PromptTemplate(template='''You are a helpful assistant that translates{input_language}to{output_language}.''',input_variables=["input_language","output_language"],)system_message_prompt=SystemMessagePromptTemplate(prompt=prompt)chat=ChatOpenAI()chat.invoke(system_message_prompt.format_messages(input_language="English",output_language="French"))
Output:
AIMessage(content="Vous êtes un assistant utile qui traduit l'anglais enfrançais.", additional_kwargs={}, example=False)
Output Parsers
In Chapter 3, you used regular expressions (regex) to extract structured data from text that contained numerical lists, but it’s possible to do this automatically in LangChain with output parsers.
Output parsers are a higher-level abstraction provided by LangChain for parsing structured data from LLM string responses. Currently the available output parsers are:
- List parser
- Datetime parser
- Enum parser
- Auto-fixing parser
-
Wraps another output parser, and if that output parser fails, it will call another LLM to fix any errors.
- Pydantic (JSON) parser
-
Parses LLM responses into JSON output that conforms to a Pydantic schema.
- Retry parser
-
Provides retrying a failed parse from a previous output parser.
- Structured output parser
- XML parser
As you’ll discover, there are two important functions for LangChain output parsers:
.get_format_instructions()-
This function provides the necessary instructions into your prompt to output a structured format that can be parsed.
.parse(llm_output: str)-
This function is responsible for parsing your LLM responses into a predefined format.
Generally, you’ll find that the Pydantic (JSON) parser with ChatOpenAI() provides the most flexibility.
The Pydantic (JSON) parser takes advantage of the Pydantic library in Python. Pydantic is a data validation library that provides a way to validate incoming data using Python type annotations. This means that Pydantic allows you to create schemas for your data and automatically validates and parses input data according to those schemas.
Input:
fromlangchain_core.prompts.chatimport(ChatPromptTemplate,SystemMessagePromptTemplate,)fromlangchain_openai.chat_modelsimportChatOpenAIfromlangchain.output_parsersimportPydanticOutputParserfrompydantic.v1importBaseModel,FieldfromtypingimportListtemperature=0.0classBusinessName(BaseModel):name:str=Field(description="The name of the business")rating_score:float=Field(description='''The rating score of thebusiness. 0 is the worst, 10 is the best.''')classBusinessNames(BaseModel):names:List[BusinessName]=Field(description='''A listof busines names''')# Set up a parser + inject instructions into the prompt template:parser=PydanticOutputParser(pydantic_object=BusinessNames)principles="""- The name must be easy to remember.- Use the{industry}industry and Company context to create an effective name.- The name must be easy to pronounce.- You must only return the name without any other text or characters.- Avoid returning full stops,\n, or any other characters.- The maximum length of the name must be 10 characters."""# Chat Model Output Parser:model=ChatOpenAI()template="""Generate five business names for a new start-up company in the{industry}industry.You must follow the following principles:{principles}{format_instructions}"""system_message_prompt=SystemMessagePromptTemplate.from_template(template)chat_prompt=ChatPromptTemplate.from_messages([system_message_prompt])# Creating the LCEL chain:prompt_and_model=chat_prompt|modelresult=prompt_and_model.invoke({"principles":principles,"industry":"Data Science","format_instructions":parser.get_format_instructions(),})# The output parser, parses the LLM response into a Pydantic object:(parser.parse(result.content))
Output:
names=[BusinessName(name='DataWiz',rating_score=8.5),BusinessName(name='InsightIQ',rating_score=9.2),BusinessName(name='AnalytiQ',rating_score=7.8),BusinessName(name='SciData',rating_score=8.1),BusinessName(name='InfoMax',rating_score=9.5)]
After you’ve loaded the necessary libraries, you’ll set up a ChatOpenAI model. Then create SystemMessagePromptTemplate from your template and form a ChatPromptTemplate with it. You’ll use the Pydantic models BusinessName and BusinessNames to structure your desired output, a list of unique business names. You’ll create a Pydantic parser for parsing these models and format the prompt using user-inputted variables by calling the invoke function. Feeding this customized prompt to your model, you’re enabling it to produce creative, unique business names by using the parser.
It’s possible to use output parsers inside of LCEL by using this syntax:
chain=prompt|model|output_parser
Let’s add the output parser directly to the chain.
Input:
parser=PydanticOutputParser(pydantic_object=BusinessNames)chain=chat_prompt|model|parserresult=chain.invoke({"principles":principles,"industry":"Data Science","format_instructions":parser.get_format_instructions(),})(result)
Output:
names=[BusinessName(name='DataTech', rating_score=9.5),...]
The chain is now responsible for prompt formatting, LLM calling, and parsing the LLM’s response into a Pydantic object.
Specify Format
The preceding prompts use Pydantic models and output parsers, allowing you explicitly tell an LLM your desired response format.
It’s worth knowing that by asking an LLM to provide structured JSON output, you can create a flexible and generalizable API from the LLM’s response. There are limitations to this, such as the size of the JSON created and the reliability of your prompts, but it still is a promising area for LLM applications.
Warning
You should take care of edge cases as well as adding error handling statements, since LLM outputs might not always be in your desired format.
Output parsers save you from the complexity and intricacy of regular expressions, providing easy-to-use functionalities for a variety of use cases. Now that you’ve seen them in action, you can utilize output parsers to effortlessly structure and retrieve the data you need from an LLM’s output, harnessing the full potential of AI for your tasks.
Furthermore, using parsers to structure the data extracted from LLMs allows you to easily choose how to organize outputs for more efficient use. This can be useful if you’re dealing with extensive lists and need to sort them by certain criteria, like business names.
LangChain Evals
As well as output parsers to check for formatting errors, most AI systems also make use of evals, or evaluation metrics, to measure the performance of each prompt response. LangChain has a number of off-the-shelf evaluators, which can be directly be logged in their LangSmith platform for further debugging, monitoring, and testing. Weights and Biases is alternative machine learning platform that offers similar functionality and tracing capabilities for LLMs.
Evaluation metrics are useful for more than just prompt testing, as they can be used to identify positive and negative examples for retrieval as well as to build datasets for fine-tuning custom models.
Most eval metrics rely on a set of test cases, which are input and output pairings where you know the correct answer. Often these reference answers are created or curated manually by a human, but it’s also common practice to use a smarter model like GPT-4 to generate the ground truth answers, which has been done for the following example. Given a list of descriptions of financial transactions, we used GPT-4 to classify each transaction with a transaction_category and transaction_type. The process can be found in the langchain-evals.ipynb Jupyter Notebook in the GitHub repository for the book.
With the GPT-4 answer being taken as the correct answer, it’s now possible to rate the accuracy of smaller models like GPT-3.5-turbo and Mixtral 8x7b (called mistral-small in the API). If you can achieve good enough accuracy with a smaller model, you can save money or decrease latency. In addition, if that model is available open source like Mistral’s model, you can migrate that task to run on your own servers, avoiding sending potentially sensitive data outside of your organization. We recommend testing with an external API first, before going to the trouble of self-hosting an OS model.
Remember to sign up and subscribe to obtain an API key; then expose that as an environment variable by typing in your terminal:
export MISTRAL_API_KEY=api-key
The following script is part of a notebook that has previously defined a dataframe df. For brevity let’s investigate only the evaluation section of the script, assuming a dataframe is already defined.
Input:
importosfromlangchain_mistralai.chat_modelsimportChatMistralAIfromlangchain.output_parsersimportPydanticOutputParserfromlangchain_core.promptsimportChatPromptTemplatefrompydantic.v1importBaseModelfromtypingimportLiteral,Unionfromlangchain_core.output_parsersimportStrOutputParser# 1. Define the model:mistral_api_key=os.environ["MISTRAL_API_KEY"]model=ChatMistralAI(model="mistral-small",mistral_api_key=mistral_api_key)# 2. Define the prompt:system_prompt="""You are are an expert at analyzingbank transactions, you will be categorizing a singletransaction.Always return a transaction type and category:do not return None.Format Instructions:{format_instructions}"""user_prompt="""Transaction Text:{transaction}"""prompt=ChatPromptTemplate.from_messages([("system",system_prompt,),("user",user_prompt,),])# 3. Define the pydantic model:classEnrichedTransactionInformation(BaseModel):transaction_type:Union[Literal["Purchase","Withdrawal","Deposit","Bill Payment","Refund"],None]transaction_category:Union[Literal["Food","Entertainment","Transport","Utilities","Rent","Other"],None,]# 4. Define the output parser:output_parser=PydanticOutputParser(pydantic_object=EnrichedTransactionInformation)# 5. Define a function to try to fix and remove the backslashes:defremove_back_slashes(string):# double slash to escape the slashcleaned_string=string.replace("\\","")returncleaned_string# 6. Create an LCEL chain that fixes the formatting:chain=prompt|model|StrOutputParser()\|remove_back_slashes|output_parsertransaction=df.iloc[0]["Transaction Description"]result=chain.invoke({"transaction":transaction,"format_instructions":\output_parser.get_format_instructions(),})# 7. Invoke the chain for the whole dataset:results=[]fori,rowintqdm(df.iterrows(),total=len(df)):transaction=row["Transaction Description"]try:result=chain.invoke({"transaction":transaction,"format_instructions":\output_parser.get_format_instructions(),})except:result=EnrichedTransactionInformation(transaction_type=None,transaction_category=None)results.append(result)# 8. Add the results to the dataframe, as columns transaction type and# transaction category:transaction_types=[]transaction_categories=[]forresultinresults:transaction_types.append(result.transaction_type)transaction_categories.append(result.transaction_category)df["mistral_transaction_type"]=transaction_typesdf["mistral_transaction_category"]=transaction_categoriesdf.head()
Output:
Transaction Description	transaction_type
transaction_category	mistral_transaction_type
mistral_transaction_category
0	cash deposit at local branch	Deposit	Other	Deposit
Other
1	cash deposit at local branch	Deposit	Other	Deposit
Other
2	withdrew money for rent payment	Withdrawal	Rent
Withdrawal	Rent
3	withdrew cash for weekend expenses	Withdrawal	Other
Withdrawal	Other
4	purchased books from the bookstore	Purchase	Other
Purchase	Entertainment
The code does the following:
-
from langchain_mistralai.chat_models import ChatMistralAI: We import LangChain’s Mistral implementation. -
from langchain.output_parsers import PydanticOutputParser: Imports thePydanticOutputParserclass, which is used for parsing output using Pydantic models. We also import a string output parser to handle an interim step where we remove backslashes from the JSON key (a common problem with responses from Mistral). -
mistral_api_key = os.environ["MISTRAL_API_KEY"]: Retrieves the Mistral API key from the environment variables. This needs to be set prior to running the notebook. -
model = ChatMistralAI(model="mistral-small", mistral_api_key=mistral_api_key): Initializes an instance ofChatMistralAIwith the specified model and API key. Mistral Small is what they call the Mixtral 8x7b model (also available open source) in their API. -
system_promptanduser_prompt: These lines define templates for the system and user prompts used in the chat to classify the transactions. -
class EnrichedTransactionInformation(BaseModel): Defines a Pydantic modelEnrichedTransactionInformationwith two fields:transaction_typeandtransaction_category, each with specific allowed values and the possibility of beingNone. This is what tells us if the output is in the correct format. -
def remove_back_slashes(string): Defines a function to remove backslashes from a string. -
chain = prompt | model | StrOutputParser() | remove_back_slashes | output_parser: Updates the chain to include a string output parser and theremove_back_slashesfunction before the original output parser. -
transaction = df.iloc[0]["Transaction Description"]: Extracts the first transaction description from a dataframedf. This dataframe is loaded earlier in the Jupyter Notebook (omitted for brevity). -
for i, row in tqdm(df.iterrows(), total=len(df)): Iterates over each row in the dataframedf, with a progress bar. -
result = chain.invoke(...): Inside the loop, the chain is invoked for each transaction. -
except: In case of an exception, a defaultEnrichedTransactionInformationobject withNonevalues is created. These will be treated as errors in evaluation but will not break the processing loop. -
df["mistral_transaction_type"] = transaction_types,df["mistral_transaction_category"] = transaction_categories: Adds the transaction types and categories as new columns in the dataframe, which we then display withdf.head().
With the responses from Mistral saved in the dataframe, it’s possible to compare them to the transaction categories and types defined earlier to check the accuracy of Mistral. The most basic LangChain eval metric is to do an exact string match of a prediction against a reference answer, which returns a score of 1 if correct, and a 0 if incorrect. The notebook gives an example of how to implement this, which shows that Mistral’s accuracy is 77.5%. However, if all you are doing is comparing strings, you probably don’t need to implement it in LangChain.
Where LangChain is valuable is in its standardized and tested approaches to implementing more advanced evaluators using LLMs. The evaluator labeled_pairwise_string compares two outputs and gives a reason for choosing between them, using GPT-4. One common use case for this type of evaluator is to compare the outputs from two different prompts or models, particularly if the models being tested are less sophisticated than GPT-4. This evaluator using GPT-4 does still work for evaluating GPT-4 responses, but you should manually review the reasoning and scores to ensure it is doing a good job: if GPT-4 is bad at a task, it may also be bad at evaluating that task. In the notebook, the same transaction classification was run again with the model changed to model = ChatOpenAI(model="gpt-3.5-turbo-1106", model_kwargs={"response_format": {"type": "json_object"}},). Now it’s possible to do pairwise comparison between the Mistral and GPT-3.5 responses, as shown in the following example. You can see in the output the reasoning that is given to justify the score.
Input:
# Evaluate answers using LangChain evaluators:fromlangchain.evaluationimportload_evaluatorevaluator=load_evaluator("labeled_pairwise_string")row=df.iloc[0]transaction=row["Transaction Description"]gpt3pt5_category=row["gpt3.5_transaction_category"]gpt3pt5_type=row["gpt3.5_transaction_type"]mistral_category=row["mistral_transaction_category"]mistral_type=row["mistral_transaction_type"]reference_category=row["transaction_category"]reference_type=row["transaction_type"]# Put the data into JSON format for the evaluator:gpt3pt5_data=f"""{{"transaction_category": "{gpt3pt5_category}","transaction_type": "{gpt3pt5_type}"}}"""mistral_data=f"""{{"transaction_category": "{mistral_category}","transaction_type": "{mistral_type}"}}"""reference_data=f"""{{"transaction_category": "{reference_category}","transaction_type": "{reference_type}"}}"""# Set up the prompt input for context for the evaluator:input_prompt="""You are an expert at analyzing banktransactions,you will be categorizing a single transaction.Always return a transaction type and category: do notreturn None.Format Instructions:{format_instructions}Transaction Text:{transaction}"""transaction_types.append(transaction_type_score)transaction_categories.append(transaction_category_score)accuracy_score=0fortransaction_type_score,transaction_category_score\inzip(transaction_types,transaction_categories):accuracy_score+=transaction_type_score['score']+\transaction_category_score['score']accuracy_score=accuracy_score/(len(transaction_types)\*2)(f"Accuracy score:{accuracy_score}")evaluator.evaluate_string_pairs(prediction=gpt3pt5_data,prediction_b=mistral_data,input=input_prompt.format(format_instructions=output_parser.get_format_instructions(),transaction=transaction),reference=reference_data,)
Output:
{'reasoning': '''Both Assistant A and Assistant B provided the exact same
response to the user\'s question. Their responses are both helpful, relevant,
correct, and demonstrate depth of thought. They both correctly identified the
transaction type as "Deposit" and the transaction category as "Other" based on
the transaction text provided by the user. Both responses are also
well-formatted according to the JSON schema provided by the user. Therefore,
it\'s a tie between the two assistants. \n\nFinal Verdict: [[C]]''',
 'value': None,
 'score': 0.5}
This code demonstrates the simple exact string matching evaluator from LangChain:
-
evaluator = load_evaluator("labeled_pairwise_string"): This is a helper function that can be used to load any LangChain evaluator by name. In this case, it is thelabeled_pairwise_stringevaluator being used. -
row = df.iloc[0]: This line and the seven lines that follow get the first row and extract the values for the different columns needed. It includes the transaction description, as well as the Mistral and GPT-3.5 transaction category and types. This is showcasing a single transaction, but this code can easily run in a loop through each transaction, replacing this line with aniterrowsfunctionfor i, row in tqdm(df.iterrows(), total=len(df)):, as is done later in the notebook. -
gpt3pt5_data = f"""{{: To use the pairwise comparison evaluator, we need to pass the results in a way that is formatted correctly for the prompt. This is done for Mistral and GPT-3.5, as well as the reference data. -
input_prompt = """You are an expert...: The other formatting we have to get right is in the prompt. To get accurate evaluation scores, the evaluator needs to see the instructions that were given for the task. -
evaluator.evaluate_string_pairs(...: All that remains is to run the evaluator by passing in thepredictionandprediction_b(GPT-3.5 and Mistral, respectively), as well as theinputprompt, andreferencedata, which serves as the ground truth. -
Following this code in the notebook, there is an example of looping through and running the evaluator on every row in the dataframe and then saving the results and reasoning back to the dataframe.
This example demonstrates how to use a LangChain evaluator, but there are many different kinds of evaluator available. String distance (Levenshtein) or embedding distance evaluators are often used in scenarios where answers are not an exact match for the reference answer, but only need to be close enough semantically. Levenshtein distance allows for fuzzy matches based on how many single-character edits would be needed to transform the predicted text into the reference text, and embedding distance makes use of vectors (covered in Chapter 5) to calculate similarity between the answer and reference.
The other kind of evaluator we often use in our work is pairwise comparisons, which are useful for comparing two different prompts or models, using a smarter model like GPT-4. This type of comparison is helpful because reasoning is provided for each comparison, which can be useful in debugging why one approach was favored over another. The notebook for this section shows an example of using a pairwise comparison evaluator to check GPT-3.5-turbo’s accuracy versus Mixtral 8x7b.
Evaluate Quality
Without defining an appropriate set of eval metrics to define success, it can be difficult to tell if changes to the prompt or wider system are improving or harming the quality of responses. If you can automate eval metrics using smart models like GPT-4, you can iterate faster to improve results without costly or time-consuming manual human review.
OpenAI Function Calling
Function calling provides an alternative method to output parsers, leveraging fine-tuned OpenAI models. These models identify when a function should be executed and generate a JSON response with the name and arguments for a predefined function. Several use cases include:
- Designing sophisticated chat bots
-
Capable of organizing and managing schedules. For example, you can define a function to schedule a meeting:
schedule_meeting(date: str, time: str, attendees: List[str]). - Convert natural language into actionable API calls
-
A command like “Turn on the hallway lights” can be converted to
control_device(device: str, action: 'on' | 'off')for interacting with your home automation API. - Extracting structured data
-
This could be done by defining a function such as
extract_contextual_data(context: str, data_points: List[str])orsearch_database(query: str).
Each function that you use within function calling will require an appropriate JSON schema. Let’s explore an example with the OpenAI package:
fromopenaiimportOpenAIimportjsonfromosimportgetenvdefschedule_meeting(date,time,attendees):# Connect to calendar service:return{"event_id":"1234","status":"Meeting scheduled successfully!","date":date,"time":time,"attendees":attendees}OPENAI_FUNCTIONS={"schedule_meeting":schedule_meeting}
After importing OpenAI and json, you’ll create a function named schedule_meeting. This function is a mock-up, simulating the process of scheduling a meeting, and returns details such as event_id, date, time, and attendees. Following that, make an OPENAI_FUNCTIONS dictionary to map the function name to the actual function for ease of reference.
Next, define a functions list that provides the function’s JSON schema. This schema includes its name, a brief description, and the parameters it requires, guiding the LLM on how to interact with it:
# Our predefined function JSON schema:functions=[{"type":"function","function":{"type":"object","name":"schedule_meeting","description":'''Set a meeting at a specified date and time fordesignated attendees''',"parameters":{"type":"object","properties":{"date":{"type":"string","format":"date"},"time":{"type":"string","format":"time"},"attendees":{"type":"array","items":{"type":"string"}},},"required":["date","time","attendees"],},},}]
Specify Format
When using function calling with your OpenAI models, always ensure to define a detailed JSON schema (including the name and description). This acts as a blueprint for the function, guiding the model to understand when and how to properly invoke it.
After defining the functions, let’s make an OpenAI API request. Set up a messages list with the user query. Then, using an OpenAI client object, you’ll send this message and the function schema to the model. The LLM analyzes the conversation, discerns a need to trigger a function, and provides the function name and arguments. The function and function_args are parsed from the LLM response. Then the function is executed, and its results are added back into the conversation. Then you call the model again for a user-friendly summary of the entire process.
Input:
client=OpenAI(api_key=getenv("OPENAI_API_KEY"))# Start the conversation:messages=[{"role":"user","content":'''Schedule a meeting on 2023-11-01 at 14:00with Alice and Bob.''',}]# Send the conversation and function schema to the model:response=client.chat.completions.create(model="gpt-3.5-turbo-1106",messages=messages,tools=functions,)response=response.choices[0].message# Check if the model wants to call our function:ifresponse.tool_calls:# Get the first function call:first_tool_call=response.tool_calls[0]# Find the function name and function args to call:function_name=first_tool_call.function.namefunction_args=json.loads(first_tool_call.function.arguments)("This is the function name: ",function_name)("These are the function arguments: ",function_args)function=OPENAI_FUNCTIONS.get(function_name)ifnotfunction:raiseException(f"Function{function_name}not found.")# Call the function:function_response=function(**function_args)# Share the function's response with the model:messages.append({"role":"function","name":"schedule_meeting","content":json.dumps(function_response),})# Let the model generate a user-friendly response:second_response=client.chat.completions.create(model="gpt-3.5-turbo-0613",messages=messages)(second_response.choices[0].message.content)
Output:
Thesearethefunctionarguments:{'date':'2023-11-01','time':'14:00','attendees':['Alice','Bob']}Thisisthefunctionname:schedule_meetingIhavescheduledameetingon2023-11-01at14:00withAliceandBob.TheeventIDis1234.
Several important points to note while function calling:
-
It’s possible to have many functions that the LLM can call.
-
OpenAI can hallucinate function parameters, so be more explicit within the
systemmessage to overcome this. -
The
function_callparameter can be set in various ways:
Parallel Function Calling
You can set your chat messages to include intents that request simultaneous calls to multiple tools. This strategy is known as parallel function calling.
Modifying the previously used code, the messages list is updated to mandate the scheduling of two meetings:
# Start the conversation:messages=[{"role":"user","content":'''Schedule a meeting on 2023-11-01 at 14:00 with Aliceand Bob. Then I want to schedule another meeting on 2023-11-02 at15:00 with Charlie and Dave.'''}]
Then, adjust the previous code section by incorporating a for loop.
Input:
# Send the conversation and function schema to the model:response=client.chat.completions.create(model="gpt-3.5-turbo-1106",messages=messages,tools=functions,)response=response.choices[0].message# Check if the model wants to call our function:ifresponse.tool_calls:fortool_callinresponse.tool_calls:# Get the function name and arguments to call:function_name=tool_call.function.namefunction_args=json.loads(tool_call.function.arguments)("This is the function name: ",function_name)("These are the function arguments: ",function_args)function=OPENAI_FUNCTIONS.get(function_name)ifnotfunction:raiseException(f"Function{function_name}not found.")# Call the function:function_response=function(**function_args)# Share the function's response with the model:messages.append({"role":"function","name":function_name,"content":json.dumps(function_response),})# Let the model generate a user-friendly response:second_response=client.chat.completions.create(model="gpt-3.5-turbo-0613",messages=messages)(second_response.choices[0].message.content)
Output:
Thisisthefunctionname:schedule_meetingThesearethefunctionarguments:{'date':'2023-11-01','time':'14:00','attendees':['Alice','Bob']}Thisisthefunctionname:schedule_meetingThesearethefunctionarguments:{'date':'2023-11-02','time':'15:00','attendees':['Charlie','Dave']}Twomeetingshavebeenscheduled:1.MeetingwithAliceandBobon2023-11-01at14:00.2.MeetingwithCharlieandDaveon2023-11-02at15:00.
From this example, it’s clear how you can effectively manage multiple function calls. You’ve seen how the schedule_meeting function was called twice in a row to arrange different meetings. This demonstrates how flexibly and effortlessly you can handle varied and complex requests using AI-powered tools.
Function Calling in LangChain
If you’d prefer to avoid writing JSON schema and simply want to extract structured data from an LLM response, then LangChain allows you to use function calling with Pydantic.
Input:
fromlangchain.output_parsers.openai_toolsimportPydanticToolsParserfromlangchain_core.utils.function_callingimportconvert_to_openai_toolfromlangchain_core.promptsimportChatPromptTemplatefromlangchain_openai.chat_modelsimportChatOpenAIfromlangchain_core.pydantic_v1importBaseModel,FieldfromtypingimportOptionalclassArticle(BaseModel):"""Identifying key points and contrarian views in an article."""points:str=Field(...,description="Key points from the article")contrarian_points:Optional[str]=Field(None,description="Any contrarian points acknowledged in the article")author:Optional[str]=Field(None,description="Author of the article")_EXTRACTION_TEMPLATE="""Extract and save the relevant entities mentioned\in the following passage together with their properties.If a property is not present and is not required in the function parameters,do not include it in the output."""# Create a prompt telling the LLM to extract information:prompt=ChatPromptTemplate.from_messages({("system",_EXTRACTION_TEMPLATE),("user","{input}")})model=ChatOpenAI()pydantic_schemas=[Article]# Convert Pydantic objects to the appropriate schema:tools=[convert_to_openai_tool(p)forpinpydantic_schemas]# Give the model access to these tools:model=model.bind_tools(tools=tools)# Create an end to end chain:chain=prompt|model|PydanticToolsParser(tools=pydantic_schemas)result=chain.invoke({"input":"""In the recent article titled 'AI adoption in industry,'key points addressed include the growing interest ... However, theauthor, Dr. Jane Smith, ..."""})(result)
Output:
[Article(points='The growing interest in AI in various sectors, ...',contrarian_points='Without stringent regulations, ...',author='Dr. Jane Smith')]
You’ll start by importing various modules, including PydanticToolsParser and ChatPromptTemplate, essential for parsing and templating your prompts. Then, you’ll define a Pydantic model, Article, to specify the structure of the information you want to extract from a given text. With the use of a custom prompt template and the ChatOpenAI model, you’ll instruct the AI to extract key points and contrarian views from an article. Finally, the extracted data is neatly converted into your predefined Pydantic model and printed out, allowing you to see the structured information pulled from the text.
There are several key points, including:
- Converting Pydantic schema to OpenAI tools
-
tools = [convert_to_openai_tool(p) for p in pydantic_schemas] - Binding the tools directly to the LLM
-
model = model.bind_tools(tools=tools) - Creating an LCEL chain that contains a tools parser
-
chain = prompt | model | PydanticToolsParser(tools=pydantic_schemas)
Extracting Data with LangChain
The create_extraction_chain_pydantic function provides a more concise version of the previous implementation. By simply inserting a Pydantic model and an LLM that supports function calling, you can easily achieve parallel function calling.
Input:
fromlangchain.chains.openai_toolsimportcreate_extraction_chain_pydanticfromlangchain_openai.chat_modelsimportChatOpenAIfromlangchain_core.pydantic_v1importBaseModel,Field# Make sure to use a recent model that supports tools:model=ChatOpenAI(model="gpt-3.5-turbo-1106")classPerson(BaseModel):"""A person's name and age."""name:str=Field(...,description="The person's name")age:int=Field(...,description="The person's age")chain=create_extraction_chain_pydantic(Person,model)chain.invoke({'input':'''Bob is 25 years old. He lives in New York.He likes to play basketball. Sarah is 30 years old. She lives in SanFrancisco. She likes to play tennis.'''})
Output:
[Person(name='Bob',age=25),Person(name='Sarah',age=30)]
The Person Pydantic model has two properties, name and age; by calling the create_extraction_chain_pydantic function with the input text, the LLM invokes the same function twice and creates two People objects.
Query Planning
You may experience problems when user queries have multiple intents with intricate dependencies. Query planning is an effective way to parse a user’s query into a series of steps that can be executed as a query graph with relevant dependencies:
fromlangchain_openai.chat_modelsimportChatOpenAIfromlangchain.output_parsers.pydanticimportPydanticOutputParserfromlangchain_core.prompts.chatimport(ChatPromptTemplate,SystemMessagePromptTemplate,)frompydantic.v1importBaseModel,FieldfromtypingimportListclassQuery(BaseModel):id:intquestion:strdependencies:List[int]=Field(default_factory=list,description="""A list of sub-queries that must be completed beforethis task can be completed.Use a sub query when anything is unknown and we might need to askmany queries to get an answer.Dependencies must only be other queries.""")classQueryPlan(BaseModel):query_graph:List[Query]
Defining QueryPlan and Query allows you to first ask an LLM to parse a user’s query into multiple steps. Let’s investigate how to create the query plan.
Input:
# Set up a chat model:model=ChatOpenAI()# Set up a parser:parser=PydanticOutputParser(pydantic_object=QueryPlan)template="""Generate a query plan. This will be used for task execution.Answer the following query:{query}Return the following query graph format:{format_instructions}"""system_message_prompt=SystemMessagePromptTemplate.from_template(template)chat_prompt=ChatPromptTemplate.from_messages([system_message_prompt])# Create the LCEL chain with the prompt, model, and parser:chain=chat_prompt|model|parserresult=chain.invoke({"query":'''I want to get the results from my database. Then I want to findout what the average age of my top 10 customers is. Once I have the averageage, I want to send an email to John. Also I just generally want to send awelcome introduction email to Sarah, regardless of the other tasks.''',"format_instructions":parser.get_format_instructions()})(result.query_graph)
Output:
[Query(id=1,question='Get top 10 customers',dependencies=[]),Query(id=2,question='Calculate average age of customers',dependencies=[1]),Query(id=3,question='Send email to John',dependencies=[2]),Query(id=4,question='Send welcome email to Sarah',dependencies=[])]
Initiate a ChatOpenAI instance and create a PydanticOutputParser for the QueryPlan structure. Then the LLM response is called and parsed, producing a structured query_graph for your tasks with their unique dependencies.
Creating Few-Shot Prompt Templates
Working with the generative capabilities of LLMs often involves making a choice between zero-shot and few-shot learning (k-shot). While zero-shot learning requires no explicit examples and adapts to tasks based solely on the prompt, its dependence on the pretraining phase means it may not always yield precise results.
On the other hand, with few-shot learning, which involves providing a few examples of the desired task performance in the prompt, you have the opportunity to optimize the model’s behavior, leading to more desirable outputs.
Due to the token LLM context length, you will often finding yourself competing between adding lots of high-quality k-shot examples into your prompts while still aiming to generate an effective and deterministic LLM output.
Note
Even as the token context window limit within LLMs continues to increase, providing a specific number of k-shot examples helps you minimize API costs.
Let’s explore two methods for adding k-shot examples into your prompts with few-shot prompt templates: using fixed examples and using an example selector.
Fixed-Length Few-Shot Examples
First, let’s look at how to create a few-shot prompt template using a fixed number of examples. The foundation of this method lies in creating a robust set of few-shot examples:
fromlangchain_openai.chat_modelsimportChatOpenAIfromlangchain_core.promptsimport(FewShotChatMessagePromptTemplate,ChatPromptTemplate,)examples=[{"question":"What is the capital of France?","answer":"Paris",},{"question":"What is the capital of Spain?","answer":"Madrid",}# ...more examples...]
Each example is a dictionary containing a question and answer key that will be used to create pairs of HumanMessage and AIMessage messages.
Formatting the Examples
Next, you’ll configure a ChatPromptTemplate for formatting the individual examples, which will then be inserted into a FewShotChatMessagePromptTemplate.
Input:
example_prompt=ChatPromptTemplate.from_messages([("human","{question}"),("ai","{answer}"),])few_shot_prompt=FewShotChatMessagePromptTemplate(example_prompt=example_prompt,examples=examples,)(few_shot_prompt.format())
Output:
Human:WhatisthecapitalofFrance?AI:ParisHuman:WhatisthecapitalofSpain?AI:Madrid...moreexamples...
Notice how example_prompt will create HumanMessage and AIMessage pairs with the prompt inputs of {question} and {answer}.
After running few_shot_prompt.format(), the few-shot examples are printed as a string. As you’d like to use these within a ChatOpenAI() LLM request, let’s create a new ChatPromptTemplate.
Input:
fromlangchain_core.output_parsersimportStrOutputParserfinal_prompt=ChatPromptTemplate.from_messages([("system",'''You are responsible for answeringquestions about countries. Only return the countryname.'''),few_shot_prompt,("human","{question}"),])model=ChatOpenAI()# Creating the LCEL chain with the prompt, model, and a StrOutputParser():chain=final_prompt|model|StrOutputParser()result=chain.invoke({"question":"What is the capital of America?"})(result)
Output:
Washington,D.C.
After invoking the LCEL chain on final_prompt, your few-shot examples are added after the SystemMessage.
Notice that the LLM only returns 'Washington, D.C.' This is because after the LLMs response is returned, it is parsed by StrOutputParser(), an output parser. Adding StrOutputParser() is a common way to ensure that LLM responses in chains return string values. You’ll explore this more in depth while learning sequential chains in LCEL.
Selecting Few-Shot Examples by Length
Before diving into the code, let’s outline your task. Imagine you’re building a storytelling application powered by GPT-4. A user enters a list of character names with previously generated stories. However, each user’s list of characters might have a different length. Including too many characters might generate a story that surpasses the LLM’s context window limit. That’s where you can use LengthBasedExampleSelector to adapt the prompt according to the length of user input:
fromlangchain_core.promptsimportFewShotPromptTemplate,PromptTemplatefromlangchain.prompts.example_selectorimportLengthBasedExampleSelectorfromlangchain_openai.chat_modelsimportChatOpenAIfromlangchain_core.messagesimportSystemMessageimporttiktokenexamples=[{"input":"Gollum","output":"<Story involving Gollum>"},{"input":"Gandalf","output":"<Story involving Gandalf>"},{"input":"Bilbo","output":"<Story involving Bilbo>"},]story_prompt=PromptTemplate(input_variables=["input","output"],template="Character:{input}\nStory:{output}",)defnum_tokens_from_string(string:str)->int:"""Returns the number of tokens in a text string."""encoding=tiktoken.get_encoding("cl100k_base")num_tokens=len(encoding.encode(string))returnnum_tokensexample_selector=LengthBasedExampleSelector(examples=examples,example_prompt=story_prompt,max_length=1000,# 1000 tokens are to be included from examples# get_text_length: Callable[[str], int] = lambda x: len(re.split("\n| ", x))# You have modified the get_text_length function to work with the# TikToken library based on token usage:get_text_length=num_tokens_from_string,)
First, you set up a PromptTemplate that takes two input variables for each example. Then LengthBasedExampleSelector adjusts the number of examples according to the length of the examples input, ensuring your LLM doesn’t generate a story beyond its context window.
Also, you’ve customized the get_text_length function to use the num_tokens_from_string function that counts the total number of tokens using tiktoken. This means that max_length=1000 represents the number of tokens rather than using the following default function:
get_text_length: Callable[[str], int] = lambda x: len(re.split("\n| ", x))
Now, to tie all these elements together:
dynamic_prompt=FewShotPromptTemplate(example_selector=example_selector,example_prompt=story_prompt,prefix='''Generate a story for{character}using thecurrent Character/Story pairs from all of the charactersas context.''',suffix="Character:{character}\nStory:",input_variables=["character"],)# Provide a new character from Lord of the Rings:formatted_prompt=dynamic_prompt.format(character="Frodo")# Creating the chat model:chat=ChatOpenAI()response=chat.invoke([SystemMessage(content=formatted_prompt)])(response.content)
Output:
Frodo was a young hobbit living a peaceful life in the Shire. However,
his life...
Provide Examples and Specify Format
When working with few-shot examples, the length of the content matters in determining how many examples the AI model can take into account. Tune the length of your input content and provide apt examples for efficient results to prevent the LLM from generating content that might surpass its context window limit.
After formatting the prompt, you create a chat model with ChatOpenAI() and load the formatted prompt into a SystemMessage that creates a small story about Frodo from Lord of the Rings.
Rather than creating and formatting a ChatPromptTemplate, it’s often much easier to simply invoke a SystemMesage with a formatted prompt:
result=model.invoke([SystemMessage(content=formatted_prompt)])
Limitations with Few-Shot Examples
Few-shot learning has limitations. Although it can prove beneficial in certain scenarios, it might not always yield the expected high-quality results. This is primarily due to two reasons:
-
Pretrained models like GPT-4 can sometimes overfit to the few-shot examples, making them prioritize the examples over the actual prompt.
-
LLMs have a token limit. As a result, there will always be a trade-off between the number of examples and the length of the response. Providing more examples might limit the response length and vice versa.
These limitations can be addressed in several ways. First, if few-shot prompting is not yielding the desired results, consider using differently framed phrases or experimenting with the language of the prompts themselves. Variations in how the prompt is phrased can result in different responses, highlighting the trial-and-error nature of prompt engineering.
Second, think about including explicit instructions to the model to ignore the examples after it understands the task or to use the examples just for formatting guidance. This might influence the model to not overfit to the examples.
If the tasks are complex and the performance of the model with few-shot learning is not satisfactory, you might need to consider fine-tuning your model. Fine-tuning provides a more nuanced understanding of a specific task to the model, thus improving the performance significantly.
Saving and Loading LLM Prompts
To effectively leverage generative AI models such as GPT-4, it is beneficial to store prompts as files instead of Python code. This approach enhances the shareability, storage, and versioning of your prompts.
LangChain supports both saving and loading prompts from JSON and YAML. Another key feature of LangChain is its support for detailed specification in one file or distributed across multiple files. This means you have the flexibility to store different components such as templates, examples, and others in distinct files and reference them as required.
Let’s learn how to save and load prompts:
fromlangchain_core.promptsimportPromptTemplate,load_promptprompt=PromptTemplate(template='''Translate this sentence from English to Spanish.\nSentence:{sentence}\nTranslation:''',input_variables=["sentence"],)prompt.save("translation_prompt.json")# Loading the prompt template:load_prompt("translation_prompt.json")# Returns PromptTemplate()
After importing PromptTemplate and load_prompt from the langchain.prompts module, you define a PromptTemplate for English-to-Spanish translation tasks and save it as translation_prompt.json. Finally, you load the saved prompt template using the load_prompt function, which returns an instance of PromptTemplate.
Warning
Please be aware that LangChain’s prompt saving may not work with all types of prompt templates. To mitigate this, you can utilize the pickle library or .txt files to read and write any prompts that LangChain does not support.
You’ve learned how to create few-shot prompt templates using LangChain with two techniques: a fixed number of examples and using an example selector.
The former creates a set of few-shot examples and uses a ChatPromptTemplate object to format these into chat messages. This forms the basis for creating a FewShotChatMessagePromptTemplate object.
The latter approach, using an example selector, is handy when user input varies significantly in length. In such scenarios, a LengthBasedExampleSelector can be utilized to adjust the number of examples based on user input length. This ensures your LLM does not exceed its context window limit.
Moreover, you’ve seen how easy it is to store/load prompts as files, enabling enhanced shareability, storage, and versioning.
Data Connection
Harnessing an LLM application, coupled with your data, uncovers a plethora of opportunities to boost efficiency while refining your decision-making processes.
Your organization’s data may manifest in various forms:
- Unstructured data
-
This could include Google Docs, threads from communication platforms such as Slack or Microsoft Teams, web pages, internal documentation, or code repositories on GitHub.
- Structured data
To query your unstructured data, a process of loading, transforming, embedding, and subsequently storing it within a vector database is necessary. A vector database is a specialized type of database designed to efficiently store and query data in the form of vectors, which represent complex data like text or images in a format suitable for machine learning and similarity search.
As for structured data, given its already indexed and stored state, you can utilize a LangChain agent to conduct an intermediate query on your database. This allows for the extraction of specific features, which can then be used within your LLM prompts.
There are multiple Python packages that can help with your data ingestion, including Unstructured, LlamaIndex, and LangChain.
Figure 4-2 illustrates a standardized approach to data ingestion. It begins with the data sources, which are then loaded into documents. These documents are then chunked and stored within a vector database for later retrieval.
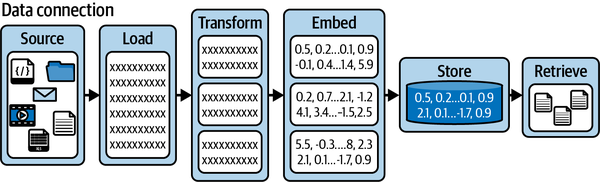
Figure 4-2. A data connection to retrieval pipeline
In particular LangChain equips you with essential components to load, modify, store, and retrieve your data:
- Document loaders
-
These facilitate uploading informational resources, or documents, from a diverse range of sources such as Word documents, PDF files, text files, or even web pages.
- Document transformers
-
These tools allow the segmentation of documents, conversion into a Q&A layout, elimination of superfluous documents, and much more.
- Text embedding models
-
These can transform unstructured text into a sequence of floating-point numbers used for similarity search by vector stores.
- Vector databases (vector stores)
-
These databases can save and execute searches over embedded data.
- Retrievers
-
These tools offer the capability to query and retrieve data.
Also, it’s worth mentioning that other LLM frameworks such as LlamaIndex work seamlessly with LangChain. LlamaHub is another open source library dedicated to document loaders and can create LangChain-specific Document objects.
Document Loaders
Let’s imagine you’ve been tasked with building an LLM data collection pipeline for NutriFusion Foods. The information that you need to gather for the LLM is contained within:
-
A PDF of a book called Principles of Marketing
-
Two .docx marketing reports in a public Google Cloud Storage bucket
-
Three .csv files showcasing the marketing performance data for 2021, 2022, and 2023
Create a new Jupyter Notebook or Python file in content/chapter_4 of the shared repository, and then run pip install pdf2image docx2txt pypdf, which will install three packages.
All of the data apart from .docx files can be found in content/chapter_4/data. You can start by importing all of your various data loaders and creating an empty all_documents list to store all of the Document objects across your data sources.
Input:
fromlangchain_community.document_loadersimportDocx2txtLoaderfromlangchain_community.document_loadersimportPyPDFLoaderfromlangchain_community.document_loaders.csv_loaderimportCSVLoaderimportglobfromlangchain.text_splitterimportCharacterTextSplitter# To store the documents across all data sources:all_documents=[]# Load the PDF:loader=PyPDFLoader("data/principles_of_marketing_book.pdf")pages=loader.load_and_split()(pages[0])# Add extra metadata to each page:forpageinpages:page.metadata["description"]="Principles of Marketing Book"# Checking that the metadata has been added:forpageinpages[0:2]:(page.metadata)# Saving the marketing book pages:all_documents.extend(pages)csv_files=glob.glob("data/*.csv")# Filter to only include the word Marketing in the file name:csv_files=[fforfincsv_filesif"Marketing"inf]# For each .csv file:forcsv_fileincsv_files:loader=CSVLoader(file_path=csv_file)data=loader.load()# Saving the data to the all_documents list:all_documents.extend(data)text_splitter=CharacterTextSplitter.from_tiktoken_encoder(chunk_size=200,chunk_overlap=0)urls=['''https://storage.googleapis.com/oreilly-content/NutriFusion%20Foods%20Marketing%20Plan%202022.docx''','''https://storage.googleapis.com/oreilly-content/NutriFusion%20Foods%20Marketing%20Plan%202023.docx''',]docs=[]forurlinurls:loader=Docx2txtLoader(url.replace('\n',''))pages=loader.load()chunks=text_splitter.split_documents(pages)# Adding the metadata to each chunk:forchunkinchunks:chunk.metadata["source"]="NutriFusion Foods Marketing Plan - 2022/2023"docs.extend(chunks)# Saving the marketing book pages:all_documents.extend(docs)
Output:
page_content='Principles of Mark eting'
metadata={'source': 'data/principles_of_marketing_book.pdf', 'page': 0}
{'source': 'data/principles_of_marketing_book.pdf', 'page': 0,
'description': 'Principles of Marketing Book'}
{'source': 'data/principles_of_marketing_book.pdf', 'page': 1,
'description': 'Principles of Marketing Book'}
Then using PyPDFLoader, you can import a .pdf file and split it into multiple pages using the .load_and_split() function.
Additionally, it’s possible to add extra metadata to each page because the metadata is a Python dictionary on each Document object. Also, notice in the preceding output for Document objects the metadata source is attached to.
Using the package glob, you can easily find all of the .csv files and individually load these into LangChain Document objects with a CSVLoader.
Finally, the two marketing reports are loaded from a public Google Cloud Storage bucket and are then split into 200 token-chunk sizes using a text_splitter.
This section equipped you with the necessary knowledge to create a comprehensive document-loading pipeline for NutriFusion Foods’ LLM. Starting with data extraction from a PDF, several CSV files and two .docx files, each document was enriched with relevant metadata for better context.
You now have the ability to seamlessly integrate data from a variety of document sources into a cohesive data pipeline.
Text Splitters
Balancing the length of each document is also a crucial factor. If a document is too lengthy, it may surpass the context length of the LLM (the maximum number of tokens that an LLM can process within a single request). But if the documents are excessively fragmented into smaller chunks, there’s a risk of losing significant contextual information, which is equally undesirable.
You might encounter specific challenges while text splitting, such as:
-
Special characters such as hashtags, @ symbols, or links might not split as anticipated, affecting the overall structure of the split documents.
-
If your document contains intricate formatting like tables, lists, or multilevel headings, the text splitter might find it difficult to retain the original formatting.
There are ways to overcome these challenges that we’ll explore later.
This section introduces you to text splitters in LangChain, tools utilized to break down large chunks of text to better adapt to your model’s context window.
Note
There isn’t a perfect document size. Start by using good heuristics and then build a training/test set that you can use for LLM evaluation.
LangChain provides a range of text splitters so that you can easily split by any of the following:
-
Token count
-
Recursively by multiple characters
-
Character count
-
Code
-
Markdown headers
Let’s explore three popular splitters: CharacterTextSplitter,
TokenTextSplitter, and RecursiveCharacterTextSplitter.
Text Splitting by Length and Token Size
In Chapter 3, you learned how to count the number of tokens within a GPT-4 call with tiktoken. You can also use tiktoken to split strings into appropriately sized chunks and documents.
Remember to install tiktoken and langchain-text-splitters with pip install tiktoken langchain-text-splitters.
To split by token count in LangChain, you can use a CharacterTextSplitter with a .from_tiktoken_encoder() function.
You’ll initially create a CharacterTextSplitter with a chunk size of 50 characters and no overlap. Using the split_text method, you’re chopping the text into pieces and then printing out the total number of chunks created.
Then you’ll do the same thing, but this time with a chunk overlap of 48 characters. This shows how the number of chunks changes based on whether you allow overlap, illustrating the impact of these settings on how your text gets divided:
fromlangchain_text_splittersimportCharacterTextSplittertext="""Biology is a fascinating and diverse field of science that explores theliving world and its intricacies\n\n. It encompasses the study of life, itsorigins, diversity, structure, function, and interactions at various levelsfrom molecules and cells to organisms and ecosystems\n\n. In this 1000-wordessay, we will delve into the core concepts of biology, its history, keyareas of study, and its significance in shaping our understanding of thenatural world.\n\n...(truncated to save space)..."""# No chunk overlap:text_splitter=CharacterTextSplitter.from_tiktoken_encoder(chunk_size=50,chunk_overlap=0,separator="\n",)texts=text_splitter.split_text(text)(f"Number of texts with no chunk overlap:{len(texts)}")# Including a chunk overlap:text_splitter=CharacterTextSplitter.from_tiktoken_encoder(chunk_size=50,chunk_overlap=48,separator="\n",)texts=text_splitter.split_text(text)(f"Number of texts with chunk overlap:{len(texts)}")
Output:
Number of texts with no chunk overlap: 3
Number of texts with chunk overlap: 6
In the previous section, you used the following to load and split the .pdf into LangChain documents:
pages = loader.load_and_split()
It’s possible for you to have more granular control on the size of each document by creating a TextSplitter and attaching it to your Document loading pipelines:
def load_and_split(text_splitter: TextSplitter | None = None) -> List[Document]
Simply create a TokenTextSplitter with a chunk_size=500 and a chunk_overlap of 50:
fromlangchain.text_splitterimportTokenTextSplitterfromlangchain_community.document_loadersimportPyPDFLoadertext_splitter=TokenTextSplitter(chunk_size=500,chunk_overlap=50)loader=PyPDFLoader("data/principles_of_marketing_book.pdf")pages=loader.load_and_split(text_splitter=text_splitter)(len(pages))#737
The Principles of Marketing book contains 497 pages, but after using a TokenTextSplitter with a chunk_size of 500 tokens, you’ve created 776 smaller LangChain Document objects.
Text Splitting with Recursive Character Splitting
Dealing with sizable blocks of text can present unique challenges in text analysis. A helpful strategy for such situations involves the use of recursive character splitting. This method facilitates the division of a large body of text into manageable segments, making further analysis more accessible.
This approach becomes incredibly effective when handling generic text. It leverages a list of characters as parameters and sequentially splits the text based on these characters. The resulting sections continue to be divided until they reach an acceptable size. By default, the character list comprises "\n\n", "\n", " ", and "". This arrangement aims to retain the integrity of paragraphs, sentences, and words, preserving the semantic context.
The process hinges on the character list provided and sizes the resulting sections based on the character count.
Before diving into the code, it’s essential to understand what the RecursiveCharacterTextSplitter does. It takes a text and a list of delimiters (characters that define the boundaries for splitting the text). Starting from the first delimiter in the list, the splitter attempts to divide the text. If the resulting chunks are still too large, it proceeds to the next delimiter, and so on. This process continues recursively until the chunks are small enough or all delimiters are exhausted.
Using the preceding text variable, start by importing RecursiveCharacterTextSplitter. This instance will be responsible for splitting the text. When initializing the splitter, parameters chunk_size, chunk_overlap, and length_function are set. Here, chunk_size is set to 100, and chunk_overlap to 20.
The length_function is defined as len to determine the size of the chunks. It’s also possible to modify the length_function argument to use a tokenizer count instead of using the default len function, which will count characters:
fromlangchain_text_splittersimportRecursiveCharacterTextSplittertext_splitter=RecursiveCharacterTextSplitter(chunk_size=100,chunk_overlap=20,length_function=len,)
Once the text_splitter instance is ready, you can use .split_text to split the text variable into smaller chunks. These chunks are stored in the texts Python list:
# Split the text into chunks:texts=text_splitter.split_text(text)
As well as simply splitting the text with overlap into a list of strings, you can easily create LangChain Document objects with the .create_documents function. Creating Document objects is useful because it allows you to:
-
Store documents within a vector database for semantic search
-
Add metadata to specific pieces of text
-
Iterate over multiple documents to create a higher-level summary
To add metadata, provide a list of dictionaries to the metadatas argument:
# Create documents from the chunks:metadatas={"title":"Biology","author":"John Doe"}docs=text_splitter.create_documents(texts,metadatas=[metadatas]*len(texts))
But what if your existing Document objects are too long?
You can easily handle that by using the .split_documents function with a TextSplitter. This will take in a list of Document objects and will return a new list of Document objects based on your TextSplitter class argument settings:
text_splitter=RecursiveCharacterTextSplitter(chunk_size=300)splitted_docs=text_splitter.split_documents(docs)
You’ve now gained the ability to craft an efficient data loading pipeline, leveraging sources such as PDFs, CSVs, and Google Cloud Storage links. Furthermore, you’ve learned how to enrich the collected documents with relevant metadata, providing meaningful context for analysis and prompt engineering.
With the introduction of text splitters, you can now strategically manage document sizes, optimizing for both the LLM’s context window and the preservation of context-rich information. You’ve navigated handling larger texts by employing recursion and character splitting. This newfound knowledge empowers you to work seamlessly with various document sources and integrate them into a robust data pipeline.
Task Decomposition
Task decomposition is the strategic process of dissecting complex problems into a suite of manageable subproblems. This approach aligns seamlessly with the natural tendencies of software engineers, who often conceptualize tasks as interrelated subcomponents.
In software engineering, by utilizing task decomposition you can reduce cognitive burden and harness the advantages of problem isolation and adherence to the single responsibility principle.
Interestingly, LLMs stand to gain considerably from the application of task decomposition across a range of use cases. This approach aids in maximizing the utility and effectiveness of LLMs in problem-solving scenarios by enabling them to handle intricate tasks that would be challenging to resolve as a single entity, as illustrated in Figure 4-3.
Here are several examples of LLMs using decomposition:
- Complex problem solving
-
In instances where a problem is multifaceted and cannot be solved through a single prompt, task decomposition is extremely useful. For example, solving a complex legal case could be broken down into understanding the case’s context, identifying relevant laws, determining legal precedents, and crafting arguments. Each subtask can be solved independently by an LLM, providing a comprehensive solution when combined.
- Content generation
-
For generating long-form content such as articles or blogs, the task can be decomposed into generating an outline, writing individual sections, and then compiling and refining the final draft. Each step can be individually managed by GPT-4 for better results.
- Large document summary
-
Summarizing lengthy documents such as research papers or reports can be done more effectively by decomposing the task into several smaller tasks, like understanding individual sections, summarizing them independently, and then compiling a final summary.
- Interactive conversational agents
-
For creating advanced chatbots, task decomposition can help manage different aspects of conversation such as understanding user input, maintaining context, generating relevant responses, and managing dialogue flow.
- Learning and tutoring systems
-
In digital tutoring systems, decomposing the task of teaching a concept into understanding the learner’s current knowledge, identifying gaps, suggesting learning materials, and evaluating progress can make the system more effective. Each subtask can leverage GPT-4’s generative abilities.
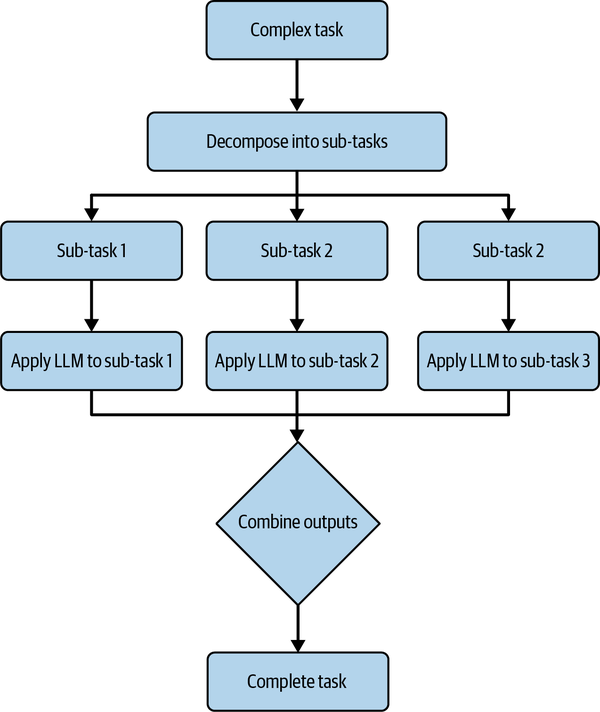
Figure 4-3. Task decomposition with LLMs
Divide Labor
Task decomposition is a crucial strategy for you to tap into the full potential of LLMs. By dissecting complex problems into simpler, manageable tasks, you can leverage the problem-solving abilities of these models more effectively and efficiently.
In the sections ahead, you’ll learn how to create and integrate multiple LLM chains to orchestrate more complicated workflows.
Prompt Chaining
Often you’ll find that attempting to do a single task within one prompt is impossible. You can utilize a mixture of prompt chaining, which involves combining multiple prompt inputs/outputs with specifically tailored LLM prompts to build up an idea.
Let’s imagine an example with a film company that would like to partially automate their film creation. This could be broken down into several key components, such as:
-
Character creation
-
Plot generation
-
Scenes/world building
Figure 4-4 shows what the prompt workflow might look like.
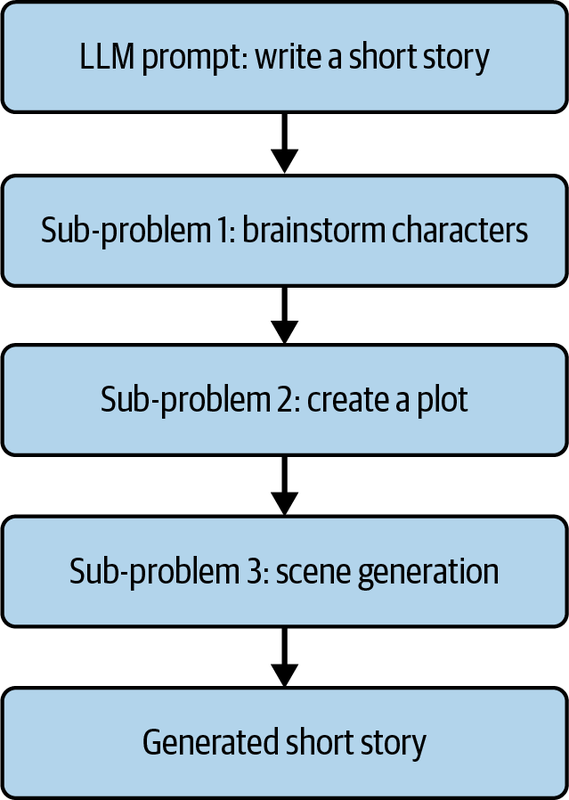
Figure 4-4. A sequential story creation process
Sequential Chain
Let’s decompose the task into multiple chains and recompose them into a single chain:
character_generation_chain-
A chain responsible for creating multiple characters given a
'genre'. plot_generation_chain-
A chain that will create the plot given the
'characters'and'genre'keys. scene_generation_chain-
This chain will generate any missing scenes that were not initially generated from the
plot_generation_chain.
Let’s start by creating three separate ChatPromptTemplate variables, one for each chain:
fromlangchain_core.prompts.chatimportChatPromptTemplatecharacter_generation_prompt=ChatPromptTemplate.from_template("""I want you to brainstorm three to five characters for my short story. Thegenre is {genre}. Each character must have a Name and a Biography.You must provide a name and biography for each character, this is veryimportant!---Example response:Name: CharWiz, Biography: A wizard who is a master of magic.Name: CharWar, Biography: A warrior who is a master of the sword.---Characters: """)plot_generation_prompt=ChatPromptTemplate.from_template("""Given the following characters and the genre, create an effectiveplot for a short story:Characters:{characters}---Genre: {genre}---Plot: """)scene_generation_plot_prompt=ChatPromptTemplate.from_template("""Act as an effective content creator.Given multiple characters and a plot, you are responsible forgenerating the various scenes for each act.You must decompose the plot into multiple effective scenes:---Characters:{characters}---Genre: {genre}---Plot: {plot}---Example response:Scenes:Scene 1: Some text here.Scene 2: Some text here.Scene 3: Some text here.----Scenes:""")
Notice that as the prompt templates flow from character to plot and scene generation, you add more placeholder variables from the previous steps.
The question remains, how can you guarantee that these extra strings are available for your downstream ChatPromptTemplate variables?
itemgetter and Dictionary Key Extraction
Within LCEL you can use the itemgetter function from the operator package to extract keys from the previous step, as long as a dictionary was present within the previous step:
fromoperatorimportitemgetterfromlangchain_core.runnablesimportRunnablePassthroughchain=RunnablePassthrough()|{"genre":itemgetter("genre"),}chain.invoke({"genre":"fantasy"})# {'genre': 'fantasy'}
The RunnablePassThrough function simply passes any inputs directly to the next step. Then a new dictionary is created by using the same key within the invoke function; this key is extracted by using itemgetter("genre").
It’s essential to use the itemgetter function throughout parts of your LCEL chains so that any subsequent ChatPromptTemplate placeholder variables will always have valid values.
Additionally, you can use lambda or RunnableLambda functions within an LCEL chain to manipulate previous dictionary values. A lambda is an anonynous function within Python:
fromlangchain_core.runnablesimportRunnableLambdachain=RunnablePassthrough()|{"genre":itemgetter("genre"),"upper_case_genre":lambdax:x["genre"].upper(),"lower_case_genre":RunnableLambda(lambdax:x["genre"].lower()),}chain.invoke({"genre":"fantasy"})# {'genre': 'fantasy', 'upper_case_genre': 'FANTASY',# 'lower_case_genre': 'fantasy'}
Now that you’re aware of how to use RunnablePassThrough, itemgetter, and lambda functions, let’s introduce one final piece of syntax: RunnableParallel:
fromlangchain_core.runnablesimportRunnableParallelmaster_chain=RunnablePassthrough()|{"genre":itemgetter("genre"),"upper_case_genre":lambdax:x["genre"].upper(),"lower_case_genre":RunnableLambda(lambdax:x["genre"].lower()),}master_chain_two=RunnablePassthrough()|RunnableParallel(genre=itemgetter("genre"),upper_case_genre=lambdax:x["genre"].upper(),lower_case_genre=RunnableLambda(lambdax:x["genre"].lower()),)story_result=master_chain.invoke({"genre":"Fantasy"})(story_result)story_result=master_chain_two.invoke({"genre":"Fantasy"})(story_result)# master chain: {'genre': 'Fantasy', 'upper_case_genre': 'FANTASY',# 'lower_case_genre': 'fantasy'}# master chain two: {'genre': 'Fantasy', 'upper_case_genre': 'FANTASY',# 'lower_case_genre': 'fantasy'}
First, you import RunnableParallel and create two LCEL chains called master_chain and master_chain_two. These are then invoked with exactly the same arguments; the RunnablePassthrough then passes the dictionary into the second part of the chain.
The second part of master_chain and master_chain_two will return exactly the same result.
So rather than directly using a dictionary, you can choose to use a RunnableParallel function instead. These two chain outputs are interchangeable, so choose whichever syntax you find more comfortable.
Let’s create three LCEL chains using the prompt templates:
fromlangchain_openai.chat_modelsimportChatOpenAIfromlangchain_core.output_parsersimportStrOutputParser# Create the chat model:model=ChatOpenAI()# Create the subchains:character_generation_chain=(character_generation_prompt|model|StrOutputParser())plot_generation_chain=(plot_generation_prompt|model|StrOutputParser())scene_generation_plot_chain=(scene_generation_plot_prompt|model|StrOutputParser())
After creating all the chains, you can then attach them to a master LCEL chain.
Input:
fromlangchain_core.runnablesimportRunnableParallelfromoperatorimportitemgetterfromlangchain_core.runnablesimportRunnablePassthroughmaster_chain=({"characters":character_generation_chain,"genre":RunnablePassthrough()}|RunnableParallel(characters=itemgetter("characters"),genre=itemgetter("genre"),plot=plot_generation_chain,)|RunnableParallel(characters=itemgetter("characters"),genre=itemgetter("genre"),plot=itemgetter("plot"),scenes=scene_generation_plot_chain,))story_result=master_chain.invoke({"genre":"Fantasy"})
The output is truncated when you see ... to save space. However, in total there were five characters and nine scenes generated.
Output:
{'characters':'''Name: Lyra, Biography: Lyra is a young elf who possesses..\n\nName: Orion, Biography: Orion is a ..''','genre':{'genre':'Fantasy'}'plot':'''In the enchanted forests of a mystical realm, a greatdarkness looms, threatening to engulf the land and its inhabitants. Lyra,the young elf with a deep connection to nature, ...''','scenes':'''Scene1: Lyra senses the impending danger in the forest ...\n\nScene 2: Orion, onhis mission to investigate the disturbances in the forest...\n\nScene 9:After the battle, Lyra, Orion, Seraphina, Finnegan...'''}
The scenes are split into separate items within a Python list. Then two new prompts are created to generate both a character script and a summarization prompt:
# Extracting the scenes using .split('\n') and removing empty strings:scenes=[sceneforsceneinstory_result["scenes"].split("\n")ifscene]generated_scenes=[]previous_scene_summary=""character_script_prompt=ChatPromptTemplate.from_template(template="""Given the following characters:{characters}and the genre:{genre}, create an effective character script for a scene.You must follow the following principles:- Use the Previous Scene Summary:{previous_scene_summary}to avoidrepeating yourself.- Use the Plot:{plot}to create an effective scene character script.- Currently you are generating the character dialogue script for thefollowing scene:{scene}---Here is an example response:SCENE 1: ANNA'S APARTMENT(ANNA is sorting through old books when there is a knock at the door.She opens it to reveal JOHN.)ANNA: Can I help you, sir?JOHN: Perhaps, I think it's me who can help you. I heard you'reresearching time travel.(Anna looks intrigued but also cautious.)ANNA: That's right, but how do you know?JOHN: You could say... I'm a primary source.---SCENE NUMBER:{index}""",)summarize_prompt=ChatPromptTemplate.from_template(template="""Given a character script, create a summary of the scene.Character script:{character_script}""",)
Technically, you could generate all of the scenes asynchronously. However, it’s beneficial to know what each character has done in the previous scene to avoid repeating points.
Therefore, you can create two LCEL chains, one for generating the character scripts per scene and the other for summarizations of previous scenes:
# Loading a chat model:model=ChatOpenAI(model='gpt-3.5-turbo-16k')# Create the LCEL chains:character_script_generation_chain=({"characters":RunnablePassthrough(),"genre":RunnablePassthrough(),"previous_scene_summary":RunnablePassthrough(),"plot":RunnablePassthrough(),"scene":RunnablePassthrough(),"index":RunnablePassthrough(),}|character_script_prompt|model|StrOutputParser())summarize_chain=summarize_prompt|model|StrOutputParser()# You might want to use tqdm here to track the progress,# or use all of the scenes:forindex,sceneinenumerate(scenes[0:3]):# # Create a scene generation:scene_result=character_script_generation_chain.invoke({"characters":story_result["characters"],"genre":"fantasy","previous_scene_summary":previous_scene_summary,"index":index,})# Store the generated scenes:generated_scenes.append({"character_script":scene_result,"scene":scenes[index]})# If this is the first scene then we don't have a# previous scene summary:ifindex==0:previous_scene_summary=scene_resultelse:# If this is the second scene or greater then# we can use and generate a summary:summary_result=summarize_chain.invoke({"character_script":scene_result})previous_scene_summary=summary_result
First, you’ll establish a character_script_generation_chain in your script, utilizing various runnables like RunnablePassthrough for smooth data flow. Crucially, this chain integrates model = ChatOpenAI(model='gpt-3.5-turbo-16k'), a powerful model with a generous 16k context window, ideal for extensive content generation tasks. When invoked, this chain adeptly generates character scripts, drawing on inputs such as character profiles, genre, and scene specifics.
You dynamically enrich each scene by adding the summary of the previous scene, creating a simple yet effective buffer memory. This technique ensures continuity and context in the narrative, enhancing the LLM’s ability to generate coherent character scripts.
Additionally, you’ll see how the StrOutputParser elegantly converts model outputs into structured strings, making the generated content easily usable.
Divide Labor
Remember, designing your tasks in a sequential chain greatly benefits from the Divide Labor principle. Breaking tasks down into smaller, manageable chains can increase the overall quality of your output. Each chain in the sequential chain contributes its individual effort toward achieving the overarching task goal.
Using chains gives you the ability to use different models. For example, using a smart model for the ideation and a cheap model for the generation usually gives optimal results. This also means you can have fine-tuned models on each step.
Structuring LCEL Chains
In LCEL you must ensure that the first part of your LCEL chain is a runnable type. The following code will throw an error:
fromlangchain_core.prompts.chatimportChatPromptTemplatefromoperatorimportitemgetterfromlangchain_core.runnablesimportRunnablePassthrough,RunnableLambdabad_first_input={"film_required_age":18,}prompt=ChatPromptTemplate.from_template("Generate a film title, the age is{film_required_age}")# This will error:bad_chain=bad_first_input|prompt
A Python dictionary with a value of 18 will not create a runnable LCEL chain. However, all of the following implementations will work:
# All of these chains enforce the runnable interface:first_good_input={"film_required_age":itemgetter("film_required_age")}# Creating a dictionary within a RunnableLambda:second_good_input=RunnableLambda(lambdax:{"film_required_age":x["film_required_age"]})third_good_input=RunnablePassthrough()fourth_good_input={"film_required_age":RunnablePassthrough()}# You can also create a chain starting with RunnableParallel(...)first_good_chain=first_good_input|promptsecond_good_chain=second_good_input|promptthird_good_chain=third_good_input|promptfourth_good_chain=fourth_good_input|promptfirst_good_chain.invoke({"film_required_age":18})# ...
Sequential chains are great at incrementally building generated knowledge that is used by future chains, but they often yield slower response times due to their sequential nature. As such, SequentialChain data pipelines are best suited for server-side tasks, where immediate responses are not a priority and users aren’t awaiting real-time feedback.
Document Chains
Let’s imagine that before accepting your generated story, the local publisher has requested that you provide a summary based on all of the character scripts. This is a good use case for document chains because you need to provide an LLM with a large amount of text that wouldn’t fit within a single LLM request due to the context length restrictions.
Before delving into the code, let’s first get a sense of the broader picture. The script you are going to see performs a text summarization task on a collection of scenes.
Remember to install Pandas with pip install pandas.
Now, let’s start with the first set of code:
fromlangchain_text_splittersimportCharacterTextSplitterfromlangchain.chains.summarizeimportload_summarize_chainimportpandasaspd
These lines are importing all the necessary tools you need. CharacterTextSplitter and load_summarize_chain are from the LangChain package and will help with text processing, while Pandas (imported as pd) will help manipulate your data.
Next, you’ll be dealing with your data:
df=pd.DataFrame(generated_scenes)
Here, you create a Pandas DataFrame from the generated_scenes variable, effectively converting your raw scenes into a tabular data format that Pandas can easily manipulate.
Then you need to consolidate your text:
all_character_script_text="\n".join(df.character_script.tolist())
In this line, you’re transforming the character_script column from your DataFrame into a single text string. Each entry in the column is converted into a list item, and all items are joined together with new lines in between, resulting in a single string that contains all character scripts.
Once you have your text ready, you prepare it for the summarization process:
text_splitter=CharacterTextSplitter.from_tiktoken_encoder(chunk_size=1500,chunk_overlap=200)docs=text_splitter.create_documents([all_character_script_text])
Here, you create a CharacterTextSplitter instance using its class method from_tiktoken_encoder, with specific parameters for chunk size and overlap. You then use this text splitter to split your consolidated script text into chunks suitable for processing by your summarization tool.
Next, you set up your summarization tool:
chain=load_summarize_chain(llm=model,chain_type="map_reduce")
This line is about setting up your summarization process. You’re calling a function that loads a summarization chain with a chat model in a map-reduce style approach.
Then you run the summarization:
summary=chain.invoke(docs)
This is where you actually perform the text summarization. The invoke method executes the summarization on the chunks of text you prepared earlier and stores the summary into a variable.
Finally, you print the result:
(summary['output_text'])
This is the culmination of all your hard work. The resulting summary text is printed to the console for you to see.
This script takes a collection of scenes, consolidates the text, chunks it up, summarizes it, and then prints the summary:
fromlangchain.text_splitterimportCharacterTextSplitterfromlangchain.chains.summarizeimportload_summarize_chainimportpandasaspddf=pd.DataFrame(generated_scenes)all_character_script_text="\n".join(df.character_script.tolist())text_splitter=CharacterTextSplitter.from_tiktoken_encoder(chunk_size=1500,chunk_overlap=200)docs=text_splitter.create_documents([all_character_script_text])chain=load_summarize_chain(llm=model,chain_type="map_reduce")summary=chain.invoke(docs)(summary['output_text'])
Output:
Aurora and Magnus agree to retrieve a hidden artifact, and they enter an
ancient library to find a book that will guide them to the relic...'
It’s worth noting that even though you’ve used a map_reduce chain, there are four core chains for working with Document objects within LangChain.
Stuff
The document insertion chain, also referred to as the stuff chain (drawing from the concept of stuffing or filling), is the simplest approach among various document chaining strategies. Figure 4-5 illustrates the process of integrating multiple documents into a single LLM request.
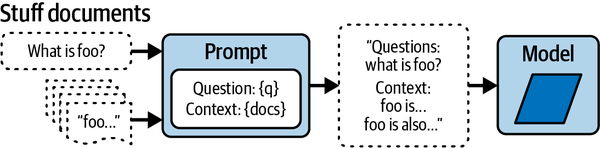
Figure 4-5. Stuff documents chain
Refine
The refine documents chain (Figure 4-6) creates an LLM response through a cyclical process that iteratively updates its output. During each loop, it combines the current output (derived from the LLM) with the current document. Another LLM request is made to update the current output. This process continues until all documents have been processed.
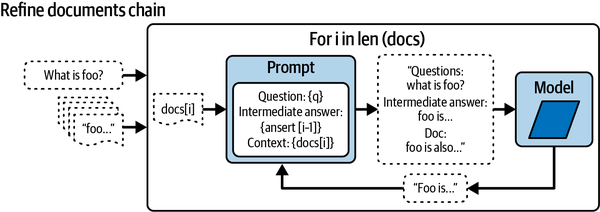
Figure 4-6. Refine documents chain
Map Reduce
The map reduce documents chain in Figure 4-7 starts with an LLM chain to each separate document (a process known as the Map step), interpreting the resulting output as a newly generated document.
Subsequently, all these newly created documents are introduced to a distinct combine documents chain to formulate a singular output (a process referred to as the Reduce step). If necessary, to ensure the new documents seamlessly fit into the context length, an optional compression process is used on the mapped documents. If required, this compression happens recursively.
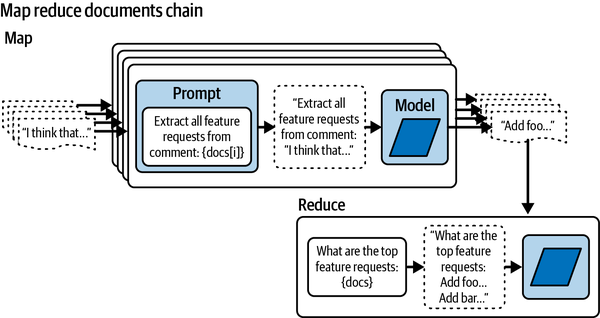
Figure 4-7. Map reduce documents chain
Map Re-rank
There is also map re-rank, which operates by executing an initial prompt on each document. This not only strives to fulfill a given task but also assigns a confidence score reflecting the certainty of its answer. The response with the highest confidence score is then selected and returned.
Table 4-1 demonstrates the advantages and disadvantages for choosing a specific document chain strategy.
| Approach | Advantages | Disadvantages |
|---|---|---|
Stuff Documents Chain |
Simple to implement. Ideal for scenarios with small documents and few inputs. |
May not be suitable for handling large documents or multiple inputs due to prompt size limitation. |
Refine Documents Chain |
Allows iterative refining of the response. More control over each step of response generation. Good for progressive extraction tasks. |
Might not be optimal for real-time applications due to the loop process. |
Map Reduce Documents Chain |
Enables independent processing of each document. Can handle large datasets by reducing them into manageable chunks. |
Requires careful management of the process. Optional compression step can add complexity and loses document order. |
Map Re-rank Documents Chain |
Provides a confidence score for each answer, allowing for better selection of responses. |
The ranking algorithm can be complex to implement and manage. May not provide the best answer if the scoring mechanism is not reliable or well-tuned. |
You can read more about how to implement different document chains in LangChain’s comprehensive API and here.
Also, it’s possible to simply change the chain type within the load_summarize_chain function:
chain=load_summarize_chain(llm=model,chain_type='refine')
There are newer, more customizable approaches to creating summarization chains using LCEL, but for most of your needs load_summarize_chain provides sufficient results.
Summary
In this chapter, you comprehensively reviewed the LangChain framework and its essential components. You learned about the importance of document loaders for gathering data and the role of text splitters in handling large text blocks.
Moreover, you were introduced to the concepts of task decomposition and prompt chaining. By breaking down complex problems into smaller tasks, you saw the power of problem isolation. Furthermore, you now grasp how prompt chaining can combine multiple inputs/outputs for richer idea generation.
In the next chapter, you’ll learn about vector databases, including how to integrate these with documents from LangChain, and this ability will serve a pivotal role in enhancing the accuracy of knowledge extraction from your data.
Get Prompt Engineering for Generative AI now with the O’Reilly learning platform.
O’Reilly members experience books, live events, courses curated by job role, and more from O’Reilly and nearly 200 top publishers.

