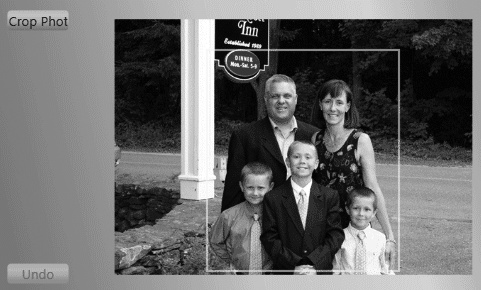
The spec for this project states that the user can drag a cropping rectangle within any photograph and then click the Crop button to crop the photo, as shown in Figure 4-3.
To accomplish this, you'll need to be able to create and display a "rubberband" on mouse down and mouse drag, and leave it in place on mouse up (activating the Crop button)—and you'll need to be able to "crop" the photo to its new rectangle.
You'll implement the rubberband as an adorner. Adorners are, essentially, elements that are rendered "on top of" existing elements (or collections of elements). You can think of WPF as having what amounts to an acetate layer of adorners that can be laid on top of adorned elements, with the adorners positioned relative to the elements that are being adorned.
Adorners are often used to create element-manipulation handles (like rotation handles or resizers) or visual feedback indications. A rubberband for cropping is an excellent example. In fact, Microsoft offers sample code that you can "borrow" and adapt for the purposes of this application, as shown in Example 4-1.
Example 4-1. The rubberband adorner
using System;
using System.IO;
using System.Windows;
using System.Windows.Input;
using System.Windows.Media;
using System.Windows.Documents;

namespace PhotoCooperative
{
   public class RubberbandAdorner : Adorner
   {
      public Window1 Window { set; get; }
      private RectangleGeometry geometry;
      public System.Windows.Shapes.Path Rubberband { get; set; }
      private UIElement adornedElement;
      private Rect selectRect;
      public Rect SelectRect { get { return selectRect; } }
      protected override int VisualChildrenCount { get { return 1; } }
      private Point anchorPoint;

      public RubberbandAdorner(UIElement adornedElement) : base(adornedElement)
      {
         this.adornedElement = adornedElement;
         selectRect = new Rect();
         geometry = new RectangleGeometry();
         Rubberband = new System.Windows.Shapes.Path();
         Rubberband.Data = geometry;
         Rubberband.StrokeThickness = 2;
         Rubberband.Stroke = Brushes.Yellow;
         Rubberband.Opacity = .6;
         Rubberband.Visibility = Visibility.Hidden;
         AddVisualChild(Rubberband);
         MouseMove += new MouseEventHandler(DrawSelection);
         MouseUp += new MouseButtonEventHandler(EndSelection);
      }

      protected override Size ArrangeOverride(Size size)
      {
         Size finalSize = base.ArrangeOverride(size);
         ((UIElement)GetVisualChild(0)).Arrange(new Rect(new Point(), finalSize));
         return finalSize;
      }

      public void StartSelection(Point anchorPoint)
      {
         this.anchorPoint = anchorPoint;
         selectRect.Size = new Size(10, 10);
         selectRect.Location = anchorPoint;
         geometry.Rect = selectRect;
         if (Visibility.Visible != Rubberband.Visibility)
             Rubberband.Visibility = Visibility.Visible;
      }

      private void DrawSelection(object sender, MouseEventArgs e)
      {
         if (e.LeftButton == MouseButtonState.Pressed)
         {
            Point mousePosition = e.GetPosition(adornedElement);
            if (mousePosition.X < anchorPoint.X)
            {
               selectRect.X = mousePosition.X;
            }
            else
            {
               selectRect.X = anchorPoint.X;
            }
            if (mousePosition.Y < anchorPoint.Y)
            {
               selectRect.Y = mousePosition.Y;
            }
            else
            {
               selectRect.Y = anchorPoint.Y;
            }
            selectRect.Width = Math.Abs(mousePosition.X - anchorPoint.X);
            selectRect.Height = Math.Abs(mousePosition.Y - anchorPoint.Y);
            geometry.Rect = selectRect;
            AdornerLayer layer = AdornerLayer.GetAdornerLayer(adornedElement);
            layer.InvalidateArrange();
         }
      }

      private void EndSelection(object sender, MouseButtonEventArgs e)
      {
         const int MinSize = 3;

         if (selectRect.Width <= MinSize || selectRect.Height <= MinSize)
         {
            Rubberband.Visibility = Visibility.Hidden;
         }
         else
         {
            Window.CropButton.IsEnabled = true;
         }
         ReleaseMouseCapture();
      }

      protected override Visual GetVisualChild(int index)
      {
         return Rubberband;
      }
   }
}
Let's unpack a bit of this code. You begin by creating a few private member variables:
private Rectangle Geometry geometry;
private UIElement adornedElement;
private Point anchorPoint;
The Geometry class is used to describe a 2-D shape. In this case, you'll use the RectangleGeometry class to constrain the rubberband to draw a rectangle as the user drags the mouse across the photograph (as you saw in Figure 4-3).
The private member variable adornedElement is the element that will be adorned (i.e., the element on which the Rubberband will act). This value is passed into the constructor, which sends it along to the abstract base class (Adorner):
public RubberbandAdorner( UIElement adornedElement ) : base( adornedElement )
anchorPoint is the starting point for the rectangle, established by an initial mouse-down event similar to this:
private void OnMouseDown( object sender, MouseButtonEventArgs e )
{
   Point anchor = e.GetPosition( CurrentPhoto );
}
The constructor attaches the RubberbandAdorner to the adornedElement (in this case, the current photo) and creates a new rectangle:
this.adornedElement = adornedElement;
selectRect = new Rect();
It then sets the Rubberband property to a new Path object (a Path is used to describe a complex geometric figure; the segments within a path are combined to create a single shape):
Rubberband = new System.Windows.Shapes.Path();
In this case, you set the Data for the Path to geometry, which you'll remember is just a RectangleGeometry (that is, the data to create a rectangle shape). The Path also takes a StrokeThickness (the width of the rectangle's border), a Stroke (the color), an Opacity (the level of transparency), and a Visibility (it starts out hidden):
geometry = new RectangleGeometry();

Rubberband.Data = geometry;
Rubberband.StrokeThickness = 2;
Rubberband.Stroke = Brushes.Yellow;
Rubberband.Opacity = .6;
Rubberband.Visibility = Visibility.Hidden;
Next, you add the rubberband member variable to the adorner by calling its AddVisualChild() method:
AddVisualChild( Rubberband );
This adds the Path to the adorner's collection of visual elements.
Finally, you add two event handlers, MouseMove (which calls DrawSelection()) and MouseUp (which calls EndSelection()):
MouseMove += new MouseEventHandler( DrawSelection );
MouseUp += new MouseButtonEventHandler( EndSelection );
StartSelection() is called by the OnMouseDown handler in Window1, as you'll see later in this chapter.
Here is the complete listing of the constructor:
public RubberbandAdorner(UIElement adornedElement) : base(adornedElement)
{
   this.adornedElement = adornedElement;
   selectRect = new Rect();

   Rubberband = new System.Windows.Shapes.Path();

   geometry = new RectangleGeometry();

   Rubberband.Data = geometry;
   Rubberband.StrokeThickness = 2;
   Rubberband.Stroke = Brushes.Yellow;
   Rubberband.Opacity = .6;
   Rubberband.Visibility = Visibility.Hidden;
   AddVisualChild(Rubberband);
   MouseMove += new MouseEventHandler(DrawSelection);
   MouseUp += new MouseButtonEventHandler(EndSelection);
}
To place each visual child element, you call the base class's ArrangeOverride() method and pass in the Size object you are given, getting back a Size object representing the area you have to work with. You then obtain each visual child in turn and call Arrange() on them, passing in a Rectangle. Finally, you return the Size object obtained from the base class:
protected override Size ArrangeOverride(Size size)
{
   Size finalSize = base.ArrangeOverride(size);
   ((UIElement)GetVisualChild(0)).Arrange(new Rect(new Point(), finalSize));
   return finalSize;
}
Get Programming .NET 3.5 now with the O’Reilly learning platform.
O’Reilly members experience books, live events, courses curated by job role, and more from O’Reilly and nearly 200 top publishers.


