Chapter 4. Deploying an Application on OpenShift
You’ve got a handle on OpenShift concepts and you have access to an OpenShift cluster. Now you’ll use OpenShift to create a project, build the project’s application from source, and run it.
A Simple Sample Application
We will honor tech tradition by beginning with a “Hello World” program. This chapter’s simple program runs an HTTP service that prints a response to each request. We’ve selected the Go programming language because it compiles quickly and to demonstrate more than one language environments. You’ll use the Java Quarkus framework to build a more complex application in later chapters. OpenShift techniques you’ll use throughout the book, like on-cluster builds and automatic deployment, are largely agnostic about the language and frameworks you choose for a project.
First, get a copy of the source code for the Hello World application. You’ll use Git to manage the source and GitHub to make your copy available for your cluster to build. Point your browser to this chapter’s GitHub repository. Fork a copy to your own GitHub account with the Fork button at the top right. In Git terms, a “fork” is an exact copy of a repository at a point in time. You can modify your fork to create your own version or to make, test, and submit changes back to the original repo. You’ll use Git in this chapter, but you don’t need deep Git expertise; the following extremely brief overview of Git words and ways should get you started.
Git and GitHub
Git is a system for distributed version control. Usually, a Git repository on your computer will store the working copies of your source code. You’ll use the git tool to commit changes there, then push the repository somewhere, or collaborate with an upstream repo with change proposals referred to as pull requests. This decentralized operation is the “distributed” part.
In this book, you’ll push source code to GitHub, a social network for source code. The “social” part means other people and, more importantly for your project, other systems can connect to, copy, work with, and propose changes to your source code stored on GitHub. GitHub also has browser-based tools for editing source and commiting changes, and in this chapter you’ll use those so that you can play the first few levels of OpenShift without a side quest into the command line.
Building and Deploying the Application on OpenShift
The first thing you need is an OpenShift Project to contain the application resources. Log in to your CRC cluster web console. There, the default account is “developer” and the password is also “developer”.
Make sure you’re using the Developer perspective by checking or changing the selection to Developer using the OpenShift perspective switcher dropdown in the upper-left corner. Click on Topology. Create a new project by clicking the Project: All Projects dropdown and then click Create Project (Figure 4-1).

Figure 4-1. OpenShift Web Console: Project dropdown
In the Create Project dialog, configure the new Project, as shown in Figure 4-2.
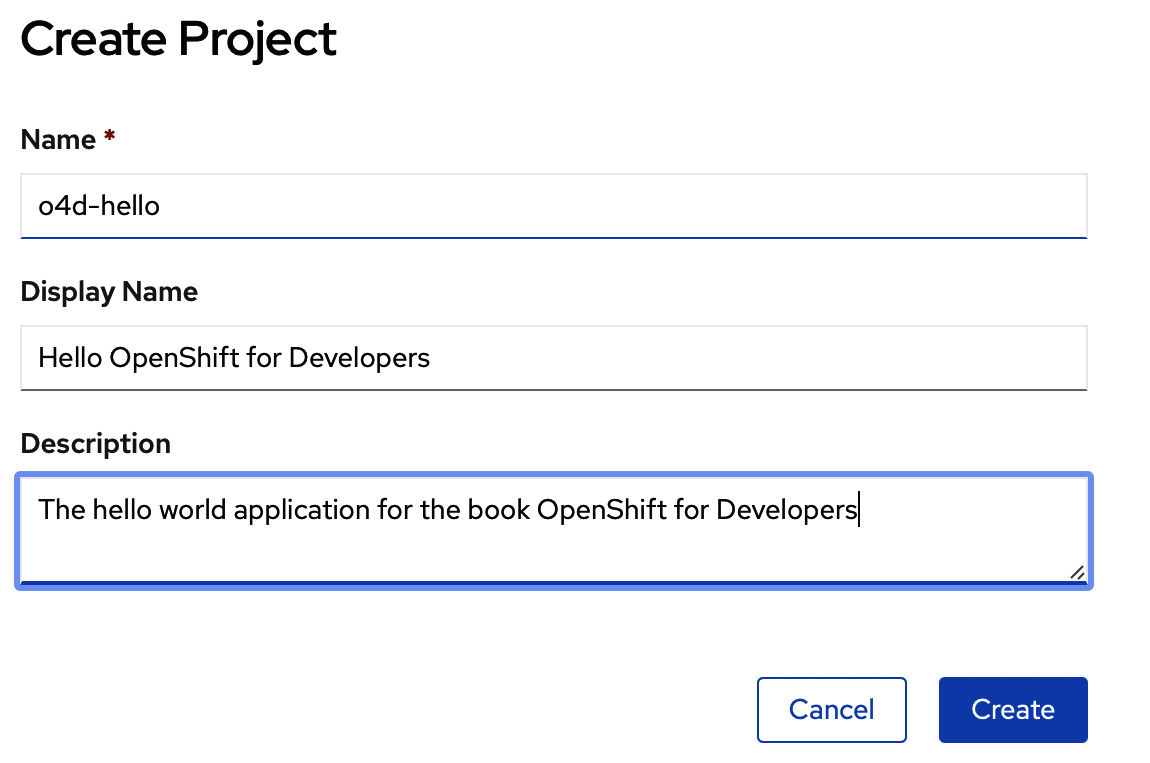
Figure 4-2. Creating a new Project
CLI How-To: Create a New Project
Create a new Project in the OpenShift CLI by executing the following code:
oc new-project \
--display-name='Hello OpenShift for Developers' \
--description='hello world' \
o4d-hello
Since you haven’t deployed anything, the Topology view will try to help out with a grid of things you might want to deploy. Choose From Git.
The console will present a Git build configuration dialog, similar to that seen in Figure 4-3. Enter the URL of your forked Hello World source in your GitHub account: for example, https://github.com/<your-name>/hello.git. When you do, OpenShift will check the contents of the repository and, for known languages, will automatically select the appropriate Builder Image containing the compiler and other tools to build it.
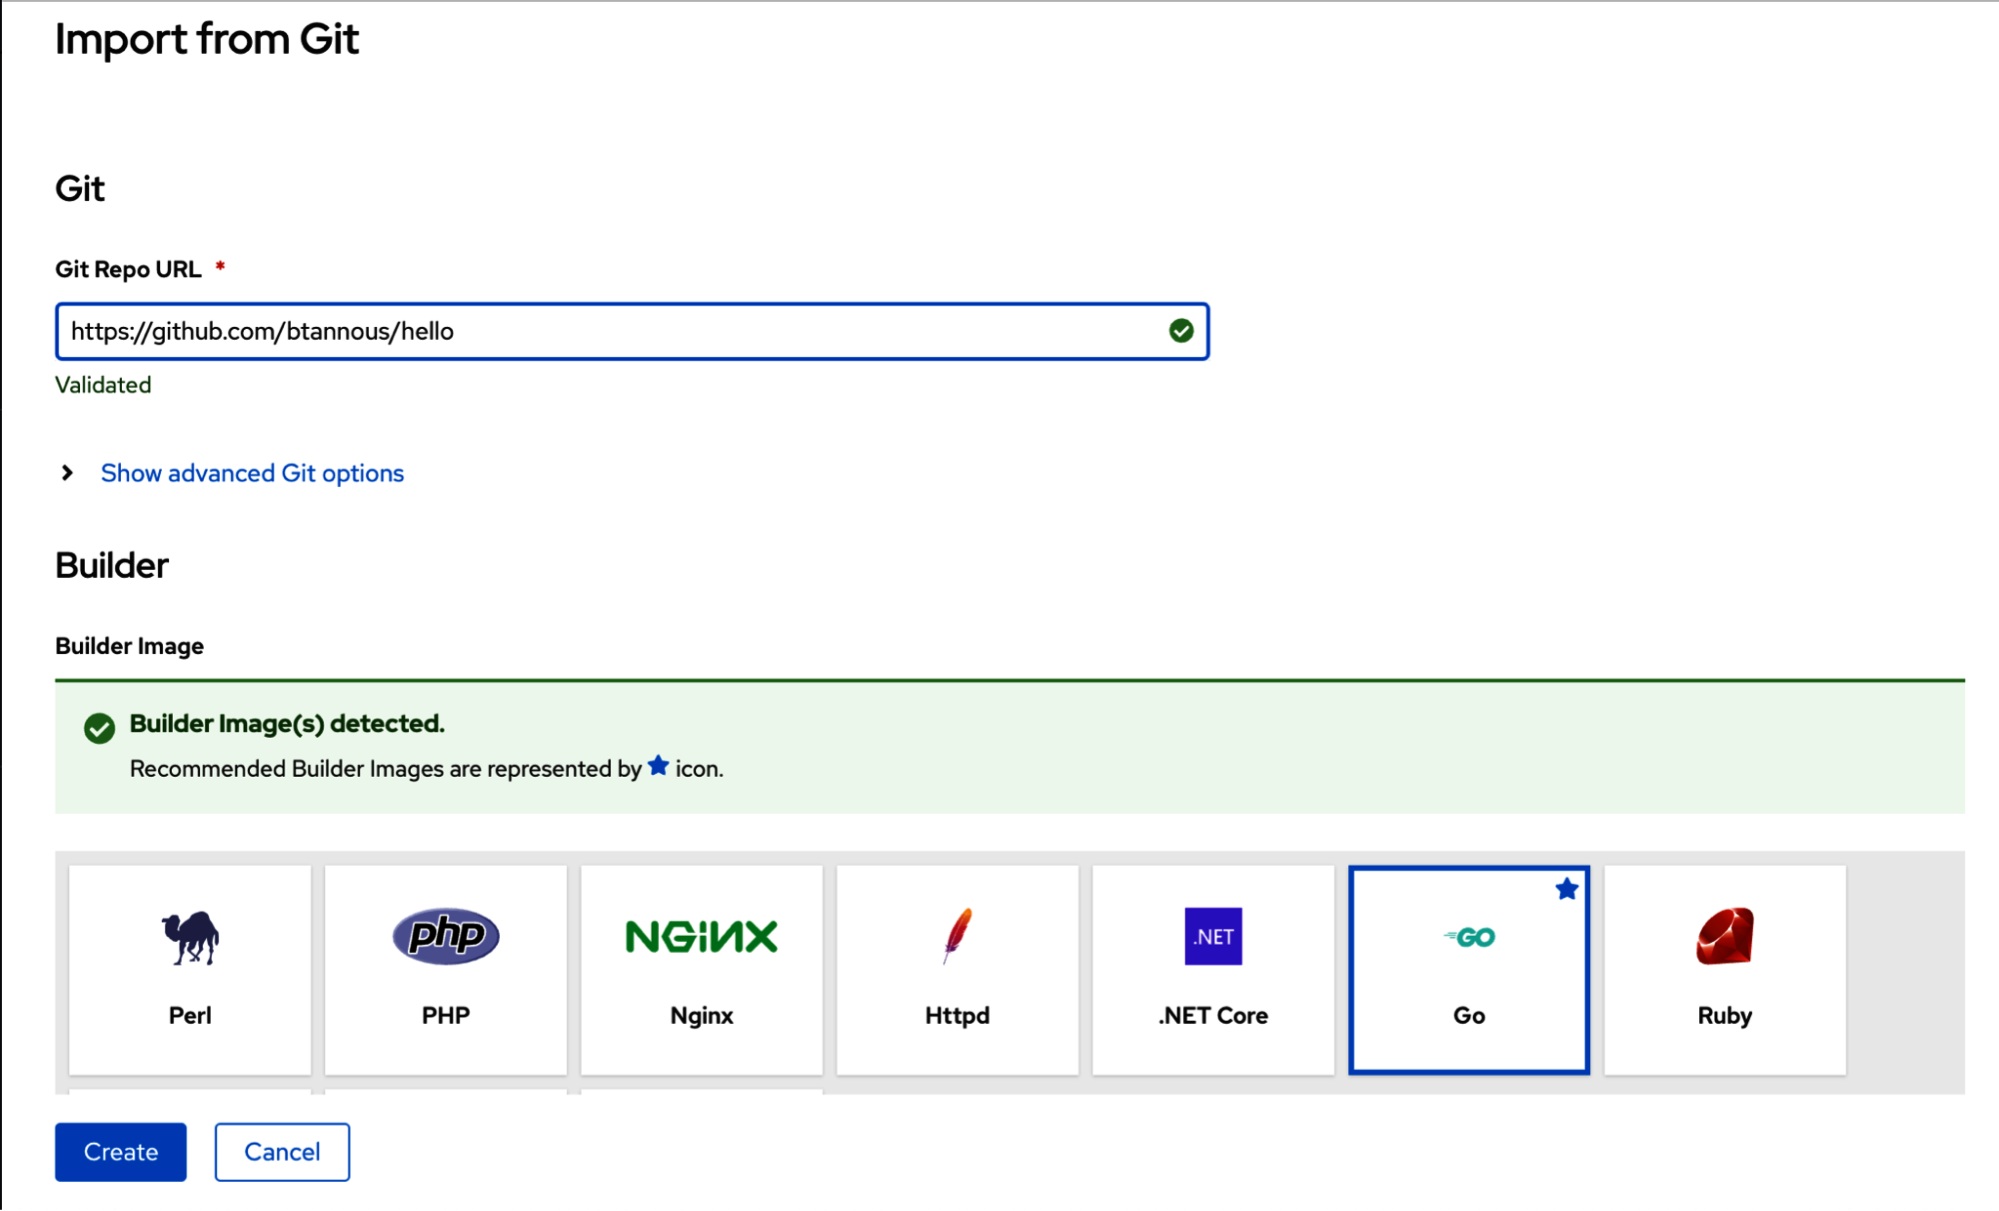
Figure 4-3. Configuring a build from Go source code in the OpenShift Web Console
Check that Go is selected in the grid of Builder Images offered in the dialog. Otherwise, accept the defaults and click Create.
CLI How-To: Create a New Go Application
It is possible to create the hello deployment using the command line by executing the following:
oc new-app golang~https://github.com/<your-name>/hello.git
When you click Create, OpenShift will start building your source code with the Go compiler tools of the selected Builder Image. You’ll be returned to the console’s Topology view, which shows the application and updates its display as it builds and deploys (Figure 4-4).
The application’s Topology icon conveys key information. Mouse over the badges on the icon’s edge and you’ll see that you can click through to build status, directly to the Git repository URL with the app’s source code, or to the external URL of a route to the application (Figure 4-5).
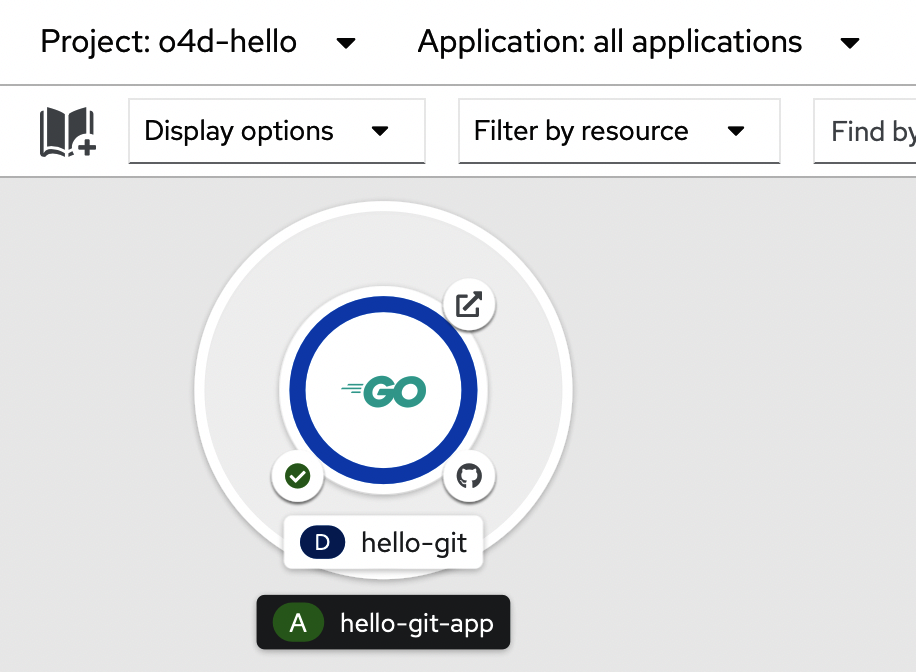
Figure 4-4. Topology view with Hello World application
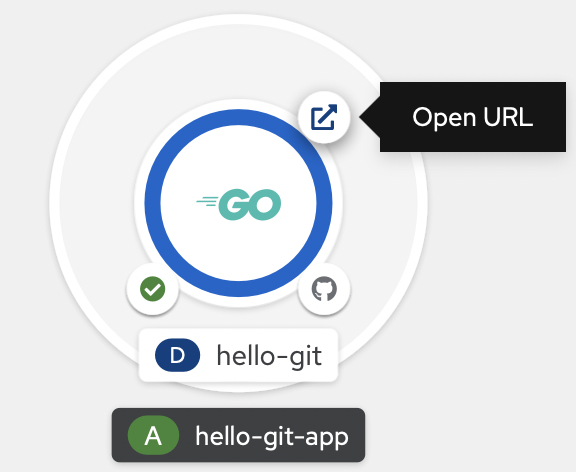
Figure 4-5. Topology icon Route badge
The status of the deployment is conveyed by different colors and tool tips. Dark blue indicates a running application, light blue one that is not yet ready, and red an application that needs attention because errors have occurred.
Click the Route badge to open the application’s external URL in your web browser (Figure 4-6).

Figure 4-6. HTTP response printed by the Hello World application
Adding and Deploying a New Feature
Starting with a few lines of source code, you’ve used OpenShift to fetch, build, and deploy a stateless web application of contrived simplicity. Now imagine you are assigned a ticket for a feature request: change the displayed text to “Hello World!”. You can make this change and then have OpenShift rebuild the application and deploy the result, replacing the previous version.
This basic loop prepares you for two key ideas in the more elaborate application you’ll build through the rest of the book. The source-to-image build system on OpenShift will form the core of the more complete deployment pipeline you’ll create in Chapter 6. In later chapters, you’ll see how to set and change deployment strategies to keep services available during redeployments, or to deploy a new application version to only a subset of replicas, for single-cluster A/B testing.
Changing hello source
To address the text-change ticket, you need to change a string in the application source. If you’re a Git veteran, you may have cloned the repo to your local machine, and you already know how to edit with your preferred tool, commit, and push back to your GitHub repo. If that process isn’t familiar to you, don’t worry; for now, the needed change is simple enough to do it quickly in the GitHub web editor, and we will show you how to clone, change, commit, and send your changes back to your publicly visible GitHub repository before you need to do more involved coding.
Open the Go source file for your Hello World application, hello-openshift-for-developers.go, in your browser. Your copy will be at https://github.com/<your-name>/hello/blob/master/hello-openshift-for-developers.go. You will see the code shown in Figure 4-7.
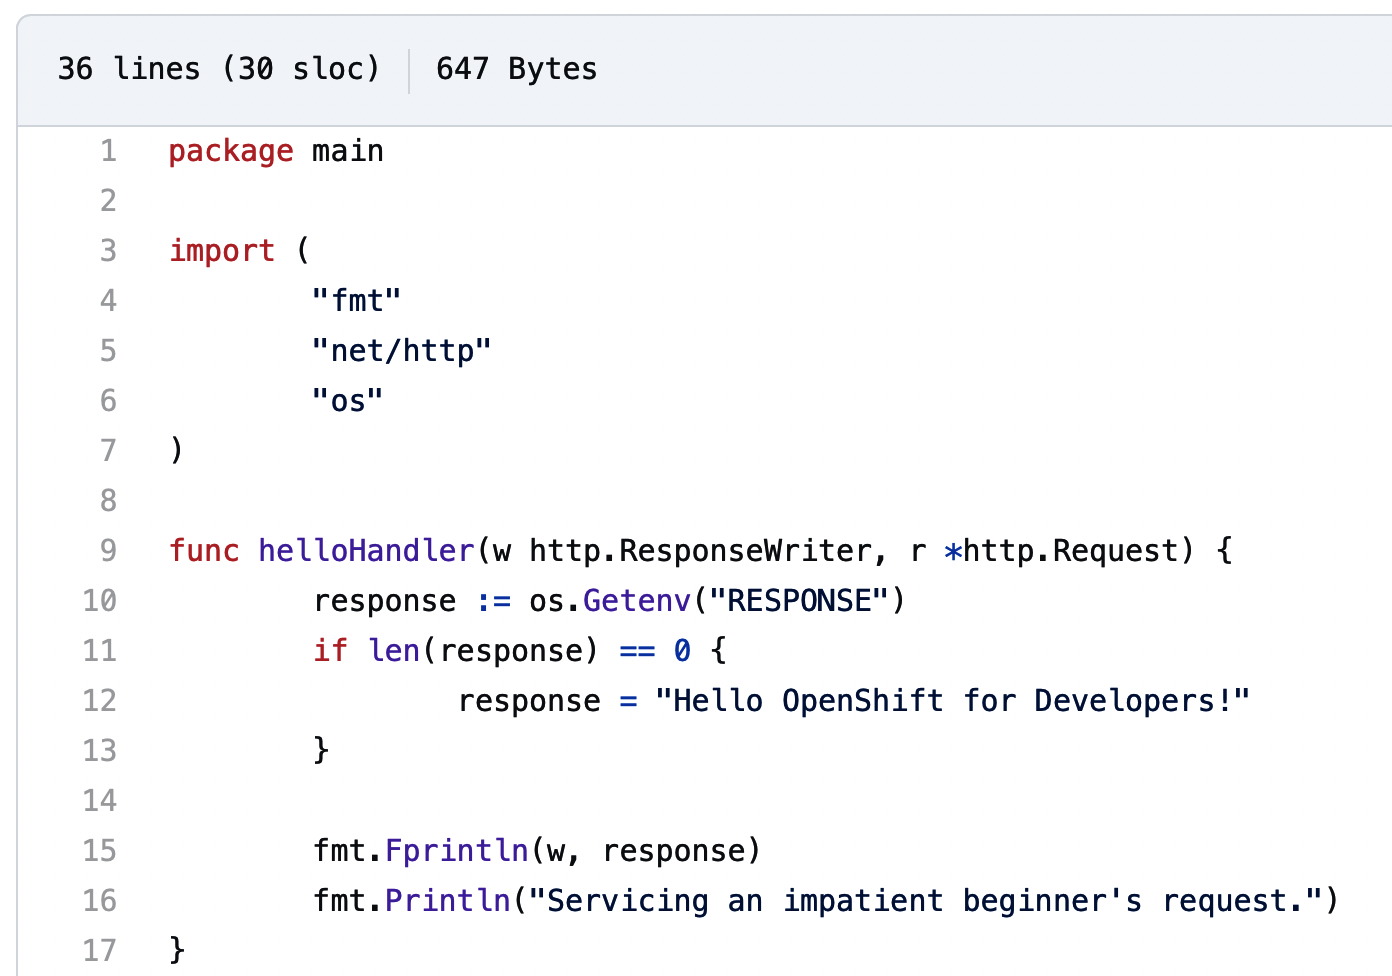
Figure 4-7. Existing GitHub source view of Hello World Go source
Click the pencil icon at the top right of the source view (Figure 4-8) to enter editor mode.
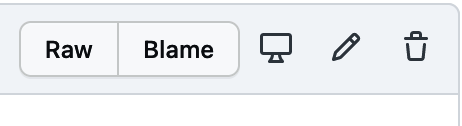
Figure 4-8. GitHub pencil icon
Then find the string Hello OpenShift for Developers! and change it to Hello World!, as shown in Figure 4-9.
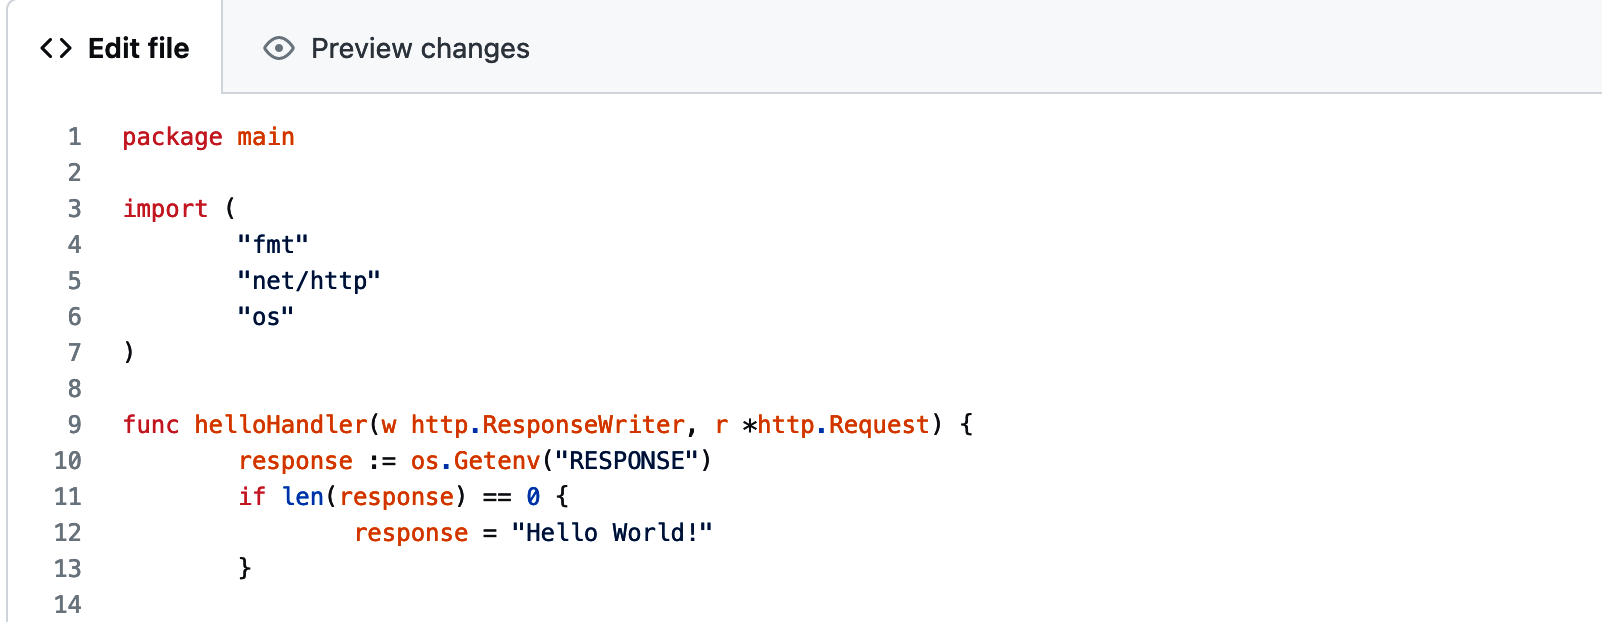
Figure 4-9. Edited GitHub source view of Hello World Go source
Finally, save the changes to the main branch of your application repo. It’s good practice to provide a pithy commit message explaining the change, with a subject and body similar to an email, as shown in Figure 4-10. Click “Commit changes” to commit your changes.
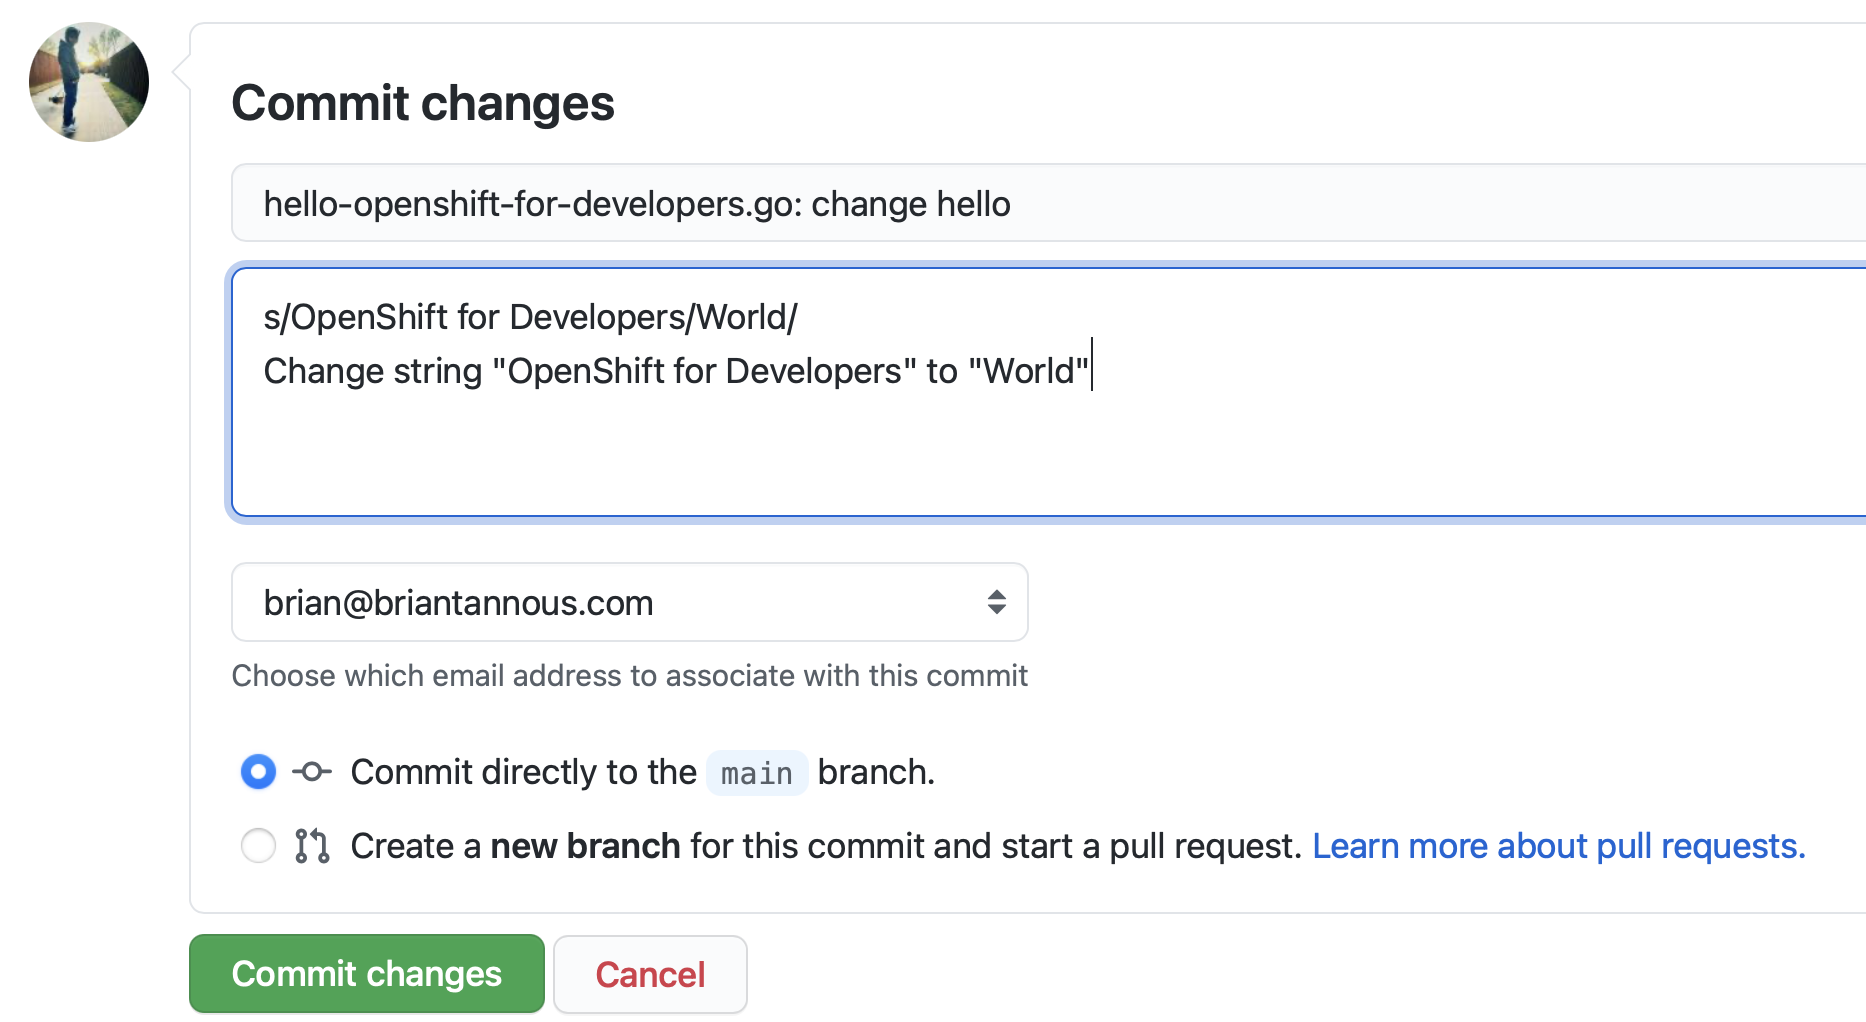
Figure 4-10. Committing changes to the Hello World repo
A new OpenShift Deployment
An OpenShift BuildConfig represents a source code location and a process for building it into a deployable container. You already have a BuildConfig, created for building the Hello World app and reused each time a new release is deployed. Open the Builds view from the left menu of the Web Console’s Developer perspective. Then click on the hello-git BuildConfig to open it (Figure 4-11).
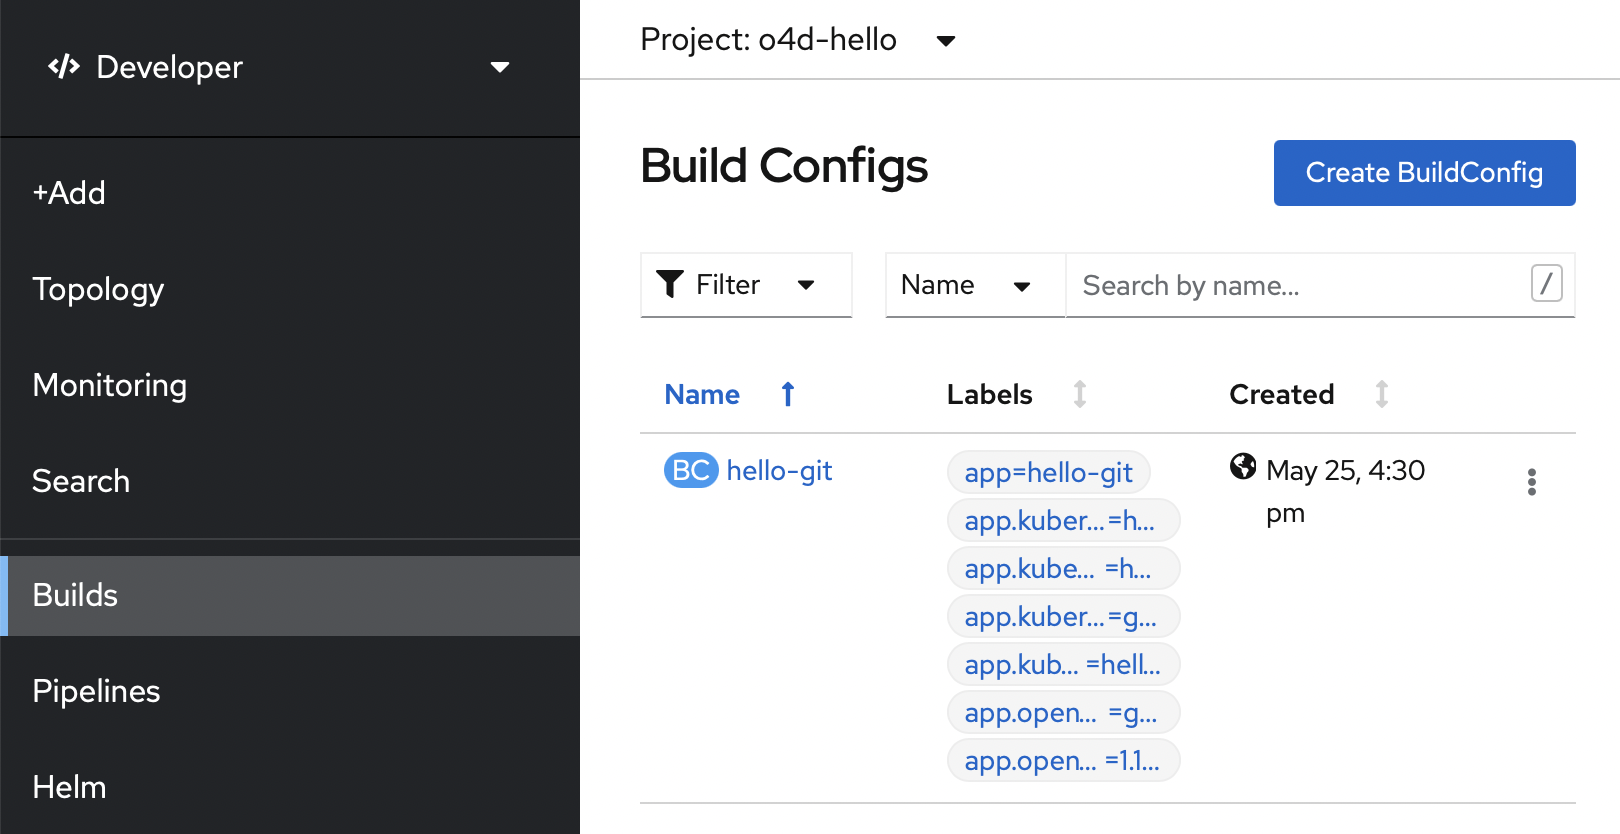
Figure 4-11. OpenShift hello-git BuildConfig
Start a build with the “Start build” item from the Actions menu at top right (Figure 4-12).
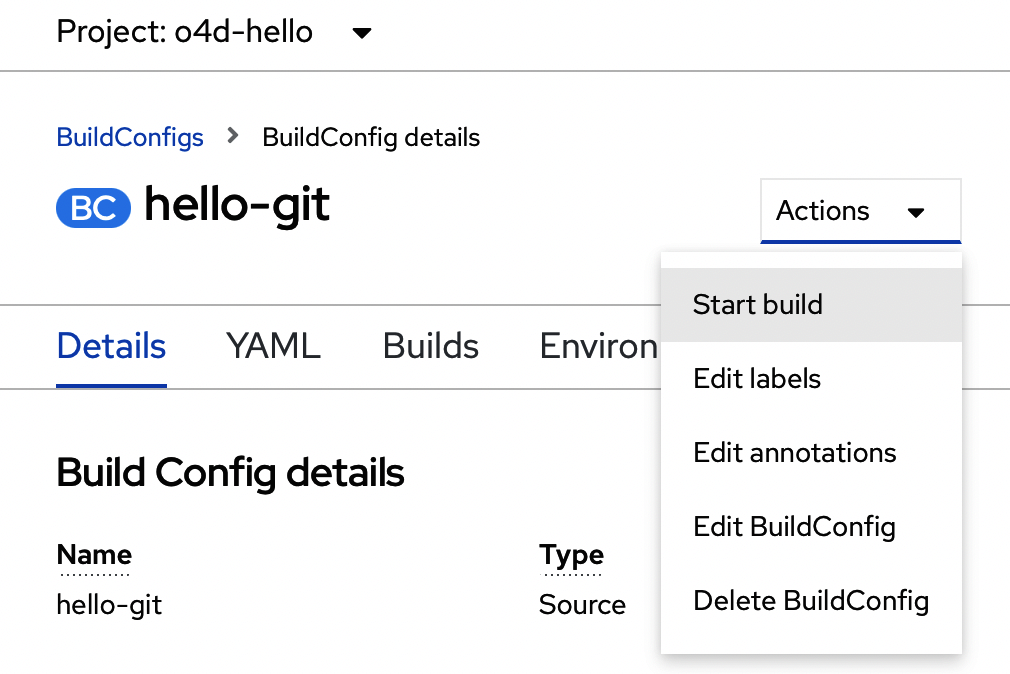
Figure 4-12. Actions menu: “Start build” item
CLI How-To: Start a Build from an Existing BuildConfig
It is possible to start the hello-git build using the command line by executing oc start-build hello-git.
As shown in Figure 4-13, when the build completes, clicking on the URL icon in the Topology view will open the latest version of your application in a browser tab. Hello World!

Figure 4-13. Application feature request ticket closed
Summary
Believe it or not, you’ve just mastered the key pieces of deploying your code on OpenShift. From source to build to rollout and a changeset in between, once configured, OpenShift assumed the “ops” chores and let you concentrate on the “dev” part. In Chapter 5, you’ll expand on the build concept with the more capable and modular OpenShift Pipelines, creating a CD process for a more complete and realistic application with multiple components and persistent state.
Get OpenShift for Developers, 2nd Edition now with the O’Reilly learning platform.
O’Reilly members experience books, live events, courses curated by job role, and more from O’Reilly and nearly 200 top publishers.

