1
Although the actuator will automatically
stop when it gets to the end of its travel,
this crushTime period (30 seconds for
my motor) sets how long the motor
should be on, before reversing.
2
The setup function controls the whole
operation of the project. After setting
both control pins to be outputs, it
immediately starts the crushing action
using the crush function.
4. SMASH CANS!
Push the Reset button on the Arduino
to trigger the crushing action (Figure
C
). Whenever the Arduino resets, it
automatically starts to move the linear
actuator. Smoosh!
GOING FURTHER
H-bridges can be used to control other
types of motors, including stepper motors.
They can also be used to switch power to
other devices, such as Peltier heating and
cooling elements. You’ll learn all this and a
lot more in my book, Make: Action.
Simon Monk
Hep Svadja
makezine.com 79
makezine.com/52
Watch the prototype crusher in action at makezine.com/go/arduino-can-crusher and
learn more about making movement, light, and sound with Arduino and Raspberry Pi in
the book Make: Action, available at makershed.com.
Time Required:
24 Hours
Cost:
$40–$60
Materials
» Arduino Uno microcontroller board
» Linear actuator, 6" stroke, 12V 3A Find
them on eBay.
» H-bridge module with L298 chip from
eBay. If your actuator’s maximum current
is not 3A, choose a different H-bridge
module (and power supply) that will cope.
» Jumper wires, female to male (2)
Adafruit #826
» Jumper wires, male to male (4)
Adafruit #758
» Adapter, female barrel jack to screw
terminal Adafruit #368
» Power supply, 12V 3A Adafruit #352
» Wood, 2×4
» Plywood, scraps
» Wood screws
Tools
» Woodworking tools
SIMON MONK
(simonmonk.org) writes books
about electronics for makers,
including Programming
Arduino (Maker Media)
and The Raspberry Pi Cookbook. He
and his wife, Linda, make and sell kits to
accompany his books at monkmakes.com.
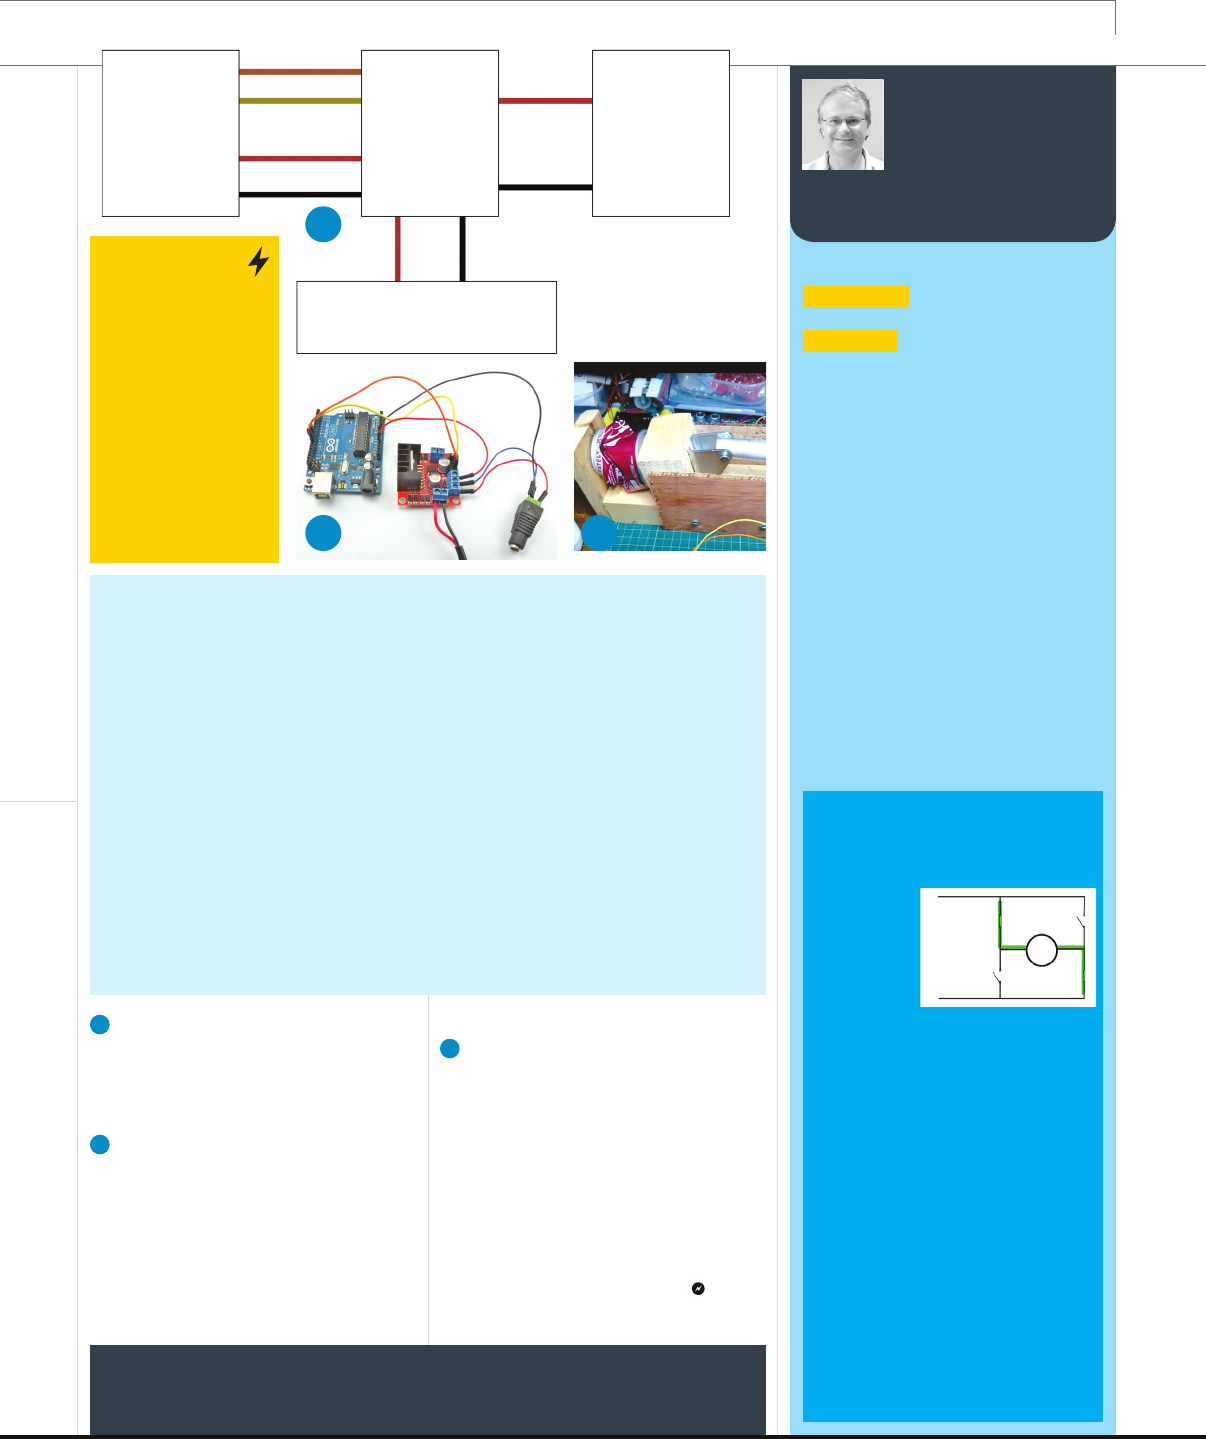
HBridges
An H-bridge is a simple circuit that
uses 4 switches to change the
direction of a DC motor (forward or
reverse)
by simply
reversing the
polarity of
the motor’s
connections.
With all
4 switches
open, no current can flow through the
motor. However, if switches S1 and S4
are closed, but S2 and S3 are open (as
shown here), current will flow from
the positive supply to terminal A of the
motor, through the motor and S4 to
the negative supply, and the motor will
turn in one direction.
If S1 and S4 are now opened and
S3 and S2 closed, the positive supply
will be applied to terminal B instead
and flow out through the motor and S2
to reverse the direction of the motor.
Interestingly, you can brake the motor
by closing S1 and S3 simultaneously
(or S2 and S4). Just don’t close S1 and
S2 at the same time (or S3 and S4) or
you’ll cause a short circuit!
The L298 chip in your H-bridge
module contains 2 miniature H-bridge
circuits that work in exactly this way.
+V
S1
A B
M
S3
S2 S4
-V
An
H-bridge
using
switches.
Arduino
D10 IN1
OUT1 OUT2
D9 IN2
5V
12V
GND
GND
12V DC
power supply
L298
H-bridge
module
Linear actuator
A
B C
CAUTION:
Linear actuators are
strong. This project
is about crushing
beverage cans, but
the actuator will quite
happily crush a hand or
anything else that you
put into the crushing
area. So be careful,
especially while you’re
getting it to work, when
there is a temptation to
adjust and intervene.
Imagine a car driving along and then suddenly
being thrown into reverse gear — that’s pretty
much what you’re doing if you suddenly reverse
the direction of a motor. For small motors
without a great deal of mass attached to them,
this isn’t normally much of a problem. But you
may find that if you’re using a Raspberry Pi or
Arduino board that’s powered from the same
power source as the motors, then the Pi may
crash or the Arduino may reset. This happens
as a result of the large current that flows when
you suddenly switch directions, causing the
board’s power supply voltage to dip.
For larger motors that are driving something
with a lot of inertia, sudden changes in speed or
direction can cause big problems. The resultant
large currents may damage the H-bridge,
and there’s also the mechanical shock to the
bearings of the motor.
This is something to bear in mind when
designing control software for larger motors.
One way to be nicer to your motors is to precede
any change in direction by setting the control
lines to let the motor stop, pausing for enough
time for it to actually stop before setting it
running again in the opposite direction.
In Arduino, setting up this kind of delay
function might look something like this:
forward(255);
delay(200);
reverse(255);
In our can crusher code, you can see we’ve set
full stops and also a delay of 1 second (1000
milliseconds) between crushing and reversing.
Be Nice to Your Motors
M52_078-9_CanCrush_F1.indd 79 6/14/16 11:12 AM
Get Make: Volume 52 now with the O’Reilly learning platform.
O’Reilly members experience books, live events, courses curated by job role, and more from O’Reilly and nearly 200 top publishers.

