Chapter 4. Image Tensors
“But he who dares not grasp the thorn
Should never crave the rose.”—Anne Brontë
In the previous chapter, you created and destroyed simple tensors. However, our data was minuscule. As you might guess, printing tensors can take you only so far and in so many dimensions. You’re going to need to learn how to deal with large tensors, which are more common. This is, of course, true in the world of images! This is an exciting chapter because you’ll start working with real data, and we’ll be able to see the effects of your tensor operations immediately.
We’ll also get to utilize some existing best practices. As you recall, in the previous chapter, you converted a tic-tac-toe game to tensors. During this exercise with a simple 3 x 3 grid, you identified one method for converting a game’s state, but another person might have come up with a completely different strategy. We’ll need to identify some common practices and tricks of the trade, so you don’t have to reinvent the wheel every time.
We will:
-
Identify what makes a tensor an image tensor
-
Build some images by hand
-
Use fill methods to create large tensors
-
Convert existing images to tensors and back
-
Manipulate image tensors in useful ways
When you finish this chapter, you’ll be confident in managing real-world image data, and a lot of this knowledge will apply to managing tensors in general.
Visual Tensors
You might assume that when an image is converted into a tensor, that resulting tensor will be rank two. If you’ve forgotten what a rank-two tensor looks like, review Chapter 3. It’s easy to picture a 2D image as a 2D tensor, except that pixel color generally can’t be stored as a single number. A rank-two tensor works only with grayscale images. The most common practice for a colored pixel is to represent it as three separate values. Those who were raised with paints were taught to use red, yellow, and blue, but us nerds prefer the red, green, blue (RGB) system.
Note
The RGB system is another instance of art imitating life. The human eye uses RGB, which is based on an “additive” color system—a system of emitting light, like computer screens do. Your art teacher probably used yellow over green to help lighten up paints that darken as you add more in a “subtractive” color system, like paint on paper.
A pixel is commonly colored by the ordered amounts of red, green, and blue within the confines of a singular byte. This 0-255 array of values looks like [255, 255, 255] for integers and like #FFFFFF for most websites seeking a hexadecimal version of the same three values. When our tensor is the data type int32, this is the interpretation method that is used. When our tensor is float32, the values are assumed to be in the range 0-1. So, an integer [255, 255, 255] represents pure white, but in float form the equivalent would be [1, 1, 1]. This also means [1, 1, 1] is pure white in a float32 tensor and interpreted as next to black in an int32 tensor.
Depending on the tensor data type, you get two color extremes from a pixel encoded as [1, 1, 1], as shown in Figure 4-1.
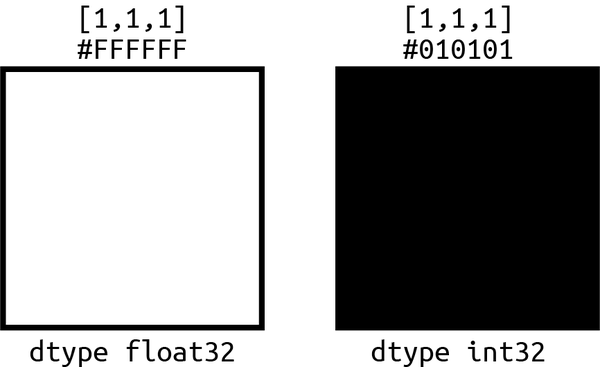
Figure 4-1. Significant color difference from the same data
This means to store images you’ll need a 3D tensor. You’ll need each three-value pixel stored at given width and height. Just as you saw in the tic-tac-toe problem, you’ll have to identify what’s the best format to do so. In TensorFlow and TensorFlow.js, it’s common practice to store the RGB values in the final dimension of a tensor. It’s also customary to store the values across height, then width, and then color dimension. This might seem odd for images, but referencing rows and then columns is the classic organizational reference order of matrices.
Warning
Most of the world will mention an image size as width by height. A 1024 x 768 image is 1024px wide and 768px high, but as we just stated, TensorFlow image tensors store height first, which can be a little confusing. That same image would be a [768, 1024, 3] tensor. This often confuses developers who are new to visual tensors.
So if you wanted to make a 4 x 3 checkerboard of pixels, you could create that image by hand with a 3D array with the shape [3, 4, 3].
The code would be as simple as the following:
constchecky=tf.tensor([[[1,1,1],[0,0,0],[1,1,1],[0,0,0]],[[0,0,0],[1,1,1],[0,0,0],[1,1,1]],[[1,1,1],[0,0,0],[1,1,1],[0,0,0]],])
A 4 x 3 pixel image would be pretty small, but if we zoomed in a few hundred times, we would be able to see the pixels we just created. The resulting image would look like Figure 4-2.
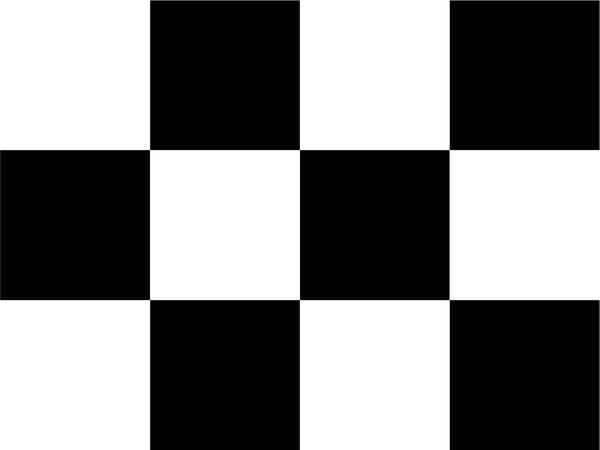
Figure 4-2. The checkered 4 x 3 TensorFlow.js image
You’re not limited to RGB, as you might have expected; adding a fourth value to the RGB dimension of a tensor will add an alpha channel. Much like in web color, #FFFFFF00 would be white at zero opacity, and a tensor pixel with a red, green, blue, alpha (RGBA) value of [1, 1, 1, 0] would be similarly transparent. A 1024 x 768 image with transparency would be stored in a tensor with the shape [768, 1024, 4].
As a corollary to the two aforementioned systems, if the final channel has only one value instead of three or four, the resulting image would be grayscale.
Our black-and-white checkered pattern example from earlier could be significantly condensed using that last bit of knowledge. Now we can build the same image but with the tensor, with code like so:
constcheckySmalls=tf.tensor([[[1],[0],[1],[0]],[[0],[1],[0],[1]],[[1],[0],[1],[0]]])
And yes, if you simply remove those inner brackets and move this to a simple 2D tensor, that will work, too!
Quick Image Tensors
I know there’s a line of people beating down your door to hand-draw images, pixel by pixel, so you might be surprised to learn some people find writing little 1s and 0s tedious. Of course, you could create arrays using Array.prototype.fill and then use that to fill arrays to create sizable 3D tensor constructors, but it’s worth noting that TensorFlow.js comes with that functionality built in.
It’s a common need to create large tensors with already populated values. In fact, if you were to continue working on our recommendation system from Chapter 3, you would need to utilize these exact features.
As it is now, you can use the methods tf.ones, tf.zeros, and tf.fill to create large tensors by hand. Both tf.ones and tf.zeros take a shape as a parameter, and then they construct that shape with every value equal to 1 or 0, respectively. So, the code tf.zeros([768, 1024, 1]) would create a 1024 x 768 black image. The optional second parameter would be the data type for the generated tensor.
Tip
Often, you can run an empty image made with tf.zeros through a model to preallocate memory. The result is immediately thrown away, and subsequent calls are much faster. This is often called model warming, and it’s a speedup trick you might see when developers are looking for things to allocate while waiting for a webcam or network data.
As you might imagine, tf.fill takes a shape, and then the second parameter is the value to fill that shape with. You might be tempted to pass a tensor as the second parameter, essentially raising the rank of the resulting generated tensor, but it’s important to note that this will not work. For a juxtaposition of what does and doesn’t work, see Table 4-1.
| This works | This fails | |
|---|---|---|
|
|
Your second parameter must be a single value to fill the tensor of the shape you gave. This nontensor value is often called a scalar. To recap, the code tf.fill([200, 200, 4], 0.5) would create a 200 x 200 gray semitransparent square, as illustrated in Figure 4-3.

Figure 4-3. Alpha channel image tensor with background
If you’re disappointed that you can’t fill a tensor with some elegant color other than grayscale, have I got a treat for you! Our next way to create large tensors not only lets you fill with tensors, but it also enables you to fill with patterns.
Let’s return to the 4 x 3 checkered image you made earlier. You hand-coded 12 pixel values. If you wanted to make a 200 x 200 checkered image, that would be 40,000 pixel values for simple grayscale. Instead, we’ll use the .tile method to expand a simple 2 x 2 tensor.
// 2 x 2 checker patternconstlil=tf.tensor([[[1],[0]],[[0],[1]]]);// tile itconstbig=lil.tile([100,100,1])

The checker pattern is a 2D black-and-white tensor. This could be any elegant pattern or color.

The tile size is 100 x 100 because the repeated pattern is 2 x 2, which results in a 200 x 200 image tensor.
Checkered pixels are hard for a human eye to see. The checkered pattern can look gray without zooming in. Much like how printed dots make up multiple colors for magazines, you can see the checkered pattern clearly once you zoom in, like in Figure 4-4.
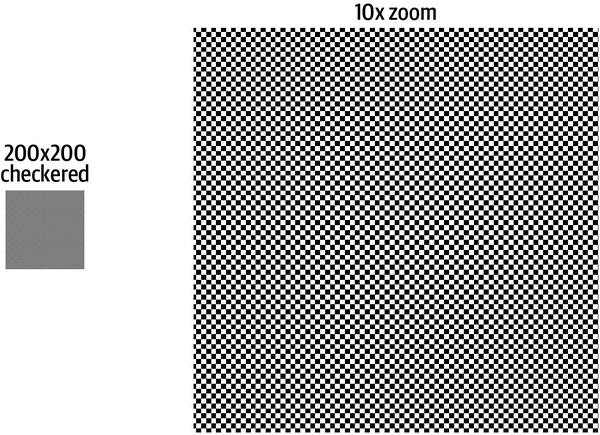
Figure 4-4. Checkered 200 x 200 tensor with 10x zoom
Lastly, if all these methods are far too structured for your taste, you can unleash the chaos! While JavaScript has no built-in method to generate arrays of random values, TensorFlow.js has a wide variety of methods to do precisely this.
For simplicity, my favorite is called .randomUniform. This tensor method takes a shape and also optionally a min, max, and data type.
If you want to build a 200 x 200 random static of grayscale colors, you can use tf.randomUniform([200, 200, 1]) or even tf.randomUniform([200, 200, 1], 0, 255, 'int32'). Both of these will make the same (as same as random can be) result.
Figure 4-5 shows some example output.
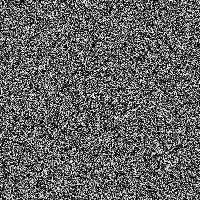
Figure 4-5. 200 x 200 random value-filled tensor
JPGs and PNGs and GIFs, Oh My!
OK, Gant! You’ve been talking about images for a bit now, but we can’t see them; all we see are tensors. How does a tensor turn into an actual visible image? And probably more important for machine learning, how does an existing image turn into a tensor?
As you might have intuited, this will vary significantly according to where the JavaScript is running, specifically the client and server. To decode an image to a tensor and back on a browser, you’ll be limited and empowered by the magic of the browser’s built-in functionality for a sandbox. Conversely, images on a server running Node.js will not be sandboxed but lack easy visual feedback.
Fear not! You will cover both of these options in this section so you can confidently apply TensorFlow.js to images, regardless of the medium.
We’ll review the following common scenarios in detail:
-
Browser: tensor to image
-
Browser: image to tensor
-
Node.js: tensor to image
-
Node.js: image to tensor
Browser: Tensor to Image
For visualizing, modifying, and saving images, you will utilize HTML elements and a canvas. Let’s start by giving us a way to visualize all the graphical lessons we’ve learned. We’ll render a tensor to a canvas in a browser.
First, create a 400 x 400 tensor of random noise, and then convert the tensor to an image in the browser. To accomplish this, you will use tf.browser.toPixels. This method takes a tensor as the first parameter, and optionally a canvas to draw to for the second parameter. It returns a promise that resolves when the render is complete.
Note
At first glance, having the canvas be an optional parameter is quite confusing. It’s worth noting that the promise resolves with a Uint8ClampedArray of the tensor as a parameter, so it’s a good way to have a “canvas ready” value created, even if you don’t have an active canvas in mind. It will likely decrease in utility as the concept of an OffscreenCanvas moves from experimental mode to an actual supported web API.
To set up our first ever canvas render, you’ll need to have a canvas in our HTML with an ID that you can reference. For those of us who are familiar with the complexity of HTML load order, you’ll need the canvas to exist before you attempt to access it from our JavaScript (or follow any best practice for your site, like checking for a document-ready state):
<canvasid="randomness"></canvas>
And now you can access this canvas by ID and pass it to our browser.toPixels method.
constbigMess=tf.randomUniform([400,400,3]);constmyCanvas=document.getElementById("randomness");tf.browser.toPixels(bigMess,myCanvas).then(()=>{// It's not bad practice to clean up and make sure we got everythingbigMess.dispose();console.log("Make sure we cleaned up",tf.memory().numTensors);});
Creating an RGB 400 x 400 image tensor
Grabbing a reference to our canvas in the Document Object Model (DOM)

Calling
browser.toPixelswith our tensor and canvas
If this code were run in an async function, you could have simply awaited the browser.toPixels call and then cleaned up. Without utilizing the promise or async functionality, the dispose would most assuredly win the possible race condition and cause an error.
Browser: Image to Tensor
As you may have guessed, browser.toPixels has a counterpart named browser.fromPixels. This method takes an image and converts it to a tensor. Fortunately for us, the input for browser.fromPixels is quite dynamic. You can pass in a wide variety of elements, from JavaScript ImageData to Image objects, to HTML elements like <img>, <canvas>, and even <video>. This makes it pretty simple to encode any image into a tensor.
As a second parameter, you can even identify the number of channels you’d like for an image (1, 3, 4), so you can optimize for the data you care about. For example, if you were identifying handwriting, there’s no real need for RBG. You can get a grayscale tensor immediately from our tensor conversion!
To set up our image to tensor conversion, you’ll explore the two most common inputs. You’ll convert a DOM element, and you’ll convert an in-memory element, too. The in-memory element will load an image via URL.
Warning
If you’ve been opening .html files locally up to this point, this is where that will stop working. You’ll need to actually use a web server like 200 OK! or one of the other mentioned hosting solutions to access images loaded by URL. See Chapter 2 if you get stuck.
To load an image from the DOM, you simply need a reference to that item on the DOM. In the source code associated with this book, I’ve set up an example to access two images. The simplest way to follow along is to read Chapter 4 on GitHub.
Let’s set our DOM image up with a simple img tag and id:
<imgid="gant"src="/gant.jpg"/>
Yes, that’s a strange image of me I decided to use. I have adorable dogs, but they are shy and have refused to sign a release to be models for my book. Being a dog lover can be “ruff.” Now that you have an image, let’s write the simple JavaScript to reference the desired image element.
Tip
Be sure the document is finished loading before trying to access the image element. Otherwise, you might get a cryptic message like “The source width is 0.” This happens most frequently on implementations with no JavaScript frontend framework. In situations where there’s nothing awaiting the DOM load event, I suggest subscribing to the window’s load event before trying to access the DOM.
With the img in place and the DOM loaded, you can call browser.fromPixels for results:
// Simply read from the DOMconstgantImage=document.getElementById('gant')constgantTensor=tf.browser.fromPixels(gantImage)console.log(`Successful conversion from DOM to a${gantTensor.shape}tensor`)
Grabbing a reference to the
imgtag.Creating a tensor from the image.
Logging proof that we now have a tensor! This prints the following:
Successful conversion from DOM to a 372,500,3 tensor
Warning
If you are getting an error similar to Failed to execute 'getImageData' on 'CanvasRenderingContext2D': The canvas has been tainted by cross-origin data., this means you’re trying to load an image from another server rather than local. For security reasons browsers protect against this. See the next example for loading external images.
Perfect! But what if our image is not in an element on our page? So long as the server allows cross-origin loading (Access-Control-Allow-Origin "*"), you’ll be able to dynamically load and process external images. This is where the JavaScript Image object example comes in. We can convert an image into a tensor like so:
// Now load an image object in JavaScriptconstcake=newImage()cake.crossOrigin='anonymous'cake.src='/cake.jpg'cake.onload=()=>{constcakeTensor=tf.browser.fromPixels(cake)console.log(`Successful conversion from Image() to a${cakeTensor.shape}tensor`)}
Create a new Image web API object.
This is not necessary here because the file is on the server, but you commonly need to set this to access external URLs.
Give the path to the image.

Wait for the image to fully load into the object before you try to turn it into a tensor.

Convert the image to a tensor.

Print our tensor shape to make sure everything went as planned. This prints the following:
Successful conversion from Image() to a 578,500,3 tensor.
By combining the two previous methods, you can have a single page that shows one image element and prints the values of two tensors to the console (see Figure 4-6).

Figure 4-6. The console log of two images becoming tensors
By the logs of the images, you can see both of them are 500-pixel-wide RGB. If you modify the second parameter, you can easily convert either of these images to grayscale or RGBA. You’ll get into modifying our image tensors later in this chapter.
Node: Tensor to Image
In Node.js, there’s no canvas for rendering, just the quiet efficiency of writing files. You’ll be saving a random 400 x 400 RGB with tfjs-node. While image tensors are pixel-by-pixel values, typical image formats are much smaller. JPG and PNGs have various compression techniques, headers, features, and more. The resulting file internals will look nothing like our pretty 3D image tensors.
Once tensors are converted to their encoded file formats, you’ll use the Node.js filesystem library (fs) to write the file out. Now that you have a plan, let’s explore the features and settings to save a tensor to JPG and PNG.
Writing JPGs
To encode a tensor into a JPG, you will use a method called node.encodeJpeg. This method takes an Int32 representation of the image and some options and returns a promise with the resulting data.
The first hiccup you might notice is that the input tensor must be that Int32 encoding with values of 0-255, where the browser could handle float and integer values. Perhaps this is an excellent opportunity for an open source contributor!?
Tip
Any Float32 tensor with values 0-1 can be transformed into a new tensor by multiplying by 255 and then converting to int32 with code like so: myTensor.mul(255).asType('int32').
Writing a JPG from a tensor, as found in chapter4/node/node-encode, in Chapter 4 on GitHub, can be as simple as this:
constbigMess=tf.randomUniform([400,400,3],0,255);tf.node.encodeJpeg(bigMess).then((f)=>{fs.writeFileSync("simple.jpg",f);console.log("Basic JPG 'simple.jpg' written");});
You create random RGB pixels for a 400 x 400 image tensor.
node.encodeJpegis called with the tensor input.The resulting data is written with the filesystem library.
Because the file you’re writing is a JPG, there’s a wide variety of configuration options you can enable. Let’s write another image and modify the defaults along the way:
constbigMess=tf.randomUniform([400,400,3],0,255);tf.node.encodeJpeg(bigMess,"rgb",90,true,true,true,"cm",250,250,"Generated by TFJS Node!").then((f)=>{fs.writeFileSync("advanced.jpg",f);console.log("Full featured JPG 'advanced.jpg' written");});
format: you can override the default color channels withgrayscaleorrgbinstead of matching the input tensor.quality: adjust the quality of the JPG. Lower numbers degrade quality, usually for size.progressive: JPGs have the ability to load from the top down, or slowly become clear as a progressive load. Setting this to true enables progressive load format.optimizeSize: spend a few extra cycles to optimize an image size without modifying the quality.chromaDownsampling: this is a trick where lighting is more important in the encoding than colors. It modifies the raw distribution of the data so it’s clearer to the human eye.densityUnit: choose either pixels per inch or centimeter; a strange few fight the metric system.
xDensity: set the pixels-per-density unit on the x-axis.
yDensity: set the pixels-per-density unit on the y-axis.
xmpMetadata: this is a nonvisible message to store in the image metadata. Generally, this is reserved for licensing and scavenger hunts.
Depending on why you’re writing the JPG, you can adequately configure or ignore these options from Node.js! Figure 4-7 shows the file size difference of the two JPGs you just created.
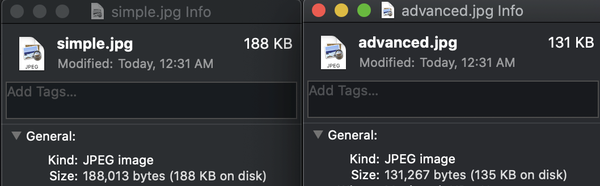
Figure 4-7. File sizes of our two examples
Writing PNGs
The features for writing a PNG are significantly more limited than a JPG. As you might have guessed, we’ll have a friendly method that helps us along the way, and it’s called node.encodePng. Just like our friend the JPG, this method expects an integer representation of our tensor with values ranging 0-255.
We can easily write a PNG with the following:
constbigMess=tf.randomUniform([400,400,3],0,255);tf.node.encodePng(bigMess).then((f)=>{fs.writeFileSync("simple.png",f);console.log("Basic PNG 'simple.png' written");});
The PNG parameters aren’t nearly as advanced. You have only one new parameter, and it’s a cryptic one! The second parameter to node.encodePng is a compression setting. This value can be anywhere between -1 and 9. The default value is 1, which means a little compression, and 9 means max compression.
Tip
You might think -1 means no compression, but from experimenting, 0 means no compression. Actually, -1 activates max compression. So, -1 and 9 are effectively the same.
Since PNGs are terrible at compressing randomness, you can set this second parameter to 9 and get a file around the same size as the default setting:
tf.node.encodePng(bigMess,9).then((f)=>{fs.writeFileSync("advanced.png",f);console.log("Full featured PNG 'advanced.png' written");});
If you’d like to see an actual file size difference, try printing something easy to compress, like tf.zeros. Regardless, you can now generate PNG files from tensors with ease.
Node: Image to Tensor
Node.js is a fantastic tool for training a machine learning model because of the direct file access and speed of decoding images. Decoding into a tensor on Node.js is quite similar to the encoding process.
Node provides functions for decoding BMP, JPG, PNG, and even GIF file formats. However, as you might expect, there is also a generic node.decodeImage method, which is capable of doing the simple identification lookup and conversion of any of these files automatically. You’ll use decodeImage for now and leave decodeBMP, etc., for you to review as needed.
The simplest decode for an image is to pass the file directly into the command. To do this, you can use the standard Node.js libraries fs and path.
This example code depends on a single cake.jpg file for loading and decoding into a tensor. The code and image resources used in this demo are available at chapter4/node/node-decode in Chapter 4 on GitHub.
import*astffrom'@tensorflow/tfjs-node'import*asfsfrom'fs'import*aspathfrom'path'constFILE_PATH='files'constcakeImagePath=path.join(FILE_PATH,'cake.jpg')constcakeImage=fs.readFileSync(cakeImagePath)tf.tidy(()=>{constcakeTensor=tf.node.decodeImage(cakeImage)console.log(`Success: local file to a${cakeTensor.shape}tensor`)constcakeBWTensor=tf.node.decodeImage(cakeImage,1)console.log(`Success: local file to a${cakeBWTensor.shape}tensor`)})
You load the designated file into memory using the filesystem library.
You decode the image into a tensor that matches the imported image’s number of color channels.
You decode this image into a grayscale tensor.
As we mentioned earlier, the decoding process also allows the decoding of GIF files. One obvious question is, “Which frame of the GIF?” For this, you can choose either all frames or the first frame for animated GIFs. The node.decodeImage method has a flag that allows you to identify what you prefer.
Note
Physicists often argue about the fourth dimension being or not being time. Regardless of the debates on 4D Minkowski spacetime being a reality, it is a proven reality for animated GIFs! To represent animated GIFs in a tensor, you use a rank-four tensor.
This example code decodes an animated GIF. The example GIF you’re going to use is a 500 x 372 animated GIF with 20 frames:
constgantCakeTensor=tf.node.decodeImage(gantCake,3,'int32',true)console.log(`Success: local file to a${gantCakeTensor.shape}tensor`)
For the node.decodeImage parameters, you’re providing the image data, followed by three channels for color, as an int32 result tensor, and the final parameter is true.
Passing true lets the method know to unroll animated GIFs and return a 4D tensor, where false would clip this down to 3D.
Our resulting tensor shape, as you might have expected, is [20, 372, 500, 3].
Common Image Modifications
Importing images into tensors for training is powerful but rarely direct. When images are used for machine learning, they generally have some common modifications.
Common modifications include:
-
Being mirrored for data augmentation
-
Resizing to the expected input size
-
Cropping out faces or other desired portions
You’ll perform many of these operations in machine learning, and you’ll see these skills being utilized in the next two chapters. The capstone project in Chapter 12 will depend on this skill extensively. Let’s take a moment to implement a few of these everyday operations to round out your comfort with image tensors.
Mirroring Image Tensors
If you’re trying to train a model on identifying cats, you can double your dataset by mirroring your existing cat photos. Slightly adjusting training images to augment datasets is a common practice.
To flip tensor data for an image, you have two options. One is to modify the image tensor’s data in a way that flips the image along the width axis. The other way is to use tf.image.flipLeftRight, which is commonly used for batches of images. Let’s do both.
To flip a single image, you can use tf.reverse and specify you want to flip only the axis that holds the pixels for the width of an image. As you already know, this is the second axis of the image, and thus the index you will pass is 1.
In the corresponding source code for this chapter, you display an image and then mirror that image in a canvas right next to it. You can access this example at simple/simple-image-manipulation/mirror.html on GitHub. The full code for this operation looks like this:
// Simple Tensor FlipconstlemonadeImage=document.getElementById("lemonade");constlemonadeCanvas=document.getElementById("lemonadeCanvas");constlemonadeTensor=tf.browser.fromPixels(lemonadeImage);constflippedLemonadeTensor=tf.reverse(lemonadeTensor,1)tf.browser.toPixels(flippedLemonadeTensor,lemonadeCanvas).then(()=>{lemonadeTensor.dispose();flippedLemonadeTensor.dispose();})
The reverse function flips the axis index
1to reverse the image.
Because you understand the underlying data, it was trivial to apply this transformation to your image. You can experiment with flipping along the height or even RGB axis. Any data can be reversed.
Figure 4-8 shows the result of tf.reverse on axis 1.
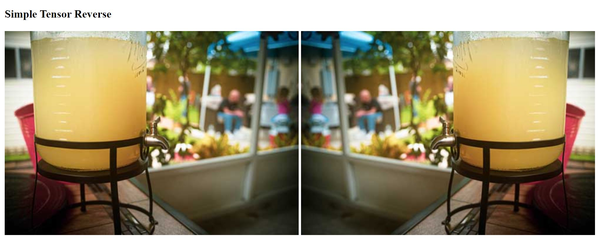
Figure 4-8. tf.reverse for lemonadeTensor with axis set to 1
Tip
Reverse and other data manipulation methods are not unique to images. You could use this to augment nonvisual datasets like tic-tac-toe and similar games.
We should also review the other method of mirroring an image, because this method can handle mirroring a group of images, and this exposes some pretty important concepts when it comes to image data. After all, our goal is to rely on the optimization of tensors as much as possible and to stay away from JavaScript iterative looping.
The second way you can mirror an image is to use tf.image.flipLeftRight. This method is geared toward handling batches of images, and batches of 3D tensors are basically 4D tensors. For our demo, you’ll take one image and make it a batch of one.
To expand the dimensionality of a single 3D image, you can use tf.expandDims, and then when you’re looking to reverse that (throw away the unnecessary bracket), you can use tf.squeeze. This way, you can move a 3D image to 4D for batch processing and back. This seems a bit silly with a single image, but it’s an excellent exercise in the concept of understanding batches and changing dimensions of tensors.
So, a 200 x 200 RGB image starts as [200, 200, 3], and then you expand it, essentially making it a stack of one. The resulting shape becomes [1, 200, 200, 3].
You can perform tf.image.flipLeftRight on a single image with the following code:
// Batch Tensor FlipconstcakeImage=document.getElementById("cake");constcakeCanvas=document.getElementById("cakeCanvas");constflipCake=tf.tidy(()=>{constcakeTensor=tf.expandDims(tf.browser.fromPixels(cakeImage).asType("float32"));returntf.squeeze(tf.image.flipLeftRight(cakeTensor)).asType("int32");})tf.browser.toPixels(flipCake,cakeCanvas).then(()=>{flipCake.dispose();});
The dimensions of the tensor are expanded.
Import the 3D image as a tensor.
As of the writing of this section,
image.flipLeftRightexpects images to be afloat32tensor. This may change in the future.Flip the image batch and then squeeze it down into a 3D tensor again when you’re done.
The
image.flipLeftRightreturned0-255values, so you’ll need to make sure our tensor you send tobrowser.toPixelsis anint32, so it renders correctly.
That was a bit more complicated than our use of tf.reverse, but each strategy has its own benefits and drawbacks. It’s essential to take full advantage of the speed and massive calculation capabilities of tensors whenever possible.
Resizing Image Tensors
Lots of AI models expect a specific input image size. That means that while your users upload 700 x 900 images, the model is looking for a tensor that is 256 x 256. Resizing images is at the core of dealing with image input.
Note
Resizing image tensors for input is a common practice for most models. This means any image that is wildly out of proportion to the desired input, like a panoramic photo, will likely perform terribly when it is resized for input.
TensorFlow.js has two excellent methods for resizing images, and both support batches of images: image.resizeNearestNeighbor and image.resizeBilinear. I recommend that you use image.resizeBilinear for any visual resizing and save image.resizeNearestNeighbor for when the specific pixel values of an image cannot be compromised or interpolated. There is a small speed difference, image.resizeNearestNeighbor being around 10x faster than image.resizeBilinear, but the difference is still measured in milliseconds per resize.
To put it bluntly, resizeBilinear blurs and resizeNearestNeighbor pixelates when they have to extrapolate for new data. Let’s upscale an image with both methods and compare. You can access this example at simple/simple-image-manipulation/resize.html.
// Simple Tensor FlipconstnewSize=[768,560]// 4x largerconstlittleGantImage=document.getElementById("littleGant");constnnCanvas=document.getElementById("nnCanvas");constblCanvas=document.getElementById("blCanvas");constgantTensor=tf.browser.fromPixels(littleGantImage);constnnResizeTensor=tf.image.resizeNearestNeighbor(gantTensor,newSize,true)tf.browser.toPixels(nnResizeTensor,nnCanvas).then(()=>{nnResizeTensor.dispose();})constblResizeTensor=tf.image.resizeBilinear(gantTensor,newSize,true)constblResizeTensorInt=blResizeTensor.asType('int32')tf.browser.toPixels(blResizeTensorInt,blCanvas).then(()=>{blResizeTensor.dispose();blResizeTensorInt.dispose();})// All done with yagantTensor.dispose();
Increase an image size 4x so you can see the difference between these two.
Resize using the nearest neighbor algorithm.
The third parameter is
alignCorners; just always set this to true.1Resize with the bilinear algorithm.
Always set this to
true(see 3).As of this writing,
resizeBilinearreturns afloat32, which you have to convert.
If you look closely at the result in Figure 4-9, you can see sharp pixelation for the nearest neighbor and a softening blur for bilinear.
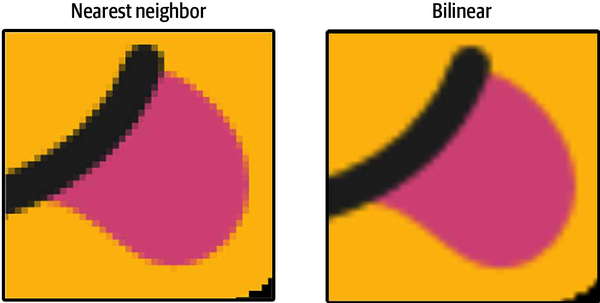
Figure 4-9. Emoji with resize methods (for image license see Appendix C)
Warning
Resizing with the nearest neighbor algorithm can be maliciously manipulated. If someone knew your final image size, they could construct a wicked image that looks different only at that resize. It’s called adversarial preprocessing. For more information see https://scaling-attacks.net.
If you want to see a stark contrast, you should try resizing the 4 x 3 image you created at the beginning of this chapter with both methods. Can you guess which method would create a checkerboard at the new size and which would not?
Cropping Image Tensors
For our final round of essential image tensor tasks, we’ll crop an image. I’d like to note, just like our mirror exercise earlier, there is a batch-friendly version of cropping large groups of images called image.cropAndResize. Know that this method exists and that you can utilize it for gathering and normalizing sections of images for training, e.g., grabbing all the faces detected in a photo and resizing them to the same input size for a model.
For now, you’ll just do a simple example of carving out some tensor data from a 3D tensor. If you were to imagine this in space, it would be like carving a small rectangle slice from a larger rectangle cake.
You can carve out whatever portion you want in any axis by giving a starting position and size of our slice. You can access this example at simple/simple-image-manipulation/crop.html on GitHub. To crop a single image, use the following code:
// Simple Tensor CropconststartingPoint=[0,40,0];constnewSize=[265,245,3];constlemonadeImage=document.getElementById("lemonade");constlemonadeCanvas=document.getElementById("lemonadeCanvas");constlemonadeTensor=tf.browser.fromPixels(lemonadeImage);constcropped=tf.slice(lemonadeTensor,startingPoint,newSize)tf.browser.toPixels(cropped,lemonadeCanvas).then(()=>{cropped.dispose();})lemonadeTensor.dispose();
Start
0pixels down,40pixels over, and at the red channel.Grab the next
265pixels height,245pixels width, and all three RGB values.Pass everything into the
tf.slicemethod.
The result is an exact crop of the original image, as you can see in Figure 4-10.
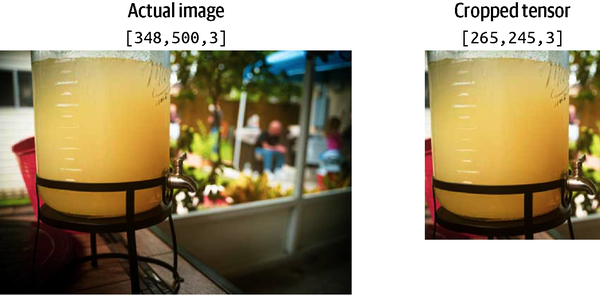
Figure 4-10. Using tf.slice to crop a single image tensor
New Image Tools
You just learned three of the most important image manipulation methods, but this is no limitation to what you can do. New AI models will require new image tensor functionality, and for that reason, TensorFlow.js and assistive libraries are continuously adding methods for handling and processing images. Now you can feel more comfortable utilizing and leaning on these tools in singular and batch forms.
Chapter Review
Encoding and decoding images from an editable tensor gives you the ability to do pixel-by-pixel manipulation on a level few people could ever do. Of course, you’ve learned visual tensors for our goals in AI/ML, but there’s a significant bonus in the fact that if you wanted, you could experiment with wild image manipulation ideas. If you so desired, you could do any of the following:
-
Tile a pixel pattern of your making
-
Subtract an image from another for an artistic design
-
Hide a message inside an image by manipulating pixel values
-
Code fractals or other mathematical visualizations
-
Remove a background image color like a green screen
In this chapter, you harnessed the ability to create, load, render, modify, and save large tensors of structured data. Dealing with image tensors is not only easy; it’s quite rewarding. You’re ready for whatever comes your way.
Chapter Challenge: Sorting Chaos
Using the methods you learned in this chapter and previous chapters, you can do some pretty exciting and interesting things with tensors. While this challenge doesn’t have any specific utility that I can think of, it’s a fun exploration of what you’ve covered. As an exercise on lessons learned, muse over this problem:
How can you generate a random 400 x 400 grayscale tensor and then sort the random pixels along an axis?
If you complete this challenge, the resulting tensor image will look like Figure 4-11.
Figure 4-11. 400 x 400 randomness sorted across the width axis
You can solve this problem using methods learned so far in this book. If you get stuck, review the TensorFlow.js online documentation. Searching the documentation for key terms will point you in the right direction.
You can find the answer to this challenge in Appendix B.
Review Questions
Let’s review the lessons you’ve learned from the code you’ve written in this chapter. Take a moment to answer the following questions:
-
If an image tensor contains values
0-255, what kind of data type is needed for it to render correctly? -
What would a 2 x 2 red
Float32look like in tensor form? -
What would
tf.fill([100, 50, 1], 0.2)create as an image tensor? -
True or false: to hold an RGBA image, you must use a rank-four image tensor.
-
True or false:
randomUniform, if given the same input, will create the same output. -
What is the method you should use to convert an image to a tensor in the browser?
-
When encoding a PNG in Node.js, what number should you use in the second parameter to get max compression?
-
If you want to flip an image tensor upside down, how could you do that?
-
Which is faster?
-
Looping over a collection of images and resizing them
-
Batching a group of images as a rank-four tensor and resizing the entire tensor
-
-
What is the rank and size of the result for:
[.keep-together]#`tf.slice(myTensor, [0,0,0], [20, 20, 3])`?#
Solutions to these exercises are available in Appendix A.
1 TensorFlow has a mistaken implementation of alignCorners that can be problematic.
Get Learning TensorFlow.js now with the O’Reilly learning platform.
O’Reilly members experience books, live events, courses curated by job role, and more from O’Reilly and nearly 200 top publishers.

