Chapter 4. Working with Workflows
As I’m sure you’ve gathered by now, workflows are at the heart of using GitHub Actions. I’ve covered a number of the basics for understanding workflows. But you also need to be able to easily create, run, and monitor them for success/failure. This chapter will focus on those kinds of activities.
First, I’ll survey some of the features that GitHub provides for creating workflows from starter ones. Then I’ll show you how to edit workflows in the GitHub interface and how to drive changes in that same interface with operations like commits and pull requests. Along the way, you’ll learn how to navigate through the results of workflow runs and how to monitor the execution of a workflow.
Finally, I’ll show you how to use the updated GitHub Actions VS Code extensions to create and edit workflows, as well as how to manage and monitor your runs, from within Visual Studio Code (VS Code).
First up is a guide to creating an initial workflow in a repository.
Creating the First Workflow in a Repository
Suppose you have a repository where you haven’t been using GitHub Actions and you want to start. How do you get started? To begin, let’s look at a simple project example in GitHub. Figure 4-1 shows a basic repository with a couple of files.
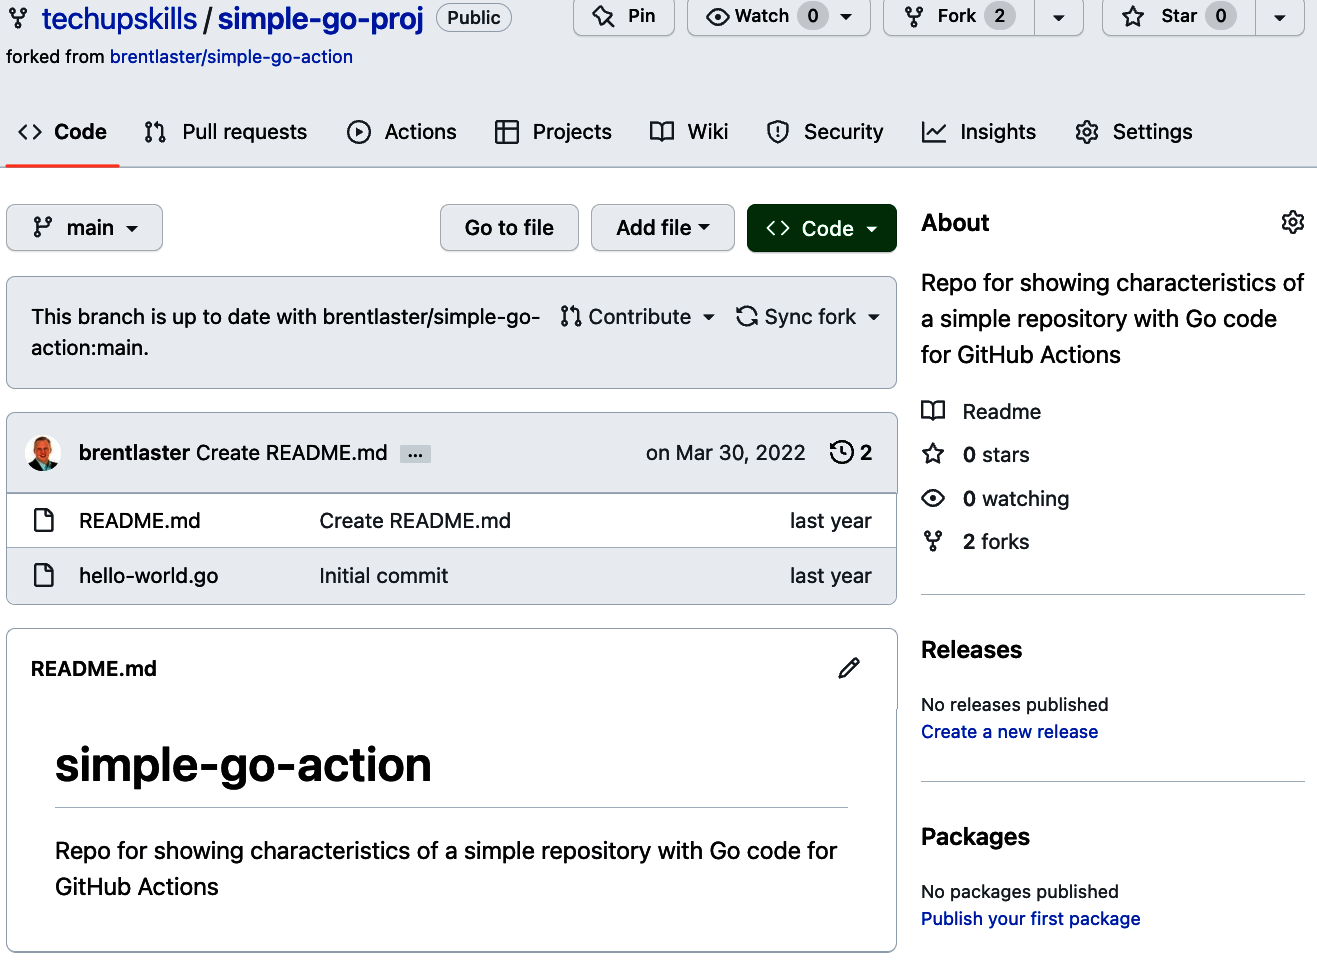
Figure 4-1. Simple project in GitHub
If you click the Actions tab in the top menu in a repository without existing workflows, you are presented with a getting started page for actions. (If desired, you can also get to this page by visiting https:<your github repo path>/actions/new.)
If you have a repository with a particular type of code already in it (Go, Java, etc.), the workflow(s) suggested by GitHub will take that into account. Figure 4-2 shows the getting started page for a repository containing Go code. GitHub has suggested Go actions under Suggested for this repository in place of a generic one.
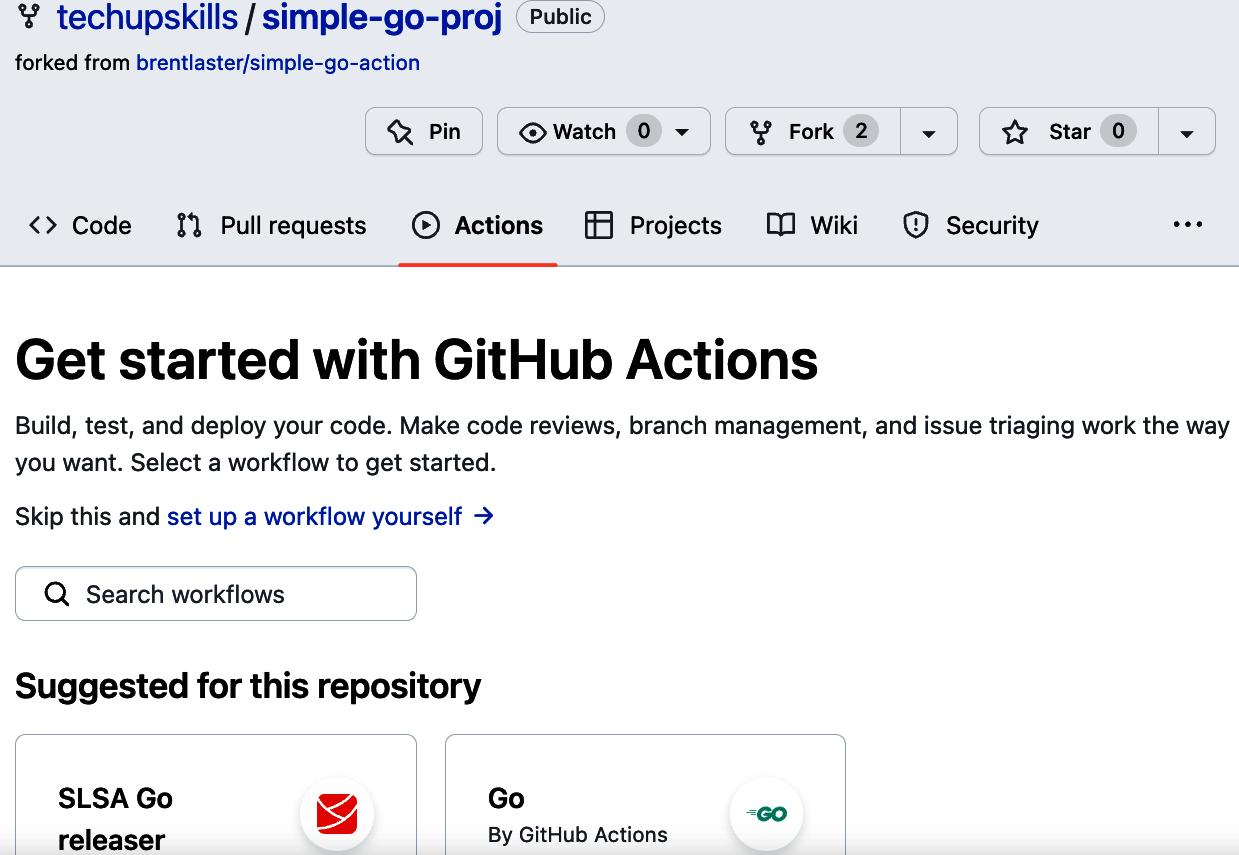
Figure 4-2. Getting started page for a Go repository
There are four ways to get started with a new workflow in a repository when there are no existing ones:
- Click the set up a workflow yourself link just above the Search workflows action.
- Click the Configure button for the suggested workflow under the Suggested for this repository title.
- Scroll and choose from one of the other suggested workflows, and click the Configure button for the appropriate one.
- Create a workflow file outside of GitHub and add it to a .github/workflows subdirectory in the repository.
Choosing either of the first two options puts the code for a basic workflow in the web interface’s editor. For the name of the workflow file, it starts with a path that includes .github/workflows and a name field that reflects the suggested workflow. That field can be edited to have whatever name you want. You can backspace and edit the path. But as discussed in Chapter 1, workflows need to live in the .github/workflows subdirectory within a project.
Moving a File Within a Repository
As a general tip, editing a file in the GitHub interface and then modifying the directory path in the name area (via backspacing and typing) is an easy way to change the location and move the file within the repository.
The right part of the window shows Featured Actions. If your repository contains code of a particular type, this window will show a related set of actions. (But you can always search for other actions via the search box in that window.) Figure 4-3 shows an example workflow populated in the editor after choosing the Simple Workflow template and clicking its Configure button.
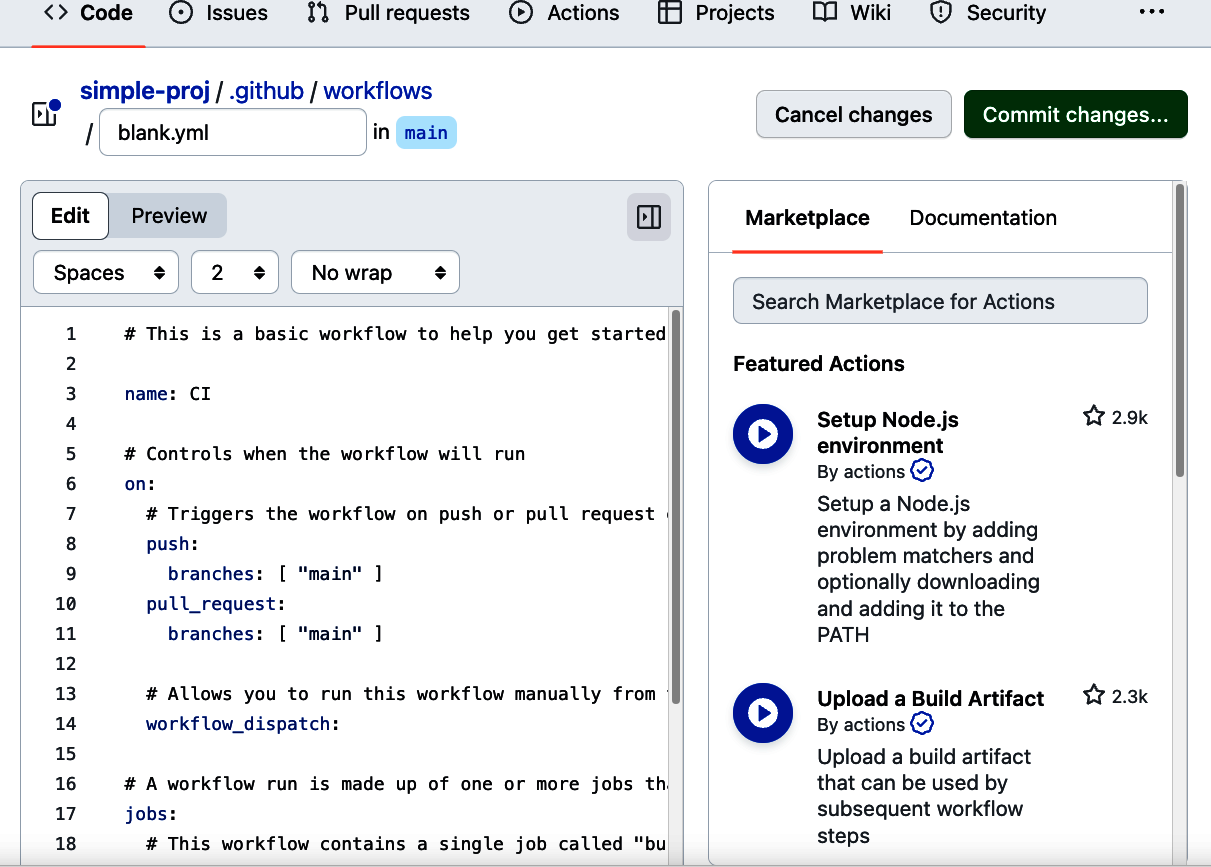
Figure 4-3. A basic starter workflow in the GitHub editor
The full code for this starter workflow is shown here. I’ll walk you through what this code is doing next:
 1 # This is a basic workflow to help you get started with Actions
 2
 3 name: CI
 4
 5 # Controls when the workflow will run
 6
 7 on:
 8   # Triggers the workflow on push or pull request events for main
 9   push:
10     branches: [ main ]
11   pull_request:
12     branches: [ main ]
13
14   # Allows you to run this workflow manually from the Actions tab
15   workflow_dispatch:
16
17 # A workflow run is made up of one or more jobs
18 jobs:
19   # This workflow contains a single job called "build"
20   build:
21     # The type of runner that the job will run on
22     runs-on: ubuntu-latest
23
24     # Steps are a sequence of tasks executed as part of a job
25     steps:
26       # Checks-out your repository under $GITHUB_WORKSPACE
27       - uses: actions/checkout@v3
28
29       # Runs a single command using the runners shell
30       - name: Run a one-line script
31         run: echo Hello, world!
32
33       # Runs a set of commands using the runners shell
34       - name: Run a multi-line script
35         run: |
36           echo Add other actions to build,
37           echo test, and deploy your project.
Looking at the listing, you can identify the components of a workflow talked about in Chapters 2 and 3.
Starting at line 7, the on section defines when this workflow will be invoked. In this case, a push or pull request to the main branch will cause the workflow to be triggered. This workflow also includes a workflow_dispatch clause at line 15. Once that code is committed on the default branch, GitHub will add a button on the Actions screen to give you the option to run this workflow manually. (The use of the workflow_dispatch trigger is described more later in this chapter and in detail in Chapter 12.)
workflow_dispatch and Branches
If a workflow includes the workflow_dispatch clause, an instance of the workflow file with the clause must exist on the default branch (usually main) for the button to show up in the interface.
The jobs section begins at line 18. There is only one job in this workflow—the build one. At the start of the job, you have the runs-on clause (line 22), which describes the type of system where this workflow will/can execute. In this case, it’s on a system running the Linux Ubuntu distribution.
Then you have the steps section in the build job (starting at line 25). As noted before, steps can either invoke predefined actions or execute operating system commands via the shell. In this starter workflow, you have both kinds of steps. At line 27, the first step uses the GitHub Action checkout@v3 to check out the contents of this repository when the workflow runs. The steps that follow, in lines 29–37, execute simple shell commands that echo text via the run clause.
After creating or editing a workflow, it needs to be committed back to the repository. The next section will show how you can do this without leaving the GitHub web interface.
Committing the Initial Workflow
When you initially code a workflow in the GitHub web editor, it is not part of the code base yet. Just as if you were editing a new file locally, you need to commit it into the repository. Before you do that, you can change the name of the workflow, if you want, by editing the line in the file that starts with name: (line 3 in this example).
When you’ve finished editing, simply click the Commit changes button in the upper right of the editor screen. Figure 4-4 shows the button. In this case, I’ve left the starter workflow named CI but renamed the workflow file itself to basic.yml.
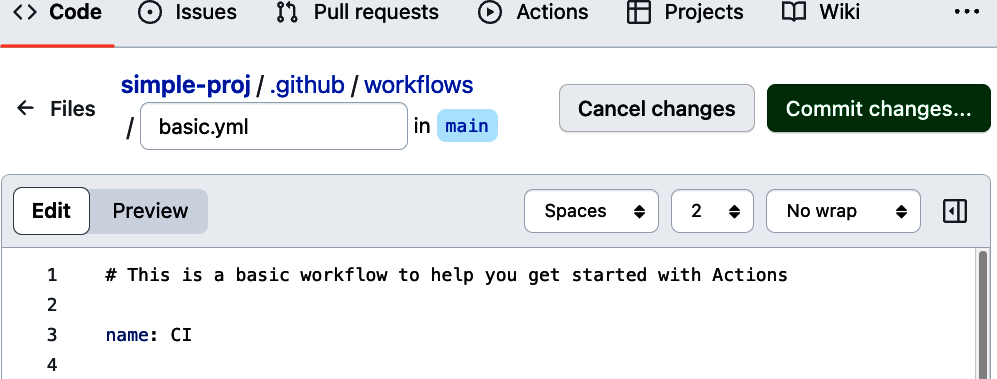
Figure 4-4. Location of naming area and button to start the commit process
Editing the Workflow File’s Path
As previously noted, you could backspace in the path area and change the directory where the workflow is stored. But don’t. Workflows must be in the .github/workflows directory of a repository to work with the actions framework.
After clicking the Commit changes button, you are presented with a pop-up dialog to gather more information about the commit (Figure 4-5). This includes the description and the choice of whether to make the change via a simple commit to the current branch or create a new branch and make the change via a pull request. I’m committing directly to the current branch here but will show the pull request example later in the chapter. For this case, you can add some comments if you want, leave the default as Commit directly to the <current> branch, and click the Commit changes button.
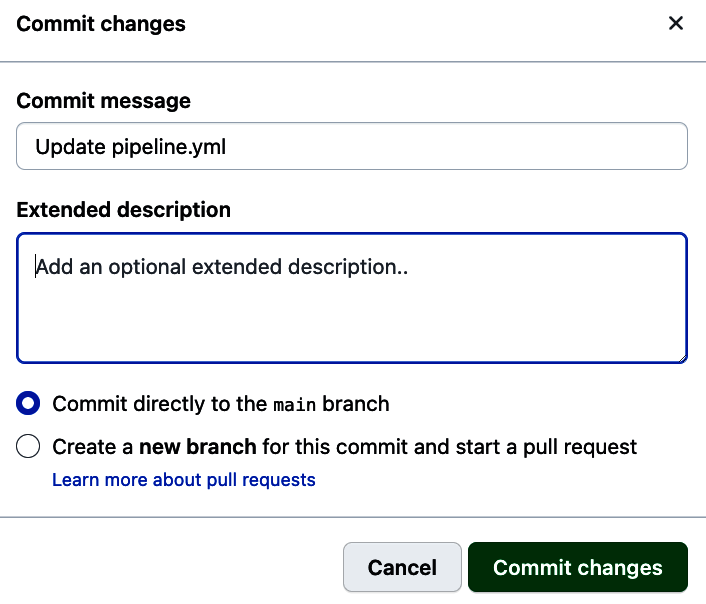
Figure 4-5. Commit dialog
After the commit is done, the file is added to the code base in the repository. Now, if you switch over to the Actions tab in the top menu, the workflow will be running (or will have run). Why? When the commit was done to main, that met the criteria specified per the workflow in the on section:
# Triggers the workflow on push or pull request events but
# only for the main branch
push:
  branches: [ main ]
pull request:
  branches: [ main ]
Figure 4-6 shows the first run of this workflow.
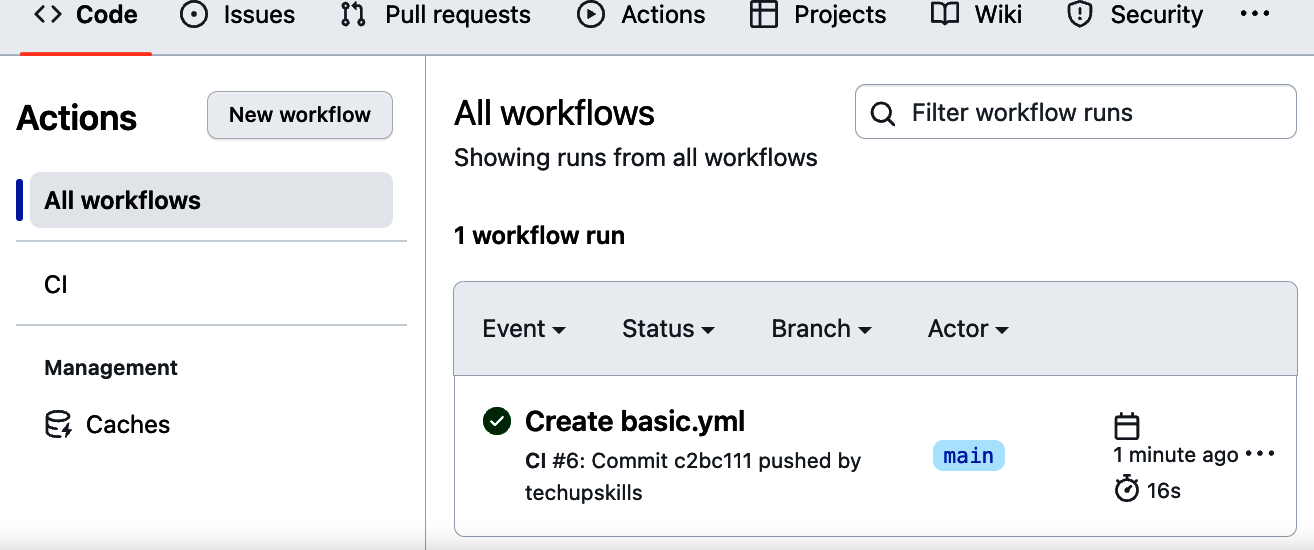
Figure 4-6. First run of the workflow
This is a good opportunity to break down what this screen is showing you and how to navigate around it.
Starting on the lefthand side is a list of the workflows associated with this repository. The item selected in this list will filter which workflow runs are shown on the righthand side. By default, the All workflows item is selected, and the runs for all of the workflows are shown in the list. If, in the list on the left, you select a specific workflow, that will filter the list on the right to display information only about the selected workflow. (The interface is shown in Figure 4-7.)
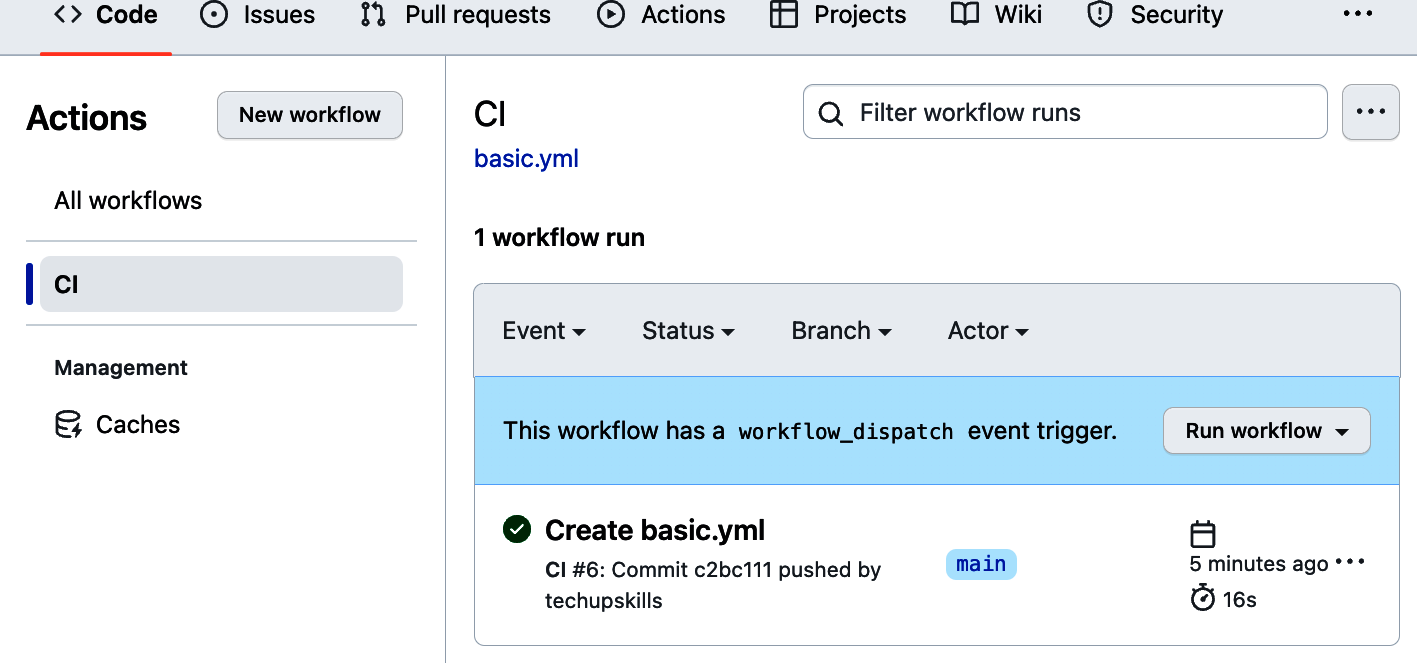
Figure 4-7. Showing runs of a particular workflow
Since there is only one workflow with only one run, there’s not much interesting about this. The one additional piece that is now displayed with the specific workflow selected is the box with the line “This workflow has a workflow_dispatch event trigger" and the Run workflow button. The reason I see this now is because I selected this workflow on the left (instead of the All workflows selection). And this workflow includes the following code in the on section of the workflow file in the default branch:
on:
  ...
  # Allows you to run this workflow manually from the Actions tab
  workflow_dispatch:
This is an instance of a workflow_dispatch trigger type. It displays a button that can initiate another run of the workflow manually. When you press it, you’re presented with a small dialog that allows you to select a branch to run it from and additional options if defined (see Chapter 8). If invoked, the workflow is executed and another run is added to the list, as shown in Figure 4-8. This direct invocation of a workflow can be useful for prototyping, debugging, and other cases where you may not always want to have to cause an event in GitHub to trigger the run.
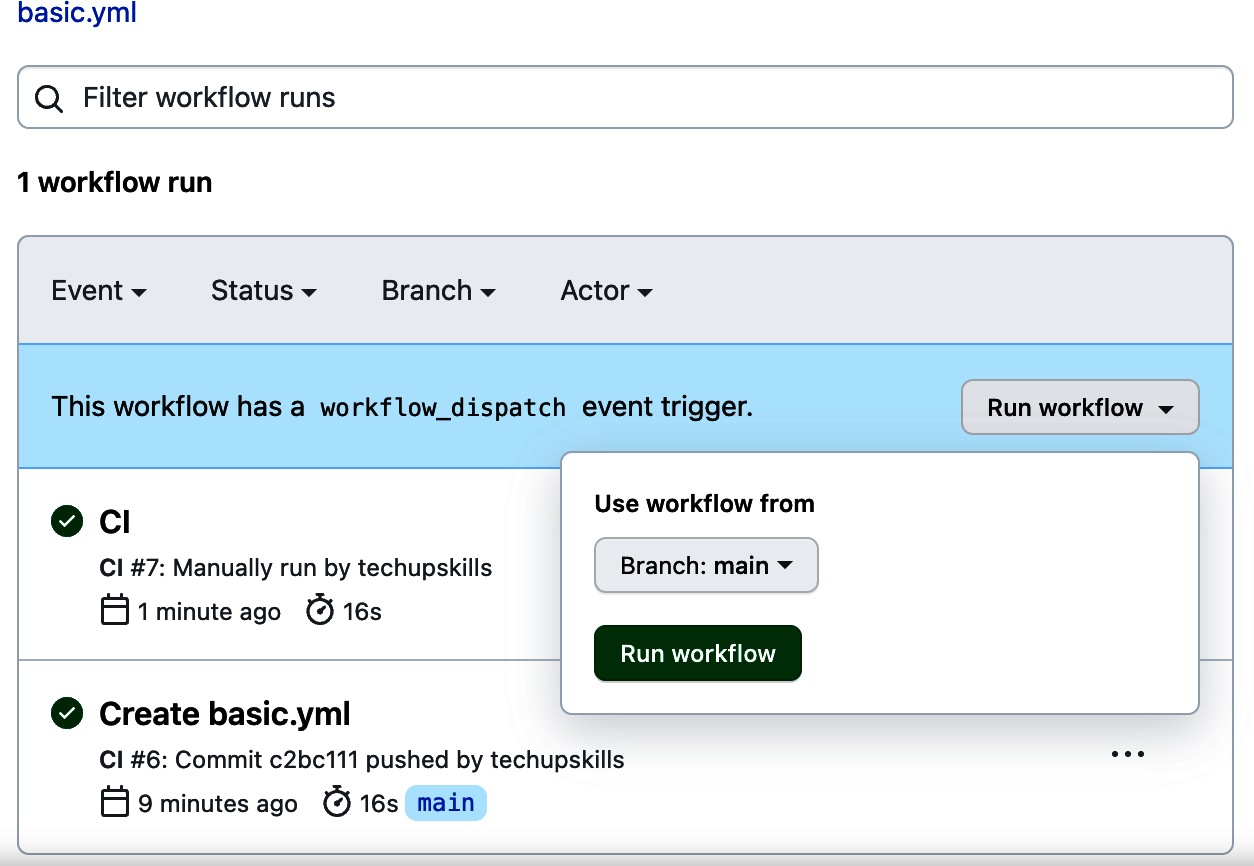
Figure 4-8. A second workflow run
If you look carefully at the descriptions of these runs (under the row with the checkmark in a circle on the left), you can read information about what event initiated each run. These are sorted in order of the time they were executed, starting with the latest run at the top.
After a run, you may want to go back and make some edits to the workflow to correct or add something. You could clone the repository down and edit the file locally. Or you can go back to the Code section of the repository in GitHub, select a file, and edit it from there.
The Actions interface on this page provides another shortcut to go directly to the workflow code: clicking the small YAML filename under the title of the workflow at the top. Figure 4-9 shows the element I’m talking about. In this case, the link/name is basic.yml.
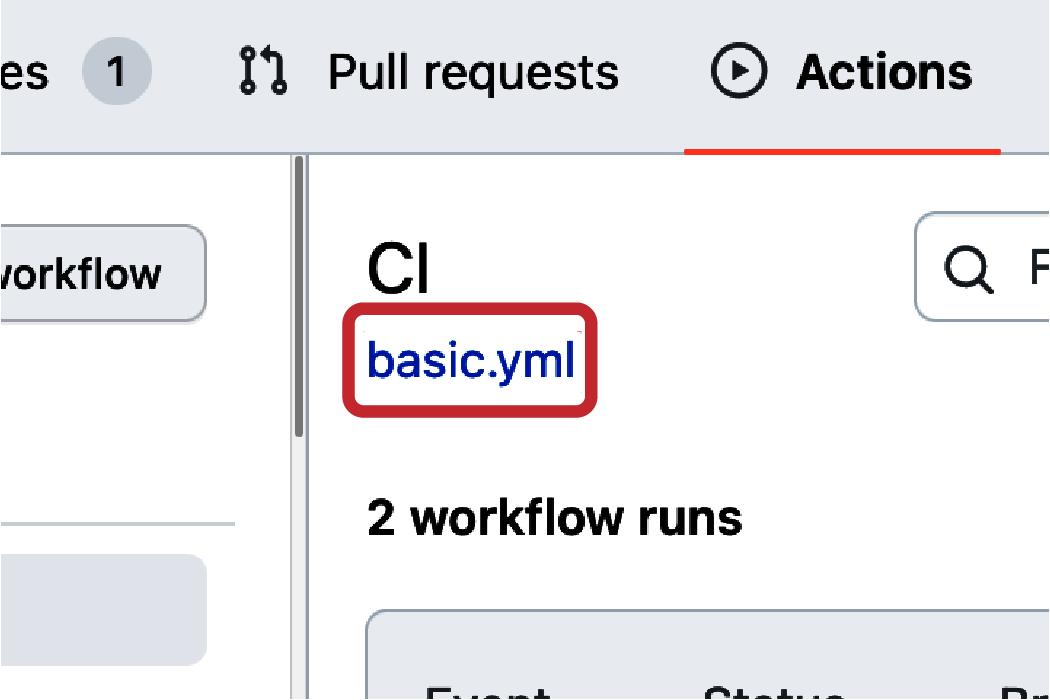
Figure 4-9. Filename shortcut to editing the workflow file
Clicking that link takes you to a view of the file in the web editor. In the top-right section of the gray bar above the file is a small set of icons. Look for the one that looks like a pencil. You can click this icon to edit the file directly in the browser (Figure 4-10).
Clicking the pencil icon brings up a basic editing interface for the file. In addition to the ability to change the file’s name and path (via the entry box with the file’s path above the code), there are also options to change the indentation and wrapping style (top right of the edit area), a tab to see previews of changes, and buttons above to commit or cancel the changes. All of this is shown in Figure 4-11.
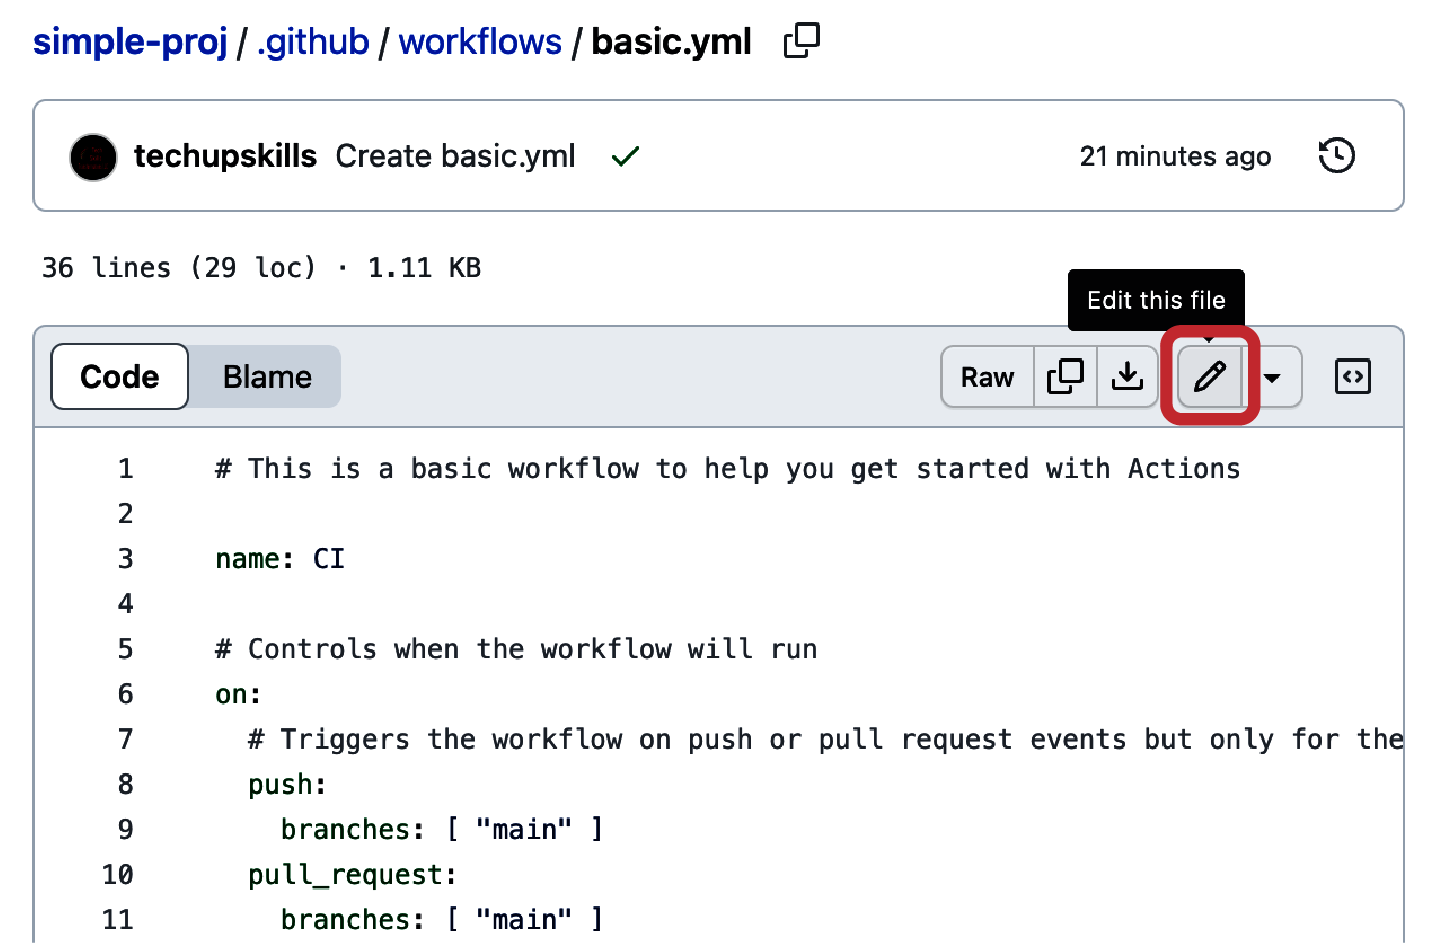
Figure 4-10. Starting an editing session in the web interface
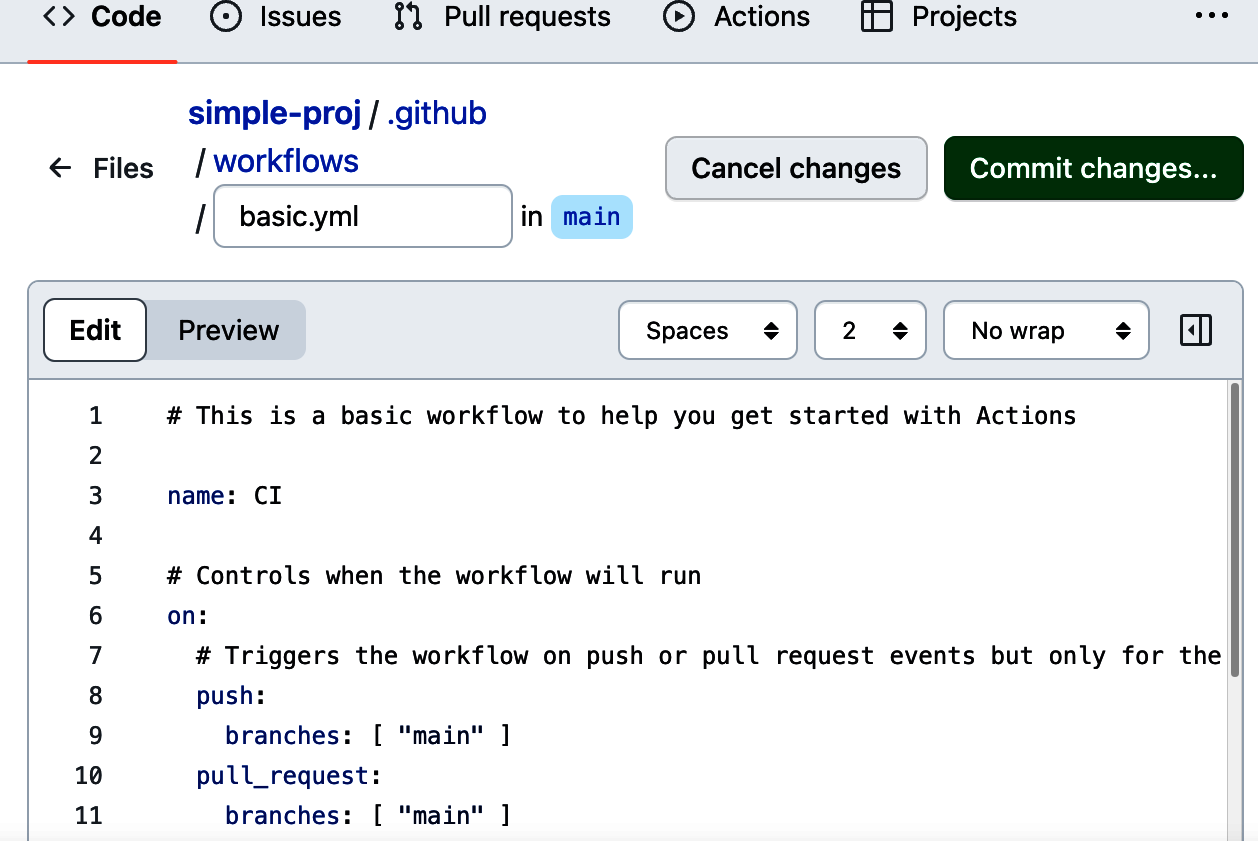
Figure 4-11. The full editing screen
To show how editing works, I can make some simple changes to alter this workflow to have two jobs instead of one. First, I’ll change the description and name of the existing job. This isn’t strictly necessary but is a better fit given the other changes being made:
# This workflow contains a single job called "build"
build:
to:
# This job checks out code from the repo
checkout:
Further down, before the first run step, I’ll add a couple of lines to make the remaining steps into their own jobs. This requires adding the following:
- A name for the job
- A
runs-onclause to say what kind of system to use for execution - A
stepsclause to indicate where the steps for the new job start
These lines are inserted (with a comment) starting at the original line 28. When you do this, it’s important to be very careful to match the expected indenting style, since this is YAML:
# This job does the core processing
process:

  # The type of runner that the job will run on
  runs-on: ubuntu-latest

  steps:
The jobs section of the workflow now looks like this:
jobs:
  # This job checks out code from the repo
  checkout:
    # The type of runner that the job will run on
    runs-on: ubuntu-latest

    # Steps represent a sequence of tasks that will be executed as part of
	the job
	steps:
      # Checks-out your repository under $GITHUB_WORKSPACE, so your job can
	  access it
      - uses: actions/checkout@v3
  process:
    # The type of runner that the job will run on
    runs-on: ubuntu-latest
    steps:
      # Runs a single command using the runners shell
      - name: Run a one-line script
        run: echo Hello, world!

      # Runs a set of commands using the runners shell
      - name: Run a multi-line script
        run: |
          echo Add other actions to build,
          echo test, and deploy your project.
You can use the Preview tab to conveniently look at what has changed in this file before it is committed. Figure 4-13 shows the code display after selecting that tab.
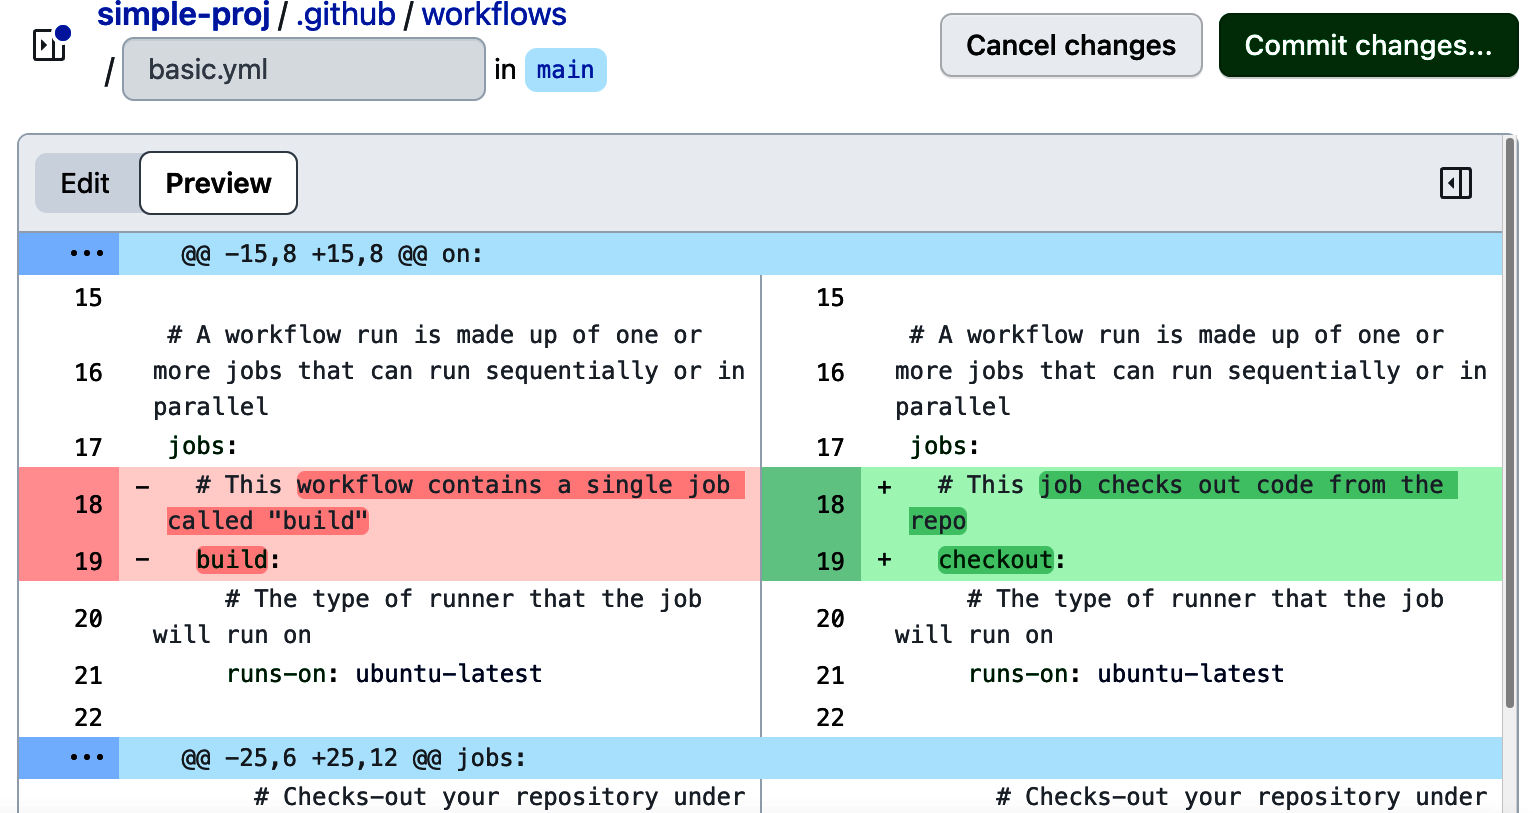
Figure 4-13. Previewing changes
Now the changes are ready to be committed. I do this by just clicking the Commit changes button. The dialog box that comes up is the same as before. This time, I’m going to select the option to do the commit via pull request. And I’ll just give the new branch a name of patch-1. Figure 4-14 shows the completed dialog box.

Figure 4-14. Dialog box for pull request
After clicking the Propose changes button, you get the standard Open a pull request dialog, shown in Figure 4-15. In the top gray bar, it is already set to compare the patch-1 branch to main. And it can merge the changes without conflicts. When ready, the next step is just clicking the Create pull request button.
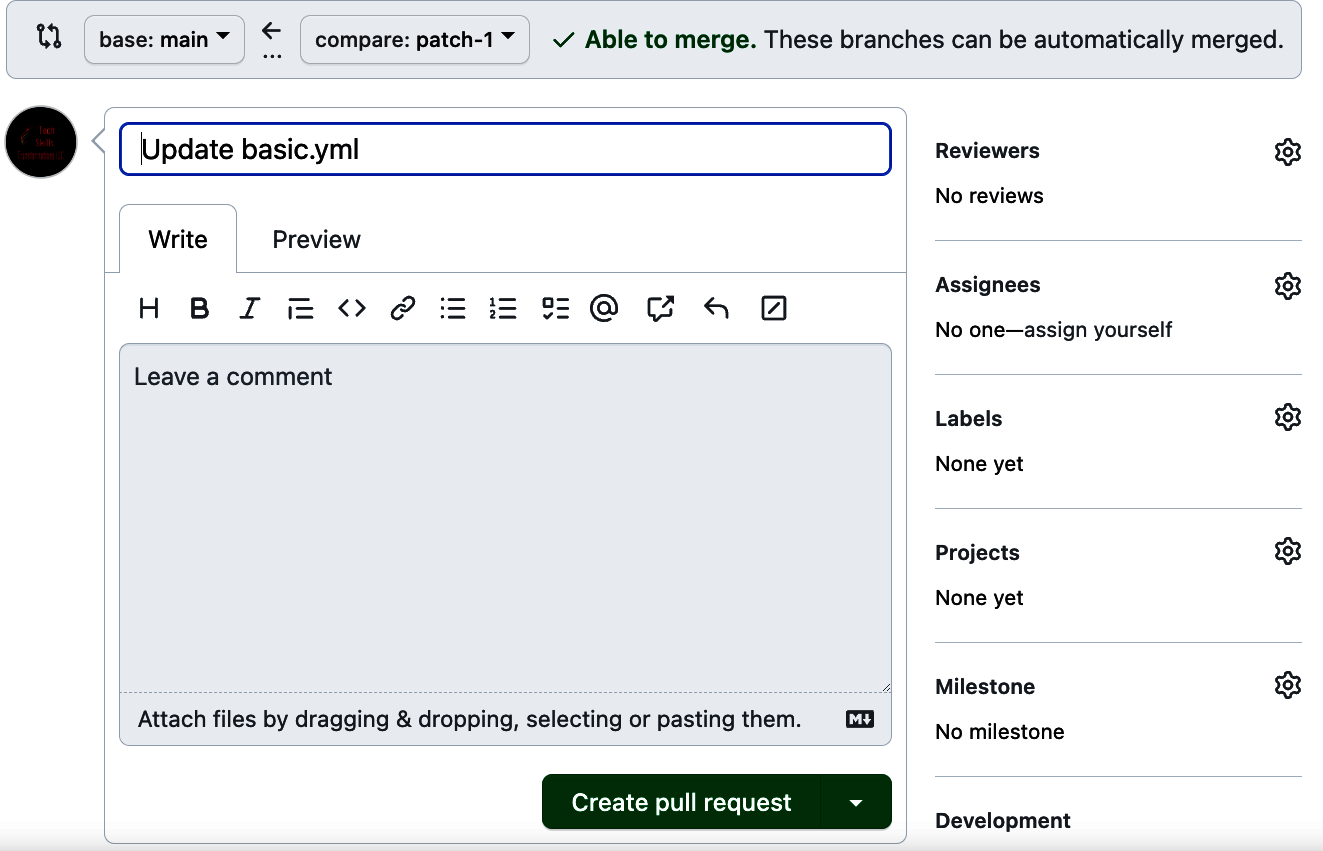
Figure 4-15. Pull request dialog for the change
After the pull request is created, GitHub will run any predefined checks associated with the repository and branch. In this case, the checks that are run are the jobs in any workflow that is triggered by a pull request in this branch. So that equates to the checkout and process jobs that were just defined in the basic.yaml workflow file. You can see them executing while the pull request is initially processed. And you can also see them after that initial processing is done by clicking the Show all checks link on the righthand side of the All checks have passed row. Figure 4-16 shows the set of checks after they have been run.
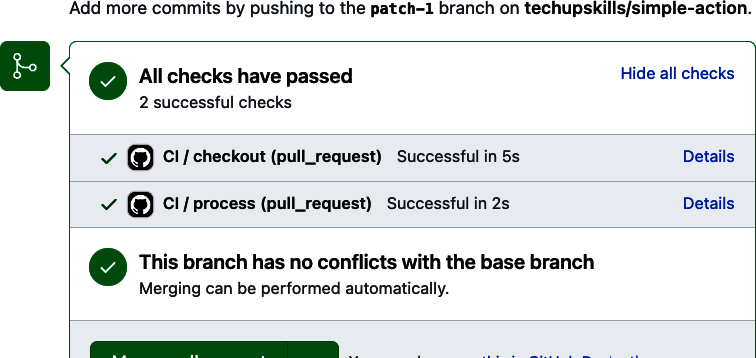
Figure 4-16. Listing checks that have been run
Clicking the Details link at the end of each row takes you to a screen for that run. In Figure 4-17, you can see the jobs from the workflow listed on the left and an area on the right that lists all of the steps that needed to be done for the job with output from the execution of each step. This also includes implicit steps, managed by GitHub, required for the job to execute, like Set up job.
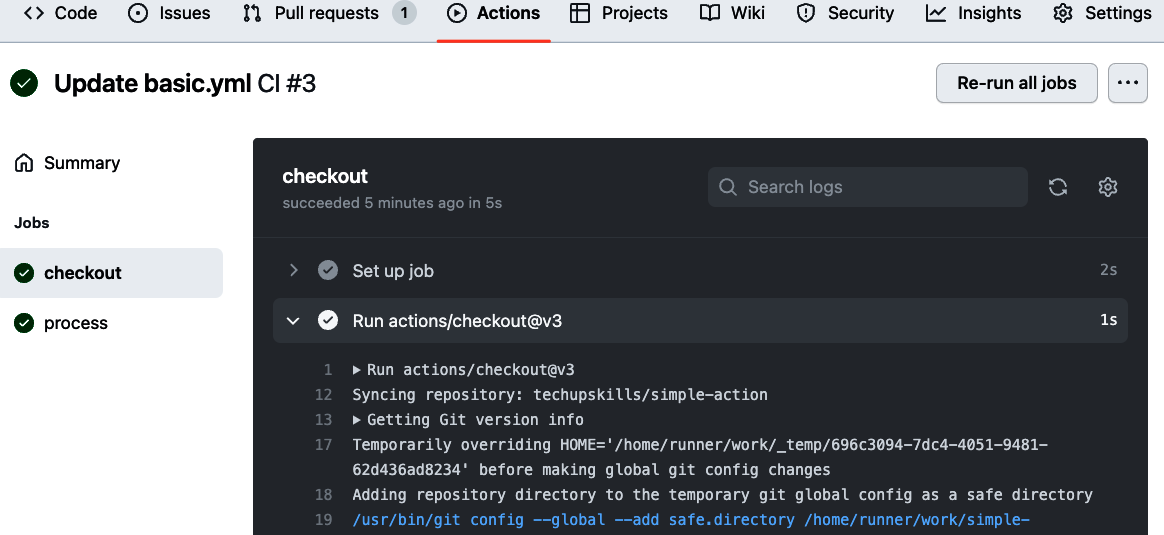
Figure 4-17. Detailed steps executed during a run
Each step can be expanded to show more detail. And some lines listed in steps can also be expanded to show collapsed output or execution details. (There will be more to say about this screen when diving deeper into runners in Chapter 5 and debugging/troubleshooting in Chapter 10.)
Another Way to Get to the Details
You can see this same details screen if you select the Pull requests tab at the top of the repository screen, select the open pull request, and then select the Checks tab. (See Figure 4-18.)
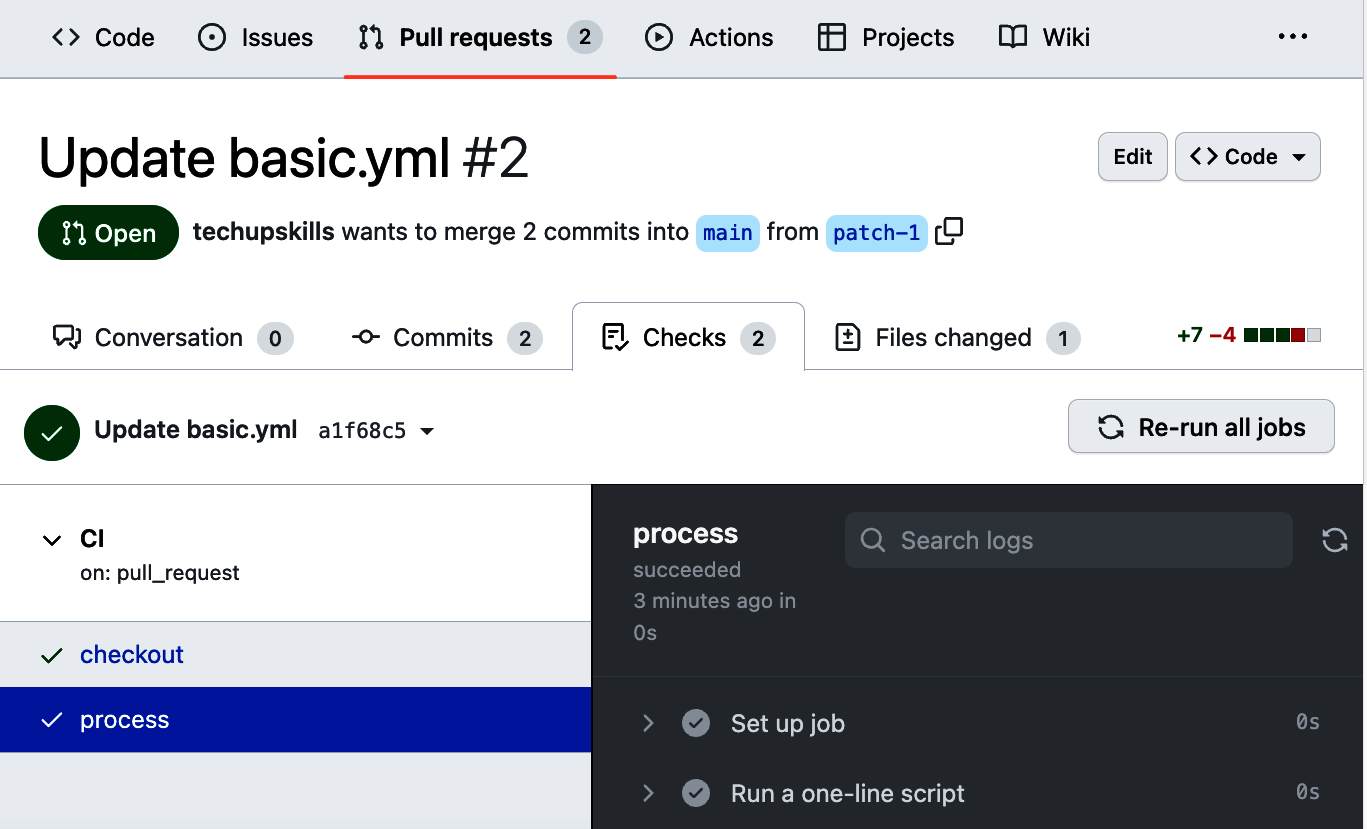
Figure 4-18. Getting to the details screen via the pull request menu
If you switch back to the main Actions tab, you can find details for all the runs of your workflow. I only have the one workflow, but I’ll go ahead and specifically select it. On the right, as shown in Figure 4-19, you can see all the runs for the selected workflow.
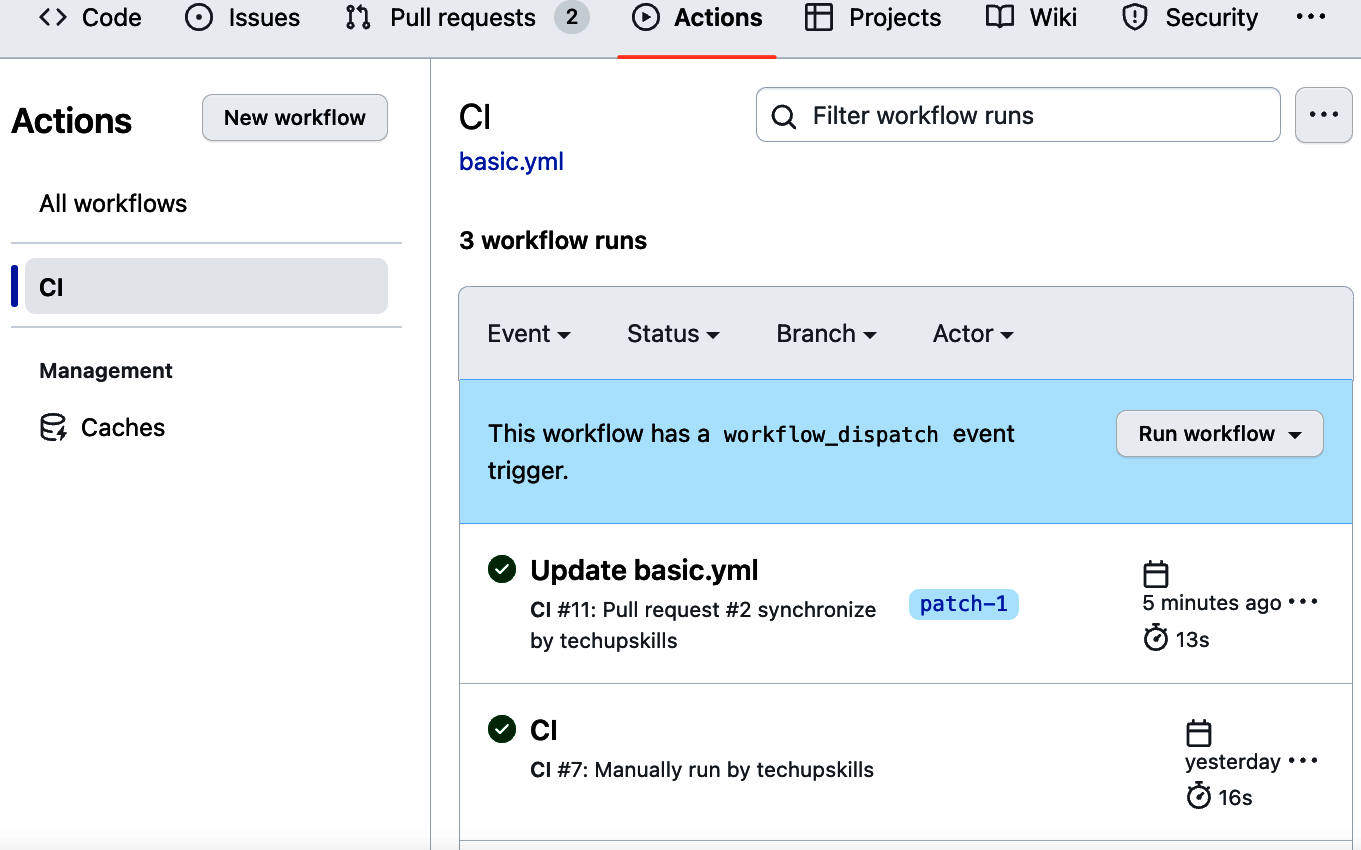
Figure 4-19. Latest workflow runs
The latest run of this workflow is in the row at the top of the list. Clicking the commit message Update basic.yaml switches the view to show the list of jobs from the workflow, along with the time they took to complete and whether they were successful or not. In Figure 4-20, success is indicated by the circles with the checkmarks in them. Clicking any name of a job in this screen will take you to a view of the step details. This is the same view you get when clicking the details link in the checks section of the pull request screen.
In the top right of the screen shown in Figure 4-20, you can also see the button Re-run all jobs. Next to that is a button that can be expanded to guide you through creating a status badge, as well as an option to delete logs. (“Creating a Status Badge” explains more about creating a status badge.)
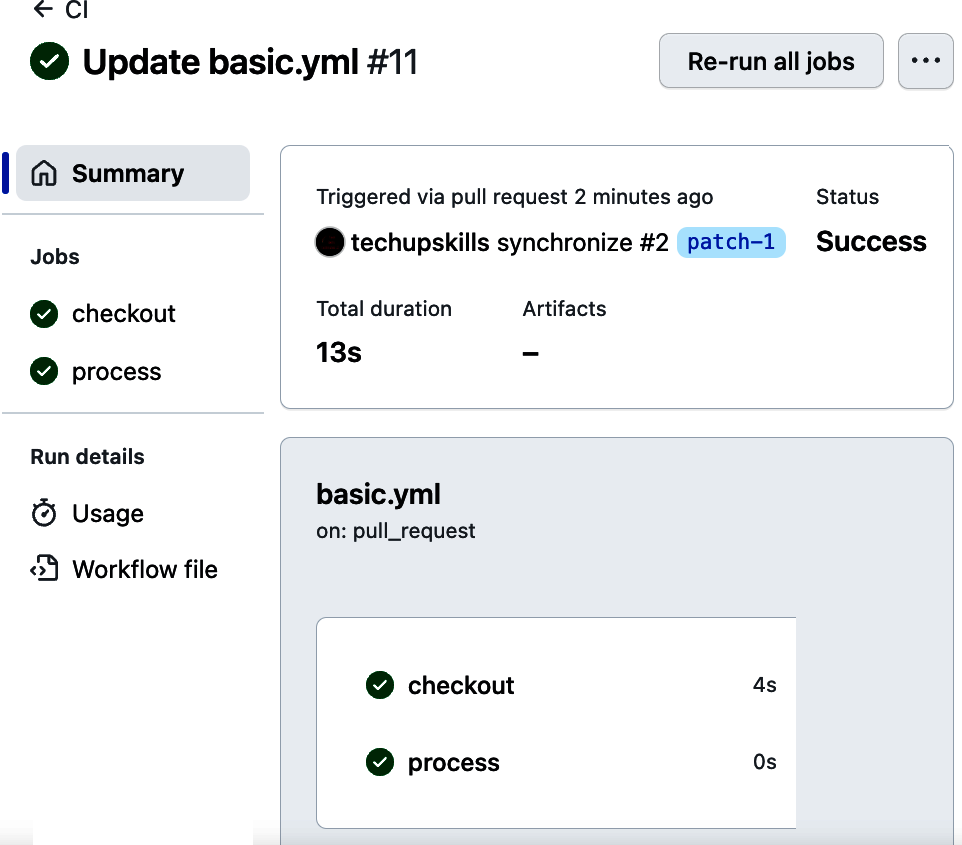
Figure 4-20. Overall jobs view for a workflow
Now that all the pre-merge checks have completed, you’re ready to merge the code and complete the pull request.
Getting Back to the Pull Request
You can easily get back to the pull request by selecting Pull requests in the top-level menu (the line that starts with < > Code) and then selecting the pull request from the list that is displayed. Or you can simply use the URL of your GitHub project ending with pull/1 (assuming this is the first pull request in your repository).
To complete the merge, you click the Merge pull request button and then click the next button, Confirm merge. You’ll then see the usual dialog that the pull request has been merged and closed (and you can delete the branch if you want).
At this point, if you click the Actions menu at the top, you’ll be able to see the most recent run of the workflow that was generated by the pull request (Figure 4-23) with the automatically generated commit message.
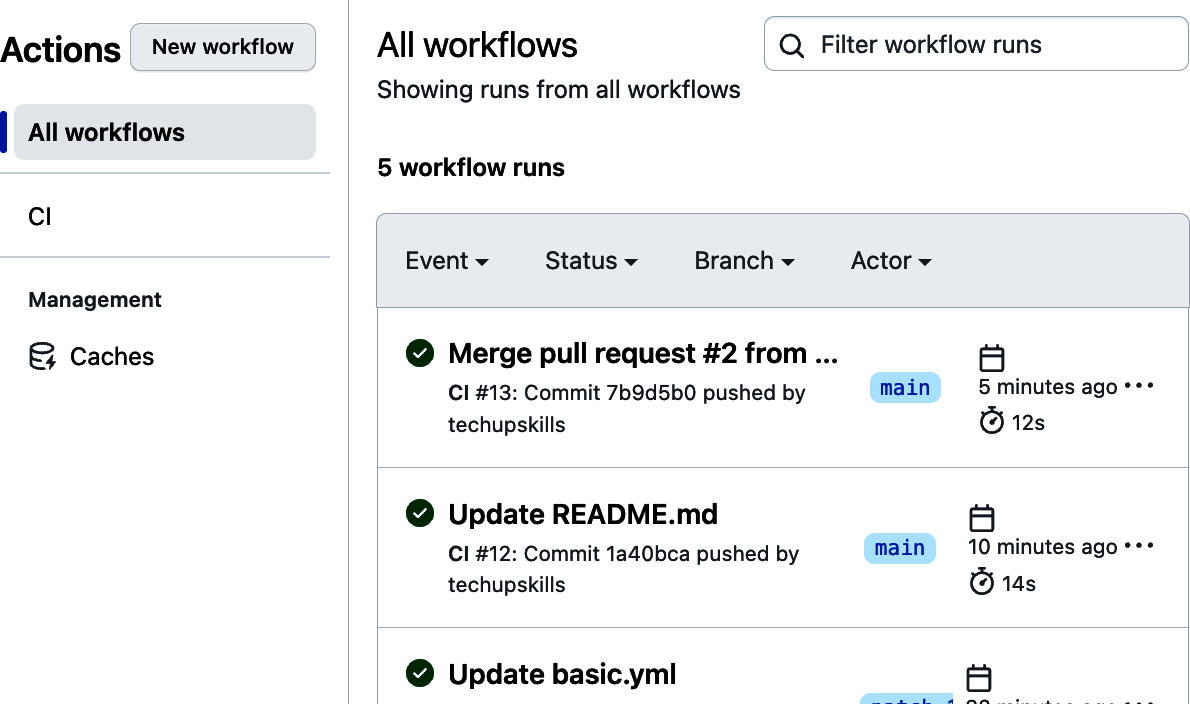
Figure 4-23. Recent runs of the project
Before leaving this screen, there are some other minor functions here worth being aware of. On the row for any run, you can select the … at the end to either delete a run or go directly to the workflow file (Figure 4-24).
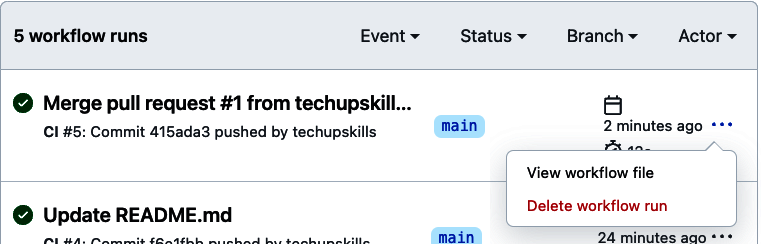
Figure 4-24. Additional options for a run
Also, there are filtering options at the top of the list of runs. You can select the drop-down list of one of them and filter to see only runs that match your selection. Figure 4-25 shows filtering the list of runs by the patch-1 branch that was used in the pull request just completed.
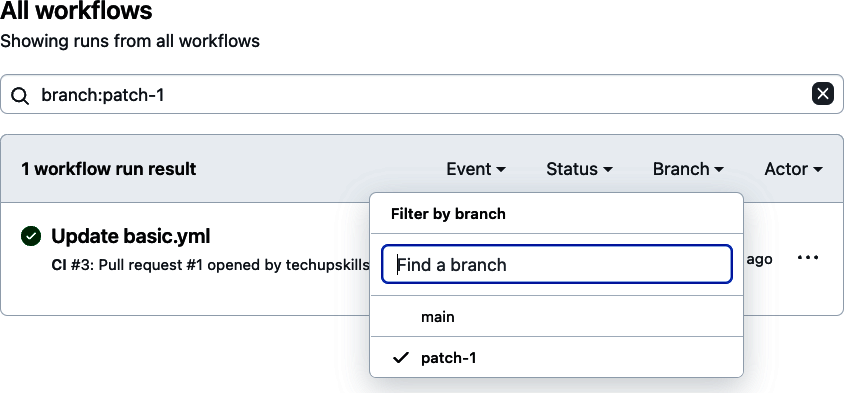
Figure 4-25. Filtering the list of runs by branch
Using the VS Code GitHub Actions Extension
If you prefer to work within an IDE, there is a GitHub Actions extension available for VS Code to let you create and edit workflows, as well as manage and monitor runs. It includes features such as linting and code completion and is officially supported by GitHub. (The extension was originally a community project mainly used for monitoring.)
If you’re familiar with VS Code, you can install the extension easily via searching for actions in the VS Code IDE (Figure 4-26) or through the VS Code GitHub Actions extension link.
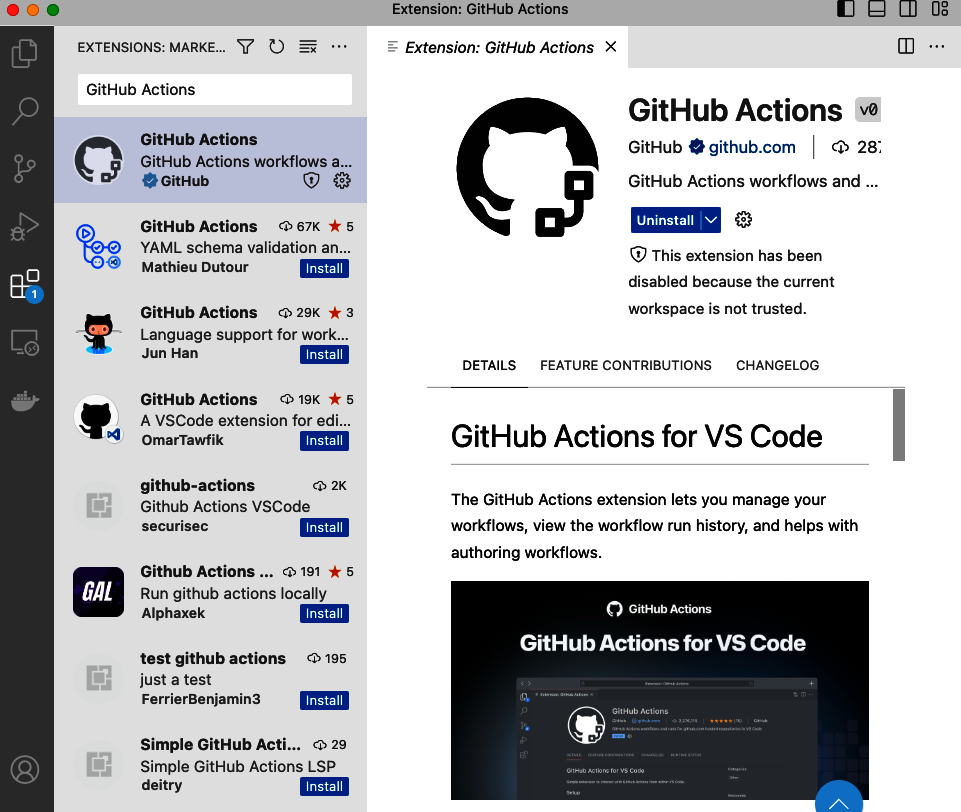
Figure 4-26. Installing extension via IDE
You can then select a repository and clone it in VS Code. At some point, you’ll be asked to sign in to GitHub and prompted to allow the extension to access your GitHub repositories (Figure 4-27).
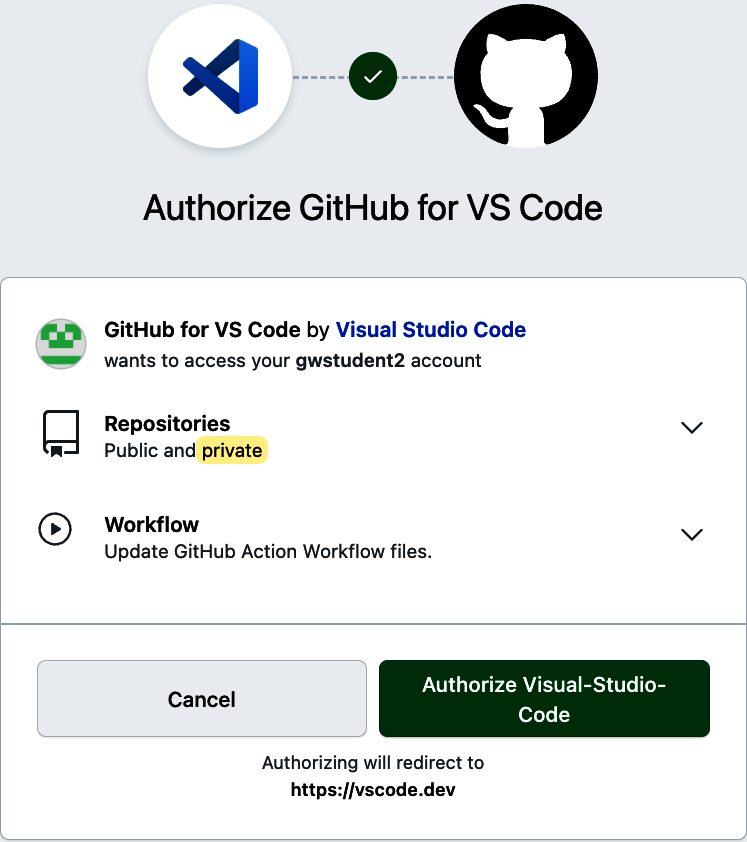
Figure 4-27. Authorizing GitHub for VS Code
After installation and authorization, you’ll have a new view in VS Code for GitHub Actions. If you already have workflows and runs of workflows within your repository, the view will show you them (Figure 4-28).
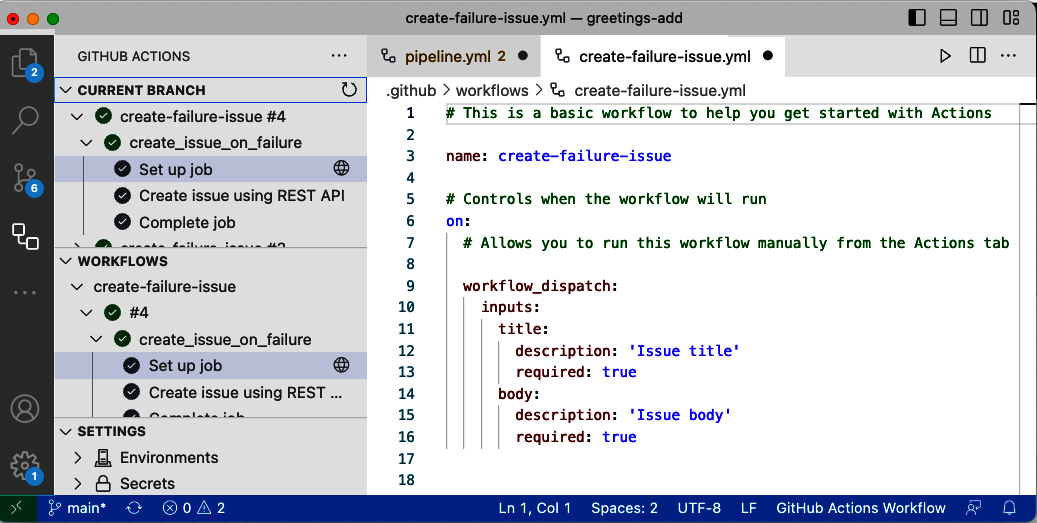
Figure 4-28. New view for actions
Within the WORKFLOWS list, selecting a workflow run by its number causes a globe icon to appear to the right. Clicking the globe icon allows you to open the workflow run in the browser in the standard actions interface. Likewise, selecting a job in the list causes a list icon to appear to the right. Selecting that allows you to view the logs associated with that job (Figure 4-29).
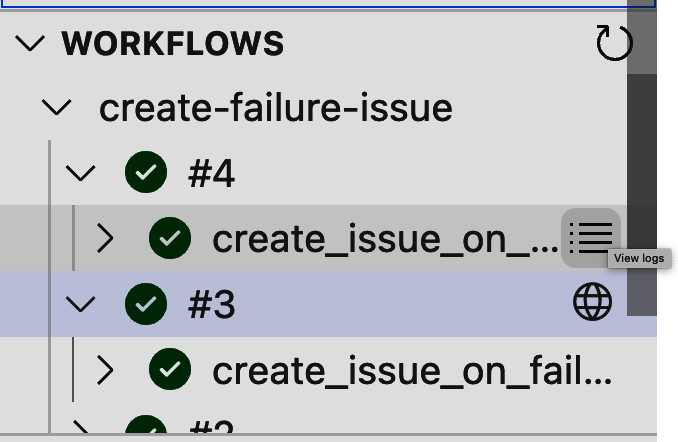
Figure 4-29. Icons for jobs and runs
If you are looking at a log, the EXPLORER view offers an OUTLINE section that you can click to move to specific points in the log more easily (Figure 4-30).
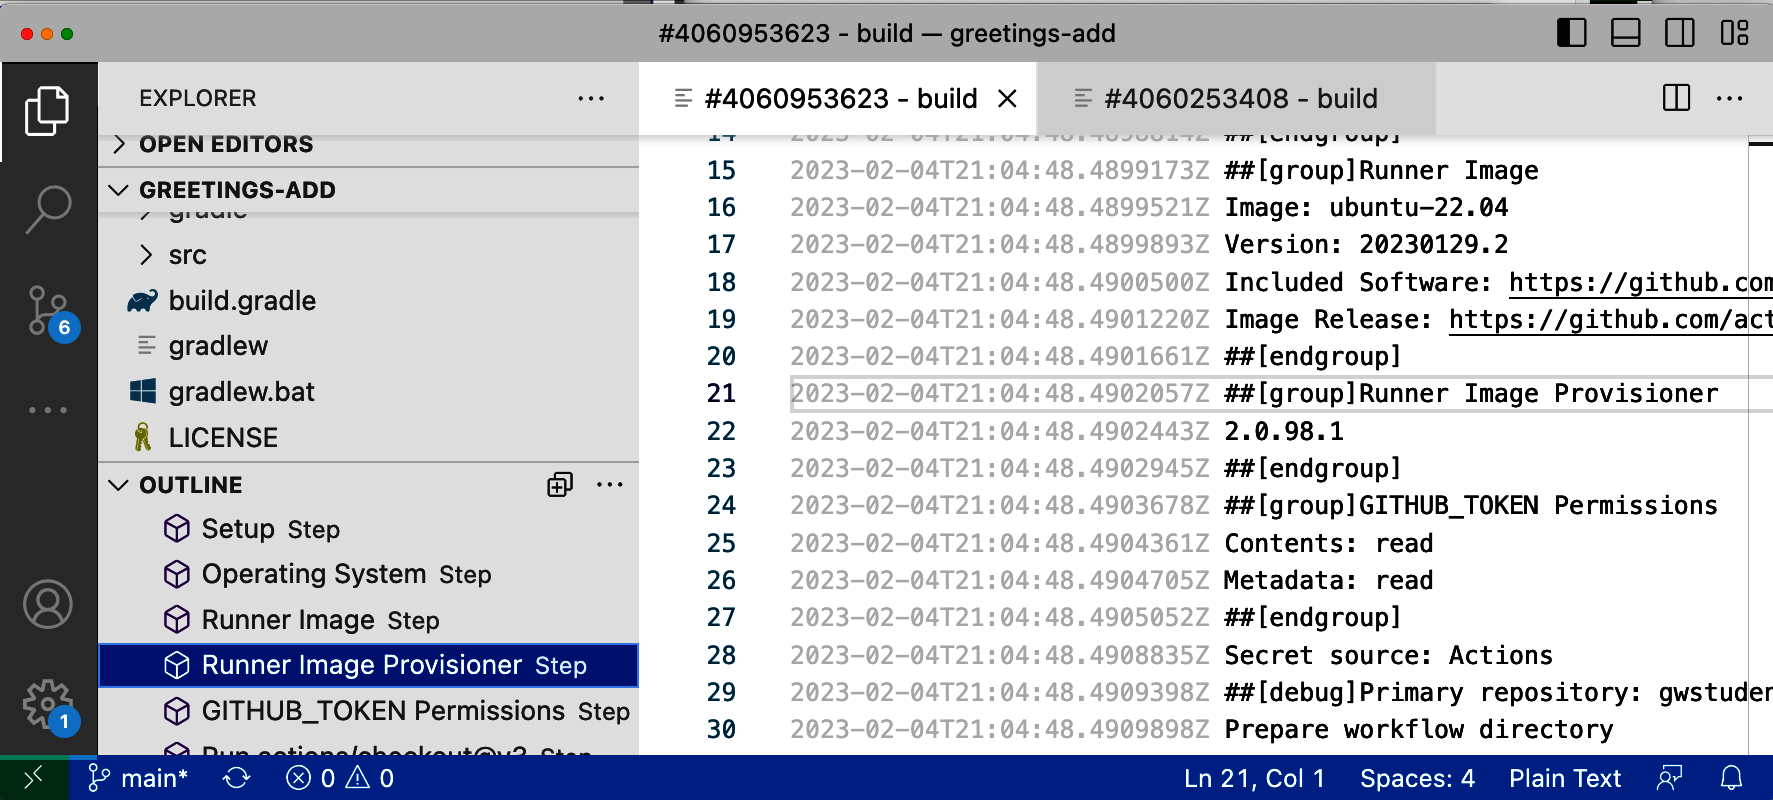
Figure 4-30. Outline for navigating around logs in Explorer view
The extension also understands the workflow schema and can provide context assistance when creating/editing workflow files. For example, if you hover over a keyword, you can get pop-ups with helpful information about the context (Figure 4-31).
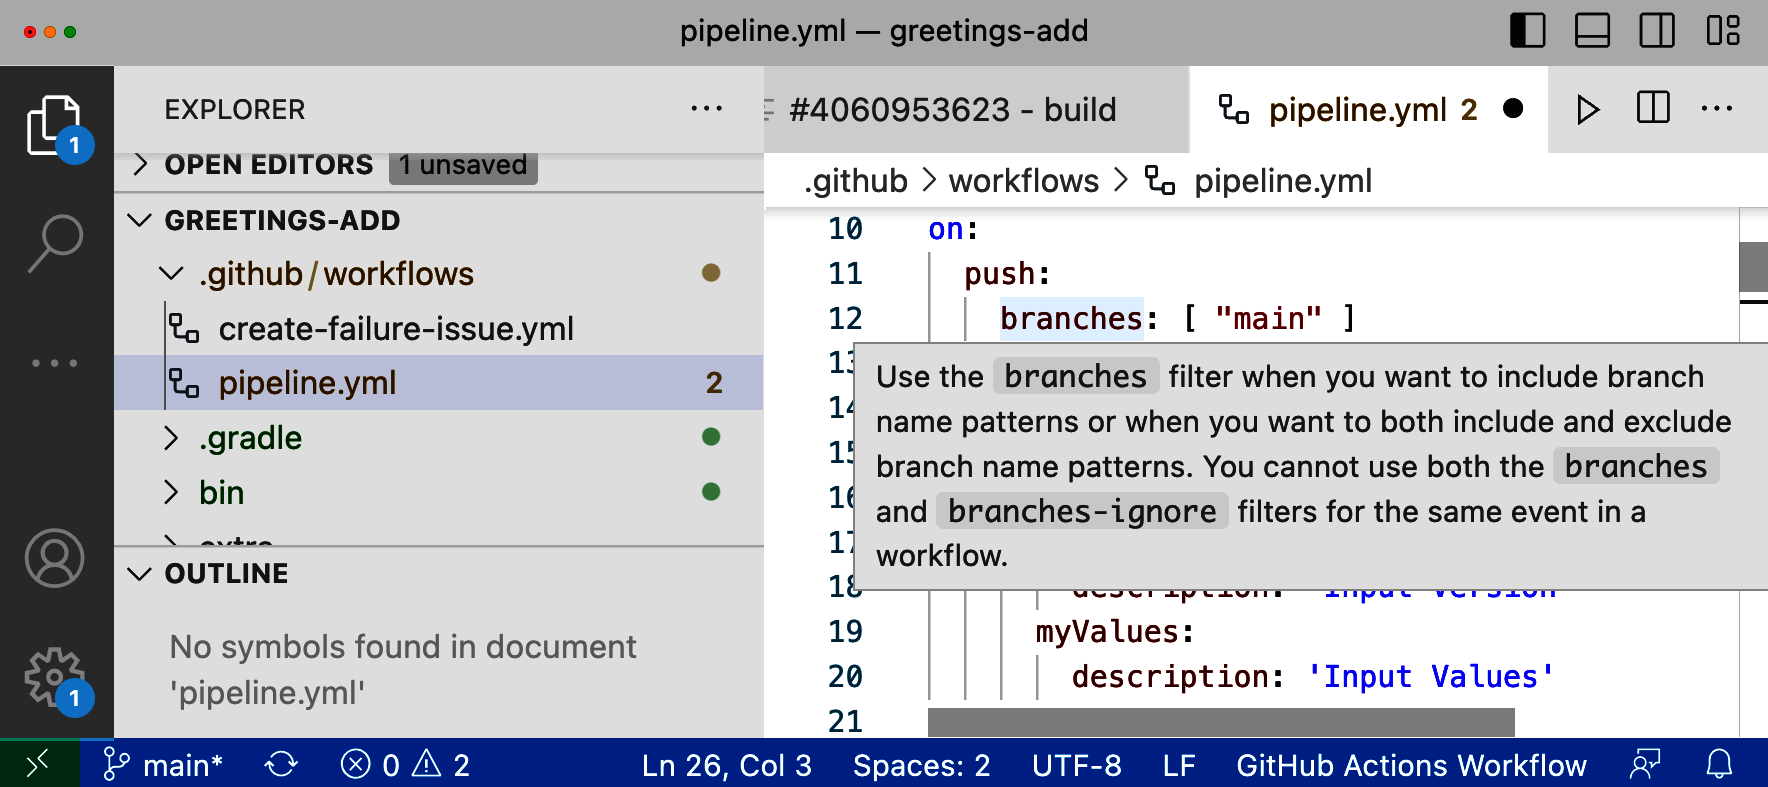
Figure 4-31. Context-sensitive help when editing workflows
The extension will notify you of syntax issues when creating/editing workflow files (Figure 4-32).
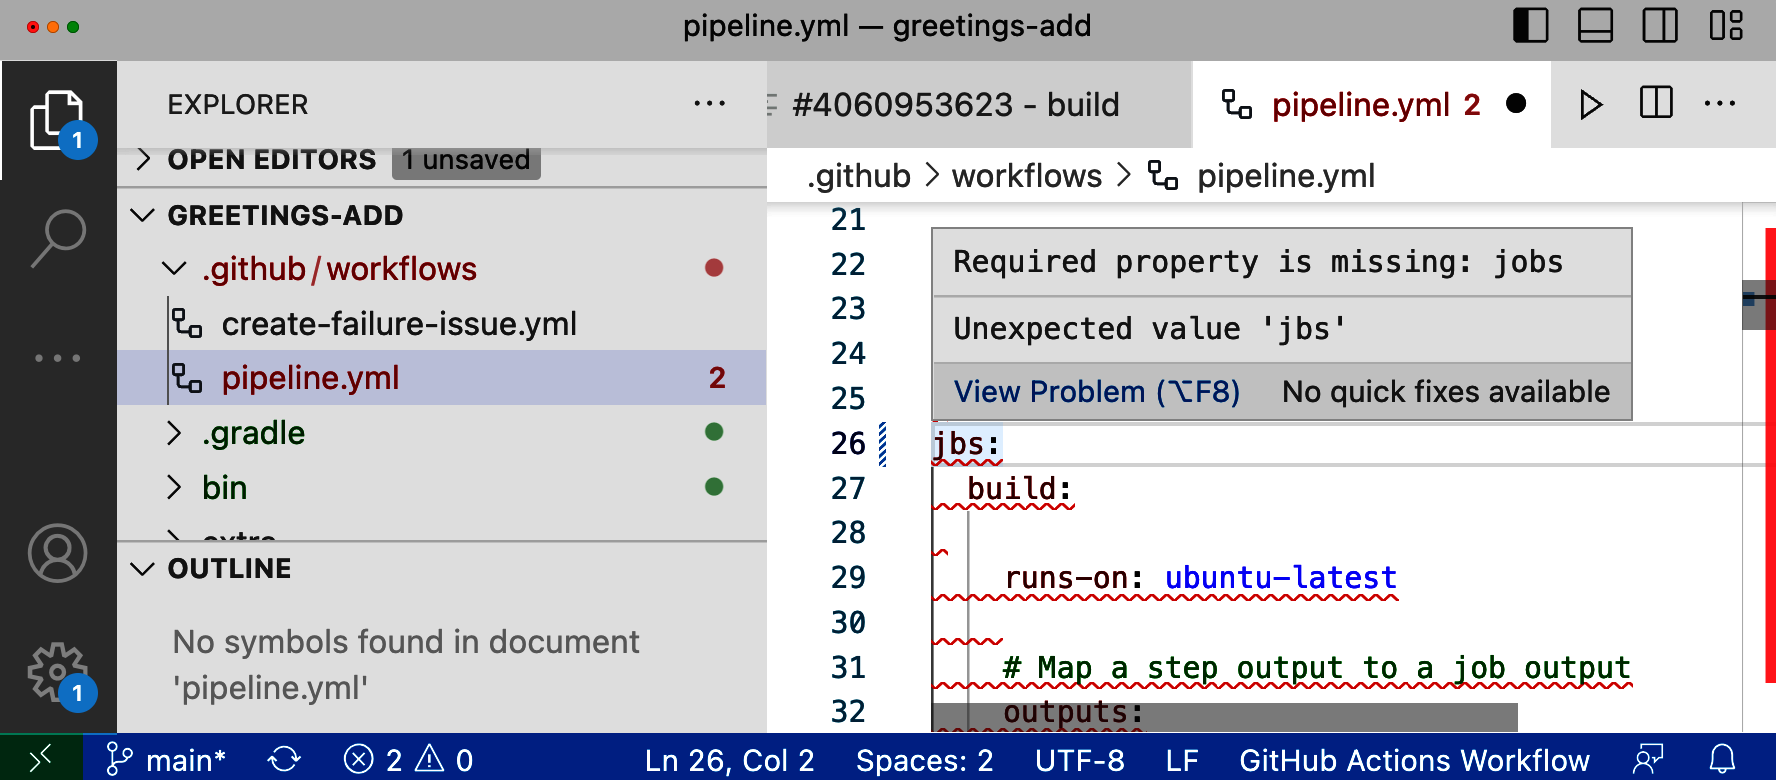
Figure 4-32. Detecting syntax errors
Other nice features include code completion for items when it can determine the set of available options (Figure 4-33) and the ability to get a quick link to the code for an action by hovering over its uses statement in the workflow (Figure 4-34).
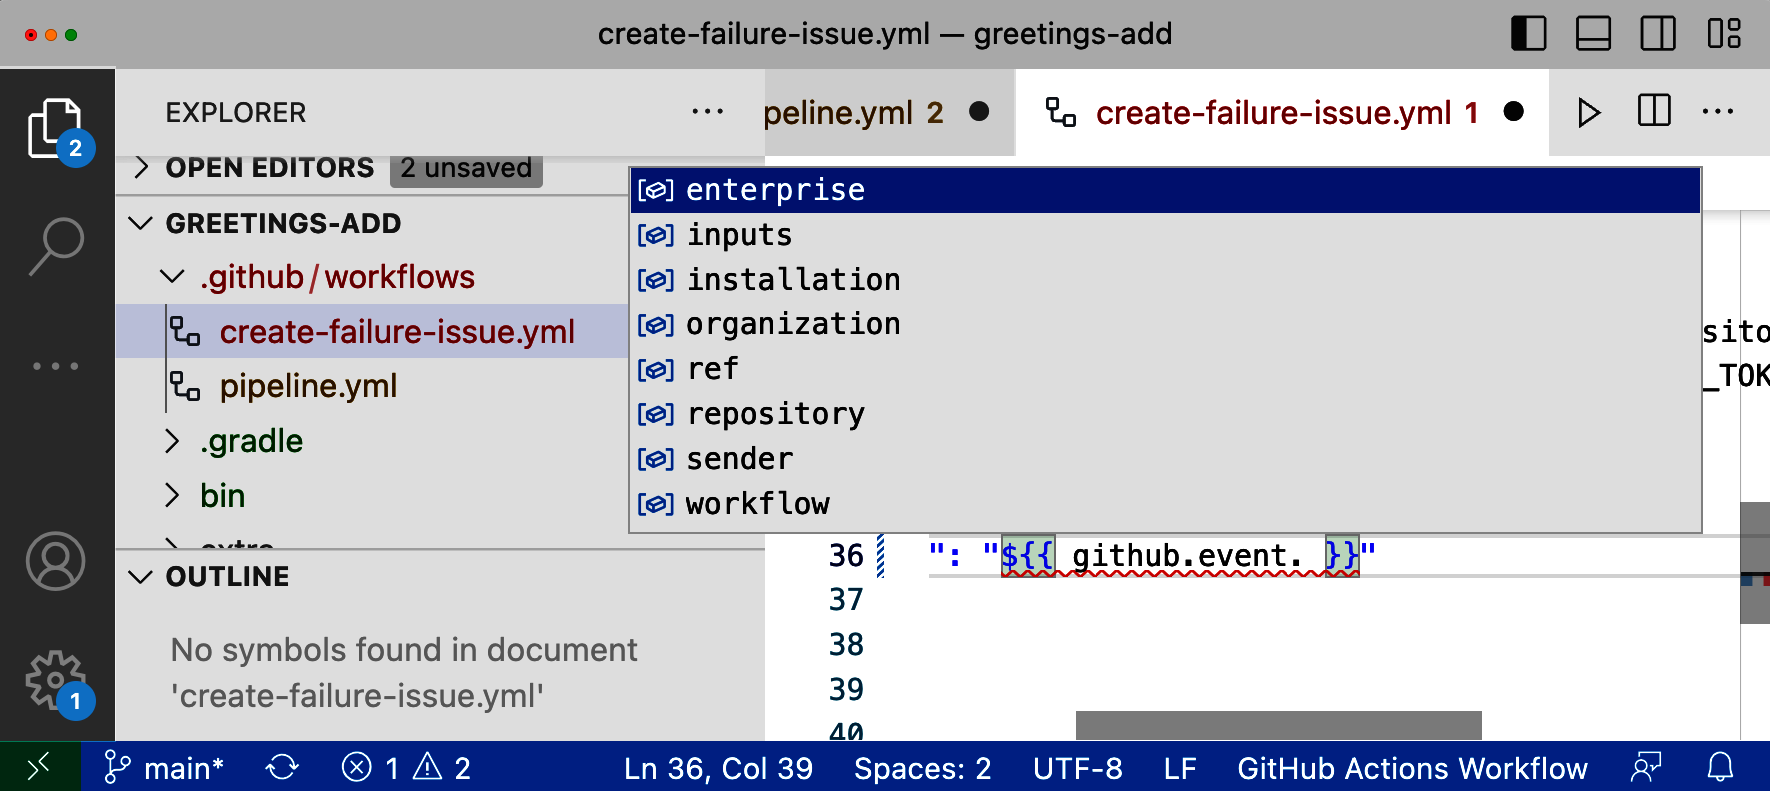
Figure 4-33. Code completion in the extension
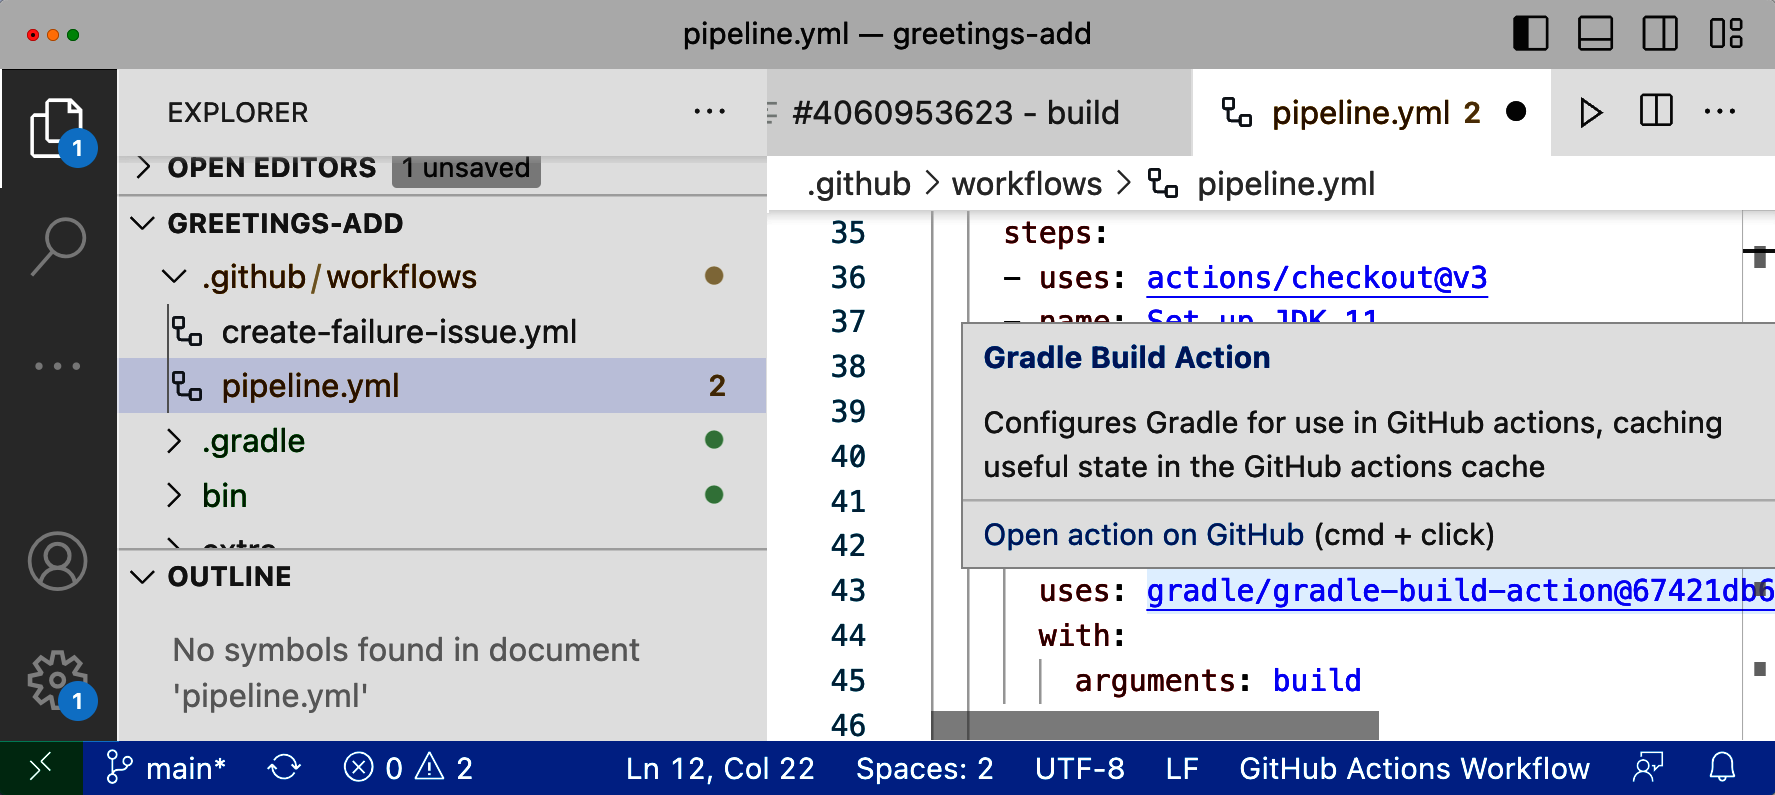
Figure 4-34. Getting a link to source for an action
Conclusion
In this chapter, I’ve introduced the GitHub web interface for working with actions and workflows. The provided functionality allows you to easily create and edit workflows without having to leave the browser. You can also execute the workflows and see each run as it happens. Previous runs are stored so you can review them.
GitHub Actions provides a set of starter and reference workflows to make creating an initial workflow easier. GitHub will look at any existing code in your repository and make suggestions for a useful initial workflow if it can. The starter and reference workflows are a good place to begin when you need a workflow for a new repository.
Executing workflows can be triggered in response to standard GitHub events but can also be triggered manually if they are set up for workflow dispatching. After execution, GitHub records information about the run, and you can drill down into the record of the run to see what actually occurred and get the details, such as what commands were ultimately done on the runner system.
Editing workflows can be done entirely with the browser or through VS Code integration if you prefer. Changes can be either committed directly to the current branch or merged via pull requests. When done via a pull request, any workflows matching the event will be triggered and run as pre-checks to validate the change in advance of the merge.
The next chapter will look more at the systems where the workflows are executed, also known as runners.
Get Learning GitHub Actions now with the O’Reilly learning platform.
O’Reilly members experience books, live events, courses curated by job role, and more from O’Reilly and nearly 200 top publishers.

