Chapter 1. Getting Started with Kubernetes
In this first chapter we present recipes that will help you get started with Kubernetes. We show you how to use Kubernetes without installing it and introduce components such as the command-line interface (CLI) and the dashboard, which allow you to interact with a cluster, as well as Minikube, an all-in-one solution you can run on your laptop.
1.1 Using Kubernetes Without Installation
Solution
To use Kubernetes without installing it, follow the interactive tutorial on the Kubernetes website.
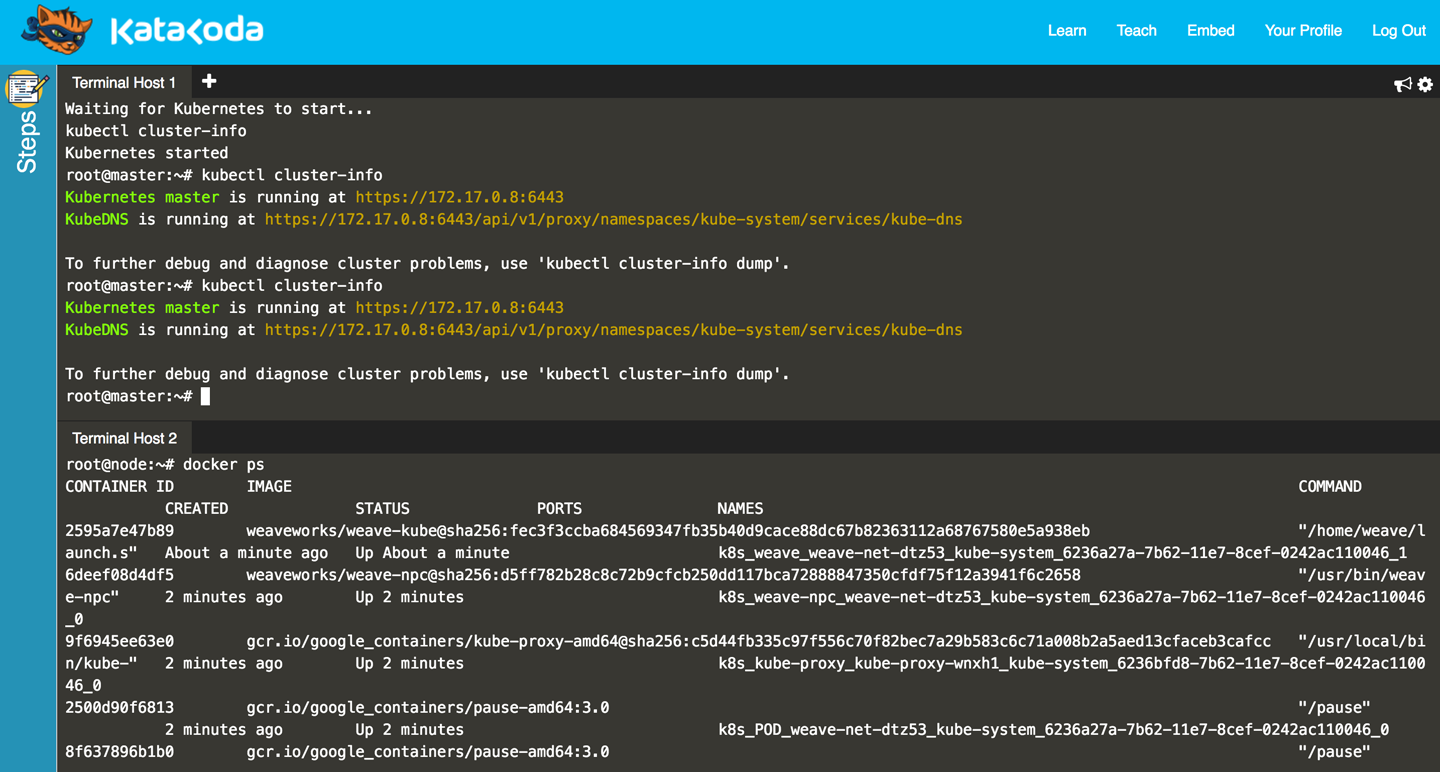
You can also use the Kubernetes playground on Katacoda. Once you’re signed in with GitHub or one of the social media authentication methods, you will see the page depicted in Figure 1-1.

Figure 1-1. Screenshot of the Katacoda Kubernetes playground
Note that an environment you launch in the playground is only available for a limited time—currently one hour—but it’s free of charge and all you need is a browser.
1.2 Installing the Kubernetes CLI, kubectl
Solution
Install kubectl in one of the following ways:
-
Download the source tarballs.
-
Use a package manager.
-
Build from source (see Recipe 13.1).
The documentation highlights a few mechanisms to get kubectl. The easiest is to download the latest official release. For example, on a Linux system, to get the latest stable version, enter:
$ curl -LO https://storage.googleapis.com/kubernetes-release/release/ \
       $(curl -s https://storage.googleapis.com/kubernetes-release/ \
       release/stable.txt) \
       /bin/linux/amd64/kubectl

$ chmod +x ./kubectl

$ sudo mv ./kubectl /usr/local/bin/kubectl
Users of macOS can get kubectl simply via Homebrew:
$ brew install kubectl
Google Kubernetes Engine users (see Recipe 2.7) will get kubectl as part of the gcloud command installation. For example, on Sébastien’s local machine:
$ which kubectl
/Users/sebgoa/google-cloud-sdk/bin/kubectl
Also note that the latest versions of Minikube (see Recipe 1.3) packages kubectl and will install it in your $PATH if it is not found.
Before you move on from this recipe, make sure you have a working kubectl by listing its version. This command will also try to get the version of the default Kubernetes cluster:
$ kubectl version
Client Version: version.Info{Major:"1", \
                             Minor:"7", \
                             GitVersion:"v1.7.0", \
                             GitCommit:"fff5156...", \
                             GitTreeState:"clean", \
                             BuildDate:"2017-03-28T16:36:33Z", \
                             GoVersion:"go1.7.5", \
                             Compiler:"gc", \
                             Platform:"darwin/amd64"}
...
See Also
-
Documentation on installing
kubectl
1.3 Installing Minikube to Run a Local Kubernetes Instance
Solution
Use Minikube. Minikube is a tool that lets you use Kubernetes on your local machine without any installation except for the minikube binary. It takes advantage of your local hypervisor (e.g., VirtualBox, KVM) and launches a virtual machine that runs Kubernetes in a single node.
To install the Minikube CLI locally, you can get the latest release or build from source. To get the v0.18.0 release and install minikube on a Linux-based machine, do:
$ curl -Lo minikube https://storage.googleapis.com/minikube/releases/v0.18.0/ \
                    minikube-linux-amd64

$ chmod +x minikube

$ sudo mv minikube /usr/local/bin/
This will put the minikube binary in your path and make it accessible from everywhere.
Discussion
Once minikube is installed, you can verify the version that is running with the following command:
$ minikube version
minikube version: v0.18.0
You can start it with:
$ minikube start
Once the startup phase has finished, your Kubernetes client, kubectl, will have a minikube context and will automatically start using this context. Checking what nodes you have in your cluster will return the minikube hostname:
$ kubectl get nodes
NAME       STATUS    AGE
minikube   Ready     5d
See Also
-
minikubesource on GitHub
1.4 Using Minikube Locally for Development
Problem
You want to use Minikube locally for testing and development of your Kubernetes application. You have installed and started minikube (see Recipe 1.3) and want to know a few extra commands to simplify your development experience.
Solution
The Minikube CLI offers a few commands that make your life easier. The CLI has built-in help that you can use to discover the subcommands on your own—here’s a snippet:
$ minikube
...
Available Commands:
  addons           Modify minikube's kubernetes addons.
...
  start            Starts a local kubernetes cluster.
  status           Gets the status of a local kubernetes cluster.
  stop             Stops a running local kubernetes cluster.
  version          Print the version of minikube.
Aside from start, stop, and delete, you should become familiar with the ip, ssh, dashboard, and docker-env commands.
Discussion
The minikube start command starts the virtual machine (VM) that will run Kubernetes locally. By default it will allocate 2 GB of RAM, so when you are done, do not forget to stop it with minikube stop. Also, you can give the VM more memory and CPUs as well as pick a certain Kubernetes version to run—for example:
$ minikube start --cpus=4 --memory=4000 --kubernetes-version=v1.7.2
For debugging the Docker daemon that is used inside Minikube, you might find minikube ssh handy; it will log you into the virtual machine. To get the IP address of the Minikube VM, use minikube ip. Finally, to launch the Kubernetes dashboard in your default browser, use minikube dashboard.
Tip
If for any reason your Minikube becomes unstable, or you want to start afresh, you can remove it with minikube stop and minikube delete. Then a minikube start will give you a fresh installation.
1.5 Starting Your First Application on Minikube
Problem
You’ve started Minikube (see Recipe 1.3), and now you want to launch your first application on Kubernetes.
Solution
As an example, you can start the Ghost microblogging platform on Minikube using two kubectl commands:
$ kubectl run ghost --image=ghost:0.9
$ kubectl expose deployments ghost --port=2368 --type=NodePort
Monitor the pod manually to see when it starts running and then use the minikube service command to open your browser automatically and access Ghost:
$ kubectl get pods
NAME                     READY     STATUS    RESTARTS   AGE
ghost-8449997474-kn86m   1/1       Running   0          2h

$ minikube service ghost
Discussion
The kubectl run command is called a generator; it is a convenience command to create a Deployment object (see Recipe 4.4). The kubectl expose command is also a generator, a convenience command to create a Service object (see Recipe 5.1) that routes network traffic to the containers started by your deployment.
1.6 Accessing the Dashboard in Minikube
Solution
You can open the Kubernetes dashboard from Minikube with:
$ minikube dashboard
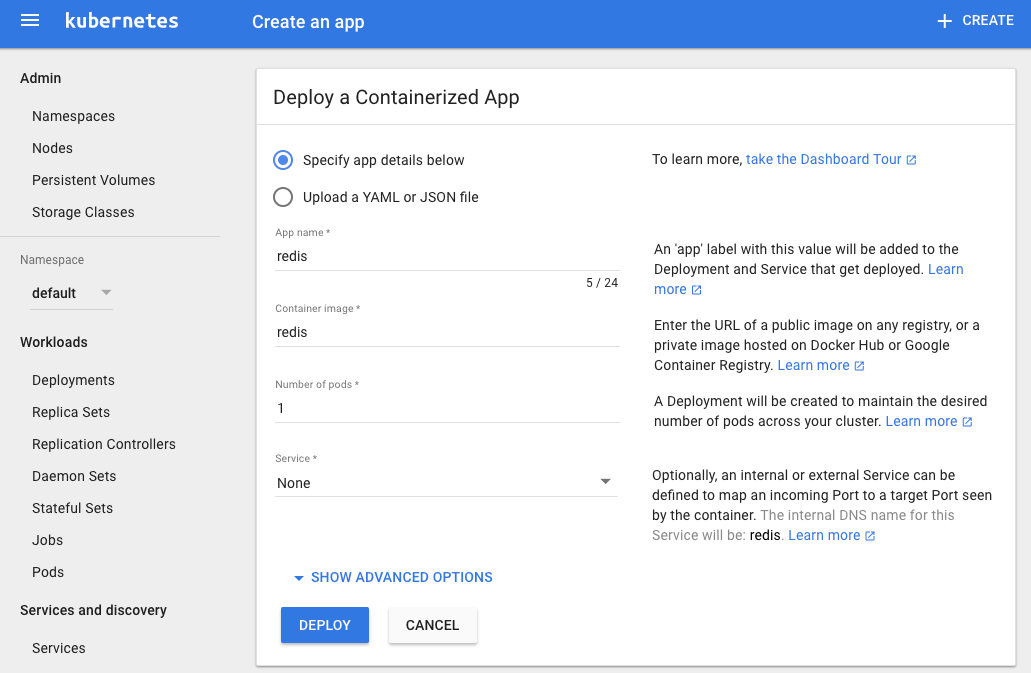
Click on the plus sign (+) at the top right of the UI that opens in your browser, and you will see the page depicted in Figure 1-2.

Figure 1-2. Snapshot of the dashboard application create view
Discussion
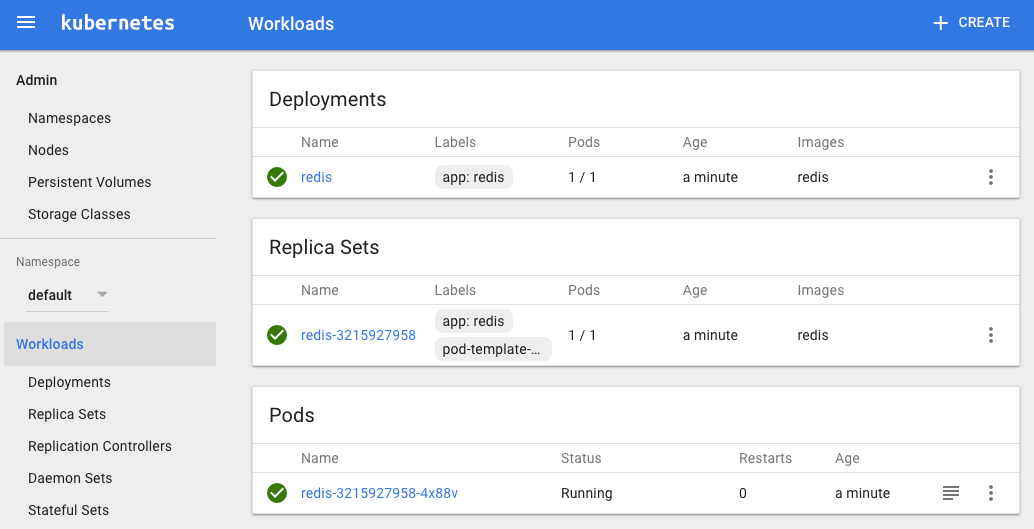
To create an application, click the Create button in the top-right corner, give the application a name, and specify the Docker image that you want to use. Then click the Deploy button and you will be presented with a new view that shows deployments and replica sets, and after a bit of time you will see a pod. These are some key API primitives we will deal with in greater detail in the rest of the book.
The snapshot in Figure 1-3 presents a typical dashboard view after having created a single application using the Redis container.

Figure 1-3. A dashboard overview with a Redis application
If you go back to a terminal session and use the command-line client, you will see the same thing:
$ kubectl get pods,rs,deployments
NAME                        READY     STATUS    RESTARTS   AGE
po/redis-3215927958-4x88v   1/1       Running   0          24m

NAME                  DESIRED   CURRENT   READY     AGE
rs/redis-3215927958   1         1         1         24m

NAME           DESIRED   CURRENT   UP-TO-DATE   AVAILABLE   AGE
deploy/redis   1         1         1            1           24m
Your Redis pod will be running the Redis server, as the following logs show:
$ kubectl logs redis-3215927958-4x88v
...
                _._
           _.-``__ ''-._
      _.-``    `.  `_.  ''-._           Redis 3.2.9 (00000000/0) 64 bit
  .-`` .-```.  ```\/    _.,_ ''-._
 (    '      ,       .-`  | `,    )     Running in standalone mode
 |`-._`-...-` __...-.``-._|'` _.-'|     Port: 6379
 |    `-._   `._    /     _.-'    |     PID: 1
  `-._    `-._  `-./  _.-'    _.-'
 |`-._`-._    `-.__.-'    _.-'_.-'|
 |    `-._`-._        _.-'_.-'    |           http://redis.io
  `-._    `-._`-.__.-'_.-'    _.-'
 |`-._`-._    `-.__.-'    _.-'_.-'|
 |    `-._`-._        _.-'_.-'    |
  `-._    `-._`-.__.-'_.-'    _.-'
      `-._    `-.__.-'    _.-'
          `-._        _.-'
              `-.__.-'

...
1:M 14 Jun 07:28:56.637 # Server started, Redis version 3.2.9
1:M 14 Jun 07:28:56.643 * The server is now ready to accept connections on
port 6379
Get Kubernetes Cookbook now with the O’Reilly learning platform.
O’Reilly members experience books, live events, courses curated by job role, and more from O’Reilly and nearly 200 top publishers.

