Now that we’ve seen how a basic Arduino sketch works, let’s move on to sending and receiving data from the Arduino board. We’ll need to know how to do this because this is how we’ll control the Arduino or get sensor readings from it when we connect it to our iOS device. For now, however, we’re going to use the Serial Monitor (see Figure 1-7 again), inside the development environment.
Open a new sketch by clicking File→New (⌘N) to open a new window:
void setup() {
Serial.begin(9600); }
void loop() {
while (Serial.available() <= 0) {
}
void loop() {
while (Serial.available() <= 0) { Serial.println("Hello world");
 delay(300);
}
}
delay(300);
}
}-
Sets the data rate in bits per second (baud) for serial data transmission.
-
Here we get the number of bytes available for reading from the serial port. If there are no bytes waiting in the buffer, we loop until some arrive.
-
Finally, here inside the loop we print “Hello World” to the serial connection.
Effectively this code will send the string “Hello World” to the serial connection every 300 ms until the board receives a byte (character), at which point it will stop.
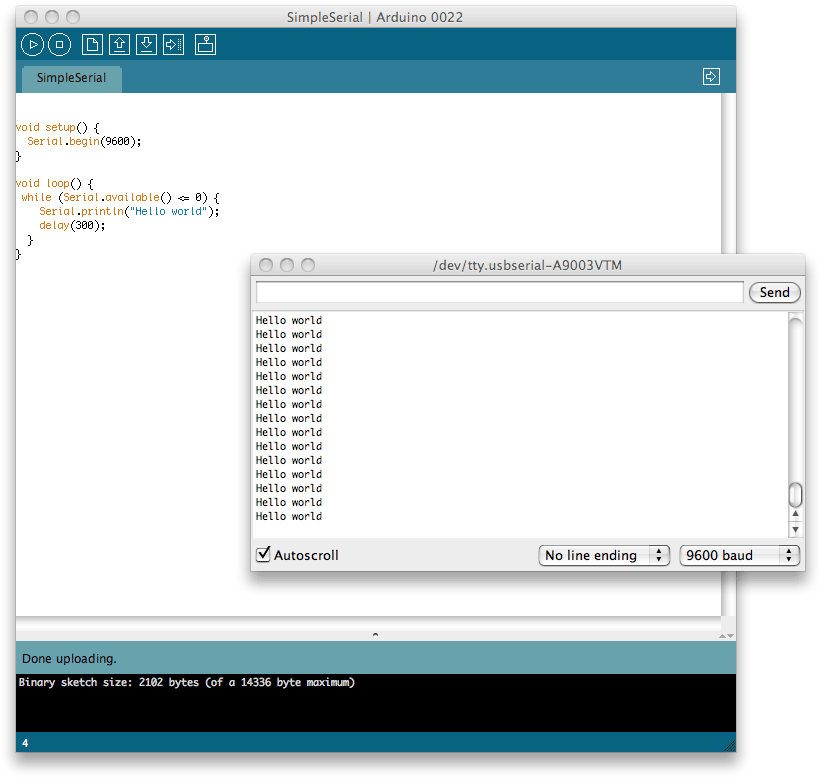
Save the contents of the sketch to a file using the File→Save (⌘S) menu item, and then click on the Verify button to compile your sketch. If all goes well, click the Upload button to upload it to the board. You should see the RX and TX LEDs light up as the code is transferred. When you see the “Done uploading” message in the status bar, click on the Serial Console button (see Figure 1-7 again) in the development environment to open the serial console.
Doing so will reset the Arduino, at which point you should see the phrase “Hello World” appear on the console every 300 ms (see Figure 1-8), accompanied by a flash of the TX LED on the Arduino board itself.
Entering a character or string in the text entry box and hitting the Send button will transmit those characters to the board, at which point the board should stop sending the string “Hello world” to the serial port.
Let’s make that a bit more specific. Add the following highlighted lines to your sketch and re-upload it to the Arduino:
void setup() {
  Serial.begin(9600);
}

void loop() {
  while (Serial.available() <= 0) {
    Serial.println("Hello world");
    delay(300);
  }

  Serial.println("Goodbye world");
  while(1) { }
}
The serial console will close automatically when you upload new code to the board, so reopen it and you should see things much as before (Figure 1-8). However, this time if you send a string to the board you should receive the string “Goodbye world” back.
Get iOS Sensor Apps with Arduino now with the O’Reilly learning platform.
O’Reilly members experience books, live events, courses curated by job role, and more from O’Reilly and nearly 200 top publishers.

