192 IBM Workplace Forms: Guide to Building and Integrating a Sample Workplace Forms Application
</TD>
</TR>
3. Save the updated file as index.jsp so as to separate this from the original index.jsp.
5.5.3 Creating a JSP to view DB2 data
In order to display the data from the DB2 database, you will need to create a JSP that reads
the data from the tables and creates the output in HTML format. This JSP uses the DB2
Access Layer connector mentioned previously in 5.1.5 to make the queries to the database
and to store the form back.
The
db2listing.jsp has a similar function to the dirlisting1.jsp mentioned in Chapter 4. The
main difference is that the forms in this example are stored in a table in DB2 and not on the
file system. This JSP is used two different ways. The first scenario is from the
index.jsp where
a user has the option to select the button, All Orders (DB2). This button does not pass in any
userID information to the servlet and all data from the database is returned. The second time
that this JSP is called is from the My Orders (DB2) button. In this case, the userID is passed
to the JSP from the servlet, and only those forms that the user has created will be displayed.
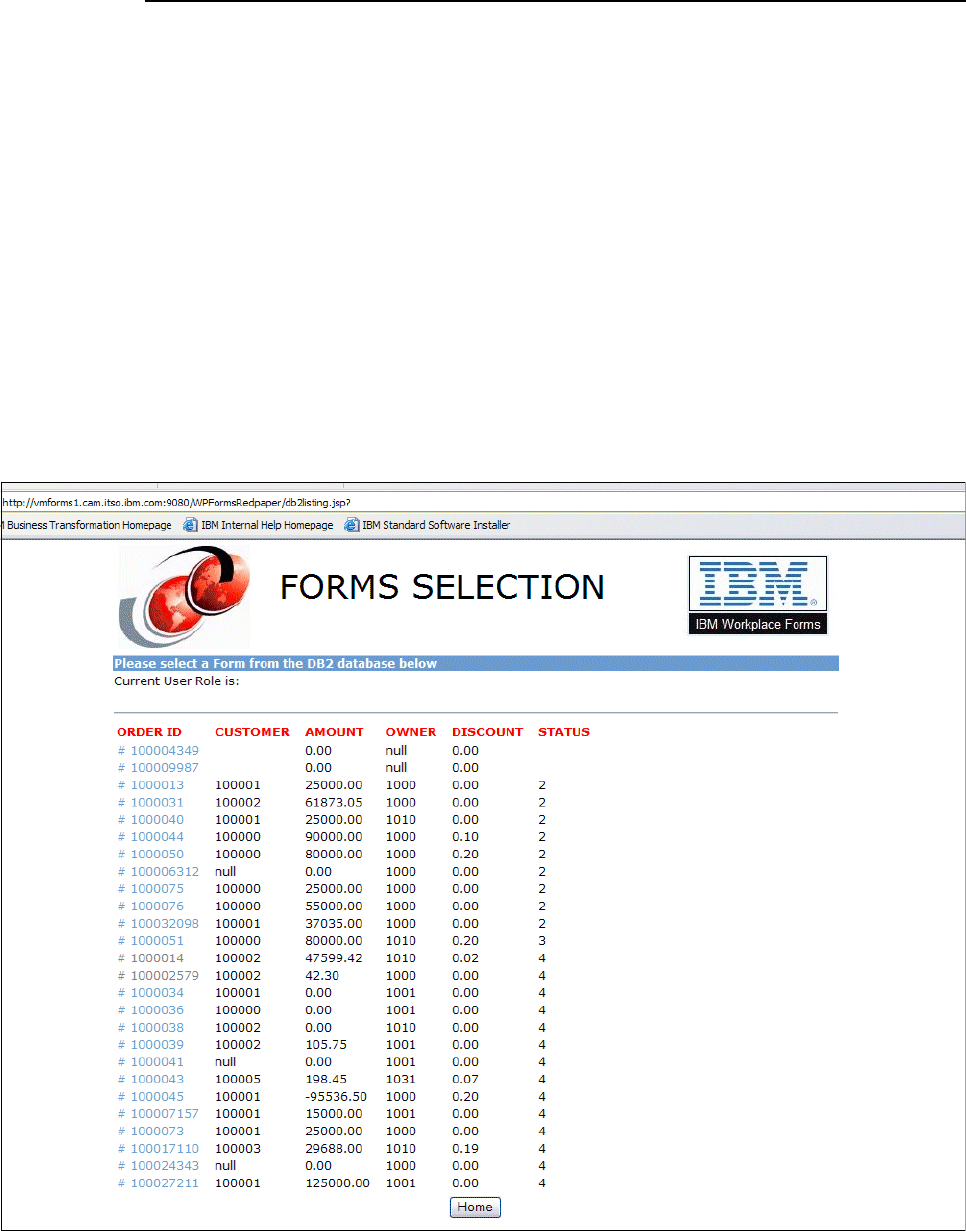
Figure 5-9 shows what the All Orders view from the
db2listing.jsp looks like.
Figure 5-9 All Orders from DB2 using db2listing.jsp
Chapter 5. Building the base scenario: Stage 2 193
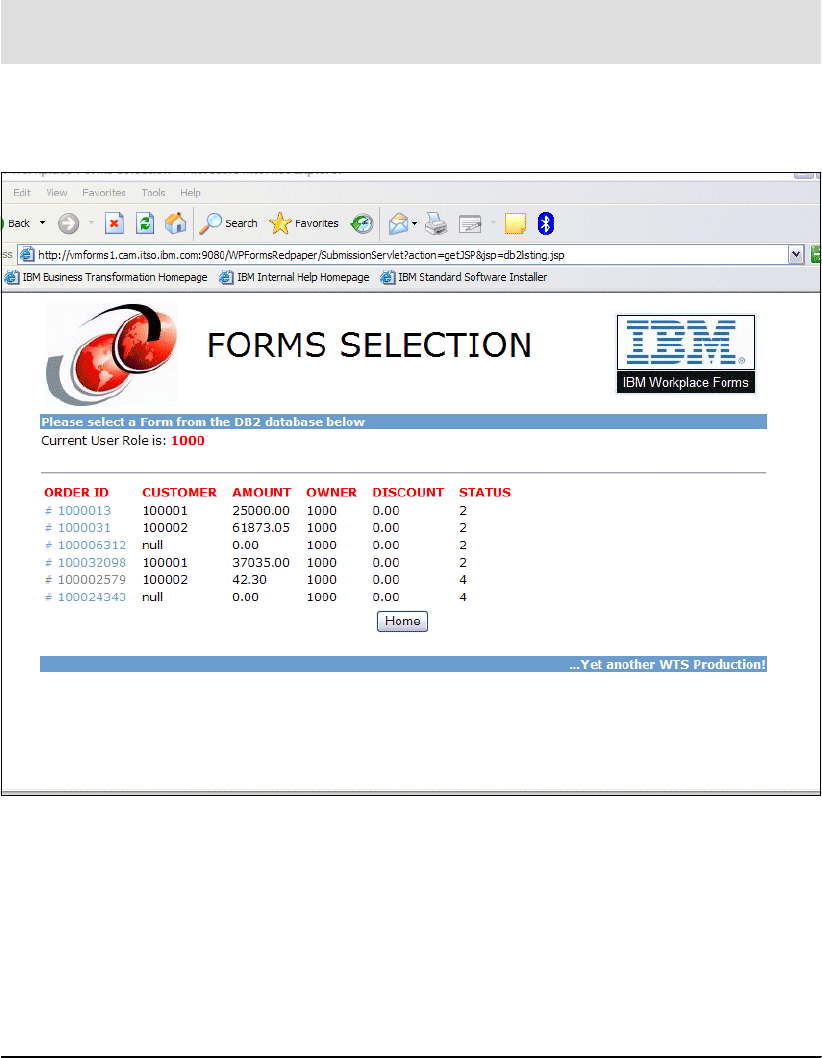
Figure 5-10 shows what the
My Orders view from the db2listing.jsp looks like.
Figure 5-10 My Orders from DB2 view using db2listing.jsp
1. Create a new JSP named db2listing.jsp and save it to the WebContent folder on the Web
server.
2. Copy the code below into the JSP. Example 5-28 shows the code to get the tables from
DB2 and then create an HTML table with the metadata values and a link to the forms that
are stored in the database.
3. Save and close the new JSP.
Example 5-28 Code to create db2listing.jsp
<html>
<head>
<meta http-equiv="Content-Type" content="text/html; charset=ISO-8859-1">
<meta http-equiv="Content-Style-Type" content="text/css">
<link rel="stylesheet" href="theme/blue.css" type="text/css">
<title>IBM Workplace Forms Selection</title>
</head>
<CENTER>
<TABLE border="0" cellpadding="2" width="760" >
<TBODY>
Note: The values in the STATUS column on the right-hand side of the screen refer to the
workflow stage, which we will talk about later in 5.7.2, “Approval workflow” on page 205
194 IBM Workplace Forms: Guide to Building and Integrating a Sample Workplace Forms Application
<TR>
<TD><IMG border="0" src="theme/redbook_logo.jpg" width="138"
height="114" align="left"></TD>
<TD align="left"><H1>FORMS SELECTION</H1></TD>
<TD><IMG border="0" src="theme/Workplace_Forms.jpg" width="158"
height="92" align="right"></TD>
</TR>
</TBODY>
</TABLE>
</CENTER>
<%@ page session="false" contentType="text/html"
import="java.util.*, java.io.File"%>
<!-- import DB2 connection library to make order query available -->
<%@ page import="forms.cam.itso.ibm.com.DB2ConnectionForms"%>
<TABLE border="0" width="760" align="center">
<TR>
<TD bgcolor="#699ccf"><B>Please select a Form from the DB2 database below</B><BR>
</TD>
</TR>
<TR>
<TD>
<%
String userID = (String) request.getAttribute("userRole");
if (userID == null) userID = "";
String [][] resArr = DB2ConnectionForms.getOrderListEmp(userID);
String html = "Current User Role is: <STRONG>" + userID + "</STRONG><P><HR>";
html = html + "<TABLE cell padding=5>";
String n = "<TD> </TD>";
String projectName = "WPFormsRedpaper";
html = html + "<TD><STRONG>ORDER
ID</STRONG></TD>"+n+"<TD><STRONG>CUSTOMER</STRONG></TD>"+n+"<TD><STRONG>AMOUNT</STRONG></TD
>"+ n;
html = html +
"<TD><STRONG>OWNER</STRONG></TD>"+n+"<TD><STRONG>DISCOUNT</STRONG></TD>"+n+"<TD><STRONG>STA
TUS</STRONG></TD>";
for (int i = 0; i < resArr.length; i++){
html = html + "<TR>";
html = html + "<TD>";
html = html + "<A href=/" + projectName +
"/SubmissionServlet?action=showForm&orderNumber=" + resArr[i][0]+">#
"+resArr[i][0]+"</A>";
html = html + "</TD>"+n;
html = html + "<TD>" + resArr[i][1] + "</TD>"+n;
html = html + "<TD>" + resArr[i][2] + "</TD>"+n;
html = html + "<TD>" + resArr[i][4] + "</TD>"+n;
html = html + "<TD>" + resArr[i][3] + "</TD>"+n;
html = html + "<TD>" + resArr[i][5] + "</TD>";
html = html + "</TR>";
}
html = html + "</TABLE>";
%>
<%=html %>

Chapter 5. Building the base scenario: Stage 2 195
</TD>
</TR>
<TR>
<TD align="center">
<FORM method=get action="SubmissionServlet">
<INPUT type="submit" value="Home">
<INPUT type="hidden" name=action value="getJSP">
<INPUT type="hidden" name=jsp value="index.jsp">
</FORM>
</TR>
</TABLE>
<TABLE width="760" align="center">
<tr bgcolor="#699ccf">
<td align="right"><B>...Yet another WTS
Production!</B></td>
</tr>
</TABLE>
Created links
Table 5-7 and Table 5-8 illustrate the links generated within dirlisting.jsp and db2listing.jsp.
Table 5-7 Examples for the generated actions in dirlisting.jsp (Stage 2)
Generated URL:
RAD6 test environment:
New form http://vmforms1.cam.itso.ibm.com:9080/WPFormsRedpaper/Submissio
nServlet?action=prepop&template=C:\WEBSPH~1\APPSER~1\installe
dApps\vmforms1\WPFormsRedpaper_war.ear\WPFormsRedpaper.war
\Redpaper_Demo\Form_Templates\Redpaper_Forms_Sample_S2_v4
1.xfdl
Open stored form not available (processed by db2listing.jsp)
Deployed application:
New form http://vmforms1.cam.itso.ibm.com:9080/WPFormsRedpaper/Submissio
nServlet?action=prepop&template=C:\WEBSPH~1\APPSER~1\installe
dApps\vmforms1\WPFormsRedpaper_war.ear\WPFormsRedpaper.war
\Redpaper_Demo\Form_Templates\Redpaper_Forms_Sample_S2_v4
1.xfdl
Open stored form not available (processed by db2listing.jsp)
Get IBM Workplace Forms: Guide to Building and Integrating a Sample Workplace Forms Application now with the O’Reilly learning platform.
O’Reilly members experience books, live events, courses curated by job role, and more from O’Reilly and nearly 200 top publishers.

